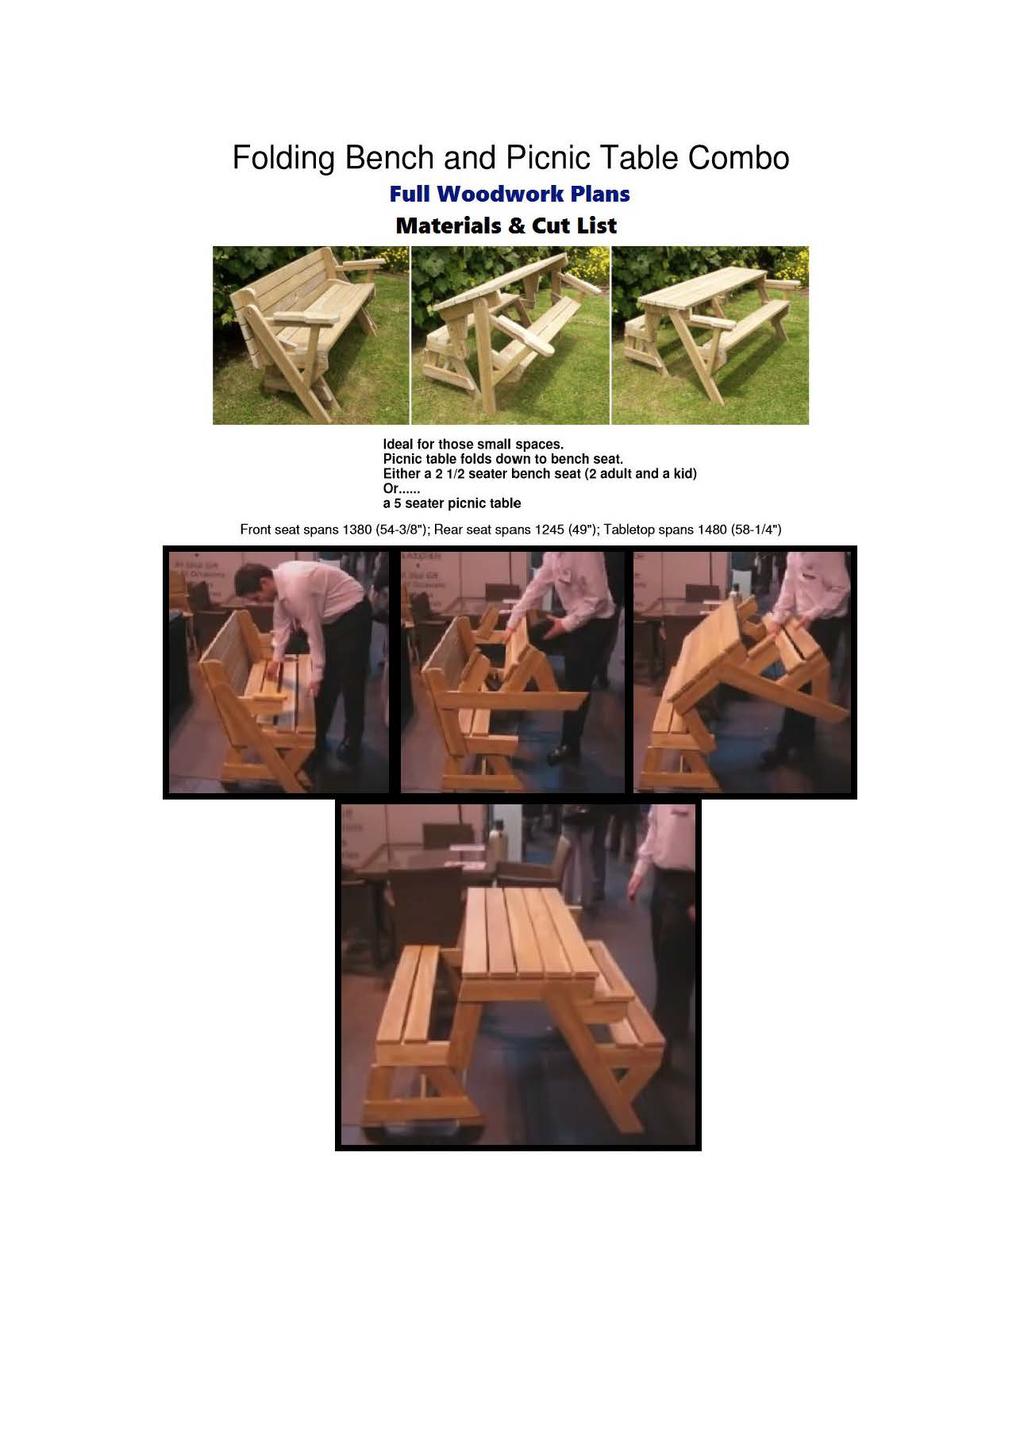
It can be either a 2½ seater bench seat (2 adult and a kid), or a 5 seater picnic table.
|
|
|
- Shawn Blake
- 5 years ago
- Views:
Transcription
1 Page 1

2 Folding picnic table in both bench-seat and picnic table mode Introduction Description A single bench seat that can be changed into a picnic table with ease. This 'Bench come Picnic Table' is ideal for those smaller areas where you don't want a picnic table taking up all the space, all the time. When the eating is over and the table is no longer needed, it can be folded back into a comfortable single bench seat and put to one side, still very much usable but taking up minimum room. It can be either a 2½ seater bench seat (2 adult and a kid), or a 5 seater picnic table. The front seat spans 1373 mm (54"), the rear seat spans 1245 mm (49"), and the tabletop spans 1487 mm (58½") Changing stock size and table length: This folding picnic table is constructed out of two different stock sizes. To use a different stock size or change the length of the table go to page 9 for details. The measurements: The measurements throughout this documentation are given in both metric (mm) and imperial (inches). The metric measurements are given first followed by the standard measurements in brackets ( ). Page 2
3 Materials List The measurements given are the actual sizes. Enquire at your local building supplies store regarding the availability of the stock sizes given in the table below. If different sizes are used, then slight adjustments will need to be made to the length of the bolts (4 only) and also the length of the rear seat boards and tabletop boards. Go to page 9 for details. Sourcing the stock sizes This project calls for two stock sizes - 90 mm x 45 mm (1½" x 3½"), and 90 mm x 32 mm (1¼" x 3½"). Both stock sizes are available in Australasia. In North America 90 mm x 45 mm (1½" x 3½") stock is widely available and 90 mm x 32 mm (1¼" x 3½") stock can be ripped out of 5/4 in. x 6 in. deck boards found at both Lowes and the Home Depot. Ideally, if you can source or obtain both stock sizes all the better, but if you can only source the 90 mm x 45 mm (1½" x 3½") stock which is more widely available, then some changes to the plans would need to be made. Go to page 9 for details. Stock Size/ Material Amount 90 mm x 32 mm (1¼" x 3½") natural decay-resistant or treated wood 16 m (53 ft) 90 mm x 45 mm (1½" x 3½") natural decay-resistant or treated wood 7 m (23 ft) 10 mm (⅜") carriage bolts 70 mm (2¾") long and self locking nuts 4 of exterior type wood screws 50 mm (2") long exterior type wood screws 75 mm (3") long 100 of 16 of exterior wood glue Note: In some cases the metric stock sizes are not an exact match to the equivalent imperial sizes. The metric measurements are more suited to Australasian standards. The imperial measurements are more suited to North American standards. Page 3
![Identifying the pieces [a] front leg [b] rear leg (inner) [c] rear leg (outer) [c1] back stop [d] lower seat rail (rear) [e] seat rail (rear) [f] leg extension part 1 (rear) [f1] leg extension part 2](/docs-images/85/91877831/images/4-0.jpg "(rear) [g] table rail [h] seat rail (front) [h1] seat rail brace (front) [i] arm rail [i1] arm rail brace [j] arm pad [k] seat board (front) [l] seat board (rear) [m] tabletop board [n] seat brace")
4 Identifying the pieces [a] front leg [b] rear leg (inner) [c] rear leg (outer) [c1] back stop [d] lower seat rail (rear) [e] seat rail (rear) [f] leg extension part 1 (rear) [f1] leg extension part 2 (rear) [g] table rail [h] seat rail (front) [h1] seat rail brace (front) [i] arm rail [i1] arm rail brace [j] arm pad [k] seat board (front) [l] seat board (rear) [m] tabletop board [n] seat brace (rear) Tools you will need Circular power saw, Drop saw (chop saw) - able to cut accurate angles, Jigsaw, hacksaw, Electric drill, Hammer, Hand saw, Measuring tape, pencil, square, screw driver, level, 10 mm (⅜") drill bit for the bolt holes, 3 mm (⅛") drill bit for the screw holes, 22 mm (⅞") drill bit to countersink (embed) the bolt head. The bit must be a larger diameter than the bolt head. Page 4

5 Plans - The individual pieces (frame) Cut all the pieces below from 90 mm x 32 mm (1¼" x 3½") stock. Pieces i, i1, and n are from the same stock ripped in half. If you use a slightly different stock size, refer to 'Changing stock size and/or table length' on page 9. Page 5
 stock. If you use a slightly different stock size, refer to 'Changing stock size and/or table length' on page 9.")
6 Plans - The individual pieces (tabletop and seat boards) In the drawings below, the seat boards are from 90 mm x 45 mm (1½" x 3½") stock, and the tabletop boards are from 90 mm x 32 mm (1¼" x 3½") stock. If you use a slightly different stock size, refer to 'Changing stock size and/or table length' on page 9. Page 6

7 Plans - Sectional details Page 7
8 Important points Some fairly accurate measuring, drilling, and cutting is required for this folding table to work in the manner that it is meant to, however, due to Murphy's law, wood sizes being different, and dare we say it, a slight error in measurements, the table might not work as smooth as it should so some precautions can be taken. Point 1. Pay special attention to the paragraph in step 3 that says "Special care should be taken for the following..." Point 2. piece [c1] is a back stop. It stops the tabletop going down too far when the table is folded into bench seat mode. Because the placement of this piece is important, it is advisable to temporary place it, i.e., hold it in place with only one screw until the folding motion has been tried. A slight adjustment may then be required. Point 3. The placement of seat [k] along seat rail [h] is also crucial. Study the dimensions shown in fig.a in the plans on page 9. Because the placement of this seat is important, it is advisable to temporary place it, i.e., hold it in place with only one screw each end of each piece, until the folding motion has been tried. A slight adjustment may be required. A bit about the wood size All the wood used is 90 mm x 32 mm (1¼" x 3½") stock except the seat boards [k] and [l] which are 90 mm x 45 mm (1½" x 3½") stock. If 90 mm x 32 mm (1¼" x 3½") stock is unavailable in your area, and you choose to use 90 mm x 45 mm (1½" x 3½") stock instead, then adjustments will need to be made to the length of the bolts (4 only), the rear seat boards [l], and the tabletop boards [m]. Sourcing the stock sizes This project calls for two stock sizes - 90 mm x 45 mm (1½" x 3½"), and 90 mm x 32 mm (1¼" x 3½"). Both stock sizes are available in Australasia. In North America 90 mm x 45 mm (1½" x 3½") stock is widely available and 90 mm x 32 mm (1¼" x 3½") stock can be ripped out of 5/4 in. x 6 in. deck boards found at both Lowes and the Home Depot. Ideally, if you can source or obtain both stock sizes all the better, but if you can only source the 90 mm x 45 mm (1½" x 3½") stock which is more widely available, then some changes to the plans would need to be made. Go to page 9 for details. Page 8
9 Changing stock size and/or table length Changing a stock size This project calls for two stock sizes - 90 mm x 45 mm (1½" x 3½"), and 90 mm x 32 mm (1¼" x 3½"). The latter is readily available in some places, but not so in others. Ideally, if you can source or obtain both stock sizes all the better, but if you can only source the 90 mm x 45 mm (1½" x 3½") stock which is more widely available, then the following changes to the plans would need to be made: The bolts would need to be ½" inch longer (there are only four), Pieces (K - longer seat boards) would need to be 1" longer, and pieces (m - tabletop boards) would need to be 1½" longer. Pieces (l - shorter seat boards) would remain the same. To use a different stock size or change the length of the table apply The 'The formula' below. Changing the table length You can change the overall length of the unit simply by changing the length of the tabletop boards, the seat boards, and the bolts. But there is a formula... The formula is worth considering if you want to make the table and seats longer (or shorter), or use a different stock size for the side frames. The formula - The difference in length between the shorter and longer seat boards is the sum of the thickness of four side framing members. For example, if the side framing members are 45 mm (1½") thick, four times that is 180 mm (6"). Therefore 180 mm (6") will be the difference between the length of the front and rear seats boards. The difference in length between the tabletop boards and the longer seat boards is the sum of the thickness of two side framing members plus 50 mm (2") for the end overhangs. For example, if the side framing members are 45 mm (1½") thick. Two times that is 90 mm (3"), and plus the 50 mm (2") overhang = 140 mm (5"). Therefore, In that case the table boards will be 140 mm (5") longer than the longer seat boards. Page 9


 holes where marked.")
10 Instructions Step 1. Cut and drill all the pieces Cut all the pieces to the length as shown in 'Plans - The individual pieces (frame)' on page 7. Mark the holes and curves. Pay particular attention as to the marking of the holes. Cut the curves and drill 10 mm (⅜") holes where marked. In pieces [f] only, first drill a 22 mm (⅞") starter hole about 5 mm (¼") deep to countersink the bolt head. Refer to the picture below or piece [f] on page 7. Page 10

![Make up the second in the same way but as a mirror image of the first. Ensure that the bottoms of pieces [b] and [c] and the horizontal pieces [d] and [e] are parallel. Temporary fix [c1].](/docs-images/85/91877831/images/11-1.jpg "Piece [c1] is a back stop. It stops the tabletop going down too far when the table is folded into bench seat mode. Temporary place it for now.")
11 Step 2. Make the rear seat side-frames Assemble both rear seat side-frames. Make one to the dimensions shown in the drawing below. Fix horizontal pieces [d] and [e] to pieces [b] and [c] with screws and exterior wood glue. Use 3 screws per meeting. Pre-drill the screw holes through the horizontal pieces. Make up the second in the same way but as a mirror image of the first. Ensure that the bottoms of pieces [b] and [c] and the horizontal pieces [d] and [e] are parallel. Temporary fix [c1]. Piece [c1] is a back stop. It stops the tabletop going down too far when the table is folded into bench seat mode. Temporary place it for now. Hold it in place with only one screw until all the mechanism is working and the folding motion has been tried. A slight adjustment may then be required. Page 11

![.. When piece [a] is 30 degrees off right angles to piece [g] (as in the picture), ensure that the arm rail [i] is tucked up firmly under the table rail [g], and also that the top](/docs-images/85/91877831/images/12-1.jpg "of the arm rail [i] does not encroach into piece [a] by more that 18 mm (¾\"). See the insert in the drawing below. The end of the arm pad [j] should be touching the table rail [g].")
12 Step 3. Make the front side-frames Assemble the two front side frames. Make one to the dimensions shown in the drawing below. Make up the second in the same way but as a mirror image of the first. Special care should be taken for the following... When piece [a] is 30 degrees off right angles to piece [g] (as in the picture), ensure that the arm rail [i] is tucked up firmly under the table rail [g], and also that the top of the arm rail [i] does not encroach into piece [a] by more that 18 mm (¾"). See the insert in the drawing below. The end of the arm pad [j] should be touching the table rail [g]. The arm pad also acts as a brake to contain the unit from spreading out too far. Fix together with screws and glue. Page 12

![(with screws and glue), and also to piece [e] (with a bolt). Refer to the drawing below.](/docs-images/85/91877831/images/13-1.jpg "Make one complete side as shown in the drawing below, and then make up the second in the same way, but as a mirror image of")
13 Step 4. Assemble the side-frames The two complete side-frames can now be assembled. This is simply a matter of joining pieces [f] and [f1] together with screws and glue, then fixing them to the table rail [g] (with screws and glue), and also to piece [e] (with a bolt). Refer to the drawing below. Make one complete side as shown in the drawing below, and then make up the second in the same way, but as a mirror image of the first. Take note which side of piece [f] has the countersink hole. Page 13
 hole widthways through the center of all the tabletop / seat boards and drill a countersink hole wherever there is a nut and washer to go.")
. How thick are the packers?")
14 Step 5. Hold the table / seat boards together The tabletop boards and the seat boards need to be held together at the middle to stop wrapping and creating an uneven tabletop or seat. One way of doing this: Drill a 10 mm (⅜") hole widthways through the center of all the tabletop / seat boards and drill a countersink hole wherever there is a nut and washer to go. Align the packers between the boards and run a 10 mm (⅜") threaded rod through all the holes. Add nuts and washers, tighten, and cut off any rod excess with a hacksaw. The packers or spacers can be either washers, or thin strips of wood with holes drilled through them. (see picture). How thick are the packers? The overall tabletop width is 460 mm (18⅛"), and the overall seat width is 183 mm (7¼"). Evenly spread the tabletop boards and the seat boards over those widths respectively, and that will determine the gap between each board - hence the thickness of the required packers (spacers). Page 14


15 Step 6. Add the table and seat boards First fix the seat boards [k] and [l] to their respective seat rails [h] and [e] ensuring the frame is square, level and plumb. The placement of the seats along the seat rails is crucial. Refer to the dimensions shown in fig.a on page 9. Because the placement of this seat is important, it is advisable to hold it in place with only one screw each end of each piece, until the folding motion has been tried as a slight adjustment may be required. Next screw the tabletop in place. It starts 10 mm (⅜") in from the rear of the table rail [g]. See picture. Ensure that the overhang at each end of the table side-frames are equal. All seat and tabletop boards should be pre-drilled and screwed with two screws at each meeting. Page 15


16 Step 7. Brace the rear seat Turn the table upside down and prop or sit the rear seat on something solid. Ensure that the seat side-frame and the seat are at right angles to each other and fix the braces in place. Just like in the picture. Flip the folding table up the right way and see how it works. Make any necessary adjustments as described in point 3 on page 10. All done! Page 16


17 If You Enjoyed This Plan, You ll LOVE The Full Plan At TedsWoodworking Want to get the FULL complete plan to this project? You ll get: All-Inclusive Blueprints & Plans Step-By-Step Photos Detailing Every Step Along The Way Illustrated Drawings and Sketches Metric and Imperial Measurements Complete Easy-To-Follow Instructions Insider tips, tricks, tactics and techniques that professionals use so you can cut corners, and get the job done faster 16,000 More Woodworking Plans! Order TedsWoodworking today and get full access to all the details of this plan PLUS 16,000 step-by-step woodworking plans. This package will blow your mind because it s filled with everything you need to complete any woodworking project you could ever imagine! Get Full Access To 16,000 Plans Now! Page 17
One piece folding Bench and Picnic Table by Les Kenny
 1 1 2 2 Updated Sept/2014 The author Les Kenny is a retired building contractor. Two "DIY for Kids" books (co-authored with his daughter Roseanne) published in 2004 and 2005 respectively got him started
Burning For It. The world's easiest table doubles as a workbench, a laundry counter, a project table and, in a pinch, a spare bunk bed.
 Burning For It The world's easiest table doubles as a workbench, a laundry counter, a project table and, in a pinch, a spare bunk bed. If you're like me, you need more surface area. And I'm not talking
Redwood 3. Install the chair back Finishing A d i r o n d a c k C h a i r Grades Materials For Adirondack Chair Quantity Size Length 4.
 Adirondack Chair Adirondack Chair BUILD THE CHAIR FRAME The rounded wooden slats, oversized armrests and inviting slant-back design identify the classic Adirondack chair. Born a century ago in upstate
woodworkersjournal.com MATERIAL LIST
 MATERIAL LIST T x W x L 1 Legs (2) 1 1 2" x 3 1 2" x 36 7 16" 2 End Uprights (2) 1 1 2" x 3 1 2" x 32 1 2" 3 Stringers (4) 1 1 2" x 3 1 2" x 42" 4 Top Cladding, Long (2) 3/4" x 7 1 4" x 65 3 4" 5 Side
ARTS AND CRAFTS CHAIR
 ARTS AND CRAFTS CHAIR 491 MATERIALS LIST--DINING CHAIR Key No. Size and description (use) A 2 1-3/4 x 1-3/4 x 16-1/4'' oak (front leg) B 2 1-3/4 x 3-3/4 x 40-1/2'' oak (rear leg) C 1 1-3/4 x 3-3/16 x 15''
GARDEN SCREEN FENCE 232
 GARDEN SCREEN FENCE 232 233 Materials List--Privacy Screen Key No. Size and description (use) A 16 3/4 x 1 x 53" cedar (horizontal slat) B 14 3/4 x 1 x 72" cedar (vertical slat) C 4 3/4 x 2-1/2 x 53" cedar
END FRAMES. End frames built using pressure treated 2x4 (1 1/2" x 3 1/2") 36" 34" 7/16" pilot hole. 5 1/2" x 1/2" lag bolt 8" wheel 23"
 36 34 7/16 pilot hole. 5 1/2 x 1/2 lag bolt 8 wheel 23") END FRAMES End frames built using pressure treated 2x4 (1 1/2" x 3 1/2") 23" 17 1/2" (B) (B) Measure from the bottom of your stone to 1" below the lip to get your measurement. 17 1/2"(B) 36" 34" 1/2" flat
END FRAMES End frames built using pressure treated 2x4 (1 1/2" x 3 1/2") 23" 17 1/2" (B) (B) Measure from the bottom of your stone to 1" below the lip to get your measurement. 17 1/2"(B) 36" 34" 1/2" flat
Why are we giving this guidebook as a FREE download?
 Construction Guide Queen, Double & Twin Vertical 1 Note: This guide covers the construction steps for all 3 sizes of the vertical wall mount Easy DIY Murphy beds, Queen, Double and Twin. The construction
Nineteenth-Century Dough Box
 Nineteenth-Century Dough Box T he dough box was a functional piece found in many a country kitchen. The idea was that the cook would make a large batch of bread dough, knead it on the large work surface
Project 18202EZ: Picnic Table
 Project 18202EZ: Picnic Table Admiration of our best work from friends and fellow woodworkers is always appreciated. But our finer woodworking skills must on occasion yield to more mundane requests. You
Timber projects. This section contains plans and instructions for three timber projects.
 Project Saw horse Timber projects This section contains plans and instructions for three timber projects. The projects are suggested for students to practise skills use tools from the course and make something
MyOutdoorPlans.com. By Julian King [2X4 GARDEN BENCH]
![MyOutdoorPlans.com. By Julian King [2X4 GARDEN BENCH]](/thumbs/75/72876801.jpg "MyOutdoorPlans.com. By Julian King [2X4 GARDEN BENCH]") MyOutdoorPlans.com By Julian King [2X4 GARDEN BENCH] CUT LIST A 2 pieces of 2 4 lumber 24 long, 2 pieces 32 1/2 long LEGS B 2 pieces of 2 4 lumber 45 long, 2 pieces 15 1/2 long, 1 piece 12 1/2 long SEAT
MyOutdoorPlans.com By Julian King [2X4 GARDEN BENCH] CUT LIST A 2 pieces of 2 4 lumber 24 long, 2 pieces 32 1/2 long LEGS B 2 pieces of 2 4 lumber 45 long, 2 pieces 15 1/2 long, 1 piece 12 1/2 long SEAT
Project Skill Level: INTERMEDIATE Plywood Used: CANPLY EXTERIOR Good Two Sides (G2S) or precision sanded Aspen
 or precision sanded Aspen") Project Skill Level: INTERMEDIATE Plywood Used: CANPLY EXTERIOR Good Two Sides (G2S) or precision sanded Aspen MATERIALS LIST: (1) ¾" x 4 ft x 8 ft plywood panel (20) #8 x 2" Robertson or Phillips wood
Project Skill Level: INTERMEDIATE Plywood Used: CANPLY EXTERIOR Good Two Sides (G2S) or precision sanded Aspen MATERIALS LIST: (1) ¾" x 4 ft x 8 ft plywood panel (20) #8 x 2" Robertson or Phillips wood
The Festival Assembly Instructions
 The Festival Assembly Instructions Toll Free: 866.768.8465 Hours: 9-5 Monday-Friday EST www.homeplacestructures.com Package ships as shown CONTACT INFORMATION: HomePlace Structures 301 Commerce Drive New
Installation Guidelines
 Page 1 Tools You ll Need 4 ft. Carpenter s level Chalk line (to mark U channel locations) Cordless drill/nut driver Caulking gun Chop saw with a metal cutting blade on it (required to make accurate and
3400 to 3440 Scarfing Sled Owners Manual Please Read Carefully!
 3400 to 3440 Scarfing Sled Owners Manual Please Read Carefully! Parts List: Please identify and verify that you have all of the hardware shown. Please refer to photos in the instructions for the parts
under the bottom shelf and along the top shelf should do the trick.
 w Bookshelves in a Day BY ST E V E L A T T A Iget the most pure enjoyment from reproducing 18th-century furniture, but every now and then it s nice to break out of that mode and dive into a project that
Important Note: Why this guidebook is FREE?
 Easy DIY Murphy Bed Construction Guide 1 Important Note: This guide is a FREE SAMPLE of our Complete Construction Guidebook. With the help of this guide you will get familiar with the construction steps
Installation Guidelines
 Page 1 Tools You ll Need 4 ft. Carpenter s level Chalk line (to mark U channel locations) Cordless drill/nut driver Caulking gun Chop saw with a metal cutting blade on it (required to make accurate and
COMPOSITE RAILING INSTALLATION
 COMPOSITE RAILING INSTALLATION Tools All you ll need is a hammer and screw gun, circular saw (carbidetipped blade with fewer than 20 teeth is recommended), level, tape measure, rasp and blue chalk line.
1 ¼-inch Pocket Screws Brad Nailer or Hammer 1 ¼-inch Brad Nails Clamps
 MATERIALS: TOOLS: (4) 2 x 6 x 8 Ft. Boards Tape Measure (2) 2 x 4 x 8 Ft. Boards Carpenter s Square (7) 1 x 4 x 8 Ft. Boards Pencil (2) 1 x 3 x 8 Ft. Boards Drill (1) Half Sheet of ¾-inch Thick Plywood
Thank you for purchasing these easel plans. I think you will find this to be a fun, easy to build project that will serve you for years to come.
 Construction Plans for The Basic Wooden Easel Updated August, 2002 Thank you for purchasing these easel plans. I think you will find this to be a fun, easy to build project that will serve you for years
Chief s Shop: Simple Woodworking Bench
 Chief s Shop: Simple Woodworking Bench Be sure to read the instructions and review the illustrations and accompanying video for this project BEFORE you start. Follow ALL SAFETY GUIDELINES AND RECOMMENDATIONS
MAKING THE TV RISER CUTTING A STOPPED GROOVE ON THE TABLE SAW
 TV RISER Cherry 19 MAKING THE TV RISER First, the material that will make up the riser is glued together. Then, dress down the glued-up panel to a flat surface and a consistent thickness. In a shop with
Installation Fence Guide Kodiak Iron. Exceptional Fencing Extraodinary Customer Service
 Installation Fence Guide Kodiak Iron Exceptional Fencing Extraodinary Customer Service Kodiak Fence System Installation Guide Thank you for the purchasing the Kodiak Fence System. Fence installation is
Tools Required. Bench Hardware. Bench Parts. Planter Hardware. Planter Parts. BENCH/PLANTER INSTALLATION GUIDELINES for
 Arbor Collection / Harvest Collection / Terra Collection Page 1 Please read all instructions completely before starting any part of the installation. Each AZEK and Kit comes complete with all hardware,
Patrol Box Plans by David J. Yarusso Troop 609
 Patrol Box Plans by David J. Yarusso Troop 609 Materials List: 1. One 4 x8 sheet of ½ thick cabinet grade (birch or oak) or AC plywood. If using AC grade, use the A grade surface on the outside for a clean
ADULT. Adirondack / Muskoka Chair Plans
 ADULT Adirondack / Muskoka Chair Plans Materials List 3/4" x 9 1/2" (1.9cm x 24.1cm) redwood, cedar or pine boards. Six, 8' (2.44m) boards should make one chair depending on knots and layout. You can also
PROJECT PLANS PATIO PLANTER BOX
 PROJECT PLNS PTIO PLNTER BOX This great-looking planter makes the perfect place for your favorite plants and flowers. It s sized to hold an 18" round plastic pot, which you can pick up in any garden center.
LOFT DOOR HANGER BARN DOORS & HARDWARE. Hardware Installation Instructions. Page
 LOFT DOOR HANGER Page 1 Specifications 2 7/16" 3/8" 1-1/2 1-3/4 Ø3 3 7/8" 11-1/16 Page 2 Parts and Tools Tools Needed Tape Measure Pencil Drill with 1/8, 1/4 and 3/8 bits, 1 spade bit and Phillips bit
Plans. Easy-to-Build Full-size Deluxe Murphy Bed Plan. For more plans, tools and hardware visit rockler.com
 Easy-to-Build Full-size Deluxe Murphy Bed Plan Build a full-size Deluxe Murphy Bed complete with decorative molding and matching side cabinets! Plans For more plans, tools and hardware visit rockler.com
10x10 Trellis Pergola
 0x0 Trellis Pergola ASSEMBLY GUIDE Ver.0-7 Table of Contents PAGE Introduction & Overview...................................................... Pergola Materials Overview..............................................................
Laney chair. assembly instructions
 Laney chair assembly instructions Smooth & Wrinkle-Free Fabric Covers: In addition to these printed instructions, you may want to watch our beauty tips videos on the customer service page of our website.
General Prisoner Transport Install Instructions PT-2-INST
 General Prisoner Transport Install Instructions PT-2-INST 50 or 60 high x 80, 100 & 120 inch long / Double Compartment Inserts Also refer to PT-A-3XX instructions for vehicle specific mounting measurements
Build It: The Most Amazing Cooler Bench Ever
 Build It: The Most Amazing Cooler Bench Ever wooditsreal.com/2017/04/28/build-it-cooler-bench-free-plans/ A bench. A cooler. Put them together and what do you get? The most amazing Cooler Bench you ve
Build a Bigger Kid's Picnic Table
 posted by Ana White [1] Designed to fit bigger kids, this super sturdy picnic table is big enough to sit a small adult too! Super easy to build design has been built hundreds of times already! Special
CountryAccents Pergola Assembly Instructions
 CountryAccents Pergola Assembly Instructions Options 11 2" Squares Lattice Railing Gingerbread Scroll (For 5" Posts Only) Site Preparation Site preparation for either the round column or the 5" post pergola
PFW 6875 Installation Guide Installationsanleitung, Guía de Instalacíon, Guida de Installazione, Guide d Installation, Installatie gids
 Maximum Flat Panel Weight: 160 lb. / 72.57 kg. Included Components Wall Mount (Qty 1) Extension Brackets (Qty 2) Bracket (Qty 1 Pair) 5/16 Flat Washers (Qty 4) Universal Spacers (Qty 8) M5 Allen Driver
CONTENTS TOOL LIST U P S I D E I N N O V A T I O N S, L L C RAMP AND STEP SYSTEM ASSEMBLY INSTRUCTIONS. Revised: June 2013
 U P S I D E I N N O V A T I O N S, L L C RAMP AND STEP SYSTEM ASSEMBLY INSTRUCTIONS TOOL LIST Required Tools: - Reciprocating Saw with Metal Cutting Blade - Drill - 7/16 Drill Bit for Metal Drilling -
A Canadian Canoes Information Sheet MAKING A STRONGBACK USING MANUFACTURED I-BEAMS
 A Canadian Canoes Information Sheet MAKING A STRONGBACK USING MANUFACTURED I-BEAMS BACKGROUND: We have worked with Ted Moores (author of CANOECRAFT and KAYAKCRAFT ) for 28 years. For most of that time,
Installation Guide. deckorum Composite Decking
 Installation Guide deckorum Composite Decking 1. Introduction Welcome to Deckorum installation Guide Please fully read the installation guide before commencing any installation works. This will provide
CONTINUED. TABLE TOPS: 1. Sort one 2x6x8 piece from your lumber. 2. Measure and mark two 48 pieces from each, then cut.
 # Materials: Quantity Each: Total Quantity: x4x8 7 x6x8 1 TIPS FOR SUCCESSFUL PREP WORK: Before starting, carefully read through the entire instruction sheet. Refer to the material list to the left and
Quick-Release Sliding Tail Vise 05G30.01
 Quick-Release Sliding Tail Vise 05G30.01 U.S. Des. Pat. No. D671,812 U.S. Pat. No. 9,050,710 Introduction The Veritas Quick-Release Sliding Tail Vise is a reworked version of the well-known tail vise that
The following instructions will guide you through the installation of your new vinyl railing stair kit.
 Installation Guide Vinyl Standard Stair Railing Tools Required Protective eye glasses Tape measure Variable speed drill/screwdriver Rotary hammer or hammer drill and masonry percussion bit recommended
PORCH-LOC INSTALLATION INSTRUCTIONS
 PORCH-LOC INSTALLATION INSTRUCTIONS 2017 HB&G Building Products, Inc. Porch-Loc Installation Instructions NOTE: DISCARD THE INSTALLATION INSTRUCTIONS AND HARDWARE THAT CAME IN YOUR PERMAPOST PACKAGING
Garden Bridge. c D E. All dimensions are in mm- Arch Tread Handrail' Post Reinforcement brace. Written & designed by David Watkins.
 Garden Bridge Written & designed by David Watkins Slmple by design yet decorative by nature. This ornate Garden Bridge will rest proudly amongst most garden backdrops. The fiddliest step in this project
Shutter At The Thought
 Shutter At The Thought Dive into the dump and come up a winner. Building projects using reclaimed materials is good for the soul. Materials: Old shutters Lazy Susan hardware Tools Drill/driver Drill bits
COMPLIMENTARY WOODWORKING PLAN
 COMPLIMENTARY WOODWORKING PLAN ORIENTAL GARDEN ARBOR PLAN This downloadable plan is copyrighted. Please do not share or redistribute this plan in any way. It has been paid for on your behalf by JET Tools,
WAREHOUSE HANGER INSTALLATION INSTRUCTIONS R H INS T A L L A TIO N INS T R U C TIO N S
 INS T A L L A TIO N INS T R U C TIO N S WAREHOUSE HANGER NOTE: Due to the size and weight of the Warehouse Hanger it is recommended that this Hanger be installed on 3 4 or wider doors. 10.11.2016 2-3/16"
Installation Instructions - Model V4JSD 1
 Installation Instructions - Model V4JSD 1 Support Assemblies: Parts list: (Note see enclosed cut sheet for quantities and dimensional information) A vertical structural member (1 ½ x 1 ½ modular frame)
Laney loveseat. assembly instructions
 Laney loveseat assembly instructions Smooth & Wrinkle-Free Fabric Covers: In addition to these printed instructions, you may want to watch our beauty tips videos on the customer service page of our website.
Ray chair & half. assembly instructions
 Ray chair & half assembly instructions Smooth & Wrinkle-Free Fabric Covers: In addition to these printed instructions, you may want to watch our beauty tips videos on the customer service page of our website.
14 x 14 super quad. VISIT LINK BELOW FOR INSTALL VIDEO
 in-ground installation instructions & user guide 14 x 14 super quad VISIT LINK BELOW FOR INSTALL VIDEO https://www.maxairtrampolines.com/pages/support-information-videos Page 2 TABLE OF CONTENTS Materials,
x2 1/4 (6mm) Floor Anchor
 Floor Anchor") Main Components x1 Rail x5 Wall Spacer x2 Anti-jump Block x2 Bent Strap x1 Right Stopper x1 Left Stopper x5 5/16 (8mm x 60mm) Carriage Bolt x5 5/16 (8mm x25mm) Anchor x5 5/16 (8mm x 90mm) Wall Screw x2
Main Components x1 Rail x5 Wall Spacer x2 Anti-jump Block x2 Bent Strap x1 Right Stopper x1 Left Stopper x5 5/16 (8mm x 60mm) Carriage Bolt x5 5/16 (8mm x25mm) Anchor x5 5/16 (8mm x 90mm) Wall Screw x2
Closet System Installation Manual
 Closet System Manual Thank you For choosing our Custom Closet Collection to fit all your needs Closets come fully assembled to make your project an enjoyable and satisfying experience. With quality Custom
MATERIALS: TOOLS: CUT LIST:
 MATERIALS: TOOLS: (2) 2x2x8 Ft. Boards Tape Measure (2) 1x4x8 Ft. Boards Pencil (4) 1x2x8 Ft. Boards Carpenter s Square (1) 4x4 Ft. Sheet of ¾-Inch Plywood Drill with 5/16-inch Drill Bit (1) 1 ½-inch Thick
The first step is to cut all wood to proper size. Refer to the cutting schedule and Details 1 and 2 for further instructions.
 CHILD S ARMOIRE 275 THIS CHILD'S ARMOIRE will make it easy for kids to keep their rooms neat and orderly. Its six drawers and two shelves provide enough storage space to house a substantial wardrobe. By
HandymanWire - Picnic Table Plans
 Page 1 of 5 HandymanWire Appliances Attics Automobiles Basements Cabinets & Counters Ceilings Decks Doors & Windows Drywall Electrical Flooring Garages Heating Masonry Miscellaneous Outside Painting Plumbing
x2 1/4 (6mm) Floor Anchor
 Floor Anchor") INSTALLATION GUIDE Main Components x1 Rail x5 Wall Spacer x2 Anti-jump Block x2 Straight Strap x1 Right Stopper x1 Left Stopper x5 5/16 (8mm x 60mm) Carriage Bolt x5 5/16 (8mm x25mm) Anchor x5 5/16 (8mm
INSTALLATION GUIDE Main Components x1 Rail x5 Wall Spacer x2 Anti-jump Block x2 Straight Strap x1 Right Stopper x1 Left Stopper x5 5/16 (8mm x 60mm) Carriage Bolt x5 5/16 (8mm x25mm) Anchor x5 5/16 (8mm
Tux chair & half. assembly instructions
 Tux chair & half assembly instructions Smooth & Wrinkle-Free Fabric Covers: In addition to these printed instructions, you may want to watch our beauty tips videos on the customer service page of our website.
PROJECT PLAN. 3-hour cedar bench
 PROJECT PLAN 3-hour cedar bench This article originally appeared in The Family Handyman magazine. For subscription information, visit www.familyhandyman.com Please note that pages that appeared in the
Tux sofa. assembly instructions
 Tux sofa assembly instructions Smooth & Wrinkle-Free Fabric Covers: In addition to these printed instructions, you may want to watch our beauty tips videos on the customer service page of our website.
Real Life Ninja Starter Pack 1 Assembly Instructions
 Real Life Ninja Starter Pack 1 Assembly Instructions MATERIALS: Warped Wall 3 - Main Sections (Only 2 Sections for 10 Warped Wall) 8 3 deck screws for joining sections inside of Warped Wall 2 Rock Wall
installation care & maintenance instructions moistureshield.com limited lifetime warranty
 installation care & maintenance instructions 866.729.2378 moistureshield.com limited lifetime warranty It s comforting to know that you re about to build a deck that gives you every possible advantage.
GlideRite Retractable Cover System For Hot Spot Spas (SE & SLX only)
") List of Contents Quantity Description 12 #10 x 1 ½ Flat Head Phillips Screw (see pg. 2) 2 #10 x ½ Pan Head Phillips Screw (see pg. 2) 8 ¼ x 2 ½ Lag Bolt (see pg. 2) 7 ¼ 20 x 5 / 8 Hex Head Bolt (see pg.
List of Contents Quantity Description 12 #10 x 1 ½ Flat Head Phillips Screw (see pg. 2) 2 #10 x ½ Pan Head Phillips Screw (see pg. 2) 8 ¼ x 2 ½ Lag Bolt (see pg. 2) 7 ¼ 20 x 5 / 8 Hex Head Bolt (see pg.
Assembly Instructions for 12x16 Floating Dock
 Assembly Instructions for 12x16 Floating Dock www.rollingbarge.com Congratulations on the purchase of your Floating Dock kit. This kit includes all the aluminum frame parts, and all the fasteners. You
CXT PRO RAILING INSTALLATION INSTRUCTIONS For Installations Using Aluminum and Glass Balusters Sold Separately
 CXT PRO RAILING INSTALLATION INSTRUCTIONS For Installations Using Aluminum and Glass Balusters Sold Separately CCRR-0171 PFS AA-652 Drill/power screwdriver Assorted drill bits Hammer Miter or circular
Router Table-Mate. Everything you'd want in a router table for just $50.
 Router Table-Mate Everything you'd want in a router table for just $50. Commercially made router tables are everywhere these days. Some of them come with more gizmos and gadgets than a 59 Edsel. By the
PFW Installation Guide Installationsanleitung, Guía de Instalacíon, Guida de Installazione, Guide d Installation, Installatie gids
 Maximum Flat Panel Weight: 100 lb. / 45.35 kg. Included Components Wall Mount (Qty 1) Extension Bracket (Qty 1 Pair) Bracket (Qty 1 Pair) 5/16 Flat Washers (Qty 4) Universal Spacers (Qty 8) M5 Allen Driver
136 PLYWOOD DESK 522
 136 PLYWOOD DESK 522 Simple in design and inexpensive, this plywood desk is made from a single 4- x 8-foot panel. Plywood is available with many hardwood veneers; it can also be covered with plastic laminate,
10 x 12 home air pro. VISIT LINK BELOW FOR INSTALL VIDEO
 in-ground installation instructions & user guide 10 x 12 home air pro VISIT LINK BELOW FOR INSTALL VIDEO https://www.maxairtrampolines.com/pages/support-information-videos Page 2 TABLE OF CONTENTS Materials,
DIY RUSTIC HALL TREE
 DIY RUSTIC HALL TREE *Before beginning this project, please read through all of the plans as well as the blog post associated with this project. Always use safety precautions whenever using power tools
7 x 14 flybed tramp. VISIT LINK BELOW FOR INSTALL VIDEO
 in-ground installation instructions & user guide 7 x 14 flybed tramp VISIT LINK BELOW FOR INSTALL VIDEO https://www.maxairtrampolines.com/pages/support-information-videos Page 2 TABLE OF CONTENTS Materials,
TREX TRANSCEND RAILING
 RAILING NOTES:» RAILINGS ARE DESIGNED TO BE INSTALLED OVER THE DECKING FRAME OR ON INSIDE OF RIM JOIST. NOTCHING OF PRESSURE-TREATED POSTS OR POSTS INSTALLED ON OUTSIDE OF RIM JOIST IS NOT ALLOWED.» All
Installation Instruction
 Tools Needed for Assembly Stud finder (for wood stud wall) Pencil Mark Electric drill Wood Stud Wall Installation Step 1. Locate the Wood Studs Installation Instruction Drill bit (for wood stud wall) Masonry
Ali sectional right. assembly instructions
 Ali sectional right assembly instructions Smooth & Wrinkle-Free Fabric Covers: In addition to these printed instructions, you may want to watch our beauty tips videos on the customer service page of our
Contest Field Border Construction Manual
 Contest Field Border Construction Manual TABLE OF CONTENTS Section 1 Field Construction...3 Section 2 Bill of Materials 3 Section 3 Construction.. 4 Step 1 - Layout...4 Step 2 - Bottom...4 Step 3 1 st
FLIP TARP SINGLE & DOUBLE UNDERBODY TRAILERS
 1-800-248-7717 1002 N. 15th Street, Middlesboro, KY 40965 FLIP TARP SINGLE & DOUBLE UNDERBODY TRAILERS INSTALLATION INSTRUCTIONS Congratulations on your purchase of a Mountain Flip Tarp Trailer system.
INS T A L L A TIO N INS T R U C TIO N S HORSESHOE W/ BAR HANGER
 INS T A L L A TIO N INS T R U C TIO N S HORSESHOE W/ BAR HANGER 6-1/2" 5" 2-7/16" 3-7/16" Ø2-7/8" 4-7/8" 11" 2" 3/16" 1/2" HORSESHOE W/ BAR S P ECIFICATIONS PARTS AND TOOLS Tools Needed Tape Measure Pencil
Real Life Ninja Complete Starter Pack (14ft. Warped Wall) Assembly Instructions
 Assembly Instructions") MATERIALS: 3 - Main Sections (Only 2 Sections for 10 ) 8 3 deck screws for joining sections inside of 2 Rock Wall Panels (with pre-installed t-nuts. Top panel comes with ladder mounting block preinstalled.)
MATERIALS: 3 - Main Sections (Only 2 Sections for 10 ) 8 3 deck screws for joining sections inside of 2 Rock Wall Panels (with pre-installed t-nuts. Top panel comes with ladder mounting block preinstalled.)
A Day House. A View of One Way to Finish the Exterior of The Day House. Read these instructions all the way through before beginning this project.
 A Day House A View of One Way to Finish the Exterior of The Day House Read these instructions all the way through before beginning this project. General Comments For the purposes of this project, the standard
GlideRite Retractable Cover System For HotSpring & Tiger River Spas (except Classic & pre-2000 Landmark Spas)
") List of Contents Quantity Description 12 #10 x 1 ½ Flat Head Phillips Screw (see pg. 2) 2 #10 x ½ Pan Head Phillips Screw (see pg. 2) 8 ¼ x 2 ½ Lag Bolt (see pg. 2) 7 ¼ 20 x 5 / 8 Hex Head Bolt (see pg.
List of Contents Quantity Description 12 #10 x 1 ½ Flat Head Phillips Screw (see pg. 2) 2 #10 x ½ Pan Head Phillips Screw (see pg. 2) 8 ¼ x 2 ½ Lag Bolt (see pg. 2) 7 ¼ 20 x 5 / 8 Hex Head Bolt (see pg.
This instruction manual is an in-depth look and explanation of how to assemble and install the Murphy Bed properly and efficiently.
 This instruction manual is an in-depth look and explanation of how to assemble and install the Murphy Bed properly and efficiently. Don t be put off by the size of the instruction manual as the large diagrams
Kentucky 4H Wood Science Plans Notebook. Plans Level 3
 Kentucky 4H Wood Science Plans Notebook Plans Level 3 MATERIALS: 2 pieces wood 3/4 x 10 x 4 1 piece wood 3/4 x 12 x 4 2 pieces wood 3/4 x 3 x 2 5 1/2" 2 pieces wood 3/4 x 3 x 1 8 1 piece wood 2 x 4 x
Quick Hoops Seedling and Micro Green Bench Instruction Manual
 Quick Hoops Seedling and Micro Green Bench Instruction Manual 955 Benton Ave., Winslow, ME 04901 Phone: 1-877-564-6697 Fax: 1-800-738-6314 Email: service@johnnyseeds.com Web Site: Johnnyseeds.com This
installation care & maintenance instructions lifecycledecking.com 25-year limited residential warranty 20-year limited commercial warranty
 installation care & maintenance instructions lifecycledecking.com 25-year limited residential warranty 20-year limited commercial warranty Installation Instructions As with any building project, use proper
BARN DOOR HARDWARE KIT
 INSTALLATION GUIDE Main Components x1 Rail x5 Wall Spacer x2 Anti-jump Block x2 Bent Strap x1 Right Stopper x1 Left Stopper x5 5/16 (8mm x 60mm) Carriage Bolt x5 5/16 (8mm x25mm) Anchor x5 5/16 (8mm x
DeckRail A Product of DeckRite LLC 3912 East Progress North Little Rock, AR Phone: (501) Fax: (501)
 Fax: (501)") Disclaimer: Deck Rail Glass Railing Installation Guide This guide is not intended to replace a trained professional installer. The drawings and instructions contained within are for demonstration purposes
Disclaimer: Deck Rail Glass Railing Installation Guide This guide is not intended to replace a trained professional installer. The drawings and instructions contained within are for demonstration purposes
Assembly Instructions for: JEAN S ULTIMATE SWING SETS
 Assembly Instructions for: JEAN S ULTIMATE SWING SETS Thank you for purchasing Forever Redwood patio furniture. Forever Redwood is built by Old-Growth Again Restoration Forestry (OGA). OGA is dedicated
VACUSEAL MODEL 200. HOT TUB PRODUCTS 233 Carrington Road Bethany CT
 VACUSEAL MODEL 200 J G F G H L HOT TUB PRODUCTS 233 Carrington Road Bethany CT 06524 860-469-2580 www.vacusealcoverlift.com www.hottubproducts.com Made in USA H K E D C I A P B 10 9 8 7 6 5 4 3 2 1 0 SPAS
INSTALLATION INSTRUCTIONS INS T A L L A TIO N INS T R U C TIO N S ROD IRON SCROLL HANGER R H
 INS T A L L A TIO N INS T R U C TIO N S ROD IRON SCROLL HANGER 10.5.2016 2-1- 3/16" 11/16" 8" 8 O 2-7/8 Ø2-7/8" 3-1/2 3-1/2" 12-9/16 12-9/16" PLEASE NOTE: These instructions are specific to a particular
INSTALLATION INSTRUCTIONS INS T A L L A TIO N INS T R U C TIO N S THE MAVERICK HANGER R H
 INS T A L L A TIO N INS T R U C TIO N S THE MAVERICK HANGER 10.6.2016 PARTS INSTALLATION SPECIFICATIONS AND TOOLS INSTRUCTIONS 2-1/4" 2-7/8 11-3/8" 1/4" 2-1/8 PARTS INSTALLATION AND INSTRUCTIONS TOOLS
Ford Pick Up Rear leaf Spring Kit Installation Instructions
 1948-1956 Ford Pick Up Rear leaf Spring Kit Installation Instructions 1-800-984-6259 www.totalcostinvolved.com Parts 48 inch leaf (2) springs (4) U-bolts 3/8-24 x l 1/4bolts (16) & nuts (2) 1/2-20 x 4
BIFOLD FUTON FRAME TRINITY ARM. Seat Rails and Slats x 1. *Note: Use 4pc of 100mm Bolts and 4pc of 60mm Bolts to attach the arms to the Stretchers.
 1A Parts in this box. 2pc with extra holes 2pc with extra holes & plastic stoppers Arms x 2 Back Rails and Slats x 1 Full Size: Slat Supports x 6 3pc are longer for the Back deck Back Side Rails x 2 Seat
176 S. New Holland Road Gordonville, PA Tel: Fax: Summit Tower
 176 S. New Holland Road Gordonville, PA 17529 Tel: 717-768-0066 Fax: 717-768-8569 A S S E M B LY M A N U A L Summit Tower Summit Tower Assembly Manual revised 9/07/05 Dear Customer, Thank you for your
AUTOMATIC ADVANCE MANUAL
 AUTOMATIC ADVANCE MANUAL AVL Looms, Inc. 3851 Morrow Lane, Suite #9 Chico, CA 95928-8305 530 893-4915 530 893-1372 fax # info@avlusa.com www.avlusa.com Copyright 2009 TABLE OF CONTENTS Page # I. Parts.........................
ROCKWELL. Two Panel Door. Half X Door. Double X Door. Z Combination Door
 ROCKWELL 4 in 1 DOOR Choose between four door styles with this Door Kit. Our versatile Rockwell Door Kit is very easy to assemble. All materials and hardware needed to assemble any of the four styles are
Installation Instructions
 Installation Instructions 000964 Revision F Installation Instructions for PIRIT Read this manual fully prior to starting installation. Call American eating Customer ervice with any questions. What you
Side Mount INSTRUCTION BOOKLET #C122 BED STYLE: PARK CITY
 Side Mount BED STYLE: PARK CITY INSTRUCTION BOOKLET #C1 WARNING! ALL MURPHY/WALLBED SYSTEMS CONTAIN STORED ENERGY. FAILURE TO USE AND FOLLOW THESE INSTRUCTIONS DURING THE INSTALLATION PROCESS COULD RESULT
DIY Field Guide ANDYMARK, INC.
 ANDYMARK, INC. Intro For the 2014-2015 FTC Game Cascade Effect, teams can purchase official field hardware from AndyMark, or they can build do-it-yourself (DIY) versions of the same hardware. The competitions