General Prisoner Transport Install Instructions PT-2-INST
|
|
|
- Damon Owens
- 5 years ago
- Views:
Transcription
1 General Prisoner Transport Install Instructions PT-2-INST 50 or 60 high x 80, 100 & 120 inch long / Double Compartment Inserts Also refer to PT-A-3XX instructions for vehicle specific mounting measurements and insert parts details PT-A-1XX Rear Step Instructions All optional equipment kits include instructions Read all instructions before starting insert installation. TOOLS REQUIRED: Standard and Metric Socket Sets Awe or Scribe Tape Measure Impact Gun (recommended) Pry-bar Caulk gun Power Drill & drill bits Wire Cutter / Crimping tool Utility knife Phillips Screwdriver Circular saw (for plywood) HARDWARE KIT # KKM or 80 Rear Compartment: (Some hardware not used in all applications) QTY DESCRIPTION PART # USED FOR: 60 1/4" x 3/4" Carriage bolt GSM32026 Main Housing 80 1/4" Serrated nut GSM30170 Main Housing 50 #10 x1-1/4" Phillips pan head sheet metal screw GSM33197 Floor/wall to ceiling 12 #10 x 3/4" Phillips flat head screw GSM34156 Vent plates/dome lights 10 #10 x 1/2" Phillips flat head screw GSM33150 AC cover to wall (driver side rear) 32 1/4" x 3/4" Phillips flat head machine screw GSM33087 Wall/Bench extension 25 1/4" x 3/4" Hex head bolt GSM rd divider, 3 rd ceiling 25 1/4" Flat washer GSM rd divider, 3 rd ceiling 15 1/2" Flat washer GSM31009 Grab straps/seat belts 15 1/2" Lock washer GSM31030 Grab straps/seat belts 15 1/2" x 1-3/4" Socket button head bolt GSM33315 Grab straps/seat belts 5 Mounting /Backing plate KKM Bulkheads 5 3/8" x 2-1/4" Grade 8 Hex head bolt GSM34023 Bulkheads 5 3/8" Grade 8 Hex nut GSM30171 Bulkheads 5 3/8" Lock washer GSM31028 Bulkheads 5 3/8" x 1 Fender washer GSM31144 Bulkheads 5 3/8" x 1.625" Fender washer GSM31149 Bulkheads 1 White Silicone tube PRM97343 Seams & Gaps 4 Lock key PRM Doors 4 Vent block off plate KKM Ceiling (vent adapter kit) 1 Dome lights (two per kit) KK-DOME-2-LED Ceiling 1 LABEL - HEAD RESTRAINT CM Dash 4 LABEL GRAB STRAPS KKM99090 PT compartment walls HARDWARE KIT # KKM Forward Compartment: 90 1/4" x 3/4" Carriage bolt GSM32026 Main Housing 90 1/4" Serrated nut GSM30170 Main Housing 40 #10 x1-1/4" Phillips pan head sheet metal screw GSM33197 Floor, wall to ceiling 12 #10 x 3/4" Phillips flat head screw GSM34156 Vent plates/dome lights 5 1/2" Flat washer GSM31009 Grab straps/seat belts 5 1/2" Lock washer GSM31030 Grab straps/seat belts
2 HARDWARE KIT # KKM Compartment (continued): QTY DESCRIPTION PART # USED FOR: 2 Vent block off plate KKM Ceiling (vent adapter kit) 1 Dome lights (two per kit) KK-DOME-2-LED Ceiling 1 LABEL - SAFETY-DRIVE W/ CAUTION KKM99091 Dash HARDWARE KIT # C-HK-277 Center Divider: 28 1/4" x 1-1/2" Hex head lag bolt GSM33062 Divider to floor 7 1/4" x 3/4" Stainless socket button head bolt GSM33309 Divider to 3 rd comp 7 1/4" Stainless flat washer GSM31048 Divider 10 #10 x 1/2" Phillips flat head machine screw GSM33080 Door frame to divider 10 #10 Thin Nylock nut GSM Door frame to divider OTHER PARTS SHIPPED LOOSE FOR INSTALLATION: X - Quantity depends on model insert X Grab Strap KK99068 Bench top X Seat belt PT-A-901 Bench top X Seat divider PT-A-907 Bench top 54 3/16 x Flange Rivets GSM32101 Seat divider to bench top X Door holder assembly (one for each door) KKM Door stop Keps nut GSM30123 Door holder bracket X 3/4 Phillips pan head machine screw GSM33119 Door holder bracket Always! Read all instructions before installing any Havis, Inc. products. Check for obstructions (Wire, brake lines, fuel tank, etc.) before drilling any holes! Use hardware provided with install kit If this is your first time installing a Havis, Inc. Prisoner Transport, please contact the factory for tips and suggestions that will ease the installation. VEHICLE PREPERATION: 1. STEPS, HVAC, VENT ADAPTOR, OPTIONS, ETC: Refer to the specific install instructions. Installing the steps prior to installing the transport insert will ease installation and must be done on Chevy and Dodge side step. Installing options may be necessary prior to installing the kit. 2. SOUND DEADENING & FLOORING: 1/2" or 3/8 plywood is always recommended to cover the entire cargo floor of the van. (1 ½) 48 x 96 sheets of plywood are needed. Havis, Inc. does not supply plywood floor kit. See vehicle specific information in the PT-A-3XX instructions. Details in these instructions will indicate the starting point / mounting location of the kit. OPTIONAL # PT-A-904 self-adhesive sound deadening wall insulation is sold separately and will help deaden road noise. 54 x 20 foot roll of material is simple cut with a razor knife. Peel and stick to walls and ceiling.


3 Remove wood crate and clear shrink-wrap covering the prisoner transport assembly. This is the rear 40/60/or 80 section of the kit. Remove all black hardware, wood panels and brackets holding wood panels PT-A-300 Trim panel kits, PT-A-100 rear steps, PT-A-200 side steps and other options are shipped inside compartments. Remove equipment and open boxes to review parts and installation instructions.


4 Remove only black hardware from assembled unit. This will give you the subassemblies as they are shown on the following pages.


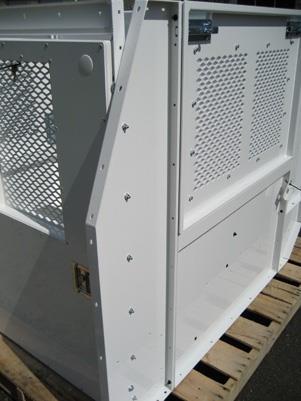
5 Primary parts shown after sub-assembly preparation for installation Driver Side full length Bench/Wall assembly with Front bulkhead wing section. Passenger Side Rear Bench/Wall/ 3 rd Compartment Bulkhead Wing section Front Bulkhead minus driver-side wing section Center Divider Driver-side ceiling (2) - Diamond plate floor Passenger-side rear ceiling Passenger-side forward ceiling Rear bulkhead/door assembly


6 Prisoner Transport insert LAYOUT Diamond plate floor and ceiling sections are not shown for detail purposes. 3 Compartment model shown NOTE: The installer must drill the wall for the upper mounting screws of the rear AC blower cover. Drill with 1/8 drill bit and attach with the supplied # 10 x 3/4 flat head sheet metal screws


7 If optional rear load light(s) (PT-A-916) was ordered, install at this time. See PT-A-916 install instructions Install optional PT-A-919 wire harness for dome lights, power vents, video system, HVAC, etc. For neatness of wiring, route all cables down driver-side B pillar. From this location, wires can be run to center console, under dash or to battery location. Be sure to tape harnesses to roof in approximate locations that accessories are being installed into insert. This will vary between the different model kits. Install PT-A-4XX HVAC or PT-A-5XX and PT-A-904 at this time. This and other optional equipment wiring must be installed prior to insert If optional Power Vent(s) (PT-A-903) was ordered, see those specific instructions for necessary prep work that may need to be done prior to installing insert. Dome Light Note: 80 long inserts include two (2) LED dome lights. 100 and 120 long inserts include four (4) LED dome lights diameter block off plates are included to cover unused ceiling holes. Additional dome lights can be purchased separately if desired. Order part number PT-A-912 Installation of Main Insert Assembly ** Refer to PT-A-3XX instructions for vehicle specific mounting and parts details ** *** See instructions included with optional accessories for installation details *** ***If OEM B pillar upper foam blocks are in the way of front bulkhead installation, cut and remove as little of the foam as needed. Do not completely remove foam blocks***
8

9 CAUTION! FLOOR MOUNT SCREW DETAILS The PT Insert kits include #10 x 1-1/4" Phillips pan head sheet metal screws for attaching diamond floor or bench and floor to 1/2 Plywood and OEM sheet metal floor. The PT insert also includes 1/4" x 1-1/2" Hex head lag bolt for attaching center divider to diamond floor, 1/2 Plywood and OEM sheet metal floor. These screw lengths are important so they can reach the low portion of the ribbed floor and will also not be too long. In some locations the floor screws may hit the high spot on the rib and penetrate further under the OEM floor. In most area s this is not a concern because screws are above the frame rail, behind a guard or far enough away from fuel tank and other OEM equipment. When screwing down the floor in a single compartment insert, we recommend three (3) rows of #10 x 1 1/4" screws. One row front to back through each bench lip, diamond plate, plywood and OEM sheet metal. One row front to back in the center through diamond plate, plywood and OEM sheet metal. There is no need to install floor screws in the center if a Center Divider is being installed. The 1/4" x 1-1/2" Hex head lag bolts for the divider will fasten everything as needed. Screws or bolts should be installed in rows at approximate locations shown in green. Do not install screws in area above fuel tank shown in red. #10 x 3/4" flat head sheet metal screws are recommended for attaching plywood to OEM floor. Only four (4) screws per piece of plywood are necessary for keeping wood in position prior to sheet metal installation. Screws for attaching plywood and plywood are not included with kit. DO NOT USE LONGER SCREWS THAN WHAT ARE SUPPLIED OR RECOMMENDED. ALWAYS DOUBLE CHECK UNDERNEATH VEHICLE TO CONFIRM SCREWS ARE IN A SAFE LOCATION.


10 Install optional PT-A-919 wire harness for dome lights, power vents, emergency lighting or any other accessories needed. Lay plywood down in van. Refer to PT-A-3XX instructions for measurements. Attach hoses from PT-A-5XX to OEM HVAC system or PT-A-4XX series kit. Run hoses along inner roof. Unbolt all black hardware and stage benches for install. Front and rear sections need to be bolted together at this time. Attach bench endcaps using 1/4" x 3/4" Phillips flat head machine screw. Repeat for other bench. Install front bulkhead in van and lean against front seats. Load the passenger side bench into the van and line up to the front bulkhead. Attach the bench to the front bulkhead. Do not tighten hardware Load the driver side bench assembly into the van and line up to the front bulkhead. Do not tighten hardware Attach driver side bench to front bulkhead.


11 Slide diamond plate floor into van. Make sure floor sits over the lip of the benches. Install rear door frame into van and line up the benches. Attach to benches using 1/4" x 3/4" carriage bolts and serrated nuts. Repeat process for passenger side. To reduce the chance of rattles, place duct tape over hose clamps. Install ceiling panels starting with the front driver side. Be sure to pull wiring and hoses into their respective holes. Load the remaining ceiling panels into the van. Be sure not to crush hoses when routing them through the ceiling. Attach the ceiling panels to the front and rear bulkheads using 1/4" x 3/4" carriage bolts and serrated nuts. Front and rear ceiling panels are attached together using 1/4" x 3/4" Phillips flat head machine screws.


12 Attach the wall to the ceiling using #10 x 3/4" self-threading screws. Attach HVAC hoses to vent adaptors using supplied hose clamps found in PT-A-5XX and PT-A- 4XX series kits. Wire and mount dome lights in ceiling cutouts Check measurements in PT-A-3XX instructions. Center the insert in the van and line up to the measurements. Drill and temporarily attach the rear lower corner of the door frame with a #10 Phillips sheet metal screw. Repeat process for front bulkhead. Measure out about 9.5 inches or roughly 7 diamonds and make a mark. Drill a 3/16 hole just through the diamond plate and bench lip only. Do not drill through OEM van floor. Using a screw gun, install #10 x 1.25 Phillips pan head screws into the floor. Make four (4) even rows of screws. A row down the center is not necessary as the divider will use that space. Add remaining screws in door frame and front bulkhead.


13 With the help of a second installer. Lift the front divider wall section into the van. Line up to the front bulkhead. Bolt to front bulkhead using 1/4" x 3/4" carriage bolts and serrated nuts. Place middle divider section into van insert and line up bolt holes to front divider section. Use alignment tool to help line up middle bulkhead and both dividers. Bolt the panels together using 1/4" x 5/8" stainless socket button head bolt and washer. Place the rear most divider wall into the van and line up to middle divider and door frame. Install 1/4" x 5/8 stainless socket button head bolts and washers. Attach to the door frame using x 3/8 Flat head machine screws and nylock nuts. Place weather stripping over bolts. Install two (2) 1/4" x 3/4" carriage bolts and serrated nuts at the top of rear divider to bulkhead frame. Center and straighten the divider and drill 3/16 holes through diamond plate only. Do not drill through OEM van floor.


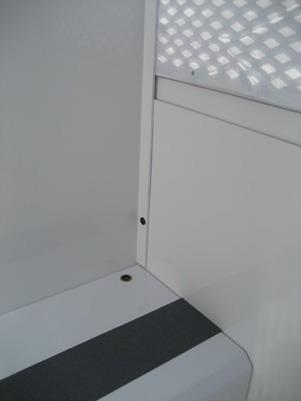
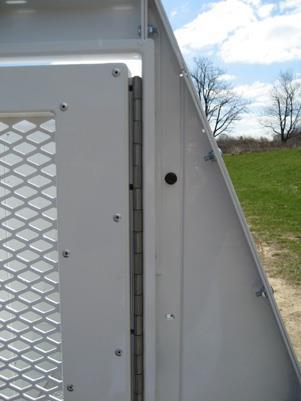
14 Attach divider to floor with 1/4" x 1.25 #14 lag bolts. Repeat process for ceiling Tighten all hardware Drill a 3/8 hole in the corners of the kit for through bolts. Refer to PT-A-3XX instructions for hole placement. Always check for obstructions. KKM Backing plate and other bulkhead to floor mount hardware shown. NOTE: Bulkheads have different holes for mounting. Double check under floor on the van you are working on to confirm correct mounting holes before drilling. Adjust doors as needed for proper alignment to pins. Loosening of the bolts on the hinge to raise or lower the door may be necessary. The latches should meet the pins evenly and engage both stages when closing. Attach door stop Socket and bracket assembly to door frame using #8 x ¾ Phillips machine screws and nuts. Bracket mount holes may need to be drilled in rear bulkhead. Double Check and tighten all hardware. Silicone all seems and joints. This will allow the unit to be hosed out. Installation is now complete


 Safety labels to Center Divider or walls.")
15 1/2" Mount Seat Belts and Grab Straps to bench with 1/2" x 1-3/4" bolts, lock washers and flat washers. Install with belt strap towards rear for ease of Officer tightening. Install seat dividers as per PT-A-907 instructions. Note: Seat divider should be placed 1/2" back from seat front bend Drivers side rear Seat Divider must be mounted rearward of the Seat Belt / Grab Strap mount hardware. All other Dividers will be in line with belt hardware. Side / 3 rd compartment bench is not as deep as other benches. Make sure you position the divider to allow space for mount hardware. Note: Depending on how the end user chooses to use the side / 3 rd compartment, installation of the seat divider may not be desired in this small compartment. Attach Safety label to dash Drive with Extra Caution While Transporting Passengers Attach four (4) Safety labels to Center Divider or walls. Hold onto Straps While Vehicle is in Motion Attach Safety label to dash The Adjustable Head Restraint is a Safety Device. Adjust the Head Restraint as per Owner s Manual Prior to Operating This Vehicle.


16 PRISONER TRANSPORT OPTIONS (All SOLD SEPERATLEY) Flip Down Step PT-A-902 See caution notes for Transit and Promaster vans. Power Vent PT-A-903 Sound Deadening Insulation PT-904 Rear Load Light PT-A-916 Under bench storage PT-A-906 C-2410 console with C-B68 mount kit. Transit Van shown
HARDWARE KIT # KKM or Rear Compartment: (Some hardware not used in all applications)
") PRISONER TRANSPORT INSTRUCTIONS for CHEVROLET EXPRESS VAN PT-C01-100-2A TOOLS REQUIRED: Standard and Metric Socket Sets Awe or Scribe Tape Measure Impact Gun (recommended) Pry-bar Caulk gun Drill & drill
PRISONER TRANSPORT INSTRUCTIONS for CHEVROLET EXPRESS VAN PT-C01-100-2A TOOLS REQUIRED: Standard and Metric Socket Sets Awe or Scribe Tape Measure Impact Gun (recommended) Pry-bar Caulk gun Drill & drill
INSTALL INSTRUCTIONS KK & KK KWIK-KIT PRISONER TRANSPORT INSERT FORD and CHEVY VAN PRISONER TRANSPORT
 INSTALL INSTRUCTIONS KK-100-03 & KK-120-03 KWIK-KIT PRISONER TRANSPORT INSERT FORD and CHEVY VAN PRISONER TRANSPORT TOOLS REQUIRED: ¼ & 3/8 Ratcheting Wrenches ¼ & 3/8 Air Ratchets (recommended) 3/8 Impact
INSTALL INSTRUCTIONS KK-XXX-02 XX-Specify length: FORD and CHEVY VAN PRISONER TRANSPORT INSERT
 INSTALL INSTRUCTIONS KK-XXX-02 XX-Specify length: 80 100 120 FORD and CHEVY VAN PRISONER TRANSPORT INSERT TOOLS REQUIRED: ¼ & 3/8 Ratcheting Wrenches ¼ & 3/8 Air Ratchets (recommended) 3/8 Impact Guns
KWIK-KIT KK-S INSTALLATION INSTRUCTION PACKAGE
 KWIK-KIT KK-S-120-02 INSTALLATION INSTRUCTION PACKAGE INSTALLATION INSTRUCTIONS HAVIS KWIK-KIT KK-S-120-02 2002-2007 DODGE/FREIGHTLINER SPRINTER VAN PLEASE READ COMPLETE INSTRUCTIONS PRIOR TO INSTALLATION
INSTALLATION INSTRUCTIONS KK-K9-C12-K CHEVY IMPALA
 INSTALLATION INSTRUCTIONS KK-K9-C12-K 2000-2005 CHEVY IMPALA READ ALL INSTRUCTIONS PRIOR TO INSTALLATION TOOLS REQUIRED: Power Drill Drill bits1/4 and 5/32 7/l6 wrench and socket 15,18 and\or 19mm socket
K9 KIT INSTALLATION INSTRUCTIONS CROWN VIC KK-K9-F7-K
 K9 KIT INSTALLATION INSTRUCTIONS 1998-2011 CROWN VIC KK-K9-F7-K TOOLS REQUIRED: Power Drill (Cordless preferable) Drill Bit Set Standard Wrench and Socket Set Metric Socket Set Screwdriver Set Torx Bit
K9 KIT INSTALLATION INSTRUCTIONS CROWN VIC with Fire Suppression System Model KK-K9-F7-K-FS
 K9 KIT INSTALLATION INSTRUCTIONS 2005-2011 CROWN VIC with Fire Suppression System Model KK-K9-F7-K-FS TOOLS REQUIRED: Power Drill (Cordless preferable) Drill Bit Set Standard Wrench and Socket Set Metric
INSTALLATION INSTRUCTIONS K9-C20-32 & K9-C CHEVROLET 4 DOOR TAHOE, GMC YUKON, SUBURBAN and YULON XL
 INSTALLATION INSTRUCTIONS K9-C20-32 & K9-C21-32 2007-2014 CHEVROLET 4 DOOR TAHOE, GMC YUKON, SUBURBAN and YULON XL TOOLS REQUIRED: Power drill Drill bit set Standard & metric socket sets Phillips screwdriver
INSTALLATION INSTRUCTIONS KK-K9-F14-K K9 KIT FOR FORD EXPEDITION
 INSTALLATION INSTRUCTIONS KK-K9-F14-K-32 32 K9 KIT FOR 2003-2016 FORD EXPEDITION TOOLS REQUIRED: Power Drill Drill Bit Set Standard & Metric Socket Sets Phillips Screw Driver Open End Wrench Set Wire Cutters
INSTALL INSTRUCTIONS K9-F14-PT K9/PRISONER TRANSPORTATION SYSTEM FORD EXPEDITION
 INSTALL INSTRUCTIONS K9-F14-PT K9/PRISONER TRANSPORTATION SYSTEM 2003-2017 FORD EXPEDITION HARDWARE: QTY: DESCRIPTION: PART #: 28 ¼-20 x ½ Stainless carriage bolt GSM32022 8 ¼-20 x ¾ Stainless carriage
Bulkhead Model Number and
 Bulkhead Model Number 96141-3-01 and 96142-3-01 Installing your ProMaster bulkhead is very clear cut following these instructions. Before cutting or drilling in the floor, verify the location of you gas
WPS crew Doors Installation instructions
 WPS-132-133 crew Doors Installation instructions ORDER OF INSTALLATION FOR A COMPLETE ENCLOSURE OF A CREW WPS (Weather Protection System) IS AS FOLLOWS: 1. Heater 2. Rear Thresholds - Right Hand & Left
ATTENTION: PLEASE READ AND UNDERSTAND ALL INSTRUCTIONS AND WARNINGS BEFORE ASSEMBLING, INSTALLING OR USING THIS PRODUCT.
 VAN STORAGE SOLUTIONS FOR THE WAY YOU WORK TM INSTALLATION MANUAL BULKHEAD Model Number 96101-3-01 ATTENTION: PLEASE READ AND UNDERSTAND ALL INSTRUCTIONS AND WARNINGS BEFORE ASSEMBLING, INSTALLING OR USING
Installation for Full Size Polaris Ranger Crew Doors
 Installation for Full Size Polaris Ranger Crew Doors Order of Installation: Heater Doors Wiper on to Windshield Windshield Top & Back Panel Note: Most of the steps in these instructions need to be repeated
Assembly Instructions 10 X 10 Aluminum Frame Building
 Assembly Instructions 10 X 10 Aluminum Frame Building 27 97 9 8 47 36 74 52 10 10 X 10 Square Building W/ Dome Includes: The Steel Entry Door with a Dead Bolt Lock assembly and Aluminum Door Frame. Metal
RH-412 STEEL DOORS INSTALLATION INSTRUCTIONS
 RH-412 STEEL DOORS INSTALLATION INSTRUCTIONS By following the steps outlined below, the assembly, installation and adjustment of the steel doors, will be a simple process. Let s start with the Driver Side.
INSTALLATION INSTRUCTIONS INTERIOR WINDOW GUARDS WGI-C1, C2, C3 & C CHEVROLET FULL SIZE WINDOW VANS
 INSTALLATION INSTRUCTIONS INTERIOR WINDOW GUARDS WGI-C1, C2, C3 & C4 1997-2019 CHEVROLET FULL SIZE WINDOW VANS TOOLS REQUIRED: Power drill Safety goggles Hand jig saw Pencil Drill Bit Set File Set Phillips
INSTALLATION INSTRUCTIONS RH 412 STEEL DOORS
 By following the steps outlined below, the assembly, installation and adjustment of the steel doors, will be a simple process. Let s start with the Driver Side. Note: Having the hood open makes the job
Installation Guide 40670
 Installation Guide 40670 Kargo Master Rancho Cordova, CA 95742 800-343-7486 CustomerService@KargoMaster.com DATE: Installation Instructions 40670 *PLEASE READ ALL INSTRUCTIONS AND WARNINGS PRIOR TO ASSEMBLING,
D. Drill Bolt Holes Through Topper Shell and Bed Rails
 A. Check Mounting Kit Check to make sure that all of the following items are included in the mounting kit. Call 515-272-4372 if you need to obtain a part from BrandFX. Double-stick tape (1 roll) White
Model #SH & CH SH Pine CH Naturaline
 Model #SH304-101 & CH304-101 Assembly Manual SH304-101 Pine CH304-101 Naturaline Component Parts A 2 ea. Angled Rail - 2 x 4 x 107-1/8" B 1 ea. Center Angled Rail - 2 x 4 x 107-1/8" C 9 ea. Rock Board
INSTALLATION GUIDE. C20-FTL STRAIGHT PARTITION Transit Partition ( Perforated Window, No Access, Steel )
") INSTALLATION GUIDE C20-FTL STRAIGHT PARTITION Transit Partition ( Perforated Window, No Access, Steel ) QUICK START GUIDE Phase 1 - Assembly q 1.1 Setup... q 1.2 Partition Assembly... 3-5 5-6 Phase 2 -
INSTALLATION GUIDE C20-FTL STRAIGHT PARTITION Transit Partition ( Perforated Window, No Access, Steel ) QUICK START GUIDE Phase 1 - Assembly q 1.1 Setup... q 1.2 Partition Assembly... 3-5 5-6 Phase 2 -
Installation Instructions Kit, Base Rail Bracket Part # 31413
 Installation Instructions Kit, Base Rail Bracket Part # 31413 Dealer / Installer: Provide a copy of these Instructions to the end user of this product. These Instructions provide important operating and
INSTALLATION GUIDE N5-DS48-4
 INSTALLATION GUIDE N5-DS48-4 Shelving ( steel ) Transit High Roof & Medium Roof Promaster Standard Roof & High Roof Nissan NV High Roof Sprinter Low Roof & High Roof Box Truck / Trailer QUICK START GUIDE
Rear Mount Installation Instructions
 Rear Mount Installation Instructions Ford Transit Low Roof 130 WB Frame Kit Part #: DTC 0809-011 V1.0.10.12.18 IMPORTANT INSTALLATION STEPS ARE DENOTED USING A STOP SIGN. THESE STEPS MUST BE PERFORMED
Bushwacker Jeep Flat Style Fender Flares Front Pair
 Bushwacker Jeep Flat Style Fender Flares Front Pair Note: These instructions involve cutting parts of your vehicle. Please read all instructions prior to starting. Installation Time: 3-4 Hours Tools Required:
40670 Transit Connect/NV200/City Express/ProMaster City Partition
 40670 Transit Connect/NV200/City Express/ProMaster City Partition Top Panel (1) Bottom Panel (1) Transit Connect (2014) Top Angle (1) TC Top MNT BRKT (2) TC Bottom MNT PLT (2) NV200/City Express Top Mount
INSTALLATION INSTRUCTIONS FOR FRONT CASTING DECK RAIL Ranger
 INSTALLATION INSTRUCTIONS FOR FRONT CASTING DECK RAIL Ranger TOOLS REQUIRED FOR INSTALLATION: Drill motor, (1) 5/16 inch drill bit, (1) 13/64 drill bit, (1) 3/16 inch hex wrench (1) 3/32 inch hex wrench.
RangerWare Fiberglass Door System Installation Instructions P/N
 Page 1 of 9 RangerWare Fiberglass Door System Installation Instructions P/N 2878016 ORDER OF INSTALLATION Note: To assure proper order, read all Accessory Installation Instructions before beginning. 1.
======================================================================================== ( DR / DR) JK WRANGLER MOD RACK
 JK WRANGLER MOD RACK") (10984 4DR / 10982 2DR) JK WRANGLER MOD RACK INSTALLATION SHEET Important Notes: Some brands of windshield light brackets and snorkels may not be compatible with the 10984 MOD Rack System. Body lifts are
(10984 4DR / 10982 2DR) JK WRANGLER MOD RACK INSTALLATION SHEET Important Notes: Some brands of windshield light brackets and snorkels may not be compatible with the 10984 MOD Rack System. Body lifts are
Side Katerack Installation Instructions
 Side Katerack Installation Instructions Ram ProMaster City 2015+ Frame Kit Part #: CRC 28-1000-001 V1.0.12.06.18 IMPORTANT INSTALLATION STEPS ARE DENOTED USING A STOP SIGN. THESE STEPS MUST BE PERFORMED
revised. You can make sure you are looking at the most recent KEEPING SERVICE INFORMATION CURRENT
 1 to the Kwikee Products Service Training. It is our sincere hope that the information you gain from this training will enhance your confidence in and familiarity with the products we manufacture. The
Ford F150 Front Bumper
 2009-2011 Ford F150 Front Bumper Warning! Read the instructions completely before beginning the installation. Before tightening bolts, drilling or cutting where required, check to make sure that there
Be sure any accessory used will fit with the soft upper doors before installing. Not all accessories will be compatible.
 Company Name: Spike Power Sports Vehicle Name: Polaris General 2P Product Description: Soft Upper Doors Part Number: 58-1600 Revision: R01 09/19/2018 Contents: 655 Elm Ridge Ave, Canal Fulton OH, 44614
Transit Connect Full/Half Installation Instructions
 GATHER THESE TOOLS FOR ASSEMBLY & INSTALLATION 7/16 wrench, T45 Torx socket, 7/16 socket, 3/8 drive ratchet - 3/8 socket One 1/8 square end driver bit provided - Electric drill/driver/18v cordless One
GlideRite Retractable Cover System For HotSpring & Tiger River Spas (except Classic & pre-2000 Landmark Spas)
") List of Contents Quantity Description 12 #10 x 1 ½ Flat Head Phillips Screw (see pg. 2) 2 #10 x ½ Pan Head Phillips Screw (see pg. 2) 8 ¼ x 2 ½ Lag Bolt (see pg. 2) 7 ¼ 20 x 5 / 8 Hex Head Bolt (see pg.
List of Contents Quantity Description 12 #10 x 1 ½ Flat Head Phillips Screw (see pg. 2) 2 #10 x ½ Pan Head Phillips Screw (see pg. 2) 8 ¼ x 2 ½ Lag Bolt (see pg. 2) 7 ¼ 20 x 5 / 8 Hex Head Bolt (see pg.
INSTALLATION GUIDE Locker With Top Shelf Transit Low Roof & Nissan NV Low Roof ( Aluminum )
") INSTALLATION GUIDE 7115 Locker With Top Shelf Transit Low Roof & Nissan NV Low Roof ( Aluminum ) QUICK START GUIDE Phase 1 - Assembly q 1.1 Setup... q 1.2 Locker w/ Top Shelf Assembly... 3-5 6-13 Phase
INSTALLATION GUIDE 7115 Locker With Top Shelf Transit Low Roof & Nissan NV Low Roof ( Aluminum ) QUICK START GUIDE Phase 1 - Assembly q 1.1 Setup... q 1.2 Locker w/ Top Shelf Assembly... 3-5 6-13 Phase
INSTALLATION INSTRUCTIONS
 NOTE: Bolts should remain hand tight until all bolts are installed. STEP 1 Installing the door base (both sides). 1. Locate the outer, roll cage, mounting bolt (passenger side is shown in the illustration).
BOX-115 Club Car Precedent Utility Box Mounting Kit Installation Instructions
 BOX-115 Club Car Precedent Utility Box Mounting Kit Installation Instructions Contents of BOX-115 Utility Box Mounting Kit: a (1 ea.) Utility Box Support Frame, Passenger Side b (1 ea.) Utility Box Support
BOX-118 E-Z-Go TXT Utility Box Mounting Kit Installation Instructions
 BOX-118 E-Z-Go TXT Utility Box Mounting Kit Installation Instructions Contents of BOX-118 Utility Box Mounting Kit: a (1 ea.) Utility Box Support Frame, Driver Side b (1 ea.) Utility Box Support Frame,
Side DuraRac Installation Instructions
 Side DuraRac Installation Instructions Ford Transit Low Roof 130 /148 WB Frame Kit Part #: CRC 22-1010-002 V1.0.08.10.18 IMPORTANT INSTALLATION STEPS ARE DENOTED USING A STOP SIGN. THESE STEPS MUST BE
Installation instructions, accessories. TV receiver, digital
 Installation instructions, accessories Instruction No 30756561 Version 1.1 5 Part. No. 30756181, 30756569 TV receiver, digital Volvo Car Corporation TV receiver, digital- 30756561 - V1.1 Page 1 / 36 Equipment
Katerack Wagon Shelving System
 Ford Transit Connect Assembly Installation Instructions Sheet 1 of 14 BEFORE YOU START! IMPORTANT INSTALLATION STEPS ARE DENOTED USING A STOP SIGN. THESE STEPS MUST BE PERFORMED IN THE SPECIFIED ORDER
BioPrism Solid Surface
 Please read all instructions before installing products. These instructions are intended for use with InPro s standard toilet partitions, which include 58 high doors and wall panels, when deviating from
MM Strut Tower Brace, Cobra (MMSTB-7)
") The MM strut Tower Brace attaches to each strut tower and to the firewall. 3430 Sacramento Dr., Unit D San Luis Obispo, CA 93401 Telephone: 805/544-8748 Fax: 805/544-8645 www.maximummotorsports.com MM
The MM strut Tower Brace attaches to each strut tower and to the firewall. 3430 Sacramento Dr., Unit D San Luis Obispo, CA 93401 Telephone: 805/544-8748 Fax: 805/544-8645 www.maximummotorsports.com MM
Installation Instructions
 Installation Instructions Follow these simple instructions to install your OneDayCab! IMPORTANT: Unpack and check shipment for damage. Verify color, size and parts before demolition. Installation of interiors
Assembly Instructions
 Unite Panel System Hinge Door July 2016 #12 x / slotted hex washer head bolt Figure 1 threshold bracket frame Detail F threshold bracket threshold bracket (installed) #12 x / slotted hex washer head bolt
TIRE RACK INSTALLATION INSTRUCTIONS Dodge Sprinter
 Aluminess Products Inc 9402 Wheatlands Ct. #A Santee, CA 92071 619-449-9930 TIRE RACK INSTALLATION INSTRUCTIONS 07-11 Dodge Sprinter Please read before beginning Stainless steel hardware may bind together
Rugged Ridge Body Armor Guard Kit, 5 Pieces, Black (07-Current JK 4-door)
") Rugged Ridge Body Armor Guard Kit, 5 Pieces, Black (07-Current JK 4-door) Installation Time: 60 Minutes Tools Required: Notes: Phillips head screwdriver 3/8 socket or Flat head screwdriver 1/2 socket 7
Rugged Ridge Body Armor Guard Kit, 5 Pieces, Black (07-Current JK 4-door) Installation Time: 60 Minutes Tools Required: Notes: Phillips head screwdriver 3/8 socket or Flat head screwdriver 1/2 socket 7
3/4 Rear DuraRac Installation Instructions
 3/4 Rear DuraRac Installation Instructions Ford Transit Low Roof 130 WB Frame Kit Part #: CRC 27-1010-001 V1.0.09.28.18 IMPORTANT INSTALLATION STEPS ARE DENOTED USING A STOP SIGN. THESE STEPS MUST BE PERFORMED
FORD 4100/4400 SUPERRAIL MOUNTING KIT WITH ADAPTER FOR B&W GOOSENECK PART #4431
 FORD 4100/4400 SUPERRAIL MOUNTING KIT WITH ADAPTER FOR B&W GOOSENECK PART #4431 Installation Instructions SPECIFICATIONS Fits 1999 2016 Ford F250 & F350 Short Bed Mounts to B&W gooseneck part #1108 & 1111
INSTALLATION INSTRUCTIONS GRILLE GUARD 09-ON DODGE RAM PART #
 INSTALLATION INSTRUCTIONS GRILLE GUARD 09-ON DODGE RAM PART # PARTS LIST: Qty Description Qty Description 1 Grille Guard 8 12-1.75mm x 35mm Hex Bolts 2 Brackets (for trucks without 22 12mm x 30.1mm OD
SAVVY OFF ROAD GAS TANK SKID INSTALLATION INSTRUCTIONS
 It is best to work with a fuel tank that has the least amount of fuel in it as possible. Thank you for purchasing the best skid on the market. Please follow these instructions and your installation should
CHEVY 4100/4400 SUPERRAIL MOUNTING KIT WITH ADAPTER FOR B&W GOOSENECK PART #4434
 CHEVY 4100/4400 SUPERRAIL MOUNTING KIT WITH ADAPTER FOR B&W GOOSENECK PART #4434 Installation Instructions SPECIFICATIONS Fits 1999-2010 Chevy 2500 & 3500 Short Bed Mounts to B&W gooseneck part #1067 Hitch
TOYOTA TACOMA LED BED LIGHTS Preparation
 Preparation Part Number: PT948-35160 Kit Contents Item # Quantity Reqd. Description 1 1 Hardware Kit 2 1 Driver Side LED assembly 3 1 Passenger Side LED assembly 4 1 Main Wire Harness Hardware Bag Contents
INSTALLATION INSTRUCTIONS DODGE RAM 2 & 4WD 1500 PART # P5058
 INSTALLATION INSTRUCTIONS 2009-13 DODGE RAM 2 & 4WD 1500 PART # P5058 PARTS LIST: Qty Description Qty Description 1 Grille Guard 12 12-1.75mm Hex Nuts 2 Upper Frame Mounting s (for trucks without tow hooks
PROVEN WORLDWIDE SNORKEL FOR CHEVY COLORADO NEW PRODUCT
 AEV30272AC Last Updated: 10/09/18 PROVEN WORLDWIDE SNORKEL FOR CHEVY COLORADO NEW PRODUCT Please visit www.aev-conversions.com to view the most current installation guide for this product. This is a new
NISSAN NV200 CHEVY CITY EXPRESS WALL LINER KIT INSTALLATION INSTRUCTIONS
 NISSAN NV200 CHEVY CITY EXPRESS WALL LINER KIT INSTALLATION INSTRUCTIONS NOTES: 1. Before commencing, remove all wall liners and D Rings already installed in the vehicle. 2. Consult layout PDF and compare
Medium HoneyBadger Chase Rack Installation Instructions
 PREPARATION Medium HoneyBadger Chase Rack Installation Instructions 1. Disconnect the negative terminal on the battery. Park the vehicle on level ground and set the emergency brake. 2. We recommend reading
Bushwacker Jeep Flat Style Fender Flares Rear Pair (JK Wrangler 2dr)
") Bushwacker Jeep Flat Style Fender Flares Rear Pair (JK Wrangler 2dr) Note: These instructions involve cutting parts of your vehicle. Please read all instructions prior to starting. Installation Time: 3-4
Bushwacker Jeep Flat Style Fender Flares Rear Pair (JK Wrangler 2dr) Note: These instructions involve cutting parts of your vehicle. Please read all instructions prior to starting. Installation Time: 3-4
Contractors Rack Assembly and Installation Instructions
 Part # 18601 & 16601 Contractors Rack Assembly and Installation Instructions 4751 Littlejohn St. Unit A, Baldwin Park, CA 91706 Page 1 of 12 11/13/08 Thank you for purchasing the Paramount Restyling Contractors
INSTALLATION GUIDE. C20-FTM STRAIGHT PARTITION Transit Partition ( Perforated Window, No Access, Steel )
") INSTALLATION GUIDE C20-FTM STRAIGHT PARTITION Transit Partition ( Perforated Window, No Access, Steel ) QUICK START GUIDE Phase 1 - Assembly q 1.1 Setup... q 1.1.1 Unpack components; compare with the bill
INSTALLATION GUIDE C20-FTM STRAIGHT PARTITION Transit Partition ( Perforated Window, No Access, Steel ) QUICK START GUIDE Phase 1 - Assembly q 1.1 Setup... q 1.1.1 Unpack components; compare with the bill
INSTALLATION MANUAL WEEKENDER STEEL LADDER RACK
 TRUCK STORAGE SOLUTIONS SECURING YOUR REPUTATION INSTALLATION MANUAL WEEKENDER STEEL LADDER RACK STEEL & ALUMINUM SIDE BOX WITH PACK RAT DRAWER UNITS MODELS ATTENTION: PLEASE READ AND UNDERSTAND ALL INSTRUCTIONS
WARNING Indicates a hazardous situation which, if not avoided, could result in death or serious injury. WARNING. Ranger XP Door Kit
 REVISION 04 November, 20 2018 Ranger XP Door Kit Prior to installation, please verify if a revised version of this instruction sheet is available on Knowledge Center. The following symbols may be used
JK Front Crusher Flares
 INSTALLATION INSTRUCTIONS INST-17-03-030_A JK Front Crusher Flares IMPORTANT: Thank you for purchasing this Poison Spyder product. Please read through this entire document before proceeding with installation.
INSTALLATION GUIDE NS Double Clamp Ladder Rack NV200 / City Express ( Aluminum )
") INSTALLATION GUIDE 1530-NS Double Clamp Ladder Rack NV200 / City Express ( Aluminum ) QUICK START GUIDE Phase 1 - Assembly q 1.1 Setup... q 1.2 Ladder Rack Assembly... 3-5 5-13 Phase 2 - Installation q
INSTALLATION GUIDE 1530-NS Double Clamp Ladder Rack NV200 / City Express ( Aluminum ) QUICK START GUIDE Phase 1 - Assembly q 1.1 Setup... q 1.2 Ladder Rack Assembly... 3-5 5-13 Phase 2 - Installation q
START HERE BEFORE YOU BEGIN FIG 1 STEP 2
 PROFESSIONAL INSTALL RECOMMENDED REAR MODULAR / MULTI LED ROOF MOUNTS PART#: Z350040 / Z350050 REAR ROOF LED LIGHT MOUNTS Parts included (1) - Driver Side Roof Mount Upright (1) - Passenger Side Roof Mount
Kawasaki Teryx 750 Cab Kit* Caution: Before using this product, read this manual and follow all Safety Instructions.
 Owner s Manual Model: Kawasaki Teryx 750 Kawasaki Teryx 750 Cab Kit* Caution: Before using this product, read this manual and follow all Safety Instructions. Safety Instructions Cab Kit Contents Hardware
CHEVY 4100/4400 SUPERRAIL MOUNTING KIT WITH ADAPTER FOR B&W GOOSENECK PART #4432
 CHEVY 4100/4400 SUPERRAIL MOUNTING KIT WITH ADAPTER FOR B&W GOOSENECK PART #4432 Installation Instructions SPECIFICATIONS Fits 2011-2018 Chevy 2500 & 3500 Short Bed Mounts to B&W gooseneck part #1011 Hitch
INSTALLATION GUIDE. C30-NH STRAIGHT PARTITION Nissan NV ( Swing Door, Steel )
") INSTALLATION GUIDE C30-NH STRAIGHT PARTITION Nissan NV ( Swing Door, Steel ) QUICK START GUIDE Phase 1 - Assembly q 1.1 Setup... q 1.2 Partition assembly... 3 to 4 5 to 6 Phase 2 - Installation q 2.1 Tips
INSTALLATION GUIDE C30-NH STRAIGHT PARTITION Nissan NV ( Swing Door, Steel ) QUICK START GUIDE Phase 1 - Assembly q 1.1 Setup... q 1.2 Partition assembly... 3 to 4 5 to 6 Phase 2 - Installation q 2.1 Tips
INSTALLATION GUIDE 3020-FTH CONTOURED PARTITION
 INSTALLATION GUIDE 3020-FTH CONTOURED PARTITION Transit Partition ( Tempered Glass Window, Aluminum ) QUICK START GUIDE Phase 1 - Assembly q 1.1 Setup... q 1.1.1 Unpack components; compare with the bill
INSTALLATION INSTRUCTIONS CONTOURED LIGHT BAR APPLICATION: CHEVY EQUINOX/ GMC TERRAIN PART NUMBERS: ,
 INSTALLATION INSTRUCTIONS CONTOURED LIGHT BAR APPLICATION: 2010-2014 CHEVY EQUINOX/ GMC TERRAIN PART NUMBERS: 32-21020, 32-21025 ITEM QUANTITY DESCRIPTION TOOLS NEEDED 1 1 CONTOUR BAR TORQUE WRENCH 2 1
SAFETY THIS PRODUCT IS FOR OFFROAD USE ONLY. ALL LIABILITY FOR INSTALLATION AND USE RESTS WITH THE OWNER.
 SAFETY Your safety and the safety of others is very important. In order to help you make informed decisions about safety, we have provided installation instructions and other information. These instructions
Assembly Instructions 10 X 10 Aluminum Roof Support
 Assembly Instructions 10 X 10 Aluminum Roof Support Aluminum Roof Support Bolt Package 16-5/16 X 2 ¼ SS Bolt 24-5/16 X 1 SS Bolt 40-5/16 SS Nylon Lock Nuts 16-5/16 SS Flat Washers 28-4 ½ Wood Screws 36-1
FLOE DOCK FURNITURE WARNING ASSEMBLY INSTRUCTIONS
 FLOE DOCK FURNITURE ASSEMBLY INSTRUCTIONS KIT P/N 510-00400-02 KIT P/N 510-00405-02 KIT P/N 510-00406-02 KIT P/N 510-00410-02 WARNING IT IS THE INSTALLER S RESPONSIBILITY TO PROPERLY INSTALL this chair
PARTITION INSTALLATION INSTRUCTIONS
 PARTITION INSTALLATION INSTRUCTIONS 2015 Chevrolet Tahoe PPV / Part Number 5703FW, FWA & FEW Do not attempt to install this product on any vehicle equipped with third row seating! Parts List Distributed
Side Mount INSTRUCTION BOOKLET #C122 BED STYLE: PARK CITY
 Side Mount BED STYLE: PARK CITY INSTRUCTION BOOKLET #C1 WARNING! ALL MURPHY/WALLBED SYSTEMS CONTAIN STORED ENERGY. FAILURE TO USE AND FOLLOW THESE INSTRUCTIONS DURING THE INSTALLATION PROCESS COULD RESULT
C4 Fabrication Rock Slider Installation 14+ 5th Gen 4Runner w/o KDSS
 C4 Fabrication Rock Slider Installation 14+ 5th Gen 4Runner w/o KDSS Thank you for your purchase of the C4 Fabrication s 5th Gen 4Runner Rock Sliders! This product was carefully crafted to ensure a perfect
Installation Instructions
 DODGE 16K Industry Standard Rail Custom Mounting Kit #2728 Gross Trailer Weight (Maximum)...16,000 lbs. Vertical Load Weight (Max. Pin Weight)...4,000 lbs. SYSTEM TOW CAPACITY Please note, in order to
BOX-117 E-Z-Go RXV Utility Box Mounting Kit Installation Instructions
 BOX-117 E-Z-Go RXV Utility Box Mounting Kit Installation Instructions Contents of BOX-117 Utility Box Mounting Kit: a (1 ea.) Utility Box Support Frame, Driver Side b (1 ea.) Utility Box Support Frame,
2-Door EXO-Top Roof Rack System
 Page 1/29 Part 13516.01 2-Door EXO-Top Roof Rack System! WARNING The EXO-Top Roof Rack System is rated to a dynamic 300 lb, evenly distributed load. Further loading could result in serious injury or death.
INSTALLATION INSTRUCTIONS
 INSTALLATION INSTRUCTIONS SNYPER TUBULAR FENDERS APPLICATION: 2007-2017 Jeep Wrangler JK PART NUMBER: 62-1005, 62-1015 ITEM QUANTITY DESCRIPTION TOOLS NEEDED 1,2 2 FRONT FENDERS, DRIVER (1) AND PASSENGER
INSTALLATION INSTRUCTIONS
 INSTALLATION INSTRUCTIONS SPORTSMAN WINCH MOUNT GRILLE GUARD APPLICATION: 2016-2018 Toyota Tacoma PART NUMBER: 40-93885, 45-93880, 46-23885 ITEM QUANTITY DESCRIPTION TOOLS NEEDED 1 1 WINCH TRAY 15MM SOCKET
Polaris XP Doors (P144202) Installation Instructions
 Installation Instructions") Polaris XP4 000 Doors (P440) Installation Instructions WARNING Pro Armor Door and Net are designed to work together to replace your original equipment nets and/or door. Install both the Pro Armor Door
Polaris XP4 000 Doors (P440) Installation Instructions WARNING Pro Armor Door and Net are designed to work together to replace your original equipment nets and/or door. Install both the Pro Armor Door
Size Grade Torque 9/ ft/lbs. 5/ ft/lbs. 3/ ft/lbs. 7/ ft/lbs ft/lbs.
 8-3 HJ3205,Rev 4 BOlT TORQUE SPECIfICATIONS STANDARD BOlTS: Size Grade Torque 5/6 5 20 ft/lbs. 3/8 5 35 ft/lbs. 7/6 5 56 ft/lbs. /2 5 85 ft/lbs. Size Grade Torque 9/6 5 23 ft/lbs. 5/8 5 70 ft/lbs. 3/4
Cabinet Mount Lifter Instructions
 PART LIST 2 @ Side Pivot Arms 1 @ Coupler Tube 1 @ Left Hand Bracket 1 @ Right Hand Bracket 2 @ Cover Support Arms w/ Foam Grip 1 set of Cover Saver 4 @ 4 Wood Screw 8 @ 1 Wood Screw 12 @ 1 Black Tek Screw
Toyota FJ Cruiser 2006-Up Set Part # Revision A
 Toyota FJ Cruiser 2006-Up Set Part # 31924 Revision A 03-31-08 Step 1: Prior to Installation: A) Fit: Verify the fit of the flares to vehicle. (Some filing, sanding, or cutting may be necessary to ensure
frame bracket Dodge x 2 & 4 x 4 (6-1/2 & 8 Boxes Includes Mega Cab)
") , Rev 4 02/19 frame bracket 8552026 Dodge 3500 4 x 2 & 4 x 4 (6-1/2 & 8 Boxes Includes Mega Cab) 14 5 7 2 4 11 9 10 17 3 6 1 8 13 15 16 18 12 ITEM PART # DESCRIPTION QTY. 1 00085.50 FLAT WASHER 10 2 00248
, Rev 4 02/19 frame bracket 8552026 Dodge 3500 4 x 2 & 4 x 4 (6-1/2 & 8 Boxes Includes Mega Cab) 14 5 7 2 4 11 9 10 17 3 6 1 8 13 15 16 18 12 ITEM PART # DESCRIPTION QTY. 1 00085.50 FLAT WASHER 10 2 00248
Ram Promaster Rack. Installation instructions for
 Installation instructions for Ram Promaster Rack MyGlassTruck.com 200 Acorn Road LOCAL 856-595-9069 WEB www.myglasstruck.com Glassboro, NJ 08028 FAX 856-863-1480 1-844-364-4022 Version 1.0 November 2015
ABM International, Inc. Navigator Assembly Manual
 ABM International, Inc. 1 1.0: Parts List Tablet (Qty. 1) Tablet mount (Qty. 1) NOTE: Mount may appear and operate different then image below Control Box (Qty. 1) Motor Power Supply (Qty. 1) 2 X-axis motor
 For Wallbed models: KING SIZE INSTRUCTION BOOKLET #C1 Watch step by step installation instructions at: https://www.wallbedsbywilding.com/wallbed-installation-studio-series/ WARNING! ALL MURPHY/WALLBED
Equilibrium. Conference Table. Installation Instruction. Revision B 11/07/16
 Equilibrium Conference Table Installation Instruction Revision B 11/07/16 Equilibrium End User Agreement Enwork Equilibrium table bases must be installed directly onto a four inch minimum thickness concrete
N. 15th Street, Middlesboro, KY FLIP TARP DUMP BODY INSTALLATION INSTRUCTIONS
 1-800-248-7717 1002 N. 15th Street, Middlesboro, KY 40965 FLIP TARP DUMP BODY INSTALLATION INSTRUCTIONS Congratulations on your purchase of a Mountain Flip Tarp Dump Body tarping system. With tarping systems
- 1 - P/N REV E 9/15
 INSTRUCTIONS HIGH TECH II DELUXE FLUSH UNIT ASSEMBLY The following instruction is a guideline, illustrating suggested methods, assembly sequence, and tool selection. Actual assembly may vary by each situation.
4832A Installation Sheet Part List
 4832A Installation Sheet Part List (1) 4016A-43-003 Qty 1- (2) 4016A-43-002 Qty 1- (3) 4016A-43-001 Qty 2- (4) 4016A-10-005 Qty 1- (5) 4016A-43-004L Qty 1- Mounting Bolt Kit (A) (K) Qty 2 - Qty 6 - M10
 INSTRUCTION BOOKLET #C0 Watch step by step installation instructions at: https://www.wallbedsbywilding.com/wallbed-installation-studio-series/ WARNING! ALL MURPHY/WALLBED SYSTEMS CONTAIN STORED ENERGY.
Parts and tools needed for installation- Cleaning and Painting -
 Thank you for the purchase of our JK Rear Trail Doors. We have made these from 6061-T6 aluminum and reinforced them with stiffeners at the top that double as a comfortable armrest and support for Rugged
INSTRUCTIONS. Taurus (BM) Unit Assembly
 Unit Assembly") INSTRUCTIONS Taurus (BM) Unit Assembly Tool Selection QTY Description QTY Description 1 Flat head screw driver 1 Air ratchet 1 Drill with ¼ Bit 1 7/16 deep well socket (for wood base) 1 Drill with 3/16
INSTRUCTIONS Taurus (BM) Unit Assembly Tool Selection QTY Description QTY Description 1 Flat head screw driver 1 Air ratchet 1 Drill with ¼ Bit 1 7/16 deep well socket (for wood base) 1 Drill with 3/16
INSTALLATION INSTRUCTIONS
 INSTALLATION INSTRUCTIONS Trans4mer Grille Guard/Winch Mount For Chevrolet Silverado 1500HD & 2500 Kit 68162 This WARN Trans4mer system can be customized to give your Chevy Silverado a wide variety of
Instruction Guide 4A90L
 Instruction Guide 4A90L Kargo Master Rancho Cordova, CA 95742 800-343-7486 CustomerService@KargoMaster.com DATE: *PLEASE READ ALL INSTRUCTIONS AND WARNINGS PRIOR TO ASSEMBLING, INSTALLING, AND USING THIS