Build It: The Most Amazing Cooler Bench Ever
|
|
|
- Osborne Thornton
- 6 years ago
- Views:
Transcription

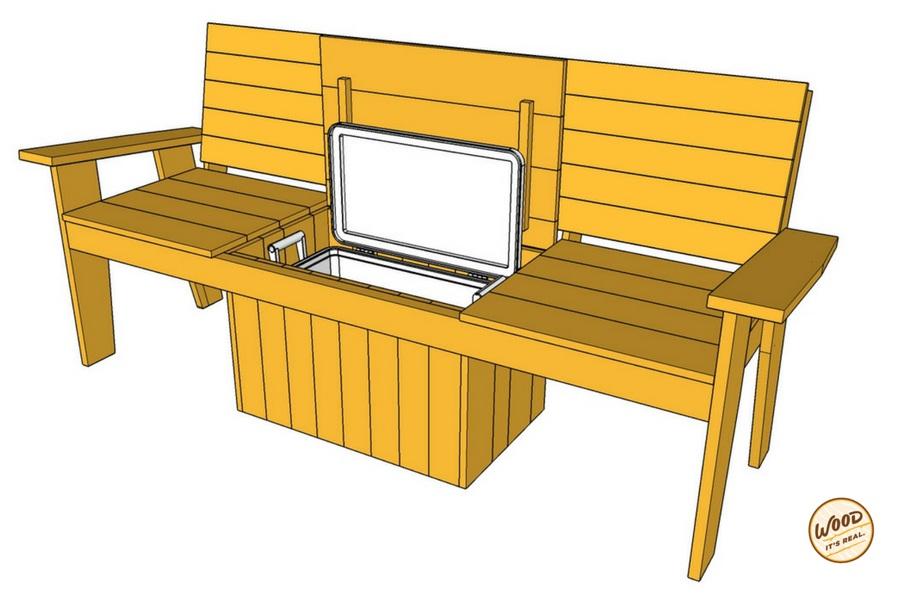
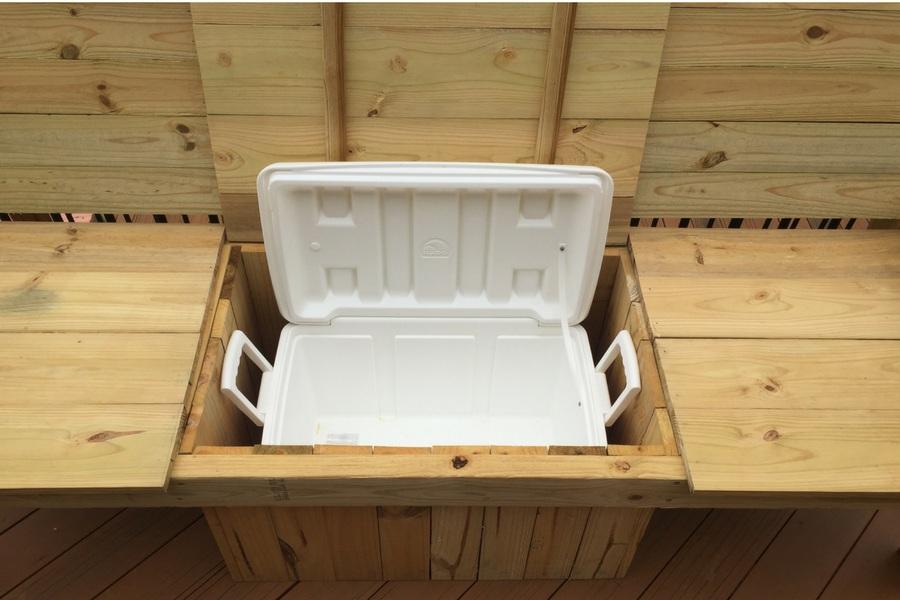
1 Build It: The Most Amazing Cooler Bench Ever wooditsreal.com/2017/04/28/build-it-cooler-bench-free-plans/ A bench. A cooler. Put them together and what do you get? The most amazing Cooler Bench you ve ever seen. After searching online for plans that incorporated a cooler into a bench without also having to take that cooler apart and build it into the bench itself we decided to take a crack at our own plans. What we came up with is a sturdy, large, and novice-diyer-friendly project. The cooler can be simply dropped into the bench and covered with a hinged seat. We felt it was important to design and build a cooler bench that could use simple tools and wouldn t take many weekends to make. While the real beginner might take a while to build this project, it s something that most folks can tackle. The cool thing about this plan, too, is that you can modify it to fit any cooler you may already have, making it larger or smaller based on your cooler s dimensions. The one we used can be picked up online or at large retailers for only $15-$20. Here s what we imagined when concocting this design: Someone sitting on their dock or their patio, far away from the kitchen, and wanting easy access to cold beverages and snacks without having to go ALL. THE. WAY. TO. THE. HOUSE. We wanted this easy-access cooler to still be useful outside of just being inside the bench and thought it important that folks be able to remove the cooler to clean it out or take it somewhere else. We also thought it would be neat for folks who live in a place where storage at a premium, so they could just store their cooler right in the bench. Once you build the bench, you can customize it by painting or staining it. This bench will last a long time outside since it s built from pressure treated Southern Yellow Pine. We d like to point out that if you do plan on putting this bench directly onto grass or dirt, be sure to use lumber treated for Ground Contact for the legs and cooler box. If you re changing some of the pieces of lumber to Ground Contact, you will need to alter the material list accordingly and you will likely need to edit some of the cuts. 1/51
 1 x6 x 8 Pressure Treated Southern Yellow Pine boards (11) 1 x4 x 8 Pressure Treated Southern Yellow Pine boards Other Two piano hinges One Box Exterior Grade Deck")
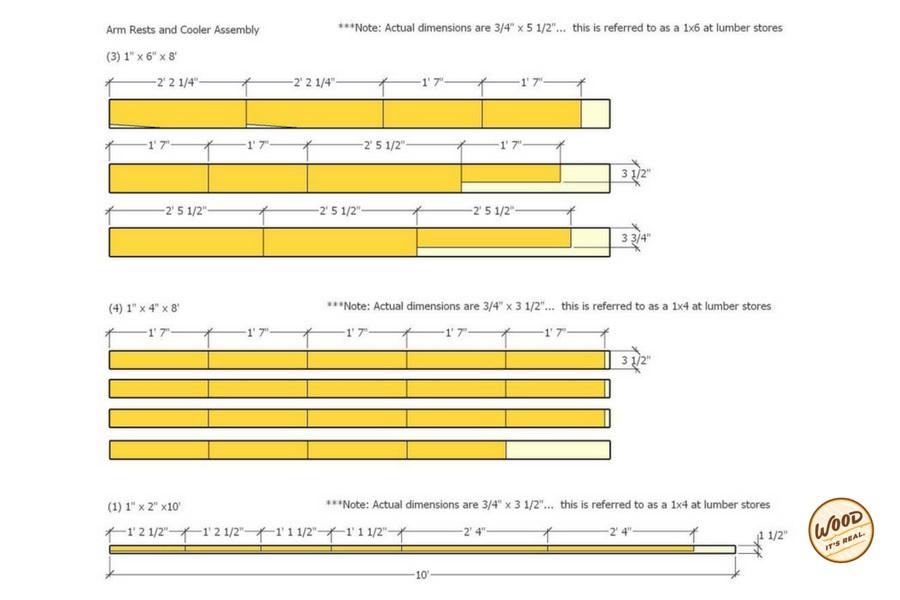
2 IT S COOLER BENCH BUILDING TIME We recommend getting the following supplies: MATERIALS Lumber (2) 2 x4 x 12 Pressure Treated Southern Yellow Pine boards (1) 5/4 x6 x 10 Pressure Treated Southern Yellow Pine decking board (5) 1 x6 x 8 Pressure Treated Southern Yellow Pine boards (11) 1 x4 x 8 Pressure Treated Southern Yellow Pine boards Other Two piano hinges One Box Exterior Grade Deck Screws, #8 x 1 1/2 Nails for nail gun or Finishing Nails Wood Glue 150 grit sandpaper 2/51

3 TOOLS Pencil, Measuring Tape Level Speed Square Circular Saw Table or Miter Saw (if available) Electric Drill / Driver Nail Gun or Hammer Radial Sander / Sanding Block Safety Glasses / Ear Protection Dust Mask / Work Gloves OVERALL DIMENSIONS OF THE COOLER BENCH Note: If you don t own a circular saw, or a table and/or miter saw, your local hardware store might rent out tools to you, or you could potentially find a friend or family member with a wood shop. CUT LIST It can be a good idea to cut off the factory edges of your lumber by running it through a table saw for a super smooth 3/51

4 edge, just be careful not to take off too much. See the how-to video from another project to see what we mean. Otherwise, just be mindful to pick up boards that have super straight edges. With your board prepped (if you want), follow these cuts for your Cooler Bench, keeping in mind it can sometimes be best to measure as you go.: 4/51
5 5/51
6 6/51

7 And now for the important part: building this beast of a cooler bench. Step 1: Cooler Frame 7/51

8 1. Assemble two of each of these panels for the cooler box. 2. Fasten the cleats to each board using a nail gun and glue. The tops of each board will be fastened to the bench s frame. 8/51

9 3. Glue and fasten at the edges on all four sides to form the cooler box. 9/51

10 4. Attach a cleat to the back of the cooler box to help give support to the back and to help keep the box together. 10/51

11 5. Fasten the piano hinges now to the back of the cooler box. It will be too hard later on to attach these. Step 2: Build the Bench Frame 11/51

12 1. Center a on the front of the cooler box. 2. Fasten the board with wood glue and decking screws. 12/51

13 3. Fasten the remaining 2 4 frame pieces using wood glue and decking screws. 13/51

14 You might notice this box is a resemble a bench. Step 3: Cut and Attach the Cooler Bench Legs 14/51

15 1. Use a table saw, circular saw or miter saw to get the angle cuts into the leg. 15/51

16 The most important angle cut here will be the little one at the top, which will allow an angled armrest later on in the build. 16/51

17 2. Cut the angles for the rear legs. If you don t feel like cutting the longer angles on any of these legs, it s all good. You ll just end up having the legs look a little bit chunkier. Repeat: chunky legs are OK. 17/51

18 3. Glue and screw the front legs to they sit flush with the front apron of the bench frame. 18/51

19 4. Glue and screw the back legs where the edge of the back legs meet near the top corner of the side frame. The back legs will angle back slightly and will not be flush to the frame. 5. Install the back and front legs on a level surface. Test the angle of the arms using a flat board on the top to keep the height and angles correct. Step 4: Cut, Build, and Attach the Seat Back Frames 19/51

20 To make sure you have the back legs in the right spot, you ll test the angle of the arms using a flat board on the top to keep the height and angles correct. 20/51
, as that s what mounts to the bench frame and will give the seat back an angle.")
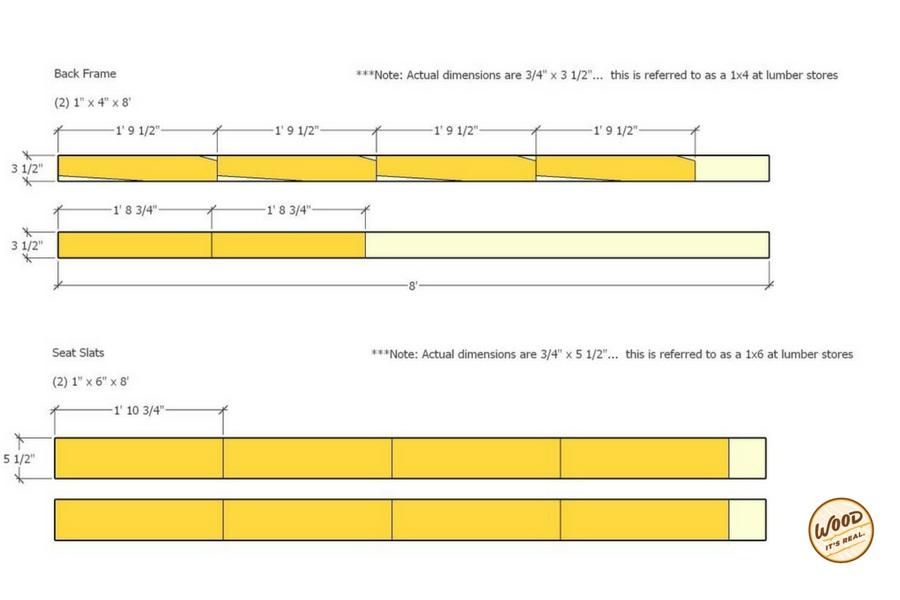
21 1. The back frame will also have an ever-so-slight angle for laid back times on this bench. Mark and cut four boards as instructed in the picture above. The most important cut here is the shorter angle (the 2.75 cut), as that s what mounts to the bench frame and will give the seat back an angle. If you choose not to cut the longer angle, the back will just look more square and slightly less refined. 21/51

22 2. Cut two boards for the bottom part of the back seat frame, each bottom board for the seat frame will be long. 22/51

23 3. Build the frames by gluing and screwing the angle-cut boards to the bottom boards you just cut. 23/51

24 4. Measure 1 in from the end of the bench frame. Attach the back seat frames to the back of the bench frame using your wood glue and decking screws. Step 5 (or the Last Step): Cut and Attach Bench Arms 24/51

25 Install the back frame where the top of the short angled cut will meet flush at the top of the seat frame assembly. 25/51

26 Almost done! 26/51

27 1. Mark and cut the angle/taper for the bench arms. If you don t feel like doing the angle, it won t affect the function of the arms, it just won t have that little refined edge. 27/51

28 2. The reason we mention you can do the arms as the last step is because it will be easier to install the seats without the arms already in place. But if you want to go for it now, that s cool too! Installing them now or later won t affect the structural integrity of the bench. 28/51

29 3. Fasten the arms, whether it s now or later, with glue and screws into the top of both the front and rear legs. 4. Attach the arms to the seat back frame as well, from the inside of the seat back frame as noted above. 29/51

30 Step 6: Measure, Cut, and Attach Seat Slats 30/51

31 1. Measure and cut 8 boards to What s important here is to just double check those lengths against the actual measurements of your bench. Here are a few tips.: 31/51

32 When you re picking out your boards for both the bench seat and the bench back, lay them out at the store to see how well they fit together and to make sure our boards aren t bowed or curved. This is especially important if you don t have a table saw to plane the edges of the lumber. You want the boards to fit as flush as possible. You can even number the boards at both ends to help you remember the order of the best way for the slats to lay, with 1 being in the front, for example. 32/51

33 you want to make the cuts as perfect is possible to the cooler bench box, you can lay out the boards the full length of the bench seat and mark from there. That way, after you cut your boards and the bench all comes together, you ll have a very small gap for the lid to open and close. 33/51

34 2. Fasten the seat slats to the top of the seat frame using finishing nails or decking screws. 34/51

35 No matter how hard you try, things might not be absolutely perfect. And that s OK. Your inner perfectionist might have to do some deep breathing exercises to calm down. This is especially true if you re not a professional and aren t working with professional-level tools. 35/51

36 Step 7: Measure, Cut, and Attach Back Slats 36/51

37 1. It s nearly time to sit back and enjoy your bench. Cut your boards to the length of the back of your bench, /51

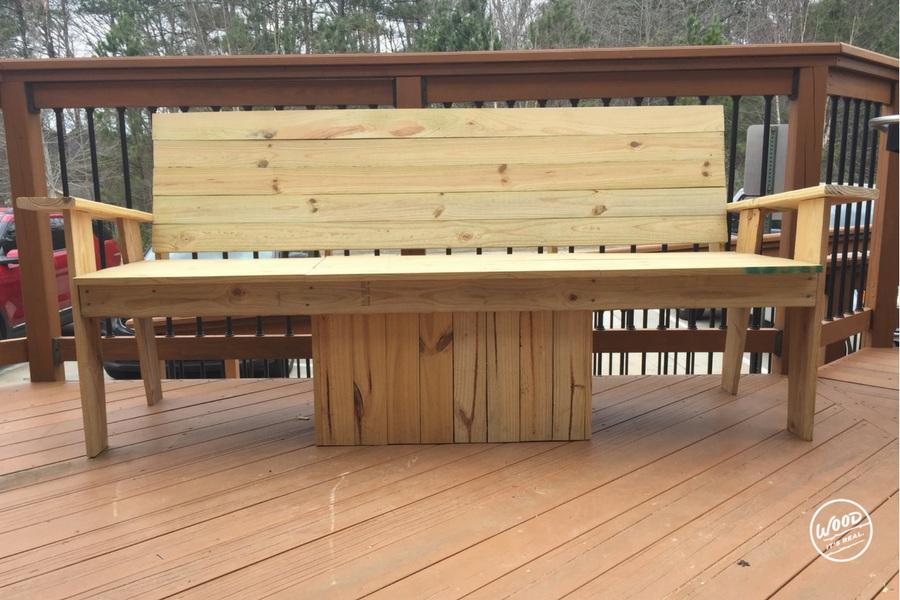
38 2. Using 1 spacer blocks underneath the lowest back slate, attach the boards using glue and finishing nails/nail gun nails to the seat back frame assembly. Step 7: Measure, Cut, Assemble, and Attach Cooler Box Lid 38/51

39 Here s how we used spacers. 39/51

40 Make sure the boards on the back of your seat are level. It s so great seeing that bubble in the middle of the lines. 40/51

41 1. Measure and cut the boards for the lid. Note that the last board, the one that will attach to the hinges is not as wide as the others, and will need to be cut to 3.75 wide. 2. Fasten cleats to the bottom side of the cooler lid boards using glue and a nail gun. 41/51

42 Measure 3 or so inches in from the outside of the lid frame boards to attach the cleats. 42/51

43 2. Drop the lid assembly into place, lining up the boards as closely as possible to the seat boards. 43/51

44 3. Attach the hinges to the back board of the cooler lid. Step 8: Drop In the Cooler 44/51

45 Moment of truth: will the lid open and close without issues? 45/51
46 1. Drop in your cooler with your perfectly built and installed cooler box lid. 46/51

47 Step 9: Enjoy Your Hand-Crafted Cooler Bench for Years to Come 47/51
48 48/51
49 49/51
50 50/51
51 51/51
MyOutdoorPlans.com. By Julian King [2X4 GARDEN BENCH]
![MyOutdoorPlans.com. By Julian King [2X4 GARDEN BENCH]](/thumbs/75/72876801.jpg "MyOutdoorPlans.com. By Julian King [2X4 GARDEN BENCH]") MyOutdoorPlans.com By Julian King [2X4 GARDEN BENCH] CUT LIST A 2 pieces of 2 4 lumber 24 long, 2 pieces 32 1/2 long LEGS B 2 pieces of 2 4 lumber 45 long, 2 pieces 15 1/2 long, 1 piece 12 1/2 long SEAT
MyOutdoorPlans.com By Julian King [2X4 GARDEN BENCH] CUT LIST A 2 pieces of 2 4 lumber 24 long, 2 pieces 32 1/2 long LEGS B 2 pieces of 2 4 lumber 45 long, 2 pieces 15 1/2 long, 1 piece 12 1/2 long SEAT
Once you ve made this project, let us know how it went. We d love to see it and brag about you, OK?
 Build It: Let It Snow(flake) wooditsreal.com/2017/12/18/build-a-snowflake/ HANDMADE HOLIDAY Here s a way to bring something extra to your winter decor: build a simple, yet stunning snowflake. Keeping with
Cedar 2-Drawer Desktop Storage Cube
 Cedar 2-Drawer Desktop Storage Cube 5 ½ Dimensions 5 ½ 5 ½ 2 2 1 7/8 4 ¼ 4 ½ Author s Notes: Build a Cedar 2-Drawer Desktop Storage Cube from just 1 cedar fence picket. No angles, special cuts or rips
Chief s Shop: Simple Woodworking Bench
 Chief s Shop: Simple Woodworking Bench Be sure to read the instructions and review the illustrations and accompanying video for this project BEFORE you start. Follow ALL SAFETY GUIDELINES AND RECOMMENDATIONS
How to Build A Porch Swing
 How to Build A Porch Swing SUPPLIES USED Tape measure Drill 2.5" Wood Screws 1.5" Wood Screws 2" Finishing nails Hammer (or nail gun if you're lucky) Sand paper/ Electric sander Exterior paint Safety glasses
PROJECT PLANS PATIO PLANTER BOX
 PROJECT PLNS PTIO PLNTER BOX This great-looking planter makes the perfect place for your favorite plants and flowers. It s sized to hold an 18" round plastic pot, which you can pick up in any garden center.
CONTINUED. BACK & SEAT RAILS: 1. Sort three (3) 2x2x8 pieces. 2. Measure and cut one (1) 61 length from each piece.
 2x2x8 pieces. 2. Measure and cut one (1) 61 length from each piece.") # Materials: Quantity Each: Total Quantity: 2x2x8 6 2x4x8 9 4x4x8 2 4x6x8 1 TIPS FOR SUCCESSFUL PREP WORK: Before starting, carefully read through the entire instruction sheet. Refer to the material list
# Materials: Quantity Each: Total Quantity: 2x2x8 6 2x4x8 9 4x4x8 2 4x6x8 1 TIPS FOR SUCCESSFUL PREP WORK: Before starting, carefully read through the entire instruction sheet. Refer to the material list
1 ¼-inch Pocket Screws Brad Nailer or Hammer 1 ¼-inch Brad Nails Clamps
 MATERIALS: TOOLS: (4) 2 x 6 x 8 Ft. Boards Tape Measure (2) 2 x 4 x 8 Ft. Boards Carpenter s Square (7) 1 x 4 x 8 Ft. Boards Pencil (2) 1 x 3 x 8 Ft. Boards Drill (1) Half Sheet of ¾-inch Thick Plywood
PLANS BY KELLEY FARMHOUSE DESIGNS LOFTED DORM ROOM BED
 PLANS BY KELLEY FARMHOUSE DESIGNS LOFTED DORM ROOM BED DIMENSIONS: 82" X 70" X 45" DIFFICULTY LEVEL: INTERMEDIATE TOOLS REQUIRED ONE+ Circular Saw ONE+ AirStrike 16GA Finish Nailer ONE+ Impact Driver ONE+
Direct Importers of the Finest Exotic Hardwood Decking, Lumber, & Flooring
 Direct Importers of the Finest Exotic Hardwood Decking, Lumber, & Flooring These Instructions can be found online at: http://www.advantagelumber.com/how-to/buildwoodstoragebox.html Material List 72 FEET
PROJECT PLANS HOBBY BENCH
 PROJECT PLANS HOBBY BENCH This great-looking bench provides the perfect place to pursue a variety of hobbies. It offers a large bench top with built-in trays for small items, plus shelves up above to hold
Modern Outdoor Chair from 2x4s and 2x6s [1]
![Modern Outdoor Chair from 2x4s and 2x6s [1]](/thumbs/89/98920110.jpg "Modern Outdoor Chair from 2x4s and 2x6s [1]") [1] Submitted by Ana White [2] on Wed, 2017-06-28 13:08 Page 1 of 27 [1] Additional Photos [3] [4] [5] Page 2 of 27 [6] Disclosure: I have been a long time user and fan of BEHR PREMIUM (R) Waterproofing
[1] Submitted by Ana White [2] on Wed, 2017-06-28 13:08 Page 1 of 27 [1] Additional Photos [3] [4] [5] Page 2 of 27 [6] Disclosure: I have been a long time user and fan of BEHR PREMIUM (R) Waterproofing
Fan Back Adirondack Chair Assembly Instructions How To Assemble Your Chair in 12 Easy Steps Parts List 5 9
 Fan Back How To Assemble Your Chair in 12 Easy Steps Parts List 5 9 5 5 9 5 5 1 12 11 7 7 1 8 13 10 2 6 4 3 3 3 3 3 2 #1 (2) frame, left & right #2 (2) 20" legs, left & right #3 (6) 20" seat slats #4 (1)
Shoe Organizer Plans Our Home from Scratch
 Shoe Organizer Plans by Our Home from Scratch Our Home from Scratch LLC Page 1 Disclaimer Our Home from Scratch LLC and its legal owners cannot be held responsible for any loss, damage, injury or death
woodworkersjournal.com MATERIAL LIST
 MATERIAL LIST T x W x L 1 Legs (2) 1 1 2" x 3 1 2" x 36 7 16" 2 End Uprights (2) 1 1 2" x 3 1 2" x 32 1 2" 3 Stringers (4) 1 1 2" x 3 1 2" x 42" 4 Top Cladding, Long (2) 3/4" x 7 1 4" x 65 3 4" 5 Side
Free Doghouse Plans Page 1 of 2
 Free Doghouse Plans Page 1 of 2 This doghouse is designed with the beginner in mind. It might even be a good project to involve the kids. The entire project requires only one sheet of plywood, two 2"x4"s
Porch. Swing. Build A. farmstead: project
 farmstead: project Porch Build A Swing Instructions Cut all parts to fit as you assemble the project and use the Parts List and Cutting Diagram as a guide for dimensions. When gluing pieces together, you
DIY X Panel Side Table
 DIY X Panel Side Table *Before beginning this project, please read through all of the plans as well as the blog post associated with this project. Always use safety precautions whenever using power tools
I love the outdoors. And I m impressed with whatever forces in the universe have made it possible for me to purchase a collapsible canvasand-metal
 Limbert Chair 9 I love the outdoors. And I m impressed with whatever forces in the universe have made it possible for me to purchase a collapsible canvasand-metal camp chair for under $20. But when you
DIY Outdoor Console Table Addicted2DIY.com
 DIY Outdoor Console Table Addicted2DIY.com *Before beginning this project, please read through all of the plans. Always use safety precautions whenever using power tools and follow the manufacturer s suggested
OUTDOOR COOLER STAND. ProWood Project Plan
 ProWood Project Plan OUTDOOR COOLER STAND With ProWood Professional Grade pressure-treated wood, you can easily build this sturdy outdoor cooler stand and expand your family s backyard fun. This project
How To Build Horizontal Slat Fences and Screens
 How To Build Horizontal Slat Fences and Screens All Day Fencing Construction and design guide: www.alldayfencing.com.au p: 1300 633 623 Construction and Design of Horizontal Slat Fences and Screens First
OUTDOOR STOOL. ProWood Project Plan
 ProWood Project Plan OUTDOOR STOOL With ProWood Professional Grade pressure-treated wood, you can easily build this sturdy stool and complement your outdoor deck, patio or yard furniture and expand your
Flamingo. That s what I looked
 Plans N O W w w w. P l a n s N O W. c o m flip-seat Storage Bench Flamingo. That s what I looked like as I stood in the doorway perched on one leg, with my other foot raised so that I could untie the laces
Redwood 3. Install the chair back Finishing A d i r o n d a c k C h a i r Grades Materials For Adirondack Chair Quantity Size Length 4.
 Adirondack Chair Adirondack Chair BUILD THE CHAIR FRAME The rounded wooden slats, oversized armrests and inviting slant-back design identify the classic Adirondack chair. Born a century ago in upstate
Roll-Away Patio Chair
 oll-way Patio hair Project Plan FO YOU STT This project, designed for the Kreg Jig H and Kreg Jig H Screws, uses 1 ½"-thick material, commonly called 2- by lumber. We recommend cedar for outdoor projects,
Copyright 2010 Springbok Publishing All Rights Reserved- Page 1
 Copyright 2010 Springbok Publishing All Rights Reserved- www.woodensaddlerackplans.com Page 1 Legal Information All contents copyright 2010 by Springbok Publishing. All rights reserved. No part of this
DIY Rustic Dresser Addicted2DIY.com
 DIY Rustic Dresser Addicted2DIY.com *Before beginning this project, please read through all of the plans as well as the blog post associated with this project. Always use safety precautions whenever using
Kitchen Upper Cabinet: Single Door Cabinets from Scratch
 Kitchen Upper Cabinet: Single Door by Cabinets from Scratch Our Home from Scratch LLC Page 1 Disclaimer Our Home from Scratch LLC and its legal owners cannot be held responsible for any loss, damage, disappointment,
Kitchen Upper Cabinet: Double Doors Cabinets from Scratch
 Kitchen Upper Cabinet: Double Doors by Cabinets from Scratch Our Home from Scratch LLC Page 1 Disclaimer Our Home from Scratch LLC and its legal owners cannot be held responsible for any loss, damage,
PLANS BY TOM BURY MURPHY WORKTABLE TOTAL DIMENSIONS: FOLDED UP 30 X 48 X 0 FOLDED DOWN 30 X 58 X 84
 MURPHY WORKTABLE TOTAL DIMENSIONS: FOLDED UP 30 X 48 X 0 FOLDED DOWN 30 X 58 X 84 MATERIALS LIST: (2) 2 x8 x8 (3) 2 x4 x8 (1) 1 x2 x8 (1) 48 x96 3/4 plywood (2) 1-1/2 x30 continuous hinge (1) Left-side
How to Build a Raised Bed Cold Frame
 How to Build a Raised Bed Cold Frame Protect your plants from frost with a cold frame that sits right on top of your existing 4' x 4' raised bed. The lid is held open with screen door closers, and the
It can be either a 2½ seater bench seat (2 adult and a kid), or a 5 seater picnic table.
, or a 5 seater picnic table.") Page 1 Folding picnic table in both bench-seat and picnic table mode Introduction Description A single bench seat that can be changed into a picnic table with ease. This 'Bench come Picnic Table' is ideal
Page 1 Folding picnic table in both bench-seat and picnic table mode Introduction Description A single bench seat that can be changed into a picnic table with ease. This 'Bench come Picnic Table' is ideal
Grade 11 Woods Lift Lid Coffee Table. Based on Under the big Top from Popular Mechanics Website
 Grade 11 Woods Lift Lid Coffee Table Based on Under the big Top from Popular Mechanics Website TABLE TOP 1. Select enough lumber to construct a top that is between 22 ½ and 24 wide after jointing. Ensure
Entrance Cabinet Plans
 Entrance Cabinet Plans www.andrewharriswoodwork.com Page 1 of 19 Introduction I have tried to ensure all steps are covered in these plans but if you find any errors in the plans or have a question then
PROJECT PLAN. 3-hour cedar bench
 PROJECT PLAN 3-hour cedar bench This article originally appeared in The Family Handyman magazine. For subscription information, visit www.familyhandyman.com Please note that pages that appeared in the
Greene & Greene. Mailbox. by Seth Keller. Signature details create an elegant box. 2 AmericanWoodworker.com
 Greene & Greene Mailbox by Seth Keller Signature details create an elegant box. 2 AmericanWoodworker.com We needed a new mailbox, but I couldn t find an off-the-shelf version that I liked. So I decided
Simple Woodworking: Outdoor Pitch Chair
 Parts Lumber Front Front Leg Front Leg Drill three pocket holes on each end of the Front - one centered and two 3/4" from each side. Cut a 15-degree miter on one end of the Front Legs. It will be easier
PROJECT PLANS WOODEN GIFT BOX
 PROJECT PLANS WOODEN GIFT BOX Make the gifts you give even more special by presenting them in this one-of-a-kind gift box. In fact, the box may be valued more than whatever it contains. The box is sized
PROJECT PLANS ROLLING LAUNDRY SORTER
 R PROJECT PLANS ROLLING LAUNDRY SORTER Sorting laundry certainly doesn t rank high on anyone s list. So, anything that makes this task easier is welcome. If that functionality can be mixed with a bit of
Tools: Drill/Driver Kreg Jig Miter Saw Jigsaw Circular Saw Adjustable Square Tape Measure Veneer Trimmer Sandpaper and Sander
 R PROJECT PLANS DROP-FRONT DESK Create a workspace almost anywhere with this drop-front desk. Mounted to a wall, it doesn t take up any floor space, which means you can hang it wherever you need to work.
Kreg Tool Co. All Rights Reserved.
 Version 1 p. 1 Materials: Lumber: Qty: Board 2 2x2s 3 ft. long 2 1x2s 8 ft. long 2 1x3s 8 ft. long 6 1x6s 10 ft. long INSTRUCTIONS: Supplies: 1 1 / 4" Kreg Screws (coarse thread for softwoods, fine thread
COMPOSITE RAILING INSTALLATION
 COMPOSITE RAILING INSTALLATION Tools All you ll need is a hammer and screw gun, circular saw (carbidetipped blade with fewer than 20 teeth is recommended), level, tape measure, rasp and blue chalk line.
A Day House. A View of One Way to Finish the Exterior of The Day House. Read these instructions all the way through before beginning this project.
 A Day House A View of One Way to Finish the Exterior of The Day House Read these instructions all the way through before beginning this project. General Comments For the purposes of this project, the standard
Sort 4 (four) 2x6x12 pieces and cut to 126 1/2" for a total of 4 (four) 126 1/2" pieces.
 2x6x12 pieces and cut to 126 1/2 for a total of 4 (four) 126 1/2 pieces.") # Materials: Quantity Each: Total Quantity: xx8 6 x6x8 1 x6x1 1 TIPS FOR SUCCESSFUL PREP WORK: Before starting, carefully read through the entire instruction sheet. Refer to the material list to the left
# Materials: Quantity Each: Total Quantity: xx8 6 x6x8 1 x6x1 1 TIPS FOR SUCCESSFUL PREP WORK: Before starting, carefully read through the entire instruction sheet. Refer to the material list to the left
Hudson Dresser [1] Hudson Dresser Published on Ana White ( Submitted by dan-k [2] on Fri, :43 [1]
![Hudson Dresser [1] Hudson Dresser Published on Ana White ( Submitted by dan-k [2] on Fri, :43 [1]](/thumbs/90/102626096.jpg "Hudson Dresser [1] Hudson Dresser Published on Ana White ( Submitted by dan-k [2] on Fri, :43 [1]") [1] Submitted by dan-k [2] on Fri, 2011-03-11 11:43 [1] If you plan on staining this piece, it is recommended that you stain all of the drawer face materials before assembly for a more professional look.
[1] Submitted by dan-k [2] on Fri, 2011-03-11 11:43 [1] If you plan on staining this piece, it is recommended that you stain all of the drawer face materials before assembly for a more professional look.
PROJECT PLANS EXPANDABLE CRAFT CENTER
 R PROJECT PLANS EXPANDABLE CRAFT CENTER Whether you re working on craft projects, sewing, or pursuing another hobby, this craft center offers a great place to work. It features a large work surface that
How to build a hockey stick chair
 How to build a hockey stick chair The hockey stick chair is a project that's guaranteed to turn heads. It doesn t involve many special tools, but does involve a couple more types of hardware than usual.
Installation Guide. Pionite Decorative Surfaces One Pionite Road, Auburn, Maine PIONITE ( )
") Installation Guide A Subsidiary of Panolam Surface Systems SMPBRO00-012 6/14 Pionite decorative laminates are designed for finished interior surfaces which require high impact, wear and stain resistance
Installation Guide A Subsidiary of Panolam Surface Systems SMPBRO00-012 6/14 Pionite decorative laminates are designed for finished interior surfaces which require high impact, wear and stain resistance
(1) 2x4 Ft. Sheet of ¼-inch Plywood. 1 ¼-inch Wood Screws. 1 ¼-inch Brad Nails ¾-inch Brad Nails Wood Glue CUT LIST:
 2x4 Ft. Sheet of ¼-inch Plywood. 1 ¼-inch Wood Screws. 1 ¼-inch Brad Nails ¾-inch Brad Nails Wood Glue CUT LIST:") MATERIALS: (5) 1x3x8 Ft. Boards (3) 2x4x8 Ft. Boards (10) 1x4x8 Ft. Boards (1) 1x2x10 Ft. Board (1) 2x2x4 Ft. Board (2) 1x6x8 Ft. Boards (1) 4x8 Ft. Sheet of ¾-inch Plywood (1) 2x4 Ft. Sheet of ¼-inch
MATERIALS: (5) 1x3x8 Ft. Boards (3) 2x4x8 Ft. Boards (10) 1x4x8 Ft. Boards (1) 1x2x10 Ft. Board (1) 2x2x4 Ft. Board (2) 1x6x8 Ft. Boards (1) 4x8 Ft. Sheet of ¾-inch Plywood (1) 2x4 Ft. Sheet of ¼-inch
The following instructions will guide you through the installation of your new vinyl railing stair kit.
 Installation Guide Vinyl Standard Stair Railing Tools Required Protective eye glasses Tape measure Variable speed drill/screwdriver Rotary hammer or hammer drill and masonry percussion bit recommended
This book, or portions of it, may not be duplicated, resold, or redistributed in any way, without the expressed written consent of Stay Tooned, Inc.
 Copyright 2006 - Stay Tooned, Inc. All rights reserved worldwide. This book, or portions of it, may not be duplicated, resold, or redistributed in any way, without the expressed written consent of Stay
(28) 2 x 4 x 8 Ft. Boards Tape Measure (9) 2 x 6 x 8 Ft. Boards Pencil (6) 2 x 2 x 8 Ft. Boards Carpenter s Square (9) 1 x 3 x 8 Ft.
 2 x 4 x 8 Ft. Boards Tape Measure (9) 2 x 6 x 8 Ft. Boards Pencil (6) 2 x 2 x 8 Ft. Boards Carpenter s Square (9) 1 x 3 x 8 Ft.") MATERIALS: TOOLS: (28) 2 x 4 x 8 Ft. Boards Tape Measure (9) 2 x 6 x 8 Ft. Boards Pencil (6) 2 x 2 x 8 Ft. Boards Carpenter s Square (9) 1 x 3 x 8 Ft. Boards Drill 2 ½-inch Pocket Screws Circular Saw 2
MATERIALS: TOOLS: (28) 2 x 4 x 8 Ft. Boards Tape Measure (9) 2 x 6 x 8 Ft. Boards Pencil (6) 2 x 2 x 8 Ft. Boards Carpenter s Square (9) 1 x 3 x 8 Ft. Boards Drill 2 ½-inch Pocket Screws Circular Saw 2
About.com :
 http://woodworking.about.com/gi/dynamic/offsite.htm?sit...//www.popularwoodworking.com/features/fea.asp%3fid=1088 (1 of 8)1/28/2004 12:05:01 AM Modern Storage Tower The last thing I want to do when starting
Harriet Chair with Modifications
 Harriet Chair with Modifications This modification of the Harriet chair includes a slat back, padded seat, and is 2 inches wider than the original plan. The overall dimensions of the finished chair: 38
pholstered Vanity Seat
 U pholstered Vanity Seat For years I sat on an extremely uncomfortable chair to apply my makeup. I finally replaced it with this sturdy seat that is both attractive and comfortable. This finished size
Kitchen Base Cabinet: Multiple Drawers Cabinets from Scratch
 Kitchen Base Cabinet: Multiple Drawers by Cabinets from Scratch Our Home from Scratch LLC Page 1 Disclaimer Our Home from Scratch LLC and its legal owners cannot be held responsible for any loss, damage,
This indicates a diagram detailing the dimensions of a project part and/or the placement for pocket holes, screws, nails, etc.
 S i m p le Woodworking: What You'll Need v lumber 2-1 x 12 x 6 hardware/supplies (availability will vary) 1 1/4" pocket hole screws #18 x 1 1/2 brads or pocket hole plugs 12-inch continuous hinge magnetic
diy outdoor bar from diyhuntress.com
 diy outdoor bar from diyhuntress.com 2 DIMENSIONS & DISCLAIMER: Please double check the overall dimensions for your specific build before starting. Please wear appropriate safety gear when operating power
Important Note: Why this guidebook is FREE?
 Easy DIY Murphy Bed Construction Guide 1 Important Note: This guide is a FREE SAMPLE of our Complete Construction Guidebook. With the help of this guide you will get familiar with the construction steps
Jeff Branch WOODWORKING YOU CAN BUILD A. By adding subtle design elements, a traditional furniture style becomes decidedly modern.
 Jeff Branch WOODWORKING YOU CAN BUILD A By adding subtle design elements, a traditional furniture style becomes decidedly modern. Jeff Branch WOODWORKING Publisher: Jeff Branch Editor: Jeff Branch Art
What we ll be learning today
 Set Construction What we ll be learning today The use, construction of, and terminology of typical scenic elements The lumber, tools, and hardware used to build these scenic elements Stock Scenery Stock
ENJOY THIS SELECTION FROM. Woodworking 101. Includes Step-by-Step Instructions for 8 Projects. Woodworking
 W ENJOY THIS SELECTION FROM Woodworking 101 Includes Step-by-Step Instructions for 8 Projects Woodworking 101 Aimé Fraser, Matthew Teague, and Joe Hurst-Wajszczuk To purchase your copy of Woodworking 101,
Chapter 18. Interior Doors
 Chapter 18. Interior Doors 18.1 SWINGING DOORS 18.2 SLIDING DOORS 18.3 BIFOLD DOORS Tools needed by volunteers: Hammer Nail apron Tape measure Square Pencil Tools and equipment needed: Extension cords
 America s leading woodworking authority To download these plans, you will need Adobe Reader installed on your computer. If you want to get a free copy, visit: http://adobe.com/ reader. Having trouble downloading
Here are the tools and materials we used for the project:
 When we began our kitchen remodel, we knew we were going to have to do something about the trash can-- our old one was stained and dented and just had to go. While we would have loved to have had room
HM OUTDOOR TABLE:HM OUTDOOR TABLE 25/7/08 11:18 AM Page 30
 HM080827 OUTDOOR TABLE:HM080827 OUTDOOR TABLE 25/7/08 11:18 AM Page 30 The treated-pine frames of the table and benches are topped with sturdy blackbutt timber. HM080827 OUTDOOR TABLE:HM080827 OUTDOOR
Windsor Chair Online. Assembly Instructions
 Windsor Chair Online Assembly Instructions Date: 1/4/2007 Other Chairs Offered Philadelphia Arm Chair New England Comb Back Sackback d Arm Chair Bow Back Side Chair Fan Back Side Chair Page 1 Table of
Castle loft bed [1] Additional Photos. Castle loft bed Published on Ana White (http://www.ana-white.com)
![Castle loft bed [1] Additional Photos. Castle loft bed Published on Ana White (http://www.ana-white.com)](/thumbs/76/73086219.jpg "Castle loft bed [1] Additional Photos. Castle loft bed Published on Ana White (http://www.ana-white.com)") [1] Submitted by fsmumford [2] on Tue, 2011-10-18 21:51 [1] Additional Photos [3] [4] Page 1 of 31 [5] [6] [7] Summary: I stumbled upon Ana s blog about a year ago. Since, like many of you, I have become
[1] Submitted by fsmumford [2] on Tue, 2011-10-18 21:51 [1] Additional Photos [3] [4] Page 1 of 31 [5] [6] [7] Summary: I stumbled upon Ana s blog about a year ago. Since, like many of you, I have become
LARGE PLYWOOD CUTTING GUIDE
 Copyright 2015 Shanty-2-Chic.com Workbench I f you are tight on space but large on ideas this bench is just what you need. Sturdy and mobile this bench has an ingenious fold out wing that gives you over
Building dimensions supplied by the #1 supplier of cornhole bags and boards on the internet.
 Building dimensions supplied by www.cornhole-game.org, the #1 supplier of cornhole bags and boards on the internet. SUPPLIES QUANTITY (1) ½ FIBERBOARD (PLYWOOD) SHEET - 4 X 8 (3) 2 X 4 BOARDS - 8 LONG
Above are the offsets for the plywood panels.
 DinkyDink Plans Bottom Panel Half Station X Y X2 Y2 1 1/4 3/4 0 11 5/16 2 4 9/16 4 12 9/16 3 11 11/16 1/4 11 7/16 14 1/2 4 18 5/8 1/16 18 5/8 15 11/16 5 25 3/4 0 25 3/4 16 5/16 6 32 13/16 0 32 13/16 16
McCue Bumper Installation Instructions
 McCue Bumper Installation Instructions McCue 8" Bumper Tools Required: Saw with 10-12" blade Tape measure Flat head screwdriver Phillips screw driver Pencil or chalk line Drill with Philips driver bit
Materials and Tools: Printer s Triple Console Cabinet. Free Plans to build a Triple Console Cabinet
 Materials and Tools: Materials: 3 sets euro style bottom corner mount drawer slides, 16 length 3 sets inset hinges 24 cup style handles 8 2x2 @ 8 feet long 6 1x3 @ 8 feet long 6 1x2 @ 8 feet long 1 sheet
3x2 Building. Instructions. Jackson Van Buren s
 Jackson Van Buren s 3x2 Building Instructions Lumber QTY 2 3 DESCRIPTION 1/2 x 2 x Plywood 8 x 2 x Stud Hardware QTY IMAGE DESCRIPTION 36 16 8 Coarse Drywall Screw 2 1/2 Deck Screw 3/8 x Carriage Bolt
Computer Desk. Project designed by April Wilkerson
 Project designed by April Wilkerson Copyright WilkerDos.com 2018 Project plan Desk Page 2 of 16 Page 3 of 16 File cabinet Page 4 of 16 Metal base Page 5 of 16 Glue up Get started by gluing up boards for
DIY RUSTIC HALL TREE
 DIY RUSTIC HALL TREE *Before beginning this project, please read through all of the plans as well as the blog post associated with this project. Always use safety precautions whenever using power tools
Make a cupboard as a BCATS
 National Certificate in Building, Construction, and Allied Trades Skills (BCATS) Make a cupboard as a BCATS project Unit Standard 25921 Level 2, Credit 6 Name: Contents Reference Page What you need to
Workbench. Process Guide
 Workbench Process Guide Design, Lumber, Tools & Nails Made entirely from 2x and 4x construction lumber Hardware speeds up the consturction while also reduces the amount of planing we have to do by using
SE5a Instrument Board part 2 - rev 1.1
 SE5a Instrument Board part 2 - rev 1.1 Fuel (Petrol) Valve This valve uses two circular name plates, eight brass screws, one black plastic base, copper wire and two black plastic risers. You can pick any
10x12 Victorian Manual
 Tools Needed: -Cordless Drill (12V or higher) -#2 Square Drive Bit -Hammer -6 Step Ladder -Tape Measure -Square utility knife w/ blade & hook blade -Speed Square Little Cottage Co. PO Box 455 Berlin, OH
indicates a diagram detailing the dimensions of a project part and/or the placement for pocket holes, screws, nails, etc.
 f a r m h o u s e d i ni ng c h a i r What You'll Need lumber Beginner 1-1 x2x4 1-1 x2x8 3-2x3x8 1-2x4x8 1-3/4 x 2 x 4 sheet of plywood (availability will vary) Intermediate Intermediate Beginner About
PoorBoy Skiff. A 10-11ft 6in skiff for outboard motoring By Steven Lewis
 PoorBoy Skiff. A 10-11ft 6in skiff for outboard motoring By Steven Lewis PoorBoy is about the simplest small motorboat you will come across. It consists of 2-2 1/4 sheets of plywood (1-1 1/4 sheets x3/8
Adirondack Chair BUILD TIME
 There are many variations of the classic adirondack chair. This particular version features straightforward construction and common materials. This chair makes for a satisfying project that can be built
PROJECT PLANS MULTIPURPOSE WORK CENTER
 R PROJECT PLANS MULTIPURPOSE WORK CENTER This handy project can provide the work space you need anywhere in your home. Whether you need that work space in the shop, the garage, the basement, or in a laundry
Nineteenth-Century Dough Box
 Nineteenth-Century Dough Box T he dough box was a functional piece found in many a country kitchen. The idea was that the cook would make a large batch of bread dough, knead it on the large work surface
Almost Heaven Saunas THE AUTHENTIC SAUNA EXPERIENCE. Worthington Sauna Installation & Owner s Manual
 Almost Heaven Saunas THE AUTHENTIC SAUNA EXPERIENCE Worthington Sauna Installation & Owner s Manual Read this entire manual through to the end before proceeding with the assembly. ELECTRICAL REQUIREMENTS
Why are we giving this guidebook as a FREE download?
 Construction Guide Queen, Double & Twin Vertical 1 Note: This guide covers the construction steps for all 3 sizes of the vertical wall mount Easy DIY Murphy beds, Queen, Double and Twin. The construction
WOOD TOY NEWS SANDING DRUMS & JIGS ISSUE
 WOOD TOY NEWS SANDING DRUMS & JIGS ISSUE toymakingplans.com June 11, 2014 Wednesday How to Make a Sanding Drum Jig for Smarter Toymaking. By Imants Udris Udie Our discussion begins based on the 5 piece
14 x 14 super quad. VISIT LINK BELOW FOR INSTALL VIDEO
 in-ground installation instructions & user guide 14 x 14 super quad VISIT LINK BELOW FOR INSTALL VIDEO https://www.maxairtrampolines.com/pages/support-information-videos Page 2 TABLE OF CONTENTS Materials,
U. M. ARMY Texas Conference. Wheel Chair Ramp Manual
 U. M. ARMY Texas Conference Wheel Chair Ramp Manual June 2014 U. M. ARMY Texas Conference Building & Repair Tips Wheelchair Ramps Complete a site survey to determine the design and layout of the ramp.
irdhouse Table Special Tools and Techniques Materials and Supplies Hardware
 B irdhouse Table This whimsical table is one of our favorite projects, because it never fails to produce a smile on the faces of our backyard guests. Not only is it cheerful to behold but the glass top
Castle Bed. Page 1 of 24
 Castle Bed www.andrewharriswoodwork.com Page 1 of 24 Introduction This plan makes a twin bed that is 91 inches long and 60 inches wide. I have tried to ensure all steps are covered in these plans but if
A DIYer s Experience with the Screened Walls Only Kit
 A DIYer s Experience with the Screened Walls Only Kit June 2011 Greetings, My name is Al, I am a DIYer (Do It Yourself) who recently purchased a screened walls kit from screenhouse.com. My wife and I are
Tall Outdoor Chair Set March/April 2018
 Tall Outdoor Chair Set March/April 2018 Traditional, low-slung Adirondack chairs are an enduring favorite among woodworkers, because their casual styling makes them easy to build. But, once you re seated
Tilt-Top Table. Clean lines and a clever pivot highlight this attractive and useful table
 Tilt-Top Table READY FOR DINNER swing the top down and you have a beautiful table ready for a cozy meal. 60 SMALL FOOTPRINT with the top swung up, the table fits neatly against a wall, freeing up floor
Copyright 1998 KDE Technologies
 Modular Computer Corner Desk Unit Copyright 1998 KDE Technologies http://members.tripod.com/~kdetech/ 1. Introduction 2. Plans Sheet one - Isometric Sheet two - Top Detail / Corner Unit Sheet three - Leg
CUSTOM SHUTTERS IN-A-BOX
 CUSTOM SHUTTERS IN-A-BOX SHUTTER ASSEMBLE INSTRUCTIONS & INSTALLATION INSTRUCTIONS 1. Inspect the contents of your package. Do not discard the shutter packaging box until you have started painting your
WOOD TOY NEWS. July 23, 2013 Tuesday
 WOOD TOY NEWS Make your own perfect turntable for spray painting toys with these useful tips. And it s fast, fun and easy to build! by Imants Udris Watch the video on our website at : http://www.toymakingplans.com/website/how-to/
DOCUMENT CHEST. Curly Maple, White Pine
 25 DOCUMENT CHEST Curly Maple, White Pine 100 MAKING THE DOCUMENT CHEST After the stock has been thicknessed, ripped to width, and cut to length, plough a 1/4" X 3 /8" groove on the inside faces of the