Building the ArcadeCab Trackball/Single-Player Controller
|
|
|
- Blake Baldwin
- 6 years ago
- Views:
Transcription

1 Building the ArcadeCab Trackball/Single-Player Controller Introduction This help document details the construction of the original ArcadeCab Ultra- Trackball controller. It is based on my construction document that was used exclusively in-house. About fifteen months ago I changed the trackball design to become CNC-based, although the single-player panels continued using these plans to great success. As I have more or less stopped building these for sale, I m freely offering these plans to those who might wish to build their own. I hope it benefits you. If you build one using these plans, please me a picture or two at Mike@ArcadeCab.com. Mike Trello January 8 th,
2 List of Materials Below is a list of materials you will need and the major tools required. Certain items, such as the table saw, are handy but not mandatory. A 3/8 spade bit does a great job in lieu of a countersink bit. You may find you need items in addition to those listed. Materials 24 x 24 ¾ MDF board (or plywood) 13-1/2 x 7-5/8 3/16 masonite/hardboard 1 x 2 x 16 ledger board 1-5/8 coarse drywall screws (12) 1 coarse drywall screws (4) Package of four (4) ¾ x 5/16 rubber bumpers ( 24 x 24 laminate piece (optional) Laminate glue (optional) Metal file for the laminate edges (optional) Tools [ ] Circular Saw [ ] Table Saw [ ] Drill [ ] Jigsaw [ ] Router [ ] Slot cutting bit [ ] Flush trim bit [ ] Laminate trim bit [ ] Saw horses [ ] 1-1/8 spade bit [ ] Assorted clamps [ ] Extension cord [ ] 1/16 bit [ ] Countersink bit [ ] Straight edge Arcade Accessories To build a complete Ultra-Trackball controller, you will need five feet of ¾ T- molding, a 3 Happ or Betson trackball, a Happ trackball mounting plate, and three Happ Horizontal Pushbuttons. AutoCad Dimensional File (.DWG) I have a file that details all the parts dimensions in an AutoCad file. There are a number of free viewers available if you do not have a CAD program. The file is located at /Projects/TB_Plans/ArcadeCab_Ultra- Trackball_Original_Design.dwg. Note that if you cannot open this file you aren t missing anything critical- it is merely another project resource
![Section 1- Cutting the Sides Create the Sides [ ] Referring to the very simple cutting diagram above, cut a strip off the MDF sheet 3-1/2 wide. [ ] Cut this strip into two 8-5/8 pieces. Be exact.](/docs-images/72/67126035/images/3-0.jpg "You ll end up with boards that are 3-1/2 x8-5/8. [ ] With one of the two sides, make a mark 2-3/4 up on one end. Draw a line from that mark to the upper corner of the opposite end.")
3 Section 1- Cutting the Sides Create the Sides [ ] Referring to the very simple cutting diagram above, cut a strip off the MDF sheet 3-1/2 wide. [ ] Cut this strip into two 8-5/8 pieces. Be exact. You ll end up with boards that are 3-1/2 x8-5/8. [ ] With one of the two sides, make a mark 2-3/4 up on one end. Draw a line from that mark to the upper corner of the opposite end. Take the jigsaw and, carefully, cut along the line. You should end up with a board like the picture at top of next page. [ ] Repeat with the second side
![Creating the Front and Back [ ] Cut a strip off the MDF sheet that is 4 wide. This will be the back.](/docs-images/72/67126035/images/4-0.jpg "[ ] Cut a strip off the MDF sheet that is 3-1/4 wide. This is the front.")
![[ ] Take the back strip (4 x24 ) to the table saw. Set the table saw at exactly 6 degrees.](/docs-images/72/67126035/images/4-1.jpg "[ ] Take a side piece and set the table saw s width to exactly the back edge width of the side piece")
4 Creating the Front and Back [ ] Cut a strip off the MDF sheet that is 4 wide. This will be the back. [ ] Cut a strip off the MDF sheet that is 3-1/4 wide. This is the front. [ ] Take the back strip (4 x24 ) to the table saw. Set the table saw at exactly 6 degrees. [ ] Take a side piece and set the table saw s width to exactly the back edge width of the side piece (3-1/2 ). See below for an example. Once happy, cut
5 [ ] Reset the saw for the front board (3-1/2 x24 ), using the front edge of the side piece. Cut a test board, then the final strip when the setting is perfect. [ ] Set the table saw back at 0 degrees. [ ] Take the two beveled strips and cut each into 13-5/8 pieces. The resultant boards are 13-5/8 x2-3/4 (front) and 13-5/8 x3-1/2 (back)
![Section 2- Putting the box together Put the box together [ ] Put a side board and back together.](/docs-images/72/67126035/images/6-0.jpg "Pre-drill, countersink, and screw a 1-1/4 screw into the side.")


6 Section 2- Putting the box together Put the box together [ ] Put a side board and back together. Pre-drill, countersink, and screw a 1-1/4 screw into the side. When drilling the hole, you may want to drill halfway, back the bit out, then drill the rest of the way. MDF fills the bit rather fast. Note about pre-drilling MDF- Make sure you pre-drill all holes when you work with MDF. MDF has a nasty habit of splitting when you don t do this, especially when you screw into an end. Do this religiously and you ll have no problems. [ ] Put second screw into the side, being sure the pieces are perfectly flush. [ ] Add the second side. Then add the front. Be sure that everything is flush
![Cut hardboard for the base [ ] Take a piece of the 3/16](/docs-images/72/67126035/images/7-0.jpg "masonite/hardboard. Cut a piece 13-1/2 x 7-1/8.")
![[ ] It should fit tight inside the box, except for a gap of](/docs-images/72/67126035/images/7-1.jpg "about 1/8 at one end.")


7 Cut hardboard for the base [ ] Take a piece of the 3/16 masonite/hardboard. Cut a piece 13-1/2 x 7-1/8. [ ] It should fit tight inside the box, except for a gap of about 1/8 at one end. Below shows the base set within the sides/back. Why the 1/8 gap? Simple, it is there so you can remove this bottom panel as needed. I discovered that if the bottom was cut to fit the hole exactly, it was nearly impossible to get back out again. The gap allows you to use your finger or a coin to get it started
![Section 3- Finishing the Base Cutting and attaching the 1x2s [ ] Cut two](/docs-images/72/67126035/images/8-0.jpg "strips of 1 x2 that are 7-1/8 long.")

8 Section 3- Finishing the Base Cutting and attaching the 1x2s [ ] Cut two strips of 1 x2 that are 7-1/8 long. You ll need only two despite what the picture below shows. [ ] Take the controller box, put the hardboard into the bottom of it, then place the 1x2s inside, tight against the sides (as shown below)
![[ ] On the outside of each box side, mark](/docs-images/72/67126035/images/9-0.jpg "where two screws will go, up 5/8 from the")


9 [ ] On the outside of each box side, mark where two screws will go, up 5/8 from the bottom. [ ] Pre-drill and countersink where you made marks, being sure to keep the 1x2 in place. Then drill 1-5/8 screws into the holes to attach the ledgers permanently
![Pre-drill the holes for the hardboard base [ ] While you have the hardboard insert in place, flip the controller upside down. [ ] Pre-drill two holes on either side, into the ledgers within.](/docs-images/72/67126035/images/10-0.jpg "Countersink each hole slightly. [ ] Drive in 1 screws and then back them out. We ll replace them at the very end. Set the hardboard bottom aside for later.")
10 Pre-drill the holes for the hardboard base [ ] While you have the hardboard insert in place, flip the controller upside down. [ ] Pre-drill two holes on either side, into the ledgers within. Countersink each hole slightly. [ ] Drive in 1 screws and then back them out. We ll replace them at the very end. Set the hardboard bottom aside for later. Painting the underside of the top and the bottom (Optional) [ ] Flip the base upside down, removing the hardboard insert. [ ] Paint the bottom edges of the box with the black latex paint. Use a sponge brush. [ ] Let the pieces dry, then apply a second coat. This is just to seal the MDF and to give it a little more polished look. Cutting the grommet hole (Original method) [ ] On the back, measure in 7-1/2 from the side and up 1-1/2 from the base. Using that as a center mark, drill through with a ¾ spade bit. You ll end up with a hole like in the below picture

11 Cutting the grommet hole (Alternative method- Console hole): I began building the single-player panels with this console hole after numerous requests. To do this, I first measure over 7-1/2 from the side, up about ¾ and draw a line. Take a ½ straight router bit and route up to the line. The result is shown below
12 Note about the optional laminate- I laminated all the Ultra-Trackball and Single-Player panels for sale. I did try painting one just for curiosities sake but it did not turn out well at all. It certainly was not suitable for sale. You, of course, are free to finish the panel any way you choose and painting certainly is the simplest (and cheapest). But if you have access to some laminate, I would seriously consider it as the control panel comes out looking so nice with it. Lowes and Menards both sell sheets, although they tend to be pricey. CabinetParts ( is an excellent alternative if you need to order multiple sheets. Attaching the laminate to the base (Optional) [ ] Lay two 2x4s next to each other across the sawhorses. Push them together and this is where you ll hang the box while you are working with it. [ ] Cut a strip of laminate 4-1/2 wide. Cut two pieces 16 long off this strip (for the front and back). Cut two pieces 11 long (for the sides). [ ] Glue up both sides and the two side pieces of laminate. [ ] Wait 45 minutes then attach the laminate pieces securely. [ ] Trim cut the two sides. [ ] Glue up the front and back as you did the sides. [ ] Wait 45 minutes then attach the laminate securely. [ ] Trim cut the front and back. [ ] You will need to file the top edge of the front piece due to the bevel. [ ] File all corners and edges at 45 degrees to smooth them off. Raw laminate edges are razor sharp! [ ] Clean up any bad spots as necessary. [ ] From the inside, drill through the center of the grommet with the smallest bit you have. Then flip around and drill through the laminate side with a 5/8 spade bit. Be careful. Trim it up
![Section 4- The Top Rough cut the top. [ ] Cut a strip off the MDF that is 10 wide with the circular saw. Refer to page 3 for the cutting diagram if you need to. You ll now have a strip 10 x 24.](/docs-images/72/67126035/images/13-0.jpg "[ ] Cut this board to 16, giving you a finished dimension of 10 x16.")
13 Section 4- The Top Rough cut the top. [ ] Cut a strip off the MDF that is 10 wide with the circular saw. Refer to page 3 for the cutting diagram if you need to. You ll now have a strip 10 x 24. [ ] Cut this board to 16, giving you a finished dimension of 10 x16. Note- I have a template that is used to flush-trim all the tops, so I do not have any photos of what I describe in the next section(s). The template is also used for the TB and button hole placement so the description will be very vague. Hopefully the process will be self-explanatory enough. Shaping the top [ ] Using the measurements from the picture below, draw out the shape of the controller on your 10 x 16 blank. Cut it out with the jigsaw, and smooth any rough spots with sandpaper. [ ] Slot the top panel with the slotter to accept the T-molding. A better explanation of the process is found within my cabinet plans on /CabinetPlans2/CabinetPlans2_Cutting_Side_Two.html
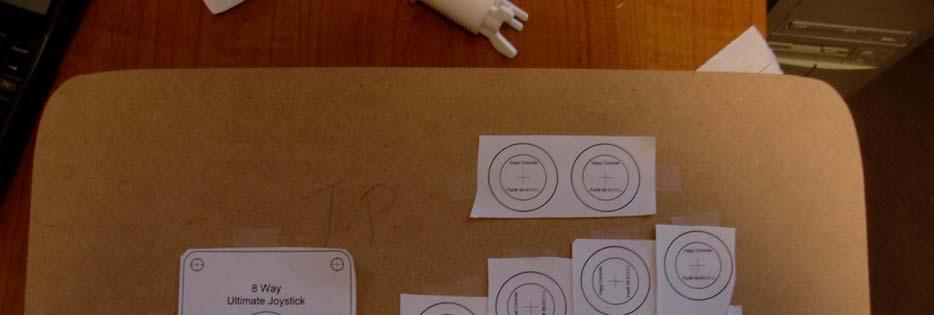
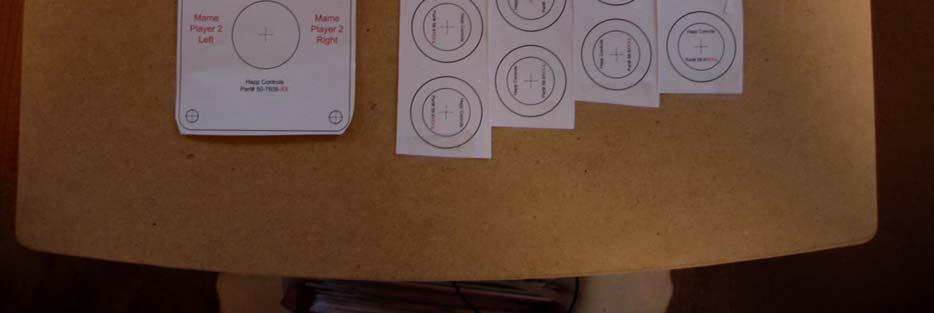
![Drilling the top for the trackball controller [ ] Print out and take your trackball plate template, and three-button template (see Appendix B for the templates) and tape them to the control panel top](/docs-images/72/67126035/images/14-0.jpg "in the correct location. The left edge of the trackball plate is 8 from the left side of the panel.")
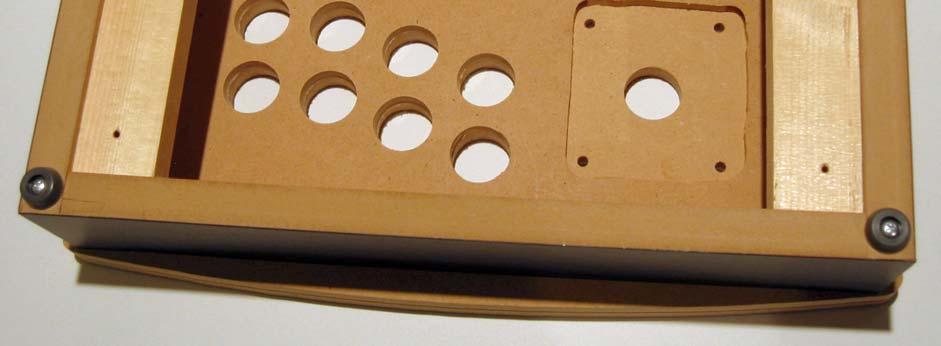
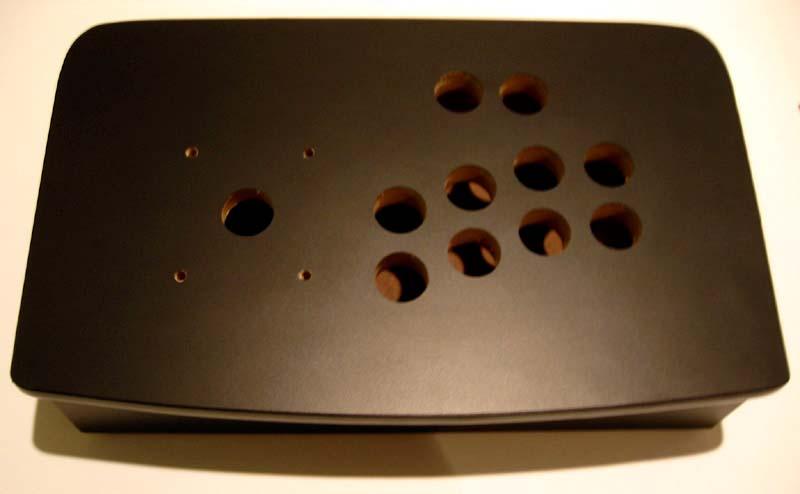
14 Drilling the top for the trackball controller [ ] Print out and take your trackball plate template, and three-button template (see Appendix B for the templates) and tape them to the control panel top in the correct location. The left edge of the trackball plate is 8 from the left side of the panel. The center of the leftmost button is 2-1/2 from the left side, which makes the rightmost button s center 2-1/2 from the left edge of the trackball plate. [ ] Drill through halfway for the four (4) trackball bolts. Use a 13/64 bit. [ ] Start each of the button holes with the 1-1/8 spade bit. [ ] Remove the paper templates (or what is left of them). [ ] Finish drilling through the button holes and the trackball holes. You might want to get most of the way through, then flip the panel over and finish from the backside. See below. Jigsaw rough cutting the TB cutout [ ] Trace the trackball hole s outline with pencil. [ ] Drill two ½ starter hole within the trackball tracing. [ ] Take the jigsaw and cut out the area, being careful. Test fit a cover and TB in the hole to ensure it fits correctly before moving on. If the trackball doesn t fit, use the jigsaw to remove any extra material to ensure it does
![Section 5- Finishing the top Attaching the top [ ] Position the top exactly where it needs to be and attach two clamps to hold it securely to the base. I place the clamps in the middle of each side.](/docs-images/72/67126035/images/15-0.jpg "[ ] You will need to find spots in the four corners of the top panel to drill for the screws. Be sure each location is centered over the base side. See picture below.")
15 Section 5- Finishing the top Attaching the top [ ] Position the top exactly where it needs to be and attach two clamps to hold it securely to the base. I place the clamps in the middle of each side. [ ] You will need to find spots in the four corners of the top panel to drill for the screws. Be sure each location is centered over the base side. See picture below. [ ] Pre-drill and countersink a hole at each mark. Drive in a 1-5/8 screw into each hole. This should lock the top to the base very solidly. Make very sure that the screw heads are below the surface!
16 Laminating the top (Optional) [ ] Rough cut a piece of laminate that is 12 x 18. [ ] Flip the laminate upside down and apply glue to it. Apply glue to the top (clean) surface of the top panel. [ ] Wait 45 minutes (or until the glue is clear) then apply the laminate to the top panel. [ ] Flush cut the top panel s edges. [ ] Flip the panel upside down. With a 13/64 bit, drill through the two trackball holes that you can reach. Take your time. [ ] Take a 5/8 spade bit and drive holes through the center of the button holes and trackball area. Pop thru from the back just slightly and finish from the topside. [ ] Flip the panel right side up again. [ ] Trim each hole out with the laminate router bit. If you could not reach the 3rd button hole, drill through it from this side with the 5/8 bit and then clean the hole up. [ ] Take the trackball template and figure out where the remaining two trackball holes need to be drilled out. Use the 13/64 bit and drill them out. Cleaning it up [ ] Remove any traces of the laminate s paper backing. [ ] The four corners will need touched up with a Sharpie. Use the pen and mark the edge, making sure to hit it all. Then, immediately rub the ink off the corner with your finger. The ink should stay where it was needed and be wiped off the laminate. [ ] Repeat for the other three corners and any other imperfection
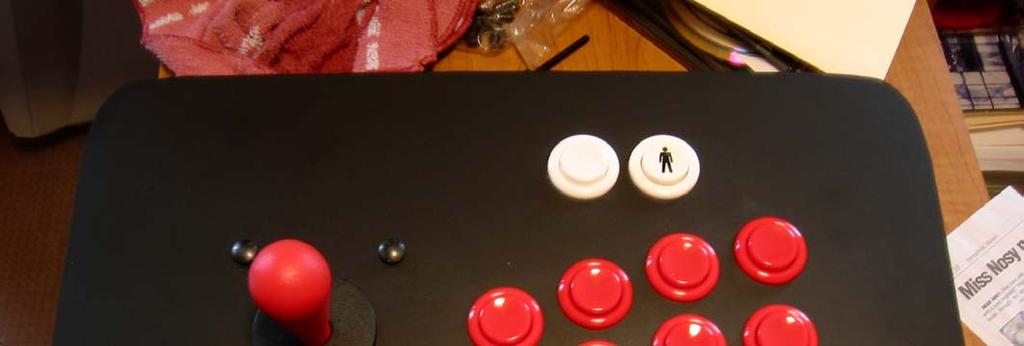
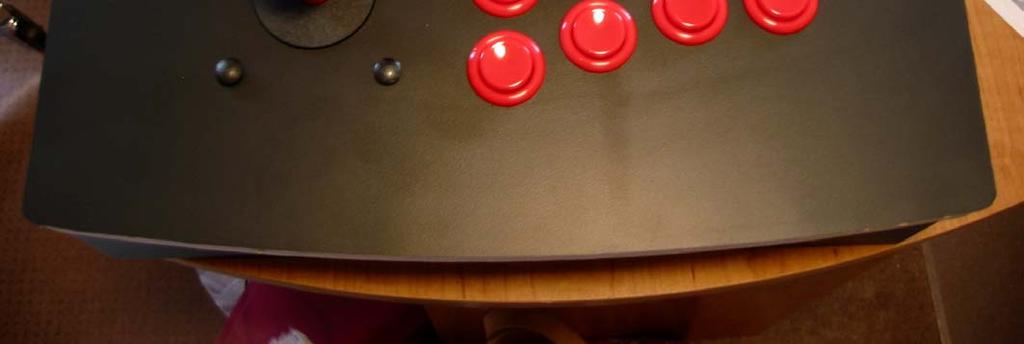
![Attach the feet (Brainerd ¾ x 5/16 Rubber Bumpers) [ ] With the controller upside down, place a foot in a corner and pre-drill. Then screw the foot into place. Repeat for the other three corners.](/docs-images/72/67126035/images/17-0.jpg "Putting it all together [ ] Blow any dust and debris from inside the controller. Wipe it out. [ ] Install each button and the trackball proper and its cover. Apply the nuts where applicable.")
17 Attach the feet (Brainerd ¾ x 5/16 Rubber Bumpers) [ ] With the controller upside down, place a foot in a corner and pre-drill. Then screw the foot into place. Repeat for the other three corners. Putting it all together [ ] Blow any dust and debris from inside the controller. Wipe it out. [ ] Install each button and the trackball proper and its cover. Apply the nuts where applicable. You ll need to crimp the connectors tighter. Wiring for the trackball buttons is: Green = Left Red = Middle Yellow = Right [ ] Ensure all connections are tight. Use a plastic tie to fasten the wires together for a nice, tidy unit. See top of next page
![[ ] Add the T-molding.](/docs-images/72/67126035/images/18-1.jpg "Use a damp cloth to protect")

![[ ] Screw the hardboard](/docs-images/72/67126035/images/18-3.jpg "back into place using the")
18 [ ] Add the T-molding. Use a damp cloth to protect the molding when using the rubber mallet. [ ] Screw the hardboard back into place using the pre-drilled holes
19 Section 6- Finishing up Testing and Cleanup [ ] Plug the controller into a PC and test it out. Make sure everything works as it should and nothing rattles. Rattles=bad! [ ] Wipe the controller down with a damp cloth to remove most of the fingerprints. [ ] Now the controller is ready to go!! I hope this document has helped. If you are interested in building a single-player controller, read on into Appendix A. Appendix B includes the trackball and button templates. Mike Trello

20 Appendix A- Alternatives for the top The beauty of the Ultra-Trackball design is that all manner of controllers can be designed from its basic shell by altering just the top cutouts. All of the ArcadeCab Single-Player panels used it successfully. There is room within for ten buttons placed comfortably, plus a joystick. In addition, it is possible to add pinball buttons to the sides. You are limited by only your imagination. Below are several PDF layouts that might help with your design. The PDF links print to-scale. Pages 21 and 22 show the construction progression for a typical single-player panel. /images/store_pics/6-straight.pdf /images/store_pics/7-standard.pdf /images/store_pics/8-standard.pdf /images/store_pics/8-straight.pdf /images/store_pics/6-curved.pdf /images/store_pics/8-curved.pdf

21 - 21 -
22 - 22 -
23 Appendix B- More Templates ArcadeCab.com: Building the ArcadeCab Trackball/Single-Player Controller /Projects/TB_Plans/Happ_TB_mounting_plate_Template.pdf or /Projects/TB_Plans/Happ_TB_mounting_plate_Template.doc This is the Happ trackball mounting plate template. It will print to scale. You drill in the four extreme corners. /Projects/TB_Plans/Happ_Button_Template.doc or /Projects/TB_Plans/Happ_Button_Template.pdf
Corner Entertainment Center Plans
 Table of Contents Introduction... 3 Let s discuss the tools needed... 3 Let s discuss the materials needed... 4 Let s build it... 4 Attaching the 2x2's... 7 Determine the shelf spacing... 9 Scribing the
Hudson Dresser [1] Hudson Dresser Published on Ana White ( Submitted by dan-k [2] on Fri, :43 [1]
![Hudson Dresser [1] Hudson Dresser Published on Ana White ( Submitted by dan-k [2] on Fri, :43 [1]](/thumbs/90/102626096.jpg "Hudson Dresser [1] Hudson Dresser Published on Ana White ( Submitted by dan-k [2] on Fri, :43 [1]") [1] Submitted by dan-k [2] on Fri, 2011-03-11 11:43 [1] If you plan on staining this piece, it is recommended that you stain all of the drawer face materials before assembly for a more professional look.
[1] Submitted by dan-k [2] on Fri, 2011-03-11 11:43 [1] If you plan on staining this piece, it is recommended that you stain all of the drawer face materials before assembly for a more professional look.
Copyright 2010 Springbok Publishing All Rights Reserved- Page 1
 Copyright 2010 Springbok Publishing All Rights Reserved- www.woodensaddlerackplans.com Page 1 Legal Information All contents copyright 2010 by Springbok Publishing. All rights reserved. No part of this
Coffee table with recessed tray
 Coffee table with recessed tray Dinner is served Coffee table with recessed tray This coffee table has it all: it contains a recessed tray, so that you can treat your guests to various delicacies. 1 Introduction
Installation Guide. Pionite Decorative Surfaces One Pionite Road, Auburn, Maine PIONITE ( )
") Installation Guide A Subsidiary of Panolam Surface Systems SMPBRO00-012 6/14 Pionite decorative laminates are designed for finished interior surfaces which require high impact, wear and stain resistance
Installation Guide A Subsidiary of Panolam Surface Systems SMPBRO00-012 6/14 Pionite decorative laminates are designed for finished interior surfaces which require high impact, wear and stain resistance
Make your own zero clearance throat plate.
 Make your own zero clearance throat plate. A picture tutorial By Wayne Breshears One of the more important table saw accessories you can have is a zero clearance insert or throat plate. The close tolerance
How-to-Install. Laminate Countertops and Sheet Laminate. FREE brochure Reverso en español
 FREE brochure Reverso en español How-to-Install Laminate Countertops and Easy to install instructions provided inside Multiple colors available for unique design options Durable and easy to care for Accessory
Copyright 1998 KDE Technologies
 Modular Computer Corner Desk Unit Copyright 1998 KDE Technologies http://members.tripod.com/~kdetech/ 1. Introduction 2. Plans Sheet one - Isometric Sheet two - Top Detail / Corner Unit Sheet three - Leg
DIY Wine Storage Cabinet
 DIY Wine Storage Cabinet ADDICTED2DIY.COM *Before beginning this project, please read through all of the plans and the blog post. When building this project, be sure to measure your wood and cut to fit.
Hinge Mortising Jig. One of the make it or break it parts of building a. 6 ShopNotes No. 74
 Hinge Mortising Jig A Mortise for a Hinge. Quick, clean, and accurate that s the only way to describe the mortise you get with a trim router and this hinge mortising jig. One of the make it or break it
Robert Bosch GmbH. Wall organiser
 Wall organiser The organisational talent Wall organiser Say goodbye to messiness! The wall organiser is the ideal place to store everything that tends to lie around. 1 Introduction Wardrobes, drawers and
Robert Bosch GmbH. Minimalist washstand
 Minimalist washstand Neat and tidy Minimalist washstand Minimalist design in the bathroom is in fashion. And rightly so, as this washstand proves: because less is more! 1 Introduction Here s an idea to
ARTS AND CRAFTS CHAIR
 ARTS AND CRAFTS CHAIR 491 MATERIALS LIST--DINING CHAIR Key No. Size and description (use) A 2 1-3/4 x 1-3/4 x 16-1/4'' oak (front leg) B 2 1-3/4 x 3-3/4 x 40-1/2'' oak (rear leg) C 1 1-3/4 x 3-3/16 x 15''
DIY Field Guide ANDYMARK, INC.
 ANDYMARK, INC. Intro For the 2014-2015 FTC Game Cascade Effect, teams can purchase official field hardware from AndyMark, or they can build do-it-yourself (DIY) versions of the same hardware. The competitions
Making Simple Bookbinding Equipment
 Tony Firman 20 1 2 19 Notes Tony Firman Tony Firman Bookbinding 18 3 : 2012 Tony Firman Bookbinding P.O. Box 507 Haslet, TX 76052 www.tonyfirmanbookbinding.com 4. When all the tapes have been pinned in
Traditional Undermount: S Method (Undermount):
:") TOOLS REQUIRED 15.1 TOOLS REQUIRED The installation of Corian shape product must be a precise and exacting process to ensure that a good fit is always created. Using the correct tools is essential. In
TOOLS REQUIRED 15.1 TOOLS REQUIRED The installation of Corian shape product must be a precise and exacting process to ensure that a good fit is always created. Using the correct tools is essential. In
Eco Office File Base. Materials and Tools: Free Plans to build an office file cabinet base
 Materials and Tools: Materials: 1 - Sheet 3/4 PureBond Hardwood Plywood (Available at the Home Depot) 1 - Sheet 1/4 PureBond Hardwood Plywood (Available at the Home Depot) 3-21 Drawer Slides, Euro Style
Materials and Tools: Printer s Triple Console Cabinet. Free Plans to build a Triple Console Cabinet
 Materials and Tools: Materials: 3 sets euro style bottom corner mount drawer slides, 16 length 3 sets inset hinges 24 cup style handles 8 2x2 @ 8 feet long 6 1x3 @ 8 feet long 6 1x2 @ 8 feet long 1 sheet
Project Skill Level: INTERMEDIATE Plywood Used: CANPLY EXTERIOR Good Two Sides (G2S) or precision sanded Aspen
 or precision sanded Aspen") Project Skill Level: INTERMEDIATE Plywood Used: CANPLY EXTERIOR Good Two Sides (G2S) or precision sanded Aspen MATERIALS LIST: (1) ¾" x 4 ft x 8 ft plywood panel (20) #8 x 2" Robertson or Phillips wood
Project Skill Level: INTERMEDIATE Plywood Used: CANPLY EXTERIOR Good Two Sides (G2S) or precision sanded Aspen MATERIALS LIST: (1) ¾" x 4 ft x 8 ft plywood panel (20) #8 x 2" Robertson or Phillips wood
ADULT. Adirondack / Muskoka Chair Plans
 ADULT Adirondack / Muskoka Chair Plans Materials List 3/4" x 9 1/2" (1.9cm x 24.1cm) redwood, cedar or pine boards. Six, 8' (2.44m) boards should make one chair depending on knots and layout. You can also
GENERAL NOTES: Page 1 of 9
 Laminating A Zia Into A Turning Blank by W. H. Kloepping, Jan. 2009 This describes how a zia (the New Mexico state symbol) can be laminated into a turning blank. Materials needed: Square Turning Block
Notification System Installation Guide
 Notification System Installation Guide NOTE: It is strongly recommend that you hire a licensed electrician to perform the installation of this product. Materials Provided 1. Directory Sign (1) a. Directory
Ways to get the most out of your
 5 Ways to get the most out of your router table When you mount a router on a table, you expand your shop s potential. To help you take advantage of this potential, we assembled five router table techniques
Laminate Cabinet Installation Instructions
 Laminate Cabinet Installation Instructions www.easygaragestorage.com/installation How To Use These Instructions Thank you for your purchase! Please read each step of this manual thoroughly to ensure proper
Installing your new Bevella Top. L Shaped Countertop with Joints No Finished Ends (Fits Between Four Walls)
") Installing your new Bevella Top L Shaped Countertop with Joints No Finished Ends (Fits Between Four Walls) Bevella RTI Countertops are engineered and manufactured to the highest quality standards, built
Installing your new Bevella Top L Shaped Countertop with Joints No Finished Ends (Fits Between Four Walls) Bevella RTI Countertops are engineered and manufactured to the highest quality standards, built
BONDO PROCESS. Installation Guide.
 BONDO PROCESS Installation Guide www.karran.com BONDO PROCESS This Installation Guide demonstrates simple methods and proven techniques for seamlessly installing Karran undermount sinks in laminate countertops.
An Inner Hive Cover. In the Beekeeper s Work Shop. Building a Bee Hive: The Inner Hive Cover. by Stephen E. Tilmann
 An Inner Hive Cover In the Beekeeper s Work Shop The project for this article is an inner hive cover. The inner cover sits on top of the topmost hive body (super) and underneath the telescoping top cover
COFFEE TABLE WITH RECESSED TRAY
 COFFEE TABLE WITH RECESSED TRAY Why not treat your guests to a tray laid with delicacies and then remove it from sight in your new coffee table. There's no easier way to show that you are a thoughtful
Contents. pages 20-24: Installing Edge sinks into. custom laminate countertops page 8: Installing Edge sinks into postform laminate countertops
 Contents pages 2-8: Installing Edge sinks into custom laminate countertops page 8: Installing Edge sinks into postform laminate countertops pages 9-14: Installing Acrylic sinks into custom laminate countertops
Seamed Undermount Bowls
 CUTOUT TEMPLATES MAKING CUTOUT TEMPLATES 7.1 CUTOUT TEMPLATES The use of an accurate template is one of the most essential elements to the successful completion of a cutout in Corian. For the completion
" BASE CABINET
 INSTALLATION GUIDE INSTALLATION GUIDE Before You Begin Installing Your Kitchen Cabinets 1. Read through installation guide to understand all steps and gather tools needed. 2. Verify that all of the hardware,
Phase Two. The Skirt, Play Area and Sub Table ( continued )
") Dry fit the skirt in place and make sure all is tight. Drill a countersink screw hole on the back of the skirt down where you will connect it to the bull nose. Make three holes on each board (ends and
Dry fit the skirt in place and make sure all is tight. Drill a countersink screw hole on the back of the skirt down where you will connect it to the bull nose. Make three holes on each board (ends and
Cabinet is 90% assembled, all you need to do is to attach the legs, lay the glass top on the cabinet, connect the faucet, drains & ptrap.
 Things you might need for the installation: vessel sink, plumber's putty(home depot), liquid nails(home depot), Bucket silicone caulk(home depot), Putty knife Plumber's putty Pipe wrench Channel-lock pliers
Wilsonart Decorative Edge Fabrication Manual
 Fabrication Manual BR1515 - Revision 10/2013 Product Description Wilsonart Decorative Edge moldings may well be the best way to attain leading-edge kitchen and bath design without a leading edge budget.
Computer Desk. Project designed by April Wilkerson
 Project designed by April Wilkerson Copyright WilkerDos.com 2018 Project plan Desk Page 2 of 16 Page 3 of 16 File cabinet Page 4 of 16 Metal base Page 5 of 16 Glue up Get started by gluing up boards for
Building Instructions
 Building Instructions Tools Required Tape measure Straight edge Pencil/pen Jigsaw Table Saw Circular Saw Electric drill 1 Hole saw bit Saw horses/table Protractor Staple gun Caulk gun Paint brush Wrenches
THE PODIUM MUSIC STAND
 THE PODIUM MUSIC STAND 1 Set Assembly Instructions Wooden Parts: a. 1 Column b. 2 Long Slide Pieces c. 2 Slide Spacers (1 long & 1 short) d. 4 Feet e. 2 Fork Pieces f. 1 Fork Spacer g. 2 Long Desk Frame
TOOLS 2 ½ hole saw (a good sharp one. You re going to make 36 holes.) Sharp pencil Yard stick Compass Protractor Sandpaper Rasp Drill Motor Jig Saw
 Sharp pencil Yard stick Compass Protractor Sandpaper Rasp Drill Motor Jig Saw") My version of this upright rifle rack does not have a turntable or lazy Suzan on it. I need to be able to move my rifles around so I opted to put casters on the bottom of the rack. With four casters, it
My version of this upright rifle rack does not have a turntable or lazy Suzan on it. I need to be able to move my rifles around so I opted to put casters on the bottom of the rack. With four casters, it
Arched. Building an. Passageway. Although my company specializes in high-end jobs
 Building an Arched Passageway All photos by Brian Striegler This straightforward approach combines basic shop methods with simple site joinery to create an elegant frame-and-panel archway by Gary Striegler
The build should take around 2 to 3 hours. However, by leaving yourself more time you can go at a relaxed pace and be sure not to miss anything.
 Before We Start Before we jump into building your Picade, make sure you have everything to hand. I know you're eager to jump right into the construction, but we need to get set up properly first! 1. Prepare
Extendable Large Dovetail Jig
 Extendable Large Dovetail Jig Instruction Manual Part # 3458 CAUTION: Please read, understand, and follow all manufacturers instructions, guidelines and owners manuals that come with your power tools.
Shop Projects. Plans NOW. Each Built from One Sheet of Plywood!
 Plans NOW www.plansnow.com 5 Shop Projects Each Built from One Sheet of Plywood! Tool Tote - Sawhorse - Workbench - Wood Bin - Wall Cabinet PLUS: 7 SHOP SECRETS Working with Plywood Dread the thought of
Butterfly Leaf Dining Table Plans
 Butterfly Leaf Dining Table Plans Part 1 An attractive dining table with a secret: the leaf folds and stores inside the table. Season 1, Episode 7 P a g e 2 I first saw a butterfly leaf table in a back
Contest Field Border Construction Manual
 Contest Field Border Construction Manual TABLE OF CONTENTS Section 1 Field Construction...3 Section 2 Bill of Materials 3 Section 3 Construction.. 4 Step 1 - Layout...4 Step 2 - Bottom...4 Step 3 1 st
ining Table Materials *Notes on Materials
 D ining Table We looked around for the perfect table for the dining room. Some were too big, some too small, and most were just too expensive. So we built this one, and we are happy with the result. It
INSTALLATION GUIDE VERSION 11/14
 INSTALLATION GUIDE VERSION 11/14 In this guide we will demonstrate effective techniques and methods for installing EDGE stainless steel sinks seamlessly in both laminate and solid surface. These techniques
15 Dovetail Jig. Instruction Manual. Part # 3452
 15 Dovetail Jig Instruction Manual Part # 3452 CAUTION: Please read, understand, and follow all manufacturers instructions, guidelines and owners manuals that come with your power tools. Peachtree Woodworking
Introducing the Trim Finishing System. A Wood to Wall System that allows the home owner to get professional results from their molding purchases.
 Introducing the Trim Finishing System A Wood to Wall System that allows the home owner to get professional results from their molding purchases. Molding New molding can improve the look of any house. Several
Building Tips This model can be built using the following types of adhesives:
 Page 1 Building Tips This model can be built using the following types of adhesives: Epoxy (with or without microballons) Odorless cyanoacrylate (CA) with accelerator UHU Creativ for Styrofoam (or UHU
The Universal Table Saw Sled
 The Universal Table Saw Sled Do Precision Work Even with Inexpensive Table Saws! Table saw blades always tend to move the wood while the cut is being made. This is why it's so difficult to get accurate
Service Manual for XLE/XLT Series Laser Engravers
 Service Manual for XLE/XLT Series Laser Engravers Table of Contents Maintenance...1 Beam alignment...3 Auto focus alignment...8 Bridge alignment...10 Electronics panel replacement...11 X motor change...12
Metal Aircraft Landing Light Installation Instructions
 Metal Aircraft Landing Light Installation Instructions This landing light kit was designed for the Thorp T-18 as a method of installing a halogen landing light in the leading edge of the outer bay of the
TM TM DOG HOUSE Age 9+
 TM TM DOG HOUSE Age 9+ Safety First! Use eye protection, always! Use ear protection with loud power tools Stay with kids while they work! Follow tool manufacturers safety guidelines This project is recommended
10. Wing prep and subassembly
 Date Section Objective: Construct and fabricate the sub-assemblies of the wing panel. Required Parts: Wing left 11gal PN104-300, Wing right 1gal PN104-400, Wing left 15 gal option PN104-322, Wing right
make something original Mobile Workstand Shelf support (2) Caster extension (2) Leveling feet (4) Rigid caster (2)
 Caster extension (2) Leveling feet (4) Rigid caster (2)") Mobile Workstand Panel (2) Leg (4) Long frame member (2) Crossmember (6) Shelf (1) Shelf support (2) Caster extension (2) Leveling feet (4) Rigid caster (2) THIS IS NOT THE COMPLETE PLAN: it is merely
Mobile Workstand Panel (2) Leg (4) Long frame member (2) Crossmember (6) Shelf (1) Shelf support (2) Caster extension (2) Leveling feet (4) Rigid caster (2) THIS IS NOT THE COMPLETE PLAN: it is merely
3400 to 3440 Scarfing Sled Owners Manual Please Read Carefully!
 3400 to 3440 Scarfing Sled Owners Manual Please Read Carefully! Parts List: Please identify and verify that you have all of the hardware shown. Please refer to photos in the instructions for the parts
TECHNIQUE. Because of the flexibility of the woven paper elements, this necklace moves nicely when worn. BEGINNER PAPER/WOOD. facetjewelry.
 TECHNIQUE FCT-SR-09248-03 BEGINNER PAPER/WOOD Because of the flexibility of the woven paper elements, this necklace moves nicely when worn. 203 Kalmbach Publishing Co. This material may not be reproduced
Router Table-Mate. Everything you'd want in a router table for just $50.
 Router Table-Mate Everything you'd want in a router table for just $50. Commercially made router tables are everywhere these days. Some of them come with more gizmos and gadgets than a 59 Edsel. By the
3x2 Building. Instructions. Jackson Van Buren s
 Jackson Van Buren s 3x2 Building Instructions Lumber QTY 2 3 DESCRIPTION 1/2 x 2 x Plywood 8 x 2 x Stud Hardware QTY IMAGE DESCRIPTION 36 16 8 Coarse Drywall Screw 2 1/2 Deck Screw 3/8 x Carriage Bolt
Tools and Tips: ( 1 )
") Tools and Tips: As you build instructions will show in my many picture manual how to assemble. You can use your own methods as you desire, my results are very good. A smooth, flat work surface is very
Tools and Tips: As you build instructions will show in my many picture manual how to assemble. You can use your own methods as you desire, my results are very good. A smooth, flat work surface is very
R2C Performance Products 7550 Industrial Drive Forest Park, IL Ph: (708)
") Congratulations on your purchase of the finest Sprint Car Filter and stack sealing system available. This system has been designed for unparalleled ease of assembly, disassembly and cleaning while providing
Congratulations on your purchase of the finest Sprint Car Filter and stack sealing system available. This system has been designed for unparalleled ease of assembly, disassembly and cleaning while providing
This book, or portions of it, may not be duplicated, resold, or redistributed in any way, without the expressed written consent of Stay Tooned, Inc.
 Copyright 2006 - Stay Tooned, Inc. All rights reserved worldwide. This book, or portions of it, may not be duplicated, resold, or redistributed in any way, without the expressed written consent of Stay
Pivot-Door Downdraft Cabinet Plans
 Pivot-Door Downdraft Cabinet Plans Finished Cabinet Closed Open Exploded View Introduction This simple downdraft-style dust collection cabinet is a great way to keep your shop cleaner and keep your router
Central New York Rocket Team Challenge 2018 Rocket Assembly Instructions
 Central New York Rocket Team Challenge 2018 Rocket Assembly Instructions Note: These instructions vary from those provided by the manufacturer of the rocket kits. There is also considerable varying discussion
Cowper From Steve Wolverton on the T&TTT forum, Feb 2005 For Reference Only Do not use to build a trailer. Check on Teardrop and Tiny Travel Trailers
 Cowper From Steve Wolverton on the T&TTT forum, Feb 2005 For Reference Only Do not use to build a trailer. Check on Teardrop and Tiny Travel Trailers for up to date building information; http://www.mikenchell.com/forums
PLEASE READ THIS NOTICE BEFORE BEGINNING ANY PHASE OF INSTALLATION!!!!
 PLEASE READ THIS NOTICE BEFORE BEGINNING ANY PHASE OF INSTALLATION!!!! This kit is designed to be installed by someone with a fair amount of mechanical aptitude. However, if you are not comfortable making
Closet System Installation Manual
 Closet System Manual Thank you For choosing our Custom Closet Collection to fit all your needs Closets come fully assembled to make your project an enjoyable and satisfying experience. With quality Custom
Wallpaper. the Right Way. Wallpaper is trendy again, both with designers, who are speccing it more often, and
 Wallpaper the Right Way Installed correctly, this wall covering should last a lifetime and come off easily once it has worn out its welcome By John Clift Wallpaper is trendy again, both with designers,
REAR FUSELAGE ASSEMBLY
 SECTION 2 Rear Fuselage Bottom Assembly Ref Dwg 8FR-2 SECTION 2 - Page 1 of 17 FUSELAGE BOTTOM SKIN 8F2-3A Note: The edges of skin 8F2-3A are not a straight line. Check: edge distance from the center of
a.k.a. casegoods instructions
 a.k.a. casegoods instructions a a.k.a. workwall installation IMPORTANT NOTES Failure to install product according to installation instruction will result in loss of warranty. Tools required for assembly
ALUMINUM AIR TRIM INSTALLATION INTRODUCTION
 ALUMINUM AIR TRIM INSTALLATION INTRODUCTION KEISER CORPORATION has always taken pride in designing and engineering the highest quality equipment on the market. This means that you will receive years of
About.com :
 http://woodworking.about.com/gi/dynamic/offsite.htm?sit...//www.popularwoodworking.com/features/fea.asp%3fid=1088 (1 of 8)1/28/2004 12:05:01 AM Modern Storage Tower The last thing I want to do when starting
Media Console with DVD Drawer Storage, Cyndi Collection [1]
![Media Console with DVD Drawer Storage, Cyndi Collection [1]](/thumbs/72/67419420.jpg "Media Console with DVD Drawer Storage, Cyndi Collection [1]") Media Console with DVD Drawer Storage, Cyndi Collection [1] Submitted by Ana White [2] on Thu, 2011-05-12 15:32 [1] You see, I'm really quite greedy. I want to build everything, EVERYTHING for myself.
Media Console with DVD Drawer Storage, Cyndi Collection [1] Submitted by Ana White [2] on Thu, 2011-05-12 15:32 [1] You see, I'm really quite greedy. I want to build everything, EVERYTHING for myself.
Shoulder Plane. dovetailed. fine tools. Make an heirloom tool and learn the secret to creating double dovetails in metal it s easier than you think.
 fine tools dovetailed Shoulder Plane Make an heirloom tool and learn the secret to creating double dovetails in metal it s easier than you think. I ve always been fascinated by old, metal hand planes.
How To Create An Entertainment Unit
 How To Create An Entertainment Unit Materials required: 2 x Pine Panels - 1800mm x 450mm x 18mm 4 x Pine Panels - 310mm x 450mm x 18mm 1 x Pine Panels - 650mm x 450mm x 18mm 6 x Bun feet (your choice of
Side "A" Stake here. Side "C" Side "D" Side "B" Here Shirley and I are setting up a 10 X 16 ground work.
 Choosing the Location It is always best to locate your greenhouse so that it can receive maximum sunlight at all times of the year especially in winter months. If Possible orient the long side towards
Agricultural Mechanics and Technology Power Tool Safety Rules
 Agricultural Mechanics and Technology Power Tool Safety Rules Name: BAND SAW Use: Cutting curves, circles and irregular shapes. 1. Use clean SHARP blades. 2. The teeth should always point DOWN. 3. Adjust
MyOutdoorPlans.com. By Julian King [2X4 GARDEN BENCH]
![MyOutdoorPlans.com. By Julian King [2X4 GARDEN BENCH]](/thumbs/75/72876801.jpg "MyOutdoorPlans.com. By Julian King [2X4 GARDEN BENCH]") MyOutdoorPlans.com By Julian King [2X4 GARDEN BENCH] CUT LIST A 2 pieces of 2 4 lumber 24 long, 2 pieces 32 1/2 long LEGS B 2 pieces of 2 4 lumber 45 long, 2 pieces 15 1/2 long, 1 piece 12 1/2 long SEAT
MyOutdoorPlans.com By Julian King [2X4 GARDEN BENCH] CUT LIST A 2 pieces of 2 4 lumber 24 long, 2 pieces 32 1/2 long LEGS B 2 pieces of 2 4 lumber 45 long, 2 pieces 15 1/2 long, 1 piece 12 1/2 long SEAT
Pre-Paint>Wings>Fit ailerons. Objectives of this task: Materials and equipment required: Size the ailerons and pre-mould strips
 Pre-Paint>Wings>Fit ailerons Objectives of this task: In this task the ailerons and the pre-mould strips will be sized and trimmed, then flocked onto the wings and glassed in place, and the next day the
Flex Fence Instruction Manual
 The Safer Stronger Smarter Choice Flex Fence Instruction Manual Table of contents 2 3 4 4 5 5 6 7 8 10 10 11 11 12 13 13 15 18 18 19 20 22 Table of contents Supplies, tools and equipment Introduction Laying
Router Table. Construction
 Router Table A router table is an invaluable tool. The problem, however, is that ready-built router tables are usually relatively expensive and too narrow for many projects. This router table provides
Questions? Call us at or us at
 Questions? Call us at 610-345-9044 or email us at admin@selectincrements.com CAUTION: 1) Don t let the banana plug prongs touch any metal when the pod is unhooked, you could damage your amplifier. 2) Never
INSTALLATION GUIDE SLIMLINE ROOF LANTERN 4 PANE CONFIGURATION
 INSTALLATION GUIDE SLIMLINE ROOF LANTERN 4 PANE CONFIGURATION SLIMLINE STEP-BY-STEP INSTALLATION GUIDE Thank you for choosing Roof Maker, we hope you are delighted with your new rooflight. Our roof lanterns
Easy Five Cube Tower Bookshelf. Copyrighted Material. Page 1
 Compare to: Land of Nod Cube Collection, 5 Cube Tower Bookshelf Skill Level: Beginner Easy Five Cube Tower Bookshelf This fully framed five cube tower can hold everything from towels to boots to books
Adjustable Hammered Dulcimer Stand
 Adjustable Hammered Dulcimer Stand Musicmaker s Kits (Hwy 36 behind Joseph s Restaurant) P.O. Box 2117 Stillwater MN 55082 651 439 9120 www.harpkit.com PARTS LIST: 1 Set of Assembly Instructions A. 2 front
 America s leading woodworking authority To download these plans, you will need Adobe Reader installed on your computer. If you want to get a free copy, visit: http://adobe.com/ reader. Having trouble downloading
Copyrighted Material Page 1
 Compare to: Pottery Barn Teen Storage Bed System Skill Level: Beginner Working with the rest of the components in the Storage Bed Collection, the Small Hutch fits on top of the Storage Headboard and will
MATERIALS: TOOLS: CUT LIST:
 MATERIALS: (3) 4x4x8 Ft. Boards (8) 2x4x8 Ft. Boards 2 ½-inch Pocket Screws 2 ½-inch Wood Screws 1-inch Wood Screws (16) Figure 8 Tabletop Fasteners Wood Glue Wood Filler TOOLS: Tape Measure Pencil Carpenter
GlideRite Retractable Cover System For HotSpring & Tiger River Spas (except Classic & pre-2000 Landmark Spas)
") List of Contents Quantity Description 12 #10 x 1 ½ Flat Head Phillips Screw (see pg. 2) 2 #10 x ½ Pan Head Phillips Screw (see pg. 2) 8 ¼ x 2 ½ Lag Bolt (see pg. 2) 7 ¼ 20 x 5 / 8 Hex Head Bolt (see pg.
List of Contents Quantity Description 12 #10 x 1 ½ Flat Head Phillips Screw (see pg. 2) 2 #10 x ½ Pan Head Phillips Screw (see pg. 2) 8 ¼ x 2 ½ Lag Bolt (see pg. 2) 7 ¼ 20 x 5 / 8 Hex Head Bolt (see pg.
After the canopy hinge is square with the firewall and the nut plates are installed you can set up the hinge mounts. Start by clamping a 1/16 tongue
 Written by: Sean Cole September 19, 2008 When fitting the stiffener use 3/32 clecos to hold it in place, it makes a smaller hole and is easier to work with. Only use the amount needed to hold the stiffener
Skybolt V2 Construction Manual
 Skybolt V2 Construction Manual Property of www.ppgplans.com Do not duplicate or make public. Warnings & Disclaimers. This product shows how to build a basic frame only for Powered Paragliding. It is the
Router Table. In a recent article, I wrote about the router table I built for the Center. 5 Essential Jigs for the
 5 Essential Jigs for the Router Table Great fixtures and fences offer better control and new possibilities BY PETER SCHLEBECKER In a recent article, I wrote about the router table I built for the Center
How to Make a Hat Bending Jig
 How to Make a Hat Bending Jig MATERIALS One 2" x 8" x 11" long (Base Block) exact measurements are 7 ½" x 1 ½" x 11" (Pine is OK to use, I have used scrap Walnut for my benders) Four pieces of Oak 1" x
1 ¼-inch Pocket Screws Brad Nailer or Hammer 1 ¼-inch Brad Nails Clamps
 MATERIALS: TOOLS: (4) 2 x 6 x 8 Ft. Boards Tape Measure (2) 2 x 4 x 8 Ft. Boards Carpenter s Square (7) 1 x 4 x 8 Ft. Boards Pencil (2) 1 x 3 x 8 Ft. Boards Drill (1) Half Sheet of ¾-inch Thick Plywood
Sweet Pea Garden Bunk Bed Storage Stairs [1]
![Sweet Pea Garden Bunk Bed Storage Stairs [1]](/thumbs/90/101417444.jpg "Sweet Pea Garden Bunk Bed Storage Stairs [1]") [1] Submitted by Ana White [2] on Fri, 2012-09-28 13:32 Page 1 of 27 Page 2 of 27 [1] Happy Friday! If you missed us a little this week on the blog, thank you - I missed you too! I've been traveling to
[1] Submitted by Ana White [2] on Fri, 2012-09-28 13:32 Page 1 of 27 Page 2 of 27 [1] Happy Friday! If you missed us a little this week on the blog, thank you - I missed you too! I've been traveling to
BUILDING A STORM DOOR
 BUILDING A STORM DOOR BY NEAL BARRETT Illustrations by George Retseck If you're in the market for a storm door, you probably know that there are many styles and models available. However, most of them
First determine your wall elevation (display size). Note: this must be determined before You order your Legacy Wall Display kit.
. Note: this must be determined before You order your Legacy Wall Display kit.") First determine your wall elevation (display size). Note: this must be determined before You order your Legacy Wall Display kit. There are three elevations to choose from: Twenty four, Twenty, and Eighteen
First determine your wall elevation (display size). Note: this must be determined before You order your Legacy Wall Display kit. There are three elevations to choose from: Twenty four, Twenty, and Eighteen
Shed Assembly Instructions
 Shed Kit Contents The shed kit includes all the parts needed to assemble your shed except for tools and fasteners such as screws and nails. The various pieces are pre-cut and many are marked to indicate
Tools and Tips: ( 1 )
") Tools and Tips: As you build instructions will show in my many picture manual how to assemble. You can use your own methods as you desire, my results are very good. A smooth, flat work surface is very
Tools and Tips: As you build instructions will show in my many picture manual how to assemble. You can use your own methods as you desire, my results are very good. A smooth, flat work surface is very
PAUL DAUNNO ADDS TOYMAKING TO HIS
 WOOD TOY NEWS Monday January 26, 2015 PAUL DAUNNO ADDS TOYMAKING TO HIS VAST ARRAY OF WOODWORKING SKILLS. toymakingplans.com Meet Toymaker Paul Daunno I was born and raised in New Jersey and my father