AG Optical Systems. Newtonian Astrograph Manual Version AG Optical Systems
|
|
|
- Darren Hensley
- 5 years ago
- Views:
Transcription

1 AG Optical Systems Newtonian Astrograph Manual Version

2 Table of Contents 1. Introduction 2. System Specifications 3. Initial Assembly 4. Collimation 5. Care and Cleaning 6. Cooling Fan Operation 7. Warranty
3 Introduction Thank you for your purchase of an AG Optical Systems Newtonian Astrograph. Your telescope has been carefully crafted using modern manufacturing technologies and high-tech materials to provide outstanding, reliable performance. As with any high quality optical instrument, care must be taken in the use and maintenance of the telescope to ensure it performs to its maximum potential. Should you have any questions that are not addressed by the contents of this manual please contact AG Optical Systems. System Specifications System Focal Length: F3.8 (with Wynne corrector) Primary Mirror Substrate: Schott Borofloat Primary Mirror Coating: Enhanced aluminum Secondary Mirror Substrate: Schott Borofloat Secondary Mirror Coating: Enhanced aluminum Back focus: 80 mm from last lens surface of Wynne corrector to focal plane Cooling fans: 12 vdc, center pin positive, 5.5 x 2.1 mm jack Receiving the Telescope Please inspect the shipping box for any damage when you receive the telescope from the shipper. If any significant damage to the box is visible (crushed corners, major tears in the cardboard, water damage, etc.) you may want to bring it to the attention of the delivery person and document the damage by taking images of it. Once you have the box opened, carefully inspect the telescope for any damage and, if any should be found, document the damage with a photograph and immediately contact the shipping company and AG Optical Systems. Initial Assembly Very little assembly is required to prepare your AG Optical Systems astrograph for use. You will need to attach the Atlas focuser and 3.5 Optec extension tube to the focuser base by following these steps: 1. Locate the 3.5 (diameter) Optec extension tube. Threaded into one end of this tube will be the Optec extension tube-to-atlas adapter. The other end will consist of a male thread. Carefully thread the male threaded end of the extension tube into the focuser base that is attached to the tube until a snug fit is achieved. 2. Slide the Atlas focuser over the Optec extension tube-to-atlas adapter and secure it firmly using the three set screws located on the sides of the Atlas focuser. 3. Collimating the telescope is the next step!

4 Collimation Precise collimation is critical to ensure the full potential of your AG Optical Systems astrograph is realized. Due to the fast focal ratio of your AG Optical Systems astrograph, even very slight adjustments to the alignment of the primary and secondary mirrors will have a noticeable effect on the quality of the image at the focal plane. Best results will be achieved when you use quality collimation tools and follow a systematic approach. Be patient and do not settle for anything less than text book perfect collimation. AG Optical Systems suggests you read many of the excellent online resources describing how to collimate a Newtonian telescope. These resources provide a rich wealth of detailed theoretical and practical information that will enable you to achieve precise collimation of your AG Optical Systems astrograph. To facilitate the collimation process, the primary mirror of your astrograph has been center marked with a small collimation target. This center spot will greatly aid in the initial alignment of the primary and secondary mirror. AG Optical Systems suggests that you follow an identical process each time you insert a collimation tool into your 2 adapter. Due to a lack of standardized manufacturing tolerances for collimation tools and 2 adapters, significant variation in the location of the collimation tool within the adapter is possible. This variation makes it difficult to achieve repeatable and precise results when collimating
5 optical systems with fast focal ratios. You may consider using only one set screw (the same one each time) when placing collimation tools into your adapter and then using only the minimum pressure necessary to hold the tool in place. Suggested Collimation Tools 2 laser collimator (preliminary secondary adjustment) 2 Cheshire sight tube (primary collimation) 2 autocollimation tool (precise secondary collimation) Focuser adapters to allow the use of 2 collimation tools o AG Optical Systems suggest the use of the FLI AD-53 Adapter, Astro-Physics adapters (A1008-A, A3502-A and ADA2003) to locate the collimation tools at the focal plane of the system. NOTE It is very important that the surface of the collimation tool (i.e. where you place your eye) is located as closely as possible to the focal plane of the telescope. For your AGO Newtonian the focal plane is located approximately 8.5 from the surface of the tube.

6
7 Collimation Process Overview Below is a general overview of the collimation process. Detailed instructions follow in the subsequent section. 1. Place the telescope on your mount and point the telescope approximately 45 degrees above the horizon. 2. Insert the proper combination of adapters into the Atlas focuser to place the collimation tools at the focal plane. (approx. 8.5 above the surface of the carbon fiber composite tube) 3. Insert a quality 2 laser and make initial adjustments to the secondary to place the laser beam at the center of the primary mirror. 4. Insert 2 Cheshire tube and make adjustments to the primary mirror to center the Hotspot reflection. 5. Insert 2 autocollimation tool and make adjustments to the secondary mirror to align Hotspot reflections in central and off-axis view ports. 6. Re-insert 2 Cheshire to confirm primary is still aligned. If it is not, adjust the primary mirror and then repeat step Iterate steps 5 and 6 until text book alignment is achieved. AG Optical Systems uses the Catseye Hotspot center dot and detailed instructions on how to use this type of center spot to collimate your telescope are reprinted below with permission from Catseye. Catseye provides an excellent tutorial video at the following link:

8 Detail Instructions AutoCollimation Process

9

10

11 Collimation Adjustment Collimating an AG Optical Systems Newtonian is accomplished by making adjustments to the primary mirror cell and secondary mirror cell until the optical axis of both mirrors are coincident and co-axial with the mechanical axis of the focuser.

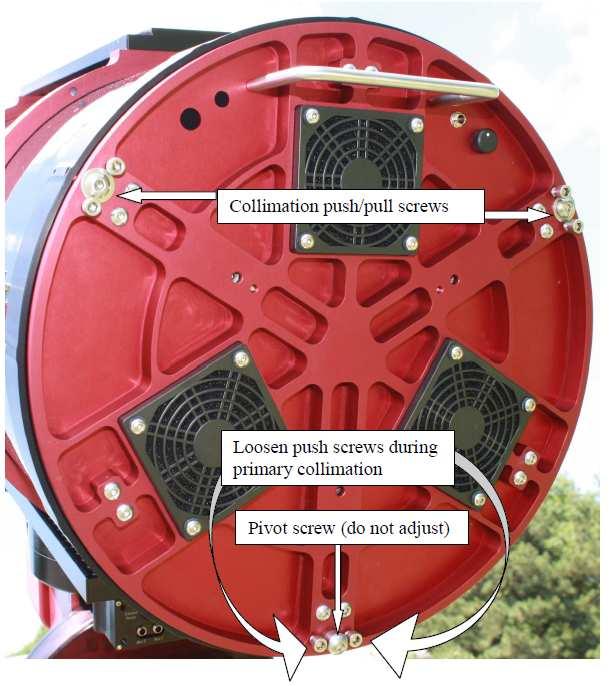
12 The key to successfully collimating your Newtonian astrograph is to use a systematic approach that involves making small adjustments to each mirror, assessing the results of the adjustments, and then making subsequent adjustments to further refine the collimation of the astrograph. Once collimation is achieved, the system will hold collimation for long periods of time unless the OTA is subject to rough handling. Adjusting the Secondary Mirror Making collimation adjustments to the secondary mirror: Adjust the three 5/16-24 socket cap screws located in the hub at the center of the spider to adjust the tip/tilt of the secondary mirror. These three screws pull against a central pivot point so it may be necessary to loosen one screw and then tighten the other screws if you need to make a large adjustment. Fine adjustments can usually be made using one screw. Be careful, however, not to over-tighten any screw during this process. snug is good enough. Note: Do not completely back out the three secondary collimation screws as the secondary holder will come lose. Damage to your system may result!
13 Making collimation adjustments to the primary mirror Collimation adjustments to the primary mirror are made by adjusting two sets of screws on the mirror cell back plate. Each set consists of a single, spring-loaded pull screw (which is a 5/16-24 TPI button cap screw) and two push screws. A third set of screws is identified by a thick pair of spherical washers located under the 5/16 button cap screw. No adjustment to this screw is required. However, during the collimation process, the push screws associated with this pivot screw should be loosened to allow the mirror cell to freely pivot. During coarse adjustment of the primary it is most simple to loosen all of the push screws a couple of turns and use only the pull screws to collimate the primary mirror. Remember.. do not adjust the pivot screw.
14

15 Insert Wynne Corrector After completing the collimation process, install the Wynne corrector/ccd camera assembly on the scope and take an image being careful to accurately focus the system. AG Optical Systems has found that focusing on a star located mid-way between the center and corner of the chip often provides the best results. To install the Wynne corrector, insert the Wynne corrector into the Atlas focuser and firmly tighten the three set screws in the FLI Atlas to lock the Wynne corrector into place. Thread the CCD camera onto the Wynne corrector adapter (which should be attached to the Wynne corrector). Tips Use the diffraction spikes around moderately bright stars to help determine when you have achieved focus. Out of focus stars will show four pairs of diffraction spikes. When focus is achieved each pair of diffraction spikes will converge into a single, sharp spike. If any diffraction spike is wider than the other three, then the system is not precisely collimated. You can use this approach to dial-in collimation under the stars if the results obtained using the collimation tools are not satisfactory. Focus very carefully as even a slight amount of defocus can cause off-axis stars to be oblong and distorted. Ensure that your collimation tools are located at the focal plane of the system
16 Leave the cooling fans constantly running at a medium to slow speed as this will help keep the telescope thermally equalized as well as help prevent dew from appearing on the secondary mirror. Don t give up until you achieve text book collimation. Even slight miscollimation will cause stars to be oblong somewhere on your CCD chip. Do not over-tighten collimation screws. snug is good enough! Use high quality collimation tools Care and Cleaning Warm water or gentle household cleaners (such as Windex) may be used to clean the exterior of your AG Optical Systems astrograph. Paint thinners and other strong chemical solvents should not be used as they may cause damage to the finish of your astrograph. WARNING AG Optical Systems recommends that you always keep your AG Optical Systems astrograph covered when the telescope is exposed to direct sunlight. The black finish (paint or clear coated carbon fiber) rapidly absorbs heat which, in extreme cases, could cause damage to the paint and in any case causes undesirable heating of the telescope. Cooling Fan Operation Your AG Optical Systems astrograph is equipped with three fans to decease the time it takes the primary mirror to achieve thermal equilibrium with ambient air. These fans require 12 volt DC power that is supplied via the center pin positive 5.5 mm x 2.1 mm female connector located on the back plate of the telescope. The speed of the fans can be adjusted using the small black knob located on the back plate. AG Optical Systems recommends that you ramp the fans to their highest speed and then slow them to the speed you desire. Only a slight turn on the knob is required to adjust the speed of the fans. Warranty AG Optical Systems warrants the products it manufactures against defects in materials and workmanship for a period of two years for the original purchaser of the item. AG Optical Systems at its sole discretion will determine if the product has defective materials and/or workmanship. The customer will be responsible for paying all shipping costs associated with the return of the item and must contact AG Optical Systems prior to returning the item. If AG Optical Systems determines the item to be defective in materials and/or workmanship, AG Optical Systems will reimburse the customer's shipping costs and pay for shipping to return the item to the customer.
17 The terms of this warranty are void if the product is used for a purpose for which it was not designed (to include solar observations) or is subject to abuse beyond normal use. Items not manufactured by AG Optical Systems are covered by the terms of the original manufacturer.
AG Optical Systems. Imaging Harmer Wynne Astrograph Manual Version
 AG Optical Systems Imaging Harmer Wynne Astrograph Manual Version 1 2014 Please read through the entire manual before making any adjustments to your AG Optical Systems telescope. Table of Contents 1.
AG Optical Systems. Imaging Dall Kirkham Astrograph Manual Version AG Optical Systems
 AG Optical Systems Imaging Dall Kirkham Astrograph Manual Version 7 2013 Table of Contents 1. Introduction 2. System Specifications 3. Initial Assembly 4. Collimation 5. Care and Cleaning 6. Cooling Fan
AG Optical Systems LLC
 AG Optical Systems LLC Convergent, Imaging Harmer Wynne, Imaging Dall Kirkham Astrograph Manual Version 1 2019 Please read through the entire manual before making any adjustments to your AG Optical Systems
Howie's Laser Collimator Instructions:
 Howie's Laser Collimator Instructions: WARNING: AVOID DIRECT OR MIRROR REFLECTED EYE EXPOSURE TO LASER BEAM The laser collimator is a tool that enables precise adjustment of the alignment of telescope
Hubble Optics CDK 17 Collimation Instructions 03/27/2012 Hubble Optics
 Hubble Optics CDK 17 Collimation Instructions 03/27/2012 Hubble Optics 1: CDK17 Specification: System Effective Focal Length: 2894.7 mm, (this might be slightly different for different set of optics) Figure
PlaneWave CDK Telescope Instructions. Setting the spacing and collimation for the CDK14/17/20/24
 PlaneWave CDK Telescope Instructions Setting the spacing and collimation for the CDK14/17/20/24 Collimation and Secondary Spacing Procedure The CDK optical design has four optical elements shown in Figure
Eric B. Burgh University of Wisconsin. 1. Scope
 Southern African Large Telescope Prime Focus Imaging Spectrograph Optical Integration and Testing Plan Document Number: SALT-3160BP0001 Revision 5.0 2007 July 3 Eric B. Burgh University of Wisconsin 1.
SIPS instructions for installation and use
 SIPS instructions for installation and use Introduction Thank you for purchasing the Starlight Integrated Paracorr System (referred to as SIPS hereafter), which incorporates the best focuser on the market
Hyperion. 16 f/7.3 Astrograph Operating Instructions
 Hyperion 16 f/7.3 Astrograph Operating Instructions Thank you for purchasing a Hyperion telescope. You now own the most state-of-the-art astrograph available. In addition to providing a large aberration-free
INSTALLATION & ADJUSTMENT INSTRUCTIONS FOR LETHAL WEAPON MODEL 150 & MODEL 200 SIGHTS AND ACCESSORIES
 Sight Assembly...................2 Mounting Sight on Bow: LW 1.........................2 LW 2.........................3 LW MAX.....................3 Set-Up and Adjustment: 2-Axis Leveling................4
USING THE 2 TELETUBE XLS TM & TELECAT XLS TM ADJUSTABLE SIGHT TUBE
 USING THE 2 TELETUBE XLS TM & TELECAT XLS TM ADJUSTABLE SIGHT TUBE Revised 09/20/08 With the rapid proliferation of larger-aperture, low f-ratio Newtonian telescopes with 2" focusers and larger diagonal
Using a Howie Glatter Laser for Collimation of the Altair Deepfield RC
 Using a Howie Glatter Laser for Collimation of the Altair Deepfield RC Background Collimating a Richey Cretien scope is fundamentally different to collimating a Newtonian or SCT. For optimum performance,
INSTRUCTION MANUAL. X-Wedge for LX200 and LX600 telescopes _07028_XWedge_InstructionManual.indd 1
 INSTRUCTION MANUAL X-Wedge for LX200 and LX600 telescopes 55-12003_07028_XWedge_InstructionManual.indd 1 8/8/2012 11:07:49 AM X-Wedge AutoStar Instruction #497 HANDBOX Manual X-WEDGE OPERATING MANUAL This
Hollywood Swing Away 2 and 4 Bike Racks Assembly and Installation Guide
 Hollywood Swing Away 2 and 4 Bike Racks Assembly and Installation Guide Tools Required: two adjustable wrenches, pliers, ¾ socket wrench recommended Note: please do assembly near your vehicle as you Can
Diode Pointer Quick Start Guide
 Important Note: Read all Danger, Warning, Caution terms, symbols, and instructions located in the (Safety & Hazard information) on our website. Reference the Diode Pointer Specifications located on our
The techniques covered so far -- visual focusing, and
 Section 4: Aids to Focusing The techniques covered so far -- visual focusing, and focusing using numeric data from the software -- can work and work well. But a variety of variables, including everything
US RACK, Inc Falcon Drive, Madera, CA
 US RACK, Inc. - 2850 Falcon Drive, Madera, CA 93637-559-661-3050 INSTRUCTIONS for MOTORCYCLE RACK with Cradling Wheel Chocks WARNING: Do NOT attempt to install or use this rack without following all instructions.
U.S. Rack, Inc Falcon Drive, Madera, CA APR17 INSTALLATION AND USE INSTRUCTIONS for SIDE-MOUNT LADDER RACK
 U.S. Rack, Inc. 2850 Falcon Drive, Madera, CA 93637 15APR17 INSTALLATION AND USE INSTRUCTIONS for SIDE-MOUNT LADDER RACK WARNING: Do NOT attempt to install or use this rack without following all instructions.
Technical Specifications SECTION C
 Page 1 of 12 INSTITUTE FOR PLASMA RESEARCH Technical Specifications SECTION C Design, Fabrication, assembly, testing and supply of Filter polychromators & associated components and demonstration of performance
Hubble Optics Ultra Light UL 16 Dobsonian instruction manual
 Hubble Optics Ultra Light UL 6 Dobsonian instruction manual REV:.. 03-0-202 Please read these instructions thoroughly before beginning assembly and subsequent use of the telescope..unpacking... 2 2. Assembly...
CFC Series Cable Replacement Kit. for CFP Series Carbon Fiber Boom Poles. Owner s Manual
 CFC Series Cable Replacement Kit for CFP Series Carbon Fiber Boom Poles Owner s Manual TA (mini XLR) connector Right-angle XLR connector Nylon line Coiled XLR cable. mm hex key Tip strain relief Introduction
Hubble Optics Ultra Portable UP 12 Dobsonian instruction manual
 Hubble Optics Ultra Portable UP 12 Dobsonian instruction manual Draft: 1.0 12-27-2016 Please read these instructions thoroughly before beginning assembly and subsequent use of the telescope. 1. Unpacking...2
machines 608 Trestle Point Sanford, FL Phone Fax
 Alignment for BOSSLASER machines 608 Trestle Point Sanford, FL 32771 Phone 888-652-1555 Fax 407-878-0880 www.bosslaser.com Table of Contents Four Corner Test. Error! Bookmark not defined. Vertical Alignment...
Service Manual for XLE/XLT Series Laser Engravers
 Service Manual for XLE/XLT Series Laser Engravers Table of Contents Maintenance...1 Beam alignment...3 Auto focus alignment...8 Bridge alignment...10 Electronics panel replacement...11 X motor change...12
Radiant 3000F Video Light (Cat. No. 6052)
") Fantasea Line Radiant 3000F Video Light (Cat. No. 6052) Instruction Manual 1 TABLE OF CONTENTS TABLE OF CONTENTS... 2 DISCLAIMER... 3 INTRODUCTION... 3 GENERAL INFORMATION... 3 SPECIFICATIONS... 4 INCLUDED
Fantasea Line Radiant 3000F Video Light (Cat. No. 6052) Instruction Manual 1 TABLE OF CONTENTS TABLE OF CONTENTS... 2 DISCLAIMER... 3 INTRODUCTION... 3 GENERAL INFORMATION... 3 SPECIFICATIONS... 4 INCLUDED
ABSL Model Background Stand
 ABSL Model Background Stand Product Overview: The Ravelli ABSL model background stand is adjustable up to 13' tall by 15' wide. It is comprised of two tripod stands and five 3 cross bar sections and includes
8MAY15 U.S. Rack Inc Falcon Drive, Madera, CA
 8MAY15 U.S. Rack Inc. 2850 Falcon Drive, Madera, CA 93637 1-888-877-2257 INSTRUCTION for GALLEON OVERHEAD STAKE POCKET RACK WARNING: Do NOT attempt to install or use this rack without following all instructions.
Supplementary Materials
 Supplementary Materials In the supplementary materials of this paper we discuss some practical consideration for alignment of optical components to help unexperienced users to achieve a high performance
AgilOptics mirrors increase coupling efficiency into a 4 µm diameter fiber by 750%.
 Application Note AN004: Fiber Coupling Improvement Introduction AgilOptics mirrors increase coupling efficiency into a 4 µm diameter fiber by 750%. Industrial lasers used for cutting, welding, drilling,
User s Manual Astro-Cube Dew Annihilator (Model:MDA-4)
") User s Manual Astro-Cube Dew Annihilator (Model:MDA-4) Copyright Feb 17th 2017 User s Manual MDA-4 Dew Annihilator Series Contents A. Overview... 2 B. Features... 3 C. Contents Of Box... 5 D. Input/output
User s Manual Astro-Cube Dew Annihilator (Model:MDA-4) Copyright Feb 17th 2017 User s Manual MDA-4 Dew Annihilator Series Contents A. Overview... 2 B. Features... 3 C. Contents Of Box... 5 D. Input/output
Applications of Optics
 Nicholas J. Giordano www.cengage.com/physics/giordano Chapter 26 Applications of Optics Marilyn Akins, PhD Broome Community College Applications of Optics Many devices are based on the principles of optics
Diode Pointer Quick Start Guide
 Important Note: Read all Danger, Warning, Caution terms, symbols, and instructions located on our website. The diode pointer provides a safety measure by enabling operators to monitor the location of the
V-Groover SIMPLEX INSTRUCTION AND OPERATION MANUAL M O DEL 703. For best results use only authentic Logan blades.
 www.logangraphic.com SIMPLEX M O DEL 703 INSTRUCTION AND OPERATION MANUAL For best results use only authentic Logan blades CAUTION: BLADES EXTREMELY SHARP Use replacement blades #1258 Logan Graphic Products,
MODEL M1023 QUICK CHANGE COLLET ATTACHMENT INSTRUCTION MANUAL. Phone: On-Line Technical Support:
 MODEL M1023 QUICK CHANGE COLLET ATTACHMENT INSTRUCTION MANUAL Phone: 1-360-734-3482 On-Line Technical Support: tech-support@shopfox.biz #6727BL COPYRIGHT JANUARY, 2005 BY WOODSTOCK INTERNATIONAL, INC.
STRINGING MACHINE OWNER'S MANUAL. Copyright 1998 GAMMA Sports - All Rights Reserved
 6002 STRINGING MACHINE OWNER'S MANUAL Issue 3 - June 20, 1998 Copyright 1998 GAMMA Sports - All Rights Reserved 6002 OWNER'S MANUAL TABLE OF CONTENTS PAGE 1... WARRANTY PAGE 2... FEATURES PAGE 3... ASSEMBLY
OPERATING INSTRUCTIONS for. Gold-Print TM. Model SPR-10 Screen and Stencil Printer
 OPERATING INSTRUCTIONS for Gold-Print TM Model SPR-10 Screen and Stencil Printer TABLE OF CONTENTS INSTALLATION...3 Z ADJUSTMENTS...3 X, Y & Ø ADJUSTMENTS...4 CIRCUIT BOARD POSITIONING...5 ILLUSTRATIONS...6
Instructions for use:
 Protective T-Ring for CANON EOS #2958550 (basic version: T-Ring without filter) (scope of delivery e.g. version 2958550C with built-in clear protective filter with Phantom Group TM multi-coating Instructions
OWNER S MANUAL Table Tennis Table Patent Pending
 OWNER S MANUAL Table Tennis Table Patent Pending Be sure to write your model number and serial number here for future reference. You can find these numbers printed on the bottom of the table. MODEL # T8266
SYNGUIDER USER'S MANUAL
 SYNGUIDER USER'S MANUAL GETTING STARTED PREPARING THE SYNGUIDER BASIC OPERATIONS OPERATION UNDER THE NIGHT SKY SPECIFICATIONS 1 3 4 9 15 060613V1 Thank you for choosing the SynGuider. The SynGuider can
The Astronomical League
 The Astronomical League www.astroleague.org Library Telescope Modifications Check the collimation with the eyepiece cap provided (the one with the hole in its center) before starting on any modifications.
MaxiMist SprayMate Pro HVLP TANNING SYSTEM
 MaxiMist SprayMate Pro HVLP TANNING SYSTEM DO NOT USE EQUIPMENT BEFORE READING THIS MANUAL This manual contains important warnings and instructions. Please read these instructions carefully and keep for
Models 2230 and 2240
 Models 2230 and 2240 Overview... 2 Tools Needed... 2 Hardware...3 Assembly... 4-13 Installation... 14 Drawer Removal... 15 Operation... 15 Maintenance... 15 Accessories... 16 Limited Warranty... 16 Perform
Ribcage Installation. Part 2 - Assembly. Back-Bone V1.06
 Ribcage Installation Part 2 - Assembly Back-Bone V1.06 Contents Section 1 Before You Get Started... 2 Included With Your Kit:... 2 Figure: A... 3 CAUTION!... 4 Note:... 4 Tools Required... 5 Section 2:
MAXIMIST HVLP TANNING SYSTEM
 L0941 12 10:Layout 1 16/12/10 09:03 Page 1 MAXIMIST HVLP TANNING SYSTEM DO NOT USE EQUIPMENT BEFORE READING THIS MANUAL This manual contains important warnings and instructions. Please read these instructions
OWNER S MANUAL. Safety. Please read this owner s manual before use and keep it at hand for reference. Warranty
 Please read this owner s manual before use and keep it at hand for reference. OWNER S MANUAL Safety Important safety instructions for using the INCRA Miter5000 Before using the INCRA Miter5000, read and
KURT D810 AngLock Vise Base Assembly
 KURT MANUFACUTRING - LIFETIME IRONCLAD TM WARRANTY All Kurt Manufacturing Company industrial workholding products and parts with the exceptions noted below, are warranted against defects in material and
MODEL 7000 BEVEL-MILL
 MODEL 7000 BEVEL-MILL HECK INDUSTRIES P.O. BOX 425 HARTLAND, MI 48353 TOLL FREE: 800-886-5418 PHONE: 810-632-5400 FAX: 810-632-6640 WWW.HECKIND.NET INSTRUCTION MANUAL Save This Manual You will need the
User Manual. Digital Compound Binocular LED Microscope. MicroscopeNet.com
 User Manual Digital Compound Binocular LED Microscope Model MD82ES10 MicroscopeNet.com Table of Contents i. Caution... 1 ii. Care and Maintenance... 2 1. Components Illustration... 3 2. Installation...
USER MANUAL LASER SIGHT. Triple Duty CRL (Compact Rail Laser) English
 English") USER MANUAL LASER SIGHT Triple Duty CRL (Compact Rail Laser) English ABOUT SIGHTMARK Sightmark offers a wide range of products that include red dot scopes, reflex sights, rangefinders, riflescopes, laser
USER MANUAL LASER SIGHT Triple Duty CRL (Compact Rail Laser) English ABOUT SIGHTMARK Sightmark offers a wide range of products that include red dot scopes, reflex sights, rangefinders, riflescopes, laser
INSTRUCTION MANUAL TAPER ATTACHMENT MODEL M1022. Phone: (360) On-Line Technical Support: FOR USE WITH MODEL M1019
 On-Line Technical Support: FOR USE WITH MODEL M1019") MODEL M1022 TAPER ATTACHMENT FOR USE WITH MODEL M1019 INSTRUCTION MANUAL Phone: (360) 734-3482 On-Line Technical Support: tech-support@shopfox.biz #6809BL COPYRIGHT DECEMBER, 2004 BY WOODSTOCK INTERNATIONAL,
MODEL M1022 TAPER ATTACHMENT FOR USE WITH MODEL M1019 INSTRUCTION MANUAL Phone: (360) 734-3482 On-Line Technical Support: tech-support@shopfox.biz #6809BL COPYRIGHT DECEMBER, 2004 BY WOODSTOCK INTERNATIONAL,
MODULAR BUMPER INSTALLATION MANUAL
 MODULAR BUMPER INSTALLATION MANUAL Parts List* 1 Center section 1 Side extension, passenger / right 1 Side extension, driver / left 1 Side cap, passenger / right 1 Side cap, driver / left 1 Brush guard,
Laser Alignment. Step-By-Step for the Epilog Mini / Helix Manufactured From 2004 to 2009 (8000 Model)
") Laser Alignment Step-By-Step for the Epilog Mini / Helix Manufactured From 2004 to 2009 (8000 Model) 1 Laser alignment can be done if any of the following applies to you. You are experiencing a general
Laser Alignment Step-By-Step for the Epilog Mini / Helix Manufactured From 2004 to 2009 (8000 Model) 1 Laser alignment can be done if any of the following applies to you. You are experiencing a general
The only coma-corrector for Newtonian telescopes which does not increase the focal length. An f/4 Newton stays an f/4 Newton! Properties of the MPCC:
 MPCC Mark III Manual Photographic version (for CCD & DSLR): #2458400A V-1 Visual Multi Purpose Coma Corrector Mark III for visual and photographic use #2458403 The only coma-corrector for Newtonian telescopes
Components of the Microscope
 Swift M3 Microscope The Swift M3 is a versatile microscope designed for both microscopic (high magnification, small field of view) and macroscopic (low magnification, large field of view) applications.
User s Manual Astro-Cube MDA-3 Family Dew Annihilator
 User s Manual Astro-Cube MDA-3 Family Dew Annihilator Copyright Sept 20th 2018 User s Manual MDA-3 Dew Annihilator Series Contents A. Overview... 2 B. Features... 4 C. Contents Of Box... 6 D. Input/output
CONFOCAL MICROSCOPE CM-1
 CONFOCAL MICROSCOPE CM-1 USER INSTRUCTIONS Scientific Instruments Dr. J.R. Sandercock Im Grindel 6 Phone: +41 44 776 33 66 Fax: +41 44 776 33 65 E-Mail: info@jrs-si.ch Internet: www.jrs-si.ch 1. Properties
MODEL 83 Pail Handler
 MORSE MFG. CO., INC. 727 West Manlius Street P.O. Box 518 East Syracuse, NY 13057-0518 Phone: 315-437-8475 Fax: 315-437-1029 Email: service@morsemfgco.com Website: www.morsemfgco.com COPYRIGHT 2005 MORSE
US RACK, Inc Falcon Drive, Madera, CA
 US RACK, Inc - 2850 Falcon Drive, Madera, CA 93637-559-661-3050 INSTALLATION AND USE INSTRUCTIONS for Long-John Extension Ladder Rack WARNING: Do NOT attempt to install or use this rack without following
Fletcher F-3000 / F-3100 Accessory Laser Kit
 Fletcher F-3000 / F-3100 Accessory Laser Kit Shown Assembled on F-3000 Machine Product Warranty The Fletcher-Terry Company warrants the product purchased to be free from defects in parts and workmanship
GCX Mounting Assembly Installation Guide. Drager Narcomed GS Anesthesia Machines with Philips MP60/70 IntelliVue Patient Monitor Kit
 GCX Mounting Assembly Installation Guide Drager Narcomed GS Anesthesia Machines with Philips MP60/70 IntelliVue Patient Monitor Kit Philips MP60/70 IntelliVue Patient Monitor AGM Philips M8048A Flexible
Astro-Physics Inc. 400QMD Lubrication/Maintenance Guide
 Astro-Physics Inc. 400QMD Lubrication/Maintenance Guide The following guidelines should be followed to lubricate the three main parts of the 400QMD mount. The QMD stands for Quartz Micro-Drive controller.
LIGHT BEAM ANTENNA MaxRange Antenna Series Assembly Instructions MaxRange Plus Digital / High Definition Television Antennas
 LIGHT BEAM ANTENNA MaxRange Antenna Series Assembly Instructions MaxRange Plus Digital / High Definition Television Antennas Assembly Instructions 1 MaxRange Plus Antenna These instructions will lead you
BL-ER-P Ethernet Radio Unit for Pedestal Installation Guide
 Assemble the Antenna Riser 1. Remove the antenna riser assembly and the antenna from its packaging. 2. Remove the plastic cap, the nut, and the lock washer from the stem of the antenna. 3. Put the stem
MAXIMIST ULTRA PRO HVLP SPRAY TANNING SYSTEM
 MAXIMIST ULTRA PRO HVLP SPRAY TANNING SYSTEM DO NOT USE EQUIPMENT BEFORE READING THIS MANUAL This manual contains important warnings and instructions. Please read these instructions carefully and keep
Introducing Celestron s EdgeHD Optical System
 Introducing Celestron s EdgeHD Optical System See the Universe in HD EdgeHD is an Aplanatic Schmidt telescope designed to produce aberration free images across a wide visual and photographic field of view.
Installation Procedures 2015 Corvette C-7 Z06 With Carbon Fiber Kit SNS 50a
 Installation Procedures 2015 Corvette C-7 Z06 With Carbon Fiber Kit SNS 50a Warning: Please read directions completely before starting. If you have any questions please contact BMPP before beginning your
Radiant Pro 2500 Video Light (Cat. No. 6047)
") Fantasea Line Radiant Pro 2500 Video Light (Cat. No. 6047) Instruction Manual 1 TABLE OF CONTENTS TABLE OF CONTENTS... 2 DISCLAIMER... 3 INTRODUCTION... 3 GENERAL INFORMATION... 3 SPECIFICATIONS... 4 INCLUDED
Fantasea Line Radiant Pro 2500 Video Light (Cat. No. 6047) Instruction Manual 1 TABLE OF CONTENTS TABLE OF CONTENTS... 2 DISCLAIMER... 3 INTRODUCTION... 3 GENERAL INFORMATION... 3 SPECIFICATIONS... 4 INCLUDED
User s Manual Meade Astro-Cube Dew Annihilator (Models Meade MD-A)
") User s Manual Meade Astro-Cube Dew Annihilator (Models Meade MD-A) Copyright Dec 7 2016 User s Manual for the Astro-Smart Astro-Cube Dew Annihilator (Models Meade M-DA) Contents A. Overview... 2 B. Features...
User s Manual Meade Astro-Cube Dew Annihilator (Models Meade MD-A) Copyright Dec 7 2016 User s Manual for the Astro-Smart Astro-Cube Dew Annihilator (Models Meade M-DA) Contents A. Overview... 2 B. Features...
ILFORD SPORTSVIEW PROJECTOR INSTRUCTION BOOK
 ILFORD SPORTSVIEW PROJECTOR INSTRUCTION BOOK Now that you're the owner of a new Sportsview Projector, you'll want to begin using it right away. The Sportsview Projector is extremely simple to operate,
Phone # La Jolla Doors. Block Frame Installation Manual Aluminum Frame with either Vinyl or Aluminum Panels
 Phone # 800-440-8785 www.lajolladoors.com La Jolla Doors Block Frame Installation Manual Aluminum Frame with either Vinyl or Aluminum Panels Thank you for choosing La Jolla Doors In this manual you will
Legacy Woodworking Machinery a division of Phantom Engineering. The Legacy CNC. Assembly Manual
 Legacy Woodworking Machinery a division of Phantom Engineering The Legacy CNC Assembly Manual New Orientation of the Legacy Step one: Re-orientation of the machine Remove the X-axis screw and supports.
User s Manual Astro-Cube Dew Annihilator (Model:MDA-3)
") User s Manual Astro-Cube Dew Annihilator (Model:MDA-3) Copyright Feb 17th 2017 User s Manual MDA-3 Dew Annihilator Series Contents A. Overview... 2 B. Features... 4 C. Contents Of Box... 5 D. Input/output
User s Manual Astro-Cube Dew Annihilator (Model:MDA-3) Copyright Feb 17th 2017 User s Manual MDA-3 Dew Annihilator Series Contents A. Overview... 2 B. Features... 4 C. Contents Of Box... 5 D. Input/output
ENGLISH. DL6(M) DoveLock Quick Change Jaw System User Guide
 DoveLock Quick Change Jaw System User Guide") ENGLISH DL6(M) DoveLock Quick Change Jaw System User Guide Introduction Thank you for purchasing the Kurt DoveLock Quick Change jaw system. The following instruction will help you to install and use your
ENGLISH DL6(M) DoveLock Quick Change Jaw System User Guide Introduction Thank you for purchasing the Kurt DoveLock Quick Change jaw system. The following instruction will help you to install and use your
Lunette 2 Series. Curved Fixed Frame Projection Screen. User s Guide
 Lunette 2 Series Curved Fixed Frame Projection Screen User s Guide Important Safety and Warning Precautions Please follow these instructions carefully to ensure proper maintenance and safety with your
Sunset Swings By Health in Motion, LLC
 Sunset Swings By Health in Motion, LLC Model 421 Lounge Swing Assembly and Operation Manual Record Serial Number Here www.sunsetswings.com by Health In Motion, LLC. 11/6/2009 421 Owners Assembly and Operation
INSTALL INSTRUCTIONS WELCOME TO THE NEWAGE PERFORMANCE CABINETRY SERIES NEWAGE STEEL WELDED CABINETRY
 NEWAGE STEEL WELDED CABINETRY WELCOME TO THE NEWAGE PERFORMANCE CABINETRY SERIES ALL CABINETS MUST BE MOUNTED TO STUDS ON A SECURE WALL, AS PER THESE INSTRUCTIONS. FAILURE TO DO SO MAY RESULT IN SERIOUS
ABM International, Inc.
 ABM International, Inc. Lightning Stitch required 1 1.0: Parts List head and motor assembly (Qty. 1) Reel stand (Qty. 1) Needle bar frame clamp (Qty. 1) Motor drive (Qty. 1) 2 Cable harness with bracket
Installation Procedures For Corvette Basic/C-6 SNS 28
 Installation Procedures For 2005-2013 Corvette Basic/C-6 SNS 28 Warning: Please read directions completely before starting. If you have any questions please contact BMPP before beginning your installation.
INSTALLATION MANUAL FRONT. See pages 2 and 3 of this manual for configuration options. Level of Difficulty. Product Photo (center section only)
") INSTALLATION MANUAL FRONT Level of Difficulty Moderate Product Photo (center section only) All hardware listed below will be provided with the bumpers center section. Additional hardware will be supplied
INSTALLATION MANUAL FRONT Level of Difficulty Moderate Product Photo (center section only) All hardware listed below will be provided with the bumpers center section. Additional hardware will be supplied
Tools Needed 3/32 Allen Wrench which is located in your accessory kit Masking Tape
 Beam Alignment Overview Proper alignment of the beam is an important part of laser preventive maintenance. If the beam is out of alignment it is possible to lose power on the table, which will yield poor
Please Do Not Return This Product To The Store!
 MODEL NOS. T8512 TOURNAMENT SERIES 3 TABLE TENNIS TABLE OWNER'S MANUAL 1. Read this manual carefully before starting assembly. Read each step completely before beginning each step. 2. Some smaller parts
COMPETITOR CB-610 STANDARD BENCH
 NOTE: Please read all instructions carefully before using this product Table of Contents Safety Notice COMPETITOR CB-610 STANDARD BENCH Hardware Identifier Assembly Instruction Exploded Diagram Parts List
TABLE OF CONTENTS. Safety notes i. Care and Maintenance. ii. 1. Components Illustration Installation of Components.. 4
 TABLE OF CONTENTS Safety notes i Care and Maintenance. ii 1. Components Illustration... 1 2. Installation of Components.. 4 2.1 Installation Diagram... 4 2.2 Installation Procedures 5 3. Operation...11
INSTRUCTION MANUAL. Lathe Duplicator MODEL North Glenn Road, Casper, Wyoming woodworker.com
 140-069LatheDuplictr(1/12) 10/30/06 8:20 AM Page 1 INSTRUCTION MANUAL Lathe Duplicator MODEL 140-069 1108 North Glenn Road, Casper, Wyoming 82601 1-800-645-9292 woodworker.com 140-069LatheDuplictr(1/12)
Ambient Light Rejecting Fixed Frame Screen. (3.9 width frame) User s Guide
 User s Guide") Ambient Light Rejecting Fixed Frame Screen (3.9 width frame) User s Guide Attention: The DarkStar 9 is composed of high quality sensitive multi-layer projection material. Please follow the precautions
Ambient Light Rejecting Fixed Frame Screen (3.9 width frame) User s Guide Attention: The DarkStar 9 is composed of high quality sensitive multi-layer projection material. Please follow the precautions
Dual Arm Tilt LCD Mount
 Installation Manual model # 51324 M o u n t i n g S y s t e m s Dual Arm Tilt LCD Mount Fits Displays 13 to 32 Supports Up to 50 lbs (23 kgs) Projection from Wall from 3 to 17 Meets VESA Standards 50/75/100,
Page 1. SureMotion Quick-Start Guide: LACPACC_QS 1st Edition - Revision A 03/15/16
 R K C T I Repair Kit Product Compatibility Repair Kit # Linear Actuator Assembly # LACPACC-002 LACPACC-003 LACP-16TxxLP5 (0.5-in lead screw pitch) LACP-16TxxL1 (1-in lead screw pitch) C P I R K 4 ea Flanged
PFT CABLE GYM INSTRUCTION MANUAL
 PFT CABLE GYM INSTRUCTION MANUAL QUESTION? As a quality home gym supplier we are committed to your complete satisfaction. If you have questions, or find missing or damaged parts, we will guarantee your
QUAD 1000 OWNERS MANUAL OPERATION GUIDE
 QUAD 1000 OWNERS MANUAL OPERATION GUIDE www.laserlinemfg.com REV. 4.30.18 COMPONENTS 4001-0000 Quad 1000 5 arc second zenith laser featuring electronic servo self-leveling with variable temperature compensation
MODEL SETUP & OPERATION MANUAL DOVETAIL JIG FEATURES SPECIFICATIONS
 SETUP & OPERATION MANUAL FEATURES Male and female dovetail joints are cut simultaneously, to ensure perfectly matched dovetail joints. Side stops provided, allow repeated precise dovetail joint cutting
Field Inspection Gage. Instruction Manual
 Field Inspection Gage Instruction Manual IMPORTANT This Manual details the use of the Denar Field Inspection Gage to calibrate Denar Articulators. For information on the use of the condylar and incisal
QL55 Series Luminescence Sensor
 Self-contained, microprocessor-based luminescence sensor Features Self-contained design in a robust, compact metal housing High sensitivity Microprocessor-controlled Senses luminescent marks, even on luminescent
impact VC-500LR Monolight INSTRUCTIONS
 impact lighting equipment and accessories VC-500LR Monolight INSTRUCTIONS Congratulations on your purchase of the Impact VC-500LR Monolight. We feel that it will contribute much to your photographic skill
Installation Instructions FW8S-STXL / FW8G-STXL Filter Wheel
 Installation Instructions FW8S-STXL / FW8G-STXL Filter Wheel SBIG Astronomical Instruments, A Division of Diffraction Limited. 59 Grenfell Crescent, Unit B, Ottawa, ON Canada, k2g 0G3 Tel: 613.225.2732
CHARA AO Calibration Process
 CHARA AO Calibration Process Judit Sturmann CHARA AO Project Overview Phase I. Under way WFS on telescopes used as tip-tilt detector Phase II. Not yet funded WFS and large DM in place of M4 on telescopes
INSTALLATION INSTRUCTIONS for INSIGHT FIBER OPTIC FLAME SCANNERS
 CU-101 JUNE 2, 2009 INSTALLATION INSTRUCTIONS for INSIGHT FIBER OPTIC FLAME SCANNERS APPLICATION The FIREYE fiber optic scanners have been designed for installation on burners where movable vanes, air
SIMPLEX ELITE MAT CUTTER
 INSTRUCTION MANUAL MODEL 750-1 / 760-1 SIMPLEX ELITE MAT CUTTER INSTRUCTIONS AND OPERATION MANUAL 40 in (101 cm) mat cutting system with bevel & straight cutters, production stops, 27 in (68 cm) squaring
1. TABLE OF CONTENT 2. ASSEMBLY ATEX. PENCOflex Installation Instructions & Service Manual
 ATEX 1. TABLE OF CONTENT 1. Table Of content... 1 2. Assembly... 1 3. Alignment... 2 4. Earthing... 3 5. Inspection and replacement of Elastic elements... 4 5.1. Rubber elements... 4 5.2. Pins... 4 5.2.1
INSTALLATION MANUAL GIOTTO SCREEN
 INSTALLATION MANUAL GIOTTO SCREEN Before installing the Giotto screen, please read the following instructions carefully: The Giotto screen must be used INDOORS ONLY. It is forbidden to stay under the Giotto
OPERATIONS MANUAL. Port-O-Slitter
 Tapco Products Company The World Leader in Specialty Tools for the Professional Port-O-Slitter OPERATIONS MANUAL General instructions, set up, accessories and guide to using your portable precision slitting,