OKI B721/B731/MPS5501 Printer Important Information Update
|
|
|
- Robert Johnston
- 5 years ago
- Views:
Transcription

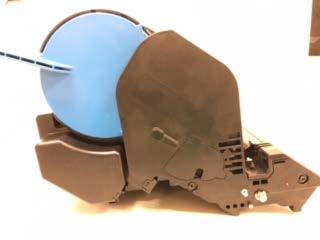
1 OKI B721/B731/MPS5501 Printer Important Information Update 543 Toner Sensor Error after installing a new or replacement print cartridge into the printer. Check the print cartridge for the following problem before checking any other possible causes. Confirm that all shipping restraints have been removed from the print cartridge. While the print cartridge is still installed in the printer confirm that the Blue Lock Lever is in the UP / Locked Position (see red arrow below). Note: If the Blue Lock Lever is in the Down / Unlocked position when the print cartridge is installed in the printer the 543 Toner Sensor Error will appear. Ensure blue lever is in up position, then close the front cover and see if the 543 Toner Sensor Error clears. If the error clears, there is no need to read beyond this point. Procedure completed If the error persists remove the print cartridge from the printer and place it onto a flat surface. Look for the small access panel on the right side of the printer cartridge. Page 1 of 6

2 Page 2 of 6
.")
.")


3 With the print cartridge sitting on the flat surface look into the small window in the access panel. Move the blue lock lever to the down / unlocked position. You should see the black lever behind the access panel blocking the small window (see red circles below). Now move the blue lock lever in the up / locked position. You should not see the black lever behind the access panel blocking the small window (see red circle below). Repeat moving the blue lock lever up and down 2 or 3 times to insure everything is working properly. Normally you should not see the black lever in the access panel window when the blue lock lever is in the up / locked position. Blue Lever Position Window View Comments DOWN Black lever blocks window Correct Position UP Black lever DOES NOT block window Correct Position UP Black lever blocks window Incorrect Position If moving the Blue lever results in the correct position, cartridge is ok, procedure complete. Based on this result - recheck cartridge installation, if a 543 condition persists, please contact OKIDATA for additional troubleshooting With the blue lever UP, if it results in the black lever blocking the window, (in red above), please continue below. Page 3 of 6

4 Based on above, the window is being blocked by the black lever, when the blue lock lever is in the up / locked position. This is the source of the 543 toner sensor error condition. To resolve the 543 Toner Sensor Error condition, and to continue to use the print cartridge, you need to perform the following procedure: Carefully insert a screw driver blade into the opening to lift the access panel off of the print cartridge. WARNING: Do not insert the screwdriver blade too far into the opening as you could lift the light colored toner flag off of its mounting (see red arrow below). Page 4 of 6
.")


5 Once the access panel has been lifted off the print cartridge you can remove the malfunctioning black lever (see red arrow below). Now that the black lever has been removed replace the access cover. Line up the three studs on the back side of the of the access cover with the corresponding holes in the print cartridge. Then press the access cover into place with your finger. Modification is now complete. Insert the print cartridge into the printer. Make sure the blue lock lever is in the up / locked position. Close the printer front cover and the 543 Toner Sensor Error will clear. Page 5 of 6
6 If the error does not clear make sure the print cartridge is properly in position. If it still does not clear you need to trouble shoot the printer. Important Note: This modification will not cause any problems with the cartridge; it will function normally until it is time to replace the cartridge. Please call OKIDATA to get help with any part of this process, or to trouble shoot the printer if the 543 Toner Sensor Error is not cleared when you are finished. Page 6 of 6
How to remove Jammed Paper
 How to remove Jammed Paper C301/C310/C321/C330/ C331/C510/C511/C530/ C531/ES5430/ES5431 Rev.1 Paper Jams Paper jams occasionally occur due to paper misfeeding from a paper tray or at any point on the paper
How to remove Jammed Paper
 How to remove Jammed Paper MC760/MC770/MC780 ES7470/ES7480 Rev.1 Paper Jams Paper jams occasionally occur due to paper misfeeding from a paper tray or at any point on the paper path through the printer.
Installation Instructions for Converting Hinging on Roll-In Refrigerators
 Installation Instructions for Converting Hinging on Roll-In Refrigerators Part number 161651 hinge conversion kit RH is for converting a right side hinged door and part number 161652 hinge conversion kit
LEFT-SIDE CARTR. LATCH REPLACEMENT
 Service Edge Page 5 long screw A. TOP COVER: 3 short screws, 1 long screw B. LEFT COVER: 4 tabs, 2 screws SCREW SCREW LEFT-SIDE CARTR. LATCH REPLACEMENT CLJ 3000, 3600, 3800, CP3505 This printer series
ES3640e MFP Technician s Installation Guide
 Technician s Installation Guide Configuration A with High Capacity Feeder HCF.jpg Configuration B with Second Tray and Cabinet cab.jpg With optional Finisher: ES3640e MFP 01_Finis her.jpg 1 Warning Icon.jpg
FD 1202 AutoSeal Tabletop Pressure Sealer
 FD 1202 AutoSeal Tabletop Pressure Sealer 4/2015 OPERATOR MANUAL FIRST EDITION TABLE OF CONTENTS TOPIC PAGE SPECIFICATIONS 1 UNPACKING, COMPONENTS 2 SET-UP 3 OPERATION 5 DETERMINING FOLD TYPE 6 ADJUSTING
Tuscany 32" x 79" Open Bookcase
 Tuscany 32" x 79" Open Bookcase ADULT ASSEMBLY REQUIRED DUE TO THE PRESENCE OF SMALL PARTS, SHARP POINTS, SHARP EDGES If you have any questions regarding assembly or if you are missing parts, do not return
ApexDesk Assembly Guide
 ELECTRIC HEIGHT-ADJUSTED SIT TO STAND DESK ApexDesk Assembly Guide REV-1507C Table of Contents CAUTION, USE & LIABILITY... 3 PARTS & HARDWARE LIST... 4 PARTS / COMPONENT DIAGRAMS... 5 ASSEMBLY INSTRUCTIONS...
XEROX PHASER 3600 TONER CARTRIDGE REMANUFACTURING INSTRUCTIONS
 XEROX PHASER 3600 TONER CARTRIDGE REMANUFACTURING INSTRUCTIONS XEROX PHASER 3600 TONER CARTRIDGE REMANUFACTURING THE XEROX PHASER 3600 TONER CARTRIDGE By Mike Josiah and the Technical Staff at UniNet The
OKI C911 / 931 / 941
 OKI C911 / 931 / 941 Disassembly & Reassembly Procedures Distributed at the Oki Data C900 Series Service Classes Oki Data Training Department REV. 1.60 2000 Bishops Gate Blvd. Mt. Laurel, NJ 08054 Copyright
fi-6130 / fi-6230 Cleaning and Maintenance
 fi-6130 / fi-6230 Cleaning and Maintenance fi-6130 / fi-6230 Cleaning and Maintenance fi-6130 / fi-6230 Image Scanner Operator's Guide Chapter 4 DAILY CARE This chapter describes how to clean the scanner.
Cleaning the cutter blade
 Cleaning the cutter blade < Daily maintenance > In order to use this printer in good condition, please perform the daily maintenance. Note the following when performing the maintenance. Do not lubricate
MY-HITE ADJUSTABLE TABLE
 081717 MY-HITE ADJUSTABLE TABLE Model Number : FSQAHTB FRIANT & ASSOC. 4901 E.12 STREET OAKLAND, CA 94601 T:510.535.5113 FAX:510.535.5237 www.friant.com/systems/my-hite Please Read Instructions Before
Tilting & Swiveling Plasma/LCD Flat Panel Wall Mount Installation Guide Model: A380SM
 Tilting & Swiveling Plasma/LCD Flat Panel Wall Mount Installation Guide Model: A380SM Easy installation Built-in level for easy positioning Corrective leveling adjustments after installation Forward /
MY-HITE CORNER ADJUSTABLE TABLE
 081717 MY-HITE CORNER ADJUSTABLE TABLE C-LEG OPTION Model Number : FCNAHBC FRIANT & ASSOC. 4901 E.12 STREET OAKLAND, CA 94601 T:510.535.5113 FAX:510.535.5237 www.friant.com/systems/my-hite Please Read
FORMAX. FD1500 AutoSeal OPERATOR MANUAL FIRST EDITION
 FORMAX FD1500 AutoSeal OPERATOR MANUAL FIRST EDITION TABLE OF CONTENTS 1500 Shown with Optional Stand Page: 1. DESCRIPTION, UNPACKING AND SET UP 2. CONTROLS, OPERATION 3. FOLD PLATE ADJUSTMENT, SETTING
Video Wall Installation Instructions 2W X 3H, 3W X 3H
 Video Wall Installation Instructions 2W X 3H, 3W X 3H www.microndisplaysolutions.com Table of Contents Important Safety Instructions... 3 Configuration... 4 Package Contents, included and optional items...
Vinyl Cutter Instruction Manual
 Vinyl Cutter Instruction Manual 1 Product Inventory Inventory Here is a list of items you will receive with your vinyl cutter: Product components (Fig.1-4): 1x Cutter head unit complete with motor, plastic
Wixey ELECTRONIC DIGITAL READOUT
 Wixey ELECTRONIC DIGITAL READOUT Model WR500 INSTRUCTIONS Step 1- Mounting the readout assembly to your planer 1 Tighten any of the side cover mounting screws (1) and if necessary use a small amount of
INSTALLATION INSTRUCTIONS FOR A&L PRODUCTS
 INSTALLATION INSTRUCTIONS FOR A&L PRODUCTS AUGUST 2017 1 RECOMMENDED BUILDING IN-DETAIL Should you require further information, please contact A&L Windows on 1800 441 414 2 IMPORTANT IMPORTANT Allow Vinyl
How to remove Jammed Paper
 How to remove Jammed Paper C801/C810/C821/C830/ C8600/C8800/ES2632a3/ ES8430 Rev.1 Paper Jams Paper jams occasionally occur due to paper misfeeding from a paper tray or at any point on the paper path through
NORMAN SHUTTERS INSTALLATION INSTRUCTIONS. 4 sided Deco Frame. (Outside Mount - 2 Panel) Getting Started
 Getting Started") NORMAN SHUTTERS INSTALLATION INSTRUCTIONS 4 sided Deco Frame (Outside Mount - 2 Panel) Getting Started Recommended Tools: Nail Gun or Drill, Tape Measure, Torpedo Level, Box Knife, 6 Philips head driver
NORMAN SHUTTERS INSTALLATION INSTRUCTIONS 4 sided Deco Frame (Outside Mount - 2 Panel) Getting Started Recommended Tools: Nail Gun or Drill, Tape Measure, Torpedo Level, Box Knife, 6 Philips head driver
Required Tools: Suggested Additional Tools: 1 Cordless Drill with Robertson Bits 1 Ratchet Wrench 1 7/16 or 11mm socket 1 7/16 or 11mm Gear Wrench
 Thank you for your recent purchase of a Cabinets by Hayley garage cabinet system. You are about to experience the best made cabinets that you can purchase. Cabinets by Hayley are designed for beauty and
Tilting, Swiveling & Rotating Flat Panel Wall Mount
 Tilting, Swiveling & Rotating Flat Panel Wall Mount Model: VXA980TC +5 to -5 +5 to -5 Supports most 0-80 Flat Panel TVs Maximum Weight Capacity: 32 lbs. Supports VESA Sizes up to 600x500 For technical
How to remove Jammed Paper
 How to remove Jammed Paper B840/ES8140 Rev.1 Paper Jams Paper jams occasionally occur due to paper misfeeding from a paper tray or at any point on the paper path through the printer. When a jam occurs,
Rim-Lock Door Set Installation Instructions
 Rim-Lock Door Set Installation Instructions Let s get started Check Your Parts List Two Doorknobs with Set Screws B. Doorknob Spindle C. Rim Lock with Mounting Screws D. Keeper with Mounting Screws E.
TONER CARTRIDGE REMANUFACTURING INSTRUCTIONS DELL 1130 TONER CARTRIDGE
 DELL 1130 TONER CARTRIDGE REMANUFACTURING INSTRUCTIONS DELL 1130 TONER CARTRIDGE REMANUFACTURING THE DELL 1130 CARTRIDGE By Mike Josiah and the Technical Staff at UniNet DELL 1130 CORE CHANGE UNINET TECH
INSTALLATION GUIDE 2009-CURRENT HUMMER H3T PRODUCT CODE:
 INSTALLATION GUIDE 2009-CURRENT HUMMER H3T PRODUCT CODE: 268 June 22, 2010 TOOLS NEEDED COMPONENTS INCLUDED P2 Tip 3/8" Drill Rubber Gasket(s) x 2 Bracket(s) x 2 1/2" Drill Bit Bulkhead Flange #2 Phillips
INSTALLATION INSTRUCTIONS Lateral Shift Accessory Model: PAC-800
 INSTALLATION INSTRUCTIONS Lateral Shift Accessory Model: PAC-800 The PAC-800 Lateral Shift Accessory is for use with Chief Model PSM, PST, PRO, PLP, Large Flat Panel Display wall mounts. It can be installed
Solar & Roller Shades
 STEP BY STEP INSTALLATION INSTRUCTIONS Solar & Roller Shades Cordless Control with Mounting Bar or Cordless Control with Cassette Table of Contents Step 1 - Getting Started.... 3 Everything You Need A
Congratulations on your purchase of our new reproduced 1969 Mercury Cougar Stainless Steel Rocker Moldings
 Congratulations on your purchase of our new reproduced 1969 Mercury Cougar Stainless Steel Rocker Moldings Before starting installation, we recommend that you read these instructions a couple of times
FD 125 Large-Format Card Cutter
 FD 125 Large-Format Card Cutter 3/201 OPERATOR MANUAL Page 2 Table of Contents SAFETY PRECAUTIONS... 4 Introduction... 5 Specifications... 5 Accessories... 5 Major Components and Assemblies... 6 Control
Solar & Roller Shades
 STEP BY STEP INSTALLATION INSTRUCTIONS Solar & Roller Shades Cordless Control with Mounting Bar or Cordless Control with Cassette Everything You Need A Smooth Set-Up We want you to love your new window
FD 2002IL AutoSeal System
 FD 2002IL AutoSeal System 4/2017 OPERATOR MANUAL FIRST EDITION TABLE OF CONTENTS DESCRIPTION 1 SPECIFICATIONS 1 UNPACKING 1 SETUP 2 Sealer Alignment Base Setup 2 Sealer Setup 2-4 Printer Alignment Base
STENCIL MACHINE OPERATION uline.com H-259, H-347 H-408 CUTTING THE OIL BOARD INSERTING THE OIL BOARD
 H-259, H-347 H-408 π STENCIL MACHINE 1-800-295-5510 uline.com OPERATION NOTE: No assembly is necessary after you unpack your machine. INSERTING THE OIL BOARD 1. Move the release lever to the right. This
Assembly Instructions for Model: VMPL3
 Assembly Instructions for Model: VMPL3 Thank you for choosing a Sanus Systems VisionMount Wall Mount. The VMPL3 is designed to hold 27-84 Flat Panel LCD or Plasma Displays weighing up to 280 lbs. It will
Sentinel Series Cigar Humidor End Tables
 Sentinel Series Cigar Humidor End Tables Assembly Instructions Models: Sentinel 500, 1000 and 1500 Style: Contemporary SENTINEL ASSEMBLY INSTRUCTIONS Congratulations! You have purchased a superior cigar
COLOR LASERJET PRO MFP. Repair Manual
 OK COLOR LASERJET PRO MFP Repair Manual X M76 M77 HP Color LaserJet Pro MFP M76, M77 Repair Manual Copyright and License 03 Copyright Hewlett-Packard Development Company, L.P. Reproduction, adaptation,
MORTISE LOCK INSTALLATION INSTRUCTIONS
 MORTISE LOCK INSTALLATION INSTRUCTIONS INSPIRE TM ROSELESS DESIGNER TRIM FM 340 Rev. 10/18 TABLE OF CONTENTS: DOOR PREPARATION 1 ML2000 LOCK HANDING 2 FULL WORKING TRIM (STD) 3 HALF WORKING TRIM (M30)
Trouble shooting guide for Detecto Mechanical Physicians Balance Beam Scales Models:
 Trouble shooting guide for Detecto Mechanical Physicians Balance Beam Scales Models: 475-485-4420-4520-495-437-438-439-337-339 Symptom: Cannot balance (Calibrate Zero) using zero balance adjustment Beam
Product End-of-Life Disassembly Instructions Product Category: Printers
 Product End-of-Life Disassembly Instructions Product Category: Printers Marketing Name / Model [List multiple models if applicable.] HP Officejet Pro X45dn/ CN459A HP Officejet Pro X45dw/CN463A HP Officejet
OPERATOR'S MANUAL RULES FOR SAFE OPERATION
 OPERATOR'S MANUAL #4950300 ROUTER AND JIG SAW MOUNTING KIT (FOR USE WITH THE BT3000 TABLE SAW) CONGRATULATIONS AND THANK YOU FOR BUYING THIS RYOBI ROUTER AND JIG SAW MOUNTING KIT. Your new #4950300 Router
How to Install Custom Real Wood and Faux Wood Blinds
 Before you begin your installation: READ ALL INSTALLATION INSTRUCTIONS! Make sure that you have all tools and hardware needed for installation. Check the installation surface (wall, ceiling, or window
Thank you for selecting the Fuji Xerox ApeosPort/ DocuCentre-V 3065/3060/2060 hereafter referred as the machine, the device or the printer.
 Features Content Thank you for selecting the Fuji Xerox ApeosPort/ DocuCentre-V 3065/3060/2060 hereafter referred as the machine, the device or the printer. This complimentary user guide describes the
Epson Work Force 1100 CFS System Installation Instructions
 Epson Work Force 1100 CFS System Installation Instructions Epson Work Force 1100 with MIS CFS System Prerequisite - Before starting this installation, you MUST test your printer to make sure it is printing
ContainAire Dual Sliding Door Unit Pictogram User Installation Guide
 ContainAire Dual Sliding Door Unit Pictogram User Installation Guide 2014 Tate Access Floors, Inc. 1 Introduction Thank you for choosing a Tate Airflow product. Tate Airflow products are engineered to
INSTALLATION INSTRUCTIONS Flat Panel Static Wall Mount Model: GSM-111
 INSTALLATION INSTRUCTIONS Flat Panel Static Wall Mount Model: GSM-111 The GSM-111 static wall mount fits most 23" to 30" displays. The GSM-111 is designed to adapt to VESA 200mm/ 100mm compliant displays.
Must read this before installation Important instructions about your CISS system HP8500/HP8000
 Must read this before installation Important instructions about your CISS system HP8500/HP8000 1. If your printer is brand new you must first install the original cartridges that came with your printer.
Stair Mounting Kit. Installing safety gates in modern homes can be very challenging, especially for stairs.
 Stair Mounting Kit Installation Guide Installing safety gates in modern homes can be very challenging, especially for stairs. The Stair Mounting Kit will allow you to mount gates to most square and round
INSTALLATION INSTRUCTIONS Medium Flat Panel Model MSP-SI1
 INSTALLATION INSTRUCTIONS Medium Flat Panel Model MSP-SI1 IMPORTANT! : The MSP-S11 Mount is designed for use with Sharp 45" LCD displays that have a 200mm x 200mm mounting pattern. IMPORTANT! : The mount
V-Groover SIMPLEX INSTRUCTION AND OPERATION MANUAL M O DEL 703. For best results use only authentic Logan blades.
 www.logangraphic.com SIMPLEX M O DEL 703 INSTRUCTION AND OPERATION MANUAL For best results use only authentic Logan blades CAUTION: BLADES EXTREMELY SHARP Use replacement blades #1258 Logan Graphic Products,
How to remove Jammed Paper
 How to remove Jammed Paper MC851(+)/MC860/MC861(+)/ ES8451MFP/ES8460MFP/ ES8461MFP Rev.1 Paper Jams Paper jams occasionally occur due to paper misfeeding from a paper tray or at any point on the paper
Installing Your Electronic Deadbolt
 Ultra Security Plus Electronic Deadbolt Installation Instructions http://www.hberger.com/video-gallery/electronic-deadbolt New Installation Lock Location Preparation (Skip this section if you door has
MULTI-ACTIVITY PLAY TABLE
 ASSEMBLY INSTRUCTIONS! WARNING: CHOKING HAZARD - Small parts. Not for children under 3 years.! CAUTION: Adult assembly required. C 2006 Melissa and Doug, Inc. All Rights Reserved www.melissaanddoug.com
AutoSeal FD 1506 Plus / FE 1506 Plus
 AutoSeal FD 1506 Plus / FE 1506 Plus FK / FL SERIES 06/2018 OPERATOR MANUAL FIRST EDITION TABLE OF CONTENTS DESCRIPTION 1 UNPACKING AND SET-UP 2 CONTROL PANEL 3 OPERATION 3 FOLD PLATE ADJUSTMENT 4 SETTING
Sentinel Series Cigar Humidor End Tables
 Sentinel Series Cigar Humidor End Tables Assembly Instructions Models: Sentinel 500, 1000 and 1500 Style: Traditional SENTINEL ASSEMBLY INSTRUCTIONS Congratulations! You have purchased a superior cigar
HARVIL 3-IN-1 FLIP TABLE ASSEMBLY INSTRUCTIONS
 HARVIL 3-IN-1 FLIP TABLE ASSEMBLY INSTRUCTIONS NGD1018/1022 THANK YOU! Thank you for your purchase of this Harvil product. We work around the clock and around the globe to ensure that Harvil products maintain
ALUMA-CLASSIC FENCE W1716 & W1720 INSTRUCTION MANUAL
 ALUMA-CLASSIC FENCE W1716 & W1720 INSTRUCTION MANUAL Phone: Phone: 1-360-734-3482 On-Line On-Line Technical Technical Support: Support: tech-support@woodstockint.com tech-support@shopfox.biz COPYRIGHT
HP COLOR LASERJET 3500
 HP COLOR LASERJET 3500 TONER CARTRIDGE REMANUFACTURING INSTRUCTIONS HP COLOR LASERJET 3500 TONER CARTRIDGE REMANUFACTURING THE HP 3500 COLOR LASERJET TONER CARTRIDGE By Javier Gonzalez and the Technical
1 Rolscreen Cartridge Removal:
 Rolscreen Retractable Screen Cartridge Dis-Assembly and Assembly Service Instruction These instructions apply to: Rolscreen Retractable Screen 2/2017-Current Tools Required: Flat blade screwdriver Drill/driver
Whalen Furniture Mfg. Factory No. 5 Page # 1
 If you have any questions regarding assembly or if you are missing parts, do not return this item to Sam s Wholesale Club Please call our customer service number and have your instructions and parts list
Replacing the Reciprocator on the SWF Compact Series Machine (601C and 1201C)
") Follow the instructions below to replace the reciprocator in the SWF Compact series machines. The tools required can be found in the tool kit that came with the machine. Preparation 1. First, place the
Follow the instructions below to replace the reciprocator in the SWF Compact series machines. The tools required can be found in the tool kit that came with the machine. Preparation 1. First, place the
GETTING STARTED. Instructions IMPORTANT PS B PS B. Record the serial number from the tag on the door front.
 PS-15-20-B IMPORTANT Instructions Record the serial number from the tag on the door front. Keep keys in a secure place away from children. DO NOT STORE KEYS INSIDE SAFE GETTING STARTED When you first receive
INSTALLATION OF WELLS SUPER QUICK CHUCK LEFT HAND ON BALDOR LATHE
 DENTAL, INC. TECHNICAL BULLETIN Q832-022510 5860 FLYNN CREEK ROAD READ ALL INSTRUCTIONS P.O. BOX 106 BEFORE PROCEEDING COMPTCHE, CALIFORNIA, U.S.A. 95427 SAVE THIS FOR FUTURE REFERENCE THIS PRODUCT IS
Thanks for shopping with Improvements! Slanted Shoe Shelves Item #512142
 Thanks for shopping with Improvements! Slanted Shoe Shelves Item #512142 Note: Read these instructions carefully before assembling. Tools required: Philips screwdriver (not included). Find a clean, smooth
STEP BY STEP INSTALLATION INSTRUCTIONS. Sheer Shadings. Cordless Control
 STEP BY STEP INSTALLATION INSTRUCTIONS Sheer Shadings Cordless Control Everything You Need A Smooth Set-Up We want you to love your new window coverings and that includes having a smooth installation experience.
EmagiKit. Privacy Pod Plus. Quiet. Easy. Affordable. INSTRUCTIONS ASSEMBLY
 EmagiKit Privacy Pod Plus Quiet. Easy. Affordable. INSTRUCTIONS ASSEMBLY DIMENSIONS AND COMPONENTS 47 47 Ceiling Unit 2-B 2-L 2-R Glass Door Corner Trim Door Handle 90 Adjustable Height Work Surface 1-B
Installation Instructions 8115F 8115SF
 TM Installation Instructions 85F 85SF Single Control Centerset Lavatory Faucet with Speed Connect Drain Congratulations on purchasing your American Standard faucet with the Speed Connect Drain, a feature
Installation Instructions
 for s TOC Table of Contents 1 Mortise Lock Handing Instructions.... 2 2 3 4 5 Mortise Lock Door Preparation & Installation... 3 HSS Trim Installation.... 5 Knob x Knob...6 Lever x Knob....7 Turn-Piece
LARGE FLAT PANEL DISPLAY STATIC MOUNT PST 2000 Series
 INSTALLATION INSTRUCTIONS LARGE FLAT PANEL DISPLAY STATIC MOUNT The PST static wall mount accommodates large flat screens weighing up to 200 lbs (90.72kg). The teardrop holes in the mount allow for quick
NORMAN SHUTTERS INSTALLATION INSTRUCTIONS. 4 Sided L Frame. (Outside Mount - Single Panel) Getting Started
 Getting Started") NORMAN SHUTTERS INSTALLATION INSTRUCTIONS 4 Sided L Frame (Outside Mount - Single Panel) Getting Started Recommended Tools: Nail Gun or Drill, Tape Measure, Torpedo Level, Box Knife, 6 Philips head driver
NORMAN SHUTTERS INSTALLATION INSTRUCTIONS 4 Sided L Frame (Outside Mount - Single Panel) Getting Started Recommended Tools: Nail Gun or Drill, Tape Measure, Torpedo Level, Box Knife, 6 Philips head driver
Showpiece Cabinet Integrated Stand For 32" - 52" LCD HDTV
 Showpiece Cabinet Integrated Stand For 32" - 52" LCD HDTV Installation and Assembly Instructions 2009 Incredible Technologies Inc. Version 0109 Showpiece Cabinet Integrated Stand for 32" - 52" LCD HDTV
ASSEMBLY INSTRUCTIONS MANUAL
 PAGE 1 OF 9 RECOMMENDED TOOLS FOR ASSEMBLY: ALLEN WRENCH (INCLUDED) BOX WRENCH (INCLUDED) PHILLIPS SCREW DRIVER (NOT INCLUDED) PARTS IN CARTON: ALLEN WRENCH SCREWS (20 EACH) ROUND HEAD SCREWS (8 EACH)
Mount to the Wall INSTALLATION MANUAL
 Mount to the Wall 15 Locate the Wooden Studs This step applies to wooden stud wall installation only. Determine and mark the exact locations of two stud centers on the wall. Wooden studs should be spaced
S T E P 1. Tools Needed. Curved Needle Nose Pliers. L Shaped Tool (Supplied w/ kit) Flathead Eyeglasses Screwdriver
 Flathead Eyeglasses Screwdriver") Curved Needle Nose Pliers Flathead Eyeglasses Screwdriver L Shaped Tool (Supplied w/ kit) Tools Needed 2 Make sure weapon is pointed in a safe direction, unloaded, and on safe. 3 Remove lower receiver
Curved Needle Nose Pliers Flathead Eyeglasses Screwdriver L Shaped Tool (Supplied w/ kit) Tools Needed 2 Make sure weapon is pointed in a safe direction, unloaded, and on safe. 3 Remove lower receiver
Repairing Microsoft Wedge Touch Mouse Battery Cover Retaining Clip
 Repairing Microsoft Wedge Touch Mouse Battery Cover Retaining Clip Disassembly, repair and reassembly of Wedge Touch mouse when the battery cover will not stay closed. Also is a good guide to repair other
PWM-T210 Installation Instructions UNIVERSAL FLAT PANEL MOUNT
 UNIVERSAL FLAT PANEL MOUNT IN-PWMT210.R0 TABLE OF CONTENTS Warning Statements 3 Parts List 4 Installation Tools 4 Locating the Center of the 5 Mounting Bracket Positioning 5 Securing the Mounting Brackets
Stuff-Your-Stuff Platform Bed (Twin and Full)
") Stuff-Your-Stuff Platform Bed (Twin and Full) Pre-Assembly: Please read all instructions before beginning assembly. Assembly by two people is a must. Save all packing materials until assembly is complete
Stuff-Your-Stuff Platform Bed (Twin and Full) Pre-Assembly: Please read all instructions before beginning assembly. Assembly by two people is a must. Save all packing materials until assembly is complete
Heavy Duty Ceiling Tilt Mount Installation Manual
 HD-CTM-5580 Heavy Duty Ceiling Tilt Mount Installation Manual *This Installation requires a minimum of two people. For your safety: Read the complete instruction manual before starting an installation
Modern Gatherings 60" TV Console Assembly Instructions
 Parts List Page 1 of 6 No. Description Sketch Quantity A Console 1 B Door 1 Thank you for purchasing this quality product. Be sure to check all packing material carefully for small parts that may have
INSTALLATION MANUAL PBL-UMP
 INSTALLATION MANUAL PBL-UMP Table of Contents Warning Statements... 4 Parts List... 5 Installation Tools... 5 Features... 7 Projector Preparation... 8 Bracket Installation... 10 Leveling the Mounting Bracket...
RTA-3520 DIMENSIONS MAXIMUM WEIGHT CAPACITIES. Product Size: 47.5"W x 23"D x 30"H
 MODEL RTA - 3520 Thanks for purchasing one of our products. Please read carefully the assembly instructions before the installation. Please save this manual for future reference. Complete video assembly
PHTM100 - Phantom 100 Flat Screen Wall Mount with Wafer Thin Projection Fits Screens up to 25 lbs with 100mm or 75mm Mounting Patterns
 PHTM100 - Phantom 100 Flat Screen Wall Mount with Wafer Thin Projection Fits Screens up to 25 lbs with 100mm or 75mm Mounting Patterns Features: Durable high quality gloss black baked on powder coat finish
Tilting Flat Panel Wall Mount Installation Guide
 Tilting Flat Panel Wall Mount Installation Guide Model: A580TM Easy installation Built-in level for easy positioning Safety bolts lock the TV on the mount Easy to adjust tilt angles: +5 to -15 degrees
MC-6 Cabinet / Work Center Assembly Instructions
 MC-6 Cabinet / Work Center Assembly Instructions Inspection Notice: Shipping damage is the responsibility of the freight company. Please inspect the cabinet for any visible signs of damage and notify the
Truss Pitch-Adjustable (TPP) Mount
 Mount") I N S T R U C T I O N M A N U A L Truss Pitch-Adjustable (TPP) Mount The Truss Pitch-Adjustable (TPP) mount is a perfect solution exhibit, retail and digital signage applications. The mount is quick, easy
I N S T R U C T I O N M A N U A L Truss Pitch-Adjustable (TPP) Mount The Truss Pitch-Adjustable (TPP) mount is a perfect solution exhibit, retail and digital signage applications. The mount is quick, easy
AutoSeal FD 2006IL / FE 2006IL
 AutoSeal FD 2006IL / FE 2006IL FI / FJ Series 06/2018 OPERATOR MANUAL First Edition TABLE OF CONTENTS DESCRIPTION 1 SPECIFICATIONS 1 UNPACKING 1 SETUP 2 Sealer Alignment Base Setup 2 Sealer Setup 2-4
PLEASE READ THE ENTIRE BULLETIN BEFORE BEGINNING THE PROCEDURE
 Bulletin # 205 System 4 Board Replacement Page 1 of 5 Summary Products Affected Key Word Tags Tools/Equipment (If Required) Parts/Materials (If Required) Related Media Replacing the System 4 control board
Basic steps to time the Gammill quilting machine s rotary sewing hook
 Basic steps to time the Gammill quilting machine s rotary sewing hook 1.) Turn the machine off and unplug it. 2.) With the needle bar in the raised position, remove the bobbin and bobbin case. 3.) Remove
Roomba 500 Series Servicing and Repair Guide. Chapter 3: How to Open Up Roomba
 Roomba 500 Series Servicing and Repair Guide Chapter 3: How to Open Up Roomba 1 This repair guide explains how to perform general disassembly on the Roomba 500 series robot vacuum. It is suggested to consult
Full-Motion TV Mount - 47" to 90" Installation Guide
 Full-Motion TV Mount - 47" to 90" Installation Guide Full-motion Articulating LCD/Plasma TV Wall-mount TV size: 47" - 90" Tilt angle: +/- 12 degrees Max load capacity: 200 lbs / 90 kg Wall distance (at
Technical Instructions Printers OEM Info Tools 1
 ML2250TECH Technical Instructions Printers OEM Info Tools 1 CORPORATE LOS ANGELES, USA US 1 800 394.9900 Int l +1 818 837.8100 FAX 1 800 394.9910 Int l +1 818 838.7047 ATLANTA, USA US 1 877 676.4223 Int
Slitter/E-Prom Upgrade for Duplo CC-228
 This Service Bulletin covers the upgrade of the Post Card Slitter and E-Prom for the Duplo CC-228 machines at Staples locations nationwide. Be sure to review and follow ALL of these instructions. Failure
DIGITAL MULTIFUNCTIONAL SYSTEM
 MODEL: MX-M850 MX-M950 MX-M00 DIGITAL MULTIFUNCTIONAL SYSTEM Maintenance Guide REGULAR MAINTENANCE REPLACING SUPPLIES REMOVING MISFEEDS REMOVING STAPLE JAMS Keep this manual close at hand for reference
Copyright 2010, by Walker Edison Furniture Co., LLC. All rights reserved.
 General Assembly Guidelines I. Insure that all parts and hardware are available before beginning assembly. II. III. IV. Follow each step carefully to insure the proper assembly of this product. Two people
ADULT ASSEMBLY REQUIRED DUE TO THE PRESENCE OF SMALL PARTS, SHARP POINTS, SHARP EDGES
 ADULT ASSEMBLY REQUIRED DUE TO THE PRESENCE OF SMALL PARTS, SHARP POINTS, SHARP EDGES If you have any questions regarding assembly or if you are missing parts, do not return this item to the retailer.
FOLDING DOOR INSTRUCTIONS
 FOLDING DOOR INSTRUCTIONS Please read these instructions carefully and follow them step by step to insure a smooth installation. Most importantly DO NOT open hardware boxes and mix hardware up. Hardware
Pantry IMPORTANT NOTE Carefully remove all the parts from the carton and put them individually on a soft cloth to prevent scratches or oth
 88 5076 691 Pantry IMPORTANT NOTE Carefully remove all the parts from the carton and put them individually on a soft cloth to prevent scratches or other damages occurring to the parts. We have taken great
Phone # La Jolla Doors. Block Frame Installation Manual Aluminum Frame with either Vinyl or Aluminum Panels
 Phone # 800-440-8785 www.lajolladoors.com La Jolla Doors Block Frame Installation Manual Aluminum Frame with either Vinyl or Aluminum Panels Thank you for choosing La Jolla Doors In this manual you will
How to remove Jammed Paper
 How to remove Jammed Paper MB460/MB470/MB480/ MB461/MB471/MB471w/ MB491/ES4161/ES4191 Rev.2 Paper Jams Paper jams occasionally occur due to paper misfeeding from a paper tray or at any point on the paper