HP COLOR LASERJET 3500
|
|
|
- Frank Morrison
- 5 years ago
- Views:
Transcription


1 HP COLOR LASERJET 3500 TONER CARTRIDGE REMANUFACTURING INSTRUCTIONS HP COLOR LASERJET 3500 TONER CARTRIDGE


2 REMANUFACTURING THE HP 3500 COLOR LASERJET TONER CARTRIDGE By Javier Gonzalez and the Technical Staff at UniNet 1. Use a 7/64 (11 mm) drill bit to drill two holes opposite each other around the pin area on the gear side as shown. Use a pair of needle-nose pliers to grip and pull the pin out. 2. Repeat the same procedure on the contact (gearless) side.


3 3. Use a hook tool to remove the spring that connects the drum unit to the toner cartridge. 4. Separate the two halves. TONER CARTRIDGE DISASSEMBLY 5. Remove the screw from the contact-side end-cap. 6. Press in on the end cap locking clip to unlock and remove the end cap.


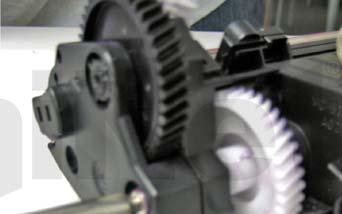
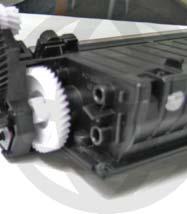


4 7. The inner contacts should come off along with the end cap. 8. Use a Phillips screwdriver to remove the two screws shown on the gear side cover. 9. Remove the gear cover and the two outer gears shown.


5 10. Use a small flat head screwdriver to pry out the metal gear plate shown. 11. Remove the three small inner gears shown. 12. Remove the two screws on the roller support assembly, then slide it out. it should come off fairly easily.


")


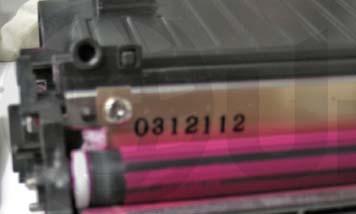
6 13. Remove the developer roller, lifting from one side, then sliding it out as shown. 14. Remove the two roller support plate screws, and roller support plate on the contact (gearless) side. 15. Remove the two doctor blade screws, and doctor blade. Clean the doctor blade with a lint-free cloth, and apply a small amount of pressure. Do NOT use any chemicals. Shake off excess toner from the hopper. A few moderate taps will help loosen the toner, and will not harm the cartridge. Clean with compressed air.
 drill bit to center the hole.")


7 16. You must now drill and create your own fill hole, using a 1/2 (12.5 mm) drill bit to center the hole. Be careful not to drill too deep as to damage the toner sensor window inside. DRILLING & FILLING OPTIONS 1. Make sure the hole size you drill matches the plug you are going to use. 17. Use a one-inch (25.4 mm) size drill bit or grinding tool to make the hole one inch in diameter. Be careful not to drill too deep as to damage the toner sensor window. Dump out any remaining toner from inside the cartridge. Clean agan with compressed air. This will prevent any drilled plastic shavings from damaging the toner cartridge. 2. The plug can be a maximum of 9mm deep. Any deeper will prevent the flaps inside from spinning. 3. If you prefer not to drill a hole, you may fill the hopper through the doctor blade opening. TONER CARTRIDGE ASSEMBLY 18. Install the new or cleaned doctor blade. 19. Fill with new toner.


 through the hub as")


8 20. Priot to installing the new fill plug, wipe the new fill hole area clean of toner. Apply silicone or caulking to the edges of the new toner fill plug to create a seal. Install the new fill plug. DRUM UNIT DISASSEMBLY 21. Push the drum pin out (downward) through the hub as shown, using a pin-punch and small hammer. Rotate the drum so that the extruded pin faces up. 22. Grip the pin and pull it out, using a pair of pliers. Brace the pliers against the right edge of the cartridge for leverage.


9 23. Remove the insert that holds the drum axle bearing in place, by pushing it out from the inside. Insert a flat head screwdriver through the hole shown to accomplish this. 24. Insert a small flat screwdriver into a small hole beneath the contact shown. Turn the screwdriver to push the white tab out. Remove the white tab (ring) to unlock the axle as shown.


10 25. Pry out the axle bearing as shown. 26. Let the bearing hang on the edge as shown. 27. Tilt the drum and axle upward, at a 30-degree angle to remove the drum. 28. Slide out the drum as shown.


11 29. Unlock the PCR by pressing in on the locking tabs shown. 30. Remove the PCR. 31. Use an X-Acto knife to cut through the factory adhesive and release the wiper blade.


12 32. Remove the two wiper blade screws, and the wiper blade. Clean the wiper blade. 33. Before installing the new or cleaned wiper blade, apply an adhesive or caulking to seal and prevent leakage. Assemble the drum unit by following the disassembly steps in reverse order. NOTE: Before installing the drum, make sure the contacts inside are angled in the correct place; otherwise, the drum may cause print defects.
XEROX PHASER 3600 TONER CARTRIDGE REMANUFACTURING INSTRUCTIONS
 XEROX PHASER 3600 TONER CARTRIDGE REMANUFACTURING INSTRUCTIONS XEROX PHASER 3600 TONER CARTRIDGE REMANUFACTURING THE XEROX PHASER 3600 TONER CARTRIDGE By Mike Josiah and the Technical Staff at UniNet The
HP M506/MFP M527 CF-287A/X
 HP M506/MFP M527 CF-287A/X TONER CARTRIDGE REMANUFACTURING INSTRUCTIONS HP CF-287A/X TONER CARTRIDGE REMANUFACTURING THE HP LASERJET ENTERPRISE M506/MFP M527 CF-287A/X TONER CARTRIDGE By Mike Josiah and
TONER CARTRIDGE REMANUFACTURING INSTRUCTIONS DELL 1130 TONER CARTRIDGE
 DELL 1130 TONER CARTRIDGE REMANUFACTURING INSTRUCTIONS DELL 1130 TONER CARTRIDGE REMANUFACTURING THE DELL 1130 CARTRIDGE By Mike Josiah and the Technical Staff at UniNet DELL 1130 CORE CHANGE UNINET TECH
PRO 400 M401 MFP M425 CF-280A/X TONER CARTRIDGE REMANUFACTURING INSTRUCTIONS
 HP PRO 400 M401 MFP M425 CF-280A/X TONER CARTRIDGE REMANUFACTURING INSTRUCTIONS HP CF-280A/X TONER CARTRIDGE REMANUFACTURING THE HP LASERJET PRO 400 M401/MFP M425 (CF-280A/X) TONER CARTRIDGE By Mike Josiah
Samsung SCX-4200 Remanufacturing Instructions
 Samsung SCX-4200 Remanufacturing Instructions Oasis Imaging Products, Inc. Technical Support: 800-322- 8992 ext 110 Reference Information: OEM Cartridge Yield @ 5% Tools Required SCX-4200A 3000 Phillips
AbsoluteCOLOR AbsoluteBLACK UniDrums UniRollers UniParts UniCoatings JAPAN EUROPE
 AbsoluteCOLOR AbsoluteBLACK UniDrums UniRollers UniParts UniCoatings HP 2600 CARTRIDGE REMANUFACTURING INSTRUCTIONS HP 2600N COLOR LASER PRINTER PRELIMINARY TECHNICAL DETAILS AND REMANUFACTURING INSTRUCTIONS
Technical Guide. Remanufacturing the HP LaserJet Pro M402/MFP M426 CF-226A/X toner cartridge. By Mike Josiah and the Technical Staff at Uninet
 Technical Guide Remanufacturing the HP LaserJet Pro M402/MFP M426 CF-226A/X toner cartridge Remanufacturing the HP LaserJet Pro M402/MFP M426 CF-226A/X toner cartridge First introduced in September 2015,
REMANUFACTURING INSTRUCTIONS
 REMANUFACTURING INSTRUCTIONS V5.4: 02-14 HP LaserJet CP1025/100 M175 MFP, HP TopShot LaserJet Pro P200 M275 MFP, Canon LBP-7010c/7016c/7018c, (i-sensys, imageclass, Satera ) HP CE310A/CE311A/CE312A/CE313A/CE314A
REMANUFACTURING INSTRUCTIONS
 REMANUFACTURING INSTRUCTIONS V 1.1: 5-16 HP Color LaserJet M252 Printer, M277 MFP HP CF400A, CF401A, CF402A, CF403A, CF400X, CF401X, CF402X, CF403X CONTENTS Tools & Supplies... 2 Separating the Two Halves...
Technical Specifications:
 Technical Specifications: Print Method: Print Speed: Duplex Speed: First page out: Resolution: Duty Cycle: Memory: Laser Color up to 5ppm Monochrome up to 21ppm Color up to 5ipm Monochrome up to 9.5ipm
Technical Instructions Supplies Tools 1
 HP2500/HP1500TECH Technical Instructions Supplies Tools 1 CORPORATE LOS ANGELES, USA US 1 800 394.9900 Int l +1 818 837.8100 FAX 1 800 394.9910 Int l +1 818 838.7047 ATLANTA, USA US 1 877 676.4223 Int
Technical Instructions Printers OEM Info Tools 1
 HPP3005TECH Technical Instructions Printers OEM Info Tools 1 CORPORATE LOS ANGELES, USA US 1 800 394.9900 Int l +1 818 837.8100 FAX 1 800 394.9910 Int l +1 818 838.7047 ATLANTA, USA US 1 877 676.4223 Int
TRUE TECHNICAL SERVICE MANUAL - ALL MODELS. DOORS/DRAWERS/LIDS
 DOORS/DRAWERS/LIDS 55 56 NOTES DOORS/DRAWERS/LIDS Swing s 73 74 NOTES INSTALLATION OF A GDM-SWING DOOR Phillips Head Screwdriver (2) - 1/8" Drift Punches (forged) Top Bracket NOTE: It may be necessary
MFP 277 (CF400A/X-201A/X
 Technical Guide Remanufacturing the HP LaserJet Pro M252 and MFP 277 (CF400A/X-201A/X series) black and colour toner cartridges Remanufacturing the HP LaserJet Pro M252 and MFP 277 (CF400A/X-201A/X series)
The User may not distribute, share, and otherwise convey the copyrighted documents to any other persons, corporations
 LICENSE AGREEMENT Static Control Components, Inc. (Static Control) grants this limited license to the person, firm or corporation (hereinafter "User) downloading electronically or by printing this file
INSTALLATION INSTRUCTIONS
 INSTALLATION INSTRUCTIONS Thank You, for your recent purchase with TrimLine Windows, Inc. This is a quality product and deserves a quality installation. Please follow the attached instructions for a quick
Technical Instructions Printers OEM Info Tools 1
 ML2250TECH Technical Instructions Printers OEM Info Tools 1 CORPORATE LOS ANGELES, USA US 1 800 394.9900 Int l +1 818 837.8100 FAX 1 800 394.9910 Int l +1 818 838.7047 ATLANTA, USA US 1 877 676.4223 Int
KONICA MINOLTA PAGEPRO 1400W DRUM UNIT REMANUFACTURING INSTRUCTIONS
 Absolute COLOR Absolute BLACK Unidrums Unirollers Uniparts Unicoatings KONICA MINOLTA PAGEPRO 1400W DRUM UNIT REMANUFACTURING INSTRUCTIONS KONICA MINOLTA 1400W COLOUR LASER PRINTER DRUM UNIT Summit Technologies
VYTEX PREMIUM SLIDING GLASS DOOR. Table of Contents. Precautions and Safety 2. Tools Required...3. Inspect and Prepare Door...4
 VYTEX PREMIUM SLIDING GLASS DOOR Table of Contents Precautions and Safety 2 Tools Required...3 Inspect and Prepare Door...4 Hardware and Parts Check List....4 Master Frame Assembly 5 Master Frame Installation..7
STEINBERGER TRANSTREM (TYPE 2) TECHNICAL DOCUMENT
 TECHNICAL DOCUMENT") STEINBERGER TRANSTREM (TYPE 2) TECHNICAL DOCUMENT These instructions apply to newer style TransTrems only (non-threaded ball type or modified threaded ball type). For purposes of discussion, these TransTrems
STEINBERGER TRANSTREM (TYPE 2) TECHNICAL DOCUMENT These instructions apply to newer style TransTrems only (non-threaded ball type or modified threaded ball type). For purposes of discussion, these TransTrems
For additional assistance call
 The following pages will help guide you through the process of assembling your new 48 custom prize wheel. Choose an assembly area with plenty of room to lay your pieces on the floor and also a bench or
Repairing Microsoft Wedge Touch Mouse Battery Cover Retaining Clip
 Repairing Microsoft Wedge Touch Mouse Battery Cover Retaining Clip Disassembly, repair and reassembly of Wedge Touch mouse when the battery cover will not stay closed. Also is a good guide to repair other
Exterior Door Handle - LH - Unpainted (05-14 All)
") Tools Required: Exterior Door Handle - LH - Unpainted (05-14 All) 1) 10mm and 7mm sockets 2) Socket wrench (small size recommended) 3) T30 Torx bit 4) Plastic pry/molding tool (below, A) 5) Thin plastic
Tools Required: Exterior Door Handle - LH - Unpainted (05-14 All) 1) 10mm and 7mm sockets 2) Socket wrench (small size recommended) 3) T30 Torx bit 4) Plastic pry/molding tool (below, A) 5) Thin plastic
TRUE TECHNICAL SERVICE MANUAL - ALL MODELS. DOORS/DRAWERS/LIDS
 DOORS/DRAWERS/LIDS 55 56 NOTES DOORS/DRAWERS/LIDS Springs 97 TORSION SPRING REPLACEMENT GDM RADIUS FRONT - SWING DOOR INSTALLATION INSTRUCTIONS Tools Required (2) - 1 8" drift Punch (forged) Needle-Nose
PRINTER REPAIR ARTICLE HP LJ 4345/M4345 Swing Plate Replacement
 a1 output bin a2 DUPLEXER a4 FORMATTER COVER a5 FORMATTER a3 fuser entr. guide PRINTER REPAIR ARTICLE HP LJ 4345/M4345 Swing Plate Replacement Grinding noise near the fuser means it is time to replace
Remanufacturing Instructions
 Cartridge Reference System Support Series 367 HP LaserJet 9000 Remanufacturing Instructions About the Printer The HP LaserJet 9000 was introduced in May 2001 and targeted at the general departmental office
The User may not distribute, share, and otherwise convey the copyrighted documents to any other persons, corporations or individuals.
 LICENSE AGREEMENT Static Control Components, Inc. (Static Control ) grants this limited license to the person, firm or corporation (hereinafter "User") downloading electronically or by printing this file
All Terrain Flares 2014 Chevy Silverado
 Page 1/8 Components: 1. Front Flares (2) 2. Rear Flares (2) Tools required: - Utility knife - #2 Phillips driver - Socket wrench - 13 mm Socket - 6 mm Allen Wrench - T-15 Torx bit - Trim Removal Tool -
S T E P 1. Tools Needed. Curved Needle Nose Pliers. L Shaped Tool (Supplied w/ kit) Flathead Eyeglasses Screwdriver
 Flathead Eyeglasses Screwdriver") Curved Needle Nose Pliers Flathead Eyeglasses Screwdriver L Shaped Tool (Supplied w/ kit) Tools Needed 2 Make sure weapon is pointed in a safe direction, unloaded, and on safe. 3 Remove lower receiver
Curved Needle Nose Pliers Flathead Eyeglasses Screwdriver L Shaped Tool (Supplied w/ kit) Tools Needed 2 Make sure weapon is pointed in a safe direction, unloaded, and on safe. 3 Remove lower receiver
RTI TECHNOLOGIES, INC.
 RTI TECHNOLOGIES, INC. BRC500 & BRC550 Arbor/Spindle Mechanism Adjustment & Service Technical Instructions The arbor/spindle mechanism of the BRC500/550 is designed to be robust for long life. Occasionally
PLEASE READ THE ENTIRE BULLETIN BEFORE BEGINNING THE PROCEDURE
 Bulletin # 205 System 4 Board Replacement Page 1 of 5 Summary Products Affected Key Word Tags Tools/Equipment (If Required) Parts/Materials (If Required) Related Media Replacing the System 4 control board
Remanufacturing Instructions HP 2500 OPC Drum Unit
 For, please call Memphis, TN at (888) 757-0762 or Nashua, NH at (888) 833-5727. OEM Reference Information OEM Product #: Drum Unit (C9704A) OEM Yield: Color: 5,000 pages Black: 20,000 pages 1. Remove the
How To Measure Your Finished Opening
 3000 Series Bifold Doors How To Measure Your Finished Opening MEASURE FROM RIGHT TO LEFT 2 PLACES (WIDTH) MEASURE FROM TOP TO BOTTOM 2 PLACES (HEIGHT) Tools Required for Assembly: Tools Needed: Phillips
Series----SP3600A SHOWER DOOR
 Series----SP3600A SHOWER DOOR INSTALLATION INSTRUCTIONS Please read these instructions carefully to familiarize yourself with the required tools, materials, and installation sequences. The Exploded Diagram
E-FLIGHT BLADE CX COMPLETE DISASSEMBLY JANUARY 2006
 E-FLIGHT BLADE CX COMPLETE DISASSEMBLY JANUARY 2006 AERONUTS THIS IS NOT AN OFFICIAL E-FLIGHT MANUAL OR INSTRUCTION. IT IS BEING PROVIDED FOR INFORMATIONAL PURPOSES ONLY. AUTHOR ASSUMES NO LIABILITY FOR
How to Install Custom Real Wood and Faux Wood Blinds
 Before you begin your installation: READ ALL INSTALLATION INSTRUCTIONS! Make sure that you have all tools and hardware needed for installation. Check the installation surface (wall, ceiling, or window
3.2.3 Rear Door Window and Quarter Window Carrier Assembly
 Tighten all bolts. Tighten bolts marked -1- and -2- in specified sequence. Tightening torque: 8 Nm Remaining bolts can be tightened in any sequence. Insert door window -3- through window recess without
OPERATIONAL MANUAL V1.0. Removing/Replacing Blades
 OPERATIONAL MANUAL V1.0 BLUEROCK WS-212 Wire Stripper Removing/Replacing Blades CAUTION!! IMPORTANT!! DANGER!! WARNING!! DISCONNECT MACHINE FROM POWER BEFORE PROCEEDING!! Estimated Completion Time: 90
Fig Remove chain cover plate bolts. Fig Remove hammer member. Fig Loosen set screws at base of 12-tooth sprocket.
 Fig. 17.2. Remove chain cover plate bolts. Fig. 17.1. Remove hammer member. Fig. 17.3. Remove chain cover plate. Fig. 17.4. Loosen set screws at base of 12-tooth sprocket. Page 61 Fig. 17.5. Remove socket
HURST COMP STICK KIT DODGE CHARGER, MAGNUM, AND CHRYSLER 300 (with AUTO-STICK) Catalog # & by Hurst Performance
 Catalog # & by Hurst Performance") HURST COMP STICK KIT 2005-2007 DODGE CHARGER, MAGNUM, AND CHRYSLER 300 (with AUTO-STICK) Catalog #538 0410 & 538 0411 2009 by Hurst Performance FORM 159 0410 03/09 Thank you for purchasing the Hurst Comp
HURST COMP STICK KIT 2005-2007 DODGE CHARGER, MAGNUM, AND CHRYSLER 300 (with AUTO-STICK) Catalog #538 0410 & 538 0411 2009 by Hurst Performance FORM 159 0410 03/09 Thank you for purchasing the Hurst Comp
Side and rear window, assembly overview
 64-7 Side and rear window, assembly overview 1 - Side/rear window Removing Unbroken Page 64-9 Broken Page 64-11 Installing Page 64-13 Curing time Page 64-21 Re-sealing Page 64-25 2 - PUR adhesive sealant
REMANUFACTURING INSTRUCTIONS
 REMANUFACTURING INSTRUCTIONS V 1.5: 12-17 HP LaserJet Pro M102/Pro MFP M130 HP CF217A CONTENTS Tools & Supplies... 2 Disassembly... 4 Reassembly... 6 Chip Removal/Replacement... 9 About Static Control...
35 mw HeNe Laser Ballast Resistor Insulation Upgrade Instructions
 35 mw HeNe Laser Ballast Resistor Insulation Upgrade Instructions A video that demonstrates the laser upgrade process can be found at: http://www.reoinc.com/site/14309- instructions General Notes Please
3/2004. Core Barrel Tool Assembly and Disassembly
 3/2004 Core Barrel Tool Assembly and Disassembly Core Barrel Tool Assembly and Disassembly This document covers the assembly and disassembly procedure for two variants of the Core Barrel modular system:
Baby Grande or Grande Crank Shade with Cables and Housing Installation Instructions
 Baby Grande or Grande Crank Shade with Cables and Housing Installation Instructions Tools Needed Drill 3/8 Metal Drill Bit Screwdriver (Flat & Phillips) Measuring Tape Pencil 4 Level Plumb Line ¼ Masonry
Door window. Front door window, assembly overview
 64-50 Door window Front door window, assembly overview 1 - Window channel Pushed onto flange 2 - Door window Removing Page 64-52 Adjusting Page 64-53 3 - Door 4 - Outer window channel Pushed onto flange
Table of Content. Sayl Disassembly for Recycling
 Y Sayl Disassembly for Recycling Table of Content 1. Work Chair Disassembly... 2 2. Side Chair Disassembly...17 3. Work Stool Footring Disassembly... 22 1 Y Sayl Disassembly for Recycling Work Chair Disassembly
Midwest RDH Handpiece Repair Procedure
 Midwest RDH Handpiece Repair Procedure The Midwest RDH handpiece is fairly common and is used by hygienists to clean teeth. The most common problems for this handpiece include a bad prophy head or a dirty
REPAIR INSTRUCTIONS. Cat. No Cat. No MILWAUKEE ELECTRIC TOOL CORPORATION. SDS Max Demolition Hammer. SDS Max Rotary Hammer
 Cat. No. 9-0 SDS Max Demolition Hammer Cat. No. -0 SDS Max Rotary Hammer MILWAUKEE ELECTRIC TOOL CORPORATION W. LISBON ROAD BROOKFIELD, WISCONSIN 00-0 8-9-0 d 000 8-9-0 d Special Tools Require Forcing
DYNATRAC BALL JOINT REBUILD INSTRUCTIONS V4.0
 DYNATRAC PRODUCTS 2007-2016 4X4 JEEP JK HEAVY DUTY BALL JOINT JP44-2X3050-C DYNATRAC BALL JOINT REBUILD INSTRUCTIONS V4.0 WARNING: Improper use or installation of this product can cause major failures
INSTALLATION INSTRUCTIONS
 INSTALLATION INSTRUCTIONS TOOLS REQUIRED Rechargeable, variable speed drill 3/8 diameter drill bit 3 Robertson bits #0, #1 and #2 Slot screwdriver Non marring hammer with 1 head Level Caulk or sealant
PROSTEER BALL JOINT REBUILD INSTRUCTIONS V1.0
 DYNATRAC PRODUCTS 2003-2010 4X4 DODGE 2500/3500 HEAVY DUTY BALL JOINT PROSTEER BALL JOINT REBUILD INSTRUCTIONS V1.0 WARNING: Improper use or installation of this product can cause major failures that could
Series 1100 Aluminum Door Canopy
 Series 00 Aluminum Door Canopy with Support Arms It is our recommendation that you read instructions carefully prior to assembly and installation. Series 00 with Support Arms MOUNTING BAR (A) TOP TRIM
INSTALLATION INSTRUCTIONS
 INSTALLATION INSTRUCTIONS SOLID PHENOLIC TOILET PARTITIONS 1080 DuraLineSeries Class-A Fire Rated Includes Institutional Hardware Option.67 IMPORTANT: Storage and Handling Information on last page. Review
Chapter 6 Frame And Lens Repairs
 Chapter 6 Frame And Lens Repairs 6.1 General Information All maintenance on the frame of the EXO Full-Face mask can be accomplished with common hand tools. 6.2 Lens Replacement Tools required: Dow DC-111
SR-1.0 Manual, a.doc 11/14/2006 Page 1 of 17
 SR-1.0 Manual, 20061108a.doc 11/14/2006 Page 1 of 17 ASSEMBLY INSTRUCTIONS, MODEL SR-1.0 EXTRUSION HEAD STREAMLINE EXTRUSION, INC. Following is a set of photos and verbal descriptions for assembling the
FD 1202 AutoSeal Tabletop Pressure Sealer
 FD 1202 AutoSeal Tabletop Pressure Sealer 4/2015 OPERATOR MANUAL FIRST EDITION TABLE OF CONTENTS TOPIC PAGE SPECIFICATIONS 1 UNPACKING, COMPONENTS 2 SET-UP 3 OPERATION 5 DETERMINING FOLD TYPE 6 ADJUSTING
935 RODA VINESSE NEED INSTALLATION HELP? DOUBLE ROLLERS FRAMELESS DOOR INSTALLATION INSTRUCTIONS QCI XX/XX/XXXX. Call BASCO ( )
") INSTALLATION INSTRUCTIONS 935 RODA DOUBLE ROLLERS FRAMELESS DOOR NEED INSTALLATION HELP? Call 1-800-45-BASCO (452-2726) Monday - Friday VINESSE QCI0286 1 XX/XX/XXXX 935 Roda Parts List With double rollers
INSTALLATION INSTRUCTIONS 935 RODA DOUBLE ROLLERS FRAMELESS DOOR NEED INSTALLATION HELP? Call 1-800-45-BASCO (452-2726) Monday - Friday VINESSE QCI0286 1 XX/XX/XXXX 935 Roda Parts List With double rollers
INSTALL/REMOVAL INSTRUCTIONS: WINDOW REGULATOR
 REMOVAL/INSTALL OF WINDOW REGULATOR (741-584) Ford Focus 2000-2007 General Tech Tips: Use painter s tape rather than duct tape to secure window. It will not damage paint or leave sticky residue. A plastic
EllisSaw.com. EllisSaw.com P.O. Box Verona, WI
 P.O. Box 9019 Verona, WI 9-019 GENERAL OPERATING & SAFETY INSTRUCTIONS * READ INSTRUCTIONS BEFORE USE * CAUTION: Disconnect power supply cord from power source when doing repair work or changing belt.
WSG 8-115; 8-125; P; WSG ; WSG P; WSG PS; WSG P; WSG 15-70Inox
 Repair instructions Page of 47 Contents. Models described 2. Technical data 3. Notes and requirements 4. Tools required 5. Lubricants and auxiliary substances required 6. Disassembly 7. Assembly 8. Connection
STEP 1 : DESTROYER FRONT BUMPER INSTALL GATHER YOUR TOOLS AND LAY OUT YOUR PARTS... *shorty bumper to show hardware* Tools Required:
 DESTROYER FRONT BUMPER INSTALL JL STEP 1 : GATHER YOUR TOOLS AND LAY OUT YOUR PARTS... Tools Required: - Utility knife - 11/16 Deep socket - Ratchet - 11/16 Crescent wrench - Ratchet Extension - 1/4 socket
* * 98/9950WDC. Fire-Rated Devices include these. additional components. 1-Point Latch (LBL)
") *24739468* 24739468 98/9950WDC Installation Instructions 1-Point Latch (LBL) Fire-Rated Devices include these additional components Metal Edge Wrap required for 60 and 90-minute applications 2-Point Latch
*24739468* 24739468 98/9950WDC Installation Instructions 1-Point Latch (LBL) Fire-Rated Devices include these additional components Metal Edge Wrap required for 60 and 90-minute applications 2-Point Latch
Water Line and Water Line Assembly Gasket
 1 Preparation for Repair 1) Remove tip from scaler 2) Remove scaler from air supply 3) Remove gasket from back end of scaler. Examine gasket for obvious wear or disfigurement. Replace if necessary. 2 Remove
INSTALLATION INSTRUCTIONS
 INSTALLATION INSTRUCTIONS HIGH PRESSUE LAMINATE (HPL) TOILET PARTITIONS 1030 TrimLineSeries 1040 DesignerSeries Includes continuous hardware option.65. IMPORTANT: Storage and Handling Information on last
Repair Instructions. Durametallic PSS III. Experience In Motion. Split Seal
 Repair Instructions Durametallic PSS III Split Seal Experience In Motion PSS III seal reference Gland Gland Gasket Split Joint gasket Coil Spring Seal Drive Sleeve Gasket Split Joint Gasket Rotating Face
Model 209 Fireback Replacement
 Model 209 Fireback Replacement Please read all the instructions before you begin the procedure. Confirm that you have all the necessary tools and materials. If you have any questions, technical support
REPAIR INSTRUCTIONS: CABLE
 The repair instructions describe replacing the Cable in the Easy Sun PARASOL Sunshade. These repair instructions are intended only for persons with experience of using the tools required. Please read the
IMPORTANT: One Corner Entry Shower Door requires two cartons.
 IMPORTANT: You should check with your local plumbing or building code agency about this product for compliance before it is installed. IMPORTANT: One Entry Shower Door requires two cartons. 95302-2-AB
Introduction To Automotive Technology
 Introduction To Automotive Technology UNIT 4: BASIc hand Tools LESSON 2: TYPES OF SCREWDRIVERS AND PLIERS I. Screwdrivers A. The standard screwdriver has a straight blade for turning screws with a slot
FMT 250; FMT 250Q; FMT 250QSL. Repair instructions FMT 250Q / FMT 250QSL. Page 1 of 30
 Repair instructions FMT 250 FMT 250Q / FMT 250QSL Page 1 of 30 Contents 1. Models described 2. Technical data 3. Notes and requirements 4. Tools required 5. Lubricants and auxiliary substances required
Replacing the Reciprocator on the SWF Compact Series Machine (601C and 1201C)
") Follow the instructions below to replace the reciprocator in the SWF Compact series machines. The tools required can be found in the tool kit that came with the machine. Preparation 1. First, place the
Follow the instructions below to replace the reciprocator in the SWF Compact series machines. The tools required can be found in the tool kit that came with the machine. Preparation 1. First, place the
Series 1500 Aluminum Door Canopy
 Series 500 Aluminum Door Canopy with Sidewings It is our recommendation that you read instructions carefully prior to assembly and installation. Series 500 with Sidewings mounting bar (A) top trim (B)
Baby Grande or Grande Crank Shade with Cables and Housing Installation Instructions
 Baby Grande or Grande Crank Shade with Cables and Housing Installation Instructions Tools Needed Drill 3/8 Metal Drill Bit Screwdriver (Flat & Phillips) Measuring Tape Pencil 4 Level Plumb Line ¼ Masonry
Fold-A-Way Patio Door ASSEMBLY & INSTALLATION GUIDE
 Fold-A-Way Patio Door ASSEMBLY & INSTALLATION GUIDE This instruction guide provides the minimum recommended procedures to correctly prepare the rough opening, install a fold-a-way patio door unit and apply
SERVICE PARTS LIST PAGE 1 OF 6 BASE ASSEMBLY SPECIFY CATALOG NO. AND SERIAL NO. WHEN ORDERING PARTS 12" SLIDING COMPOUND MITER SAW
 PAGE 1 OF 6 BASE ASSEMBLY 00 0 CATALOG NO. EXAMPLE: SPECIFY CATALOG NO. AND NO. WHEN ORDERING PARTS 6955-20 1 02-80-0050 Thrust Bearing (1) 2 05-80-0510 M5 x 12mm Flat Head T-20 Screw (5) 3 05-81-0135
HR175 Sash Replacement Kit Installation Instructions
 HR175 Sash Replacement Kit Installation Instructions IMPORTANT: Please read before you begin. Weather Shield HR175 Sash Replacement Kits Important: Thoroughly read and follow these instructions, failure
TOYOTA COROLLA EC REARVIEW MIRROR Section I Installation Preparation
 Section I Installation Preparation Part Number: PT374-02030 Section I Installation Preparation Kit Contents Item # Quantity Reqd. Description 1 1 AD Mirror Assembly w/compass & Maplights 2 1 Hardware Bag
101B, 210X, ELM, VSTB Installation Manual
 101B, 210X, ELM, VSTB Installation Manual 99-16105-I001 Copyright 2010 by ALL rights reserved. Information in this document is subject to change without notice. Companies, names and data used in examples
RULTRACT RETRACTOR CABLE REPLACEMENT INSTRUCTIONS. Rultract, Inc. is the ONLY authorized service center in the U.S.A.
 RULTRACT RETRACTOR CABLE REPLACEMENT INSTRUCTIONS Rultract, Inc. is the ONLY authorized service center in the U.S.A. When your Rultract instrument needs repair or service, contact Rultract Inc. or Rultract
Large Case Storage - Counterweights
 Large Case Storage - Counterweights Lateral File/Combo Cabinet CAUTION Please refer to the Steelcase Specification Guide for Storage for additional guidance on determining the correct counterweight package.
Daily Maintenance. 2. Insert bobbin cases in to rotary hooks. Make sure bobbin thread is not over 2 inches long. Close bobbin case covers.
 Rotary hook 1. Open bobbin case covers and remove bobbin cases. Use brush to remove lint build up in and around rotary hooks. Compressed air may also be used. Daily Maintenance Cle aning Oiling Rotary
INSTALL/REMOVAL INSTRUCTIONS: WINDOW REGULATOR
 REMOVAL/INSTALL OF WINDOW REGULATOR (741-768) Jeep Cherokee 1997 2001 General Tech Tips: Use painter s tape rather than duct tape to secure window. It will not damage paint or leave sticky residue. A plastic
1200 SERIES 2 PANEL DOOR rev.1 DETAILED INSTALLATION INTRUCTIONS
 1200 SERIES 2 PANEL DOOR 10.2013 rev.1 DETAILED INSTALLATION INTRUCTIONS GENERAL: Door elevations shown in these instructions are as viewed from the outside. X denotes the active or moving panel(s). O
Replacing the Reciprocator on an SWF Multi-head.
 Replacing the Reciprocator on an SWF Multi-head. Follow the instructions below to replace the reciprocator in the SWF multi-head machines. The tools required are found in the tool kit that came with the
INSTALLATION INSTRUCTIONS REPLACING EXISTING DEADBOLT ASSEMBLY
 INSTALLATION INSTRUCTIONS REPLACING EXISTING DEADBOLT ASSEMBLY A B C L M N D E F G O P Q H I J Tools provided in Amesbury installation kit: (A) door router fixture, (B) doorframe router fixture, (C) ½
C70 Window Roller Repair Taken from: Heres the problem:
 C70 Window Roller Repair Taken from: http://www.volvospeed.com/vs_forum/topic/115086-how-to-c70-window-rollers-permanent-fix/ Heres the problem: This happened to two separate window assemblys on my c70
OSBORNE SHOWER DOOR INSTALLATION
 SKU(s): 939719, 939720, 939721 OSBORNE SHOWER DOOR INSTALLATION BEFORE YOU BEGIN We recommend consulting a professional if you are unfamiliar with installing this type of product. Signature Hardware accepts
Legacy Woodworking Machinery a division of Phantom Engineering. The Legacy CNC. Assembly Manual
 Legacy Woodworking Machinery a division of Phantom Engineering The Legacy CNC Assembly Manual New Orientation of the Legacy Step one: Re-orientation of the machine Remove the X-axis screw and supports.
Gazebo ASSEMBLY INSTRUCTIONS. Urban
 Urban Gazebo ASSEMBLY INSTRUCTIONS Urban's Installation Instructions conceptualize the assembly of Urban's products. Urban does not warrant the accuracy or sufficiency of any advice or recommendations
Installation Instructions
 Supafold Slide Aside System Three Fold Room Divider Installation Instructions Distinctive Doors Ltd Supafold Slide Aside Internal Folding System IMPORTANT: Before proceeding with the installation, and
Motorized or Crank Operated Fortress Zipper Track Shade with Housing and Side Track Installation Instructions
 Motorized or Crank Operated Fortress Zipper Track Shade with Housing and Side Track Installation Instructions Tools Needed Drill 3/8 Metal Drill Bit ¼ Masonry Drill Bit Measuring Tape Pencil 4 Level Phillips
Bushwacker Jeep Flat Style Fender Flares Rear Pair (JK Wrangler 2dr)
") Bushwacker Jeep Flat Style Fender Flares Rear Pair (JK Wrangler 2dr) Note: These instructions involve cutting parts of your vehicle. Please read all instructions prior to starting. Installation Time: 3-4
Bushwacker Jeep Flat Style Fender Flares Rear Pair (JK Wrangler 2dr) Note: These instructions involve cutting parts of your vehicle. Please read all instructions prior to starting. Installation Time: 3-4
BASIC TOOLS AND MATERIALS NEEDED. Introduction HOW TO CARE FOR YOUR DOOR
 DO IT RIGHT! Use a Kohler Certified Installer, (KCI), for the installation of your Kohler Shower Door. Contact your Kohler Distributor/Showroom or call Kohler at 1-800-4-KOHLER for the KCI nearest you.
BABY WOLF LOOM. Assembly Instructions for Knocked-Down Looms
 BABY WOLF LOOM Assembly Instructions for Knocked-Down Looms BEFORE YOU BEGIN Please read through the directions before beginning to assemble your loom. Unpack the loom parts carefully. Do not throw away
SERVICE PARTS LIST PAGE 1 OF 6 BASE ASSEMBLY SPECIFY CATALOG NO. AND SERIAL NO. WHEN ORDERING PARTS 12" DUAL BEVEL COMPOUND MITER SAW B27B
 PAGE 1 OF 6 BASE ASSEMBLY 00 0 EXAMPLE: Component Parts (Small #) Are Included When Ordering The Assembly (Large #). SPECIFY CATALOG NO. AND NO. WHEN ORDERING PARTS = Part number change from previous service
Rockwell Automation PowerFlex 755 Disassembly
 Rockwell Automation PowerFlex 755 Disassembly Disassembling a 1HP Rockwell Automation PowerFlex 755 VFD. Written By: Alex Nolan ifixit CC BY-NC-SA www.ifixit.com Page 1 of 12 INTRODUCTION This guide outlines
White Industries Front Hub Instructions
 White Industries Front Hub Instructions Tools required: 2mm hex/allen wrench, set of sockets, mallet, bearing puller, bearing press. Disassembly 1. Loosen the set screws, there are three or one depending
Martin Yale 7000E Guillotine Cutter
 Martin Yale 7000E Guillotine Cutter Blade Leveling Guide Provided By http://www.mybinding.com http://www.mybindingblog.com Blade Removal, Installation and Leveling for the 7000E Disclaimer The following
MOTOR & BULK HEAD. A Manual for Repair and Maintenance Technicians
 MOTOR & BULK HEAD A Manual for Repair and Maintenance Technicians CAUTION This manual is designed to help technicians who are already experienced in workshop procedures and know how to handle tools. Only