INSTALLATION MANUAL PBL-UMP
|
|
|
- Estella Scott
- 5 years ago
- Views:
Transcription

1 INSTALLATION MANUAL PBL-UMP
2 Table of Contents Warning Statements... 4 Parts List... 5 Installation Tools... 5 Features... 7 Projector Preparation... 8 Bracket Installation Leveling the Mounting Bracket Securing the Upper Assembly Ceiling Plate Securing the Projector to the Upper Assembly Final Adjustments Plastic Cap Installation Troubleshoot ing Procedures...16 Technical Specifications Warranty Contact us Notes Installation Manual Page 3
3 Warning Statements WARNING: WARNING: WARNING: THE CEILING STRUCTURE MUST BE CAPABLE OF SUPPORTING 25 LBS. IF NOT, THE CEILING MUST BE REINFORCED. PROPER INSTALLATION PROCEDURE BY A QUALIFIED SERVICE TECHNICIAN, AS OUTLINED IN THE INSTALLATION INSTRUCTIONS, MUST BE ADHERED TO. FAILURE TO DO SO COULD RESULT IN SERIOUS PERSONAL INJURY, OR EVEN DEATH. SAFETY MEASURES MUST BE PRACTICED AT ALL TIMES DURING THE INSTALLATION OF THIS PRODUCT. USE PROPER SAFETY GEAR AND TOOLS FOR THE INSTALLATION PROCEDURE TO PREVENT PERSONAL INJURY. PRIOR TO THE INSTALLATION OF THIS PRODUCT, THE INSTALLATION INSTRUCTIONS SHOULD BE READ AND COMPLETELY UNDERSTOOD. THE INSTALLATION INSTRUCTIONS MUST BE READ TO PREVENT PERSONAL INJURY AND PROPERTY DAMAGE. KEEP THESE INSTALLATION INSTRUCTIONS IN AN EASILY ACCESSIBLE LOCATION FOR FUTURE REFERENCE. Indicates that the power plug is to be disconnected from the power outlet. Safety precautions must be taken at all times. Warning and Caution statements. A secure structure must support the weight, or load, of the projector. When mounting to a ceiling that contains wooden studs, dead center of the wooden stud must be confirmed prior to installation. Do not install on a structure that is prone to vibration, movement or chance of impact. Failure to do so could result in damage to the projector and/or damage to the mounting surface. Do not install near heater, fireplace, direct sunlight, air conditioning or any other source of direct heat energy. Failure to do so may result in damage to the projector and could increase the risk of fire. At least two qualified people should perform the installation procedure. Injury and/or damage can result from dropping or mishandling the projector. Recommended mounting surfaces: wooden studs and solid-flat concrete. If the mount is to be installed on any surface other than wooden studs, use suitable hardware (which is commercially available). Page 4 Installation Manual
 888-6024.")
 M6 x 12 Hex head screws (4ea) Installation Tools Phillips Head Screw Driver Portable Drill Soft Material/ Blanket Pencil ¼ Drill Bit Green Level (Supplied) Tape Measure Wrench with")
4 Parts List NOTE: This mount is shipped with all proper installation hardware and components. Make sure that none of these parts are missing and/or damaged before beginning installation. If there are parts missing and/or damaged, please stop the installation and contact us (800) Upper Assembly (1) Universal Mounting Bracket (1ea) #14 Wood Screws (3) M3 x 16mm Phillips Head Screws (4ea) M3 Flat Washers (4ea) M5 x 12 Hex head screws (4ea) M4 x 12 Hex head screws (4ea) Plastic barrel caps (4ea) M6 x 12 Hex head screws (4ea) Installation Tools Phillips Head Screw Driver Portable Drill Soft Material/ Blanket Pencil ¼ Drill Bit Green Level (Supplied) Tape Measure Wrench with ½ Drive Socket Stud Finder (Commercially Available) Ladder M3 Allen Wrench (Supplied) M5 Allen Wrench (Supplied) Installation Manual Page 5
5 A B C D E F G H I J K L M Single Wooden Stud Mounts Solid Structure Mounting Points Ceiling Plate Allen Wrench Extension Tension Knobs Safety Knob Security Screws Leveling Screws Universal Mounting bracket Leg Assembly Projector (not included) Tri-Lock Opening Option 1 H D B F A C E G K NOTE: The four (two-piece) leg assemblies can be used as single leg or any combination of single and dual legs together as shown in Options 1 and 2. The number of legs may vary depending on the number of mounting points found on the bottom of the projector. I M J L D Combination Leg Option 2 M H Single Leg J L Page 6 Installation Manual
6 Features Congratulations on your recent purchase of your PBL-UMP universal projector ceiling / wall mount kit. Designed for projectors weighing 25 lbs (13kg) or less. The mount is very easy to install and loaded with additional no cost installation features built into the mount. These features allow you to optimize your projector s position to the screen for best projector performance and picture quality. Adjustable-height suspension channel to lower the projectors height (can be removed for low-profile mounting of only 2.5 ) 0-45 angled ceiling compensation Mounts to ceiling or a wall Tilt / roll up to 20 + Rotates 360 Positive locking in any set position Quick release system for easy projector mounting and removal Cables can be routed inside the height extension channel Upper ceiling plate allows for single wood stud mounting and cable insertion through the ceiling plate for clean appearance Installation Manual Page 7
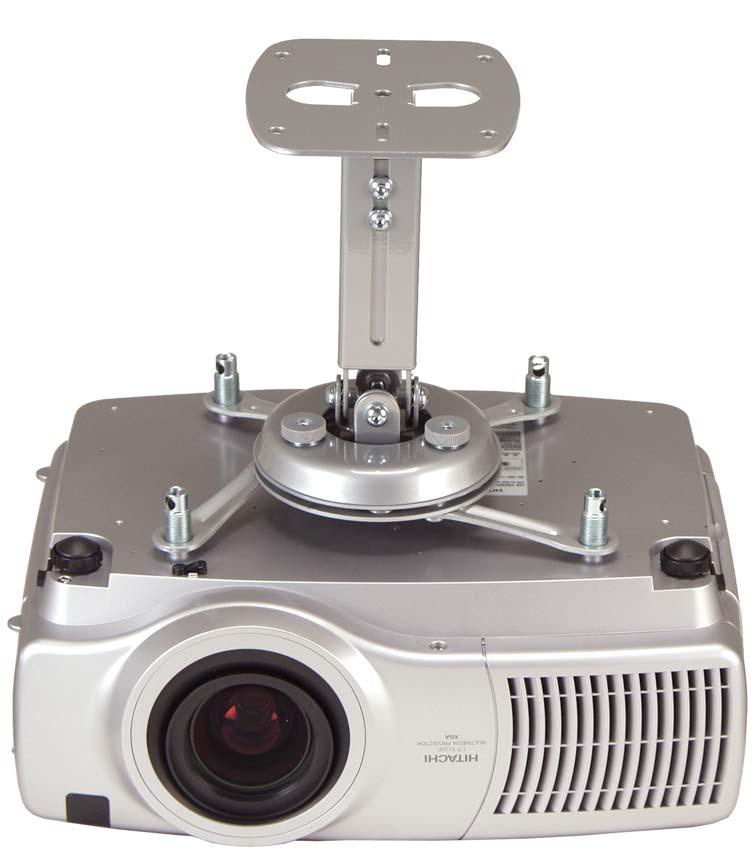
7 Projector Preparation WARNING: CAUTION: Proper installation procedure by qualified personnel as outlined in the installation instructions must be adhered to. Failure to do so could result in serious personal injury and possible damage to the projector. THE PROJECTOR IS FRAGILE HANDLE WITH CARE AT ALL TIMES. NOTE: Review the projectors manufacture s operation manual and refer to the ceiling mounting section of the operator s manual. Here you will normally find important reference information regarding installation dimensions such as (distance from the screen to the lens of the projector, top of the lens placement to the top screen etc. Adherence to these recommendations during your installation will enhance the quality of your final image on the screen. 1. Carefully invert the projector and place it on a smooth flat surface. Identify the number of mounting points and screw thread (pitch) size. 2. Most projectors have either three or four mounting points and are M4, M5, or M6 in thread size (Figure 1). Mounting Points Inverted Projector Blanket/ Soft Cloth Flat Surface Figure 1. Projector Preparation 3. Separate the upper assembly from the projector mounting bracket by slightly loosening the two tension knurl knobs to create free play between the bracket tri-lock assembly and the upper section tri-lock assembly points (Figure 2A and 2B). 4. Next loosen the security screw knurl knob far enough to allow the two parts to be rotated 180 apart and separate (Figure 2C). Page 8 Installation Manual
8 A B Upper Assembly Tension Knobs Safety Knob Rotate 180 To unlock C Tri-Lock Opening Figure 2. Mount Preparation Installation Manual Page 9
9 Bracket Installation NOTE: The two-piece mounting kegs are designed to allow for the positioning of each leg around projector air vents located on the base of the projector. Where applicable, each leg mount may be shortened by removing the locking screw. This will allow for a better bracket fit, overall. NOTE: For easier installation, the mounting legs should be first mounted to the projector. Each leg should then be adjusted so that they can mount to the Universal Mount (Figure 3). 1. Locate the mounting points on the bottom of the projector and use the appropriate number of mounting legs. 2. Select the mounting hardware that the projector requires and loosely install the universal mount on the projector. Two Piece Leg One Piece Leg M5 Allen Wrench M6 x 12mm Hex Head Screw M5 x 12mm Hex Head Screws M4 x 12mm Hex Head Screws Inverted Projector Universal Mount Leveling Barrels In the event that your projector should require M3 hardware, please follow these instructions: 1. Thread the leveling barrel into the hole on the mounting arm. 2. Place the M3 flat washer into the leveling barrel hole. 3. Use the M3 x 16mm Phillips Head screws to attach the leveling barrel to the projector. Figure 3. Bracket Installation Page 10 Installation Manual
10 Leveling the Mounting Bracket CAUTION: Secure but do not over tighten the mounting hardware. Failure to do so will result in damaging the threads in the projector. 1. Rotate the leveling barrels to level the mounting bracket. 2. Position the mounting bracket so that it avoids most, if not all, ventilation points (including lamp and filter access doors). 3. When the desired position is achieved, tighten the mounting screws to the projector and then tighten the hex head leg screws with the M5 Allen wrench (Figure 4). M5 Allen Wrench Level Inverted Projector DOWN Leveling Barrels UP Adjusting the Mount. Figure 4. Leveling the Mounting Bracket Installation Manual Page 11
11 Securing the Upper Assembly Ceiling Plate Review your projector s owner s manual to determine what distance is recommended from the front of the lens to the edge of the screen for best picture ratio. NOTE: However in most home theater and office ceiling mount installations this is not practical as the projector would be to low within the room. At a minimum you should at least locate the inverted projectors top of the lens point to a point centered horizontally on the screen and no higher then the top image edge of the screen). Most projector manufacturers prefer to have the center of the projector lens centered of the top of the screen when the projector is inverted for ceiling mounting. It is normally better to have the top edge of the lens as close to parallel with the top image edge of the screen as well. Before you mount your screen and projector, make sure the mounting location will safely support the weight of the projector. NOTE: Make sure to measure from the center of the mounting bracket to the front edge of the lens to determine the proper placement of the center of the upper assembly. 1. Secure the ceiling assembly into a solid wood ceiling stud with the two (2) #14 x 2 wood screws (supplied) or with other (commercially available) hardware depending on your installation environment (Figure 5). Wooden Ceiling Stud Ceiling Structure Wood Screws Upper Assembly Secure the ceiling mount to the center of the wooden stud. Figure 5. Securing the Upper Assembly Ceiling Plate Page 12 Installation Manual
12 Securing the Projector to the Upper Assembly 1. Make sure the three-knurl knobs are loosened to fully expose to the tri-lock mounting plate in the base of the upper assembly. 2. Carefully lift the projector and insert the mounting bracket mating special tri-lock cutout into the mating portion of the upper assembly. 3. Once inserted rotate the projector and mounting bracket 180 and secure the rear safety knob first to prevent further rotation of the bracket in the upper assembly. 4. Tighten the remaining two tension knurl knobs until the mount becomes rigid. The safety knob should line up with the alignment slot on the mounting bracket. NOTE: Follow the numbering sequence prior to securing the projector to the upper assembly. 1 The alignment slot must be in direct alignment with the safety knob to lock the mounting bracket to the upper assembly. Insert universal bracket to the tri-lock, then rotate the projector 180 Safety Knurl Knob 2 Tension Knurl Knobs Universal Mount 3 Tri-Lock Opening Alignment Slot Projector Figure 6. Low Profile Installation Installation Manual Page 13
13 Final Adjustments 1. With the projector secured in the mount and power on and signal supplied to the projector you can now proceed with the final height, tilt, roll and yaw to optimize the projected image. A The height can be adjusted by rotating the PBC clockwise (higher) / counterclockwise (lower). Once the height is achieved, tighten the locking set screw using the supplied Allen Wrench. B To adjust the tilt angle of the projector, slightly loosen the side M8 screws and tilt to the desired angle and firmly tighten the two M8 adjustment screws. C If roll adjustment is needed to square the images on the screen, slightly loosen the front and rear M8 screws and adjust to the desired angle. Then firmly tighten the two M8 adjustment screws. B A Wooden Stud Ceiling Structure Allen Wrench Wooden Stud Ceiling Structure C Roll Adjustment Re-check the hardware for tightness and security. Figure 7. Final Adjustments Page 14 Installation Manual
14 Plastic Cap Installation 1. Once all the final adjustments have been finished install the plastic caps on the leveling barrels (Figure 8). Figure 8. Plastic Cap Installation Installation Manual Page 15
15 Troubleshooting Procedures QUESTION: ANSWER: QUESTION: ANSWER: My projector mount must be set at an angle to be viewed properly on the wall, but the projector will not hold at this position. Why is this? The angle adjustments are not tight; they must be tightened. Why won t my bracket fit my projector? There may be several mounting positions for your particular bracket. Try to line up the holes on the bracket with the mounting points on the projector. If this still does not solve the problem, then contact Customer Service and advise them of the situation. Page 16 Installation Manual
16 Technical Specifications Figure 9. Technical Dimensions Installation Manual Page 17
INSTALLATION MANUAL PBC-UMS
 INSTALLATION MANUAL. PBC-UMS Premier Mounts 3130 E. Miraloma Avenue Anaheim, CA 92806 Phone: (800) 368-9700 Fax: (800) 832-4888 mounts@mounts.com www.mounts.com Rev. 01 PBL-110 Projector Mount Page 2 Installation
INSTALLATION MANUAL ELPMBUNI
 INSTALLATION MANUAL ELPMBUNI Warning Statements WARNING: WARNING: WARNING: WARNING: PREMIER MOUNTS DOES NOT WARRANT AGAINST DAMAGE CAUSED BY THE USE OF ANY PREMIER MOUNTS PRODUCT FOR PURPOSES OTHER THAN
INSTALLATION INSTRUCTIONS
 INSTALLATION INSTRUCTIONS PBC- UMW (White) PBC-UMS (Black) PBC UNIVERSAL PROJECTOR MOUNT NORTH AMERICA 3130 East Miraloma Avenue Anaheim, CA 92806 USA USA and Canada Phone: 800-368-9700 Fax: 800-832-4888
INSTALLATION MANUAL SP-CEIL-012
 INSTALLATION MANUAL SP-CEIL-012 InFocus Corporation 27700B S.W. Parkway Ave. Wilsonville, OR 97070-9215 1-800-294-6400 www.infocus.com IN-SPECEIL012.R2 PBL-110 Projector Mount Page - 2 - Installation Manual
LCD DISPLAY MOUNT
 I N S T A L L A T I O N M A N U A L 38-804769-01 LCD DISPLAY MOUNT WWW.CHRISTIEDIGITAL.COM Contents - Assembly drawing - Securing the bottom wall plate - Fine tune adjustments - Marking the top plate mounting
Universal flat-panel mount
 I N S T A L L A T I O N M A N U A L Universal flat-panel mount www.christiedigital.com PM 2004/ REV 02 Contents - Assembly drawing - Fine tune tilt adjustments - Parts list - Installing the adapter plate
INSTALLATION MANUAL SFM3
 INSTALLATION MANUAL SFM3 Sony Electronics, Inc. 16540 West Bernardo Drive San Diego, CA 92127 www.sony.com IN-SFM3.R0 Table of Contents WARNING STATEMENTS...- 3 - PARTS LIST...- 4 - INSTALLATION TOOLS...-
PAM-200 Universal Projector Mount
 INSTALLATION MANUAL PAM-200 Universal Projector Mount Sony Electronics 16540 West Bernardo Drive San Diego, CA 92127 www.sony.com IN-PAM200.R0 Table of Contents Parts List...- 3 - Installation Tools...-
INSTALLATION MANUAL SFM2
 INSTALLATION MANUAL SFM2 Sony Electronics, Inc. 16540 West Bernardo Drive San Diego, CA 92127 www.sony.com IN-SFM2.R1 Table of Contents WARNING STATEMENTS... - 3 - PARTS LIST... - 4 - INSTALLATION TOOLS...
Universal flat-panel mount
 R I N S T A L L A T I O N M A N U A L Universal flat-panel mount LISTED E176225 3130 E. Miraloma Ave. Anaheim, CA 92806 Phone: 800 368-9700 Fax: 800 832-4888 www.mounts.com PREMIER MOUNTS 2004/ REV 00
Installation Instructions
 Tilt/Pivot Mount Premier Mounts 3130 E. Miraloma Avenue Anaheim, CA 92806 Phone: (800) 368-9700 Fax: (800) 832-4888 techsupport@mounts.com www.mounts.com IN-PTMB.R0 TABLE OF CONTENTS Warning Statements
INSTALLATION MANUAL CTM-VESA
 INSTALLATION MANUAL CTM-VESA Premier Mounts 3130 E. Miraloma Avenue Anaheim, CA 92806 Phone: (800) 368-9700 Fax: (800) 832-4888 mounts@mounts.com www.mounts.com IN-CTMVESA.R1 PBL-110 Projector Mount Page
Installation Instructions
 Installation Instructions AM2 Articulating Swingout Arm Premier Mounts 3130 E. Miraloma Avenue Anaheim, CA 92806 Phone: (800) 368-9700 Fax: (800) 832-4888 techsupport@mounts.com www.mounts.com IN-AM2.R1
PWM-T210 Installation Instructions UNIVERSAL FLAT PANEL MOUNT
 UNIVERSAL FLAT PANEL MOUNT IN-PWMT210.R0 TABLE OF CONTENTS Warning Statements 3 Parts List 4 Installation Tools 4 Locating the Center of the 5 Mounting Bracket Positioning 5 Securing the Mounting Brackets
NOVA-EXT Versatile Projector Mount Model: NOVA-EXT
 INSTALLATION MANUAL NOVA-EXT Versatile Projector Mount Model: NOVA-EXT NORTH AMERICA 3130 East Miraloma Avenue Anaheim, CA 92806 USA USA and Canada Phone: 800-368-9700 Fax: 800-832-4888 Other Locations
INSTALLATION INSTRUCTIONS
 INSTALLATION INSTRUCTIONS PP-FCTA Suspended Ceiling Adapter NORTH AMERICA 3130 East Miraloma Avenue Anaheim, CA 92806 USA USA and Canada Phone: 1.800.368.9700 Fax: 1.800.832.4888 Other Locations Phone:
Assembly Instructions for model: VMPR1
 Assembly Instructions for model: VMPR1 Congratulations on your purchase! The VMPR1 ceiling mount provides a unique, simplified method of ceiling mounting inverted LCD/DLP projectors. Its low profile design
INSTALLATION INSTRUCTIONS
 INSTALLATION INSTRUCTIONS CTM-MS1 Flat Panel Display Mount (26 to 37 ) NORTH AMERICA 3130 East Miraloma Avenue Anaheim, CA 92806 USA USA and Canada Phone: 800-368-9700 Fax: 800-832-4888 Other Locations
PFW 6851 Display Wall Mount, Turn & Tilt 80 kg INSTALLATION INSTRUCTIONS
 Display Wall Mount, Turn & Tilt 80 kg INSTALLATION INSTRUCTIONS 9531-007-Z00-01 Table of Contents Warning Statements 2 Parts List 3 Installation Tools 3 Wood Stud Installation 5 Concrete Surface Installation
INSTALLATION INSTRUCTIONS
 INSTALLATION INSTRUCTIONS Universal Low Profile Flat Mount Model: U.S. Toll Free: 1-866-752-6271 Outside N. America: 1-503-748-5799 E-mail: ts@planar.com FRANCE Phone: +33 5 6378 3810 E-mail: emeats@planar.com
INSTALLATION INSTRUCTIONS
 CREATING POSITIVE CUSTOMER EXPERIENCES INSTALLATION INSTRUCTIONS PDS-PLUS Universal Projector Mount Model: NORTH AMERICA 3130 East Miraloma Avenue Anaheim, CA 92806 USA USA and Canada Phone: 1.800.368.9700
PBM-UNI Installation Guide
 1321 S. State College Blvd., Fullerton, CA 92831 USA Warning Statements Warning Warning Warning THE CEILING STRUCTURE MUST BE CAPABLE OF SUPPORTING AT LEAST FOUR (4) TIMES THE WEIGHT OF THE PROJECTOR.
Dual Arm Tilt LCD Mount
 Installation Manual model # 51324 M o u n t i n g S y s t e m s Dual Arm Tilt LCD Mount Fits Displays 13 to 32 Supports Up to 50 lbs (23 kgs) Projection from Wall from 3 to 17 Meets VESA Standards 50/75/100,
INSTALLATION INSTRUCTIONS
 INSTALLATION INSTRUCTIONS Universal Low Profile Tilt Mount Model: U.S. Toll Free: 1-866-752-6271 Outside N. America: 1-503-748-5799 E-mail: ts@planar.com FRANCE Phone: +33 5 6378 3810 E-mail: emeats@planar.com
Full Motion Gas Spring TV Wall Mount - 24" to 55" Installation Instructions
 Full Motion Gas Spring TV Wall Mount - 24" to 55" Installation Instructions 04-1102A Caution Prior to installation of this product, the installation instructions should be read and completely understood.
MPA-9000 Universal Ceiling Projector Mount Kit
 I N S T R U C T I O N M A N U A L Universal Ceiling Projector Mount Kit The Universal Ceiling Projector Mount provides a unique, simplified method of ceiling mounting your inverted projector. This low
AST-2446 INSTALLATION INSTRUCTIONS
 AST-2446 Suspension Adapter AST-2446 INSTALLATION INSTRUCTIONS Single Stud Installation Step 1. Secure the ceiling plate to the ceiling structure (see WARNING). Step 2. Use suitable hardware (commercially
INSTALLATION INSTRUCTIONS
 INSTALLATION INSTRUCTIONS FLIP Flip-Down LCD Mount NORTH AMERICA 3130 East Miraloma Avenue Anaheim, CA 92806 USA USA and Canada Phone: 800-368-9700 Fax: 800-832-4888 EUROPE Swallow House, Shilton Industrial
Full-Motion TV Mount - 47" to 90" Installation Guide
 Full-Motion TV Mount - 47" to 90" Installation Guide Full-motion Articulating LCD/Plasma TV Wall-mount TV size: 47" - 90" Tilt angle: +/- 12 degrees Max load capacity: 200 lbs / 90 kg Wall distance (at
Installation Guide. Model VLS-TM1540. Universal Tilt/Pivot Wall Mount for use with Flat Panel Displays
 Installation Guide www.revenaproducts.com 4915 SW Griffith Drive Suite 302 Beaverton, OR 97005 Model VLS-TM1540 Universal Tilt/Pivot Wall Mount for use with 15-40 Flat Panel Displays Installation Guide
SAM. Model: STV-C65 LCD Mobile Visualized Stand Instruction Manual. Weight Capacity: 1251bs / 56.7kg Suits LCD Flat Panel Display: 42"-55" Page 20
 SAM Model: STV-C65 LCD Mobile Visualized Stand Instruction Manual Weight Capacity: 1251bs / 56.7kg Suits LCD Flat Panel Display: 42"-55" 20 Step 6 LCD Mobile Lift Stand Model: STV-C65 Cable management
Full-Motion TV Mount 36" to 65" Installation Instructions
 Full-Motion TV Mount 36" to 65" Installation Instructions Full-motion/articulating universal LCD/Plasma TV wall-mount TV size: 36" - 65" Tilt angle: 0-15 degrees Max load capacity: 132 lbs / 60 Kgs Wall
Assembly Instructions for Model: VMPR1
 Assembly Instructions for Model: VMPR1 Thank you for choosing a Sanus Systems Model: VMPR1 ceiling mount. The VMPR1 ceiling mount provides a unique, simplified method of ceiling mounting inverted LC/LP
Planar FWMG-MXL INSTALLATION INSTRUCTIONS
 Planar FWMG-MXL INSTALLATION INSTRUCTIONS Fixed Wall Mount for Ultra Large Displays 50-98 weighing less than 300 lbs. Part Number: 955-0217-00 Planar, A Leyard 1195 NW Compton Drive Beaverton, OR 97006
INSTALLATION INSTRUCTIONS Small Flat Panel Height-Adjustable, Extended Pitch Swing Arm Wall Mount Model KWE-110
 INSTALLATION INSTRUCTIONS Small Flat Panel Height-Adjustable, Extended Pitch Swing Arm Wall Mount Model KWE-110 The KWE dual swing arm wall mount is designed to provide a broad range of viewing for Small
Installation Instructions PP-FCMA
 Installation Instructions PP-FCMA Step 1 Carefully remove a 24 (610mm)x48 (1120mm) or two 24 (610mm)x24 (610mm) suspended ceiling tiles. Step 2 Install the four (4) each ¼ x3 eye bolts securely into the
Ultra-Thin LED/LCD TV Mount - 23" to 42"
 Ultra-Thin LED/LCD TV Mount - " to 4" Installation Instructions Ultra-Thin LED/LCD TV Wall Mount Material:.0mm Cold Rolled Steel Plate TV Size: " - 4 Max load capacity: 99lbs / 45kg Wall distance: 0.4"
INSTALLATION INSTRUCTIONS
 CREATING POSITIVE CUSTOMER EXPERIENCES INSTALLATION INSTRUCTIONS Universal Low Profile Tilt Mount for 42 to 63 Flat Panels NORTH AMERICA 3130 East Miraloma Avenue Anaheim, CA 92806 USA USA and Canada Phone:
INSTALLATION MANUAL FLAT LCD DISPLAY MOUNT MODEL
 INSTALLATION MANUAL FLAT LCD DISPLAY MOUNT MODEL CMK Ceiling WARNING! The wall, floor or ceiling should be capable of supporting a weight of at least five (5) times the monitor s weight. If it cannot,
INSTALLATION INSTRUCTIONS
 INSTALLATION INSTRUCTIONS Universal Short Throw Projector Arm Model: UNI-STA/UNI-EXT NORTH AMERICA 3130 East Miraloma Avenue Anaheim, CA 92806 USA USA and Canada Phone: 1-800-368-9700 Fax: 1-800-832-4888
Full Motion TV Mount - 23" to 42" Installation and Operating Instructions
 Full Motion TV Mount - " to " Installation and Operating Instructions Full-motion/articulating universal LCD/Plasma TV wall-mount TV size: " - " Tilt angle: 0- degrees Max load capacity:00 lbs Wall distance:.75"
INSTALLATION INSTRUCTIONS
 INSTALLATION INSTRUCTIONS Polaris Universal Projector Mount Model: NORTH AMERICA 1321 S. State College Blvd. Fullerton, CA 92831 USA USA and Canada Phone: 1.800.368.9700 Fax: 1.800.832.4888 Other Locations
INSTALLATION INSTRUCTIONS
 INSTALLATION INSTRUCTIONS P4263F Universal Low Profi le Flat Mount for 42 to 63 Flat Panels NORTH AMERICA 3130 East Miraloma Avenue Anaheim, CA 92806 USA USA and Canada Phone: 1.800.368.9700 Fax: 1.800.832.4888
Installation and Assembly: In-wall Mount for 32" to 71" Flat Panel Screens
 Installation and Assembly: In-wall Mount for 32" to 71" Flat Panel Screens Model# IM760P, IM760P-S IM760PU, IM760PU-S Screen size range 32" to 71" (81 to 180 cm) 32" to 60" (81 to 152 cm) IM760P IM760P-S
Showpiece Cabinet Integrated Stand For 32" - 52" LCD HDTV
 Showpiece Cabinet Integrated Stand For 32" - 52" LCD HDTV Installation and Assembly Instructions 2009 Incredible Technologies Inc. Version 0109 Showpiece Cabinet Integrated Stand for 32" - 52" LCD HDTV
SB-WM-ART2-L-BL SB-WM-ART2-XL-BL
 SB-WM-ART2-L-BL SB-WM-ART2-XL-BL Weatherproof Universal Dual-Arm Articulating Mount for Large TVs INSTALLATION MANUAL WARNING The maximum weight of this wall mount is 150 lbs (68.04 kg). Use with heavier
INSTALLATION INSTRUCTIONS
 INSTALLATION INSTRUCTIONS Universal Swingout Arm for 37 to 47 Flat Panels Model: AM80 NORTH AMERICA 3130 East Miraloma Avenue Anaheim, CA 92806 USA USA and Canada Phone: 1-800-368-9700 Fax: 1-800-832-4888
Installation and Assembly - Universal Articulating Swivel Double-Arm for 42" - 60" Plasma Screens
 Installation and Assembly - Universal Articulating Swivel Double-Arm for 42" - 60" Plasma Screens Models: PLAV 70-UNL, PLAV 70-UNL-S PLAV 70-UNLP, PLAV 70-UNLP-S R This product is UL Listed. It must be
Modular Video Wall System with Push-to-Pop-out and Anti-Theft Features VW401P. User s Manual
 Modular Video Wall System with Push-to-Pop-out and Anti-Theft Features Contents Weight Limit.... 2 Warning Statements.... 2 Installation Tools.... 3 Parts List... 4 Features.... 5 Installing the Mount....
Universal Projector Ceiling Mount Model: DPM-45
 Universal Projector Ceiling Mount Model: DPM-45 Instruction Manual Images may different from actual product Disclaimer It is Dyconn s intention to have all the correct information represented within this
INSTALLATION INSTRUCTIONS
 INSTALLATION INSTRUCTIONS AM2 / AM2-B Articulating Swingout Arm NORTH AMERICA 3130 East Miraloma Avenue Anaheim, CA 92806 USA USA and Canada Phone: 1.800.368.9700 Fax: 1.800.832.4888 Other Locations Phone:
Installation and Assembly: In-wall Mount for 32" to 71" Flat Panel Displays
 Installation and Assembly: In-wall Mount for 32" to 71" Flat Panel Displays Model# Display size range IM760P, IM760P-S 32" to 71" (81 to 180 cm) IM760PU, IM760PU-S 32" to 65" (81 to 165 cm) This product
Fixed Wall Arm. Installation Guide. Part number Rev E 2012 PolyVision Corporation All rights reserved
 Fixed Wall Arm Installation Guide Part number 2002003-001 Rev E 2012 PolyVision Corporation All rights reserved Table of contents Important Safety Instructions... 3 Overview... 4 Important considerations...
Installing flat panels on the MPL15 wall mount
 Installing flat panels on the MPL15 wall mount The MPL15 (DS-VW775) is a full-service video wall mount that can accommodate tiled LCD panels with up to a 400 x 400 mm VESA pattern in portrait and landscape
INSTALLATION INSTRUCTIONS
 INSTALLATION INSTRUCTIONS Universal Swingout Arm Model: AM300/AM300-B NORTH AMERICA 3130 East Miraloma Avenue Anaheim, CA 92806 USA USA and Canada Phone: 1.800.368.9700 Fax: 1.800.832.4888 Other Locations
P4263TP. Installation Guide. Low-Profile Tilting Portrait Mount for Flat-Panels
 Low-Profile Tilting Portrait Mount for Flat-Panels 1321 S. State College Blvd., Fullerton, CA 92831 USA Weight Limit Maximum Flat Panel Weight: 175 lbs. Warning Statements THE WALL STRUCTURE MUST BE CAPABLE
INSTALLATION INSTRUCTIONS Small Flat Panel Mounts Model: F-Series
 INSTALLATION INSTRUCTIONS Small Flat Panel Mounts Model: F-Series This Instruction Manual covers most of the F-Series wall and desk mounts, as well as selected F-Series pole mounts. NOTE: Some F-Series
LC6X4WTM Security Wall Mount with Tilt for up to 60" Flat Screens with VESA 600mm x 400mm or less
 Page 1 of 6 The LC6X4WTM Security Wall Mount with Tilt is designed to secure a flat screen, up to a 60", to the wall while still allowing the monitor to tilt. The VESA mounting patterns on the front of
SB-WM-ART1-M-BL. Weatherproof Universal Single-Arm Articulating Mount for Medium Displays INSTALLATION MANUAL
 SB-WM-ART1-M-BL Weatherproof Universal Single-Arm Articulating Mount for Medium Displays INSTALLATION MANUAL WARNING The maximum weight of this wall mount is 90 lbs (41 kg). Use with heavier than the maximum
INSTALLATION INSTRUCTIONS HEAVY DUTY TILT WALL MOUNT Model: PPH-2000
 INSTALLATION INSTRUCTIONS HEAVY DUTY TILT WALL MOUNT Model: PPH-2000 Specifications: Accomodates Akira and Orion 84" displays without interface bracket; accomodates other large flat panel displays with
INSTALLATION GUIDE. Model:B60 RECESSED IN WALL MOUNT
 INSTALLATION GUIDE Model:B60 RECESSED IN WALL MOUNT Features: Installs between 16 (406mm) wood stud centers Mounting Pattern Compliance: VESA 100*100mm up to 600 x 400mm Level 5 degree horizontal adjustment
Tilting & Swiveling Plasma/LCD Flat Panel Wall Mount Installation Guide Model: A380SM
 Tilting & Swiveling Plasma/LCD Flat Panel Wall Mount Installation Guide Model: A380SM Easy installation Built-in level for easy positioning Corrective leveling adjustments after installation Forward /
Projector Ceiling Mount
 INSTALLATION MANUAL Projector Ceiling Mount PID:3010 PID:5466 20kg (44lbs) RATED CAUTION: DO NOT EXCEED RATED LISTED WEIGHT. SERIOUS INJURY OR PROPERTY DAMAGE MAY OCCUR! ISSUED: FEB. 2013 NOTE: Read the
INSTALLATION INSTRUCTIONS
 INSTALLATION INSTRUCTIONS Premier Mounts Tilting Wall Mount Model: TWM-085 For use with Panasonic 85 Flat Panel NORTH AMERICA 3130 East Miraloma Avenue Anaheim, CA 92806 USA USA and Canada Phone: 1.800.368.9700
LC200WT Security Wall Mount with Tilt for up to 32" Flat Screens
 Page 1 of 6 The LC200WT Security Wall Mount with Tilt is designed to secure up to a 32" flat panel monitor to the wall while still allowing the monitor to tilt. The VESA mounting patterns on the front
LC200DS1 Double Stud Articulating Wall Mount for Flat Panel Screens up to 32" with up to 200mm x 200mm VESA Mounting Patterns
 Page 1 of 6 LC200DS1 Double Stud Articulating Wall Mount for Flat Panel Screens up to 32" with up to 200mm x 200mm VESA Mounting Patterns A multi-position dual articulating arm for flat screens up to 60
TP4463. ASSeMBly INSTruCTIONS FLAT PANEL TV MOUNTING SYSTEM OPTION 1 OPTION 2 OPTION 3
 TP63 FLAT PANEL TV MOUNTING SYSTEM OPTION 1 OPTION 2 OPTION 3 Flat Panel TV Stand Stand with TV Mounting System Stand with Wall Mount ASSeMBly INSTruCTIONS for your safety, please follow these precautions:!
USE AND CARE GUIDE FIXED LED / LCD TV WALL MOUNT (UNIVERSAL MOUNTING PATTERN, FITS VESA
 Item #302-080 Model #50710 USE ND CRE GUIDE FIXED LED / LCD TV WLL MOUNT (UNIVERSL MOUNTING PTTERN, FITS VES 100/200/300/400/600) Questions, problems, missing parts? Before returning to the store, call
Small Flat Panel Height-Adjustable Dual Swing Arm Wall Mount With Universal Slat Wall Mount (MSP-JS-KWG-110)
") INSTALLATION INSTRUCTIONS Small Flat Panel Height-Adjustable Dual Swing Arm Wall Mount With Universal Slat Wall Mount () The dual swing arm desk mount is a sleek design providing a broad range of viewing
INSTALLATION INSTRUCTIONS Small Flat Panel Height-Adjustable Dual Swing Arm Wall Mount With Universal Slat Wall Mount () The dual swing arm desk mount is a sleek design providing a broad range of viewing
Model MSPPWRTW Large Flat Panel Single Arm Wall Mount
 INSTALLATION INSTRUCTIONS Model Large Flat Panel Single Arm Wall Mount The is wall-mounted, rugged, versatile, and installer-friendly. The mount is compatible with the standard (14 x 14 ) PSB interface
Tilting, Swiveling & Rotating Flat Panel Wall Mount
 Tilting, Swiveling & Rotating Flat Panel Wall Mount Model: VXA980TC +5 to -5 +5 to -5 Supports most 0-80 Flat Panel TVs Maximum Weight Capacity: 32 lbs. Supports VESA Sizes up to 600x500 For technical
MONOPRICE. Modular Video Wall System with Push-to-Pop-out and Anti-Theft Features. User's Manual P/N 16102
 MONOPRICE Modular Video Wall System with Push-to-Pop-out and Anti-Theft Features P/N 16102 User's Manual CONTENTS SAFETY WARNINGS AND GUIDELINES... 3 INTRODUCTION... 4 FEATURES... 5 CUSTOMER SERVICE...
Articulating TV/Monitor Wall Mount Model: WA300S (Butterfly Series)
") P Articulating TV/Monitor Wall Mount Model: WA300S (Butterfly Series) Instruction Manual Images may different from actual product Disclaimer It is Dyconn s intention to have all the correct information
P Articulating TV/Monitor Wall Mount Model: WA300S (Butterfly Series) Instruction Manual Images may different from actual product Disclaimer It is Dyconn s intention to have all the correct information
Mounts by. Model PMU50 PROJECTOR MOUNT. Simple to adjust no-tools required
 Mounts by A division of David Engineering & Mfg. Inc. Model PMU50 PROJECTOR MOUNT Thank you for purchasing the PDR Projector mount with the exclusive Bayonet locking system. To ensure the correct usage,
ELPMB27. Short Throw Projector Wall Mount Installation Manual xxx(fr) xxx(de) xxx(it) xxx(es) xxx(pt) xxx(zhs)
 xxx(de) xxx(it) xxx(es) xxx(pt) xxx(zhs)") ELPMB27 Short Throw Projector Wall Mount Installation Manual xxx(fr) xxx(de) xxx(it) xxx(es) xxx(pt) xxx(zhs) Safety Instructions Before using the wall mount, make sure you read all of the safety instructions
ELPMB27 Short Throw Projector Wall Mount Installation Manual xxx(fr) xxx(de) xxx(it) xxx(es) xxx(pt) xxx(zhs) Safety Instructions Before using the wall mount, make sure you read all of the safety instructions
ET-PKL100S. Installation Instructions. Ceiling Mount Bracket (for Low Ceilings) Model No.
 Model No.") Installation Instructions Ceiling Mount Bracket (for Low Ceilings) Model No. ET-PKL100S Thank you for purchasing this Panasonic Product. JJ To customers The Installation Instructions is intended for use
Installation Instructions Ceiling Mount Bracket (for Low Ceilings) Model No. ET-PKL100S Thank you for purchasing this Panasonic Product. JJ To customers The Installation Instructions is intended for use
19 to 39 TV WALL MOUNT - FULL MOTION
 19 to 39 TV WALL MOUNT - FULL MOTION RF-HTVMMAB For wood-stud and concrete wall installations Safety information and specifications...2 Tools needed...2 Package contents...3 Installation instructions...5
INSTALLATION INSTRUCTIONS. Large Flat Panel Wall Mount Model: PRO-2000 Series
 INSTALLATION INSTRUCTIONS Large Flat Panel Wall Mount Model: PRO-2000 Series PRO-2000 Series Wall Mount Features: Accommodates large flat screens weighing up to 200 lbs (90.7 kg). Mounting brackets adapt
Preference Collection 5580 Treatment Console INSTALLATION GUIDE
 Preference Collection 5580 Treatment Console INSTALLATION GUIDE 0 WARNING Failure to install the 5580 as described in this installation guide may cause the unit to collapse, resulting in serious injury
Assembly Instructions for Model: VMPL3
 Assembly Instructions for Model: VMPL3 Thank you for choosing a Sanus Systems VisionMount Wall Mount. The VMPL3 is designed to hold 27-84 Flat Panel LCD or Plasma Displays weighing up to 280 lbs. It will
Wall mounting bracket
 Install Manual Wall mounting bracket Please read this manual carefully before operating your set and retain it for future reference. OSW200 P/NO : MFL63640578 (1502-REV01) www.lg.com COMPONENT Install
INSTALLATION INSTRUCTIONS
 INSTALLATION INSTRUCTIONS PP-FCTA Suspended Ceiling Adapter NORTH AMERICA 3130 East Miraloma Avenue Anaheim, CA 92806 USA USA and Canada Phone: 1.800.368.9700 Fax: 1.800.832.4888 Other Locations Phone:
Installation Guide PMWT-660/680. Projector Wall Mount
 Installation Guide PMWT-660/680 Projector Wall Mount for SMART Board TM interactive whiteboards Trademark Notice SMART Board and the SMART logo are trademarks of SMART Technologies Inc. TORX is a trademark
PRC-LA Installation Guide
 1321 S. State College Blvd., Fullerton, CA 92831 USA Weight Limit Maximum Flat Panel Weight: Warning Statements 50 lbs. THE WALL STRUCTURE MUST BE CAPABLE OF SUPPORTING AT LEAST FOUR TIMES THE WEIGHT OF
A195B CEILING TV MOUNTING BRACKET Vesa Size : 200 x 200mm User Manual Notice d Utilisation
 A195B CEILING TV MOUNTING BRACKET Vesa Size : 200 x 200mm User Manual Notice d Utilisation Thank you for purchasing an Electrovision bracket, please read these instructions carefully and leave with the
Flat Panel Dual Swing Arm Wall Mount (FWD-110) MSP-SA
 MSP-SA") INSTALLATION INSTRUCTIONS Flat Panel Dual Swing Arm Wall Mount (FWD-110) The dual arm wall mount was designed to support flat panel displays with 10 to 30 diagonal screens and weighing a maximum of 40
INSTALLATION INSTRUCTIONS Flat Panel Dual Swing Arm Wall Mount (FWD-110) The dual arm wall mount was designed to support flat panel displays with 10 to 30 diagonal screens and weighing a maximum of 40
INSTALLATION INSTRUCTIONS Small Flat Panel FMA Pivot Arrays Models: FMA-220 and FMA-320
 INSTALLATION INSTRUCTIONS Small Flat Panel FMA Pivot Arrays The FMA-220 and FMA-320 pivot array allow both horizontal and vertical display pitch adjustment. The pitch adjustment range is 30 (15 up / 15
A195FF TILT & SWIVEL TV MOUNTING BRACKET Vesa Size : 600 x 400mm User Manual Notice d Utilisation
 A195FF TILT & SWIVEL TV MOUNTING BRACKET Vesa Size : 600 x 400mm User Manual Notice d Utilisation Thank you for purchasing an Electrovision bracket, please read these instructions carefully and leave with
Installation Instructions
 Installation Instructions Ceiling Mount Bracket for DLP Based Projectors (for High Ceilings) Model No. ET-PKD100H Contents Important Safety Notice.................. 2 For DLP Based Projector: PT-D10000
PART #MSP-DCCST Flat Panel Tilt Mount
 INSTALLATION INSTRUCTIONS PART # Flat Panel Tilt Mount The Flat Panel Tilt Mount is a quick disconnect mounting solution for flat panel displays. The mount features adjustability between 0 and 15 degrees
model tsa-sa48 Sliding Crosscut Table installation guide
 model tsa-sa48 Sliding Crosscut Table installation guide A Note About Color Variations Among Anodized Aluminum Components Congratulations on the purchase of this SawStop Sliding Crosscut Table. We at SawStop
Wooden Frame Type Instruction Manual
 Wooden Frame TypeInstruction Manual Thank you for selecting our product. Before starting installation, please read this manual thoroughly to ensure correct installation. Please keep this manual at hand
INSTALLATION INSTRUCTIONS
 INSTALLATION INSTRUCTIONS Universal Short Throw Projector Wall Mount Model: UNI/UNIE NORTH AMERICA 3130 East Miraloma Avenue Anaheim, CA 92806 USA USA and Canada Phone: 1-800-368-9700 Fax: 1-800-832-4888
INSTALLATION INSTRUCTIONS
 INSTALLATION INSTRUCTIONS Ultra Short-Throw Projector Wall Mount Model: UNIU NORTH AMERICA 3130 East Miraloma Avenue Anaheim, CA 92806 USA USA and Canada Phone: 1-800-368-9700 Fax: 1-800-832-4888 Other
IMPORTANT WARNINGS AND CAUTIONS!
 I N S T R U C T I O N M A N U A L The Christie Vivid Green ceiling mount will suspend your Christie Vivid Green projector in an upright position to compliment conference rooms, classrooms or home theater
Installation Instruction
 Tools Needed for Assembly Stud finder (for wood stud wall) Pencil Mark Electric drill Wood Stud Wall Installation Step 1. Locate the Wood Studs Installation Instruction Drill bit (for wood stud wall) Masonry
TITAN2-EDGE Public Access Computer Station Dual Track
 TITAN2-EDGE Public Access Computer Station Dual Track TITAN2-EDGE Rev A 6/17 Model TITAN2-EDGE ASSEMBLY AND ADJUSTMENT TITAN2-EDGE PARTS AND TOOLS PLEASE REVIEW these instructions before beginning the
PART #MSP-DCCPPWS Plasma Wall Swing-Out (PWS) Wall Mount
 Wall Mount") I N S T R U C T I O N M A N U A L PART # Plasma Wall Swing-Out (PWS) Wall Mount The wall mount is a rugged, versatile, and installer-friendly solution to unique display mounting requirements. With the
I N S T R U C T I O N M A N U A L PART # Plasma Wall Swing-Out (PWS) Wall Mount The wall mount is a rugged, versatile, and installer-friendly solution to unique display mounting requirements. With the
Medium Flat Panel Dual Swing Arm Wall Mount JWD-V
 INSTALLATION Medium Flat Panel Dual Swing Arm Wall Mount The single swing arm wall mount is designed for mounting a medium sized flat panel display. The can swing out from, or fold against, the wall depending