IMPORTANT WARNINGS AND CAUTIONS!
|
|
|
- Harold Lyons
- 5 years ago
- Views:
Transcription


1 I N S T R U C T I O N M A N U A L The Christie Vivid Green ceiling mount will suspend your Christie Vivid Green projector in an upright position to compliment conference rooms, classrooms or home theater installations. This mount can be attached using a standard NPT 1 1/2 pipe column, an adjustable column, or flush mounted. BEFORE YOU BEGIN CAUTION: To prevent damage to the mount, which could affect or void the Factory warranty, thoroughly study all instructions and illustrations before you begin to install the mount. Pay particular attention to the Important Precautions on Page 1. If you have any questions about this installation, see the back page of this manual for contact information. PART NO (Rev. A) 2000 Christie Digital Systems Printed in USA 10-01
2 IMPORTANT WARNINGS AND CAUTIONS! WARNING: CAUTION: A WARNING alerts you to the possibility of serious injury or death if you do not follow the instructions. A CAUTION alerts you to the possibility of damage or destruction of equipment if you do not follow the corresponding instructions. WARNING: Improper installation can result in serious personal injury! Make sure that the ceiling structural members can support a redundant weight factor five times the total weight of the equipment. If the ceiling can not support this weight, reinforce the ceiling before installing the mount. WARNING: Be aware also of the potential for personal injury or damage to the unit if it is not adequately mounted. WARNING: The installer is responsible for verifying that the ceiling to which the mount is anchored will safely support the combined load of all attached components or other equipment. WARNING: The weight of the projector must not exceed 40 lbs (18 kg), the maximum load capacity of the mount. CAUTION: To avoid personal injury or damage to the mount, be sure that it is installed square and parallel in all dimensions. CAUTION: Check the unit for shipping damage before you begin the installation. CONTENTS TOOLS REQUIRED FOR INSTALLATION... 1 MOUNT ASSEMBLY PROCEDURES... 2 RPA INSTALLATION PROCEDURES... 3 ADJUST YAW, PITCH AND ROLL... 4 PARTS... 6 DEALER INFORMATION... 8 DIMENSIONAL DRAWING... 9 TOOLS REQUIRED FOR INSTALLATION Phillips screwdrivers, No. 1 and No. 2 TIP Drill and bit set 3/8 Wrench NOTE: Other tools may be required depending on the method of installation. 1
.")

. 4. Place the hanging bracket on the cradle with the four #10-24 X 1/2 long studs through the four.21 diameter outside holes (see Figure 3). 5.")
3 MOUNT ASSEMBLY PROCEDURES Assemble the mount as follows: 1. Install four self adhesive round felt pads on each side of the square filter cutout in the cradle bracket (see Figure 1). CAUTION: To avoid damage to the projector, spread sides of cradle bracket enough to prevent scratching or marring paint on the sides of the projector. 2. If necessary, carefully spread the vertical legs of the cradle and slide the projector into the cradle, aligning the filter hole cutout in the bracket with the filter door of the projector. 3. On the side facing the projector surface (opposite the surface with studs) of the hanger bracket, install four 1/2 diameter white rubber bumpers over four.21 diameter holes (see Figure 2). 4. Place the hanging bracket on the cradle with the four #10-24 X 1/2 long studs through the four.21 diameter outside holes (see Figure 3). 5. Using four #10-24 nylock nuts and flat washers, secure the hanging bracket to the cradle. Felt Pads Figure 1. Attach Adhesive Round Felt Pads Figure 2. Install Bumpers (four places) Figure 3. Secure Bracket to Cradle 2


. 3.")
. b.")
. 2. Secure the ceiling bracket to the wood framing member. 3.")
4 RPA INSTALLATION PROCEDURES There are two methods for installing the RPA. The RPA can be column mounted or surface mounted. WARNING: Improper installation can cause serious personal injury! Make sure that the ceiling structural members can support a redundant weight factor five times the total weight of the equipment you intend to support overhead. The ceiling must be reinforced before you install the mount if the ceiling cannot support a redundant weight factor five times the total weight of the equipment. Column Mount RPA Install the RPA on a column as follows: 1. Thread the locking ring, tangs facing down, and RPA onto the threaded end of the column tube (see Figure 4 and Figure 5). 2. Using six studs on mount and six thumb screws, secure the RPA to the mount (see Figure 6). 3. Thread the locking ring against the RPA to lock the RPA in position and, if desired, route the cables through the RPA and pipe as shown in Figure 9. Surface Mount RPA Install the RPA as follows: 1. Disassemble the RPA: a. Remove four #10-24 X 3/8 long pan head roll adjustment screws (see Figure 7). b. Remove two #10-24 X 3/8 long pivot screws. c. Remove the Ceiling bracket from the joint bracket (see Figure 8). 2. Secure the ceiling bracket to the wood framing member. 3. Secure the ceiling bracket to the joint bracket (see Figure 8) using four #10-24 X 3/8 long pan head roll adjustment screws and two #10-24 X 3/8 long pivot screws (see Figure 7). 4. Using six studs on mount and six thumb screws, secure the RPA to the mount (see Figure 7). 5. If desired, route cables through RPA as shown in Figure 9. Tang Down Figure 4. Thread Locking Ring on Column Pivot Screw Figure 5. Thread RPA on Column Roll Adj. Screws Ceiling Bracket Figure 6. RPA on Mount Pivot Screw Figure 7. RPA Screws Roll Adj. Screws Joint Bracket Adjustment Plate Figure 8. RPA Disassembly 3

5 ADJUST YAW, PITCH, AND ROLL Adjust Yaw Adjust Yaw as follows: 1. Loosen the 1 1/2 jam nut and back it off a couple of turns. WARNING: When turning the mount in a counterclockwise direction, it may be completely unthreaded. The assembly could fall from the pipe. 2. Turn the assembly clockwise (raise) or counterclockwise (lower) to the desired yaw position. 3. Turn the jam nut down (counterclockwise) until it securely seats against the top cross member. Adjust Pitch (Vertical Elevation) Adjust pitch using the three #10-24X3/8 pitch adjustment screws located on each side of the adjustment plate. Adjust pitch as follows: 1. Loosen (slightly) three #10-24X3/8 pitch adjustment screws located on each side of the adjustment plate (see Figure 10). 2. Adjust projector angle to desired pitch. 3. Tighten three #10-24X3/8 pitch adjustment screws located on each side of the adjustment plate. Adjust Roll Adjust roll using the six #10-24X3/8 roll adjustment screws, three on the front and three on the back, of the adjustment plate. Adjust roll as follows: 1. Loosen (slightly) six #10-24X3/8 roll adjustment screws (see Figure 11). 2. Adjust projector to desired roll position. 3. Tighten six #10-24X3/8 roll adjustment screws. Jam Nut Pitch Adjustment Roll Adjustment Figure 9. Adjust Yaw, Pitch, and Roll Three pitch adjustment screws each side Figure 10. Adjust Pitch Three roll adjustment screws each side Figure 11. Roll Adjustment 4
6 THIS PAGE INTENTIONALLY BLANK 5
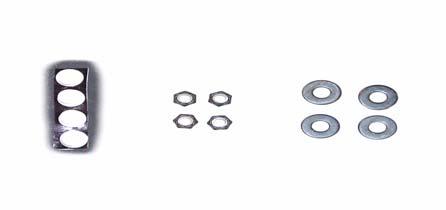
7 PARTS Table 1: Parts No. Nomenclature Qty. No. Nomenclature Qty. 1 RPA 1 6 Bumpers, white, rubber 4 2 Ring, lock 1 7 Nuts, Nylock 4 3 Bracket, hanging 1 8 Washer, #10, flat 4 4 Bracket, cradle 1 9 Nuts, thumb, Pads, felt, round, adhesive 4 6

8
9 CHRISTIE Technical Support CHRISTIE Digital Systems, Inc. 809 Wellington St. North Kitchener, Ontario, Canada N2G 4Y7 Tel (General) Toll Free (Technical Support) Fax (Service) CHRISTIE Digital Systems, Inc. Image Point 58 Suttons Park Ave. Reading, Berkshire RG6 1AZ United Kingdom Tel Fax CHRISTIE Digital Systems, Inc. 37 Tannery Lane # Tannery House Singapore Tel Fax NORTH AMERICA EUROPE ASIA-PACIFIC CHRISTIE Digital Systems, Inc Camden Drive Cypress, CA USA Tel (General) Toll Free (Technical Support) Fax (Service) CHRISTIE Digital Systems, Inc. Hohenzollernstraße Mönchengladbach Germany Tel Fax CHRISTIE Sales (Canada) CHRISTIE Sales (U.S.) Tel Tel or Fax Fax
10 VIVID GREEN CEILING MOUNT LINE DRAWING 9
11 RPA LINE DRAWING 10
CAUTION: To prevent damage to your equipment, thoroughly study all instructions and illustrations before you begin to install the extension.
 I N S T R U C T I O N M A N U A L The Christie Vivid extension is an easy to install option designed to provide quick height adjustment for your installation needs. This extension can be secured to ceilings
MPA-9000 Universal Ceiling Projector Mount Kit
 I N S T R U C T I O N M A N U A L Universal Ceiling Projector Mount Kit The Universal Ceiling Projector Mount provides a unique, simplified method of ceiling mounting your inverted projector. This low
Flat Panel Dual Swing Arm Wall Mount (FWD-110) MSP-SA
 MSP-SA") INSTALLATION INSTRUCTIONS Flat Panel Dual Swing Arm Wall Mount (FWD-110) The dual arm wall mount was designed to support flat panel displays with 10 to 30 diagonal screens and weighing a maximum of 40
INSTALLATION INSTRUCTIONS Flat Panel Dual Swing Arm Wall Mount (FWD-110) The dual arm wall mount was designed to support flat panel displays with 10 to 30 diagonal screens and weighing a maximum of 40
INSTALLATION INSTRUCTIONS Small Flat Panel FMA Pivot Arrays Models: FMA-220 and FMA-320
 INSTALLATION INSTRUCTIONS Small Flat Panel FMA Pivot Arrays The FMA-220 and FMA-320 pivot array allow both horizontal and vertical display pitch adjustment. The pitch adjustment range is 30 (15 up / 15
INSTALLATION INSTRUCTIONS Medium Flat Panel Model MSP-SI1
 INSTALLATION INSTRUCTIONS Medium Flat Panel Model MSP-SI1 IMPORTANT! : The MSP-S11 Mount is designed for use with Sharp 45" LCD displays that have a 200mm x 200mm mounting pattern. IMPORTANT! : The mount
MSP-DCCPGTU Large Screen Tilt Display Mount
 INSTALLATION INSTRUCTIONS Large Screen Tilt Display Mount The Large Screen Tilt Display Mount is a quick disconnect mounting solution for large flat panel displays. The mount features infinite adjust ability
INSTALLATION INSTRUCTIONS Small Flat Panel Height-Adjustable, Extended Pitch Swing Arm Wall Mount Model KWE-110
 INSTALLATION INSTRUCTIONS Small Flat Panel Height-Adjustable, Extended Pitch Swing Arm Wall Mount Model KWE-110 The KWE dual swing arm wall mount is designed to provide a broad range of viewing for Small
Small Flat Panel Height-Adjustable Dual Swing Arm Wall Mount With Universal Slat Wall Mount (MSP-JS-KWG-110)
") INSTALLATION INSTRUCTIONS Small Flat Panel Height-Adjustable Dual Swing Arm Wall Mount With Universal Slat Wall Mount () The dual swing arm desk mount is a sleek design providing a broad range of viewing
INSTALLATION INSTRUCTIONS Small Flat Panel Height-Adjustable Dual Swing Arm Wall Mount With Universal Slat Wall Mount () The dual swing arm desk mount is a sleek design providing a broad range of viewing
INSTALLATION INSTRUCTIONS Flat Panel Static Wall Mount Model: GSM-111
 INSTALLATION INSTRUCTIONS Flat Panel Static Wall Mount Model: GSM-111 The GSM-111 static wall mount fits most 23" to 30" displays. The GSM-111 is designed to adapt to VESA 200mm/ 100mm compliant displays.
MSP-DCCPGSU Large Screen Static Display Mount
 INSTALLATION INSTRUCTIONS Large Screen Static Display Mount The Large Screen Static Display Mount () is a quick disconnect mounting solution for large flat panel displays. The mount self-adjusts for the
WMA-300 Single Stud Wall Arm
 INSTALLATION INSTRUCTIONS Single Stud Wall Arm The Single Stud Wall Arm can be used to wall mount RPA, UPC or LCDA series ceiling mounts. The also provides a mounting solution for TV/Monitor mounts. The
MSP-DCCLFSD LCD Flat Screen Swing-Down Mount
 INSTALLATION INSTRUCTIONS LCD Flat Screen Swing-Down Mount Perfect for home applications under kitchen cabinets or other rooms with a soffit. The LCD Flat Screen Swing-Down mount is a sturdy, versatile
Speaker Mount Center Channel Speaker Adapter (PAC-301)
") I N S T R U C T I O N M A N U A L Speaker Mount Center Channel Speaker Adapter () The Speaker Mount Center Channel Speaker Adapter () uses the same interface as the Side Speaker Adapter and can be used
I N S T R U C T I O N M A N U A L Speaker Mount Center Channel Speaker Adapter () The Speaker Mount Center Channel Speaker Adapter () uses the same interface as the Side Speaker Adapter and can be used
Medium Flat Panel Dual Swing Arm Wall Mount JWD-V
 INSTALLATION Medium Flat Panel Dual Swing Arm Wall Mount The single swing arm wall mount is designed for mounting a medium sized flat panel display. The can swing out from, or fold against, the wall depending
CMA-455 Suspended Ceiling-Tile Reinforcing Kit
 INSTALLATION INSTRUCTIONS CMA-455 Suspended Ceiling-Tile Reinforcing Kit The provides a sturdy support for LCD/DLP hanging brackets (and certain other products) when installing these products in a suspended
Model MSPPWRTW Large Flat Panel Single Arm Wall Mount
 INSTALLATION INSTRUCTIONS Model Large Flat Panel Single Arm Wall Mount The is wall-mounted, rugged, versatile, and installer-friendly. The mount is compatible with the standard (14 x 14 ) PSB interface
MSP-WRTIDSKY1 Light Weight Suspended Ceiling Kit for use with Island Display Skybox
 INSTALLATION INSTRUCTIONS MSP-WRTIDSKY1 Light Weight Suspended Ceiling Kit for use with Island Display Skybox The MSP-WRTIDSKY1 Light Weight Suspended Ceiling Kit provides a sturdy support for LCD displays
PART #MSP-DCCPPWS Plasma Wall Swing-Out (PWS) Wall Mount
 Wall Mount") I N S T R U C T I O N M A N U A L PART # Plasma Wall Swing-Out (PWS) Wall Mount The wall mount is a rugged, versatile, and installer-friendly solution to unique display mounting requirements. With the
I N S T R U C T I O N M A N U A L PART # Plasma Wall Swing-Out (PWS) Wall Mount The wall mount is a rugged, versatile, and installer-friendly solution to unique display mounting requirements. With the
Assembly Instructions for model: VMPR1
 Assembly Instructions for model: VMPR1 Congratulations on your purchase! The VMPR1 ceiling mount provides a unique, simplified method of ceiling mounting inverted LCD/DLP projectors. Its low profile design
LARGE FLAT PANEL DISPLAY STATIC MOUNT PST 2000 Series
 INSTALLATION INSTRUCTIONS LARGE FLAT PANEL DISPLAY STATIC MOUNT The PST static wall mount accommodates large flat screens weighing up to 200 lbs (90.72kg). The teardrop holes in the mount allow for quick
LCD MONITOR/TV WALL MOUNT
 INSTALLATION INSTRUCTIONS LCD MONITOR/TV WALL MOUNT DUAL DESK CLAMP (RFCD-110) S CAUTION CAUTION A alerts you to the possibility of serious injury or death if you do not follow the instructions. A CAUTION
Truss Pitch-Adjustable (TPP) Mount
 Mount") I N S T R U C T I O N M A N U A L Truss Pitch-Adjustable (TPP) Mount The Truss Pitch-Adjustable (TPP) mount is a perfect solution exhibit, retail and digital signage applications. The mount is quick, easy
I N S T R U C T I O N M A N U A L Truss Pitch-Adjustable (TPP) Mount The Truss Pitch-Adjustable (TPP) mount is a perfect solution exhibit, retail and digital signage applications. The mount is quick, easy
Flat Panel Tilt Wall Mount (GPM-111)
") INSTALLATION INSTRUCTIONS Flat Panel Tilt Wall Mount () The tilt wall mount fits most 23 to 30 displays. The is designed to adapt to VESA 200mm/100mm compliant displays. This mount will also adapt to standard
INSTALLATION INSTRUCTIONS Flat Panel Tilt Wall Mount () The tilt wall mount fits most 23 to 30 displays. The is designed to adapt to VESA 200mm/100mm compliant displays. This mount will also adapt to standard
Medium Flat Panel Universal Interface Bracket (MSB-V)
") INSTALLATION Medium Flat Panel Universal Interface Bracket () INSTRUCTIONS The interface bracket functions as the universal mounting solution for medium flat panel displays. The is compatible with a multitude
INSTALLATION Medium Flat Panel Universal Interface Bracket () INSTRUCTIONS The interface bracket functions as the universal mounting solution for medium flat panel displays. The is compatible with a multitude
SPOM1 INSTALLATION INSTRUCTIONS. Medium Flat Panel Wall Mount. Instrucciones de instalación Installationsanleitung Instruções de Instalação
 INSTALLATION INSTRUCTIONS Instrucciones de instalación Installationsanleitung Instruções de Instalação Istruzioni di installazione Installatie-instructies Instructions d installation Medium Flat Panel
Mobile Cart for Flat Panel Display (PTC-2000 Series)
") INSTALLATION INSTRUCTIONS Mobile Cart for Flat Panel Display ( Series) The Mobile Cart for Flat Panel Display is designed to assist the presenter in showrooms, boardrooms, and trade show exhibits. The
INSTALLATION INSTRUCTIONS Mobile Cart for Flat Panel Display ( Series) The Mobile Cart for Flat Panel Display is designed to assist the presenter in showrooms, boardrooms, and trade show exhibits. The
INSTALLATION INSTRUCTIONS Plasma Floor Stand (PFB-2000SB)
") INSTALLATION INSTRUCTIONS Plasma Floor Stand (PFB-2000SB) Chief s Plasma Floor Stand is a safe, stable, easy-toinstall modular design solution for digital signage and presentations. Ideal where wall or
INSTALLATION INSTRUCTIONS Plasma Floor Stand (PFB-2000SB) Chief s Plasma Floor Stand is a safe, stable, easy-toinstall modular design solution for digital signage and presentations. Ideal where wall or
INSTALLATION INSTRUCTIONS HEAVY DUTY TILT WALL MOUNT Model: PPH-2000
 INSTALLATION INSTRUCTIONS HEAVY DUTY TILT WALL MOUNT Model: PPH-2000 Specifications: Accomodates Akira and Orion 84" displays without interface bracket; accomodates other large flat panel displays with
OB1U INSTALLATION INSTRUCTIONS. Interactive Flat Panel Over White Board Mount
 INSTALLATION INSTRUCTIONS Interactive Flat Panel Over White Board Mount Spanish Product Description German Product Description Portuguese Product Description Italian Product Description Dutch Product Description
INSTALLATION INSTRUCTIONS Lateral Shift Accessory Model: PAC-800
 INSTALLATION INSTRUCTIONS Lateral Shift Accessory Model: PAC-800 The PAC-800 Lateral Shift Accessory is for use with Chief Model PSM, PST, PRO, PLP, Large Flat Panel Display wall mounts. It can be installed
INSTALLATION INSTRUCTIONS. PLASMA TV WALL MOUNT TILT Universal (RGTU-210) WARNINGS WARNING
 WARNINGS WARNING") PLASMA TV WALL MOUNT TILT Universal (RGTU-210) S CAUTION CAUTION CAUTION A alerts you to the possibility of serious injury or death if you do not follow the instructions. A CAUTION alerts you to the possibility
PLASMA TV WALL MOUNT TILT Universal (RGTU-210) S CAUTION CAUTION CAUTION A alerts you to the possibility of serious injury or death if you do not follow the instructions. A CAUTION alerts you to the possibility
INSTALLATION INSTRUCTIONS Small Flat Panel Mounts Model: F-Series
 INSTALLATION INSTRUCTIONS Small Flat Panel Mounts Model: F-Series This Instruction Manual covers most of the F-Series wall and desk mounts, as well as selected F-Series pole mounts. NOTE: Some F-Series
CTA-100 VCR / DVD / Cable Box Adapter
 INSTALLATION INSTRUCTIONS VCR / DVD / Cable Box Adapter The provides a centralized mounting solution for a VCR/DVD/cable box. The shelf on the can be adjusted to fit the width and height of most VCR/DVD/Cable
INSTALLATION INSTRUCTIONS SLBU / SLMU UNIVERSAL INTERFACE BRACKETS
 INSTALLATION INSTRUCTIONS SLBU / SLMU UNIVERSAL INTERFACE BRACKETS The Universal Interface Bracket provides a solution for simplifying inventory of RPA and RPM series mounts and SLB/SLM projector brackets.
FSD-4100 LCD Flat Screen Swing-Down Mount
 INSTALLATION INSTRUCTIONS LCD Flat Screen Swing-Down Mount Perfect for home applications under kitchen cabinets or other rooms with a soffit. The LCD Flat Screen Swing-Down mount is a sturdy, versatile
Assembly Instructions for Model: VMPR1
 Assembly Instructions for Model: VMPR1 Thank you for choosing a Sanus Systems Model: VMPR1 ceiling mount. The VMPR1 ceiling mount provides a unique, simplified method of ceiling mounting inverted LC/LP
INSTALLATION INSTRUCTIONS SMALL FLAT PANEL ADJUSTABLE PITCH WALL MOUNT Model: FTR Series
 INSTALLATION INSTRUCTIONS SMALL FLAT PANEL ADJUSTABLE PITCH WALL MOUNT Model: FTR Series Specifications: Designed for installation on single wood studs or drywall (1/2" minimum thickness); either option
Mobile Cart for Flat Panel Display MSP-SPTC42 (PTC-2000 Series)
") INSTALLATION INSTRUCTIONS Mobile Cart for Flat Panel Display (PTC-2000 Series) The Mobile Cart for Flat Panel Display is designed to assist the presenter in showrooms, boardrooms, and trade show exhibits.
INSTALLATION INSTRUCTIONS Mobile Cart for Flat Panel Display (PTC-2000 Series) The Mobile Cart for Flat Panel Display is designed to assist the presenter in showrooms, boardrooms, and trade show exhibits.
LCD TV WALL MOUNT INSTALLATION INSTRUCTIONS. DUAL Swing Arm (RFWD-110) WARNING
 WARNING") INSTALLATION INSTRUCTIONS LCD TV WALL MOUNT DUAL Swing Arm (RFWD-110) WARNINGS WARNING WARNING CAUTION CAUTION The maximum weight to be installed on the RFWD wall mount is 40 lbs. (18.1 kg). The RFWD is
INSTALLATION INSTRUCTIONS LCD TV WALL MOUNT DUAL Swing Arm (RFWD-110) WARNINGS WARNING WARNING CAUTION CAUTION The maximum weight to be installed on the RFWD wall mount is 40 lbs. (18.1 kg). The RFWD is
MEDIUM FLAT PANEL DISPLAY TILT MOUNT MSP-MT (MTR-V)
") INSTALLATION INSTRUCTIONS MEDIUM FLAT PANEL DISPLAY TILT MOUNT (MTR-V) The tilt mount accommodates medium flat panel displays weighing up to 100 lbs (45.36kgs). The teardrop holes in the mount allow for
INSTALLATION INSTRUCTIONS MEDIUM FLAT PANEL DISPLAY TILT MOUNT (MTR-V) The tilt mount accommodates medium flat panel displays weighing up to 100 lbs (45.36kgs). The teardrop holes in the mount allow for
INSTALLATION INSTRUCTIONS MSP-SPFB (PFB-2000S) Plasma Floor Stand
 Plasma Floor Stand") INSTALLATION INSTRUCTIONS MSP-SPFB (PFB-2000S) Plasma Floor Stand Chief s Plasma Floor Stand is a safe, stable, easy-toinstall modular design solution for digital signage and presentations. Ideal where
INSTALLATION INSTRUCTIONS MSP-SPFB (PFB-2000S) Plasma Floor Stand Chief s Plasma Floor Stand is a safe, stable, easy-toinstall modular design solution for digital signage and presentations. Ideal where
INSTALLATION INSTRUCTIONS SMALL FLAT PANEL ADJUSTABLE PITCH WALL MOUNT Model: FTR Series
 INSTALLATION INSTRUCTIONS SMALL FLAT PANEL ADJUSTABLE PITCH WALL MOUNT Model: FTR Series Specifications: Designed for installation on single wood studs or drywall (1/2" minimum thickness); either option
SAM. Model: STV-C65 LCD Mobile Visualized Stand Instruction Manual. Weight Capacity: 1251bs / 56.7kg Suits LCD Flat Panel Display: 42"-55" Page 20
 SAM Model: STV-C65 LCD Mobile Visualized Stand Instruction Manual Weight Capacity: 1251bs / 56.7kg Suits LCD Flat Panel Display: 42"-55" 20 Step 6 LCD Mobile Lift Stand Model: STV-C65 Cable management
INSTALLATION MANUAL PBC-UMS
 INSTALLATION MANUAL. PBC-UMS Premier Mounts 3130 E. Miraloma Avenue Anaheim, CA 92806 Phone: (800) 368-9700 Fax: (800) 832-4888 mounts@mounts.com www.mounts.com Rev. 01 PBL-110 Projector Mount Page 2 Installation
INSTALLATION INSTRUCTIONS LARGE FLAT PANEL IN WALL ENCLOSURE Model: PAC-500
 INSTALLATION INSTRUCTIONS LARGE FLAT PANEL IN WALL ENCLOSURE Model: PAC-500 Specifications: Designed for in-wall installation spanning a minimum of 3 wood studs, 16" on center. Accomodates MWR, PWR and
PART #MSP-DCCST Flat Panel Tilt Mount
 INSTALLATION INSTRUCTIONS PART # Flat Panel Tilt Mount The Flat Panel Tilt Mount is a quick disconnect mounting solution for flat panel displays. The mount features adjustability between 0 and 15 degrees
Universal Projector Ceiling Mount Model: DPM-45
 Universal Projector Ceiling Mount Model: DPM-45 Instruction Manual Images may different from actual product Disclaimer It is Dyconn s intention to have all the correct information represented within this
INSTALLATION INSTRUCTIONS. Large Flat Panel Wall Mount Model: PRO-2000 Series
 INSTALLATION INSTRUCTIONS Large Flat Panel Wall Mount Model: PRO-2000 Series PRO-2000 Series Wall Mount Features: Accommodates large flat screens weighing up to 200 lbs (90.7 kg). Mounting brackets adapt
INSTALLATION MANUAL PBL-UMP
 INSTALLATION MANUAL PBL-UMP Table of Contents Warning Statements... 4 Parts List... 5 Installation Tools... 5 Features... 7 Projector Preparation... 8 Bracket Installation... 10 Leveling the Mounting Bracket...
Plasma Presenters Cart (PPC-2000)
") I N S T R U C T I O N M A N U A L (PPC-2000) The (PPC) is designed to assist the presenter in showrooms, boardrooms, and trade show exhibits. The PPC provides agile mobility for screens weighing up to
I N S T R U C T I O N M A N U A L (PPC-2000) The (PPC) is designed to assist the presenter in showrooms, boardrooms, and trade show exhibits. The PPC provides agile mobility for screens weighing up to
INSTALLATION MANUAL SP-CEIL-012
 INSTALLATION MANUAL SP-CEIL-012 InFocus Corporation 27700B S.W. Parkway Ave. Wilsonville, OR 97070-9215 1-800-294-6400 www.infocus.com IN-SPECEIL012.R2 PBL-110 Projector Mount Page - 2 - Installation Manual
K3 Series INSTALLATION INSTRUCTIONS. Kontour Array Arm Series
 INSTALLATION INSTRUCTIONS K3F30 K3F0 K3F0 K3G30 K3G0 K3G0 K3G30 Kontour Array Arm Series Spanish Product Description German Product Description Portuguese Product Description Italian Product Description
INSTALLATION INSTRUCTIONS POLE/PITCH- ADJUSTABLE MOUNT Model: TPM-2000 SERIES
 INSTALLATION INSTRUCTIONS POLE/PITCH- ADJUSTABLE MOUNT Model: TPM-2000 SERIES Specifications: Weight capacity of 150 lbs. (68 kg). Provides tilt range from 5 up to 15 down. Accommodates vertical pole (1"
Dual Arm Tilt LCD Mount
 Installation Manual model # 51324 M o u n t i n g S y s t e m s Dual Arm Tilt LCD Mount Fits Displays 13 to 32 Supports Up to 50 lbs (23 kgs) Projection from Wall from 3 to 17 Meets VESA Standards 50/75/100,
INSTALLATION INSTRUCTIONS Y-Connector Accessory (For Multi-Dual Arm Mounting Systems) Model: KSA-1011
 Model: KSA-1011") INSTALLATION INSTRUCTIONS Y-Connector Accessory (For Multi-Dual Arm Mounting Systems) Model: KSA-1011 Specifications: Installs to K-Series desk or wall mount. Accommodates K-Series mounting arms (fixed
INSTALLATION INSTRUCTIONS Y-Connector Accessory (For Multi-Dual Arm Mounting Systems) Model: KSA-1011 Specifications: Installs to K-Series desk or wall mount. Accommodates K-Series mounting arms (fixed
Installing flat panels on the MPL15 wall mount
 Installing flat panels on the MPL15 wall mount The MPL15 (DS-VW775) is a full-service video wall mount that can accommodate tiled LCD panels with up to a 400 x 400 mm VESA pattern in portrait and landscape
INSTALLATION INSTRUCTIONS
 CREATING POSITIVE CUSTOMER EXPERIENCES INSTALLATION INSTRUCTIONS PDS-PLUS Universal Projector Mount Model: NORTH AMERICA 3130 East Miraloma Avenue Anaheim, CA 92806 USA USA and Canada Phone: 1.800.368.9700
FHP INSTALLATION INSTRUCTIONS. Ceiling Mount
 INSTALLATION INSTRUCTIONS Ceiling Mount Spanish Product Description German Product Description Portuguese Product Description Italian Product Description Dutch Product Description French Product Description
MantelMount. TM1A Installation Instructions IMPORTANT SAFETY INSTRUCTIONS - SAVE THESE INSTRUCTIONS
 MantelMount TMA Installation Instructions IMPORTANT SAFETY INSTRUCTIONS - SAVE THESE INSTRUCTIONS TM Thank you for choosing the MantelMount television wall mount. Please read this entire manual before
LC200DS1 Double Stud Articulating Wall Mount for Flat Panel Screens up to 32" with up to 200mm x 200mm VESA Mounting Patterns
 Page 1 of 6 LC200DS1 Double Stud Articulating Wall Mount for Flat Panel Screens up to 32" with up to 200mm x 200mm VESA Mounting Patterns A multi-position dual articulating arm for flat screens up to 60
Projector Ceiling Mount
 INSTALLATION MANUAL Projector Ceiling Mount PID:3010 PID:5466 20kg (44lbs) RATED CAUTION: DO NOT EXCEED RATED LISTED WEIGHT. SERIOUS INJURY OR PROPERTY DAMAGE MAY OCCUR! ISSUED: FEB. 2013 NOTE: Read the
INSTALLATION MANUAL ELPMBUNI
 INSTALLATION MANUAL ELPMBUNI Warning Statements WARNING: WARNING: WARNING: WARNING: PREMIER MOUNTS DOES NOT WARRANT AGAINST DAMAGE CAUSED BY THE USE OF ANY PREMIER MOUNTS PRODUCT FOR PURPOSES OTHER THAN
Mounts by. Model PMU50 PROJECTOR MOUNT. Simple to adjust no-tools required
 Mounts by A division of David Engineering & Mfg. Inc. Model PMU50 PROJECTOR MOUNT Thank you for purchasing the PDR Projector mount with the exclusive Bayonet locking system. To ensure the correct usage,
Model POA-CHB-XL50. Assembly and Installation Manual. Projector Bracket. Contents. Be sure to consult with a qualified installation specialist
 Assembly and Installation Manual Projector Bracket Model POA-CHB-XL50 Be sure to consult with a qualified installation specialist This bracket is specifically for use with our projector. Be especially
INSTALLATION INSTRUCTIONS
 INSTALLATION INSTRUCTIONS Universal Short Throw Projector Arm Model: UNI-STA/UNI-EXT NORTH AMERICA 3130 East Miraloma Avenue Anaheim, CA 92806 USA USA and Canada Phone: 1-800-368-9700 Fax: 1-800-832-4888
INSTALLATION INSTRUCTIONS Horizontal And Vertical Table Stands and Accessories Model: KTP-Series
 INSTALLATION INSTRUCTIONS Horizontal And Vertical Table Stands and Accessories Model: KTP-Series The KTP-Series is a free standing, pole mount solution for multiple displays. KTP-320 KTP-220 / KTP-225
STOP. V00029AC Rev. 04 READ ALL OF THE FOLLOWING INSTRUCTIONS BEFORE REMOVING CABINET FROM SKID TOOL LIST. NET-ACCESS S-Type Network Cabinets
 Rev. 04 STOP READ ALL OF THE FOLLOWING INSTRUCTIONS BEFORE REMOVING CABINET FROM SKID NET-ACCESS S-Type Network Cabinets -Phillips screwdriver -Flatblade screwdriver -22mm socket wrench -15mm socket wrench
FSCTD Dual Back to Back Flat Screen Ceiling Mount
 Page 1 of 6 FSCTD Dual Back to Back Flat Screen Ceiling Mount The FSCTD Dual Back to Back Flat Screen Ceiling Mount is designed to suspend a monitor from a single flange mounted to structure in the ceiling.
The Bowflex Revolution XP Home Gym Assembly Instructions. P/N: Rev ( /0 )
") P/N: 001-7057 Rev ( /0 ) The Bowflex Revolution XP Home Gym Assembly Instructions 2 Table of Contents Before You Start... 2 Tools You Will Need / Hardware Contents... 3 Box Contents... 6 Assembling Your
P/N: 001-7057 Rev ( /0 ) The Bowflex Revolution XP Home Gym Assembly Instructions 2 Table of Contents Before You Start... 2 Tools You Will Need / Hardware Contents... 3 Box Contents... 6 Assembling Your
AST-2446 INSTALLATION INSTRUCTIONS
 AST-2446 Suspension Adapter AST-2446 INSTALLATION INSTRUCTIONS Single Stud Installation Step 1. Secure the ceiling plate to the ceiling structure (see WARNING). Step 2. Use suitable hardware (commercially
SAN12 ( <00>)
") SAN12 (6904-002020 ) Wood 13mm (1/2 in.) 3mm (1/8 in.) Sanus Systems 2221 Hwy 36 West Saint Paul, MN 55113 USA Customer Service Americas: 800-359-5520 651-484-7988 info@sanus.com Europe, Middle East,
SAN12 (6904-002020 ) Wood 13mm (1/2 in.) 3mm (1/8 in.) Sanus Systems 2221 Hwy 36 West Saint Paul, MN 55113 USA Customer Service Americas: 800-359-5520 651-484-7988 info@sanus.com Europe, Middle East,
INSTALLATION INSTRUCTIONS
 INSTALLATION INSTRUCTIONS AM2 / AM2-B Articulating Swingout Arm NORTH AMERICA 3130 East Miraloma Avenue Anaheim, CA 92806 USA USA and Canada Phone: 1.800.368.9700 Fax: 1.800.832.4888 Other Locations Phone:
e997 Articulating Wall Arm MANUAL IM004-03
 e997 Articulating Wall Arm MANUAL 10.18.16 IM004-03 0 WELCOME The Enovate Medical e997 Articulating Wall Arm was designed to set a new standard in quality. Enovate Medical s goal is to provide a wall arm
LC200C9F Ceiling Mount for up to 32" Flat Panel Screens with 200mm x 200mm VESA Mounting Patterns
 Page 1 of 6 LC200C9F Ceiling Mount for up to 32" Flat Panel Screens with 200mm x 200mm VESA Mounting Patterns The LC200C9F Flat Screen Ceiling Mount is designed to suspend a monitor from a round flange
Equilibrium. Conference Table. Installation Instruction. Revision B 11/07/16
 Equilibrium Conference Table Installation Instruction Revision B 11/07/16 Equilibrium End User Agreement Enwork Equilibrium table bases must be installed directly onto a four inch minimum thickness concrete
INSTALLATION INSTRUCTIONS
 INSTALLATION INSTRUCTIONS Universal Swingout Arm for 37 to 47 Flat Panels Model: AM80 NORTH AMERICA 3130 East Miraloma Avenue Anaheim, CA 92806 USA USA and Canada Phone: 1-800-368-9700 Fax: 1-800-832-4888
MM540 Installation Instructions IMPORTANT SAFETY INSTRUCTIONS - SAVE THESE INSTRUCTIONS
 MM50 Installation Instructions IMPORTANT SAFETY INSTRUCTIONS - SAVE THESE INSTRUCTIONS Please read this entire manual before you begin. Do not unpack any contents until you verify all requirements on PAGE.
INSTALLATION INSTRUCTIONS
 INSTALLATION INSTRUCTIONS Universal Low Profile Flat Mount Model: U.S. Toll Free: 1-866-752-6271 Outside N. America: 1-503-748-5799 E-mail: ts@planar.com FRANCE Phone: +33 5 6378 3810 E-mail: emeats@planar.com
INSTALLATION INSTRUCTIONS
 INSTALLATION INSTRUCTIONS PP-FCTA Suspended Ceiling Adapter NORTH AMERICA 3130 East Miraloma Avenue Anaheim, CA 92806 USA USA and Canada Phone: 1.800.368.9700 Fax: 1.800.832.4888 Other Locations Phone:
INSTALLATION INSTRUCTIONS. Projector Guard Security Cage PG3A
 INSTALLATION INSTRUCTIONS Projector Guard Security Cage PG3A PG3A DISCLAIMER Milestone AV Technologies and its affiliated corporations and subsidiaries (collectively "Milestone"), intend to make this manual
INSTALLATION INSTRUCTIONS. Yamaha Speaker Adapter Accessory PAC-Y3
 INSTALLATION INSTRUCTIONS Yamaha Speaker Adapter Accessory DISCLAIMER Milestone AV Technologies and its affiliated corporations and subsidiaries (collectively "Milestone"), intend to make this manual accurate
INSTALLATION INSTRUCTIONS. Locking Projector Mount MSP-CCS3
 INSTALLATION INSTRUCTIONS Locking Projector Mount DISCLAIMER Milestone AV Technologies and its affiliated corporations and subsidiaries (collectively "Milestone"), intend to make this manual accurate and
MANUAL e130. Wallstation
 MANUAL 07.29.13 e130 Wallstation The Enovate Medical e130 Wallstation was designed to set a new standard in quality. Enovate Medical s goal is to provide a wallstation that is ready for years of use,
INSTALLATION GUIDE. Model:B60 RECESSED IN WALL MOUNT
 INSTALLATION GUIDE Model:B60 RECESSED IN WALL MOUNT Features: Installs between 16 (406mm) wood stud centers Mounting Pattern Compliance: VESA 100*100mm up to 600 x 400mm Level 5 degree horizontal adjustment
NOVA-EXT Versatile Projector Mount Model: NOVA-EXT
 INSTALLATION MANUAL NOVA-EXT Versatile Projector Mount Model: NOVA-EXT NORTH AMERICA 3130 East Miraloma Avenue Anaheim, CA 92806 USA USA and Canada Phone: 800-368-9700 Fax: 800-832-4888 Other Locations
Installation Instruction
 Tools Needed for Assembly Stud finder (for wood stud wall) Pencil Mark Electric drill Wood Stud Wall Installation Step 1. Locate the Wood Studs Installation Instruction Drill bit (for wood stud wall) Masonry
INSTALLATION INSTRUCTIONS
 INSTALLATION INSTRUCTIONS Polaris Universal Projector Mount Model: NORTH AMERICA 1321 S. State College Blvd. Fullerton, CA 92831 USA USA and Canada Phone: 1.800.368.9700 Fax: 1.800.832.4888 Other Locations
Star Trac Turbo Trainer Assembly & Setup
 Star Trac Turbo Trainer Use the following procedures to unpack and assemble your Turbo Trainer manufactured by Star Trac. UNPACKING AND PARTS LIST Position the shipping carton so the Heavy End logo is
Installation Instructions
 Installation Instructions AM2 Articulating Swingout Arm Premier Mounts 3130 E. Miraloma Avenue Anaheim, CA 92806 Phone: (800) 368-9700 Fax: (800) 832-4888 techsupport@mounts.com www.mounts.com IN-AM2.R1
INSTALLATION INSTRUCTIONS
 CREATING POSITIVE CUSTOMER EXPERIENCES INSTALLATION INSTRUCTIONS Universal Low Profile Tilt Mount for 42 to 63 Flat Panels NORTH AMERICA 3130 East Miraloma Avenue Anaheim, CA 92806 USA USA and Canada Phone:
INSTALLATION INSTRUCTIONS Horizontal And Vertical Table Stands and Accessories Model: KTP-Series
 INSTALLATION INSTRUCTIONS Horizontal And Vertical Table Stands and Accessories The KTP-Series is a free standing, pole mount solution for multiple displays. KTP-320 KTP-220 / KTP-225 KTP-440 / KTP-445
A-dec 574L and 575L Dental Lights on a Cabinet or Wall INSTALLATION GUIDE
 A-dec 574L and 575L Dental Lights on a Cabinet or Wall INSTALLATION GUIDE A-dec 574L Dental Light Mounted on an A-dec Inspire TM 59 Central Console Before You Begin. Turn off the power to the system before
MM340 Installation Instructions IMPORTANT SAFETY INSTRUCTIONS - SAVE THESE INSTRUCTIONS
 MM30 Installation Instructions IMPORTANT SAFETY INSTRUCTIONS - SAVE THESE INSTRUCTIONS Please read this entire manual before you begin. Do not unpack any contents until you verify all requirements on PAGE.
INSTALLATION INSTRUCTIONS
 INSTALLATION INSTRUCTIONS Universal Low Profile Tilt Mount Model: U.S. Toll Free: 1-866-752-6271 Outside N. America: 1-503-748-5799 E-mail: ts@planar.com FRANCE Phone: +33 5 6378 3810 E-mail: emeats@planar.com
DX-TVMLPTB03. Low-Profile TV Wall Mount ASSEMBLY GUIDE. For either wood-stud or concrete wall installations
 ASSEMBLY GUIDE DX-TVMLPTB03 Low-Profile TV Wall Mount For either wood-stud or concrete wall installations Safety information and specifications...2 Tools needed...........................3 Package contents......................3
Tilting & Swiveling Plasma/LCD Flat Panel Wall Mount Installation Guide Model: A380SM
 Tilting & Swiveling Plasma/LCD Flat Panel Wall Mount Installation Guide Model: A380SM Easy installation Built-in level for easy positioning Corrective leveling adjustments after installation Forward /
INSTALLATION MANUAL FLAT LCD DISPLAY MOUNT MODEL
 INSTALLATION MANUAL FLAT LCD DISPLAY MOUNT MODEL CMK Ceiling WARNING! The wall, floor or ceiling should be capable of supporting a weight of at least five (5) times the monitor s weight. If it cannot,
Projector Flush Mount
 Projector Flush Mount ABtUS SIGAPORE PTE LTD Model: AV819 www.abtussingapore.com Patent Pending Revision 21/05/2012 ABtUS SINGAPORE PTE LTD www.abtussingapore.com User Operation Guide IMPORTANT NOTES Thank
QMP2MM1 INSTALLATION INSTRUCTIONS. Music Stand Height Adjust Single Monitor
 INSTALLATION INSTRUCTIONS Music Stand Height Adjust Single Monitor Spanish Product Description German Product Description Portuguese Product Description Italian Product Description Dutch Product Description
SM-RAZOR-T-M/L/XL. Strong Low Profile Tilt Mount for Ultra-Thin Flat-Panel TVs INSTRUCTION MANUAL
 SM-RAZOR-T-M/L/XL Strong Low Profile Tilt Mount for Ultra-Thin Flat-Panel TVs INSTRUCTION MANUAL WARNINGS: Installation of this product should be done by a qualified professional. Do not begin installation