Nice and expensive cameras make good images.
|
|
|
- Madison Stephens
- 5 years ago
- Views:
Transcription
1
2 Introduc)on: Photographic Myths Nice and expensive cameras make good images. It is true that nice and expensive cameras make good images. However, they only make great images based on HOW the camera is used. It may also be said that good or successful images can be made by inexpensive cameras as well. Many images that I expose for my fine art work are exposed with a $30 camera. Making successful images is all about your intended purpose and what you intend to communicate through your work. Having expensive cameras and equipment great, but only if you now why you have it and what to do with it.
3 Introduc)on: Photographic Myths If I buy a nice camera it should make great images for me. I should only have to push the buion. Because of the advancements in photography, par)cular digital photography, it is easier to make images. However, most who purchase a dslr camera find that using it successfully is much harder than it seems. The difficulty comes in controlling the image results and altering the images results. Being able to make the image that you desire is a result of knowing how to control the camera and not leaving the camera in control. It is aperall just a machine. It is up to the photographer to interpret the cameras results and to be able to use all that the camera can offer us to make a successful image. It is also important to realize that most images are successful because of the photographer s vision and not what camera they used. Great photographers have great vision. By vision, I do not mean that they have perfect eyesight. The term vision, in this sense involves the manner in which they have brought the image together, through knowledge of the technical and the ordering of the elements of art to make a great composi)on.
4 Introduc)on: Photographic Myths Because of the introduc)on of the dslr camera, anyone can be a professional photographer Photography has become so accessible. This accessibility and affordability of photography has made the thought of photography as a profession a possibility for so many. The introduc)on of dslr cameras has introduced an influx of professional photographers. dslr cameras are affordable and photographic educa)on is available in so many forms. There are no specific licenses or degrees one has to have in order to be called a professional photographer. Although, there is more involved than just pressing a buion in order to be a professional photographer. Nice equipment and camera knowledge are not necessarily what separates great photographers from mediocre ones. It is usually, the decisions made in composi)on, ligh)ng, and camera sezngs manipula)ons that make photographers successful. It is the themes they photograph and the stories that they are able to successfully tell.
5 Introduc)on: Photographic Myths The more megapixels the beier. Most camera adver)sements boast the high number or increased number in megapixels as the best thing ever. So it is no wonder that most people believe that great, quality images are made from cameras with a lot of megapixels. Megapixels are great, don t get me wrong. The quality of the image has much to do with the size of the sensor (which holds the megapixels) and the type of lens you are using. A megapixel is one million pixels. The idea is that more pixels make finer, cleaner images. So, when purchasing a camera, megapixels are important, but don t forget to think about the size of the sensor and the lens you will be using.
 4.")
6 Introduc)on: Basic Digital Terminology Styles/Types of Digital Cameras: We will make a brief overview of 4 basic types of digital cameras. They are: 1. the point and shoot 2. the advanced digital camera 3. the digital slr (DSLR) 4. the digital back (part of a medium format camera system)
7 Introduc)on: Basic Digital Terminology Styles/Types of Digital Cameras: The Point and Shoot Size: Most point and shoot cameras are small in size and are made by many manufacturers, such as Sony, Canon, Fuji, Olympus, Panasonic, and so many more. Use/Users: Point and Shoot cameras are designed for the amateur user. They are most open used for snapshots, such as candid pictures made on vaca)on or at a special gathering, etc. Most who use the point and shoot style of camera use it because of its ease of use. Price Range: Point and Shoot cameras can range from $ $ The number of megapixels and the manufacturer have a great deal to do with the price. Resolu)on: The term resolu)on goes along with megapixels. The resolu)on determines the quality of your printed image. It is a beast of a topic, so we will get to it in more detail later. In short, the more megapixels the beier the quality and the bigger the sensor in the camera the beier the quality. Lenses: Point and Shoot cameras have lens aiached to the body of the camera that are not interchangeable. In other words, you cannot take the lens off the camera and put a different one on. Point and shoot cameras offer either a fixed lens, or an op)cal and/or digital zoom. A fixed lens does not change focal lengths. In other words, if you want to fill more of your image with your main subject, you must physically move closer. Digital zoom simply takes the center of the image and enlarges it. The quality of the image suffers with the digital zoom feature. Op)cal zoom is comparable to binoculars. You can get close to something without physically having to move closer. to the subject. A good lens is very important in choosing a camera. OPen )mes it is safer to stay with established brands when choosing a lens. Always be sure you are buying a lens made of glass and not plas)c!!

8 Introduc)on: Basic Digital Terminology Styles/Types of Digital Cameras: The Point and Shoot
. The term prosumer is a combina)on of the words professional and consumer.")
9 Introduc)on: Basic Digital Terminology Styles/Types of Digital Cameras: The Prosumer Camera The term Prosumer Camera, also called the bridge camera, describes advanced digital camera that have fully manual controls and high- quality glass (lens). The term prosumer is a combina)on of the words professional and consumer. These cameras serve as a bridge between the point and shoot camera and the professional quality of a digital SLR (dslr) cameras.
10 Introduc)on: Basic Digital Terminology Styles/Types of Digital Cameras: The Prosumer Camera Size: They are quite a bit bigger than point and shoots, but smaller than dslr cameras. Use/Users: Just as it sounds the Prosumer camera are for those who want more control over the camera, but are not using it for professional purposes. Price Range: Prosumer cameras start at around $ Resolu)on: The term resolu)on goes along with megapixels. The resolu)on determines the quality of your printed image. It is a beast of a topic, so we will get to it in more detail later. In short, the more megapixels the beier the quality and the bigger the sensor in the camera the beier the quality. Prosumer cameras are usually at least 8 megapixels or more. Lenses: Prosumer cameras have lens aiached to the body of the camera that are not interchangeable. In other words, you cannot take the lens off the camera and put a different one on. Prosumer cameras offer either a fixed lens, or an op)cal and/or digital zoom. They are usually beier quality than what you would find on a point and shoot camera. A fixed lens does not change focal lengths. In other words, if you want to fill more of your image with your main subject, you must physically move closer. Digital zoom simply takes the center of the image and enlarges it. The quality of the image suffers with the digital zoom feature. Op)cal zoom is comparable to binoculars. You can get close to something without physically having to move closer. to the subject. A good lens is very important in choosing a camera. OPen )mes it is safer to stay with established brands when choosing a lens. Always be sure you are buying a lens made of glass and not plas)c!!

11 Introduc)on: Basic Digital Terminology Styles/Types of Digital Cameras: The Digital Single Lens Reflex Camera The term DSLR stands for digital single lens reflex. Single Lens Reflex cameras are those having a single lens in which light enters to form an image into the viewfinder as well as onto the sensor. It is much comparable to the regular SLR cameras that are film based. Rather than film the digital cameras have a sensor to record the data coming from the light that comes through the lens. The term reflex refers to a mirror that pops up and out of the way when the shuier buion has been pressed. When the mirror pops up, light passes through to the sensor (or exposes film in a film camera). It is the camera style of choice for a wide variety of photography professionals from photojournalists to portrait photographers and so much more. Professionals choose these cameras because of the fully manual controls and also because they are flexible in terms of accessories, such as baieries, flashes, and lenses.
12 Introduc)on: Basic Digital Terminology Styles/Types of Digital Cameras: The Digital Single Lens Reflex Camera Size: They are a bit bigger than prosumer cameras and range in size depending on quality. Use/Users: It is the chosen by photographers based on its image quality (resolu)on), interchangeability, and ability to manually adjust sezngs to suit needs. They are used by photojournalists, portrait photographers, ar)sts, wedding photographers, and avid photography lovers. Price Range: They start at around $ and go up around $ Resolu)on: The term resolu)on goes along with megapixels. The resolu)on determines the quality of your printed image. It is a beast of a topic, so we will get to it in more detail later. In short, the more megapixels the beier the quality and the bigger the sensor in the camera the beier the quality. D- SLR cameras are usually at least 8 megapixels or more. OPen )mes you can find the term full- frame with D- SLRs. This means that the size of the sensor is comparable to the size of a 35mm nega)ve. Lenses: D- SLR cameras have interchangeable lens. Many D- SLR camera systems offer a wide variety of lens, from zoom to telephoto to wide angle. Some camera systems such as Canon and Nikon offer lens that can be used by both digital and film models. The accessories available for D- SLR are very numerous, from baiery packs, to hot- shoe flashes (not built- in), to filters.

13 Introduc)on: Basic Digital Terminology Styles/Types of Digital Cameras: The Medium Format Digital SLR Just as the D- SLR sensors are compared to the 35mm frame size, Medium Format Digital sensors are compared to the size of 120 and 220 film formats. Some medium format cameras are designed with a detachable back so that photographers can switch from digital to film on the same camera body. These camera systems are quite expensive.
14 Introduc)on: Basic Digital Terminology Styles/Types of Digital Cameras: The Medium Format Digital SLR Size: They are generally shaped a bit different than the digital SLR and a bit bigger as well Use/Users: Meant solely for professional photographers. OPen used for images to be printed or presented in a very large size. Price Range: They start at around $10,000 and go up around $45,000. Resolu)on: The term resolu)on goes along with megapixels. The resolu)on determines the quality of your printed image. It is a beast of a topic, so we will get to it in more detail later. In short, the more megapixels the beier the quality and the bigger the sensor in the camera the beier the quality. Medium format digital SLRs range from megapixels. Lenses: Medium format D- SLR cameras have interchangeable lens. You cannot use the lens from d- slrs that have sensors comparable to 35mm film cameras. These camera systems offer a wide variety of lens, from zoom to telephoto to wide angle. Common Medium Format brands are Mamiya and Hasselblad. Photographers open shoot with these types of cameras tethered, meaning their camera is connected to a computer so they can instantly view the images they are making.
15 Introduc)on: Basic Digital Terminology Pixels: A term pixel is a compound of the words picture and element. Every pixel in an image has a numerical value between 0 and 255 and is made up of three color channels, red, blue and green (RGB). For example, the red square in Figure 1 is made up of red- 185, green- 57, and blue- 12. If you would like to know more about pixels you can research bit depth as well. Every digital image is made up of a certain number of pixels. The more pixels the beier quality of image you have. If you have ever shopped around for a digital camera you may have no)ced that manufacturers use pixel counts to let the consumer know the maximum number of pixels the camera can produce to make the best quality image it is capable of producing. For example if the maximum resolu)on of an 8.2 megapixel camera is 3504x2336 that means that the camera is capable of producing an image around in x in if printed at 300 dpi. Figure 1:
nuous tone")

16 Introduc)on: Basic Digital Terminology Pixels: Digital images appear rather smooth just like a con)nuous tone photograph. If you look closely or zoom in, you can actually see a lot of liile pixels or liile squares that make up the photograph.
ve film to capture images, digital cameras capture images using a light sensi)ve sensor.")
17 Introduc)on: Basic Digital Terminology Sensors: The digital sensor (without gezng too technical) is the light sensi)ve part of your camera that captures the image. Whereas a film camera uses light sensi)ve film to capture images, digital cameras capture images using a light sensi)ve sensor. They are usually talked about in terms of their size rela)onship to film. Most consumer cameras and even prosumer cameras have sensors much smaller than a 35 mm nega)ve. In short, the larger the sensor, they beier image quality you will have. The image below is of a 39 megapixel sensor. No)ce that it is much larger than the frame size of 35mm film. This type of sensor would be found in a high- end medium format digital camera. You may see the phrase full frame sensor when looking over very nice DSLR Cameras. This means that the sensor of the camera is equivalent to that of a 35mm nega)ve.

18 Introduc)on: Basic Digital Terminology Sensors: Just like film, your sensor can gather dust that can result in spots on your images. You can remove dust from your sensor using a visible dust blower, special sensor cleaning kit, or you can have it professionally cleaned.
19 Introduc)on: Camera SeZngs Camera SeZngs: If you are a digital SLR user, then you know that there are many features and sezngs available to you. Even though this is not the popular and most fun thing to do, reading your user manual is one of the best things you can do to understand your camera. APer all, the manual does tell you how to operate your camera as well as informing you what it can do. When in ques)on about a func)on or a buion...look it up in the user manual! Here is a list of vital camera func)ons and sezngs that we will be discussing: 1. RAW vs. JPEG 2. White Balance 3. Color Space 4. Shoo)ng Modes 5. Manual Exposure 6. the Histogram
20 Introduc)on: Camera SeZngs RAW vs. JPEG: This is quite an extensive topic, however, we will keep it basic. There are many different file formats when dealing with digital images. Most cameras record images using a jpeg file format. Higher quality cameras have the ability to record in a RAW file format. The Main Differences: JPEG: Jpegs are smaller in size because they use compression. This means it takes some of the informa)on out of the file to get it smaller. The smaller size file is the advantage in terms of storage on both your memory card and your computer. However, the loss of detail and informa)on is the disadvantage. Most photo labs will accept the jpeg file format. There are some photo labs that will accept )ff files. RAW: When shoo)ng in RAW you have the most control over your image. The images are somewhat compressed in a non- lossy way so you do not loose any informa)on. The disadvantage is that the RAW files must be converted to either JPEG or TIFF formats before sending them to a print lab. With RAW files you can also do a number of edi)ng steps before conver)ng it, such as adjus)ng exposure, white balance, and sharpening. When shoo)ng in RAW, then camera does not add any sharpening to it. The other advantage to a RAW file is that when you edit it, the changes will never be saved to the file itself, so you will always have the file in its original state as taken during camera exposure.
mum size prints (enlarged prints).")
21 Introduc)on: Camera SeZngs RAW vs. JPEG: File Formats There are open several sizes of jpegs to choose from the file format/size window on your digital dslr camera. Small JPEG: Great for web only. Medium JPEG: Great for web or small sized prints. Large JPEG: Great for web and op)mum size prints (enlarged prints). RAW: Great for op)mum quality and op)mum sized prints RAW + JPEG: Records both a RAW and JPEG version of your exposures. Gives you the op)on to edit in JPEG format or RAW format. Takes up much more space on your memory card File Format Screen on DSLR:

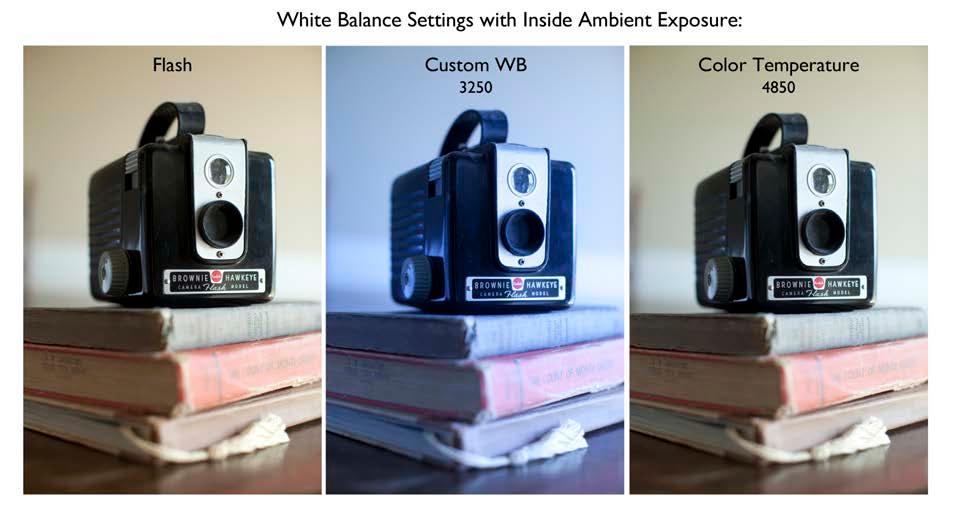
22 Introduc)on: Camera SeZngs White Balance: This is another term that derives from tradi)onal film based photography. Films are temperature balanced based on the ligh)ng situa)on in which one shoots. For example, if I am going to be taking pictures outside I will buy daylight balanced film. If I am going to be taking pictures in the studio with tungsten lights, I will buy Tungsten- balanced film. If I were to use daylight film with tungsten ligh)ng, my pictures will be very yellow. With digital cameras you can choose the type of ligh)ng situa)on in which you will be photographing. The reason it is called white balance is because it uses white as a star)ng point to gauge temperature. Many cameras have an auto white balance that lets the camera decide the best sezng for your situa)on. But, it is always beneficial to give the others a try to see which image best suits your needs. Sec)on from Canon s Manual Concerning White Balance: To the human eye, a white object looks white regardless of the type of ligh)ng. With a digital camera, the color temperature is adjusted with sopware to make the white areas look white. This adjustment serves as the basis for the color correc)on. The result is natural - looking colors in the pictures.

23 Introduc)on: Camera SeZngs White Balance:
24 Introduc)on: Camera SeZngs White Balance:

25 Introduc)on: Camera SeZngs White Balance:

26 Introduc)on: Camera SeZngs White Balance:

27 Introduc)on: Camera SeZngs White Balance:

28 Introduc)on: Camera SeZngs White Balance:
29 Introduc)on: Camera SeZngs Color Space: Basic differences between: Adobe RGB (1998) or srgb srgb: srbg is best to use if you do not know a lot about image processing. It has a narrow range of reproducible colors and is the color space of choice for the web. Adobe RGB (1998): Adobe RGB has a wider range of reproducible colors than srgb and is mainly used for print purposes. You may need to consider the following when deciding which space is best to use: Are the images going to be used solely for web? (srgb) Does my client have a request for a specific space? (OPen )mes magazines, etc. will ask for a specific color space.) Does my print lab or album company ask for a specific color space?
30 Shoo)ng Modes: Overview Shoo)ng Modes: Cameras generally have different modes to shoot in, such as Manual, Program mode, Fully Automa)c, Aperture Priority, ShuIer Priority, Bulb, Portrait, Night, Landscape, and Mo)on. I will give you a very brief overview. Manual (M): YOU do the work. This is the best way to learn how to make good photographs. Most, not all, digital cameras have the op)on of shoo)ng in Manual mode. This means you decide what aperture and shuier speed to use for the given situa)on. Manual mode gives you the most control over your image. This is the mode we will be focusing on in this workshop. Program Mode (P): The camera chooses the aperture and shuier speed to suit the overall brightness of a scene. Auto : the camera does everything for you - sets the ISO, the shuier, aperture, and white balance. Aperture Priority (Av): You set the desired aperture sezng and the camera sets the shuier speed to suit the overall brightness of a scene. ShuIer Priority (Tv): You set the desired shuier speed sezng and the camera sets the aperture to suit the overall brightness of a scene.
31 Shoo)ng Modes: Overview Shoo)ng Modes: Manual Exposure Here is a quote from Neil van Niekerk concerning automa)c exposure (photographer: There s a side effect to using automa)c metering that I ve no)ced among newcomers to photography there s a tendency to blame the camera. It s a subtle ship in mind set, but it is there. Instead of assuming responsibility and learning about good technique, it becomes a quest for a camera that will do it all. With manual metering, you are in control. So if there is a problem, you are the one that needs to figure out why, and how to improve on it. You decide. Not the camera. This idea of controlling the camera is the sole purpose of this workshop. The following informa)on concerning exposure will help you to create the images you desire. It will take )me and it will take effort and dedica)on. The following informa)on will not reveal a magic buion on your camera that will turn you into Ansel Adams. You will however, learn how to use this informa)on to essen)ally control the feeling of your image and on the most basic level, make your images darker or brighter, focused or less focused, noisy or less noisy, etc.
32 Shoo)ng Modes: Overview Shoo)ng Modes: Manual Exposure Here is a quote from Neil van Niekerk concerning automa)c exposure (photographer: There s a side effect to using automa)c metering that I ve no)ced among newcomers to photography there s a tendency to blame the camera. It s a subtle ship in mind set, but it is there. Instead of assuming responsibility and learning about good technique, it becomes a quest for a camera that will do it all. With manual metering, you are in control. So if there is a problem, you are the one that needs to figure out why, and how to improve on it. You decide. Not the camera. This idea of controlling the camera is the sole purpose of this workshop. The following informa)on concerning exposure will help you to create the images you desire. It will take )me and it will take effort and dedica)on. The following informa)on will not reveal a magic buion on your camera that will turn you into Ansel Adams. You will however, learn how to use this informa)on to essen)ally control the feeling of your image and on the most basic level, make your images darker or brighter, focused or less focused, noisy or less noisy, etc.
33 Shoo)ng Modes: Overview Shoo)ng Modes: Manual Exposure The term exposure refers to the amount of light required to properly expose an image to achieve the desired amount of detail in all areas of the image. The correct exposure is achieved by the proper combina)on of light intensity (aperture) and dura)on of light (shuier speed) entering the camera. Correct exposure is open achieved by interpre)ng the light meter s (whether internal or hand- held) measurements that will give the desired effect for the subject maier being photographed. Light is measured by a light meter (internal or handheld) Light meters give a combina)on of f- stop (aperture) and shuier speed that will give a correct exposure for the light in a given scene. The combina)on of aperture and shuier given can be used in different combina)ons. These varying combina)ons are called equivalent exposures. Ex: Given Exposure: 1/1000sec Equivalent Exposures: 1/2000sec 1/500sec 1/250sec
34 Shoo)ng Modes: Overview Shoo)ng Modes: Manual Exposure One thing that must be understood is that the light meter in your camera is open incorrect and must be interpreted. The fact that these internal light meters are open incorrect is more reason for us as photographers to be able to expose in Manual mode. If the camera gives us undesirable results, then we will be able to alter the image by changing the sezngs to beier suit what we desire. In a medium light photography, the correct exposure is open a subjec)ve opinion. This is because there are so many ways to photograph just one given subject/scene. The choices made with aperture and shuier speed and ligh)ng can drama)cally change the same composi)on. The ul)mate goal is to find the correct exposure, or the correct balance between highlights, mid- tones, and shadows that retain detail in all desired areas of the image.

35 Shoo)ng Modes: Overview Shoo)ng Modes: Manual Exposure Correct exposure makes for op)mum edi)ng and prin)ng leading to a more successful finished product. Overexposure leads to blown out highlights and a lack of rich shadows and midtones. Underexposure leads to shadow areas that lack detail. The result is an images that lacks the dynamic range for a dynamic image.
36 Shoo)ng Modes: Overview Shoo)ng Modes: Manual Exposure These Variables Control Exposure in Ambient Situa)ons: 1. ShuIer Speed 2. Aperture 3. ISO 4. Light quality (indoors vs. outdoors, sunny vs. cloudy) 5. Light to Subject Distance.
37 Manual Exposure Manual Exposure: ShuIer Speed A shuier is a mechanical device inside a camera that controls how long light is let through. There are different types such as focal plane, leaf, and diaphragm. ShuIer speed controls the dura)on that light enters the camera to strike/expose the film/sensor. ShuIer speeds are measured in frac)ons of a second and seconds. There is also a B sezng on cameras which allows the photographer to choose how long to leave the shuier open. Typical ShuIer Speeds: B 1 1/2 1/4 1/8 1/15 1/30 1/60 1/125 1/250 1/500 1/1000 1/2000
38 Manual Exposure Manual Exposure: ShuIer Speed The higher the number the faster the shuier speed The lower the number the slower the shuier speed Ex: 1/2000 is faster than 1/125 Each shuier speed is also referred to as a stop and each just either doubles the light dura)on or cuts it by half.

39 Manual Exposure Manual Exposure: ShuIer Speed ShuIer Speed Controls Ambient Exposure: The shuier controls HOW LONG light enters the camera to expose the sensor. The below example shows the difference between.5 second and 1/4th of a second. Note that the aperture sezngs are the same. In the previous example the apertures were changed to result in the same amount of light coming into the camera. 1/500th second 1/4th f/ f/16
40 Manual Exposure Manual Exposure: Aperture The aperture is the size of the diaphragm opening built in to the lens of a camera. It controls the intensity or amount of light coming into the lens to expose the film or digital sensor. In other words it controls HOW MUCH light enters the camera. Each aperture value is called a stop or an f- stop A wider opening allows more light in whereas a smaller opening allows less light in. When the value of the f- stop decreases by one stop, twice the amount of light is let in to the camera. Ex: going from f/5.6 to f/4 doubles the amount of light coming into the camera. This is called opening up. When the value of the f- stop increases by one stop, half the amount of light is let in to the camera. Ex: going from f/4 to f/5.6 cuts the amount of light coming into the camera by half. This is called closing down.
41 Manual Exposure Manual Exposure: Aperture Here is a range of apertures you may expect to see:

42 Manual Exposure Manual Exposure: Aperture In addi)on to controlling how much light enters the camera, the aperture also control depth of field You can control how much of the scene is in focus from foreground to middle ground to background by the choice of aperture. In general, the smaller the aperture, the sharper the image from foreground to background. EX: f/2.8 will create a much shallower depth of field than f/11 Wider apertures like f/4, f/2.8, etc. are useful if you want to background to drop out of focus. Smaller apertures, like f/16 and f/22 are useful if you want sharp focus from foreground to background Here is an example of great vs. wide depth of field: f/1.8 f/11 In each image, the subject is in focus, but no)ce the difference in the amount of focus in front and behind of the subject.


43 Manual Exposure f/1.8 f/16


44 Manual Exposure 150 mm at f/4 50mm at f/4
45 Manual Exposure Manual Exposure: ISO (Interna)onal Standards Organiza)on) ISO refers to a film s sensi)vity to light or the sensor s sensi)vity to light. A few things about ISO: In short, the higher the ISO number the less light you need to make an image. You can think of ISO ra)ngs like stops. If I go from ISO 400 to 200 that is one stop more light required to make an image. Or, another way to look at it, ISO 200 is twice as fast as ISO 100. The higher the ISO, the more visible grain or noise is in an image Higher ISOs are useful for indoor exposures where there is not much available light. Lower ISOs are useful and desirable for outdoor exposures.

46 Manual Exposure Manual Exposure: ISO (Interna)onal Standards Organiza)on) This por)on of an image has been zoomed so that you can see the differences in ISO. As you can see, the image on the right has much less visible grain at ISO 100 and the image on the lep has much higher visible grain at ISO ISO 100 ISO 1600
47 Manual Exposure Manual Exposure: Internal Light Meters Q: I understand what aperture and shuier speed do, but how do I know which combina)on to use? A: Use your light meter to start somewhere Light is measured by a light meter (internal or handheld) Light meters give a combina)on of f- stop (aperture) and shuier speed that will give a correct exposure for the light in a given scene. The light meter inside digital SLR cameras is called an internal light meter. It can also be referred to as a reflec)ve light meter or a gray meter.
48 Manual Exposure Manual Exposure: Internal Light Meters Reflected Light Meters measure the light reflected off a subject and calculate and exposure (f- stop and shuier speed) for that given scene. When a scene/subject has an average distribu)on of tones from highlights to midtones, to shadows, the light meter open gives an adequate meter reading. When a scene/subject does not have an average distribu)on of tones and is abundant in either high values or low values, the light meter open misinterprets the scene. And this is where your brain kicks in! Internal light meters are ac)vated by pressing the shuier buion of your camera half- way down. Be careful not to press too hard or you will release the shuier. When the shuier buion has been depressed half- way you will be able to see a meter reading on the inside and outside of your camera. The internal light meter will give you a readout that will relay to you if you current sezngs (shuier speed, aperture, ISO) will result in an underexposed, overexposed, or correct exposure.
49 Manual Exposure Manual Exposure: Internal Light Meters
50 Manual Exposure Manual Exposure: Internal Light Meters Understanding How The Light Meter Works: Middle Gray to Save the Day! A reflected meter measures the light that is reflected off of the subject. Because dark objects (or objects in shadow) reflect less light than bright objects, a reflected light meter can be tricked by an unusual subject or background. Reflected meters are calibrated to measure light in a scene and produce a medium gray tone, the same value that is represented by the gray card. Gray Card = 18 % reflectance gray. The reflected light meter in your camera works well in most situa)ons, but it can be fooled when the subject is unusually light or dark. It is in these situa)ons where you must make a decisions based on the situa)on you are faced with and the base meter reading your camera gave you. Q. How does middle gray help us? A. Now that we know how cameras see, we can interpret what the camera is telling us.
51 Manual Exposure Manual Exposure: Internal Light Meters Understanding How The Light Meter Works: Middle Gray to Save the Day! Here are a few examples where an overall meter reading would not work well: Contrasty Scenes A scene where one tone is dominant or a has a very limited tonal range Your subject is backlit (like a person in front of a bright window) Your subject is against a very dark background An image taken at night

52 Manual Exposure Manual Exposure: Internal Light Meters
53 Manual Exposure Manual Exposure: Internal Light Meters Metering Methods: 1. Subject is Backlit: Move in close and meter off the subject, then use that reading. Or Use an incident- light meter to take a meter reading off the subject Or Use a gray card, take a meter reading of the gray card and use those sezngs 2. Landscape/Cityscape with significant sky coverage: Tilt the camera down to exclude the sky; this will give a more accurate reading for the landscape/cityscape. 3. Subject against a dark background: Move in close to meter the subject excluding the dark background OR Use a gray card to meter from. 4. Bracke)ng: Make several varying exposures from one scene.
54 Manual Exposure Manual Exposure: Internal Light Meters Metering Methods: Bracke)ng Bracke)ng is a method used to find the desired exposure by making mul)ple exposures of the same scene at varying exposures. In the example shown, there were two exposures taken in addi)onal to the camera s given exposure. One exposure was one stop overexposed and one was one stop underexposed. Because the scene had a variety of tones, in terms of highlights, midtones, and shadows, the exposure given from the camera was correct. Bracke)ng can be useful in post- processing if you don t have any ligh)ng available for the subject because you can composite parts of the scenes in Photoshop to get exactly what you want.
55 Manual Exposure Manual Exposure: Equivalent Exposures Just because you arrive at a given set of aperture and shuier speed sezngs given by your camera does not mean you have to seile for them. For example, what if your camera s meter gives you a correct exposure of f/8 at 1/250th of a second and you really want to use a wide aperture sezng like f/4 to get shallow depth of field? Or, what if your camera s meter gives you a correct exposure of f/16 at 1/15th of a second and you decide that you need to use a fast shuier speed because your subject is moving? You can use equivalent exposures to change your choice of sezngs while staying at the correct exposure.
 is the same, the sezngs however are different: In this first example, you can see that the aperture and shuier speed combina)ons are different.")
56 Manual Exposure Manual Exposure: Equivalent Exposures Here are two examples of equivalent exposures. The exposure (amount of light) is the same, the sezngs however are different: In this first example, you can see that the aperture and shuier speed combina)ons are different. The subject is not moving, so the main difference is in the depth of field. Neither one is wrong. It is totally a subjec)ve choice made by the photographer as to which one works best.
 is the same, the sezngs however are different: In this second example, you can see that the aperture and shuier speed combina)ons are different as well.")
57 Manual Exposure Manual Exposure: Equivalent Exposures Here are two examples of equivalent exposures. The exposure (amount of light) is the same, the sezngs however are different: In this second example, you can see that the aperture and shuier speed combina)ons are different as well. The subject is moving, so the main difference is in the how the mo)on is captured. Again, neither one is wrong. It is totally a subjec)ve choice made by the photographer as to which one works best.
58 Manual Exposure Manual Exposure Wrap Up In a nut- shell, you need to know how to effec)vely make a scene or subject lighter or darker in a given scene with the given light source (ar)ficial ligh)ng is another subject all together). Just to wrap- up, here are the basic sezngs in you camera that will help you make an image lighter or darker. To make the image lighter: 1. ShuIer Speed: The slower the shuier speed the more light comes into the camera, making the image lighter. 2. Aperture: The wider the aperture the more light comes into the camera, making the image lighter. 3. ISO: The higher the ISO, the more sensi)ve your sensor is to light, thus making the image lighter. To make the image darker: 1. ShuIer Speed: The faster the shuier speed the less light comes into the camera, making the image darker. 2. Aperture: The smaller the aperture the less light comes into the camera, making the image darker. 3. ISO: The lower the ISO, the less sensi)ve your sensor is to light, thus making the image darker.
59 Lens Choice: Focal Length There is something magical about the image formed by a lens. Surely every serious photographer stands in awe of this miraculous device, which approaches ul)mate perfec)on. A fine lens is evidence of a most advanced technology and crap. We must come to know intui)vely what our lenses and other equipment will do for us, and how to use them. ~ Ansel Adams
60 Lens Choice: Focal Length Focal Length When choosing a camera you must also choose the appropriate lens for whatever subject maier you will be photographing. Lenses come in a wide variety, not only in focal length but also in price. Purchasing the right lens can be difficult if you don t understand some basic terminology: Focal Length is what gives different types of lens their names. The focal length is defined as a distance from the center of such a convex element (principle point) to the focal point (image plane) and it is one of the most decisive factors that determines the characteris)cs of a lens. When purchasing a lens we recognize the focal length of the lens not only by its physical length, but also by the number designated. For example: 50mm, 85mm, 200mm, mm, etc. The focal length is usually the first decision to make in purchasing a lens.
61 Lens Choice: Focal Length Focal Length One of the greatest advantages to purchasing a digital SLR camera is the fact that you can purchase a wide variety of lens for every purpose. Photographers have more than one lens to suit their changing shoo)ng situa)on and/or to give a different feel or perspec)ve to an image. Here are the basic categories of lens: Normal Lens: these focal lengths appear natural to the human eye. Wide Angle: wider than normal and shorter than a normal lens. Telephoto: longer focal length and narrower range of view Zoom: can change focal length without shiping the focal point; they offer more flexibility Prime: do not change focal length and are generally higher quality Macro: are used for close- up images. Tilt- ShiP: these lens are designed much like the old view cameras with their bellow design and the ability to move from side to side and up and down to alter perspec)ve.

62 Lens Choice: Focal Length Normal Lens A normal lens is named so because it resembles an angle of view similar to the human eye. The focal length for a normal lens for digital SLR cameras is 50mm. The 50mm is an in between focal length (not telephoto and not wide) which makes it a great general purpose lens.
ng perspec)ve thus they are great for landscape photography.")
63 Lens Choice: Focal Length Wide Angle Lens A wide angle lens is a wider perspec)ve than a normal lens and open results in distorted edges. Wide angle lens are useful to get a more expansive view of a scene, especially in a small space. Wide angle lens are great for exaggera)ng perspec)ve thus they are great for landscape photography. They can also be used for portrait photography as well, although when used up close on subject, they can exaggerate features in an un- natural or even comical way. Wide angle focal lengths are represented for digital SLR cameras as anything below 50mm. For example: 35mm, 24mm, 12mm. Really wide angle lens (12mm, 7mm) are called fisheye lens because the space is so exaggerated that it appears to be similar to that of a fish s angle of view.
mes have a macro lenses just to do detail shots like rings, flowers, etc. If you don t have the money to spend on a macro lens you could try macro filters.")
64 Lens Choice: Focal Length Macro Lens Macro lenses are used for close- up photography. Many photographers who photograph plants, insects, and small animals use macro lenses. Wedding photographers open )mes have a macro lenses just to do detail shots like rings, flowers, etc. If you don t have the money to spend on a macro lens you could try macro filters. They are somewhat like a magnifier glass for your lens. They come in different strengths, like +1, +2, +4, etc. They simply screw onto the front of your lens. The drawback to these filters is that the quality is not as good as a macro lens.
lt- ship lens in which the lens bellows move from side to side or up and down.")

65 Lens Choice: Focal Length Tilt- ShiP Lens A )lt- ship lens has the ability to move its glass elements from side to side or up and down. There are also )lt- ship lens in which the lens bellows move from side to side or up and down. Tilt- ship lenses have the ability to alter focus as well as alter perspec)ve. They are open useful for very expressive images. While they are not great for general purposes, they are desirable because of the effects you can achieve with them. These images were made using a lensbaby
ssue or a Lens Pens.")
66 Lens Choice Lens Care The first way to take care of your lens is to purchase a UV filter for it. UV filters can protect your lens from dust, scratches, as well as protec)ng the glass from breaking. A visible dust blower can help get dirt of your lens without you having to touch the surface of your lens. If you have smudges on your lens you can purchase lens )ssue or a Lens Pens. If you use lens )ssue, try to avoid gezng the oils from your fingers on the middle of the )ssue. Gather all four corners together to create a ball shape and then gently wipe off the smudges. All of these are small investments that can help protect a big investment.
67 Lens Choice: Quick Guide to Purchasing a Lens Consider what subject maier you will be photographing the most Make a budget. OPen )mes, the amount of money you can spend will determine what type of lens you can purchase. Read reviews and ar)cles wriien by other photographers about the lens, paying aien)on to its advantages and disadvantages If you are spending a large sum of money on a lens consider ren)ng the lens first before buying. There are many companies out there that rent out lens. If you are buying a used lens pay par)cular aien)on to the condi)on of the glass.
me to pay aien)on to your composi)on.")
68 Composi)on: Crea)ng interes)ng composi)ons is equally important to making great images as understanding the fundamentals of photography. You can make a perfect exposure by choosing the right aperture and shuier speed, but it can be a boring picture if you don t take the )me to pay aien)on to your composi)on. Composi)on involves paying aien)on to how the elements of art (lines, shapes, value, textures and colors) can work together to support your main subject maier. Here are just a few composi)onal concepts to consider when composing your scene: ~Focal Point(s) ~Foreground- Background Rela)onship ~Framing Devices ~Leading Lines ~Lights against Darks (Contrasts) ~Tension
69 Composi)on: Focal Points Focal Points The first step when composing your scene is to iden)fy your intended purpose with the image or what you are trying to communicate. What mood are you trying to portray? What do you want the viewer to get out of the image? Next, it is of vital important to define what your main focal point will be so that you can set up the en)re scene to support that focal point. A focal point is an area of interest in a composi)on that takes up the majority of the viewer s aien)on. There may be mul)ple interes)ng areas in one image, but usually one will take precedence over the others. Most of the )me your main focal point will be easy to define. For example, it might be a child leaning on a fence in the middle of a field. In this case the child is the main focal point, but there may be interes)ng aspects about the fence and the field that might bring interest to your subject. Your main focal point might be a large mountain in the midst of several smaller mountains, or even a buierfly in the middle of a flower. In scenes where there is plenty of nega)ve space it is open easy to determine the focal point. However, in scenes where there is a lot of informa)on in the foreground and background, it can be difficult to make your main focal point stand out. The following techniques are used to set the main focal point apart from everything else.

70 Composi)on: Focal Points
71 Composi)on: Foreground Background Rela)onships The informa)on that is behind your main subject, or the background, is just as important as the informa)on in front of your subject, or the foreground, OPen )mes, the rela)onship between the foreground and background can either make for a very interes)ng image, or a very boring one. One thing you need to ask yourself when it comes to your background is: Are there any elements in the background that are taking the aien)on away from my main subject in a distrac)ng way. The same can be said of the foreground: Are there any elements in the foreground that are taking the aien)on away from my main subject in a distrac)ng way. For example, be aware of trees or branches that could appear to be s)cking out of someone s head or poles that do could do the same. You don t want your subject to appear as if they have something growing out of their head.
72 Composi)on: Foreground Background Rela)onships The informa)on that is behind your main subject, or the background, is just as important as the informa)on in front of your subject, or the foreground, OPen )mes, the rela)onship between the foreground and background can either make for a very interes)ng image, or a very boring one. One thing you need to ask yourself when it comes to your background is: Are there any elements in the background that are taking the aien)on away from my main subject in a distrac)ng way. The same can be said of the foreground: Are there any elements in the foreground that are taking the aien)on away from my main subject in a distrac)ng way. For example, be aware of trees or branches that could appear to be s)cking out of someone s head or poles that do could do the same. You don t want your subject to appear as if they have something growing out of their head.
73 Composi)on: Foreground Background Rela)onships In the image of the bride to the lep, there was a lot going on in the background. By placing her in a more empty place (as compared to the other areas of the scene) as well as using shallow depth of field, the background is not distrac)ng, but rather supports the interest of the image. The direc)on and shape of the branches also serve to frame the subject.
ng.")
on to that spot")
74 Composi)on: Foreground Background Rela)onships In the image of the bride to the lep, there was a very large dark area on the wall that is very distrac)ng. Because it is directly behind the bride s head it looks very much like a hat. (I could have saved myself a lot of Photoshop work if I had paid aien)on to that spot while making the image.

75 Composi)on: Foreground Background Rela)onships
mes you find exis)ng framing devices in a scene that will set your subject apart from the background.")
76 Composi)on: Framing Devices When placing your subject in a scene consider how the nega)ve space (background) or shapes exis)ng in the background can serve to frame your main subject. Think of it as a frame within your viewfinder frame. OPen )mes you find exis)ng framing devices in a scene that will set your subject apart from the background. These framing devices could be a square shape made by a window, an empty space made by a grouping of branches, or a shape made by another object in the background.

77 Composi)on: Framing Devices

78 Composi)on: Framing Devices

79 Composi)on: Leading Lines Leading lines are used to send your viewer s eye to your main subject maier. Lines are visible in so many forms. They can be seen in the architectural design of a building, the branches of trees, power lines, electrical cords, street signs, shadows, etc. One thing to be aware of is that they support your main subject maier but are not distrac)ng to them.

80 Composi)on: Leading Lines

81 Composi)on: Lights Against Darks in addi)on to finding shapes that can frame your subject maier, you can use contrasts to set your main focal point off from the background. The eye is drawn to contrasts. Contrasts can be light values against dark values, complementary colors (like red and green) set next to each other, and even opposing textures (smooth against rough)

82 Composi)on: Lights Against Darks

83 Composi)on: Lights Against Darks
84 Composi)on: Tension There are )mes when photographers want to create a sense of tension in an image. However, in general, most want to avoid tension. Tension in an image is experienced by the viewer when the way in which the image was taken make the viewer feel un- easy or uncomfortable. Photographer s can create tension by the way they crop the image. For example, cropping at the wrist, neck, knees and ankles can feel tense. The viewer can also feel un- easy if the horizon line is not parallel with the picture plane.
85 The Histogram The Histogram Interpreted: The histogram is a graph represen)ng the range of highlights, midtones, and shadows in a given image. You can find the histogram in your camera as well as on the computer during post- processing (Photoshop). The histogram is a useful tool because you can use it to interpret your exposure as an addi)on to just visually looking at the image on the back of your camera. Histograms are represented by a composite channel that shows the lightness and darkness of an image as well as a Red Channel, Green Channel, and a Blue Channel. The representa)on of these colors or tones ranges from A good histogram is represented by a graph that does not peak pass the top and side boundaries and that shows informa)on in the shadow, midtones and highlight area of the graph.

86 The Histogram The Histogram Interpreted: The area on the lep side of the histogram represents the shadows in a given image. The area in the middle of he graph represents the middle tones in a given image. The are on the right side of the histogram represents the highlights in a given image. A histogram that lacks indica)on in the highlights, midtones, and shadows will likely be one that is an incorrect exposure. If you are dealing with histogram in Photoshop that has gaps or deep breaks, then the image has likely been over- edited and has lost detail.

87 The Histogram The Histogram Interpreted: A good histogram is represented by a graph that shows informa)on in the shadow, midtones and highlight area of the graph. The area on the lep side of the histogram represents the shadows in a given image. The area in the middle of he graph represents the middle tones in a given image. The area on the right side of the histogram represents the highlights in a given image.
, but can also display the brightness levels in three separate channels: Red, Green,")
88 The Histogram The Histogram Interpreted: The histogram below corresponds to the image above it. You can see it has an abundance of midtones and midtone- shadow areas. Histograms not only display the composite of the brightness in an image (as shown on the right), but can also display the brightness levels in three separate channels: Red, Green, and Blue (RGB).
on in all areas of the graph for a full tonal range image.")
89 The Histogram Good Histograms vs. Bad Histograms Recognizing a good histogram is another helpful too to help you discern whether your exposure is good. Your histogram should have a good range of detail/ informa)on in all areas of the graph for a full tonal range image. You should also be able to recognize a bad histogram so that you can adjust your exposure to maintain a good exposure.

90 The Histogram Good Histograms vs. Bad Histograms A histogram that lacks indica)on in the highlights, midtones, and shadows will likely be one that is an incorrect exposure. A histogram that has peaks that lead up to the top indicates that a tone has been clipped, which means that you have lost detail in that tone. If you are dealing with histogram in Photoshop that has gaps or deep breaks, then the image has likely been over- edited and has lost detail.
!"#$%&'!( The exposure is achieved by the proper combination of light intensity (aperture) and duration of light (shutter speed) entering the camera.!
 and duration of light (shutter speed) entering the camera.!") The term exposure refers to the amount of light required to properly expose an image to achieve the desired amount of detail in all areas of the image.! The exposure is achieved by the proper combination
The term exposure refers to the amount of light required to properly expose an image to achieve the desired amount of detail in all areas of the image.! The exposure is achieved by the proper combination
CAMERA BASICS. Stops of light
 CAMERA BASICS Stops of light A stop of light isn t a quantifiable measurement it s a relative measurement. A stop of light is defined as a doubling or halving of any quantity of light. The word stop is
One Week to Better Photography
 One Week to Better Photography Glossary Adobe Bridge Useful application packaged with Adobe Photoshop that previews, organizes and renames digital image files and creates digital contact sheets Adobe Photoshop
You might be asking some of these ques3ons are it relates to digital photography and controlling quality star3ng with your camera.
 1 You might be asking some of these ques3ons are it relates to digital photography and controlling quality star3ng with your camera. 2 3 The crop factor is the sensor's diagonal size compared to a full-
Name Digital Imaging I Chapters 9 12 Review Material
 Name Digital Imaging I Chapters 9 12 Review Material Chapter 9 Filters A filter is a glass or plastic lens attachment that you put on the front of your lens to protect the lens or alter the image as you
DSLR Essentials: Class Notes
 DSLR Essentials: Class Notes The digital SLR has seen a surge in popularity in recent years. Many are enjoying the superior photographic experiences provided by these feature packed cameras. Interchangeable
Failure is a crucial part of the creative process. Authentic success arrives only after we have mastered failing better. George Bernard Shaw
 PHOTOGRAPHY 101 All photographers have their own vision, their own artistic sense of the world. Unless you re trying to satisfy a client in a work for hire situation, the pictures you make should please
Presented by Craig Stocks Arts by Craig Stocks Arts
 Presented by Craig Stocks Arts www.craigstocksarts.com 2010 by Craig Stocks Arts Basic camera settings for point and shoot cameras (resolution, quality) Resolution - how much can you enlarge a picture?
FOCUS, EXPOSURE (& METERING) BVCC May 2018
 BVCC May 2018") FOCUS, EXPOSURE (& METERING) BVCC May 2018 SUMMARY Metering in digital cameras. Metering modes. Exposure, quick recap. Exposure settings and modes. Focus system(s) and camera controls. Challenges & Experiments.
FOCUS, EXPOSURE (& METERING) BVCC May 2018 SUMMARY Metering in digital cameras. Metering modes. Exposure, quick recap. Exposure settings and modes. Focus system(s) and camera controls. Challenges & Experiments.
Presented to you today by the Fort Collins Digital Camera Club
 Presented to you today by the Fort Collins Digital Camera Club www.fcdcc.com Photography: February 19, 2011 Fort Collins Digital Camera Club 2 Film Photography: Photography using light sensitive chemicals
ONE OF THE MOST IMPORTANT SETTINGS ON YOUR CAMERA!
 Chapter 4-Exposure ONE OF THE MOST IMPORTANT SETTINGS ON YOUR CAMERA! Exposure Basics The amount of light reaching the film or digital sensor. Each digital image requires a specific amount of light to
Intro to Digital SLR and ILC Photography Week 1 The Camera Body
 Intro to Digital SLR and ILC Photography Week 1 The Camera Body Instructor: Roger Buchanan Class notes are available at www.thenerdworks.com Course Outline: Week 1 Camera Body; Week 2 Lenses; Week 3 Accessories,
Photography Basics. Exposure
 Photography Basics Exposure Impact Voice Transformation Creativity Narrative Composition Use of colour / tonality Depth of Field Use of Light Basics Focus Technical Exposure Courtesy of Bob Ryan Depth
To start there are three key properties that you need to understand: ISO (sensitivity)
") Some Photo Fundamentals Photography is at once relatively simple and technically confusing at the same time. The camera is basically a black box with a hole in its side camera comes from camera obscura,
Some Photo Fundamentals Photography is at once relatively simple and technically confusing at the same time. The camera is basically a black box with a hole in its side camera comes from camera obscura,
Digital Photography for Rail Fans By David King
 Digital Photography for Rail Fans By David King A Little History The world of digital has affected almost everything thing that we use in today s world and that is very true in photography. Over a hundred
Introduction to camera usage. The universal manual controls of most cameras
 Introduction to camera usage A camera in its barest form is simply a light tight container that utilizes a lens with iris, a shutter that has variable speeds, and contains a sensitive piece of media, either
1. This paper contains 45 multiple-choice-questions (MCQ) in 6 pages. 2. All questions carry equal marks. 3. You can take 1 hour for answering.
 in 6 pages. 2. All questions carry equal marks. 3. You can take 1 hour for answering.") UNIVERSITY OF MORATUWA, SRI LANKA FACULTY OF ENGINEERING END OF SEMESTER EXAMINATION 2007/2008 (Held in Aug 2008) B.Sc. ENGINEERING LEVEL 2, JUNE TERM DE 2290 PHOTOGRAPHY Answer ALL questions in the answer
UNIVERSITY OF MORATUWA, SRI LANKA FACULTY OF ENGINEERING END OF SEMESTER EXAMINATION 2007/2008 (Held in Aug 2008) B.Sc. ENGINEERING LEVEL 2, JUNE TERM DE 2290 PHOTOGRAPHY Answer ALL questions in the answer
Aperture. The lens opening that allows more, or less light onto the sensor formed by a diaphragm inside the actual lens.
 PHOTOGRAPHY TERMS: AE - Auto Exposure. When the camera is set to this mode, it will automatically set all the required modes for the light conditions. I.e. Shutter speed, aperture and white balance. The
Capturing God s Creation Through The Lens An Adult Discipleship Course at Grace January 2013
 Capturing God s Creation Through The Lens An Adult Discipleship Course at Grace January 2013 Donald Jin donjin@comcast.net Course Overview Jan 6 Setting The Foundation Introduction and overview Understanding
OUTDOOR PORTRAITURE WORKSHOP
 OUTDOOR PORTRAITURE WORKSHOP SECOND EDITION Copyright Bryan A. Thompson, 2012 bryan@rollaphoto.com Goals The goals of this workshop are to present various techniques for creating portraits in an outdoor
Term 1 Study Guide for Digital Photography
 Name: Period Term 1 Study Guide for Digital Photography History: 1. The first type of camera was a camera obscura. 2. took the world s first permanent camera image. 3. invented film and the prototype of
A CAMERA IS A LIGHT TIGHT BOX
 HOW CAMERAS WORK A CAMERA IS A LIGHT TIGHT BOX Pinhole Principle All contemporary cameras have the same basic features A light-tight box to hold the camera parts and recording material A viewing system
Chapter 6-Existing Light Photography
 Chapter 6-Existing Light Photography All of these images were taken with available light. Painting with light-using available light Photography that includes artificial light which naturally exists in
Introductory Photography
 Introductory Photography Basic concepts + Tips & Tricks Ken Goldman Apple Pi General Meeting 26 June 2010 Kenneth R. Goldman 1 The Flow General Thoughts Cameras Composition Miscellaneous Tips & Tricks
Love Your Camera (Introduction to D-SLR)
") Love Your Camera (Introduction to D-SLR) Photography Workshops and Tours in New York City Phone: (646) 736-3231 Email: info@rememberforever.co Web: www.rememberforever.co Copyright 2009-2013 - Remember
Love Your Camera (Introduction to D-SLR) Photography Workshops and Tours in New York City Phone: (646) 736-3231 Email: info@rememberforever.co Web: www.rememberforever.co Copyright 2009-2013 - Remember
Camera Exposure Modes
 What is Exposure? Exposure refers to how bright or dark your photo is. This is affected by the amount of light that is recorded by your camera s sensor. A properly exposed photo should typically resemble
How This Works: Aperture size is counted in f- stops. i.e. those little numbers engraved on the lens barrel like:
 Aperture Aperture is the lens opening inside a lens. The size of the diaphragm opening in a camera lens REGULATES amount of light passes through onto the sensor inside the camera. Aperture size is counted
Autofocus Problems The Camera Lens
 NEWHorenstein.04.Lens.32-55 3/11/05 11:53 AM Page 36 36 4 The Camera Lens Autofocus Problems Autofocus can be a powerful aid when it works, but frustrating when it doesn t. And there are some situations
Improve Your Photography by using Simple Camera Settings and Techniques
 Improve Your Photography by using Simple Camera Settings and Techniques Francis J Pullen 2012 +44 (0)7768 364 567 images@francispullen.co.uk www.francispullen.co.uk Introduction Digital Cameras offer tremendous
USING LENSES A Guide to Getting the Most From Your Glass
 USING LENSES A Guide to Getting the Most From Your Glass DAN BAILEY A Guide to Using Lenses Lenses are your camera s eyes to the world and they determine the overall look of your imagery more than any
L I F E L O N G L E A R N I N G C O L L A B O R AT I V E - FA L L S N A P I X : P H O T O G R A P H Y
 L I F E L O N G L E A R N I N G C O L L A B O R AT I V E - F A L L 2 0 1 8 SNAPIX: PHOTOGRAPHY SNAPIX OVERVIEW Introductions Course Overview 2 classes on technical training 3 photo shoots Other classes
Photography Help Sheets
 Photography Help Sheets Phone: 01233 771915 Web: www.bigcatsanctuary.org Using your Digital SLR What is Exposure? Exposure is basically the process of recording light onto your digital sensor (or film).
By Mark Schutzer Coast Division Meet June 2013 Copies of this presentation can be found at
 Model lph Photography h By Mark Schutzer Coast Division Meet June 2013 Copies of this presentation can be found at http://www.markschutzer.com com Model Photography Clinic Overview This clinic will discuss
Aperture & Shutter Speed Review
 Aperture & Shutter Speed Review Light Meters Your camera s light meter measures the available light in a scene. It does so by averaging all of the reflected light in the image to find 18% gray. By metering
This has given you a good introduction to the world of photography, however there are other important and fundamental camera functions and skills
 THE DSLR CAMERA Before we Begin For those of you who have studied photography the chances are that in most cases you have been using a digital compact camera. This has probably involved you turning the
A Digital Camera Glossary. Ashley Rodriguez, Charlie Serrano, Luis Martinez, Anderson Guatemala PERIOD 6
 A Digital Camera Glossary Ashley Rodriguez, Charlie Serrano, Luis Martinez, Anderson Guatemala PERIOD 6 A digital Camera Glossary Ivan Encinias, Sebastian Limas, Amir Cal Ivan encinias Image sensor A silicon
Aperture & Shutter Speed Review
 Aperture & Shutter Speed Review Light Meters Your camera s light meter measures the available light in a scene. It does so by averaging all of the reflected light in the image to find 18% gray. By metering
By Mark Schutzer PCR Regional Convention, Fremont, CA April 2009 Copies of this presentation can be found at
 Model lph Photography h By Mark Schutzer PCR Regional Convention, Fremont, CA April 2009 Copies of this presentation can be found at http://www.markschutzer.com com Model Photography Clinic Overview This
BLACK CAT PHOTOGRAPHIC RULES-OF- THUMB
 Page 1 of 5 BLACK CAT PHOTOGRAPHIC RULES-OF- THUMB These 50+ photo-cyber-tips are meant to be shared and passed along. Rules-of-thumb are a kind of tool. They help identify a problem or situation. They
Capturing Realistic HDR Images. Dave Curtin Nassau County Camera Club February 24 th, 2016
 Capturing Realistic HDR Images Dave Curtin Nassau County Camera Club February 24 th, 2016 Capturing Realistic HDR Images Topics: What is HDR? In Camera. Post-Processing. Sample Workflow. Q & A. Capturing
Introduction to Digital Photography
 Introduction to Digital Photography A CAMERA IS A LIGHT TIGHT BOX All contemporary cameras have the same basic features A light-tight box to hold the camera parts and recording material A viewing system
Setting Up Your Camera Overview
 Setting Up Your Camera Overview Lecture #1B LOUDEN 1 Digital Shooting: Setting up your Camera & Taking Photographs Watch this Video: Getting to Know Some Controls on Your Camera (DSLR CAMERAS): http://www.youtube.com/watch?v=1wu63fbg27o&feature=rel
Understanding Your Camera 2: UUU200
 Understanding Your Camera 2: UUU200 Your 2 Understanding Camera Your Understanding Camera 2 Exposure & Metering Metering & Exposure Objective Objective After completing this class, the student will have
CHAPTER 7 - HISTOGRAMS
 CHAPTER 7 - HISTOGRAMS In the field, the histogram is the single most important tool you use to evaluate image exposure. With the histogram, you can be certain that your image has no important areas that
Basic Camera Craft. Roy Killen, GMAPS, EFIAP, MPSA. (c) 2016 Roy Killen Basic Camera Craft, Page 1
 2016 Roy Killen Basic Camera Craft, Page 1") Basic Camera Craft Roy Killen, GMAPS, EFIAP, MPSA (c) 2016 Roy Killen Basic Camera Craft, Page 1 Basic Camera Craft Whether you use a camera that cost $100 or one that cost $10,000, you need to be able
Basic Camera Craft Roy Killen, GMAPS, EFIAP, MPSA (c) 2016 Roy Killen Basic Camera Craft, Page 1 Basic Camera Craft Whether you use a camera that cost $100 or one that cost $10,000, you need to be able
 The purpose of this help file is to make sure your images print as well as possible, both for your personal pleasure and also for your public audience if you win! Remember that the most important part
Intro to Photography. Yearbook Mrs. Townsend
 Intro to Photography Yearbook Mrs. Townsend To begin with Photography is about telling a story. Good photographers use an image to make a point without words. People remember pictures of events long after
METERING FOR A BETTER PHOTOGRAPH
 METERING FOR A BETTER PHOTOGRAPH By Janet Steyer 2 8 15 INTRODUCTION This program is geared toward the photographer who has a camera with manual controls. Most of this information is based on the controls
CTE BASIC DIGITAL PHOTOGRAPHY STUDY GUIDE
 CTE BASIC DIGITAL PHOTOGRAPHY STUDY GUIDE VOCABULARY Histogram a graph of all tones in an image Image/adjust (hue/saturation, brightness/contrast) hue: color name (like green), saturation: how opaque (rich
Table of Contents. 1. High-Resolution Images with the D800E Aperture and Complex Subjects Color Aliasing and Moiré...
 Technical Guide Introduction This Technical Guide details the principal techniques used to create two of the more technically advanced photographs in the D800/D800E brochure. Take this opportunity to admire
Photography for the Lighting Designer
 Photography for the Lighting Designer Lighting designers not only have the challenge of creating emotion, space, motion, and a pretty image but we also have the challenge of selling our services to the
Digital 1! Course Notes.
 Digital 1 Course Notes Anatomy of a DSLR Light' Enters' Camera 1. Lenshood: Used to control additional light entering the lens. 2. UV filter that is purchased separately from the lens. Screws onto the
Aperture & Shutter Speed. Review
 Aperture & Shutter Speed Review Light Meters Your camera s light meter measures the available light in a scene. It does so by averaging all of the reflected light in the image to find 18% gray. By metering
Improving Your Basic Photography
 Improving Your Basic Photography Steve Dell Tonight s Topics Camera Styles & Types Camera Selection Tips Shooting Tips Shooting Techniques Shooting Triumphs 1 2 Camera Styles & Types Point & Shoot (P&S)
Digital camera modes explained: choose the best shooting mode for your subject
 Digital camera modes explained: choose the best shooting mode for your subject On most DSLRs, the Mode dial is split into three sections: Scene modes (for doing point-and-shoot photography in specific
An f-number of X may also be displayed as 1:X (instead of f/x), as shown below for the Canon f/2.8 lens.
, as shown below for the Canon f/2.8 lens.") LENS Lens The Focal Length The Lens Ratio An f-number of X may also be displayed as 1:X (instead of f/x), as shown below for the Canon 70-200 f/2.8 lens. Note: Aperture opening (iris) is rarely a perfect
LENS Lens The Focal Length The Lens Ratio An f-number of X may also be displayed as 1:X (instead of f/x), as shown below for the Canon 70-200 f/2.8 lens. Note: Aperture opening (iris) is rarely a perfect
Glossary of Terms (Basic Photography)
") Glossary of Terms (Basic ) Ambient Light The available light completely surrounding a subject. Light already existing in an indoor or outdoor setting that is not caused by any illumination supplied by
Glossary of Terms (Basic ) Ambient Light The available light completely surrounding a subject. Light already existing in an indoor or outdoor setting that is not caused by any illumination supplied by
DIGITAL PHOTOGRAPHY FOR OBJECT DOCUMENTATION GOOD, BETTER, BEST
 DIGITAL PHOTOGRAPHY FOR OBJECT DOCUMENTATION GOOD, BETTER, BEST INTRODUCTION This document will introduce participants in the techniques and procedures of collection documentation without the necessity
Lenses and Focal Length
 Task 2 Lenses and Focal Length During this task we will be exploring how a change in lens focal length can alter the way that the image is recorded on the film. To gain a better understanding before you
So far, I have discussed setting up the camera for
 Chapter 3: The Shooting Modes So far, I have discussed setting up the camera for quick shots, relying on features such as Auto mode for taking pictures with settings controlled mostly by the camera s automation.
Scanner? Don Simpson. Sun City Computer Club. Don Simpson Sun City Photography Club
 Scanner? Don Simpson Sun City Photography Club Don Simpson Sun City Computer Club Tradi:onal Uses of a Scanner Making Copies Faxing Conver:ng to digital images: Old photos Slides Nega:ves Deriva:on Photography
Take Control of Your Camera
 Take Control of Your Camera With all of the technology packed into our cameras, it is easy to hand over control & blame our equipment when our images don t meet our expectations.. In this workshop we will
Objective: to give you some understanding of why you might push more than just the big shiny silver button...
 Objective: to give you some understanding of why you might push more than just the big shiny silver button... Why am I making this presentation? Simply put: to share understanding What will we cover? Aperture
Autumn. Get Ready For Autumn. Technique eguide. Get Ready For
 Get Ready For Autumn Blink and you may have missed it, but our summer is behind us again and we re back into the short days and long nights of autumn. For photography however, the arrival of autumn means
9/19/16. A Closer Look. Danae Wolfe. What We ll Cover. Basics of photography & your camera. Technical. Macro & close-up techniques.
 A Closer Look Danae Wolfe What We ll Cover Basics of photography & your camera Technical Macro & close-up techniques Creative 1 What is Photography? Photography: the art, science, & practice of creating
-Cameras and the camera body -Lenses -Exposure -Metering -Aperture -Shutter -Reciprocity / Equivalent Exposures -Depth of Field -Plane of Critical
 CAMERA BASICS -Cameras and the camera body -Lenses -Exposure -Metering -Aperture -Shutter -Reciprocity / Equivalent Exposures -Depth of Field -Plane of Critical Focus -Bracketing -ISO -Histogram CAMERA
 Home Search Gallery How-To Books Links Workshops About Contact The Zone System 2006 KenRockwell.com INTRODUCTION Zones are levels of light and dark. A Zone System is a system by which you understand and
Technical Guide Technical Guide
 Technical Guide Technical Guide Introduction This Technical Guide details the principal techniques used to create two of the more technically advanced photographs in the D800/D800E catalog. Enjoy this
TAKING GREAT PICTURES. A Modest Introduction
 TAKING GREAT PICTURES A Modest Introduction HOW TO CHOOSE THE RIGHT CAMERA EQUIPMENT WE ARE NOW LIVING THROUGH THE GOLDEN AGE OF PHOTOGRAPHY Rapid innovation gives us much better cameras and photo software...
A BEGINNER S GUIDE TO PHOTOGRAPHY CHEATSHEET
 A BEGINNER S GUIDE TO PHOTOGRAPHY Cameras are complicated. It took me a ton of trial and error before I started to capture some pretty spectacular images. This cheatsheet is the reference guide I wish
PHOTOTUTOR.com.au Share the Knowledge
 CAMERA BASICS BY MICHAEL SMYTH This tutorial is designed to introduce new photographers to the basics of cameras and camera operation. WHAT IS A CAMERA A BOX WITH A HOLE AND SOME LIGHT SENSITIVE MATERIAL
Histograms& Light Meters HOW THEY WORK TOGETHER
 Histograms& Light Meters HOW THEY WORK TOGETHER WHAT IS A HISTOGRAM? Frequency* 0 Darker to Lighter Steps 255 Shadow Midtones Highlights Figure 1 Anatomy of a Photographic Histogram *Frequency indicates
Using Your Digital SLR
 APPENDIX B Using Your Digital SLR This appendix contains information about choosing, using, and maintaining your digital SLR camera. In This Appendix The following topics are addressed in this appendix:
1 / 9
 WWW.RICHIEHUG.COM 1 / 9 A Beginner's Guide to Digital Photography Version 1.2 By Richie Hug November 24, 2016. Most people owning a digital camera have never used other settings than just the AUTO mode.
Depth Of Field or DOF
 Depth Of Field or DOF Why you need to use it. A comparison of the values. Image compression due to zoom lenses. Featuring: The Christmas decorations I forgot to pack away My sloping table, kitchen uplighter
Name Digital Imaging I History of Photography and Chapters 1 5 Review Material
 Name Digital Imaging I History of Photography and Chapters 1 5 Review Material History of Photography The two main countries involved in the discovery of photography were France and England. In 1727 Johann
Photographing Waterfalls
 Photographing Waterfalls Developed and presented by Harry O Connor oconnorhj@yahoo.com July 26, 2017* All photos by Harry O Connor * Based on May 2012 topic Introduction Waterfall photographs are landscapes
DSLR Cameras have a wide variety of lenses that can be used.
 Chapter 8-Lenses DSLR Cameras have a wide variety of lenses that can be used. The camera lens is very important in making great photographs. It controls what the sensor sees, how much of the scene is included,
Until now, I have discussed the basics of setting
 Chapter 3: Shooting Modes for Still Images Until now, I have discussed the basics of setting up the camera for quick shots, using Intelligent Auto mode to take pictures with settings controlled mostly
EXPOSURE TIPS. Camera shake causing blurry pictures
 EXPOSURE TIPS Camera shake causing blurry pictures Hold your camera steady Digital cameras are usually held away from the body to view the LCD screen to compose the picture. This is less steady than the
mastering manual week one
 THE PURPOSE OF THIS WORKSHOP IS TO PUT THE POWER AND CONTROL OF THE CAMERA INTO YOUR OWN HANDS. When we shoot in automatic, we are at the mercy of the camera s judgment and decisions. Learning the techniques
Dental photography: Dentist Blog. This is what matters when choosing the right camera equipment! Checklist. blog.ivoclarvivadent.
 Dental photography: This is what matters when choosing the right camera equipment! Checklist Dentist Blog blog.ivoclarvivadent.com/dentist Dental photography: This is what matters when choosing the right
HDR is a process for increasing the range of tonal values beyond what a single frame (either film or digital) can produce.
 can produce.") HDR HDR is a process for increasing the range of tonal values beyond what a single frame (either film or digital) can produce. It can be used to create more realistic views, or wild extravagant ones What
HDR HDR is a process for increasing the range of tonal values beyond what a single frame (either film or digital) can produce. It can be used to create more realistic views, or wild extravagant ones What
Introduction to Digital Photography
 Introduction to Digital Photography with Nick Davison Photography is The mastering of the technical aspects of the camera combined with, The artistic vision and creative know how to produce an interesting
Best Camera Manual Lens For Nikon D90 Weddings
 Best Camera Manual Lens For Nikon D90 Weddings HELP I just purchased the Nikon D7100 to replace my Nikon D300. Now a PRO photographer says be used to shoot weddings. Should I return the camera? So, this
Making the right lens choice All images Paul Hazell
 Making the right lens choice All images Paul Hazell Aperture and focal length The two terms to make sure you understand when choosing a photographic lens for an SLR are the maximum aperture and the focal
White Balance. Introduc)on to Digital Photography
on to Digital Photography") White Balance Introduc)on to Digital Photography Lecture outline Review of light and color Review of exposure triangle 18% Grey White balance Selec)ng white balance PreseBng your own white balance When
White Balance Introduc)on to Digital Photography Lecture outline Review of light and color Review of exposure triangle 18% Grey White balance Selec)ng white balance PreseBng your own white balance When
ISO 200 1/500 sec. f/11 82mm lens
 4 ISO 200 1/500 sec. f/11 82mm lens The Creative Zone Taking Your Photography to the Next Level The Creative zone is the name given by Canon to the shooting modes that offer you the greatest amount of
Photomatix Light 1.0 User Manual
 Photomatix Light 1.0 User Manual Table of Contents Introduction... iii Section 1: HDR...1 1.1 Taking Photos for HDR...2 1.1.1 Setting Up Your Camera...2 1.1.2 Taking the Photos...3 Section 2: Using Photomatix
PHOTOGRAPHY Mohamed Nuzrath [MBCS]
![PHOTOGRAPHY Mohamed Nuzrath [MBCS]](/thumbs/80/82228500.jpg "PHOTOGRAPHY Mohamed Nuzrath [MBCS]") PHOTOGRAPHY Mohamed Nuzrath [MBCS] Coordinator HND IT / Senior Lecturer IT BCAS Kandy Campus Freelance Photographer Freelance Web/Software Developer PHOTOGRAPHY PHOTO - Light GRAPHY Drawing PHOTOGRAPHY
PHOTOGRAPHY Mohamed Nuzrath [MBCS] Coordinator HND IT / Senior Lecturer IT BCAS Kandy Campus Freelance Photographer Freelance Web/Software Developer PHOTOGRAPHY PHOTO - Light GRAPHY Drawing PHOTOGRAPHY
As can be seen in the example pictures below showing over exposure (too much light) to under exposure (too little light):
 to under exposure (too little light):") Hopefully after we are done with this you will resist any temptations you may have to use the automatic settings provided by your camera. Once you understand exposure, especially f-stops and shutter speeds,
Hopefully after we are done with this you will resist any temptations you may have to use the automatic settings provided by your camera. Once you understand exposure, especially f-stops and shutter speeds,
Getting the Basics Right
 Sinclair Scott President, 30 September 2014 Getting the Basics Right An Introduction to Digital Photography Subjects to be covered How does a digital camera work Types of Cameras Other kit Images in your
Know Your Digital Camera
 Know Your Digital Camera With Matt Guarnera Sponsored by Topics To Be Covered Understanding the language of cameras. Technical terms used to describe digital camera features will be clarified. Using special
UNDERSTANDING MACRO PHOTOGRAPHY
 VITAL UNDERSTANDING MACRO PHOTOGRAPHY Beyond the Basics Mahmood Anwar Understanding macro photography There are so many things in our world you want to get close to and photograph. Find out how to set
F-number sequence. a change of f-number to the next in the sequence corresponds to a factor of 2 change in light intensity,
 1 F-number sequence a change of f-number to the next in the sequence corresponds to a factor of 2 change in light intensity, 0.7, 1, 1.4, 2, 2.8, 4, 5.6, 8, 11, 16, 22, 32, Example: What is the difference
These aren t just cameras
 Roger Easley 2016 These aren t just cameras These are computers. Your camera is a specialized computer Creates files of data Has memory Has a screen display Has menus of options for you to navigate Your
PHOTOGRAPHY: MINI-SYMPOSIUM
 PHOTOGRAPHY: MINI-SYMPOSIUM In Adobe Lightroom Loren Nelson www.naturalphotographyjackson.com Welcome and introductions Overview of general problems in photography Avoiding image blahs Focus / sharpness
Quick Tips for Taking Better Portraits
 JANUARY 5, 2019 BEGINNER Quick Tips for Taking Better Portraits Suggested Lens choices, exposure settings and focus modes Featuring GARY SMALL D300, AF-S NIKKOR 24-85mm f/2.8-4d IF lens, 1/30 sec., f/2.8,
The Big Train Project Status Report (Part 65)
") The Big Train Project Status Report (Part 65) For this month I have a somewhat different topic related to the EnterTRAINment Junction (EJ) layout. I thought I d share some lessons I ve learned from photographing
The Big Train Project Status Report (Part 65) For this month I have a somewhat different topic related to the EnterTRAINment Junction (EJ) layout. I thought I d share some lessons I ve learned from photographing
TAKING BETTER PHOTOS ON ANY DEVICE
 TAKING BETTER PHOTOS ON ANY DEVICE Sarah Dudik Public Information & Marketing HOW TO TAKE BETTER PHOTOGRAPHS The device you use isn t as important as how you are looking through it Any device can be used