Cajón Design and Comparison
|
|
|
- Kevin Barber
- 6 years ago
- Views:
Transcription
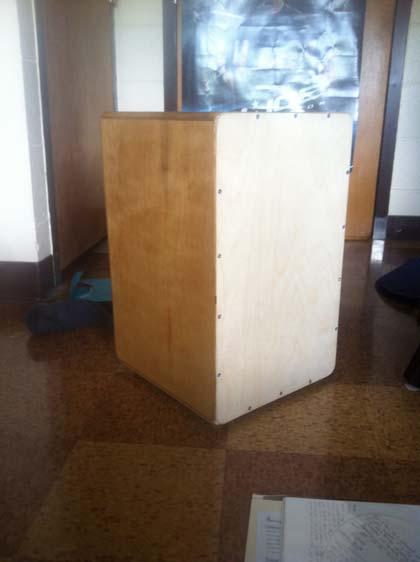
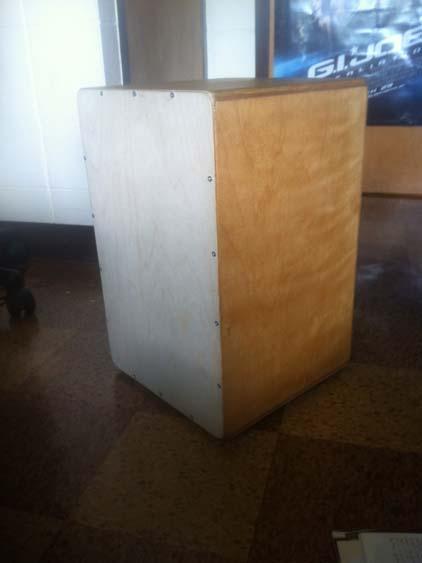
1 Cajón Design and Comparison Acoustical Physics of Music PHYS 406 University of Illinois at Urbana-Champaign Professor Errede Spring 2015 Joshua Lanzona 1
2 Table of Contents 1. Cajón Background 1.1. History 1.2. Motivation 2. Cajón Design 2.1. Materials List 2.2. Construction 3. Comparison 3.1. LP Aspire 3.2. LP Aspire Accent 3.3. Conclusion 4. Conclusions 2
3 1. Cajon Background History The cajon is a six-sided, box-shaped percussion instrument originating from Peru. It is generally played by slapping the front face, called the tapa, with your hands, fingers, or other various tools. Slaves from west and central Africa are credited with the origin of the cajon. It was developed during the periods of slavery in coastal Peru using wooden shipping crates. Cajons could easily be disguised as seats or stools, therefore making them a prime instrument during the Spanish colonial ban of music for slaves. The cajon is now widely used in Peru and the popularity has grown throughout the Americas, even reaching mainstream American music. Motivation I have always wanted to play an instrument ever since I was little, but my parents never bought me an instrument or encouraged me to play. All my life, I have been told I have long, piano-playing fingers, so then when I finally had the money and the time, I bought a keyboard for my dorm room. After a year of trying to teach myself to learn the piano, starting from scratch, in the midst of busy years in college with relatively no knowledge of music - I gave up. I sold the keyboard and started to look for a simpler instrument to play. One day during a concert, I saw a cajon being played and the timbre, the design, the playing style; it all intrigued me. I started to look up the cajon and I fell in love with it more and more. This is when I decided that I would make my own cajon during winter break, since they were expensive to buy. After winter break and not starting on the cajon, I knew that I would not be able to have the motivation or the time to make one during the semester, so I decided to make one during the summer. Coming into Physics 406, I did not know what to expect from the class. I was surprised when Professor 3
4 Errede announced that we could base our semester projects off of something we want to do and something we love. I did not expect that out of a 400-level physics class, but I was not going to complain. I started to think of all these different designs and experiments that I could do, but as usual, my dreams always over-reached my capabilities. After a couple of weeks, it dawned on me that I do not have to make a complicated designs like some of my friends in the class. I wanted to pursue my passion, no matter how simple it is, which is what helped me decide to build a cajon for my semester project. 2. Cajon Design Materials List Once I decided to build a cajon, I started to look up instructables and directions online on how to make a cajon on a budget. I was surprised to find so many different and detailed designs. I took many techniques and advice from many different instructables online but I mainly used the one called: Built your own Cajon (a drum) for less than 25.- Euro on instructables.com. The materials list below was created from reading a variety of different materials list as well as seeing what was available at local stores and shops. Materials: Front face: one 13 inch by 19 inch piece of plywood with 3mm thickness (tapa) Rear face: one 13 inch by 19 inch piece of plywood with 5mm thickness Sides: two 12 inch by 18 inch pieces of Birch plywood with ¼ inch thickness Bottom and Top: two 12 inch by 12 inch pieces of Birch plywood with ¼ inch thickness Wood Glue Wood Screws Rubber Feet 20-strand Drum Snare Wood Stain 4
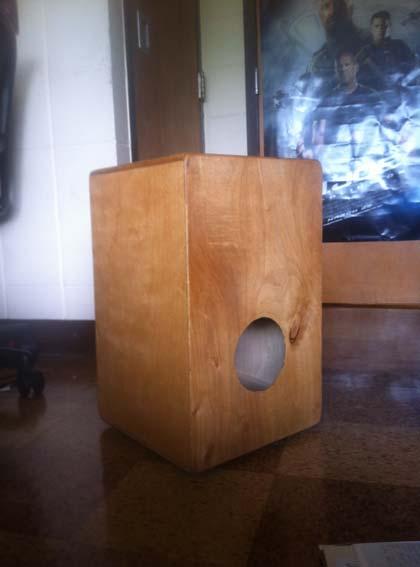
5 The tools list below was made available to me by the Newmark Structural Engineering Lab, the lab on the 5th floor of Engineering Sciences Building, Professor Errede, and the garages of a few friends. Tools: Power Drill with different drill bits for countersinking Screwdriver Orbital Sander Table Saw Band Saw Sand Paper Dremel Brush Finish Nailer The total cost of the materials list turned out to be approximately $30 and the tools were made available to me free of charge. Construction Below is the step-by-step process that I took to construct the cajon: 1. Have the side, top, and bottom pieces of Birch Plywood cut to the dimensions listed in the materials list 2. Use excess pieces of wood to use as supports to join the pieces together 3. Glue each piece of Birch plywood together and glue the support onto the vertex 4. Lather and rub the joint into the vertex to rid the glue of air pockets 5. Let the glue dry and compress the pieces together using weights or clamps 6. Cut and sand a sound hole with the diameter of a CD on the rear face 7. Glue the rear face onto the rear of the sides, top, and bottom pieces Make sure to sand the edges of the cajon to have a tight hold 5


 9.")

6 8. Countersink the tapa and the sides edges of the front face to allow screwss to fit First make a pilot hole with a thinner drilll bit than the wood screws Then use a drill bit the size of the screw head to have a space for the screw head to rest (process pictured below) 9. Screw in the wood screws into the pilot holes made using the drill 6

7 10. Sand the edges using an orbital sander in order to have a nice, smooth finish 11. Use wood stain to stain the outside of the cajon for a nice finish 12. Cut the 20-strand snare wires in half using a wire cutter 13. Using excess wood, create a support and mount for the snare wires 14. Glue the support onto the inside of the cajon at an angle in order to have the snare wires rest on the inside of the tapa 7


8 15. Countersink the bottom of the cajon on the edges where the supports are in order to create pilot holes for the rubber feet 16. Screw in the rubber feet using a drill or screwdriver 17. Screw on the tapa and it becomes ready to play 8
9 3. Comparison LP Aspire Cajon ($215) 9


10 The LP Aspire has a Siam Oak tapa with three sets of snare wires for extra sensitivity on the tapa compared to the two snares I have on my cajon. It is also 1 inch thinner and 2 inches shorter. The sound is brighter due to the sound hole being in the middle of the rear face, the smaller size, and the larger amount of snare wires. Since the tapa is tightly onto the cajon, the vibrations are minimized and the snare sound takes over, which also does not allow for as deep of a bass sound. The LP Aspire has a more comfortable playing height at 17 inches rather than 19 inches like mine. The higher quality woods are what creates the disparity in prices, but I do not believe that a $200 difference is worth the higher production and material quality. LP Aspire Accents Cajon: Darkwood ($246) 10


11 The LP Aspire Accents has variable hard wires to adjust the tension to change the sound and for authentic Flamenco trills. The height and the sound hole placement are similar to that of the LP Aspire, which creates the same type of sound. The Accents is different from the regular Aspire only in that the Accent has variable hard wires on the inside of the tapa. It has more of a tight, compressed snare sound compared to the normal LP Aspire. The hard wires are tight on the tapa which causes the snares to ring anywhere you hit the tapa. On the other hand, my cajon has a deep bass sound independent of the snares which causes two distinctively different sounds which was the reason for the lower sound hole placement and greater height. The extra sensitivity from the snares compared to my cajon make it easy for the snares to sound, but it is at the cost of having the kick drum sound come along with a prominent snare sound. 11
12 Conclusions The LP Aspire and LP Aspire Accents have similar sounds to one another, except one has higher adjustability than the other. My cajon has distinct sounds from the other two, but has a greater range of versatility in the sounds due to its size and design. When recording different beats on the three different cajons, people could tell that the cajon that I made when I shared the high, snare sound due to the LP Aspires extra sensitive wires and my cajon s distinct Latin percussive sound. When sharing the mid-hits and bass hits, people could not accurately guess which track was associated with the cajon that I made for $30 and the other cajons that could be bought for more than $200. When putting the beats together, people could not tell between the three cajons, more specifically, people could not tell which one was made by me for $30 and which one was professionally made. The conclusion that I came to after having the common ear compare the different sounds of these cajons is that cajons are easy to make and have sale value due to its market economy and simple design. Also, the common person cannot really tell between a homemade cajon and a store-bought cajon, so why waste the money? 4. Conclusion Design and constructing a cajon from scratch was my first woodworking project and was definitely one of the most fun and rewarding projects I have ever done. Due to the homework assignments and lectures in class, I became very interested in the acoustical physics of music and I wanted to apply it to a tangible project. I wanted to make an instrument so that I could be able to learn more about physics and apply physics by playing it and just having fun. The class has really showed me how I should apply what I learn in my physics classes and that is through these types of projects. I have learned more about music and physics through this project than any other physics class that I have taken. In normal labs, we would do experiments and write long lab 12
13 reports without any passion or desire to learn, just a need to complete. Due to the time that I took to learn, design, and construct the cajon, not only did I learn about physics and music, but I learned how to play an instrument as well. After all the research and homework, playing the cajon when it was fully completed was one of the most rewarding experiences of my college career. I have been able to play the cajon on stage with a worship band and just have fun jam sessions with my friends after long days at school. This project and this class has provided me with much more than I had ever thought when coming into the class. It has given me insight on how to tackle education in general, and that is to have passion. The passion that I had to continue this project is what drove my motivation and eagerness to learn more physics. And I could not have been able to have such a rewarding experience if it was not for Professor Errede and the Teaching Assistant Matt Ziemann for helping me every step of the way, advising me what to do, as well as helping me first-hand with the project as well, and for that, I am eternally grateful. 13
Patrol Box Plans by David J. Yarusso Troop 609
 Patrol Box Plans by David J. Yarusso Troop 609 Materials List: 1. One 4 x8 sheet of ½ thick cabinet grade (birch or oak) or AC plywood. If using AC grade, use the A grade surface on the outside for a clean
Mudroom Unit. Page 1 of 25
 Mudroom Unit www.andrewharriswoodwork.com Page 1 of 25 Introduction This plan makes a unit which is 66 ¾ inches tall, 39 ½ inches wide and 18 ½ inches deep. It was custom made for some friends to fit the
Chief s Shop: Simple Woodworking Bench
 Chief s Shop: Simple Woodworking Bench Be sure to read the instructions and review the illustrations and accompanying video for this project BEFORE you start. Follow ALL SAFETY GUIDELINES AND RECOMMENDATIONS
How to Build a Recessed Medicine Cabinet
 How to Build a Recessed Medicine Cabinet See post for install info http://www.hertoolbelt.com/recessed-medicine-cabinet/ Materials 6 Inset Cabinet Door Hinges 3 Latches 1 sheet Beadboard or 1/4 plywood
Here are the tools and materials we used for the project:
 When we began our kitchen remodel, we knew we were going to have to do something about the trash can-- our old one was stained and dented and just had to go. While we would have loved to have had room
Shopsmith Mobile Storage Cabinet.
 http://wwwinstructablescom/id/shopsmith-mobile-storage-cabinet/ technology workshop living food play outside Shopsmith Mobile Storage Cabinet by Beave2012 on May 3, 2015 Table of Contents Shopsmith Mobile
COMPLIMENTARY WOODWORKING PLAN
 COMPLIMENTARY WOODWORKING PLAN COFFEE TABLE PLAN This downloadable plan is copyrighted. Please do not share or redistribute this plan in any way. It has been paid for on your behalf by JET Tools, a division
Kitchen Step Stool. Premium Plan. In this plan you ll find: America s leading woodworking authority
 America s leading woodworking authority Premium Plan In this plan you ll find: Step-by-step construction instruction. A complete bill of materials. Construction drawings and related photos. Tips to help
This indicates a diagram detailing the dimensions of a project part and/or the placement for pocket holes, screws, nails, etc.
 S i m p le Woodworking: What You'll Need v lumber 2-1 x 12 x 6 hardware/supplies (availability will vary) 1 1/4" pocket hole screws #18 x 1 1/2 brads or pocket hole plugs 12-inch continuous hinge magnetic
Lesson 6. The Peg Game
 Peg Game Lesson 6 The Peg Game Here s a fun and challenging game that s small enough to take with you just about anywhere. Make several to put around the house and in your parent s cars so when you find
ADULT. Adirondack / Muskoka Chair Plans
 ADULT Adirondack / Muskoka Chair Plans Materials List 3/4" x 9 1/2" (1.9cm x 24.1cm) redwood, cedar or pine boards. Six, 8' (2.44m) boards should make one chair depending on knots and layout. You can also
Eco Office File Base. Materials and Tools: Free Plans to build an office file cabinet base
 Materials and Tools: Materials: 1 - Sheet 3/4 PureBond Hardwood Plywood (Available at the Home Depot) 1 - Sheet 1/4 PureBond Hardwood Plywood (Available at the Home Depot) 3-21 Drawer Slides, Euro Style
Chest of Drawers Plans
 Chest of Drawers Plans www.andrewharriswoodwork.com Page 1 of 15 Introduction This plan makes a chest of drawers that is 50 inches at the widest point, 19 inches deep and 40.75 inches high. I have tried
Patio Table. Page 1 of 16
 Patio Table www.andrewharriswoodwork.com Page 1 of 16 Introduction This plan makes a table that is unit which is 95 ½ inches long and 49 inches wide. The distance from the underside of the top edging to
Cedar 2-Drawer Desktop Storage Cube
 Cedar 2-Drawer Desktop Storage Cube 5 ½ Dimensions 5 ½ 5 ½ 2 2 1 7/8 4 ¼ 4 ½ Author s Notes: Build a Cedar 2-Drawer Desktop Storage Cube from just 1 cedar fence picket. No angles, special cuts or rips
Phase Two. The Skirt, Play Area and Sub Table ( continued )
") Dry fit the skirt in place and make sure all is tight. Drill a countersink screw hole on the back of the skirt down where you will connect it to the bull nose. Make three holes on each board (ends and
Dry fit the skirt in place and make sure all is tight. Drill a countersink screw hole on the back of the skirt down where you will connect it to the bull nose. Make three holes on each board (ends and
Copyrighted Material Page 1
 Compare to: Pottery Barn Teen Storage Bed System Skill Level: Beginner Working with the rest of the components in the Storage Bed Collection, the Small Hutch fits on top of the Storage Headboard and will
Grade 11 Woods Lift Lid Coffee Table. Based on Under the big Top from Popular Mechanics Website
 Grade 11 Woods Lift Lid Coffee Table Based on Under the big Top from Popular Mechanics Website TABLE TOP 1. Select enough lumber to construct a top that is between 22 ½ and 24 wide after jointing. Ensure
Chest of Drawers Plans
 Chest of Drawers Plans www.andrewharriswoodwork.com Page 1 of 12 Introduction This plan makes a chest of drawers from 2 by 4s and 2 by 6s for the top. The cabinet is 22 ½ inches at the widest point, 22
Extra Tall Bar Stool [1]
![Extra Tall Bar Stool [1]](/thumbs/72/66793416.jpg "Extra Tall Bar Stool [1]") Extra Tall Bar Stool [1] Submitted by community-contr... [2] on Fri, 2011-01-28 10:57 [1] Summary: An extra tall bar stool with cross bracing for added support. CategoriesRoom: kitchen [3] Skill Level:
Extra Tall Bar Stool [1] Submitted by community-contr... [2] on Fri, 2011-01-28 10:57 [1] Summary: An extra tall bar stool with cross bracing for added support. CategoriesRoom: kitchen [3] Skill Level:
HOGNOSE PSALTERY KIT Assembly Instructions
 HOGNOSE PSALTERY KIT Assembly Instructions WOOD PARTS 1 Plywood Top (Soundhold Pre-Cut) 1 Plywood Bottom 2 Pin Blocks 1 Short Side 1 Long Side 1 Bridge 1 Scrap of Plywood HARDWARE 1 L-Handle Tuning Wrench
MyOutdoorPlans.com. By Julian King [2X4 GARDEN BENCH]
![MyOutdoorPlans.com. By Julian King [2X4 GARDEN BENCH]](/thumbs/75/72876801.jpg "MyOutdoorPlans.com. By Julian King [2X4 GARDEN BENCH]") MyOutdoorPlans.com By Julian King [2X4 GARDEN BENCH] CUT LIST A 2 pieces of 2 4 lumber 24 long, 2 pieces 32 1/2 long LEGS B 2 pieces of 2 4 lumber 45 long, 2 pieces 15 1/2 long, 1 piece 12 1/2 long SEAT
MyOutdoorPlans.com By Julian King [2X4 GARDEN BENCH] CUT LIST A 2 pieces of 2 4 lumber 24 long, 2 pieces 32 1/2 long LEGS B 2 pieces of 2 4 lumber 45 long, 2 pieces 15 1/2 long, 1 piece 12 1/2 long SEAT
Brookfield Storage Bed Frame. Copyrighted Material. Page 1
 Compare to: Pottery Barn Kids Brookfield Storage Bed Frame Skill Level: Intermediate Brookfield Storage Bed Frame Matching the Brookstone Headboard, the storage bed takes advantage of ALL the space under
Adjustable Height Wood and Metal Stool [1]
![Adjustable Height Wood and Metal Stool [1]](/thumbs/80/80442751.jpg "Adjustable Height Wood and Metal Stool [1]") [1] Submitted by Ana White [2] on Mon, 2014-09-22 12:42 Page 1 of 23 [1] Additional Photos [3] Page 2 of 23 [4] [5] [6] [7] Hello Awesomest DIY Folks Ever, and Happy Monday! Toliy (who's been sorta interning
[1] Submitted by Ana White [2] on Mon, 2014-09-22 12:42 Page 1 of 23 [1] Additional Photos [3] Page 2 of 23 [4] [5] [6] [7] Hello Awesomest DIY Folks Ever, and Happy Monday! Toliy (who's been sorta interning
Design Update /29/2006
 Design Update 3 -- 8/29/2006 Since our first design we ve made many minor changes to key areas of the prayer bench, especially the folding hinge geometry. The general design remains the same, though the
Woodturning Tip Dec Make a Bow Knife
 Woodturning Tip Dec. 2009 Make a Bow Knife It s sure great to be back in the shop again. After several weeks of not being able to stand in front of the lathe for more that a couple of minutes before having
Empire Dresser Plans
 1 Empire Dresser Plans Materials 1 sheet 3/4" plywood (cabinet grade 4' x 8') 1 sheet 5 mm (3/16") underlayment plywood 4'x 8', buy another 1/2 sheet if you want to put a back on the dresser. 1-2" x 4"
Some Thoughts About Tools
 Some Thoughts About Tools So some of you builders will have your own way to do things but I d like to share you mine. I m using regular tools you can buy at the box stores. Nothing special. They arent
C & C 30 MK II % Cockpit Seat Backrests. Installed on S\V "Wyndisphree" S/N 58 86E18806 (03/23/2000)
") C & C 30 MK II % Cockpit Seat Backrests Installed on S\V "Wyndisphree" S/N 58 86E18806 (03/23/2000) C & C 30 MK II Building the Removable Seat Backrests 1. This package contains instructions and sketches.
C & C 30 MK II % Cockpit Seat Backrests Installed on S\V "Wyndisphree" S/N 58 86E18806 (03/23/2000) C & C 30 MK II Building the Removable Seat Backrests 1. This package contains instructions and sketches.
Seeing Sound Waves. sound waves in many different forms, and you get to have fun making a loud mess.
 Seeing Sound Waves Overview: This section is actually a collection of the experiments that build on each other. We ll be playing with sound waves in many different forms, and you get to have fun making
Kentucky 4H Wood Science Plans Notebook. Plans Level 3
 Kentucky 4H Wood Science Plans Notebook Plans Level 3 MATERIALS: 2 pieces wood 3/4 x 10 x 4 1 piece wood 3/4 x 12 x 4 2 pieces wood 3/4 x 3 x 2 5 1/2" 2 pieces wood 3/4 x 3 x 1 8 1 piece wood 2 x 4 x
Porch. Swing. Build A. farmstead: project
 farmstead: project Porch Build A Swing Instructions Cut all parts to fit as you assemble the project and use the Parts List and Cutting Diagram as a guide for dimensions. When gluing pieces together, you
Trestle Table and Benches Materials List
 Project 18444EZ: Trestle Table and Benches In the early days of our country, trestle tables were popular because they could easily be disassembled and moved out of the way when not in use no small advantage
Master Closet System. Master Closet System Published on Ana White (http://ana-white.com) posted by Ana White [1]
![Master Closet System. Master Closet System Published on Ana White (http://ana-white.com) posted by Ana White [1]](/thumbs/79/79979205.jpg "Master Closet System. Master Closet System Published on Ana White (http://ana-white.com) posted by Ana White [1]") posted by Ana White [1] An entire closet system, for under $250 dollars. Page 1 of 21 Page 2 of 21 Additional Photos Page 3 of 21 Page 4 of 21 Page 5 of 21 Page 6 of 21 Page 7 of 21 Page 8 of 21 About
posted by Ana White [1] An entire closet system, for under $250 dollars. Page 1 of 21 Page 2 of 21 Additional Photos Page 3 of 21 Page 4 of 21 Page 5 of 21 Page 6 of 21 Page 7 of 21 Page 8 of 21 About
Display Case (for J&S)
") Display Case (for J&S) This is constructed of maple plywood with solid maple (soft maple) edge banding. It was made to fit between a door and a kitchen cabinet, and has an elegant circular taper between
Display Case (for J&S) This is constructed of maple plywood with solid maple (soft maple) edge banding. It was made to fit between a door and a kitchen cabinet, and has an elegant circular taper between
I love the outdoors. And I m impressed with whatever forces in the universe have made it possible for me to purchase a collapsible canvasand-metal
 Limbert Chair 9 I love the outdoors. And I m impressed with whatever forces in the universe have made it possible for me to purchase a collapsible canvasand-metal camp chair for under $20. But when you
DIY Wine Storage Cabinet
 DIY Wine Storage Cabinet ADDICTED2DIY.COM *Before beginning this project, please read through all of the plans and the blog post. When building this project, be sure to measure your wood and cut to fit.
Adjustable Hammered Dulcimer Stand
 Adjustable Hammered Dulcimer Stand Musicmaker s Kits (Hwy 36 behind Joseph s Restaurant) P.O. Box 2117 Stillwater MN 55082 651 439 9120 www.harpkit.com PARTS LIST: 1 Set of Assembly Instructions A. 2 front
Can-Do Can Crusher. America s leading woodworking authority. Step by Step construction instruction. A complete bill of materials.
 America s leading woodworking authority Can-Do Can Crusher Step by Step construction instruction. A complete bill of materials. Exploded view and elevation drawings. How-to photos with instructive captions.
MITER SAW SUPPORT WINGS PLAN
 MITER SAW SUPPORT WINGS PLAN Version 1.0 How to build support wings for your miter saw With easy to follow step-by-step instructions, you will be able to cut, assemble, and finish your very own support
The image above is intended to give you an idea of what the dovecote will look like when finished.
 Thank you for buying my book, I hope it is useful and enjoyable in your quest to building your own dovecote. This book will give you step-by step instructions on how to build your own dovecote also included
Castle loft bed [1] Additional Photos. Castle loft bed Published on Ana White (http://www.ana-white.com)
![Castle loft bed [1] Additional Photos. Castle loft bed Published on Ana White (http://www.ana-white.com)](/thumbs/76/73086219.jpg "Castle loft bed [1] Additional Photos. Castle loft bed Published on Ana White (http://www.ana-white.com)") [1] Submitted by fsmumford [2] on Tue, 2011-10-18 21:51 [1] Additional Photos [3] [4] Page 1 of 31 [5] [6] [7] Summary: I stumbled upon Ana s blog about a year ago. Since, like many of you, I have become
[1] Submitted by fsmumford [2] on Tue, 2011-10-18 21:51 [1] Additional Photos [3] [4] Page 1 of 31 [5] [6] [7] Summary: I stumbled upon Ana s blog about a year ago. Since, like many of you, I have become
Entrance Cabinet Plans
 Entrance Cabinet Plans www.andrewharriswoodwork.com Page 1 of 19 Introduction I have tried to ensure all steps are covered in these plans but if you find any errors in the plans or have a question then
Materials and Tools: Printer s Triple Console Cabinet. Free Plans to build a Triple Console Cabinet
 Materials and Tools: Materials: 3 sets euro style bottom corner mount drawer slides, 16 length 3 sets inset hinges 24 cup style handles 8 2x2 @ 8 feet long 6 1x3 @ 8 feet long 6 1x2 @ 8 feet long 1 sheet
1 ¼-inch Pocket Screws Brad Nailer or Hammer 1 ¼-inch Brad Nails Clamps
 MATERIALS: TOOLS: (4) 2 x 6 x 8 Ft. Boards Tape Measure (2) 2 x 4 x 8 Ft. Boards Carpenter s Square (7) 1 x 4 x 8 Ft. Boards Pencil (2) 1 x 3 x 8 Ft. Boards Drill (1) Half Sheet of ¾-inch Thick Plywood
Over-Garage Door Lumber Rack Designed by RJ Brown internetwoodworking.com. Copyright 2000 All Rights Reserved
 Over-Garage Door Lumber Rack Designed by RJ Brown internetwoodworking.com Copyright 2000 All Rights Reserved Instructions for building the Over-Garage Door Lumber Rack By RJ Brown internetwoodworking.com
Shoe Organizer Plans Our Home from Scratch
 Shoe Organizer Plans by Our Home from Scratch Our Home from Scratch LLC Page 1 Disclaimer Our Home from Scratch LLC and its legal owners cannot be held responsible for any loss, damage, injury or death
Design Considerations
 Alan N. Leland Miniature Stool Design Considerations The seat of the stool is the most visible part of the stool therefore; using a figured wood will enhance the overall appeal of the finished stool. The
How to install the Kreg Bench Klamp System with Klamp Plate on a workbench
 How to install the Kreg Bench Klamp System with Klamp Plate on a workbench Posted by Vince M, www.zonetravaux.fr http://www.zonetravaux.fr/2014/01/pince-plaque-serrage-kreg-etabli/ I built my workbench
1. Position the legs on the plywood, mark the angle on the plywood, and also mark the cut at the top of the leg. Cut points "A" at a 10 degree angle u
 .com.com flyrods Construction of the "Niemiera" Planing Bench text and drawings by John Niemiera Copyright Q 2002 Niemiera H y Rods Inc. h ttp://www.niemierafiyrods.co john@niemieraflyrods 732 548-5656
Page 1. The Cluny Table
 Page 1 The Cluny Table This is two articles. The first describes my slightly simplified copy of the Cluny table, which is a lot of work to make. The second is the bare bones/starving student version, which
Potter s Wheel Plans. Flywheel is poured in form made by tacking tar paper to plywood disk. Partly set concrete is broom-finished.
 Potter s Wheel Plans Flywheel is poured in form made by tacking tar paper to plywood disk. Partly set concrete is broom-finished. Throwing Pottery on a wheel is the most challenging form of pottery making
Safety First! Use eye protection, always! Use ear protection with loud power tools. Stay with children while they work!
 TM TM ART TABLE Safety First! Use eye protection, always! Use ear protection with loud power tools Stay with children while they work! Follow tool manufacturers safety guidelines Page 1 ART TABLE Page
Benchmark Storage or Media Tower [1]
![Benchmark Storage or Media Tower [1]](/thumbs/90/104139560.jpg "Benchmark Storage or Media Tower [1]") [1] Submitted by Ana White [2] on Wed, 2011-10-05 13:03 Page 1 of 23 [1] Page 2 of 23 So excited to post a plan today! Been working long and late hours trying to get a roof on the Momplex, and have really
[1] Submitted by Ana White [2] on Wed, 2011-10-05 13:03 Page 1 of 23 [1] Page 2 of 23 So excited to post a plan today! Been working long and late hours trying to get a roof on the Momplex, and have really
Contest Field Border Construction Manual
 Contest Field Border Construction Manual TABLE OF CONTENTS Section 1 Field Construction...3 Section 2 Bill of Materials 3 Section 3 Construction.. 4 Step 1 - Layout...4 Step 2 - Bottom...4 Step 3 1 st
National 5 Practical Woodwork
 Exercise C. The legs of a chair are turned on the wood lathe. (a) (i) Sketch and name the tool used to produce the square shoulder shown at A. Name of tool: Sketch and name the tool used to check the diameter
Halloween Projects from Aidtopia. Haunted Mirror
 Halloween Projects from Aidtopia http://www.aidtopia.com/halloween/mirror/index.html Haunted Mirror Here's information on cool indoor Halloween prop you can build in a weekend. The Effect You check your
Single MJ Splitter Installation Manual - 1Si
 SP1 Single MJ Splitter Installation Manual - 1Si Micro Jig, Inc. PO Box 195607 Winter Springs, FL 32719, USA. Tel: 1-407-696-6695 Web site: www.microjig.com Email: sales@microjig.com Copyright 2004 Micro
How to Build a DIY Extra Long Wood Bench
 How to Build a DIY Extra Long Wood Bench Free woodworking plans for building a large, extra-long wood bench. This bench measures 9 in length and is designed to match the DIY Large Outdoor Dining Table,
Tools: Drill/Driver Kreg Jig Miter Saw Jigsaw Circular Saw Adjustable Square Tape Measure Veneer Trimmer Sandpaper and Sander
 R PROJECT PLANS DROP-FRONT DESK Create a workspace almost anywhere with this drop-front desk. Mounted to a wall, it doesn t take up any floor space, which means you can hang it wherever you need to work.
Castle Bed. Page 1 of 24
 Castle Bed www.andrewharriswoodwork.com Page 1 of 24 Introduction This plan makes a twin bed that is 91 inches long and 60 inches wide. I have tried to ensure all steps are covered in these plans but if
Router Table-Mate. Everything you'd want in a router table for just $50.
 Router Table-Mate Everything you'd want in a router table for just $50. Commercially made router tables are everywhere these days. Some of them come with more gizmos and gadgets than a 59 Edsel. By the
Wanderlust Suitcase Vanity
 Wanderlust Suitcase Vanity If you re like me, you re always up for an adventure. When I saw some examples of DIY reclaimed suitcases, paired with the exciting new Wanderlust embroidery design collection,
Pivot-Door Downdraft Cabinet Plans
 Pivot-Door Downdraft Cabinet Plans Finished Cabinet Closed Open Exploded View Introduction This simple downdraft-style dust collection cabinet is a great way to keep your shop cleaner and keep your router
Counter Height Bar Stool [1]
![Counter Height Bar Stool [1]](/thumbs/85/92389200.jpg "Counter Height Bar Stool [1]") Counter Height Bar Stool [1] Submitted by AndyH [2] on Wed, 2015-03-11 09:58 These stools are ideal for a kitchen counter and I made them to fit ours [1] Page 1 of 10 which is about 36 inches from the
Counter Height Bar Stool [1] Submitted by AndyH [2] on Wed, 2015-03-11 09:58 These stools are ideal for a kitchen counter and I made them to fit ours [1] Page 1 of 10 which is about 36 inches from the
Grilling Table. Page 1 of 10
 Grilling Table www.andrewharriswoodwork.com Page 1 of 10 Introduction This plan makes a table 47 inches wide, 22 inches deep and 36 inches high with the top added. All my builds are made with pocket hole
Thank you for purchasing these easel plans. I think you will find this to be a fun, easy to build project that will serve you for years to come.
 Construction Plans for The Basic Wooden Easel Updated August, 2002 Thank you for purchasing these easel plans. I think you will find this to be a fun, easy to build project that will serve you for years
DIY CHILD S STOOL. Instructions
 DIY CHILD S STOOL Children have their own special world. And having the right furniture is part of that world. We have designed an easy-to-assemble child's stool that you can paint in a selection of bright
This book, or portions of it, may not be duplicated, resold, or redistributed in any way, without the expressed written consent of Stay Tooned, Inc.
 Copyright 2006 - Stay Tooned, Inc. All rights reserved worldwide. This book, or portions of it, may not be duplicated, resold, or redistributed in any way, without the expressed written consent of Stay
Project Skill Level: INTERMEDIATE Plywood Used: CANPLY EXTERIOR Good Two Sides (G2S) or precision sanded Aspen
 or precision sanded Aspen") Project Skill Level: INTERMEDIATE Plywood Used: CANPLY EXTERIOR Good Two Sides (G2S) or precision sanded Aspen MATERIALS LIST: (1) ¾" x 4 ft x 8 ft plywood panel (20) #8 x 2" Robertson or Phillips wood
Project Skill Level: INTERMEDIATE Plywood Used: CANPLY EXTERIOR Good Two Sides (G2S) or precision sanded Aspen MATERIALS LIST: (1) ¾" x 4 ft x 8 ft plywood panel (20) #8 x 2" Robertson or Phillips wood
Package contains. Required tools and consumables:
 Thank you for purchasing the TriTrix MTM Transmission Line cabinet kit. This cabinet kit was precision cut using CNC machinery for the best possible fit and finish. With a little time and patience, your
The WoodWorker s Edge
 The WoodWorker s Edge Draw-leaf Game Table 1. 2. Layout the area for the tenons. The tenons are 3/8 thick x 4-1/2 long x 1-1/4 deep and offset to the inside. Create the tenons using the step method to
Rose Inspired Corner Shelf
 Photo 1: The side pieces are sized so you can hot melt glue them together outside of the pattern. Scoring a shallow v-groove with a utility knife holds the glue at bay. Rose Inspired Corner Shelf The best
Smoker. Written By: Feitan
 Smoker Smoking meat has been around for hundreds of years. Now with this simple smoker one can bring back to life the ancient methods of preserving meats and adding the smoky flavor. Written By: Feitan
Easy Jewelry Box. Easy Jewelry Box 1
 This easy to build dresser style jewelry box is designed to use standard board sizes you may already have on hand. Drawers are lined in felt and have felt covered bottoms to glide smoothly on the shelves
Butterfly Leaf Dining Table Plans
 Butterfly Leaf Dining Table Plans Part 1 An attractive dining table with a secret: the leaf folds and stores inside the table. Season 1, Episode 7 P a g e 2 I first saw a butterfly leaf table in a back
Cigar-box Charkha. Copyright Spin.Off magazine, Interweave Press, LLC. Not to be reprinted. All rights reserved. by Marilyn Rishel Sult
 Cigar-box Charkha by Marilyn Rishel Sult You can always find a friend to get you into trouble. Marilyn made one-box (back, disassembled for carrying) and two-box (front, set for spinning) charkhas from
Mortisting Stand. Premium Plan. In this plan you ll find: America s leading woodworking authority
 America s leading woodworking authority Premium Plan In this plan you ll find: Mortisting Stand Step-by-step construction instruction. A complete bill of materials. Construction drawings and related photos.
Metal Aircraft Landing Light Installation Instructions
 Metal Aircraft Landing Light Installation Instructions This landing light kit was designed for the Thorp T-18 as a method of installing a halogen landing light in the leading edge of the outer bay of the
FLOW HIVE ASSEMBLY GUIDE. If we look after the bees they will look after us, and the honey really is an amazing bonus. Flow Hive Hybrid 3 Frame
 AUSTRALIAN MADE If we look after the bees they will look after us, and the honey really is an amazing bonus. FLOW HIVE ASSEMBLY GUIDE Flow Hive Hybrid 3 Frame Read all instructions first. If you are unfamiliar
Project: Smoker Overview: Smoking meat has been around for. Materials: 3/4 plywood, 7-48 of 1/2 dowel,
 Project: Smoker Overview: Smoking meat has been around for hundreds of years. Now with this simple smoker one can bring back to life the ancient methods of preserving meats and adding the smoky flavor.
Copyright 1998 KDE Technologies
 Modular Computer Corner Desk Unit Copyright 1998 KDE Technologies http://members.tripod.com/~kdetech/ 1. Introduction 2. Plans Sheet one - Isometric Sheet two - Top Detail / Corner Unit Sheet three - Leg
15 Dovetail Jig. Instruction Manual. Part # 3452
 15 Dovetail Jig Instruction Manual Part # 3452 CAUTION: Please read, understand, and follow all manufacturers instructions, guidelines and owners manuals that come with your power tools. Peachtree Woodworking
Construction of a Banjolele
 Construction of a Banjolele Casey Camacho UIUC Physics 406 Spring Semester, 2013 1 Project: For my project I decided to create a banjo ukelele from scratch. The idea mainly came from my girlfriend owning
MLCS Instructions for Bowl and Tray Template Kit #9176/#9179
 MLCS Instructions for Bowl and Tray Template Kit #9176/#9179 Tools Needed: Router 1-1/2 h.p. Minimum recommended with a 1/2 collet Forstner bit 3/4-2 recommended depending on template used Drill Press
Wooden Christmas Tree
 Wooden Christmas Tree Created by DIY hacker, woodworker and teacher, Kerryn Carter of Toolschool, take your Christmas tree to a whole new level, with this wooden Christmas Tree project. PROJECT INFORMATION
(1) C & C 30 MK I I. Building the Wine Glass Holder
 C & C 30 MK I I. Building the Wine Glass Holder") (1) C & C 30 MK I I Building the Wine Glass Holder 1. This package contains instructions and sketches plus scanned pictures. 2. Woodworking skills and equipment are essential to make the pieces and assemble
(1) C & C 30 MK I I Building the Wine Glass Holder 1. This package contains instructions and sketches plus scanned pictures. 2. Woodworking skills and equipment are essential to make the pieces and assemble
Agricultural Mechanics and Technology Power Tool Safety Rules
 Agricultural Mechanics and Technology Power Tool Safety Rules Name: BAND SAW Use: Cutting curves, circles and irregular shapes. 1. Use clean SHARP blades. 2. The teeth should always point DOWN. 3. Adjust
A Magazine Rack with a Top
 A Magazine Rack with a Top Introduction: I have never come across a good free plan for a magazine rack. Yet almost all homes have one. So this is one of the few items I have made on my own, as I don t
Simple Soap Cutter. This first photo shows the cutter sitting on top of the two bricks and the 8 bar log ready to rock-n-roll.
 Simple Soap Cutter I've had this thing sitting in the garage for a year now and forgot about it. Last month I discovered it again and decided to finish it off and give it a test run. The idea is not one
The Unity Way Church Sound Desk
 The Unity Way Church Sound Desk I. Introduction This document will attempt to show and explain the thoughts that went into the construction of the sound desk at Unity Way Church. The desk was designed
Fortress Fe Posts must always be secured to the deck framing. Fortress Fe Posts should never be attached to only the deck boards.
 Installation Instructions for Fortress Horizontal Cable Panel System with UB-05 Brackets and Fe Posts It is the responsibility of the installer to meet all code and safety requirements, and to obtain all
Media Center Woodworking Plans Our Home from Scratch
 Media Center Woodworking Plans by Our Home from Scratch Our Home from Scratch LLC Page 1 Disclaimer Our Home from Scratch LLC and its legal owners cannot be held responsible for any loss, damage, injury
Weather Forecaster Materials List
 Project 14438EZ: Old World Weather Forecaster The weather house type of weather forecaster is a very old traditional type that was popular in Europe, especially Germany. Changes in the weather cause a
Wood Sawhorse. Description: Materials: Tools: Drawing/Photo: Name: Date:
 Wood Sawhorse Name: Date: Description: The project is a wood sawhorse that can be used for workspace for future projects. It requires layout and wood working/construction skills. Materials: 4-1x6x30 DF
Ziegfeld Brollies. A twist on the classic umbrella stand!
 Ziegfeld Brollies A twist on the classic umbrella stand! When you look at woodworking magazines you don't see many curves. I'm not talking about attractive female models, I'm talking about the furniture.
Bird Feeder. Tool Requirements
 Bird Feeder Written and constructed by Craig Tilley This wooden bird feeder will be an attractive addition to your garden. Its wide trays allow plenty of room for birds to come and have a snack, and the
A Tale of Two Budget Moxons
 The two budget Moxons one with hardware the author made, and one with hardware she purchased. Within the hand-tool woodworking community, there has been all kinds of buzz recently about Moxon vises. So
HM OUTDOOR TABLE:HM OUTDOOR TABLE 25/7/08 11:18 AM Page 30
 HM080827 OUTDOOR TABLE:HM080827 OUTDOOR TABLE 25/7/08 11:18 AM Page 30 The treated-pine frames of the table and benches are topped with sturdy blackbutt timber. HM080827 OUTDOOR TABLE:HM080827 OUTDOOR
Travis Bishop. Submitted to: Dr. John Davis. Date: 3 December Course: ETME 310 Section: 004. Lab Topic: Milling Project (Vise)
") Travis Bishop Submitted to: Dr. John Davis Date: 3 December 2012 Course: ETME 310 Section: 004 Lab Topic: Milling Project (Vise) Introduction: Purpose of Experiment: This experiment was conducted to teach
Travis Bishop Submitted to: Dr. John Davis Date: 3 December 2012 Course: ETME 310 Section: 004 Lab Topic: Milling Project (Vise) Introduction: Purpose of Experiment: This experiment was conducted to teach