Shopsmith Mobile Storage Cabinet.
|
|
|
- Cassandra Underwood
- 5 years ago
- Views:
Transcription
1 technology workshop living food play outside Shopsmith Mobile Storage Cabinet by Beave2012 on May 3, 2015 Table of Contents Shopsmith Mobile Storage Cabinet 1 Intro: Shopsmith Mobile Storage Cabinet 2 Step 1: Gather the materials 2 Step 2: Piece out the plywood 3 Step 3: Create the Hanging Bar 4 Step 4: Cut your Dados 6 Step 5: Assembly 8 Step 6: Hanging bracket alignment 10 Step 7: Doors 10 Step 8: Protective coating 11 Step 9: Final assembly 11 Advertisements 12


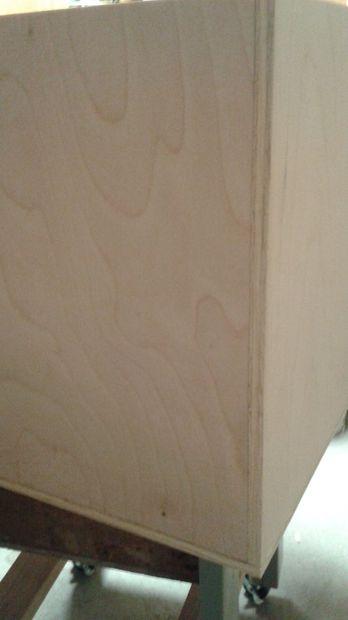
2 Intro: Shopsmith Mobile Storage Cabinet Recently I purchased a Shopsmith Mark V from a family member in my mission to get a woodworking shop I was also confined into a small space, aka my garage, so the Shopsmith fit the bill perfectly After getting it home and unloading all the accessories I found that there is a lot of small pieces, and in this case, accessory parts from 3 machines packed into one purchase My garage is already packed full, so its time to use my space efficiently So under the Shopsmith is a ton of unused space just waiting to be used While I am not the first to come up with this idea, I made it specifically to my needs, while undertaking my first cabinet build My Mission: Build a cabinet under the Shopsmith that can act as a permanent part of the machine, but in the case I need an additional table or for some reason get rid of the Shopsmith, I can detach it and it will work as a regular cabinet as well Oh yes, and do it with a single sheet of plywood, 6 hinges, 4 bolts, 4 nuts, and a lot of glue No screws or nails (except for the hinges) The design: A basic cabinet carcass with 3 hidden hinges with 2 detachable hangers to hang off the Shopsmith tubes When the Shopsmith is on it's base the cabinet hangs around 1/16" off the floor (can barely slide a few sheets of paper below it), and when its lifted onto the casters it gives me around 1/2" off the floor to move it Additional Thoughts: I asked myself if I should make an instructable about a specific tool, and here is my reasoning You can pick these up for around $500 on craigslist and with a little sandpaper, wax, and oil, you can get started with woodworking and have most of the power tools you need all in one system For the home DIY individual, its hard to beat that For the professional, I will let the web forums battle that out Secondly, this is simply a cabinet build, if you don't have a Shopsmith, don't make the hangers and you have a nice solid cabinet for whatever use you wish This is just a guide, your responsible for your own safety and those around you! Read your instruction manuals If you are unsure of how to do a specific cut or procedure, do more research before you do it Its better to have a half completed project than half a hand With that, lets get started 1 Wasted Space Step 1: Gather the materials So the material list is fairly basic, (1x) 4' x 8' x 3/4" sheet of double sided birch plywood (Home Depot) (8x) 1/4" x 2" Bolts w/ matching nut (Home Depot) (4x) Full-Overlay Euro Style Hinges (Menards) (2x) Half-Overlay Euro Style Hinges (Menards) Wood Glue (I used Titebond 3) -For the shelves I used some extra 1/4" birch plywood I had laying around However, you can omit the shelf, change them to drawers, or whatever you feel like at that point Tools Required: Shopsmith* Dado Blade Bar clamps, smaller clamps, rope, etc Whatever you can use to hold it together while the glue dries Drill bits Bandsaw (or coping saw would work as well) Circular Saw (to help trim down the 4'x8' sheet at the start) Square Screwdriver (just for hinges) *Note: If you do not have a Shopsmith, you would need a table saw, drill press, & portable drill as a replacement for it

")
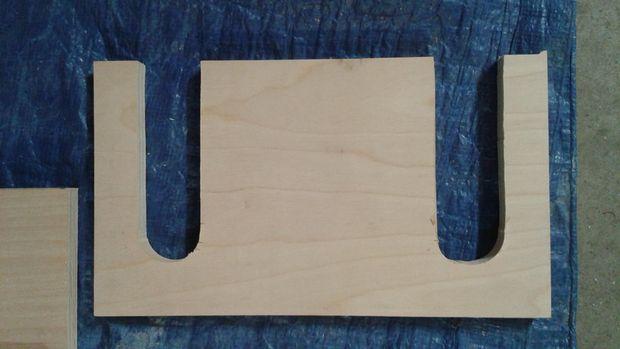
3 Step 2: Piece out the plywood Cutting the plywood into more manageable pieces is a great place to really start For this, because of the size of a 4'x8' sheet of 3/4" plywood, I found it much easier to clamp down a straight edge on the plywood, and then use a circular saw to cut them down to size It is just much easier to move a saw than that large of a sheet of wood Although, some people don't mind cutting that large of a sheet on a table saw, I am just not one of them Once you have the basic cutouts, we can be done with the circular saw and stick to the table saw *Here you will also see the sketches I made of the project with dimensions (the bracket is an old style and was modified in the process* 1 Eventually this will become the doors 2 Back of cabinet (Not trimmed lengthwise yet) 3 Top and bottom sections of the cabinet (not trimmed lengthwise yet) 4 2 sides & 2 dividers 5 2 cabinet hangers 1 Here is the old bracket I was going to make, instead of clearing out the bottom entirely, I now notched in the bracket so I could add more bolts in the center as well

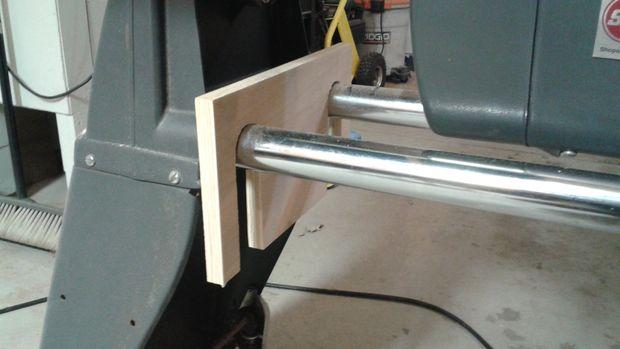
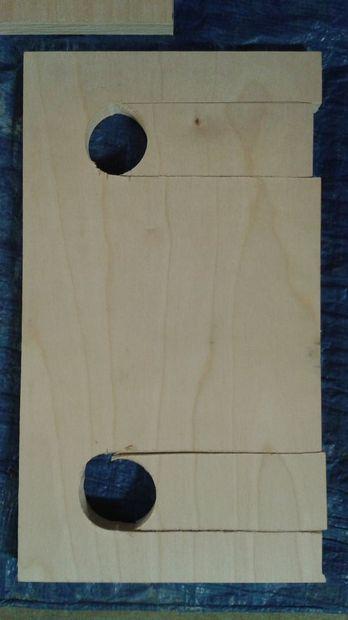
4 Step 3: Create the Hanging Bar The hanging brackets are a simple "M" shape with 2" on each side of the tubes and provide enough length so that we can later get the bolts into the exact position so that the cabinet is not touching the ground when the cabinet is on the base This was done because I have my unit in a cement floor garage, and I wanted to avoid direct contact if there is any moisture or condensation that may occur At least there is a small amount of air that can run between the cabinet and the floor Additionally, the benefit of a separate hanging bracket allows me to detach the cabinet from the Shopsmith and use it separately from the Shopsmith if I desire A second assembly table for example To determine where the holes go, determine distance between the tubes, and subtract the diameter of the 1 of the tubes That will give you the distance between the holes, so take half of that measurement, and mark to the left and to the right of the horizontal center of the board and that is your drill mark Make sure to keep around 2" above where the hole ends as the entire cabinet will be supported by this piece Now drill out the location of the tubes with a 175" forstner bit and use the bandsaw to extend that hole straight down to allow it to slide onto the tubes Place it over the lower tubes to ensure a tight fit Tip: Use a couple of squares placed across the tubes to determine the edges of the tubes (since this needs to be exact and its hard to measure a cylinder with a tape measure) Once you have
5


6 Step 4: Cut your Dados Time for some joinery We are going to use rabbet joints to hold the box together with a dado slots for our shelves The key to the dado cuts is the ensure you have downward pressure on the plywood around the blade so that it cuts perfectly half way through if there is a slight lifting of the panel First set your Dado to exactly 1/2 the thickness of your plywood Clamp a scrap piece to your fence to protect your fence since the dado will run almost flush with the fence for the first round of cuts Then use some scrap from your plywood to do some test cuts Once you can join your 2 test cuts to a perfectly flush corner with one another you can start running a dado cut along the top, bottom, and back of your side panels and dividers You also can run it around all 4 sides of the back piece, and sides and back of the top & bottom panels Make sure you lay it out and pick what sides you want on the outside and what ones you want on the inside, so you rabbet the correct side Additionally, note that the side panels are set inside the cabinet with the top panel, the bottom panel, and the back panel all overlap it giving it the added 1/2 thickness to each of the 3 sides Now if your planning on using the bottom shelf for something heavy you may want to change the rabbet on the bottom shelf so that the it is more tongue and groove style, so that downward pressure is on the sides panels, rather than a glued rabbet joint that is facing the "wrong" way For this purpose however, there should be very little stress on the bottom shelf regardless, so I will trust the glue Once all the edge dados are cut, you can cut the shelf dados DO NOT ADJUST THE HEIGHT OF THE CUT UNTIL ALL DADO CUTS ARE COMPLETE Simply move your fence to the desired distance for the first shelf, and cut it Make sure you cut each shelf dado at the same time across all dividers and the back to ensure they will all be parallel I varied mine quite a bit and did not add shelves to the center cabinet because I wanted the center dividers to only have dados on one side of the sheet (If I ran them for the middle as well I would cut dividers into pieces unless I changed the height of the cut which would be a pain) I varied the heights so that I could adjust the shelves to whatever height I wanted to accommodate a variety of different objects You then also need to run a dado down the back and down the top and bottom panels so accommodate the dividers 1 Scrap piece clamped to fence with a nearly buried blade This is to protect my actual fence when rabbeting the edges 1 If you need to adjust the height slightly, you can use one of these handy micro adjusters 1 To help support longer panels I flipped the floating table round with 2 extension supports so that it wont just fall at the end of the cutting table


7 1 if you get some odd uneaven areas, a chisel will help you even it out Although I only ran into one instance, it was likely me not holding it down at the time 1 when cutting shelf slots, you may need to keep the distance of the side panels out by 1/2 your panel's thickness so use your other panels clamped to the fence to give you that exact distance added to the fence without having to move the fence

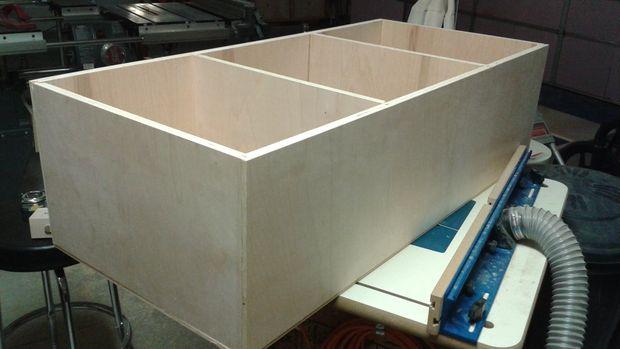
8 Step 5: Assembly Now take time to dry fit the cabinet to ensure it all goes together the way you want it to Make the necessary adjustments before you start the glue process Once it all fits properly, start gluing in all the sides and dividers, clamping them for around 30 minutes minimum a piece We want strong joints since we are not using nails or screws, so the longer the better Be sure to check and make sure everything is square along the way The benefit to having the back having a rabbet around the entire back is that it provides you with a perfect pattern for everything to fit into, so its hard to get it out of square If you don't have enough clamps (I ran into that problem), get creative A ratchet strap works well, as does a rope with a board tied to it that you can twist to get it tight Just be sure you add some scrap to the areas the ratchet strap or rope touch so that you don't cause an indent in the cabinet Let the entire thing dry for a long while under pressure so that you don't break any glued joints


9 1 Some pieces may need persuasion


10 Step 6: Hanging bracket alignment At this point we want to place the cabinet under the Shopsmith and ensure we are properly aligned Now you can mark up where the brackets meet the cabinet and decide if you want the cabinet to be on the ground when the machine is on the base, or if you want it to float Start by drilling out the holes near the top of the sides of the cabinet As long as they are the same distance from the top and match up with the brackets M shape it wont need to be an exact height, that we can do with the brackets themselves For this I simply used the horizontal boring function of the Shopsmith As you can see I used 4 bolts per side since the cabinet will rest its entire weight on these bolts and holes in the plywood Then, simply lower the Shopsmith off the casters over the cabinet to see where your holes in the bracket need to be IMPORTANT! Make sure you position it properly depth wise as well To do this, lower your saw table so the main table's tubes come down and wrap around the cabinet, and make sure you leave room in the front for the 3/4" doors we will put on next So you may want to use a piece of scrap, and then move the table end to end of the Shopsmith to make sure your parallel with the cabinet Once its aligned, mark the brackets through the holes you drilled in the cabinet, and use the drill press mode to drill out the holes in the brackets *Added Bonus* As I progressed to this point I kept losing my Allen wrenches to change tools, so I drilled holes in the top of the mounting brackets so that it I can slide them into the brackets as a permanent storage area that is easily accessible I also drilled the bottom right hole a bit larger to store the drill press chuck key I always set that down somewhere, but in that spot its easily accessible So far its worked great 1 clamp a piece of scrap to both sides of the drill point to prevent tear out Step 7: Doors For the doors, simply cut out your 3 doors, giving around 1/8" gap between each of them Have the doors flush with the outside sides of the cabinet, centered on the middle dividers, flush with the top and the bottom (or you can give it 1/8" shy of the bottom like I did and wont be noticed, but also provides a bit of protection for the door if you drag the cabinet over a screw That way it hits the cabinet carcass rather than scratch up your door since its so low to the ground Once you get the doors cut, follow the directions for the euro hinge install that comes with the hinges Do not install them yet, simply drill out your recessed hole in the door with a forstner bit for your specific hinge Make sure you plan for the brackets to go outside of the dado groves on the sides of the cabinets or you wont be able to screw in the bracket
 Make sure to hit up every surface After the first coat dries, sand it down with some")


 is to")
11 Step 8: Protective coating Now sand everything down any rough edges you see, but not too much so that it takes off the veneer of the plywood There shouldn't be much if you had a sharp blade for the cutting Then apply a coat of wipe-on poly (you can use other types of poly acrylic, but I like the wipe on method) Make sure to hit up every surface After the first coat dries, sand it down with some 120 grit paper, just to smooth it out not take off the finish Then reapply After it dries again, bump it up to 220 grit and sand it Make sure you wipe it down with a damp cloth before you apply each coat to get rid of any dust Put on your final coat and let it dry Step 9: Final assembly Now that you have finished the cabinet you can make your shelves to fit in the groves, make as many as you want, test fit your tools to fit in the cabinet For mine, I have 3 sanding discs in the left side, 1 conical sanding disc, my extra sanding disc papers, and a palm sander and an orbital sander The middle will be for lathe tools and larger pieces The right side is setup for the saw blades, safety equipment, and a few common accessories to have them right with the Shopsmith The bottom shelf is even big enough for the lower saw guard with a blade After the shelves are in, put on the doors per the hinge instructions, and bolt on the cabinet to the brackets You now have a perfect setup for your Shopsmith accessories that will go with the Shopsmith This was my first cabinet build and it turned out well beyond what I expected It really pays off to plan everything out prior to making a single cut You may also notice there is no handles, at this point I love the look of the solid wood, and was going to groove out the top of the doors for finger grips, but then my wife told me it would just catch sawdust so I avoided that Handles one day, maybe, until then its not hard to open them by simply pulling on the top of the door My tip for new woodworkers (like myself) is to eliminate any influence you have on the cuts, use the fence, make a jig for cuts if needed, do whatever you can to eliminate any extra variables that may cause a bad cut from a perfect mental picture of how it should have turned out Precision is the key, well that and sharp saw blades Dull blades are dangerous and cause tear out As an added note: The only affiliation I have with Shopsmith is that I own their product I think its a great way for the DIY community to get into woodworking since they are sold on craigslist for a fairly cheep price They just take some getting used to for those seasoned professional woodworkers because there is a lot of preplanning involved For the homeowner, it provides professional accuracy with nearly every tool you may need for most projects, and if you go the pre-owned accessory route, you can really build up a shop for a low price


12 Advertisements 1 To make the most use of the space I made this door wider so that the spindels of the 2 top sanding discs can share the same space This way I was able to add an extra shelf for the extra sanding papers 1 Highly ugly organization in this cabinet, however the plan is to make a decent organization for all the lathe tools Most likely a vertical drawer for the chisels and we shall see for the rest
Tongue & Groove Cabinet Doors Copyright 2014 JaysCustomCreations.com
 Tongue & Groove Cabinet Doors Copyright 2014 JaysCustomCreations.com A tongue and groove cabinet door is made up of at least 5 pieces. Two horizontal rails (blue), two vertical styles (green), and one
About.com :
 http://woodworking.about.com/gi/dynamic/offsite.htm?sit...//www.popularwoodworking.com/features/fea.asp%3fid=1088 (1 of 8)1/28/2004 12:05:01 AM Modern Storage Tower The last thing I want to do when starting
ENJOY THIS SELECTION FROM. Woodworking 101. Includes Step-by-Step Instructions for 8 Projects. Woodworking
 W ENJOY THIS SELECTION FROM Woodworking 101 Includes Step-by-Step Instructions for 8 Projects Woodworking 101 Aimé Fraser, Matthew Teague, and Joe Hurst-Wajszczuk To purchase your copy of Woodworking 101,
Materials and Tools: Printer s Triple Console Cabinet. Free Plans to build a Triple Console Cabinet
 Materials and Tools: Materials: 3 sets euro style bottom corner mount drawer slides, 16 length 3 sets inset hinges 24 cup style handles 8 2x2 @ 8 feet long 6 1x3 @ 8 feet long 6 1x2 @ 8 feet long 1 sheet
Mortisting Stand. Premium Plan. In this plan you ll find: America s leading woodworking authority
 America s leading woodworking authority Premium Plan In this plan you ll find: Mortisting Stand Step-by-step construction instruction. A complete bill of materials. Construction drawings and related photos.
Grade 11 Woods Lift Lid Coffee Table. Based on Under the big Top from Popular Mechanics Website
 Grade 11 Woods Lift Lid Coffee Table Based on Under the big Top from Popular Mechanics Website TABLE TOP 1. Select enough lumber to construct a top that is between 22 ½ and 24 wide after jointing. Ensure
The WoodWorker s Edge
 The WoodWorker s Edge Draw-leaf Game Table 1. 2. Layout the area for the tenons. The tenons are 3/8 thick x 4-1/2 long x 1-1/4 deep and offset to the inside. Create the tenons using the step method to
Classic Kitchen Island
 America s leading woodworking authority Step by Step construction instruction. A complete bill of materials. Classic Kitchen Island Exploded view and elevation drawings. How-to photos with instructive
Display Case (for J&S)
") Display Case (for J&S) This is constructed of maple plywood with solid maple (soft maple) edge banding. It was made to fit between a door and a kitchen cabinet, and has an elegant circular taper between
Display Case (for J&S) This is constructed of maple plywood with solid maple (soft maple) edge banding. It was made to fit between a door and a kitchen cabinet, and has an elegant circular taper between
 America s leading woodworking authority To download these plans, you will need Adobe Reader installed on your computer. If you want to get a free copy, visit: http://adobe.com/ reader. Having trouble downloading
This is a solid wood cabinet. The only plywood used is for the back and drawer bottoms.
 Sideboard Sideboard Overview: This project requires basic woodworking skills and access to woodworking machines. Woodworking machines have sharp cutting edges and are NOT forgiving. You should be properly
Jeff Branch WOODWORKING YOU CAN BUILD A. By adding subtle design elements, a traditional furniture style becomes decidedly modern.
 Jeff Branch WOODWORKING YOU CAN BUILD A By adding subtle design elements, a traditional furniture style becomes decidedly modern. Jeff Branch WOODWORKING Publisher: Jeff Branch Editor: Jeff Branch Art
BUILDING A STORM DOOR
 BUILDING A STORM DOOR BY NEAL BARRETT Illustrations by George Retseck If you're in the market for a storm door, you probably know that there are many styles and models available. However, most of them
How to Build a Recessed Medicine Cabinet
 How to Build a Recessed Medicine Cabinet See post for install info http://www.hertoolbelt.com/recessed-medicine-cabinet/ Materials 6 Inset Cabinet Door Hinges 3 Latches 1 sheet Beadboard or 1/4 plywood
Kitchen Step Stool. Premium Plan. In this plan you ll find: America s leading woodworking authority
 America s leading woodworking authority Premium Plan In this plan you ll find: Step-by-step construction instruction. A complete bill of materials. Construction drawings and related photos. Tips to help
Build a Rolling Tool Tote
 The rolling tool tote design calls for readily available materials: a cheap hand truck (it could be an axle and two wheels), 3/4 and 1/2 thick plywood, 1/4 thick MDF (you could use plywood or hardboard)
Pivot-Door Downdraft Cabinet Plans
 Pivot-Door Downdraft Cabinet Plans Finished Cabinet Closed Open Exploded View Introduction This simple downdraft-style dust collection cabinet is a great way to keep your shop cleaner and keep your router
Media Center Woodworking Plans Our Home from Scratch
 Media Center Woodworking Plans by Our Home from Scratch Our Home from Scratch LLC Page 1 Disclaimer Our Home from Scratch LLC and its legal owners cannot be held responsible for any loss, damage, injury
Woodline USA Woodline Spacer Fence System
 Woodline USA Woodline Spacer Fence System MADE IN THE USA Includes: (1) ¼ Spacer Fence (1) 3/8 Spacer Fence (1) ½ Spacer Fence (1) Hardware Package (1) 3 Piece Brass bar set (2) Setup Blocks Visit Us Online
Shop Projects. Plans NOW. Each Built from One Sheet of Plywood!
 Plans NOW www.plansnow.com 5 Shop Projects Each Built from One Sheet of Plywood! Tool Tote - Sawhorse - Workbench - Wood Bin - Wall Cabinet PLUS: 7 SHOP SECRETS Working with Plywood Dread the thought of
Nojo Design: Large Step Cabinet: February 2012
 Nojo Design: Large Step Cabinet: February 2012 The largest single piece of furniture I ve ever made is this stepped cabinet. Finished piece is 8! tall and over 10 long. This project has been great, although
Patrol Box Plans by David J. Yarusso Troop 609
 Patrol Box Plans by David J. Yarusso Troop 609 Materials List: 1. One 4 x8 sheet of ½ thick cabinet grade (birch or oak) or AC plywood. If using AC grade, use the A grade surface on the outside for a clean
Project 13586EZ: Writing Desk. Writing Desk Materials List
 Project 13586EZ: Writing Desk This writing desk will make a handsome addition to just about any room in the house. The one shown is made of cherry, a logical choice for a piece like this, but mahogany
Make your own zero clearance throat plate.
 Make your own zero clearance throat plate. A picture tutorial By Wayne Breshears One of the more important table saw accessories you can have is a zero clearance insert or throat plate. The close tolerance
Jigsaw Puzzle Tray. Premium Plan. In this plan you ll find: America s leading woodworking authority
 America s leading woodworking authority Premium Plan In this plan you ll find: Step-by-step construction instruction. A complete bill of materials. Construction drawings and related photos. Tips to help
Bathroom Storage Unit. Wilkerdos.com
 Bathroom Storage Unit Wilkerdos.com Copyright 2015 Material List Quantity Item Notes 1 4 x 8 x 3/4 plywood Construction grade 1 2 x 4 x 1/2 plywood Construction grade 11" 7-1/2" Page 1 Some 1 1/4" brad
Next-Generation Router Table
 Next-Generation Router Table Make more accurate cuts with a flat, solid-surface top. by John English 2 AmericanWoodworker.com 9 Key Features 1. Hinged Top. Bit changes are much easier. 2. Pivot Control.
Silverware Chest Plan
 Silverware Chest Plan 05L14.01 Introduction 1. Measure the space required for your cutlery before beginning this project to be sure that it will fit in the drawers and top compartment. The best way to
Christmas Bell Ornament
 Christmas Bell Ornament This is an easy Christmas ornament idea I cabbaged from a friend and skilled turner, Curt Fuller, from Utah. I kind of adapted it to my style but I still got the idea from him.
GENERAL NOTES: Page 1 of 9
 Laminating A Zia Into A Turning Blank by W. H. Kloepping, Jan. 2009 This describes how a zia (the New Mexico state symbol) can be laminated into a turning blank. Materials needed: Square Turning Block
Project Plans Kreg Tool Company / BuildSomething. All Rights Reserved.
 BY Project Plans HARDWARE ORGANIZER How easy is it top keep screws, hardware, and other small items organized instead of in the way? Just cut six identically sized pieces of plywood, add a 1x2 cleat, and
Project 17884EZ: Shaker End Table
 Project 17884EZ: Shaker End Table With its clean, simple lines, this piece is unmistakably Shaker style. Ours is made from cherry, a wood commonly used by Shaker craftsman, but we ve also seen this piece
Hinge Mortising Jig. One of the make it or break it parts of building a. 6 ShopNotes No. 74
 Hinge Mortising Jig A Mortise for a Hinge. Quick, clean, and accurate that s the only way to describe the mortise you get with a trim router and this hinge mortising jig. One of the make it or break it
Kitchen Upper Cabinet: Double Doors Cabinets from Scratch
 Kitchen Upper Cabinet: Double Doors by Cabinets from Scratch Our Home from Scratch LLC Page 1 Disclaimer Our Home from Scratch LLC and its legal owners cannot be held responsible for any loss, damage,
129 KITCHEN BASE CABINET 480
 129 KITCHEN BASE CABINET 480 There are two sorts of kitchen cabinets: base cabinets, which sit on the floor, and wall cabinets. Base cabinets provide both storage space and work surfaces. They often house
Mid-Century Credenza Thoughtful details and modern joinery merge in this sleek design
 Mid-Century Credenza Thoughtful details and modern joinery merge in this sleek design BY LIBBY SCHRUM Mid-Century Modern furniture has not been wildly popular since, well, the mid-century. But fashion
ULTIMATE ROUTER TABLE PLANS. By Dan Phalen
 ULTIMATE ROUTER TABLE PLANS By Dan Phalen January 2017 Ultimate Router Table Plans. Copyright 2012-2017 by Daniel Phalen. Published by Creston Hall Publishing Company. All rights reserved. No part of this
Kitchen Upper Cabinet: Single Door Cabinets from Scratch
 Kitchen Upper Cabinet: Single Door by Cabinets from Scratch Our Home from Scratch LLC Page 1 Disclaimer Our Home from Scratch LLC and its legal owners cannot be held responsible for any loss, damage, disappointment,
Plans. Easy-to-Build Full-size Deluxe Murphy Bed Plan. For more plans, tools and hardware visit rockler.com
 Easy-to-Build Full-size Deluxe Murphy Bed Plan Build a full-size Deluxe Murphy Bed complete with decorative molding and matching side cabinets! Plans For more plans, tools and hardware visit rockler.com
Kentucky 4H Wood Science Plans Notebook. Plans Level 3
 Kentucky 4H Wood Science Plans Notebook Plans Level 3 MATERIALS: 2 pieces wood 3/4 x 10 x 4 1 piece wood 3/4 x 12 x 4 2 pieces wood 3/4 x 3 x 2 5 1/2" 2 pieces wood 3/4 x 3 x 1 8 1 piece wood 2 x 4 x
COMPLIMENTARY WOODWORKING PLAN
 COMPLIMENTARY WOODWORKING PLAN Bookcase This downloadable plan is copyrighted. Please do not share or redistribute this plan in any way. It has been created for Wilton Tools, a division of WMH Tool Group.
10 Easy-to-Build. Plywood Projects
 10 Easy-to-Build Plywood Projects Ten shop projects ten sheets of plywood. These rock-solid essentials take just a couple hours to build and will help you make the most of the space in your shop. All content
PROJECT PLAN OUTFEED TABLE
 BUILD IT WITH ROCKLER PROJECT PLAN OUTFEED TABLE BUILD Stock # Item 00 ' Universal T-Track () 0 T-Track Intersection Kit 70 JIG IT Universal Drawer Slide Jig 0 " Drawer Slides () 77 Auto-Adjust Jig Clamp
Cedar 2-Drawer Desktop Storage Cube
 Cedar 2-Drawer Desktop Storage Cube 5 ½ Dimensions 5 ½ 5 ½ 2 2 1 7/8 4 ¼ 4 ½ Author s Notes: Build a Cedar 2-Drawer Desktop Storage Cube from just 1 cedar fence picket. No angles, special cuts or rips
hanging mirror Two-piece desk set Handmade Gifts Photo: John Tetreault
 hanging mirror Two-piece desk set Handmade Gifts 44 FINE woodworking Photo: John Tetreault Flatware carrier Tea light candle holder 4 Tasteful projects made quickly from scraps BY CHRISTIAN BECKSVOORT
Simple Dresser. Premium Plan. In this plan you ll find: America s leading woodworking authority
 America s leading woodworking authority Premium Plan In this plan you ll find: Simple Dresser Step-by-step construction instruction. A complete bill of materials. Construction drawings and related photos.
Shop-Made Miter Clamps
 *Editor s note: In the photos showing the table saw, the blade guard has been removed for clarity. I try to be as self-sufficient as possible, so I like to manufacture my own tools whenever I can. I designed
DIY Rustic Dresser Addicted2DIY.com
 DIY Rustic Dresser Addicted2DIY.com *Before beginning this project, please read through all of the plans as well as the blog post associated with this project. Always use safety precautions whenever using
Copyright MLCS 1
 Copyright 2007. MLCS 1 WORKING WITH BOX JOINTS Box joints (AKA "Finger Joints") provide a simple, yet equally effective, alternative to dovetail joinery. In particular, they serve well for applications
Instructables Butcher Block Top
 Instructables Butcher Block Top Project Overview: This project requires basic woodworking skills and access to woodworking machines. Woodworking machines have sharp cutting edges and are NOT forgiving.
SE5a Wing Panels rev 1.0
 SE5a Wing Panels rev 1.0 The top and bottom wings are different. They might look the same but the bottom wing has one less rib and some rib spacing difference. This is due to where the wooden interplane
COFFEE TABLE WITH RECESSED TRAY
 COFFEE TABLE WITH RECESSED TRAY Why not treat your guests to a tray laid with delicacies and then remove it from sight in your new coffee table. There's no easier way to show that you are a thoughtful
Shaker Classic Change the legs to change the look
 Shaker Classic Change the legs to change the look 2 Ways B Y C H R I S T I A N BECKSVOORT not long ago, a couple ordered a set of cherry side tables from me, one for each side of their pencil-post bed.
Modern Farmhouse Printer Cabinet. Addicted2DIY.com
 Modern Farmhouse Printer Cabinet Addicted2DIY.com Before beginning this project please read through all of the plans as well as the blog post associated with this project. Always use safety precautions
Corner Cupboard. This space-saving piece enhances any room 46 FINE WOODWORKING
 Corner Cupboard This space-saving piece enhances any room BY G A R R E T T H A C K On every trip to the Shelburne Museum near Burlington, Vt., I visit a favorite object a small hanging corner cabinet.
Entrance Cabinet Plans
 Entrance Cabinet Plans www.andrewharriswoodwork.com Page 1 of 19 Introduction I have tried to ensure all steps are covered in these plans but if you find any errors in the plans or have a question then
Project 11010EZ: Gun/Bookcase/Curio Cabinet
 Project 11010EZ: Gun/Bookcase/Curio Cabinet No man can be all things to all people, but this cabinet comes as close to fitting multiple uses as any inanimate object can. We ve pictured it as a gun cabinet
Butterfly Leaf Dining Table Plans
 Butterfly Leaf Dining Table Plans Part 1 An attractive dining table with a secret: the leaf folds and stores inside the table. Season 1, Episode 7 P a g e 2 I first saw a butterfly leaf table in a back
Coffee table with recessed tray
 Coffee table with recessed tray Dinner is served Coffee table with recessed tray This coffee table has it all: it contains a recessed tray, so that you can treat your guests to various delicacies. 1 Introduction
DIY Wine Storage Cabinet
 DIY Wine Storage Cabinet ADDICTED2DIY.COM *Before beginning this project, please read through all of the plans and the blog post. When building this project, be sure to measure your wood and cut to fit.
A Shaker Sewing Stand
 America s leading woodworking authority Step by Step construction instruction. A Shaker Sewing Stand A complete bill of materials. Exploded view and elevation drawings. How-to photos with instructive captions.
Industrial Cart. Materials. With High Style Restyle
 1 Industrial Cart With High Style Restyle Materials 1 sheet 3/4" plywood 1-1" x 2" x 8' board 2-1" x 3" x 8' board 1-2" x 8" x 10' board 1-2" x 6" x 8' board 3-1/4" x 2 1/2" x 4' poplar hobby boards, or
REINFORCING THE CORNERS OF FLAT FRAMES
 REINFORCING THE CORNERS OF FLAT FRAMES There are a number of different methods that may be used to join flat frame sides together. As most Woodworkers know, end grain glue joints are not nearly as strong
Installation Guide. Pionite Decorative Surfaces One Pionite Road, Auburn, Maine PIONITE ( )
") Installation Guide A Subsidiary of Panolam Surface Systems SMPBRO00-012 6/14 Pionite decorative laminates are designed for finished interior surfaces which require high impact, wear and stain resistance
Installation Guide A Subsidiary of Panolam Surface Systems SMPBRO00-012 6/14 Pionite decorative laminates are designed for finished interior surfaces which require high impact, wear and stain resistance
Making Simple Bookbinding Equipment
 Tony Firman 20 1 2 19 Notes Tony Firman Tony Firman Bookbinding 18 3 : 2012 Tony Firman Bookbinding P.O. Box 507 Haslet, TX 76052 www.tonyfirmanbookbinding.com 4. When all the tapes have been pinned in
Router Table-Mate. Everything you'd want in a router table for just $50.
 Router Table-Mate Everything you'd want in a router table for just $50. Commercially made router tables are everywhere these days. Some of them come with more gizmos and gadgets than a 59 Edsel. By the
Traditional glass-pane and wood-muntin doors highlight this free-standing piece.
 Bookcase Traditional glass-pane and wood-muntin doors highlight this free-standing piece. As the saying goes, there's nothing like good books. But they can present some storage problems--especially if
136 PLYWOOD DESK 522
 136 PLYWOOD DESK 522 Simple in design and inexpensive, this plywood desk is made from a single 4- x 8-foot panel. Plywood is available with many hardwood veneers; it can also be covered with plastic laminate,
Router Table. In a recent article, I wrote about the router table I built for the Center. 5 Essential Jigs for the
 5 Essential Jigs for the Router Table Great fixtures and fences offer better control and new possibilities BY PETER SCHLEBECKER In a recent article, I wrote about the router table I built for the Center
135 ROLLTOP DESK 515
 135 ROLLTOP DESK 515 For the person who hates to clear off a desk, who wants to leave everything where it is overnight yet still have the clutter hidden, a rolltop desk is a godsend. The tambour hides
PROJECT PLAN TOOL CHEST
 BUILD IT WITH ROCKLER PROJECT PLAN TOOL CHEST FEATURING ROCKLER S BUILD QUESTIONS? Go to www.rockler.com or call 800-279-4441 Stock # Item 63420 1/4" x 24" x 30" Baltic Birch Plywood 63446 1/2" x 24" x
Classic Project. Two-drawer Platform Bed. In this plan you ll find: Step-by-step construction instruction. A complete bill of materials.
 America s leading woodworking authority Classic Project In this plan you ll find: Step-by-step construction instruction. Two-drawer Platform Bed A complete bill of materials. Construction drawings and
A Magazine Rack with a Top
 A Magazine Rack with a Top Introduction: I have never come across a good free plan for a magazine rack. Yet almost all homes have one. So this is one of the few items I have made on my own, as I don t
Dining Table with Two-Way Drawers
 Dining Table with Two-Way Drawers DOUBLE-FRONTED DRAWERS MAKE THIS PIECE UNIQUE With two drawer fronts, a center beam, plywood bottoms, and custom pulls, these drawers are both distinctive and durable.
Computer Desk. Project designed by April Wilkerson
 Project designed by April Wilkerson Copyright WilkerDos.com 2018 Project plan Desk Page 2 of 16 Page 3 of 16 File cabinet Page 4 of 16 Metal base Page 5 of 16 Glue up Get started by gluing up boards for
Shoulder Plane. dovetailed. fine tools. Make an heirloom tool and learn the secret to creating double dovetails in metal it s easier than you think.
 fine tools dovetailed Shoulder Plane Make an heirloom tool and learn the secret to creating double dovetails in metal it s easier than you think. I ve always been fascinated by old, metal hand planes.
Dress up your dining room with this Southern delicacy. that was used to serve drinks after a hunt. Breeches and jodhpurs are optional.
 Dress up your dining room with this Southern delicacy that was used to serve drinks after a hunt. Breeches and jodhpurs are optional. Huntboard Classic Six-Legged My dad has been making this six-legged
Classic Mitered Jewelry Box
 America s leading woodworking authority Premium Plan In this plan you ll find: Step-by-step construction instruction. A complete bill of materials. Construction drawings and related photos. Tips to help
Ultimate Miter Saw Stand
 America s leading woodworking authority Ultimate Miter Saw Stand To download these plans, you will need Adobe Reader installed on your computer. If you want to get a free copy, visit: http://adobe.com/reader.
Demilune 4. Apron Joinery. Curved Apron Tenon. Bridle Joint Legs. Bridle Joint Front Apron
 Demilune Email 4 Apron Joinery There are two types of joints used in connecting the aprons and legs. The rear legs use conventional mortise and tenon joints, while the front legs use the less conventional
Jewelry Cabinet. Materials: 5/8" brad nails 5-1" x 3" x 8' boards (or if not 2 1/2" wide. 1-4' x 8' sheet - 3/4" plywood. wood glue get 1x4's)
") 1 Jewelry Cabinet Materials: 1-4' x 8' sheet - 3/4" plywood 5/8" brad nails 5-1" x 3" x 8' boards (or if not 2 1/2" wide wood glue get 1x4's) sand paper 1-1" x 6" x 8' board wood filler 1/2 sheet - 3/16"
1 Jewelry Cabinet Materials: 1-4' x 8' sheet - 3/4" plywood 5/8" brad nails 5-1" x 3" x 8' boards (or if not 2 1/2" wide wood glue get 1x4's) sand paper 1-1" x 6" x 8' board wood filler 1/2 sheet - 3/16"
A Unique Cutting Board
 A Unique Cutting Board When I was asked to make a cutting board as a special gift, I wanted to do something new and eye-catching. Tired of squares and straight lines, I envisioned curving accents not shallow
A Day House. A View of One Way to Finish the Exterior of The Day House. Read these instructions all the way through before beginning this project.
 A Day House A View of One Way to Finish the Exterior of The Day House Read these instructions all the way through before beginning this project. General Comments For the purposes of this project, the standard
The Universal Table Saw Sled
 The Universal Table Saw Sled Do Precision Work Even with Inexpensive Table Saws! Table saw blades always tend to move the wood while the cut is being made. This is why it's so difficult to get accurate
Pinewood Derby Display Case
 Pinewood Derby Display Case Optional Door Design by Neil Fern - Pack 187 Exterior Dimensions 23 ½ (H) X 10 ½ (W) X 3 ½ (D) Front Back OPTIONAL Door Finished Interior Dimensions 21 7/8 (H) X 9 (W) X 3 (D)
Design Update /29/2006
 Design Update 3 -- 8/29/2006 Since our first design we ve made many minor changes to key areas of the prayer bench, especially the folding hinge geometry. The general design remains the same, though the
Flush Trimmer Jig By Santanu Lahiri
 Flush Trimmer Jig By Santanu Lahiri I found this jig in a book published by the Fine Woodworking people: Ingenious Jigs And Shop Accessories, publisher Taunton Press, ISBN# 1-56158-296-4. The Author is
Empire Dresser Plans
 1 Empire Dresser Plans Materials 1 sheet 3/4" plywood (cabinet grade 4' x 8') 1 sheet 5 mm (3/16") underlayment plywood 4'x 8', buy another 1/2 sheet if you want to put a back on the dresser. 1-2" x 4"
Building Tips This model can be built using the following types of adhesives:
 Page 1 Building Tips This model can be built using the following types of adhesives: Epoxy (with or without microballons) Odorless cyanoacrylate (CA) with accelerator UHU Creativ for Styrofoam (or UHU
Strategies for panels, casework, boxes, and more. Prep Tips. Check your tool settings to ensure that when facejointing, planing, and
 Goof-Proof Clamping Strategies for panels, casework, boxes, and more By Jim Harrold B Prep Tips ehind every successful glueup or project assembly you ll find one or more clamping operations that ensured
Slicing Jig For Pen Inlays
 Slicing Jig For Pen Inlays By Randall Smith (randyrls) May 2008 This article has been downloaded from the library of the International Association of Penturners. www.penturners.org You are welcome to reproduce
Complete Dovetail Jig Instructions
 Complete Dovetail Jig Instructions 15 18 4 3 1 12 13 8 19 17 16 6 14 5 9 11 10 2 9 PARTS LIST - Complete Dovetail Jig Introduction Your new dovetail jig will cut Full Through Dovetails and three varieties
Corner Cabinet. American. There is something about corner cabinets that spooks
 American Corner Cabinet The triangular shape of this project puts off most woodworkers. Here s a secret: It s actually quite easy to build. There is something about corner cabinets that spooks most woodworkers.
Apartment Dining Table
 Jeff Branch WOODWORKING You Can Build an Apartment Dining Table By JEFF BRANCH H ave you ever found yourself wanting a new piece of furniture, but everything you see in stores is too big? Big furniture
Kentucky 4H Wood Science Plans Notebook. Plans Level 1
 Kentucky 4H Wood Science Plans Notebook Plans Level 1 MATERIALS NEEDED: 1 piece wood 3/4" x 2 x 2 1 piece wood 3/4" x 3 x 3 1/2" 1 wooden spring-type clothespin 2-1 1/2" nails 1-1/2 woodscrew Wood Glue
Adjustable Box Joint Jig. Richard Hicks on 8/24/2015. Box or Finger Joints
 Adjustable Box Joint Jig Richard Hicks on 8/24/2015 Box or Finger Joints Adjustable Box Joint Jig Richard Hicks on 8/24/2015 Box Joints are also called Finger Joints Because they have interlocking fingers
DIY Full-Size Captain s Bed with Storage. Addicted2DIY.com
 DIY Full-Size Captain s Bed with Storage Addicted2DIY.com Before beginning this project Please read through all of the plans as well as the blog post associated with this project. Always use safety precautions
Installing your new Bevella Top. L Shaped Countertop with Joints No Finished Ends (Fits Between Four Walls)
") Installing your new Bevella Top L Shaped Countertop with Joints No Finished Ends (Fits Between Four Walls) Bevella RTI Countertops are engineered and manufactured to the highest quality standards, built
Installing your new Bevella Top L Shaped Countertop with Joints No Finished Ends (Fits Between Four Walls) Bevella RTI Countertops are engineered and manufactured to the highest quality standards, built
While creating a two-wall
 Ready-To-Assemble Cabinets Outfit your shop in a weekend or less. By Gary Lombard with Jim Harrold 32 woodcraftmagazine.com Aug/Sept 2013 While creating a two-wall or larger shop (or a kitchen, for that
Adjustable Hammered Dulcimer Stand
 Adjustable Hammered Dulcimer Stand Musicmaker s Kits (Hwy 36 behind Joseph s Restaurant) P.O. Box 2117 Stillwater MN 55082 651 439 9120 www.harpkit.com PARTS LIST: 1 Set of Assembly Instructions A. 2 front