Strategies for panels, casework, boxes, and more. Prep Tips. Check your tool settings to ensure that when facejointing, planing, and
|
|
|
- Kellie Matthews
- 5 years ago
- Views:
Transcription

1 Goof-Proof Clamping Strategies for panels, casework, boxes, and more By Jim Harrold B Prep Tips ehind every successful glueup or project assembly you ll find one or more clamping operations that ensured flat surfaces, square corners, and tight joints. To help you succeed at your next clamping assignment, I ll tackle the most common glue-ups, including flat panels, casework, and mitered assemblies, showing you shop-proven methods that guarantee quality results. But before I begin, I d like for you to make these prep tips part of your woodworking regimen: 42 Check your tool settings to ensure that when facejointing, planing, and edge-jointing, your stock faces are parallel and that the edges are straight and perpendicular to the faces. Only then can you produce assembly-ready parts. Provide a flat surface upon which to work, such as a workbench or torsion box. Gather everything you need, including the right type and number of clamps. Make a dry run-through of the clamping operation. Use white glue or Titebond Extend for complex glueups or when gluing several parts at once. Do large glue-ups in sections. Finally, never force improperly-prepared stock into alignment with clamps. Instead, rework the stock to ensure that you have flat parts with true edges.


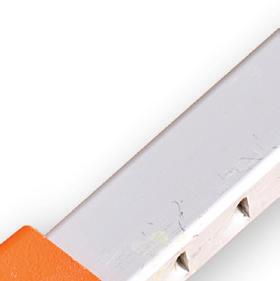

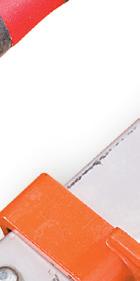
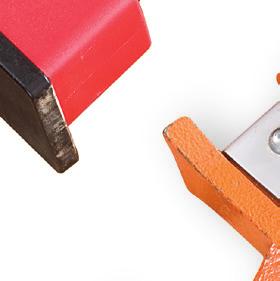
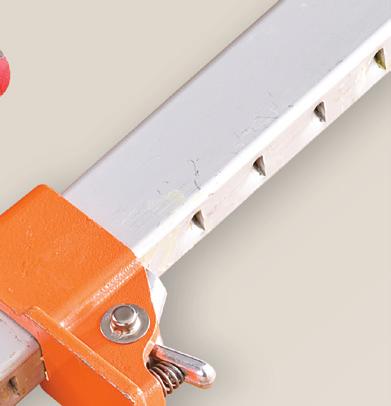


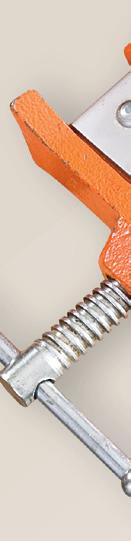
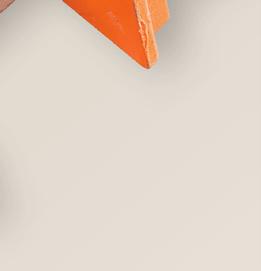


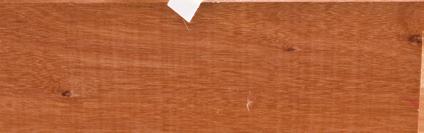
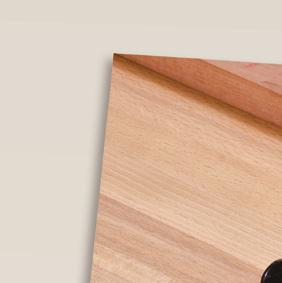
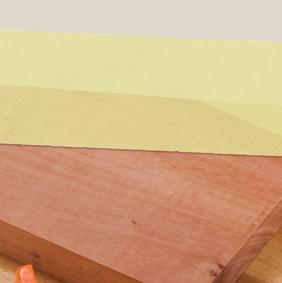
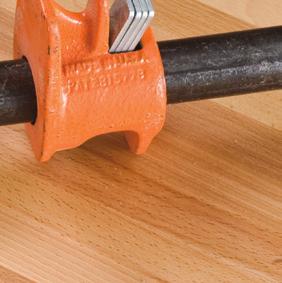
2 Packaging tape Edge-joining flat panels Flat panels include table and cabinet tops, solid door and case panels, and even simple cutting boards. Begin by arranging your prepared stock for the best grain and color match. When you re satisfied, mark a diagonal line from the center of one panel edge to each end of the opposite edge, forming a large triangle. Now you can quickly position the boards in the correct order by reassembling the triangle. To protect your workbench from glue drips, cover it with a plastic sheet, kraft paper, or a cut-to-size and varnished piece of 1 2" MDF. Place a pair of risers on the workbench, and position the panel boards on them, as shown in Photo A. These provide the clearance needed to apply the clamps and cauls at the panel ends. I made Big Boy Clamps Most panel and carcase clamping employs these clamp types. Each has advantages and disadvantages from function to cost. Pipe Clamps Pipe clamps are inexpensive. You can keep several pipe lengths on hand and switch one set of clamp heads from a shorter pipe Pipe to a longer one clamps as needed. Some pipe clamps tip over easily just what you don t need during a glue-up. Pipe clamps are heavy, making it difficult to lift Photos: William H. Hopkins 4" dowel 3 3 mil plastic T-riser Cauls A Position bar clamps under the boards resting on the risers; keep additional bar clamps, cauls, and caul clamps at the ready. Now apply the glue. my inverted-t risers from scrap 2 4s and 1 4s and covered the top edge of each 2 4 with plastic packaging tape to keep them from sticking to the panel. To center clamping pressure on the panel thickness, place a dowel of the same thickness along each edge of the panel. The a glued-up assembly off the workbench. Allowing the pipe to contact wet glue will leave a penetrating black stain. Jaws are not parallel to the bar. Aluminum-Channel Clamps Aluminum channels don t cause staining when contacting wet glue. The squared-off clamp head design resists tipping. Light weight eases the handling of a glued-up assembly. Moderate cost is more than pipe clamps, but less than parallel-jaw clamps. Jaws are not parallel to the bar. dowels also act as clamp pads to eliminate panel-edge damage. To align the boards at the panel ends, make four straightedged cauls at least as long as the panel width. I made my cauls by ripping scrap 2 4s in half and covering the glue-up contact edges with packaging tape. Aluminumchannel clamp Parallel-Jaw Clamps Tall jaws offer more clamping surface. Parallel jaws that stay 90 to the clamp bar can help square up a carcase. Plastic jaw faces protect workpiece edges. These clamps are heavy and share the weight disadvantages of pipe clamps. Parallel-jaw clamps cost more than pipe clamps and aluminumchannel clamps. Paralleljaw clamp ( K-body ) 43

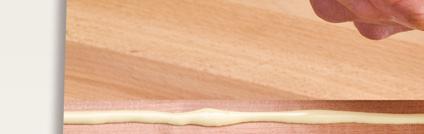
3 B Position bar clamps on the panel, capturing the dowels against the panel edges, and tighten the clamps until they are snug. Panel Glue-Ups: How Many Clamps Do I Need? Clamping pressure spreads out at a 45 angle from the point where the clamp head contacts the edge of the glue-up, as shown below. To determine clamp spacing, draw a line perpendicular to the edge of the first board, and then draw lines at 45 to each side that intersect the first glue line. The distance along the glue line between the two 45 lines is the optimum clamp spacing. As shown, clamps must be positioned closer together along a narrow board than along a wide one. Wide boards Narrow boards Glue lines To determine the number of bar clamps necessary for a panel glue-up, see sidebar below. See also Big Boy Clamps on previous page for a look at three popular types of clamps used in larger glue-ups. Next, stand all but the first board on edge and apply glue to each edge. Spread the glue evenly and modestly with a flux brush or the threads of a carriage bolt. Once clamped, each panel joint should have a small, continuous line of glue squeeze-out. Now lay the panel boards flat on the risers and apply clamps, as shown in Photo B. Immediately clamp paired cauls to the ends of the panel. Apply just enough even clamp pressure along the lengths of the cauls in order to bring the taped surfaces into full contact with the panel. Work back and forth from bar clamps to caul clamps, tightening each in succession until all clamps are tight, the joints are closed, and the board surfaces are aligned. Finally, remove the excess glue that squeezed out along the panel joints. Wipe up the glue on open-grained woods such as oak with a wet rag. Make sure to use enough water to dissolve the glue, and wipe thoroughly several times, rinsing the rag frequently between wipes. For tight-grained woods such as maple, wait for the glue to congeal but not harden, and remove it with a paint scraper, lifting the glue from the surface. Tip Alert If an alignment problem occurs during the glue-up, lay a piece of scrapwood on the high area, and hit it in place with a mallet before the clamps are tightened. Clamp pressure zone 44


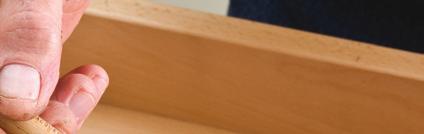
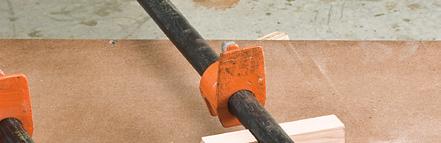
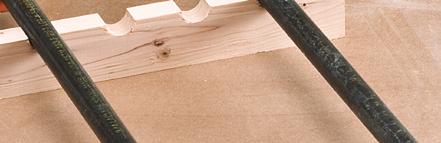
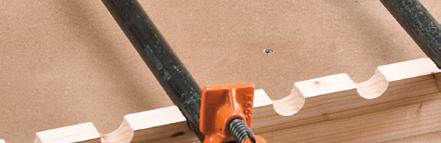
4 Shop-made squaring brace Carcase construction Gluing and clamping a cabinet carcase requires a flat work surface larger and closer to the floor than a typical workbench. Here, in two steps, I show how to add a divider between a top and bottom, and then how to permanently add and square the unit with sides. Later, the back and face frame would be added. With the carcase parts cut to shape and all dadoes and rabbets formed, temporarily position one side on the assembly table, inside face up, to serve as a spacer. Apply glue in the carcase bottom and top divider dadoes. Dry-fit the carcase bottom into the side bottom dado and the carcase top into the side top rabbet, and capture the divider in the top and bottom divider dadoes. Now position cauls on the carcase top and bottom, centered on the divider dadoes. In this case, I disc-sanded a shallow arc on one edge; the arc inclines 1 8" from the center of the caul to each end. As before, I covered the convex curved edges with plastic packaging tape. Clamp pressure at the caul ends flattens it against the assembly and exerts greater pressure at the center. This is handy when the center of the glue-up is out of reach for even those clamps having the deepest throats. Online Extra To establish a flat assembly surface, consider building a torsion box platform such as the Knockdown Assembly Table in issue 29 (June/July 09), page 33, or visit / onlineextras. Illustration: Mario Ferro Manufactured squaring brace Convex caul Torsion box C To hold all the parts in place while positioning cauls and bar clamps, clamp squaring braces to the top, bottom, and divider. D Check the carcase for square by measuring both diagonals. Adjust the carcase as needed until the measurements are equal. Making sure the edges of the divider, top, and bottom are flush at the front, apply bar clamps and tighten them enough to hold the cauls and carcase parts together. You may need to move the case corners over the edge of the table in order to turn the clamp handles. Squaring braces (shop-made or store-bought) help hold the parts together when you re working alone and adjusting the clamps and cauls as shown in Photo C. Loosen the brace clamps as needed to allow the divider to fully seat in the dadoes. Then tighten the bar clamps. Finally, reposition/reclamp the squaring brace clamps. Tip Alert Do not depend on a framing square to true up a carcase. Framing squares are notoriously inaccurate, and even if you have one that is spot on, a slight curve or bow in a carcase member can throw off your measurement. 45


5 Strapping tape Frame segments E F Use strapping tape to join the frame segments point to point, making sure they meet without gaps or overlaps. With the glue dry, remove the clamps and separate the top/bottom/divider assembly from the carcase side, and lay the assembly front face down on the assembly table. Apply glue to the side outer rabbets and dadoes and add them to the top/bottom/divider assembly. Now center cauls on the side rabbets and dadoes, position clamps at the caul ends, and tighten the clamps. Check the carcase for square, as shown in Photo D. If the carcase is not square, apply clamp pressure across the larger diagonal. Roll up the joined segments, pulling them tightly together and securing the last joint with more tape. Mitered frames and boxes Mitered assemblies present a special challenge. That s because applying clamping pressure to angled surfaces lubricated by wet glue often causes the parts to slide out of alignment. Here are some solutions for dealing with these tricky glue-ups. Gluing up a flat mitered frame can be easy as long as the frame has four sides. But an octagonal frame doesn t give you any convenient clamping surfaces. Here s where strapping or filament tape comes to the rescue, as shown in Photo E. This type of tape doesn t stretch or tear like other tapes. Now, apply glue to the miters and finish the glue-up, as shown in Photo F. For a mitered-corner box, make a set of miter cauls like the ones shown in Photo G from 1 4" plywood and " solid stock. Secure a miter caul to each box side with a spring clamp, apply glue to the miters, and assemble the box sides. Apply clamps across the corners, as shown. Consider using two clamps per corner to close any gaps. As an alternate method for applying pressure across Surgical tubing Miter caul Strap clamp G H The angled surfaces of the miter cauls align clamping pressure perpendicular to the glue surfaces, making it easy to pull the miters together without slippage. 46 Secure one end of the surgical tubing to a box side with a spring clamp; then wrap the tubing around the box, stretching it as you wrap.


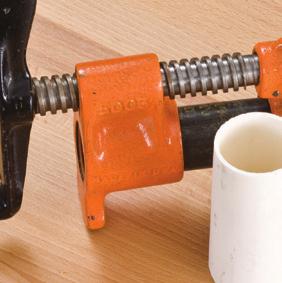
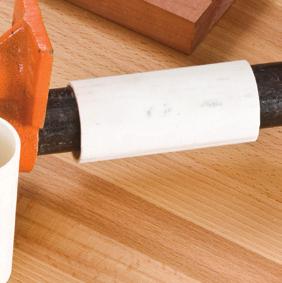


6 wide joints, consider wrapping the assembled box with surgical tubing as shown in Photo H. For boxes with shorter walls, you may get by with a strap clamp. A cheval mirror frame with a round top would be difficult to clamp if the segments were already rounded. Instead, over-size the frame pieces when cutting them and include clamping ears as shown in Photo I. These let you effectively pull the pieces together. Later, you ll trim and sand the curve to final shape and size. Clamping ears I Clamping ears let you draw the segments together at the outside of the curve. A bar clamp at the open end draws together the inside of the curve. Bonus Tips and Helpers For pipe clamps, two short pipes make one long one with the help of a simple pipe coupling. Sleeves made of plastic pipe separate clamp pipes and glue, eliminating black stains. The flexible plastic core of a disposable foam brush makes the perfect glue spreader. A pair of notched rails keeps tipsy pipe clamps upright. 47
Instructables Butcher Block Top
 Instructables Butcher Block Top Project Overview: This project requires basic woodworking skills and access to woodworking machines. Woodworking machines have sharp cutting edges and are NOT forgiving.
While creating a two-wall
 Ready-To-Assemble Cabinets Outfit your shop in a weekend or less. By Gary Lombard with Jim Harrold 32 woodcraftmagazine.com Aug/Sept 2013 While creating a two-wall or larger shop (or a kitchen, for that
ULTIMATE ROUTER TABLE PLANS. By Dan Phalen
 ULTIMATE ROUTER TABLE PLANS By Dan Phalen January 2017 Ultimate Router Table Plans. Copyright 2012-2017 by Daniel Phalen. Published by Creston Hall Publishing Company. All rights reserved. No part of this
Kitchen Step Stool. Premium Plan. In this plan you ll find: America s leading woodworking authority
 America s leading woodworking authority Premium Plan In this plan you ll find: Step-by-step construction instruction. A complete bill of materials. Construction drawings and related photos. Tips to help
About.com :
 http://woodworking.about.com/gi/dynamic/offsite.htm?sit...//www.popularwoodworking.com/features/fea.asp%3fid=1088 (1 of 8)1/28/2004 12:05:01 AM Modern Storage Tower The last thing I want to do when starting
Jeff Branch WOODWORKING YOU CAN BUILD A. By adding subtle design elements, a traditional furniture style becomes decidedly modern.
 Jeff Branch WOODWORKING YOU CAN BUILD A By adding subtle design elements, a traditional furniture style becomes decidedly modern. Jeff Branch WOODWORKING Publisher: Jeff Branch Editor: Jeff Branch Art
 America s leading woodworking authority To download these plans, you will need Adobe Reader installed on your computer. If you want to get a free copy, visit: http://adobe.com/ reader. Having trouble downloading
Build a Stout Workbench
 Build a Stout Workbench Tail vise is at the heart of this versatile bench by chris gochnour I ve done a fair amount of handplaning during my 32 years as a professional furniture maker, and I ve found that
Arched. Building an. Passageway. Although my company specializes in high-end jobs
 Building an Arched Passageway All photos by Brian Striegler This straightforward approach combines basic shop methods with simple site joinery to create an elegant frame-and-panel archway by Gary Striegler
ARTS AND CRAFTS CHAIR
 ARTS AND CRAFTS CHAIR 491 MATERIALS LIST--DINING CHAIR Key No. Size and description (use) A 2 1-3/4 x 1-3/4 x 16-1/4'' oak (front leg) B 2 1-3/4 x 3-3/4 x 40-1/2'' oak (rear leg) C 1 1-3/4 x 3-3/16 x 15''
woodworkersjournal.com MATERIAL LIST
 MATERIAL LIST T x W x L 1 Legs (2) 1 1 2" x 3 1 2" x 36 7 16" 2 End Uprights (2) 1 1 2" x 3 1 2" x 32 1 2" 3 Stringers (4) 1 1 2" x 3 1 2" x 42" 4 Top Cladding, Long (2) 3/4" x 7 1 4" x 65 3 4" 5 Side
Essential BOX JOINT JIG
 Essential BOX JOINT JIG Home in on precise finger joints with this table saw sled. By Ken Burton The box (or finger) joint is a remarkably strong, interlocking corner joint that can be quickly made on
Workbench. Process Guide
 Workbench Process Guide Design, Lumber, Tools & Nails Made entirely from 2x and 4x construction lumber Hardware speeds up the consturction while also reduces the amount of planing we have to do by using
Hinge Mortising Jig. One of the make it or break it parts of building a. 6 ShopNotes No. 74
 Hinge Mortising Jig A Mortise for a Hinge. Quick, clean, and accurate that s the only way to describe the mortise you get with a trim router and this hinge mortising jig. One of the make it or break it
Classic Kitchen Island
 America s leading woodworking authority Step by Step construction instruction. A complete bill of materials. Classic Kitchen Island Exploded view and elevation drawings. How-to photos with instructive
Build a Rolling Tool Tote
 The rolling tool tote design calls for readily available materials: a cheap hand truck (it could be an axle and two wheels), 3/4 and 1/2 thick plywood, 1/4 thick MDF (you could use plywood or hardboard)
Scratchbuild A Backwoods Water Tank Part V - Making the Frost Box and Hanging the Water Spout
 Scratchbuild A Backwoods Water Tank Part V - Making the Frost Box and Hanging the Water Spout By Dwight Ennis In this section, we're going to make the Frost Box, and we'll build the Spout Hanger Assembly
BUILDING A STORM DOOR
 BUILDING A STORM DOOR BY NEAL BARRETT Illustrations by George Retseck If you're in the market for a storm door, you probably know that there are many styles and models available. However, most of them
Pivot-Door Downdraft Cabinet Plans
 Pivot-Door Downdraft Cabinet Plans Finished Cabinet Closed Open Exploded View Introduction This simple downdraft-style dust collection cabinet is a great way to keep your shop cleaner and keep your router
Shop-Made Miter Clamps
 *Editor s note: In the photos showing the table saw, the blade guard has been removed for clarity. I try to be as self-sufficient as possible, so I like to manufacture my own tools whenever I can. I designed
Plans. Easy-to-Build Full-size Deluxe Murphy Bed Plan. For more plans, tools and hardware visit rockler.com
 Easy-to-Build Full-size Deluxe Murphy Bed Plan Build a full-size Deluxe Murphy Bed complete with decorative molding and matching side cabinets! Plans For more plans, tools and hardware visit rockler.com
Front Vise 70G G08.02
 Front Vise 70G08.01 70G08.02 The following instructions guide you through the installation of either the Regular Front Vise (70G08.01) or the Large Front Vise (70G08.02). The first step is to determine
Instructions for Real Good Toys 32 Miniatures Showcase. Kit #MS /10
 Instructions for Real Good Toys 32 Miniatures Showcase Kit #MS-600 04/10 Measure, identify, and label the parts Parts: (Measurements are approximate and are for identification purposes only) 2 Side 1/4
Reasons to Own a Shoulder Plane
 9 Reasons to Own a Shoulder Plane Fine-tune your joinery with these tips and techniques B y C h r i s G o c h n o u r It s easy to dismiss the shoulder plane as a specialty plane, another way of saying
GENERAL NOTES: Page 1 of 9
 Laminating A Zia Into A Turning Blank by W. H. Kloepping, Jan. 2009 This describes how a zia (the New Mexico state symbol) can be laminated into a turning blank. Materials needed: Square Turning Block
10 Easy-to-Build. Plywood Projects
 10 Easy-to-Build Plywood Projects Ten shop projects ten sheets of plywood. These rock-solid essentials take just a couple hours to build and will help you make the most of the space in your shop. All content
Stand & Bowls. optional. Online Extra
 Online Extra optional Stand & Bowls Once you make a bowl using the jig and technique from Woodsmith No. 229, it s only natural to see what else you can do with it. The starting point is to make copies
Tools and Tips: ( 1 )
") Tools and Tips: As you build instructions will show in my many picture manual how to assemble. You can use your own methods as you desire, my results are very good. A smooth, flat work surface is very
Tools and Tips: As you build instructions will show in my many picture manual how to assemble. You can use your own methods as you desire, my results are very good. A smooth, flat work surface is very
Durable Outdoor Table
 54 F I N E W O O D W O R K I N G Durable Outdoor Table Ipé table will seat six and weather many seasons B Y D A V I D B E D R O S I A N Last summer brought a new pool to our backyard. With it came more
The WoodWorker s Edge
 The WoodWorker s Edge Draw-leaf Game Table 1. 2. Layout the area for the tenons. The tenons are 3/8 thick x 4-1/2 long x 1-1/4 deep and offset to the inside. Create the tenons using the step method to
This is a solid wood cabinet. The only plywood used is for the back and drawer bottoms.
 Sideboard Sideboard Overview: This project requires basic woodworking skills and access to woodworking machines. Woodworking machines have sharp cutting edges and are NOT forgiving. You should be properly
Making a Massive Bookcase Step-by-Step
 Making a Massive Bookcase Step-by-Step Jeff Branch WOODWORKING The only thing challenging about this project is its huge size. By JFF BRANCH A t right is a rendering of my first woodworking project completed
Display Case (for J&S)
") Display Case (for J&S) This is constructed of maple plywood with solid maple (soft maple) edge banding. It was made to fit between a door and a kitchen cabinet, and has an elegant circular taper between
Display Case (for J&S) This is constructed of maple plywood with solid maple (soft maple) edge banding. It was made to fit between a door and a kitchen cabinet, and has an elegant circular taper between
Tools and Tips: ( 1 )
") Tools and Tips: As you build instructions will show in my many picture manual how to assemble. You can use your own methods as you desire, my results are very good. A smooth, flat work surface is very
Tools and Tips: As you build instructions will show in my many picture manual how to assemble. You can use your own methods as you desire, my results are very good. A smooth, flat work surface is very
Somewhere along the way, we ve
 Precision 60 FINEHOMEBUILDING.com Window Trim A systematic approach ensures better joints and a faster installation By Anthony Vitale Somewhere along the way, we ve decided that it s the apprentice s job
Jigsaw Puzzle Tray. Premium Plan. In this plan you ll find: America s leading woodworking authority
 America s leading woodworking authority Premium Plan In this plan you ll find: Step-by-step construction instruction. A complete bill of materials. Construction drawings and related photos. Tips to help
Grade 11 Woods Lift Lid Coffee Table. Based on Under the big Top from Popular Mechanics Website
 Grade 11 Woods Lift Lid Coffee Table Based on Under the big Top from Popular Mechanics Website TABLE TOP 1. Select enough lumber to construct a top that is between 22 ½ and 24 wide after jointing. Ensure
MODULE INTRODUCTION TO HAND TOOLS. (00103 LESSON 2 of 2) SLIDE PRESENTATION
 SLIDE PRESENTATION") MODULE 00103-09 INTRODUCTION TO HAND TOOLS (00103 LESSON 2 of 2) SLIDE PRESENTATION SLIDE 33A 12.0.0 SQUARES Squares are used for marking, checking, and measuring. The common squares are the carpenter
MODULE 00103-09 INTRODUCTION TO HAND TOOLS (00103 LESSON 2 of 2) SLIDE PRESENTATION SLIDE 33A 12.0.0 SQUARES Squares are used for marking, checking, and measuring. The common squares are the carpenter
Kentucky 4H Wood Science Plans Notebook. Plans Level 3
 Kentucky 4H Wood Science Plans Notebook Plans Level 3 MATERIALS: 2 pieces wood 3/4 x 10 x 4 1 piece wood 3/4 x 12 x 4 2 pieces wood 3/4 x 3 x 2 5 1/2" 2 pieces wood 3/4 x 3 x 1 8 1 piece wood 2 x 4 x
ining Table Materials *Notes on Materials
 D ining Table We looked around for the perfect table for the dining room. Some were too big, some too small, and most were just too expensive. So we built this one, and we are happy with the result. It
craftsman rocker Classic style meets comfort in this sturdy oak rocking chair BY MICHAEL PEKOVICH 34 FiNE woodworking
 craftsman rocker Classic style meets comfort in this sturdy oak rocking chair BY MICHAEL PEKOVICH 34 FiNE woodworking photo, this page: Michael pekovich shape the rear legs designing a chair can be a tough
Congratulations on your purchase of the Divided Light Door Set. This set will help you create beautiful cabinet doors with true divided light panels.
 Divided Light Door Set User Instructions Congratulations on your purchase of the Divided Light Door Set. This set will help you create beautiful cabinet doors with true divided light panels. Following
NEWCASTLE WOODWORKING
 NEWCASTLE WOODWORKING Seaswift Investments LLC SLIDING BABY / PET GATE DESIGN AND CONSTRUCTION NOTES AND ENGINEERING DRAWINGS BABY GATE TA11031.DOCX Page 2 PORTABLE DOCUMENT FORMAT (PDF) FILE The file
EXTREME LOAD no. TWO
 1602 - EXTREME LOAD no. TWO Kit Features: 22' 4 " x 14' x 3'-6 Oversize Load 49mm (1.9") actual height Bolt Head Details Welded Load Mounting Fins Painting Handles Tools Required: Hobby Knife Tweezers
Corner Cupboard. This space-saving piece enhances any room 46 FINE WOODWORKING
 Corner Cupboard This space-saving piece enhances any room BY G A R R E T T H A C K On every trip to the Shelburne Museum near Burlington, Vt., I visit a favorite object a small hanging corner cabinet.
Nojo Design: Large Step Cabinet: February 2012
 Nojo Design: Large Step Cabinet: February 2012 The largest single piece of furniture I ve ever made is this stepped cabinet. Finished piece is 8! tall and over 10 long. This project has been great, although
Seascape Bungalow Assembly instructions. Laser Dollhouse Designs
 Seascape Bungalow Assembly instructions Laser Dollhouse Designs NOTE: Please do a dry assembly using only tape to hold house together. This will get you familiar with parts, location, and fit. This also
REINFORCING THE CORNERS OF FLAT FRAMES
 REINFORCING THE CORNERS OF FLAT FRAMES There are a number of different methods that may be used to join flat frame sides together. As most Woodworkers know, end grain glue joints are not nearly as strong
15 Dovetail Jig. Instruction Manual. Part # 3452
 15 Dovetail Jig Instruction Manual Part # 3452 CAUTION: Please read, understand, and follow all manufacturers instructions, guidelines and owners manuals that come with your power tools. Peachtree Woodworking
Copyright WilkerDos.com Dining Table. Project Designed By April Wilkerson - Plan Created By Jay Bates (jayscustomcreations.
 Copyright WilkerDos.com 2017 Project Designed By April Wilkerson - Plan Created By Jay Bates (jayscustomcreations.com) Layout & Shopping List Page 2 of 12 Layout & Shopping List Item Quantity Description
Shopsmith Mobile Storage Cabinet.
 http://wwwinstructablescom/id/shopsmith-mobile-storage-cabinet/ technology workshop living food play outside Shopsmith Mobile Storage Cabinet by Beave2012 on May 3, 2015 Table of Contents Shopsmith Mobile
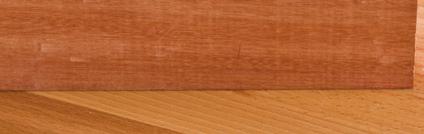
a. Select timber that is straight and free of defects b. For the best results use timber that is quarter sawn
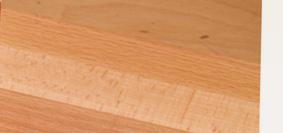
 Once regarded as the only way of obtaining wide panels made from solid timber. These wide panels were required for carcase construction, counter and bench tops also door and wall panelling. Modern "flat
Ways to get the most out of your
 5 Ways to get the most out of your router table When you mount a router on a table, you expand your shop s potential. To help you take advantage of this potential, we assembled five router table techniques
rmoire Materials Hardware
 A rmoire No house ever has enough storage space, and I built this armoire to satisfy a couple of needs. Inside the armoire is a shelf large enough for the television. Under the shelf are six drawers that
Tilt-Top Table. Clean lines and a clever pivot highlight this attractive and useful table
 Tilt-Top Table READY FOR DINNER swing the top down and you have a beautiful table ready for a cozy meal. 60 SMALL FOOTPRINT with the top swung up, the table fits neatly against a wall, freeing up floor
COMPLIMENTARY WOODWORKING PLAN
 COMPLIMENTARY WOODWORKING PLAN Bookcase This downloadable plan is copyrighted. Please do not share or redistribute this plan in any way. It has been created for Wilton Tools, a division of WMH Tool Group.
135 ROLLTOP DESK 515
 135 ROLLTOP DESK 515 For the person who hates to clear off a desk, who wants to leave everything where it is overnight yet still have the clutter hidden, a rolltop desk is a godsend. The tambour hides
Shoulder Plane. dovetailed. fine tools. Make an heirloom tool and learn the secret to creating double dovetails in metal it s easier than you think.
 fine tools dovetailed Shoulder Plane Make an heirloom tool and learn the secret to creating double dovetails in metal it s easier than you think. I ve always been fascinated by old, metal hand planes.
Celebrate 100 years of PM with the fourth in our furniture series.
 Anniversary Desk Celebrate 100 years of PM with the fourth in our furniture series. With all the business involved in running a home, it's no wonder most of us run out of space to handle the paperwork.
Tools: Scissors, hand held single-hole punch, metal ruler or other good straight-edge, sharp knife or Exacto-knife.
 Instructions for Building a Kepler Paper Model Version 30 Mar 3, 2010 You need the following files: File Sheet # Printer Paper Color Kepler_model_instructionspdf plain b/w Photometerpdf 1 Photo stock color
Extendable Large Dovetail Jig
 Extendable Large Dovetail Jig Instruction Manual Part # 3458 CAUTION: Please read, understand, and follow all manufacturers instructions, guidelines and owners manuals that come with your power tools.
Mid-Century Credenza Thoughtful details and modern joinery merge in this sleek design
 Mid-Century Credenza Thoughtful details and modern joinery merge in this sleek design BY LIBBY SCHRUM Mid-Century Modern furniture has not been wildly popular since, well, the mid-century. But fashion
Frameless Inline Door With Return QCI5263
 INSTALLATION INSTRUCTIONS Frameless Inline Door With Return QCI5263 WALL MOUNT HINGES FRAMELESS DOOR / PANEL / RETURN PANEL QCI5263 REV. 0 Page 1 Certified 06/17/2016 Parts List with wall mount hinges
Computer Desk. Project designed by April Wilkerson
 Project designed by April Wilkerson Copyright WilkerDos.com 2018 Project plan Desk Page 2 of 16 Page 3 of 16 File cabinet Page 4 of 16 Metal base Page 5 of 16 Glue up Get started by gluing up boards for
Woodline USA Woodline Spacer Fence System
 Woodline USA Woodline Spacer Fence System MADE IN THE USA Includes: (1) ¼ Spacer Fence (1) 3/8 Spacer Fence (1) ½ Spacer Fence (1) Hardware Package (1) 3 Piece Brass bar set (2) Setup Blocks Visit Us Online
Nanton Grain Mill Assembly
 ( 1 ) Nanton Grain Mill Assembly Locate package for assembling storage building. These are cut from 1/8 masonite. Inspect and lightly sand edges where it will be bonded. Use white glue or CA glue to bond.
FORWARD FUSELAGE SIDES & REAR TOP SKINS
 FORWARD FUSELAGE SIDES & REAR TOP SKINS WORK REPORT Step No. Check Parts / Tools Qty Preparations. 1 [ ] 6F5-3 Upper Front Longerons 2 2 [ ] 6F5-5 Heel Support 1 3 [ ] 6F5-2 Front Floor Skin 1 3 [ ] Firewall
Shop Projects. Plans NOW. Each Built from One Sheet of Plywood!
 Plans NOW www.plansnow.com 5 Shop Projects Each Built from One Sheet of Plywood! Tool Tote - Sawhorse - Workbench - Wood Bin - Wall Cabinet PLUS: 7 SHOP SECRETS Working with Plywood Dread the thought of
WOOD TOY NEWS SANDING DRUMS & JIGS ISSUE
 WOOD TOY NEWS SANDING DRUMS & JIGS ISSUE toymakingplans.com June 11, 2014 Wednesday How to Make a Sanding Drum Jig for Smarter Toymaking. By Imants Udris Udie Our discussion begins based on the 5 piece
Laminated Furniture Components
 Laminated Furniture Components Dec 2010 Woodworkers Simple Round Cherry Table Fritz Smith Cherry - 2008 Woodworkers 2 Snowboard Bench Fritz Smith White Oak Snowboard - 2009 Woodworkers 3 Fritz Smith Shell
Tilt-Top Table Elegant project builds hand-tool and machine skills
 Tilt-Top Table Elegant project builds hand-tool and machine skills BY M A R I O R O D R I G U E Z As a woodworking instructor, I m always looking for interesting and challenging projects to present in
136 PLYWOOD DESK 522
 136 PLYWOOD DESK 522 Simple in design and inexpensive, this plywood desk is made from a single 4- x 8-foot panel. Plywood is available with many hardwood veneers; it can also be covered with plastic laminate,
Christmas Bell Ornament
 Christmas Bell Ornament This is an easy Christmas ornament idea I cabbaged from a friend and skilled turner, Curt Fuller, from Utah. I kind of adapted it to my style but I still got the idea from him.
Building the Cathedral
 Building the Cathedral Please note that the cathedral is a fairly difficult and time consuming project. I strongly suggest building one or two easier models before tackling this one! Four molds are needed
Kitchen Base Cabinet: Multiple Drawers Cabinets from Scratch
 Kitchen Base Cabinet: Multiple Drawers by Cabinets from Scratch Our Home from Scratch LLC Page 1 Disclaimer Our Home from Scratch LLC and its legal owners cannot be held responsible for any loss, damage,
Hardware and Components:
 Hardware and Components: (A) 5/16 x 2 Hex Bolt (B) 5/16 x 2-1/4 Hex Bolt (C) 5/16 x 2-1/2 Hex Bolt (D) 4X 5/16 x 3/4 Hex Bolt (E) 4X 5/16 x 1-1/4 Hex Bolt (F) 11X 5/16 Flat Washer (G) 12X 5/16 Nylock Nut
ENJOY THIS SELECTION FROM. Pocket Hole Joinery. Pocket Hole. Joinery Bookshelf Day bed Mirror/picture frame Dresser Bathroom vanity...and More!
 t ENJOY THIS SELECTION FROM Pocket Hole Joinery Pocket Hole Joinery Bookshelf Day bed Mirror/picture frame Dresser Bathroom vanity...and More! Mark EdMundson To purchase your copy of Pocket Hole Joinery,
Tall Outdoor Chair Set March/April 2018
 Tall Outdoor Chair Set March/April 2018 Traditional, low-slung Adirondack chairs are an enduring favorite among woodworkers, because their casual styling makes them easy to build. But, once you re seated
Complete Dovetail Jig Instructions
 Complete Dovetail Jig Instructions 15 18 4 3 1 12 13 8 19 17 16 6 14 5 9 11 10 2 9 PARTS LIST - Complete Dovetail Jig Introduction Your new dovetail jig will cut Full Through Dovetails and three varieties
Perfect Tapers. on the Tablesaw. Make tapered legs of all types, quickly and safely
 Perfect Tapers on the Tablesaw Make tapered legs of all types, quickly and safely B Y S T E V E L A T T A 30 F I N e W o o D W o r K I N G COPYRIGHT 2012 by The Taunton Press, Inc. Copying and distribution
Flamingo. That s what I looked
 Plans N O W w w w. P l a n s N O W. c o m flip-seat Storage Bench Flamingo. That s what I looked like as I stood in the doorway perched on one leg, with my other foot raised so that I could untie the laces
Building Tips This model can be built using the following types of adhesives:
 Page 1 Building Tips This model can be built using the following types of adhesives: Epoxy (with or without microballons) Odorless cyanoacrylate (CA) with accelerator UHU Creativ for Styrofoam (or UHU
Can-Do Can Crusher. America s leading woodworking authority. Step by Step construction instruction. A complete bill of materials.
 America s leading woodworking authority Can-Do Can Crusher Step by Step construction instruction. A complete bill of materials. Exploded view and elevation drawings. How-to photos with instructive captions.
You Can Build an Architectural Bookcase
 Jeff Branch WOODWORKING You Can Build an Architectural Bookcase Heavy moldings bring this project to life. By JEFF BRANCH I am drawn to architecture. In particular, I like the orderly nature of Palladian
PROJECT PLAN TOOL CHEST
 BUILD IT WITH ROCKLER PROJECT PLAN TOOL CHEST FEATURING ROCKLER S BUILD QUESTIONS? Go to www.rockler.com or call 800-279-4441 Stock # Item 63420 1/4" x 24" x 30" Baltic Birch Plywood 63446 1/2" x 24" x
PROJECT PLAN MODERN COFFEE TABLE
 BUILD IT WITH ROCKLER PROJECT PLAN MODERN COFFEE TABLE With its clean lines and striking geometry, this coffee table will lend iconic midcentury modern style to any living space. And you can build it yourself
Exterra Installation Guide
 Exterra Installation Guide Installing the foam padding Please review this installation guide before you begin installing the floor. If you have any questions, please call us at 800-428-5306 any time Monday
Real Good Toys 10 Quarry St Barre, VT
 Real Good Toys Special Edition Kit #SE-RR 29 /5 Congratulations on your choice of a Real Good Toys product. Your kit has been precision made with meticulous care by our craftspeople using carefully selected
Next-Generation Router Table
 Next-Generation Router Table Make more accurate cuts with a flat, solid-surface top. by John English 2 AmericanWoodworker.com 9 Key Features 1. Hinged Top. Bit changes are much easier. 2. Pivot Control.
Chapter 16. Underlayment and Finish Stairs
 Chapter 16. Underlayment and Finish Stairs 16.1 INSTALLING UNDERLAYMENT & DRICORE 16.2 FINISHING STAIRS Tools needed by volunteers: Hammer Nail apron Tape measure Tools and equipment needed: Extension
Cherry Chest of Drawers. Dovetail joinery decorates this Shaker-inspired case piece
 Cherry Chest of Drawers Dovetail joinery decorates this Shaker-inspired case piece BY M I C H A E L P E K O V I C H DRESSER CONSTRUCTION Case top Rabbet, 9 6 in. deep 4 in. 0 7 8 in. 9 2 in. 4 in. Top
Serving Tray. When some good friends got married recently, An exercise in template-making yields a great gift project that s easy to duplicate
 Serving Tray An exercise in template-making yields a great gift project that s easy to duplicate END Create from 3 8 2 8" piece. By Geoff Noden When some good friends got married recently, I decided to
Kitchen Upper Cabinet: Single Door Cabinets from Scratch
 Kitchen Upper Cabinet: Single Door by Cabinets from Scratch Our Home from Scratch LLC Page 1 Disclaimer Our Home from Scratch LLC and its legal owners cannot be held responsible for any loss, damage, disappointment,
Redwood strips are tacked to the templates, and edge-glued. Drive brads through into the templates before putting on fiberglass doth.
 1 Make the building form and attach templates to the crosspieces. Nail a strip down the center to hold the stems and templates in position. prototype canoe took about three weekends to build. She's broad
HEAVY-DUTY WORKBENCH
 HEAVY-DUTY WORKBENCH 2009 August Home Publishing Co. Feature Project Heavy-Duty Workbench For a low cost and a weekend of work, you can build a large, rocksolid workbench that s sure to last a lifetime.
router table sled 2012 August Home Publishing Co.
 router table sled 2012 August Home Publishing Co. best-built jigs & fixtures router Table Sled Packed with features, this sled makes it easy to rout perfect-fitting joints. A router table is a great tool
Router Table. In a recent article, I wrote about the router table I built for the Center. 5 Essential Jigs for the
 5 Essential Jigs for the Router Table Great fixtures and fences offer better control and new possibilities BY PETER SCHLEBECKER In a recent article, I wrote about the router table I built for the Center
Demilune 4. Apron Joinery. Curved Apron Tenon. Bridle Joint Legs. Bridle Joint Front Apron
 Demilune Email 4 Apron Joinery There are two types of joints used in connecting the aprons and legs. The rear legs use conventional mortise and tenon joints, while the front legs use the less conventional
Router Table. Construction
 Router Table A router table is an invaluable tool. The problem, however, is that ready-built router tables are usually relatively expensive and too narrow for many projects. This router table provides
Corner Cabinet. American. There is something about corner cabinets that spooks
 American Corner Cabinet The triangular shape of this project puts off most woodworkers. Here s a secret: It s actually quite easy to build. There is something about corner cabinets that spooks most woodworkers.