Workbench. Process Guide
|
|
|
- Branden Moody
- 5 years ago
- Views:
Transcription


1 Workbench Process Guide


2 Design, Lumber, Tools & Nails Made entirely from 2x and 4x construction lumber Hardware speeds up the consturction while also reduces the amount of planing we have to do by using the cup of the board to cinch the parts in place. We get a good intro to mortise and tenon and bridle joinery as well. If you can t find 4x4s you can laminate boards together to get the thickness you need but pressure treated 4x4s will also work. Just wear a dust make while cutting it and be aware it will likely be very wet and liable to check over time. The checking won t hurt anything but you may not like the look. See parts list on opposite page for the Lumber Shopping list The planing stop can be made from any old scrap of hardwood. Since it is so thin you should be able to source it easily even from Big Box racks SAVE YOUR RECEIPT for your hardware as you may only need half the amounts of bolts depending on how your boards are cupped. Tools Needed See the tool list on the Orientation main page for full details Hardware store saw Jack plane 1 chisel 3/8 and 1 auger and brace Use a 4x4 offcut for your mallet Knife for marking

3 Workbench Parts List do NOT cut parts to these sizes at first but leave slightly longer (add 1 at least) so that adjustments can be made during the build if necessary 4 Legs: 3.5 x 3.5 x 32-36* 2 lower stretchers: 3.5 x 3.5 x 21 2 upper stretchers: 3.5 x 3.5 x 24 2 aprons: 1.5 x 11.5 x 72** 3 braces: 3.5 x 3.5 x 24 2 tops: 1.5 x 11.5 x 72** Planing Beam: 1.5 x 5.5 x 72 3/4 x 36 Oak Dowelling 3/8 x 36 Oak dowelling 1/4 x 4 x 11 Hardwood of your choice use your off cuts for blocking on the aprons and underneath the top Lumber Shopping List (4) 4x4x8 Douglas Fir (4) 2x12x8 Pine 2x6x8 Pine 3/8 x 36 Oak dowel 3/4 x 36 Oak dowel A scrap of hardwood for the planing stop Hardware (6) 3/8x4 Lag Screws (4-8) 1/2x6 Carriage Bolts (4-8) 1/2x4 Carriage Bolts (6) 3/8 Brass Ball Catches *leg lengths will vary based upon how tall you want to make your bench. The total boards listed here will be plenty long enough to accommodate every height. See Chapter 2.1 for more details on setting your bench height **this design can be made longer or shorter if you choose just by adjusting the lengths of the aprons and top boards. Everything else in the design remains the same, but you may need an extra 2x12 since you won t have offcuts to use as blocking behind your aprons and under the top.


4 Determine Your Workbench Height The lengths of the legs determine how tall your bench will be. I like a workbench like this to be palm height but you may feel differently and need to experiement a bit to figure out what is comfortable. When in doubt make the bench a bit taller than you think as you can always saw off the legs later. I made my bench a bit taller than my Roubo at my home shop at 35. Rember to subtract the thickness of the top boards from your desired height The key is to gang layout all the legs so they end up at the same legnths by using a reference surface like another board or the wall to line them all up and make them. Saw Accurately Now, Save Time Later Saw the leg to legnths as precisely as possible so you don t have to plane the difficult end grain. Layout your cut lines all the way around the 4x4 and saw each face with a shallow kerf. You can rotate the blank away or towards you and reference off the last kerf until you are scored on all for sides and the kerfs will guide your saw as you complete the cut. If worst comes to worst you may have to plane away a bit of the raised area in the middle of the end but mostly likely you can leave these legs alone until we have them assembled later.


5 Mortise & Tenons and Bridle Joints The king of joints and a fun variation The stretchers should be laid out from the shoulders, spacing them 17 apart and at least 2 of length for the tenons. With the first stretcher laid out, transfer your lines to the other stretcher. Layout a 1 wide tenon centered on the stretcher and 2 long. Saw the shoulders then saw the tenon cheeks. You can also split out the cheeks Use your 1 chisel to pare across the grain to fit the tenon. Layout a mortise 6 from the bottom of the leg and knife in the extents. Then knife in a center line. Bore 4 1 holes on the centerline. Pare the cheeks back to the lines and chop back on the end grain. Use a scrap block as a mallet. Fit the tenon to the mortise. If necessary pare the tenon cheeks to fit rather than paring the mortise walls. Layout the top stretcher the same as the lower but with longer, 3.5 tenons. Assemble and clamp using a windlass or clamps and lay out the mortise. Saw the cheeks of the bridle then bore out the root of the bridle with a 1 auger bit to gree the waste. Chop and pare back to the layout line. Fit the bridle joints to complete the leg assemblies. Don t stress over the look of the bridles as we will be sawing them later for the notches for the aprons.


6 Remove the tenon from the mortise and bore a 3/8 hole all the way through the mortise Resinsert the tenon and mark the hole location with the same 3/8 auger. Move that mark 1/16 towards the tenon shoulder and make a new mark Bore the 3/8 hole through the tenon on the new mark. Cut off a 6 section of 3/8 dowel and and point the ends using your knife. This pointing allows the peg to navigate around the offset and is essential to prevent the peg from hanging up or potentially blowing out the far side of the mortise. Reassemble the joint with or without glue, the drawbore doesn t need glue but I find it to be extra insurance to add some glue to the mix Insert the peg and begin to tap it through. I prefer a metal hammer for this work as it gives me better feedback. The peg will start to bind but keep tapping until you feel the resistance loosen up. Leave the pegs proud on both faces and saw and plane flush. With the 2 leg assemblies permanently joined, clamp them together and run them up against a stop or clamp them to a heavy object. I used the support post in the garage. Plane them together to flatten out the top surface but more importantly ensure that they are co-planar and the tops will rest cleanly and evenly on the leg assemblies.


7 Aprons Tie Together the Leg Assemblies Wide Aprons double as work holding and stretchers to stabilize the workbench. Bolts flatten any cup in the 2x12s Saw the aprons to length Layout a triangle on the bottom corners 6 from the top and from the end. Then saw that out. Ensure that the cupped face goes towards the legs Chamfer the long edges using a chisel. Show the aprons to the leg assemblies and flush them to the tops. Make sure the legs are square to the tops of the aprons then mark the intersection of the bottom of the apron to the leg. Layot a notch 1.5 deep and saw the front of the leg. I sawed mine before assembly but discovered sawing afer assembly was easier to hold. Use off cuts to flank the legs on the back side of the aprons. These should be oriented with the grain and glued in place. I used screws as my clamps while the glue dries. These offcuts both improve the connection of the aprons but add thickness for holdfasts later. Bore 1/2 holes in the center of the apron and bolt them to the legs.


8 Braces Add Some Strength and Anti Racking Your 3 brace pieces chould already be close to size as they are made up of the offcuts from the legs and stretchers. Leave them long for now Capture the legnth between the aprons and layout half lap shoulders on the braces just like we did with the stretcher tenons. The half lap is half the brace thickness and as deep as the aprongs plus whatever overlap you have in the existing length of the brace piece. This material splits away easily once the shoulder is sawn Lay the brace in place across the aprons Ensure it is square and knife around the laps to locate the mating notches. Set the depth of the notce to the exisiting brace tongue Saw the extents of the notch and place several morten cuts in between. Chop away the waste roughly at first and it will split away cleanly As you get about halfway to your baseline, switch to a light paring cut and work your way down to the lines If necessary undercut this notch slightly Fit the brace in place, it should be snug Bore a 3/8 hole or 5/16 if you have a bit for that. Wax your lag screws and seat the braces onto the aprons.


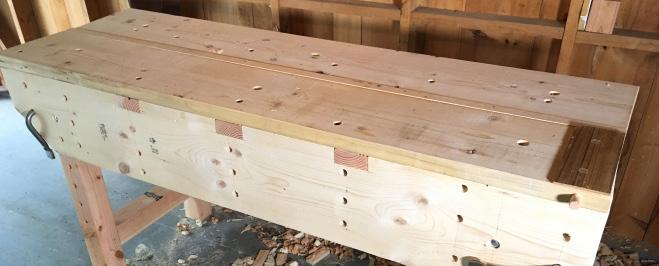
9 Check Your Assembly for Wind Again Any old straight -ish edge will work here. Even a single straight edge and a fixe element like wall trim in the background will help you determine if your aprons are in wind at all. I happen to have 2 pieces of scrap from a previous project but honestly even a few 2x4s will do the job here. Plane out any twist by focusing only on the high spots and then move on to sawing the top boards to final length. Position the top on the bench leaving a consistent 1 1/2 gap between them. Place the cup down on the bench top and bore a 1/2 hole through the center of the top board and into the top stretchers and the braces below. You may not need to bore a hole at each brace location. I skipped one of them as it felt like overkill. Hammer the carriage bolt in place and tighten with a washer and nut underneath. The centered bolt will flatten out the cup while simultaneously cinching the ends of the top boards tightly against the aprons and braces.


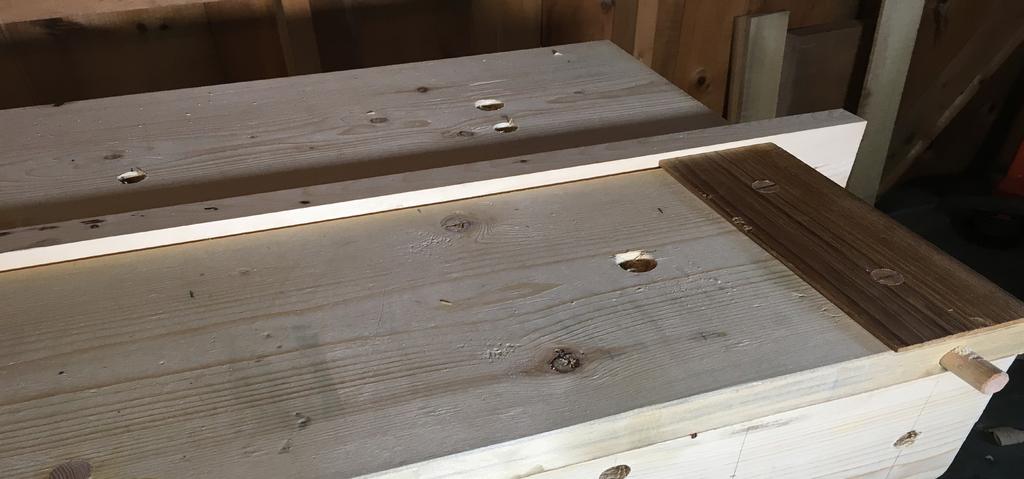
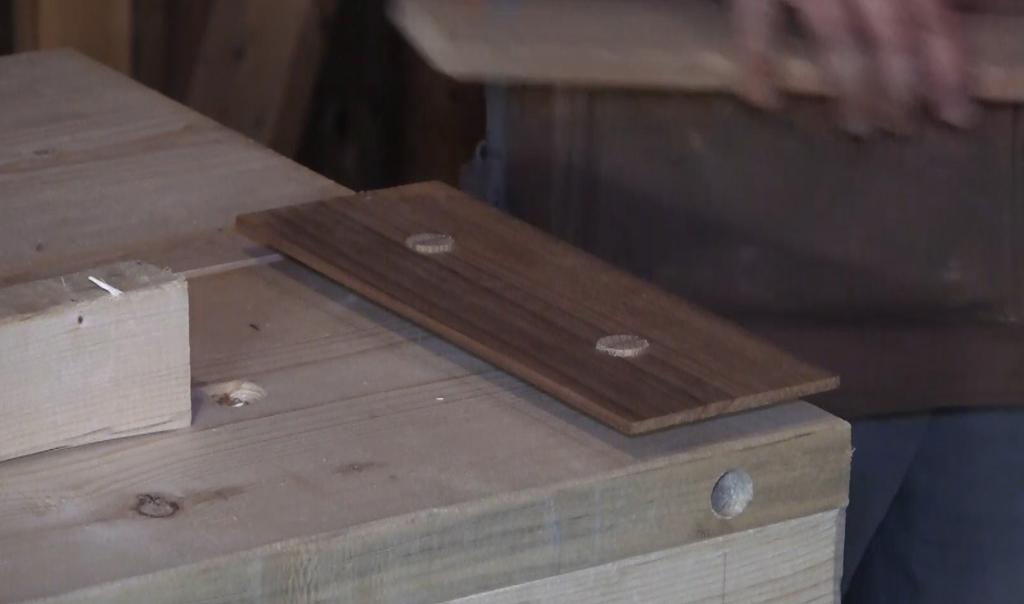
10 Work holding on the Viseless Workbench Plane the 2x6 face until it fits snugly in the top gap but not so snugly that it can t be moved easily. Mark the location of each brace and layout a notch that allows the planing beam to sit flush with the top Layout a notch to the right 1/2 shallower and one to the left 2 shallower. Saw and chop out the notches Set the beam to match the thickness of the stock to be planed to allow for across the grain planing. Bore dog holes with the 3/4 auger bit. Place your head on the pad of the brace to help you create square holes Locate dog holes along the back bench so the holdfasts reach across the planing beam and are spaced the diameter of the holdfast reach. Bore a line of holes 2 in from the front edge and spaced again the diameter of the holdfast reach. Bore holes 3 on center down the legs and 12 apart down the apron. Cut 6 lengths of 3/4 dowel Make a crosscut 1/8 deep 2 from one end of the dowel Chop away the waste and pare the face flat Bore a 3/8 hole 1/2 below the notch Press a ball catch into the hole to complete the bench dog Cut 2 7 long pieces from the Oak dowel Plane a scrap of hardwood to 1/4 x 4 x 11 Bore 3/4 dog holes 2 from the end of the bench Clamp the stop in place and mark the hole locations with the auger bit from beneath the bench. Bore 3/4 holes through the stop Saw a kerf on one end of each dowel Pare a few wedges from scrap and drive them into the dowel to lock the pegs into place and complete the planing stop.
11
I then moved on to the legs assemblies. The legs are simply three pieces of 1 ½ in x 4 ¼ in stock glued up, planed and jointed to 4 in x 4in.
 Nicholson Workbench Another workbench? Does this guy have nothing better to do than build one workbench after another? First off, this one is not for me. I recently received a commission to build a Nicholson
Tool Box. Process Guide
 Tool Box Process Guide Design, Lumber, & Nails Needed Designed from typical big box lumber dimensional lumber to minimize the rip cuts Added feet to allow the box to sit on uneven surfaces Add a sliding
Cheap, Sturdy Workbench Christopher Swingley
 Introduction heap, Sturdy Workbench hristopher Swingley The following bench is an inexpensive version of the Roubo workbenches shown in The Workbench ook by Scott Landis [1]. It s basically just a sturdy
Copyright WilkerDos.com Dining Table. Project Designed By April Wilkerson - Plan Created By Jay Bates (jayscustomcreations.
 Copyright WilkerDos.com 2017 Project Designed By April Wilkerson - Plan Created By Jay Bates (jayscustomcreations.com) Layout & Shopping List Page 2 of 12 Layout & Shopping List Item Quantity Description
Tilt-Top Table. Clean lines and a clever pivot highlight this attractive and useful table
 Tilt-Top Table READY FOR DINNER swing the top down and you have a beautiful table ready for a cozy meal. 60 SMALL FOOTPRINT with the top swung up, the table fits neatly against a wall, freeing up floor
Floating-Top Table. Creative joinery adds spark to this versatile piece
 Floating-Top Table Creative joinery adds spark to this versatile piece By Michael Pekovich 28 FINE woodworking This is one of those projects that almost wasn t. Rachel, my wife, had asked for a small,
WOODWORKING GUIDE: BASIC JOINERY
 WOODWORKING GUIDE: BASIC JOINERY Close isn't really good enough. A perfect fit is what counts. When building furniture, there are many ways to construct joints. The simplest are those that use mechanical
BUILDING A STORM DOOR
 BUILDING A STORM DOOR BY NEAL BARRETT Illustrations by George Retseck If you're in the market for a storm door, you probably know that there are many styles and models available. However, most of them
Build a Michigan Sloyd. Spoon Mule
 Build a Michigan Sloyd Spoon Mule Contents Materials Choosing and milling wood.... 3 Base Legs.... 4 Rails.... 5 Seat Assembly and shaping...10 Fin options....10 Riser Assembly....11 Wedge....12 Head Laminations....13
The WoodWorker s Edge
 The WoodWorker s Edge Draw-leaf Game Table 1. 2. Layout the area for the tenons. The tenons are 3/8 thick x 4-1/2 long x 1-1/4 deep and offset to the inside. Create the tenons using the step method to
Shoulder Plane. dovetailed. fine tools. Make an heirloom tool and learn the secret to creating double dovetails in metal it s easier than you think.
 fine tools dovetailed Shoulder Plane Make an heirloom tool and learn the secret to creating double dovetails in metal it s easier than you think. I ve always been fascinated by old, metal hand planes.
Ratcheting and Angled Leg Vises. Ratcheting Parallel Guide
 Ratcheting and Angled Leg Vises Ratcheting Parallel Guide In Scott Landis s The Work Bench Book there is a drawing of a ratchet mechanism for a parallel guide. It was one of those little tidbits I tend
Pivot-Door Downdraft Cabinet Plans
 Pivot-Door Downdraft Cabinet Plans Finished Cabinet Closed Open Exploded View Introduction This simple downdraft-style dust collection cabinet is a great way to keep your shop cleaner and keep your router
woodworkersjournal.com MATERIAL LIST
 MATERIAL LIST T x W x L 1 Legs (2) 1 1 2" x 3 1 2" x 36 7 16" 2 End Uprights (2) 1 1 2" x 3 1 2" x 32 1 2" 3 Stringers (4) 1 1 2" x 3 1 2" x 42" 4 Top Cladding, Long (2) 3/4" x 7 1 4" x 65 3 4" 5 Side
Grade 11 Woods Lift Lid Coffee Table. Based on Under the big Top from Popular Mechanics Website
 Grade 11 Woods Lift Lid Coffee Table Based on Under the big Top from Popular Mechanics Website TABLE TOP 1. Select enough lumber to construct a top that is between 22 ½ and 24 wide after jointing. Ensure
Front Vise 70G G08.02
 Front Vise 70G08.01 70G08.02 The following instructions guide you through the installation of either the Regular Front Vise (70G08.01) or the Large Front Vise (70G08.02). The first step is to determine
World. Old. Dining Table YOU CAN BUILD AN
 YOU CAN BUILD AN Old World Dining Table This design combines heavy oak timbers with period specific elements. The result brings an old world look to a modern sized dining table. Publisher: Jeff Branch
Essential BOX JOINT JIG
 Essential BOX JOINT JIG Home in on precise finger joints with this table saw sled. By Ken Burton The box (or finger) joint is a remarkably strong, interlocking corner joint that can be quickly made on
Framework joints FABRICATION - WOOD JOINTS. Corner joints. Tee joints. Worksheet 15a. Cable Educational Ltd
 FABRICATION - WOOD JOINTS The word: fabricate means to join together. Most wooden products are held together with adhesive. Adhesive works very well when the edge of a piece of wood is being glued to the
World. Old. Dining Table YOU CAN BUILD AN
 YOU CAN BUILD AN Old World Dining Table This design combines heavy oak timbers with period specific elements. The result brings an old world look to a modern sized dining table. Publisher: Jeff Branch
Demilune 4. Apron Joinery. Curved Apron Tenon. Bridle Joint Legs. Bridle Joint Front Apron
 Demilune Email 4 Apron Joinery There are two types of joints used in connecting the aprons and legs. The rear legs use conventional mortise and tenon joints, while the front legs use the less conventional
Building a Sawbench. Precision Sawing at The Woodwright's School August 2010
 Building a Sawbench Precision Sawing at The Woodwright's School August 2010 Introduction: Though I work with both machinery and hand tools, I consider a pair of traditional old-school sawbenches to be
craftsman rocker Classic style meets comfort in this sturdy oak rocking chair BY MICHAEL PEKOVICH 34 FiNE woodworking
 craftsman rocker Classic style meets comfort in this sturdy oak rocking chair BY MICHAEL PEKOVICH 34 FiNE woodworking photo, this page: Michael pekovich shape the rear legs designing a chair can be a tough
Chapter 23. Garage Construction
 Chapter 23. Garage Construction 23.1 ESTABLISHING CHALK LINES 23.2 MEASURING AND CUTTING WALL PLATES 23.3 MARKING WINDOW & DOOR LOCATIONS ON EXTERIOR WALL PLATES 23.4 MARKING STUDS ON EXTERIOR WALL PLATES
The Moravian Workbench by Will Myers
 The Moravian Workbench by Will Myers I know what you are thinking, Isn t this the guy who wrote the long droning article about building a Roubo work bench a few months ago? How many work benches does this
Dining Table with Two-Way Drawers
 Dining Table with Two-Way Drawers DOUBLE-FRONTED DRAWERS MAKE THIS PIECE UNIQUE With two drawer fronts, a center beam, plywood bottoms, and custom pulls, these drawers are both distinctive and durable.
Hinge Mortising Jig. One of the make it or break it parts of building a. 6 ShopNotes No. 74
 Hinge Mortising Jig A Mortise for a Hinge. Quick, clean, and accurate that s the only way to describe the mortise you get with a trim router and this hinge mortising jig. One of the make it or break it
Chain Drive Vise. Installation Instructions. (revised 11/29/2018)
") Chain Drive Vise Installation Instructions (revised 11/29/2018) Lie-Nielsen Chain Drive Vise Instructions Table of Contents page About Your Chain Drive Vise 3 Parts List 4 Exploded Parts Diagram 5 step
Chain Drive Vise Installation Instructions (revised 11/29/2018) Lie-Nielsen Chain Drive Vise Instructions Table of Contents page About Your Chain Drive Vise 3 Parts List 4 Exploded Parts Diagram 5 step
Project 13586EZ: Writing Desk. Writing Desk Materials List
 Project 13586EZ: Writing Desk This writing desk will make a handsome addition to just about any room in the house. The one shown is made of cherry, a logical choice for a piece like this, but mahogany
Trestle Table and Benches Materials List
 Project 18444EZ: Trestle Table and Benches In the early days of our country, trestle tables were popular because they could easily be disassembled and moved out of the way when not in use no small advantage
Apartment Dining Table
 Jeff Branch WOODWORKING You Can Build an Apartment Dining Table By JEFF BRANCH H ave you ever found yourself wanting a new piece of furniture, but everything you see in stores is too big? Big furniture
Chapter 1. Beam and Sill Plates
 Chapter 1. Beam and Sill Plates 1.1 ESTABLISHING SQUARE SILL PLATE CHALK LINES 1.2 INSTALLING TREATED SILL PLATES 1.3 INSTALLING LAMINATE BEAM Tools needed by volunteers: Hammer Nail apron Tape measure
Tilt-Top Table Elegant project builds hand-tool and machine skills
 Tilt-Top Table Elegant project builds hand-tool and machine skills BY M A R I O R O D R I G U E Z As a woodworking instructor, I m always looking for interesting and challenging projects to present in
A candle stick addresses transferring and reproducing dimensions from a plan and breaking the project into steps.
 Activities Discussion These projects allow more skill development including making items to match a drawing, sizing projects to specific dimensions, and just trying fun stuff for the first time! A candle
Silverware Chest Plan
 Silverware Chest Plan 05L14.01 Introduction 1. Measure the space required for your cutlery before beginning this project to be sure that it will fit in the drawers and top compartment. The best way to
ENJOY THIS SELECTION FROM. Woodworking 101. Includes Step-by-Step Instructions for 8 Projects. Woodworking
 W ENJOY THIS SELECTION FROM Woodworking 101 Includes Step-by-Step Instructions for 8 Projects Woodworking 101 Aimé Fraser, Matthew Teague, and Joe Hurst-Wajszczuk To purchase your copy of Woodworking 101,
Traditional glass-pane and wood-muntin doors highlight this free-standing piece.
 Bookcase Traditional glass-pane and wood-muntin doors highlight this free-standing piece. As the saying goes, there's nothing like good books. But they can present some storage problems--especially if
Butterfly Leaf Dining Table Plans
 Butterfly Leaf Dining Table Plans Part 1 An attractive dining table with a secret: the leaf folds and stores inside the table. Season 1, Episode 7 P a g e 2 I first saw a butterfly leaf table in a back
Can-Do Can Crusher. America s leading woodworking authority. Step by Step construction instruction. A complete bill of materials.
 America s leading woodworking authority Can-Do Can Crusher Step by Step construction instruction. A complete bill of materials. Exploded view and elevation drawings. How-to photos with instructive captions.
Build a Stout Workbench
 Build a Stout Workbench Tail vise is at the heart of this versatile bench by chris gochnour I ve done a fair amount of handplaning during my 32 years as a professional furniture maker, and I ve found that
Dovetail Saw Guides. Figure 1: Dovetail saw guide, exploded view. Guide Block. UHMW Friction Pad. Sliding Clamp. Rare-Earth Magnet
 Dovetail Saw Guides U.S. Pat. No. 6,607,016 Dovetail joints have traditionally been the hallmark of a cabinetmaker who had acquired an expert level of skill. They are also a mark of quality and attention
129 KITCHEN BASE CABINET 480
 129 KITCHEN BASE CABINET 480 There are two sorts of kitchen cabinets: base cabinets, which sit on the floor, and wall cabinets. Base cabinets provide both storage space and work surfaces. They often house
Serving Tray. When some good friends got married recently, An exercise in template-making yields a great gift project that s easy to duplicate
 Serving Tray An exercise in template-making yields a great gift project that s easy to duplicate END Create from 3 8 2 8" piece. By Geoff Noden When some good friends got married recently, I decided to
Chapter 18. Interior Doors
 Chapter 18. Interior Doors 18.1 SWINGING DOORS 18.2 SLIDING DOORS 18.3 BIFOLD DOORS Tools needed by volunteers: Hammer Nail apron Tape measure Square Pencil Tools and equipment needed: Extension cords
ARTS AND CRAFTS CHAIR
 ARTS AND CRAFTS CHAIR 491 MATERIALS LIST--DINING CHAIR Key No. Size and description (use) A 2 1-3/4 x 1-3/4 x 16-1/4'' oak (front leg) B 2 1-3/4 x 3-3/4 x 40-1/2'' oak (rear leg) C 1 1-3/4 x 3-3/16 x 15''
Strategies for panels, casework, boxes, and more. Prep Tips. Check your tool settings to ensure that when facejointing, planing, and
 Goof-Proof Clamping Strategies for panels, casework, boxes, and more By Jim Harrold B Prep Tips ehind every successful glueup or project assembly you ll find one or more clamping operations that ensured
HEAVY-DUTY WORKBENCH
 HEAVY-DUTY WORKBENCH 2009 August Home Publishing Co. Feature Project Heavy-Duty Workbench For a low cost and a weekend of work, you can build a large, rocksolid workbench that s sure to last a lifetime.
Chain Drive Vise. Installation Instructions. (revised 05/04/2016)
") Chain Drive Vise Installation Instructions (revised 05/04/2016) Lie-Nielsen Chain Drive Vise Instructions Table of Contents page About Your Chain Drive Vise 3 Parts List 4 Exploded Parts Diagram 5 step
Chain Drive Vise Installation Instructions (revised 05/04/2016) Lie-Nielsen Chain Drive Vise Instructions Table of Contents page About Your Chain Drive Vise 3 Parts List 4 Exploded Parts Diagram 5 step
The saw is not a decoration piece but sees regular use at the school. The cross pieces at either end are made from oak, the long stretchers are made
 Roy s Saw When you walk in the front door of Roy Underhill s Woodright s School and look to your left in the window hanging above Roy s stuffed chicken is a large frame saw. Now the chicken is an interesting
This is a solid wood cabinet. The only plywood used is for the back and drawer bottoms.
 Sideboard Sideboard Overview: This project requires basic woodworking skills and access to woodworking machines. Woodworking machines have sharp cutting edges and are NOT forgiving. You should be properly
Jeff Branch WOODWORKING YOU CAN BUILD A. By adding subtle design elements, a traditional furniture style becomes decidedly modern.
 Jeff Branch WOODWORKING YOU CAN BUILD A By adding subtle design elements, a traditional furniture style becomes decidedly modern. Jeff Branch WOODWORKING Publisher: Jeff Branch Editor: Jeff Branch Art
DVD Cabinet. rabbeting with a moving filletster plane At this point, the insides of the case, and the shelves 5-JAN-2005
 INTRODUCTION DVD Cabinet CHRISTOPHER SWINGLEY 5-JAN-2005 These plans are derived from Michael Dunbar s Colonial Cupboard hand tool project in Fine Woodworking, Number 151, October 2001, pages 64-71. The
Windsor Chair Online. Assembly Instructions
 Windsor Chair Online Assembly Instructions Date: 1/4/2007 Other Chairs Offered Philadelphia Arm Chair New England Comb Back Sackback d Arm Chair Bow Back Side Chair Fan Back Side Chair Page 1 Table of
Project 17884EZ: Shaker End Table
 Project 17884EZ: Shaker End Table With its clean, simple lines, this piece is unmistakably Shaker style. Ours is made from cherry, a wood commonly used by Shaker craftsman, but we ve also seen this piece
Heirloom Tool Chest. This classic chest offers a lesson in efficient woodworking
 Heirloom Tool Chest This classic chest offers a lesson in efficient woodworking BY CH R I S G O C H N O U R A COMFORTABLE HOME FOR TOOLS Made of cherry and constructed entirely with hand tools, the tool
Classic Project. Contemporary Table. In this plan you ll find: Step-by-step construction instruction. A complete bill of materials.
 America s leading woodworking authority Classic Project In this plan you ll find: Step-by-step construction instruction. Contemporary Table A complete bill of materials. Construction drawings and related
 America s leading woodworking authority To download these plans, you will need Adobe Reader installed on your computer. If you want to get a free copy, visit: http://adobe.com/ reader. Having trouble downloading
Installation of Balustrade Systems
 Installation of Balustrade Systems IMPORTANT: Be sure to mark the center point of each newel post's location prior to installation to insure proper spacing. All product interfaces must use PL Premium Adhesive
Step-by-Step Instructions for Making the Wall-hung Bookcase
 Step-by-Step Instructions for Making the Wall-hung Bookcase When a piece of furniture has an air and look of simplicity, you can be sure that it deftly conceals the complexity of its making. I wanted this
HANDCRAFTED LIDDED CHEST IN CHERRY With Red Cedar Lining
 HANDCRAFTED LIDDED CHEST IN CHERRY With Red Cedar Lining Design A chest was desired as a gift to family. The Shaker style of furniture was identified as a pleasing style. After viewing a number of pictures
under the bottom shelf and along the top shelf should do the trick.
 w Bookshelves in a Day BY ST E V E L A T T A Iget the most pure enjoyment from reproducing 18th-century furniture, but every now and then it s nice to break out of that mode and dive into a project that
Fence Hardware Instructions (Right-Handed Version)
") S I M P L Y C L A S S I C Fence Hardware Instructions (Right-Handed Version) 8 1. 1/4-20 x 1" wing bolt (x2) 2. Bearing washer (x2) 3. Arm lock (x2) 4. Fence (not included) 5. Fence sleeve (x2) 6. Arm
S I M P L Y C L A S S I C Fence Hardware Instructions (Right-Handed Version) 8 1. 1/4-20 x 1" wing bolt (x2) 2. Bearing washer (x2) 3. Arm lock (x2) 4. Fence (not included) 5. Fence sleeve (x2) 6. Arm
Wagon Vise Retrofit Installation Instructions. American Craft Woodworks. Wagon Vise
 Wagon Vise Retrofit Installation Instructions American Craft Woodworks Wagon Vise Wagon Vise Retrofit Installation Instructions 2 Retrofit Installation Instructions Before you get started, please read
Three Legged Stool. Randy Cordle / 2016
 Three Legged Stool Randy Cordle / 2016 This stool could easily qualify as fine furniture, being equally at home in the living room or featured at the local arts and crafts fair. A few unique construction
Greene & Greene. Mailbox. by Seth Keller. Signature details create an elegant box. 2 AmericanWoodworker.com
 Greene & Greene Mailbox by Seth Keller Signature details create an elegant box. 2 AmericanWoodworker.com We needed a new mailbox, but I couldn t find an off-the-shelf version that I liked. So I decided
Japanese carpenters are renowned for the sophistication of
 Hand-Built Home for Cut nails and a clever lid clinch a traditional Japanese toolbox Japanese carpenters are renowned for the sophistication of their wooden joinery, yet they typically build toolboxes
135 ROLLTOP DESK 515
 135 ROLLTOP DESK 515 For the person who hates to clear off a desk, who wants to leave everything where it is overnight yet still have the clutter hidden, a rolltop desk is a godsend. The tambour hides
ULTIMATE ROUTER TABLE PLANS. By Dan Phalen
 ULTIMATE ROUTER TABLE PLANS By Dan Phalen January 2017 Ultimate Router Table Plans. Copyright 2012-2017 by Daniel Phalen. Published by Creston Hall Publishing Company. All rights reserved. No part of this
Classic Project. Two-drawer Platform Bed. In this plan you ll find: Step-by-step construction instruction. A complete bill of materials.
 America s leading woodworking authority Classic Project In this plan you ll find: Step-by-step construction instruction. Two-drawer Platform Bed A complete bill of materials. Construction drawings and
10 Easy-to-Build. Plywood Projects
 10 Easy-to-Build Plywood Projects Ten shop projects ten sheets of plywood. These rock-solid essentials take just a couple hours to build and will help you make the most of the space in your shop. All content
Chief s Shop: Simple Woodworking Bench
 Chief s Shop: Simple Woodworking Bench Be sure to read the instructions and review the illustrations and accompanying video for this project BEFORE you start. Follow ALL SAFETY GUIDELINES AND RECOMMENDATIONS
Outdoor Swing and Arbor
 America s leading woodworking authority Step by Step construction instruction. A complete bill of materials. Outdoor Swing and Arbor Exploded view and elevation drawings. How-to photos with instructive
Shaker Shop Stool. By Glen D. Huey
 Shaker Shop Stool By Glen D. Huey By the turn of the decade following Mother Ann Lee s visit in 1783, the Massachusetts Shaker community known as Hancock began its existence. From a small gathering of
Project 13519EZ: Shaker Sewing Desk
 Project 13519EZ: Shaker Sewing Desk This fine example of a Shaker sewing desk was measured and photographed at Hancock Shaker Village in Hancock, Massachusetts. On the original, the legs and various frame
Take the shortcut to building a stout, cost-effective work center.
 The Weekend Workbench Take the shortcut to building a stout, cost-effective work center. Written by Jim Harrold and Chad McClung Designed by Jim Harrold Overall dimensions: 60"w x 24"d x 7"h F or the up-and-comer
Chapter 9. Windows and Exterior Doors
 Chapter 9. Windows and Exterior Doors 9.1 INSTALLING WINDOWS 9.2 INSTALLING EXTERIOR HOUSE DOORS 9.3 INSTALLING SHED DOOR 9.4 INSTALLING EGRESS COMPONENTS Tools needed by volunteers: Hammer Nail apron
COMPLIMENTARY WOODWORKING PLAN
 COMPLIMENTARY WOODWORKING PLAN ORIENTAL GARDEN ARBOR PLAN This downloadable plan is copyrighted. Please do not share or redistribute this plan in any way. It has been paid for on your behalf by JET Tools,
Flamingo. That s what I looked
 Plans N O W w w w. P l a n s N O W. c o m flip-seat Storage Bench Flamingo. That s what I looked like as I stood in the doorway perched on one leg, with my other foot raised so that I could untie the laces
Carcase Construction. Choosing and making the right joints. by Tage Frid
 Carcase Construction Choosing and making the right joints by Tage Frid Furniture construction is broken down into two main categories: frame and carcase. In frame construction, relatively narrow boards
Installation Instructions
 Supafold Slide Aside System Three Fold Room Divider Installation Instructions Distinctive Doors Ltd Supafold Slide Aside Internal Folding System IMPORTANT: Before proceeding with the installation, and
Lake Erie Toolworks Wagon Vise Screw Installation Instructions Copyright, Lake Erie Toolworks, Inc. Version 1/6/2017
 Lake Erie Toolworks Wagon Vise Screw Installation Instructions Copyright, Lake Erie Toolworks, Inc. Version 1/6/2017 www.lakeerietoolworks.com Very Important Please Read! Read all instructions prior to
15 Dovetail Jig. Instruction Manual. Part # 3452
 15 Dovetail Jig Instruction Manual Part # 3452 CAUTION: Please read, understand, and follow all manufacturers instructions, guidelines and owners manuals that come with your power tools. Peachtree Woodworking
Extendable Large Dovetail Jig
 Extendable Large Dovetail Jig Instruction Manual Part # 3458 CAUTION: Please read, understand, and follow all manufacturers instructions, guidelines and owners manuals that come with your power tools.
Instructables Butcher Block Top
 Instructables Butcher Block Top Project Overview: This project requires basic woodworking skills and access to woodworking machines. Woodworking machines have sharp cutting edges and are NOT forgiving.
Plan #1 Wooden hinge, single action
 Plan #1 Wooden hinge, single action There are two types of wooden hinges, a single action hinge (that is in effect a finger joint with a pin through it) and a double action hinge which has two pins. The
Quick-Release Front Vise 05G34.01
 Quick-Release Front Vise 05G34.01 Patent Pending Introduction A front vise is the most generally useful vise on a typical workbench. It can be used for clamping parts on edge within the jaws, for clamping
Dura-Lock Roof System
 DLR-14 Dura-Lock Roof System Assembly and Installation Instructions Read the instructions before starting the job. They explain the steps required to produce a finished product that will meet factory specifications.
Cherry Chest of Drawers. Dovetail joinery decorates this Shaker-inspired case piece
 Cherry Chest of Drawers Dovetail joinery decorates this Shaker-inspired case piece BY M I C H A E L P E K O V I C H DRESSER CONSTRUCTION Case top Rabbet, 9 6 in. deep 4 in. 0 7 8 in. 9 2 in. 4 in. Top
Kentucky 4H Wood Science Plans Notebook. Plans Level 3
 Kentucky 4H Wood Science Plans Notebook Plans Level 3 MATERIALS: 2 pieces wood 3/4 x 10 x 4 1 piece wood 3/4 x 12 x 4 2 pieces wood 3/4 x 3 x 2 5 1/2" 2 pieces wood 3/4 x 3 x 1 8 1 piece wood 2 x 4 x
RLP Mini Low Profile V Track Hardware sliding door hardware/ barn door track
 Page 1 of 9 Installation Suggestions for: RLP Mini Low Profile V Track Hardware sliding door hardware/ barn door track Read these instructions to end before starting installation or ordering hardware.
DOCUMENT CHEST. Curly Maple, White Pine
 25 DOCUMENT CHEST Curly Maple, White Pine 100 MAKING THE DOCUMENT CHEST After the stock has been thicknessed, ripped to width, and cut to length, plough a 1/4" X 3 /8" groove on the inside faces of the
Rose Inspired Corner Shelf
 Photo 1: The side pieces are sized so you can hot melt glue them together outside of the pattern. Scoring a shallow v-groove with a utility knife holds the glue at bay. Rose Inspired Corner Shelf The best
Adjustable Hammered Dulcimer Stand
 Adjustable Hammered Dulcimer Stand Musicmaker s Kits (Hwy 36 behind Joseph s Restaurant) P.O. Box 2117 Stillwater MN 55082 651 439 9120 www.harpkit.com PARTS LIST: 1 Set of Assembly Instructions A. 2 front
END FRAMES. End frames built using pressure treated 2x4 (1 1/2" x 3 1/2") 36" 34" 7/16" pilot hole. 5 1/2" x 1/2" lag bolt 8" wheel 23"
 36 34 7/16 pilot hole. 5 1/2 x 1/2 lag bolt 8 wheel 23") END FRAMES End frames built using pressure treated 2x4 (1 1/2" x 3 1/2") 23" 17 1/2" (B) (B) Measure from the bottom of your stone to 1" below the lip to get your measurement. 17 1/2"(B) 36" 34" 1/2" flat
END FRAMES End frames built using pressure treated 2x4 (1 1/2" x 3 1/2") 23" 17 1/2" (B) (B) Measure from the bottom of your stone to 1" below the lip to get your measurement. 17 1/2"(B) 36" 34" 1/2" flat
Dress up your dining room with this Southern delicacy. that was used to serve drinks after a hunt. Breeches and jodhpurs are optional.
 Dress up your dining room with this Southern delicacy that was used to serve drinks after a hunt. Breeches and jodhpurs are optional. Huntboard Classic Six-Legged My dad has been making this six-legged
Oxford Stalls Installation Instructions
 Oxford Stalls Installation Instructions RAMM Horse Fencing and Stalls 13150 Airport Hwy. Swanton, OH 43558-9615 1-800-434-8456 Rev. 8/15/17 Before You Start Typical stall sizes are 10 x 10, 12 x 12 or
Section # /2" x 1 1/2" x 20" /4" x 15 3/4" x 82 1/2" /4" x 1 5/8" x 82 1/2"
 Hardware & Miscellaneous Items: A 2 3 1/2" chest handles B 7 3" T-hinges and screws C 4 1/4" T nuts D 4 1/4" x 2 1/2" Carage bolts E 2 1/4" x 2" Barrel Bolts F 2 1" x 5' Straps G 8 1/4" 3 1/2" Carage Bolts
Hand Tools. 1. Marking Out Tools
 Hand Tools 1. Marking Out Tools Steel Rule Used for measuring Measure twice, cut once, golden rule of woodwork Rule should begin from the edge of the metal Millimetres are used, nothing else will do 10mm
Woodline USA Woodline Spacer Fence System
 Woodline USA Woodline Spacer Fence System MADE IN THE USA Includes: (1) ¼ Spacer Fence (1) 3/8 Spacer Fence (1) ½ Spacer Fence (1) Hardware Package (1) 3 Piece Brass bar set (2) Setup Blocks Visit Us Online
LARGE PLYWOOD CUTTING GUIDE
 Copyright 2015 Shanty-2-Chic.com Workbench I f you are tight on space but large on ideas this bench is just what you need. Sturdy and mobile this bench has an ingenious fold out wing that gives you over