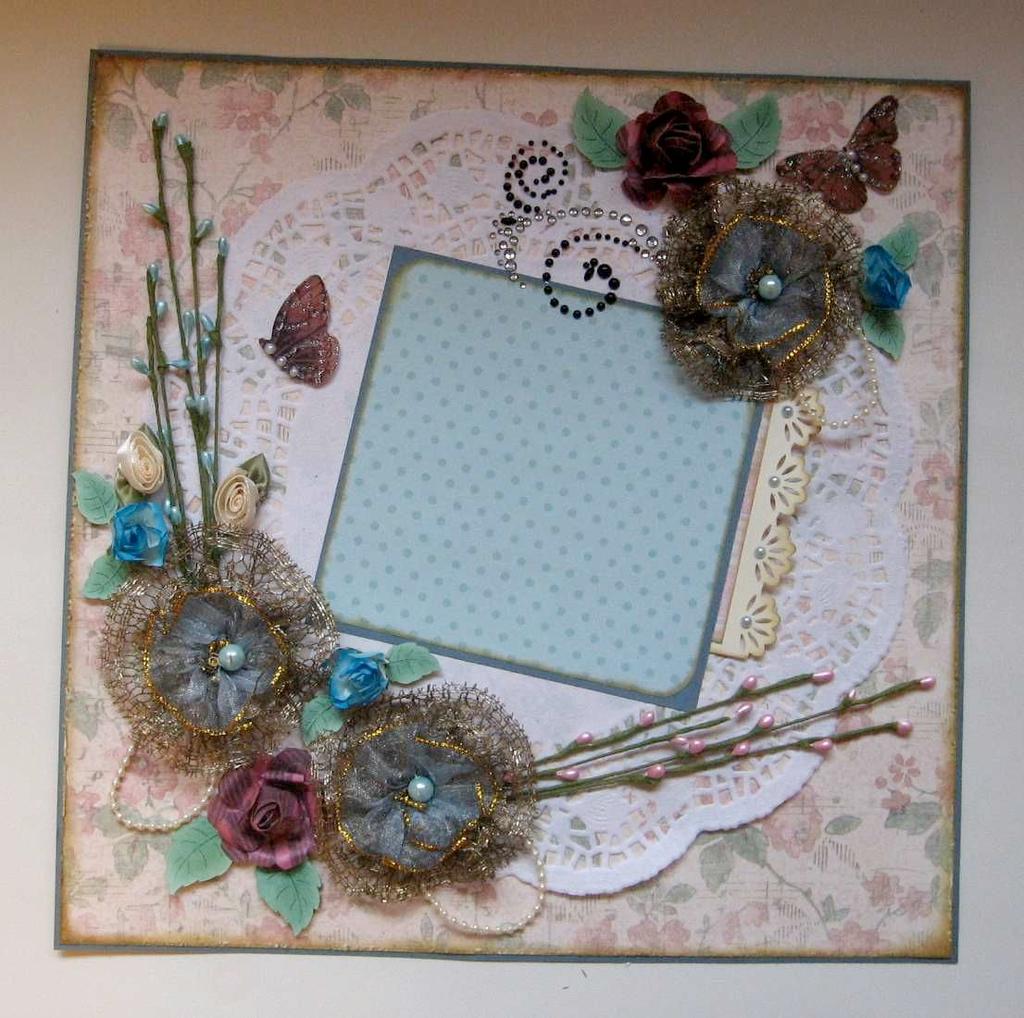
INSTRUCTIONS. Vintage Scrapbook Page Layout #1 12 x 12 inches with photo mat and pull-out photo/journaling tag
|
|
|
- Harriet Cooper
- 6 years ago
- Views:
Transcription
1 INSTRUCTIONS Vintage Scrapbook Page Layout #1 12 x 12 inches with photo mat and pull-out photo/journaling tag
2 My Angel Policy You may use the instructions included with this tutorial to create and produce as many layouts as you wish for fun or for profit. However, the instructions or images may not be reproduced either in digital or printed format and distributed for free or for profit. They may not be sold as part of a kit. If you wish to purchase multiple copies of this book, templates or images for use in a class, please the author at scrappinrabbit@gmail.com to obtain discount bulk pricing. These instructions were written to the best of my ability. I am not responsible for any damages caused by any omissions or misuse of supplies or equipment.
3 INTRODUCTION In this e-tutorial, I show you step-by-step how to create the vintage layout on the cover page. This is one of my favourite vintage themed scrapbook pages that I designed and have been selling in my online shops. The detailed instructions and photos show you how to layer and place papers and embellishments. At the beginning is a list of tools and supplies you will need. You can use embellishments you already have. When I first started scrapbooking, I used lots of Prima flowers but since flower embellishments don t come cheap, I started making my own. My book My Paper Garden shows you how to create paper flowers without the use of expensive punches or diecutting machines. It s available in e-format on my blog at If you would like to make the large lace flowers shown in this layout, I provide a free tutorial for making lace flowers on my blog at the following web address: (In this layout, I followed the instructions in the tutorial and in addition I added a layer of sheer ribbon to make the flowers.) Be forewarned though these flowers are addictive and once you starting making a few, ideas for customizing your own flowers will abound. I rarely purchase flowers anymore. As you work through the instructions for this layout, I indicate measurements and also provide tips to help make things easy. Once you ve completed this layout, you ll be able to make more in no time. The photo above shows the layout we will be working on. I m also including on the next page photographs of two other layouts I made following the same method, only with different embellishments and colours for a different look. Yours need not be exactly the same. I hope you enjoy making this project. If you need further clarification, feel free to me at scrappinrabbit@gmail.com. I plan on writing similar tutorials for other layouts I ve created so your constructive comments are appreciated. Christine

4
5 Before you start, gather up the following tools and supplies you will need to complete this project. Tools Paper Trimmer Glue stick or glue tape White or clear glue in a bottle (my favourite is a white tacky glue that dries fast) Scissors Stapler Needle and thread Foam dots for attaching die-cut leaves Corner punch Sewing machine with zigzag stitch (optional if you want to stitch around your layout) Paper distressing tool or sandpaper (optional) Following are the supplies I used: 12x12 inch background paper (I used paper from DCWV s The French Country Stack) 12x12 inch cardstock that will coordinate with your background paper (I used green cardstock) Paper and colour-coordinated cardstock for photo mat and pull-out tag Paper doily (10-1/2 inches approx.) Distress ink (I used Ranger Distress Ink in Frayed Burlap) Long ornamental stems with beads (from the dollar store!) 3 large lace flowers (see the end of this tutorial if you wish to learn how to make your own) Strands of beads 7 smaller assorted flowers Die-cut leaves Crystal swirls 2 paper butterflies Stick on pearls (optional)


6 STEP 1 Cut! inch from the left side and top of your 12x12 cardstock. The layout is very thick so by cutting off a thin edge it will allow your layout to fit properly in a page protector. STEP 2 Cut " inch from the left side and top of your background paper - your cardstock will form a border around your layout. DO NOT GLUE YOUR BACKGROUND PAPER TO YOUR CARDSTOCK JUST YET! STEP 3 Use a paper distressing tool to fray all four edges of the background paper. TIP: You can also get the same effect with scissors by running the blade along the edges of the paper.


7 STEP 4 Using a sponge, ink the edges and corners of the background paper - this will give a nice antique look. Tip: I purchased a bag of makeup sponges at my local dollar store and they work great! For this layout, I used Ranger s Distress Ink in Frayed Burlap. STEP 5 Using a glue stick, adhere the doily to the center of the background paper. Start by adding glue to the larger center area of the doily then dab a bit of glue here and there on the lacy area being careful that the glue does not ooze to the surface through the holes. TIP: Applying archival mist will neutralize the acid in the doily and help preserve it.


, and 7 inches at the bottom extending to the right")
8 STEP 6 Cut strands from the base of long stems to make 2 bunches of 4-5 strands each. (I used green and light blue beaded stems I obtained from the dollar store. You can use any type of long stems.) To determine how long your stems need to be, place 2 large lace flowers on the bottom of the page as shown in the photo and insert stems underneath. Make sure the flowers will cover the base of the stems and that the stems do not extend beyond the height or width of your page (otherwise the layout will not fit in your page protector). DO NOT GLUE THE FLOWERS DOWN YET!! Approximate measurements for the stems are 9 inches on the left side of the page (blue stems), and 7 inches at the bottom extending to the right (green stems). STEP 7 Attach the base of each bunch of stems to the background paper with a couple of staples. Don t set staples too far apart since the flowers will need to cover the stapled area.

 and glue them")

9 STEP 8 - Cut small squares of light-coloured cardstock (approx. 1 x 1 inch) and glue them over the stapled area of each bunch of stems to help keep everything in place.


10 STEP 9 Glue or tape the background paper to your cardstock. TIP: If you have access to a sewing machine, try a zigzag stitch around the edges of your background paper to help secure it to the cardstock. STEP 10 Cut 3 strands of beads each about 5 inches long. Form a loop with one strand by joining the ends and use thread to tie them together. Repeat with the other 2 strands.


11 Attach a strand underneath each of the 3 larger flowers with thread. Make sure the bottom of the strands will be visible. STEP 11 Using thread, attach a small square of cardstock to the bottom of each flower. This will allow you to add glue to the bottom of your flower and secure it to your layout. (You risk glue oozing through the lace if you try to apply it directly to the fabric.)

 to measure 5 x 5 inches. Use a corner punch to give a nice rounded edge.")

12 STEP 12 Glue two of the larger flowers to the bottom of your layout making sure they cover the base of the stems. Position the flowers so that the strands of beads at the bottom do not extend beyond the page. STEP 13 To make the photo mat, cut a piece of cardstock or paper (checkered design in the photo) to measure 5-1/4 x 5-1/4 inches. Cut a coordinating piece of paper (pink in the photo) to measure 5 x 5 inches. Use a corner punch to give a nice rounded edge. Ink the edges of the paper to give an aged appearance. Glue the paper to the cardstock. STEP 14 Apply glue to 3 sides on the back of the photo mat to form a pocket. A tag will be inserted in the right-hand side of the photo mat so make sure you glue only the three edges with right side of paper facing you, that would be the top, bottom and left edges.


.")
13 Adhere the photo mat to the center of your layout, angled slightly to the right. Make sure the right-hand side of the photo mat is the side with NO glue so that the tag can slide in. STEP 15 To make the tag, cut a piece of cardstock to measure approximately 4 x 5 inches. Use a border punch to create a decorative edge (trim the width of your tag to fit the punched border). Trim coordinating paper 1/8 of an inch smaller than the cardstock along each edge. Apply ink to the edges of the paper and glue it to the cardstock.


14 I also added ink to the top punched border and stick-on pearls to embellish the tag. The back of the tag remains blank so that it can be used for journaling. STEP 16 Insert the tag in the pocket of the photo mat, leaving the decorative edge exposed.


15 STEP 17 Glue the third large flower to the top of the photo mat, making sure it doesn t interfere when pulling out the tag. Also make sure the photo will be able to slide underneath the bottom edge of the flower if needed. STEP 18 Once your large flowers have been glued in place, you can start arranging your smaller flowers. Glue 3 small flowers on either side of the stems at the left side of the layout. Glue 2 small flowers between the two large flowers at the bottom of the page.


16 STEP 19 Use die-cut leaves (or cut your own) to fill in spaces between the flowers. Use foam dots to adhere leaves for a 3D effect. Tip: Use chalk and pens to add colour to your leaves. (Flowers with leaves)


17 STEP 20 Apply a crystal swirl to the left of the large flower at the top of your layout, overlapping it slightly onto the photo mat. STEP 21 Add 2 more small flowers and leaves on each side of the large top flower. STEP 22 Attach a butterfly close to the stems on the left side of the page.

18 Attach another butterfly in the top right corner of the page. And here is the final product! You are now ready to add your photos and journaling.
jarswe are all familiar with the concept of recycling
 Gifts in jarswe are all familiar with the concept of recycling glass bottles and jars but for thrifty crafters there is also the possibility of upcycling turning plain unwanted items into something beautiful
HopeChest. 6 pages of. project inspiration
 HopeChest c o l l e c t i o n 6 pages of project inspiration BEAUTIFUL PRINCESS by Betsy Veldman COOL TIP use journal cards to create the perfect photo mat Pink Paislee Products: Hope Chest: Heirlooms
5. Cut a piece of cream ribbon long enough to wrap around the entire box 4 times.
 Vintage Wedding A timeless elegance is created with the classic style of antique wedding gowns. This look was created using floral craft paper, ribbon and flowers, all with the same cream tone. 1 Small
Garden Goddess Mixed Media Binder Album
 Designed by ~ Annette Green Graphic 45 Supplies: 1 each Garden Goddess 8 x 8 Paper Pad 1 pack Garden Goddess Chipboard 1 pack Garden Goddess Tags & Pockets 1 each Mixed Medium Album Kraft 1 pack G45 Staples
~MINI Scrapbooks~ By: Charlene Adair Hunter Of the Dating Divas Step 1) Make sure you have ALL the supplies you will need.
 Make sure you have ALL the supplies you will need.") ~MINI Scrapbooks~ By: Charlene Adair Hunter Of the Dating Divas Step 1) Make sure you have ALL the supplies you will need. Cutting For cutting you are welcome to use scissors and a ruler, I used a 12 paper
~MINI Scrapbooks~ By: Charlene Adair Hunter Of the Dating Divas Step 1) Make sure you have ALL the supplies you will need. Cutting For cutting you are welcome to use scissors and a ruler, I used a 12 paper
Glassine Bag Album. Materials
 Glassine Bag Album Images Copyright Stampin Up! Copyright Kimberly Van Diepen Materials Paper Chocolate Chip cardstock (4 3/8 x 5 ¾ (2), 4 x 6, ½ x 2 ¼ and scrap) Rose Red cardstock (4 3/8 x 5 ½, 4 x 6
A Proper Gentleman's Board Book
 Designed by ~ Annette Green Graphic 45 Supplies: 1 pack A Proper Gentleman DCE 1 pack 12x12 Chipboard Sheets Black 1 pack G45 Staples Antique Metal Clock Keys 1 pack G45 Staples Regular Tags Black (4501806)
CARD # 1. Designed by Gloria Stengel. Place In Time - December Card Be Merry. Graphic 45 Supplies: Additional Supplies: Tools & Adhesive Instructions:
 Place In Time - December Card Be Merry CARD # 1 Designed by Gloria Stengel Graphic 45 Supplies: 218 sheets piece December of red Cut-Apart twine (#4500614) 18 sheet piece December of red Foundations sparkle
Printable Tutorial: Exploding Box Mini Album
 Printable Tutorial: Exploding Box Mini Album scrapgirls.com/all-posts/printable-tutorial-exploding-box-mini-album/ Digital scrapbooking supplies used: Spring is Here Collection Biggie ScrapSimple Craft
Designed by Gloria Stengel
 Designed by Gloria Stengel Graphic 45 Supplies: 1 sheet August Cut Apart (#4501043) 1 sheet August Flourish (#4501044) 1 each 6x6 Patterns & Solids Pad (#4501053) 1 2 pack Ephemera Cards *1 for each month
TOTT Hair Bow Instructions Flower Loop Hair Bow These instructions may not be reproduced or copied. Hair Bows made using these instructions MAY be
 Supplies & Tools Ribbon and supplies may be purchased from: http://www.theribbonretreat.com Flower Loop Bow Tips Hair Bow Maker Ribbon Barrettes & Clips Cutting Mat Scissors Hi-Temp Glue Gun Glue Sticks
SECRET CRUSH. 6 pages of SWEET. project inspiration
 SECRET CRUSH 6 pages of SWEET project inspiration Framed 3D Flowers BY JESS MUTTY Secret Crush: Love Notes, Polka Dance & Endless Love Paper Paper Goods & Element Stickers Artisan Circles & Squares White
lay it on me sketch layouts
 scrapbook s lay it on me sketch layouts featured products/ Chatterbox Happy Garden papers Scenic Route Loveland papers Crate Paper Sweet Branch papers BasicGrey painted brads Crate Paper brads and rub-ons
Planner / Journal Tutorial
 Planner / Journal Tutorial Sewing your own planners and journals is so much fun! You get to choose every part of the design, and your new book will delight you every time you open it. This method quickly
Graphic 45 club august 2013
 Graphic 45 club august 2013 STUDENT SUPPLY LIST Paper Trimmer Adhesive (dry, liquid, glue dots, 1/8 sookwang tape) Foam Squares Pencil Ruler Scissors Craft Knife & Cutting Mat Vertical Photos: one 4 x
Decorative Box with Easel Card Set & Side Waterfall Album
 Designed by ~ Annette Green Graphic 45 Supplies: 1 ea Botanical Tea Deluxe Collector's Edition (4501684) 1 ea Kraft 5 x 5 Mixed Media Box (4500984) 1 pk G45 Staples Metal Door Pulls (4500548 or 4500842)
August 2012 Greetings to Go Bold Blooms
 August 2012 Greetings to Go Bold Blooms Materials: Bold Blooms Greetings to Go Bold Blooms Unmounted (UM) Borders & Backgrounds Bold Blooms Unmounted Greetings Bold Blooms Unmounted Art Nouveau Bold Blooms
Shopping List:- How to make a... Square Flower Bag ~ Part 2
 How to make a... Square Flower Bag ~ Part 2 Shopping List:- Creative Expressions Singles Stamp Range ~ Garden Frame Pre Cut Stamp and Phill Martin Damask Border & Icons Stamp Ink Blending Mat, Grime Boss
euphoria collection kit
 scrapbook.com euphoria collection kit featuring/ Euphoria paper collection collection kit created by/ kelly goree designer note/ Use scraps first if at all possible. instructions/ kit supplies/ 1 Euphoria
Drop Spine Box. Tricia Morris. Design by: 2006 Craft TV Weekly, Inc.
 Drop Spine Box Design by: Tricia Morris 1 Think inside the box! In a marathon of gluing, folding and smoothing, Tricia shows how to make a Drop Spine Box. The steps are many, but the reward is great! So
12 pages of. project inspiration
 12 pages of project inspiration YOU LOVE STICKS BY Kim Arnold Declaration Block Party Alphabet Stickers PROJECT INSTRUCTIONS: STEP 1: Use Block Party patterned paper for the base of the layout. STEP 2:
Happy Times 6-Page Scrapbooking Kit
 Happy Times 6-Page Scrapbooking Kit 1. Begin by attaching the Wood BTP to the outside edge of both base pages. These are your anchor pieces. 2. Next attach the two 1.5 x 6" strips of Ombre BTP to the top
green at heart mini album
 national scrapbook day green at heart mini album featuring/ Green at Heart paper collection what i love about you by/ layle koncar kit supplies/ 1 Capital album in Milk Chocolate (brown) 1 Green at Heart
September 2010 Greetings to Go Adobe
 September 2010 Greetings to Go Adobe Materials: Adobe Greetings to Go Adobe Wood Mounted Adobe Collage Stamp Adobe Art Nouveau Today is Yours Stamp Adobe Greeting Great Stamp Adobe and FontArt Adobe Beads
Page of the Month Bonus Projects
 Page of the Month Bonus Projects Supply List: All leftover papers and embellishments from class All supplies listed on POTM supply list from class Black Soot Distress Ink Paper/Other: 1 x BG Candy Buttons
Card kit project sheets
 Card kit project sheets Use these projects to host an OWH cardmaking party! You may also use them for make-and-takes or classes, just please credit OWH. 1 Cut papers as per sketch. 2 Cut backer to 5.5
Shopping List:- Shopping List:- How to make a... Acetate Mothers Day Card How to make a... Strictly Dancing Tri Fold Box
 Shopping List:- Shopping List:- Grand Calibur Die Cutting Machine : WIZCAL Spellbinders All in One Tool : WIZTOOL Grand JustRite Calibur Floral Fan Elements Die Cutting : JRCR02092 Machine : WIZCAL JustRite
BUTTERFLY GARDEN. The Red Boot Quilt Company
 BUTTERFLY GARDEN The Red Boot Quilt Company www.theredbootquiltcompany.com BUTTERFLY GARDEN Approx. Size 89 1/2in length x 92 1/2in width BEFORE THE FUN BEGINS Please read all instructions before you begin.
Floral Shoppe Four Card Set w/ Die Cut Paper Flowers
 Designed by ~ Maggi Harding Graphic 45 Supplies: 1 sheet Midnight Medley (4501689) 1 sheet Sunlit Medley (4501690) 1 sheet Burgundy Blossoms (4501691) 2 sheets Verdant Blossoms (4501692) 1 sheet Pink Lilies
Steampunk Debutante : Junk Journal
 Designed by ~ Maria Cole Graphic 45 Supplies: 1 pack Steampunk Debutante DCE 1 pack G45 Staples Large Tag Kraft 1 pack G45 Staples Large Tag Ivory 1 each Antique Brass Door Knocker 1 pad Decades Dye Ink
Sewing Theme Greeting Card SINGER. Shopping List:
 SINGER Sewing Theme Greeting Card Use your sewing machine to express your personal style and creativity by making greeting cards. It s a unique way to send a message to someone special in your life and
THE FLOWER FAIRIES. This is a free pattern provided by The Red Boot Quilt Company 2017 STRICTLY NOT FOR RESALE OR DISTRIBUTION
 THE FLOWER FAIRIES This is a free pattern provided by The Red Boot Quilt Company 2017 STRICTLY NOT FOR RESALE OR DISTRIBUTION The Red Boot Quilt Company The Red Boot Quilt Company THE FLOWER FAIRIES Approx.
Techniques and ideas. by Marie Browning
 TM Techniques and ideas by Marie Browning TM Fiskars Parchamoré Crafting System is a beautiful addition to the Mini ShapeBoss Embossing System. You can make gorgeous cards, tags and scrapbook pages. The
 Supplies WARM AND NATURAL COTTON BATTING FIBER FILL STUFFING COTTON PRINT FABRIC FOR DRESS OLD LIGHT WEIGHT SWEATER TO CUT UP SMALL PIECE OF MUSLIN FOR CANDY RABBIT PLAID-APPLE BARREL NUTMEG BROWN CRAFT
Scrapbook Kit Projects from Stacy Cohen scrapbookandcards.com
 SCRAPBOOK KIT SPRING 2016 Scrapbook Kit Projects from Stacy Cohen step-by-stepinstructions instructions+ +tips sketch step-by-step THE GREAT HUNT (24 x12 ) 1 Select Classic White cardstock as your layout
WINTER. Scrapbook Kit Projects from Meghann Andrew SCRAPBOOK KIT WINTER scrapbookandcards.com
 WINTER SCRAPBOOK KIT WINTER 2018 Scrapbook Kit Projects from Meghann Andrew Q U A R T E R LY C R A F T K I T S step-by-stepinstructions instructions++tips sketch step-by-step JOYFUL (24x12) 1 Select two
PRETTY IN PINK. The Red Boot Quilt Company. This is a free pattern provided by The Red Boot Quilt Company 2017 STRICTLY NOT FOR RESALE OR DISTRIBUTION
 PRETTY IN PINK This is a free pattern provided by The Red Boot Quilt Company 2017 STRICTLY NOT FOR RESALE OR DISTRIBUTION The Red Boot Quilt Company The Red Boot Quilt Company PRETTY IN PINK Approx. Size
House of ATC cards. Michael strong. Design by: 2007 Craft TV Weekly, Inc.
 House of ATC cards Design by: Michael strong House of atc cards 1 Scallops! Michael is building a house of cards for his Artists Trading Cards. Because each card is a work of art in miniature, each deserves
SEPTEMBER 2018: MINIATURE PHOTO ALBUM
 SEPTEMBER 2018: MINIATURE PHOTO ALBUM Materials and Supplies: Thin cardboard or cardstock for the album cover Attractive complementary papers Tacky Glue Glue Stick X-acto knife Scissors Strip of soft,
Hedgehog Card. Hedgehog Design Topper. Shaped Card Template, place the dashed line up to the fold, draw around and cut it out.
 Hedgehog Design Topper Hedgehog Card Shaped Card Template, place the dashed line up to the fold, draw around and cut it out. Hedgehog Card Print off the hedgehog template sheet and cut out the base card
Copyright Bumblebee Linens LLC
 Crafts Instructions Included 1. Hankie Wedding Dress 2. Pillowcase Dress 3. Hankie Bonnet 4. Hankie Pin Cushion 5. Hankie Angel 6. Hankie Bunny 7. Pillowcase Reusable Grocery Bag 8. Linen Towel Drawstring
THE FLOWER FAIRIES. The Red Boot Quilt Company
 THE FLOWER FAIRIES The Red Boot Quilt Company www.theredbootquiltcompany.com THE FLOWER FAIRIES Approx. Size 62in x 61in BEFORE THE FUN BEGINS Please read all instructions before you begin. Abbreviations.
design project Mother s Day Flower Scarf
 design project Mother s Day Flower Scarf Sewing Mother S Day Flower ScarF Stringing SWAROVSKI ELEMENTS Article Product Group Article No. Amount Size Color Color Code Beads 5000 120 pcs. 3 mm Crystal 001
DOROTHY SIMPSON KRAUSE: PROJECTS
 DOROTHY SIMPSON KRAUSE: PROJECTS Gathering Memories: a paper portfolio This small portfolio of colored paper with pockets is perfect to hold and display some of the small items you ll collect on your cruise.
SCHOOLS OUT ALBUM HOW-TO GUIDE
 SCHOOLS OUT ALBUM HOW-TO GUIDE BY TONI D ARROCH Stamps By Me Ltd sell your soul to crafting www.stampsbyme.co.uk BACK PACK MINI-ALBUM Welcome to Toni Darroch s instructional guide to creating your own
2-Page Birthday Layout
 2-Page Birthday Layout SUPPLIES: 1 sheet purple cardstock 1 sheet beige cardstock 1 sheet patterned paper (Purple Beach from Making Memories Coastline Paper line) 4 Bar brads, various sizes 6 balloon die-cuts
Ornament Dolls: A Doll Project Tutorial. Ornament Dolls
 1 Ornament Dolls These 6 (15cm) mini dolls make perfect holiday ornaments or small gifts! The faces are sealed paper, which makes these dolls fast and easy to create. Try printing and drawing your own
CRAFTS. London Double Decker Bus Craft
 London Double Decker Bus Craft CRAFTS A double-decker bus has two levels or 'decks'. Red doubledecker buses are usually associated with London and have become a national symbol of England. This cardboard
Angel Pets Memorial Mug Rug PDF Pattern
 Angel Pets Memorial Mug Rug PDF Pattern Finished Size: 6 1/2 x 8 inches If you are only making one animal, be sure to print only that page. Use these with a snack, or hang on your wall. They also make
TOTT Hair Bow Instructions Ribbon Covered Snap Clips These instructions may not be reproduced or copied. Hair Bows made using these instructions MAY
 Supplies & Tools Ribbon and supplies may be purchased from: http://www.theribbonretreat.com Hair Bow Making Tip Hair Bow Maker Ribbon Barrettes & Clips Cutting Mat Scissors Hi-Temp Glue Gun Glue Sticks
Vintage Sewing Storage. Kerryanne English 2012
 Vintage Sewing Storage Kerryanne English 2012 Vintage Sewing Storage Kerryanne English 2012 Measures 12 cm wide by 36 cm high I m always looking for fun ways to store things in my creative space that are
by j o n e s d e s i g n c o m p a n y
 by j o n e s d e s i g n c o m p a n y HERE IS WHAT YOU NEED: :: sheet music {or pages from a book} :: pencil, scissors & some type of adhesive :: circle pattern or circle punch :: string for hanging ::
April 2016 Club Scrap Deluxe. Preparation: Trim the White and Pink Printed Cutaparts into sections as indicated by the artwork.
 Assembly Line Scrapbooking April 2016 Club Scrap Deluxe Dahlia Materials: Dahlia Deluxe Kit with Embellishment Option Tools and Supplies: 12 Paper Trimmer Adhesive Foam Adhesive Tape 3x14 CS Grid Ruler
October 2007 Greetings to Go Great Outdoors
 October 2007 Greetings to Go Great Outdoors Materials: Great Outdoors Greetings To Go Wood Mounted Grass and Tree Line Stamp Set Wood Mounted Enjoy Stamp Wood Mounted Got Adventure? Stamp Club Stamp Wood
DO-IT-YOURSELF DISNEY-INSPIRED GIFT WRAP DISNEY
 DO-IT-YOURSELF DISNEY-INSPIRED GIFT WRAP YOU WILL NEED*: Printed templates Scissors Tape Glue Craft paper Various ribbon *Additional supplies may be needed for each version and are listed before Step 1.
Shopping List:- How to make a... Strictly Dancing Tri Fold Box. How to make a... A Friend is like a Rainbow Kite Card
 Shopping List:- Grand Calibur Die Cutting Machine : WIZCAL Couture Shopping Creations Vintage List:- Rose 12" x 12" Paper Pad : CO723971 Sue Grand Wilson Calibur Noble Die Collection Cutting Pierced Machine
Delightful Miniature Purses! By Karin Buttigieg
 Delightful Miniature Purses! By Karin Buttigieg The idea for this came to me a few months ago when a customer ordered lots of miniature purse frames that I thought were pretty unattractive and I had sold
October 2013 Greetings to Go Lock & Key
 October 2013 Greetings to Go Lock & Key Lock & Key Materials: Greetings to Go Club Scrap Collection Unmounted Stamps Lock & Key Materials not included in the Club Stamp kit: Unmounted (UM) Borders & Backgrounds
Here is my tutorial so that you can make your very own Mini Chocolate Flower Vase - enjoy!
 This Mini Chocolate Flower Vase would be a beautiful treat to make for teachers, friends & family for Valentine s Day, Mother's Day, Birthdays - any special occasion - and it is so much fun to make. It
Made with Love Mini Album
 Workshop Made with Love Mini Album Additional Materials Needed: Exclusive Stamp Set: CC4192 My Acrylix For My Mother Stamp Set* Z2831 Charcoal Exclusive Inks Stamp Pad Z2844 Pixie Exclusive Inks Stamp
Flutter Easel Calendar Box with Sliding Drawer
 Designed by ~ Maria Cole Graphic 45 Supplies: 1 each Flutter 12x12 Collection Pack Flutter Stickers *Included w/collection Pack 1 pack Flutter Ephemera Cards 1 pack G45 Staples Antique Metal Door Pulls
Scrapbook Kit Projects from Stacy Cohen scrapbookandcards.com
 SCRAPBOOK KIT SPRING 2017 Scrapbook Kit Projects from Stacy Cohen step-by-stepinstructions instructions++tips sketch step-by-step HELLO SPRING (24x12) 1 Select Pearl Gray cardstock as layout base. Trim
How to Use Scotch Photo Splits Applicator for Scrapbooking
 How to Use Scotch Photo Splits Applicator for Scrapbooking This is a versatile scrapbooking design can be created for either a boy or a girl infant or toddler by just changing the color scheme of the paper,
All Year Cheer Card Kit
 All Year Cheer Card Kit February, 2017 Designer, Wendi Robinson Finished size: 5 ½ x 4 ¼ Happy Birthday Photo Play Party Boy 1. Cut Slate Cardstock to 5 ½ x 8 ½ and fold in half to create card base 2.
Ornament Finishing Techniques
 Ornament Finishing Techniques by Anne Gale The back of the ornament should enhance, not detract from the quality of the finished ornament. There are many ways to finish ornaments depending on type, shape
BELLA PAPERIE. Class Requirements You will need to bring a basic tool kit to all classes
 BELLA PAPERIE Class Requirements 2015 You will need to bring a basic tool kit to all classes This kit includes- ruler (cm & inches), pencil, rubber, scissors, 12inch/30.5cm paper trimmer, craft knife,
acorn AVENUE SCRAPBOOK KIT AUTUMN 2017 Scrapbook Kit Projects from Stacy Cohen scrapbookandcards.com
 acorn AVENUE SCRAPBOOK KIT AUTUMN 2017 Scrapbook Kit Projects from Stacy Cohen step-by-stepinstructions instructions++tips sketch step-by-step PONY RIDE (24x12) 1 Select two sheets of white cardstock as
Creating with the Envelope Punch Board Designed By: Regina Andari April 2014
 Creating with the Envelope Punch Board Designed By: Regina Andari April 2014 The Envelope Punch Board is no longer a new tool, but there are plenty of new ways to create with it. Learn to make a fun camera-shaped
BLUE SKIES. & butterflies SCRAPBOOK KIT SPRING Scrapbook Kit Projects from Kelly Goree. scrapbookandcards.com
 BLUE SKIES & butterflies SCRAPBOOK KIT SPRING 2018 Scrapbook Kit Projects from Kelly Goree Q U A R T E R LY C R A F T K I T S step-by-stepinstructions instructions++tips sketch step-by-step SPRING FLING
Shopping List:- How to make a... Strictly Dancing Tri Fold Box. How to make a... You are a Treasured Friend Box
 Shopping List:- Grand Calibur Die Cutting Machine : WIZGC-200 Sue Wilson Shadow Box Collection Stitched Lattice Frame Dies : CED9303, Shopping Special Collection List:- Arbour Gate : CED9403, New Zealand
Beauty Bloom Tutorial/ with compliments from: MakeHairBowsNow.com
 MakeHairBowsNow.com/Home of the Premier HairBow/ Accessory Making Master Course Over 88bows Page 1 Beauty Bloom MakeHairBowsNow.com/Home of the Premier HairBow/ Accessory Making Master Course Over 88bows
How to make a... Strictly Dancing Tri Fold Box
 Shopping List Grand Calibur Die Cutting Machine : Shopping WIZGC-200 List:- Grand Sue Calibur Wilson Die New Cutting Zealand Machine Collection : WIZCAL Sue ~ Wilson Wellington Austrian Die Collection
An exclusive project for Studio 5 viewers. Enjoy!
 An exclusive project for Studio 5 viewers. Enjoy! Christmas Configurations Keepsakes House The main product you will need to make this or similar project is Tim Holtz Ideology Configuration Boxes Configuration
DIY Christmas Advent Calendar Sewing Tutorial
 DIY Christmas Advent Calendar Sewing Tutorial I love counting down the days until Christmas with my children and seeing the smiles on their faces each morning as they get to check the advent calendar to
Pressed Flowers. Materials: Directions: Pressed flowers Heavyweight paper Picture frame Craft glue Small paint brush Tweezers
 Pressed Flowers Pressed flowers Heavyweight paper Picture frame Craft glue Small paint brush Tweezers 1. Pressed flowers can be purchased online or you can easily press them yourself. Begin by folding
August 2008 Greetings to Go Cruisin
 August 2008 Greetings to Go Cruisin Materials: Cruisin Greetings to Go Cruisin Unmounted Font and Borders & Backgrounds Cruisin Wood Mounted Stamp Set Cruisin Wood Mounted Happy Birthday Stamp Tools: Bone
Birthday Basics Party Pack Designed By: Anjii Rempel June 2013
 Birthday Basics Party Pack Designed By: Anjii Rempel June 2013 Perk up your party with a banner, mini-cupcake décor, Invitation and Thank You cards and goody bag stuffers! Instructions Step 1 Using Raspberry
THIS LITTLE PIGGY Mystery Block-of-the-Month MONTH #1
 THIS LITTLE PIGGY Mystery Block-of-the-Month MONTH #1 The Red Boot Quilt Company The Red Boot Quilt Company THIS LITTLE PIGGY BOM MONTH #1 Approx. size block 17 1/2in BEFORE THE FUN BEGINS Please read
Sketches by: Becky Fleck. 10 pages of. project inspiration GET INSPIRED AT PINKPAISLEE.COM
 Sketches by: Becky Fleck 10 pages of project inspiration GET INSPIRED AT PINKPAISLEE.COM INFO@PINKPAISLEE.COM TABLE OF CONTENTS SEE WHAT OUR DESIGNERS CREATED WITH THESE "PAGE MAPS" a b c d e h f g a page
1. The outer cover: If you chose to make a patchwork like cover, you will need to sew your pieces putting the 2 smaller ones on each side.
 Material : - Pretty fabrics: 5 different and assorted or 1 you specially like - another fabric for lining - Fusible interfacing - 2 Button - Embroidery floss - Thread and sewing machine. - A small notebook
Shopping List:- How to make a... Strictly Dancing Tri Fold Box. How to make a... Sue Wilson Delicate Filigree Buckle Card
 Shopping List:- Grand Calibur Die Cutting Machine : WIZGC-200 Sue Wilson Noble Double Pierced Rectangle Dies : CED5508 Shopping Sue Wilson Frames List:- & Tags Zoe Die : CED4310 Grand Creative Calibur
Coat Rack. Materials: Directions:
 Coat Rack 2x2 wooden poplar (foundation of the rack) 3/4 inch diameter wood dowels (5-8 depending on how many arms you want) 1/4 inch dowel screw 1/4 inch drill bit Power drill Ruler Pencil Paint/spray
Linda Brown, Sue Dittler, Sandy Miller, Lucy Ricardo, and Carole Thommen
 Linda Brown, Sue Dittler, Sandy Miller, Lucy Ricardo, and Carole Thommen Edited by: Sharon Reilly Teena Livsey YO-YO s especially ornament balls By: Lucy Ricardo Supply list: Scraps of fabric 1 ½ circle
The {Stamps} of Life Blue Snow Globe Shaker Card
 The {Stamps} of Life Blue Snow Globe Shaker Card Designed by Gilbert Whitmer, Jr. For more of my card designs visit: Products used The Stamps of Life November 2009 Joy2Christmas Digital Stamp Set Snowflake
School & Crayon Totes
 LeisureArtsLibrary.com Sewing #803361 School & Crayon Totes Basic Tote Design by Nancy Burdette 2 Variations by Paula Hagerman Approx Design Size: 12" x 13 3 /4" each Click Here to sign up for the FREE
March 2009 Club Scrap Common Threads
 March 2009 Club Scrap Common Threads Materials: Common Threads CS Kit Common Threads Embellishment Pack Common Threads Unmounted Borders & Backgrounds Tools: 12 Paper Trimmer 13 CS Grid Ruler Adhesive
The Important Thing. Everyday Life Album Instructions. Materials Needed. Gather photos (22 total) (P) = portrait (L) = landscape
 (P) = portrait (L) = landscape") Everyday Life Album Instructions The Important Thing Materials Needed D1772 My Acrylix Documented Scrapbooking Stamp Set E1032 My Acrylix Typography Alphabet Stamp Set BULK408 Chelsea Gardens Bulk Packet
Everyday Life Album Instructions The Important Thing Materials Needed D1772 My Acrylix Documented Scrapbooking Stamp Set E1032 My Acrylix Typography Alphabet Stamp Set BULK408 Chelsea Gardens Bulk Packet
Skull Party Favors. Instructions:
 Skull Party Favors Treat your Halloween party guests to a frightfully fantastic table! Easy to make decorations with Tulip 3D Fashion Paint, Fashion Glitter, Iron-On Crystals and Aleene s Acid-FreeTacky
Gift Design by Gina Tepper Golden Magnolia
 Gift Design by Gina Tepper Golden Magnolia These beautiful floral gifts capture the warm gold and brown tones of fall. Gold patterned scrapbooking paper, silk flowers and beads create a stunning design
Canadian Quilters Association Pattern: Quilting Tools Tote Bag
 Canadian Quilters Association Pattern: Quilting Tools Tote Bag Description: * Size: 24 x 28", storage for: 6 x 24" ruler and 18 x 24" cutting mat, and all other equipment. * Easy to carry to workshops
Design 2006 Shannon Lawrence Images Stampin Up! Design 2006 Shannon Lawrence Some images Stampin Up!
 Design and instructions 2006 Shannon Lawrence. All rights reserved. Printed images may be copyrighted by the manufacturer. You may share and reuse this document in full for personal use and nonprofit purposes
Reading pouch with matching book mark
 Reading pouch with matching book mark For every child who loves to read, these items are also perfect to get them involved in the making of it too, great summer holiday project. My niece is mad about horses
Original Recipe. Sweet Flowers Quiet Book
 Original Recipe Sweet Flowers Quiet Book Hi, everyone, it's LeAnne Ballard from Everyday Celebrations. It has been too long since I've posted over here so I am very excited to share this project. When
HALF CASE CARD & TAG KEEPER
 HALF CASE CARD & TAG KEEPER By Debbie Henderson All images copyright 1990-2017 Stampin Up! Stampin Up! Supplies Used: Stamps: Christmas Quilt Inks: Tranquil Tide, Blushing Bride, Pool Party, Whisper White
COTTONTAIL BUNNIES. The Red Boot Quilt Company
 COTTONTAIL BUNNIES This is a free pattern provided by The Red Boot Quilt Company 2017 STRICTLY NOT FOR RESALE OR DISTRIBUTION The Red Boot Quilt Company www.theredbootquiltcompany.com COTTONTAIL BUNNIES
Designed by Annette Green
 Designed by Annette Green Graphic 45 Supplies: 2 sheets Botanical Tea (#4500875) 1 sheet Robin's Egg (#4500881) 1 sheet Hello Friend (#4500882) 1 sheet Sweet Chamomile (#4500884) 1 pack Chipboard Tags
May 2008 Greetings to Go Body & Soul
 May 2008 Greetings to Go Body & Soul Materials: Body & Soul Greetings to Go Body & Soul CS Wood Mounted Stamp Set Body & Soul Unmounted Borders & Backgrounds and Fonts Body & Soul I Love Your Spirit Stamp
Designed by Gloria Stengel
 Designed by Gloria Stengel Graphic 45 Supplies: 1 sheet Cut Apart (#4501043) 1 sheet Flourish (#4501044) 1 each 6 x6 Patterns & Solids Pad (#4501053) 1 pack Time to Flourish Chipboard Tags (#4501059) 2
Feels Like Home. Deluxe Scrapbooking Workshop. 2 layouts, 2 single pages. Featured Technique: Heat Embossing. Additional Materials Needed:
 Deluxe Scrapbooking Workshop Feels Like Home 2 layouts, 2 single pages Featured Technique: Heat Embossing Additional Materials Needed: D1821 My Acrylix Feels Like Home Scrapbooking Stamp Set* Z6500 Sugarplum
The 12 DOs. of Christmas. Recycled Arts and Crafts Guide. Festive. The 12 DOs of Christmas
 Festive Recycled Arts and Crafts Guide Proud partner and page sponsors 1300 733 712 1 About this Guide Whether you re celebrating Christmas, Passover or just the summer season of festivities, we hope you