Carved Feet Made Simple. Richard Morris
|
|
|
- Ira Dawson
- 5 years ago
- Views:
Transcription


1 Carved Feet Made Simple Richard Morris


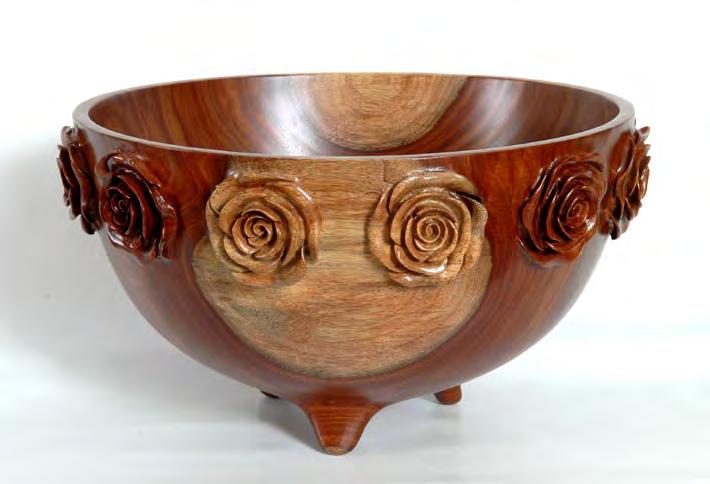
2 Photo 1 Leave 3/4 for the feet to be carved Photo 2 Reverse turn centering tool Would you like to add a little extra artistic flair to your woodturnings? Have you been thinking about ways to spice up your work? Want to add that WOW factor to your turnings? Do you want that How did you do that response from others? I have just the embellishment for you. This is an embellishment that looks complicated but is quite simple. As you will see this works for all types of turned vessels, bowls, vases, and platters. They can be solid wood, segmented, or even natural edge vessels. You will be limited only by your imagination. This article is a tremendous thought starter. Even though I call these hand carved, I use power tools, air powered grinders and sanders, and techniques that really simplify the process. You can be cranking out more artistic pieces in no time. Note: There is a list of tools used at the end of this. This demo will attempt to show the process for making a scalloped edge bowl or platter. The first thing to do is to determine what you want your bowl to look like. Determine your bowl design and turn the outside up to the foot area. We need to leave about 3/4 to 1 for the bottom for the feet to be carved out of, See Photo 1. Shape the bottom of the bowl so its curve will flow through the feet area to the center of the bottom. The center of the bottom needs to be higher off the table than the bottom of the feet for the bowl to rest on the feet. Turn the inside to the desired wall thickness. Sand the inside and out to 320 grit. As you can see I have the bowl mounted on a 6 faceplate. The bowl we are working on is 14 in diameter. The 6 faceplate gives me a guide to the diameter I want for the feet. I like the diameter of carved feet to be from 1/3 to 7/16 of the bowl diameter. It takes a bit more in diameter for carved feet than a round bottom for stability as there is a lot of wood missing between the feet. Photo 3 Drill centering hole 3/8 deep Shape the outside of the foot area to your design and sand to 320 grit. Its easier to sand a solid ring than 3 separate feet stuck out in the air. Remove the bowl from the lathe. I have a centering tool to help in centering the bowl for reverse turning the bottom, See Photo 2. Screw the tool into the faceplate, or chuck. There is a bushing in the tool for a size drill bit, which comes with the tool. Use the drill bit to drill a hole in the bottom of the bowl, approximately 3/8 deep, Carved Feet Made Simple - Page 2


3 Photo 4 Use of rubber pad for reverse turning Photo 5 Use of centering pin for reverse turning See Photo 3. Remove the tool from the faceplate and remove the faceplate from the bowl. The tool comes with a pin sized to the drill bit that replaces the point in the live center. I use a wood disk with closed cell sponge rubber glued on for a jam block to reverse turn the bottom, See Photo 4. Place the wood block in the chuck. Place the inside of the bowl against the rubber pad. Pull the tail stock up to the bottom. Align the pin in the live center to the hole in the bottom of the bowl. Sung the bowl to the rubber pad, See Photo 5. We are now ready to turn the bottom of the bowl and the foot ring. We need to turn the inside of the foot ring down to match the curve profile of the bowl. We want the curve to flow smoothly to the center of the bottom. Keep in mind that the bottom of the bowl needs to be lower, in lathe position, than the bottom of the feet or the bowl will rock around on the bottom. As you noticed there are screw holes to remove, See Photo 5. Cutting the foot ring down to match the outside wall contour will remove these. Turn the lathe on slowly to see if the bowl is balanced, if not turn the lathe off and adjust as necessary. After we get the bowl balanced turn the lathe off. Adjust the tool rest and proceed to turning the inside edge of the foot ring. Turn the shape of the ring to your design. I like the edges to be concave, this is personal not required, See Photo 6. Sand the inside of the foot ring to 320. Again it is easier to sand a solid ring than 3 individual feet while the bowl is rotating in the lathe. While cutting the inside of the foot ring turn the remaining portion of the bottom, up to the nub. Again maintain the curve profile of the bowl to the very bottom. After we carve the feet out the bowl curve profile needs to be a continuous flow between the feet. Photo 6 Turning the inside of the foot ring Carving the feet will be done with a 1/4 air grinder and a 2 spherical burr. The 2 diameter gives a nice radius on the foot. You can use a different diameter burr if that suits your design. Carving the feet also requires a table and a sled for the air grinder and pencil point. These can be made. The center line of the grinder and pencil point in conjunction with the table, which fits in the banjo, needs to Carved Feet Made Simple - Page 3


4 align with the center line of the lathe. See Photo 7. Information on how to make these is at the end of the article. Photo 7 Use of a table and air grinder sled for carving Photo 8 Mark the location of the feet on the ring We will also be using the indexing locking system on the lathe. If your lathe does not have an indexing system they are available for sale commercially. My lathe has a 24 pin indexing system. We will be carving 3 feet. 3 feet will always set without wobble when the wood moves later. 4 feet has a great chance of rocking on the feet when the wood moves. Just because I like using 3 feet does not mean your design can t have more. That means a foot will be every 8 index positions. Lock the indexing wheel in place. Using the pencil sled draw a line on the outside of the bowl, also mark the bottom of the foot ring, See Photo 8. Pull the indexing pin and rotate the bowl to the next locking position. In this example the number 2 position of 24. Mark the foot ring again. Advance the indexing wheel 6 positions and mark the foot ring again. Advance 1 position and mark. Advance 1 position and again mark the foot ring. Advance the indexing wheel another 6 positions and mark the foot ring again. We should have 9 marks on the foot ring, See Photo 9. There should be 3 marks defining the location of each of the 3 feet. Use a 1/4 air grinder, in the sled, and 2 sphere burrs to carve the feet. See Photo 9. You will need a compressor with enough air supply to power the grinder. You need at least PSI. You can use less but it will take longer. Be careful to hold down the sled as it slides back and forth on the table. The burr is rotating and will have a tendency to want to ride up out of the flute. Carve until you reach the guide line on the foot ring. My grinder has a lever valve to turn the air on and off. I have the normal air supply lever on the grinder strapped down so I don t have to hold it down while also holding the sled down on the table. Photo 9 All 3 feet marked on the ring Index the bowl until the burr will be cutting in between the marks for the feet. We want to leave the 3 marks defining the location of the feet. Assure the indexer is locked in place so the bowl does not move when carving. Carved Feet Made Simple - Page 4


5 Photo 10 Start carving the first foot Photo 11 Carve all the area between the first 2 feet Note: If the air hose on the grinder rubs the table it needs to be held up. This will cause the grinder sled to grab and may cause wood removal where you don t want. You can wrap the hose around your shoulders to eliminate this, or hang from the ceiling. Turn the grinder on and move it into the foot ring slowly. You will get a feel for how the grinder cuts the wood very quickly. Carve the foot ring down until the bottom of the cut nearly matches the curve of the bowl. Remember to leave enough wood for sanding. After the first cut turn the grinder off and lets take a look at it, See Photo 10. Visually and with your fingers assure the curve profile of the bowl is being maintained. If all feels and looks good rotate the bowl 2 index positions. Repeat the above step. Rotate the bowl again until you carve to the next foot guide line. At this point you should have all of the wood roughed out between the first two feet. As you will notice there will be several raised ridges in this area, See Photo 11. They need to be carved down free handed to make sanding a lot easier. We can use the grinder in the sled for this. It may be easier to hold a grinder not mounted in a sled also, See Photo 12. Again assure there is enough wood left for sanding. You can always take more off, you can t add any back. Photo 12 Carve the ridges down between the feet Photo 13 Rotate the bowl to line up the next foot mark. Repeat all of the steps above until the second area between the feet is roughed out. Again assuring to leave enough wood for sanding while maintaining the bowl curve profile. When all is OK with this area rotate the bowl to the third and final area. Again repeat the above steps to rough out the final portion of the foot Photo 14 Start sanding with 120 grit on firm pad ring, See Photo 13. Assure all looks and feels OK Carved Feet Made Simple - Page 5


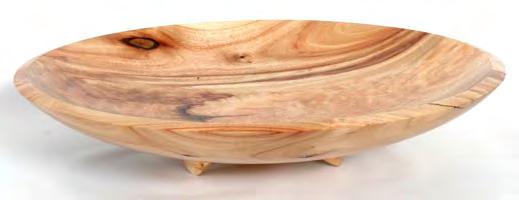
6 Photo 15 Finish sanding to 320 with soft pad before we start sanding. I sand the feet while the bowl is still in the lathe. This way I can lock the indexer to keep the bowl from rotating as I sand. I use a 3 sanding disk, firm pad, with 120 grit disk to rough sand the feet, See Photo 14. While sanding I maintain the profile curve of the bowl between the feet. The outside and inside edge of the feet should already be sanded to 320. Rotate the bowl and sand the other feet. After rough sanding I change the sanding pad to a soft pad, See Photo 15. This allows a better flow of the pad to conform to the shape of the foot. Sand all feet to 320 grit. While the bowl is mounted in the lathe you will not be able to sand all the way to the bottom as the live center is still in contact with the bowl. Remove the table from the banjo and insert the tool rest. Unlock the indexer and turn the lathe on. Trim the nub at the live center pin down as small as possible with out breaking it. Clean up the remaining portion of the bottom maintaining the curve profile, See Photo 16. Again assure there is enough wood left for sanding. Photo 16 Trim nub down Photo 17 Carve nub away Stop the lathe and remove the bowl. Place the bowl on a flat surface so we can remove the nub on the bottom. I use a piece of exercise mat to cover the work surface. This protects the edge of the bowl and helps to keep it from sliding when carving the nub off. Use the grinder as we did earlier to carve the nub away, See Photo 17. Again assuring to leave enough wood for sanding. Now sand the remaining portion of the bottom. Start with 120 grit disk on a firm 3 sanding pad, See Photo 18. Sand until the bowl curve profile is maintained. When the profile is achieved change the sanding pad to the soft one, See Photo 19. Finish sanding to 320 grit. Assure the bottom of the bowl matches the curve profile. Photo 18 Sand with 120 grit on firm pad Lets take a look at the bowl setting upright with the carved feet, See Photo 20. This just adds that extra flair to any piece, especially just a plain bowl. It appears to give the bowl a little lift off the table. If all meets the quality check we can finish the bowl. Use the finish of your choice. I prefer Mohawk s Carved Feet Made Simple - Page 6


7 Pre-Catalized Lacquer satin finish. This gives a very durable and professional looking finish that is very easy to achieve. This finish is also harder than normal lacquer. It also dries very fast thus eliminating much of the dust fallout. Just buff with steel wool between coats. There is also a Pre-Catalized Sanding Sealer that I use as the first coat. Now lets take a look at the finished product. Notice how the curve profile flows through the feet to the bottom of the bowl, See Photo 21. What a great addition to any bowl or platter. This just adds that bit of elegance to an other wise plain utilitarian bowl. Making the table and sled Photo 19 Finish sanding to 320 with soft pad Photo 20 Look at bowl setting on the carved feet Photo 21 Bowl after finishing The table has a 1 post welded to a 4 diameter 1/4 piece of plate steel. The post needs to fit your banjo. A piece of 3/4 plywood is screwed to the plate steel. The plywood can be cut to the shape of the bowl. The post needs to match your banjo size. The sled can be UHMW or wood. Take a 3 square piece of wood 6 long. Drill a 2 hole through the center, length wise. Cut this in half on the band saw and you have two sleds. Secure a 1/4 air grinder in the sled with straps. Strap the air supply lever down so it is always open. Add a lever valve to the air grinder. This will also allow you to control the speed of the grinder. This is how you will turn the air grinder on and off. This way you don t have to hold the air supply lever down on the tool while holding the sled down. Be careful as the carving burr is always rotating until the air supply valve is shut off. Carved Feet Made Simple - Page 7
8 Tools and Suppliers Air Grinders - Drills Tools Suppliers Harbour Freight - Home Depot Packard - Klingspore - Carbide Burrs - 2 wood blaster and 1 sphere By Saburr Tooth. Wood Carvers Supply - TreeLine - Mohawk Pre-Catalized Lacquer Klingspore - Sleds - pencil & grinder Home made Sled Table Home Made Sanding supplies Klingspore The Sanding Glove - Re-centering Tool Don Geiger - Indexing Plate Home made or Carved Feet Made Simple - Page 8
9 Quick List of Steps 1. Finish turn bowl except for the foot. Including sanding to 320 grit. Leave 3/4 to an 1 on the bottom to carve the feet from. 2. Use a centering tool to help with setting up the bowl for reverse turning. Drill a hole 3/8 deep in the bottom before removing the faceplate or chuck. 3. Use a rubber pad in a chuck for holding the bowl for reverse turning. Mount the bowl back on the lathe jam chucking against the rubber pad and the centering pin in the live center. 4. Turn the inside of the foot ring to desired shape. 5. Sand the inside of the foot to 320 grit. 6. Need a sled for the air grinder and pencil. Need a table for the sled to slide on. You can make these. 7. Need indexing capability, from the lathe or an indexing wheel. 8. Mark the locations of the 3 feet on the foot ring. Use the pencil and sled for this. 9. Carve the feet with the air grinder in the sled. 10. Hand carve the ridges between the feet down. Remember to leave enough wood for sanding. 11. Sand the feet to 320 grit. 12. Cut the nub on the bottom, next to the pin in the live center, down as small as possible without breaking it. 13. Remove the bowl from the lathe. Place the bowl on a piece of exercise mat to prevent slipping and to protect the rim of the bowl. 14. Carve the nub down with an air grinder. Remember to leave enough wood for sanding. 15. Sand the bottom of the bowl to 320 grit. 16. Finish as desired. Carved Feet Made Simple - Page 9
Pierce Carving. Richard Morris
 Pierce Carving Richard Morris rlmorris3@aol.com www.richardmorrisart.com 812-989-9079 Photo 1 This is the project for this Demo Would you like to add a little artistic flair to your wood turnings? Have
Wooden Faceplates. Tapping on the Lathe
 Wooden Faceplates There are lots of turning jobs where spending some time on set-up makes the turning go quicker and easier. Making Wooden Faceplates is one way to make set-ups and jigs for turning. As
How to Make a Hat Bending Jig
 How to Make a Hat Bending Jig MATERIALS One 2" x 8" x 11" long (Base Block) exact measurements are 7 ½" x 1 ½" x 11" (Pine is OK to use, I have used scrap Walnut for my benders) Four pieces of Oak 1" x
A candle stick addresses transferring and reproducing dimensions from a plan and breaking the project into steps.
 Activities Discussion These projects allow more skill development including making items to match a drawing, sizing projects to specific dimensions, and just trying fun stuff for the first time! A candle
Making a snap lid box By Jeffrey A Lavine
 Making a snap lid box By Jeffrey A Lavine Some call them boxes, some call them lidded bowls, others call them vessels or containers but whatever you call them they are both enjoyable and a challenge to
Two-Piece Hollow Form Turning Hollowing Without the Hassle
 Two-Piece Hollow Form Turning Hollowing Without the Hassle Finger Lakes Woodturners January 17, 2013 1 Hollow Turning Usually turning a closed or semi-closed form through a small opening Can be done using
Woodturning Fundamentals American Association of Woodturners, January 2013
 Woodturning Fundamentals American Association of Woodturners, January 2013 Methods and Jigs for Reverse Turning Bowls By John Lucas There are many ways to hold bowls and hollow vessels so that you can
This is an excerpt from the book. Turning Bowls. by Richard Raffan. Copyright 2001 by The Taunton Press
 This is an excerpt from the book Turning Bowls by Richard Raffan Copyright 2001 by The Taunton Press www.taunton.com 4 ROUGH-TURNING CHAPTER THE PROFILE Ialways rough out bowls in two stages. First I turn
Legacy Classic Twist Pencil Kit
 Legacy Pencil Kit Description: The pencil is great kit and has features to make it a step-up pen. It is slightly more difficult to make, but still very easy if you follow these instructions carefully.
Michael Werner July 19, 2008 Demonstration By Bob Gunther Photographs by Tina Collison and Dave Vizard
 Michael Werner July 19, 2008 Demonstration By Bob Gunther Photographs by Tina Collison and Dave Vizard Overview: Michael Werner was born and grew up in Switzerland. Making things was a family tradition
How to Make a 400 BC Greek Oenochoe Style Wine Pourer
 How to Make a 400 BC Greek Oenochoe Style Wine Pourer The purpose of the demonstration is to show how to make a hollow form wine pourer in the style of ancient Greek pottery. Live demonstration on the
Turning a CrushGrind shaft grinder without using glue
 Turning a CrushGrind shaft grinder without using glue A step-by-step approach to removing the apprehension 1 Chris West Content Introduction 3 Robert Sorby CrushGrind Recess Cutting Tool 4 Required tools
TURNING BOWLS AND PLATTERS. With Glenn Lucas 2014 ARROWMONT CLASS JIM PERRIELLO
 TURNING BOWLS AND PLATTERS With Glenn Lucas 2014 ARROWMONT CLASS JIM PERRIELLO 1. Glenn Lucas Instructor and Greg Schramek (Asheville, NC), assistant. a. Glenn Lucas is an Irish woodturner who is recognized
Agricultural Mechanics and Technology Power Tool Safety Rules
 Agricultural Mechanics and Technology Power Tool Safety Rules Name: BAND SAW Use: Cutting curves, circles and irregular shapes. 1. Use clean SHARP blades. 2. The teeth should always point DOWN. 3. Adjust
Perhaps the best thing about. Three bowls slightly rearranged Twisted Possibilities
 Three bowls slightly rearranged Twisted Possibilities By Malcolm Tibbetts Lacewood Ribbon, 13 7½" Perhaps the best thing about segmented turning is the total lack of restrictions; there is no end to the
Turning an End Grain Lidded Box
 Turning an End Grain Lidded Box by Michael Stafford Copyright 2006 All Rights Reserved 1 Turning an End Grain Lidded Box Turning an end grain lidded box differs from face grain bowl turning primarily in
TURNING A NATURAL EDGE BOWL
 TURNING A NATURAL EDGE BOWL by Jim Burrowes Make sure your lathe is at the lowest speed setting.first, mount your blank between centers. Use the tool rest as a reference to align the top (bark side) so
Turning Small Squarish Dished Platters Rev 2.1 5/5/2018
 Turning Small Squarish Dished Platters Rev 2.1 5/5/2018 John K Jordan jordanjk@gmail.com These are "small," perhaps about 7.5" to 10.5" across. They are "squarish," not quite square. I call them "dished
To Improve Your Woodturning
 To Improve Your Woodturning Things to make / buy / do before turning 1 Use measuring masking tape on tool rest 2 Outlet strip on lathe 3 Lighting - So many LED solutions! 4 Get taps to make lots of our
Jimmy s 2 nd demonstration was what he called an African Drum style box made from Iroko with a cocobolo insert in the lid with inlaid sterling silver.
 Jimmy s 2 nd demonstration was what he called an African Drum style box made from Iroko with a cocobolo insert in the lid with inlaid sterling silver. He started by roughing out the block with a roughing
Jimmy Clewes Masterclass - Cheam Woodturners 10th November 2013
 This demonstration was the first time in 6 years that Jimmy has demonstrated in the UK. He pointed out that the techniques he uses are his alone, that it is important to enjoy woodturning and do whatever
For Barrel Tapers. Installation and Operating Instructions for use with table saws and large disk sanders
 Tim s Taper Tool For Barrel Tapers Installation and Operating Instructions for use with table saws and large disk sanders Your taper tool is capable of making barrel tapered shafts. The term barrel is
Reprinted with permission. American Association of Woodturners
 Playing Fire with By Nick Cook My fascination with fire started in 1993 at the AAW symposium in Purchase, New York. I watched Australian Vic Wood burn the rim of a platter, and I was immediately hooked.
VASE FLYING-WING A BARK-EDGED. Kevin Felderhoff. Wood selection. 36 American Woodturner August 2017
 A BARK-EDGED FLYING-WING VASE Kevin Felderhoff I enjoy turning endgrain pieces and have found that the most dramatic wood grain comes from logs or branches with irregular shapes far from round. The flying-wing
How to Turn a Wooden Egg
 How to Turn a Wooden Egg By Alex Elias (Alxe24) January 2008 This article has been downloaded from the library of the International Association of Penturners. www.penturners.org You are welcome to reproduce
Fig2: The Sliding Glue Block from the back.
 Ornament Stand Introduction It was one of those forehead smacking moments. I was taking the #2 jaws off my Stronghold chuck, to put on my homemade wooden two jaw chuck set-up. For some reason instead of
Procedure for Longworth Chuck construction
 Procedure for Longworth Chuck construction Overall construction The Longworth chuck is composed of three major components. Connected to the lathe spindle is some device that fastens to the first of two
Malcolm Zander malcolmzander.com Ottawa, Ontario Canada
 Malcolm Zander mzander@magma.ca malcolmzander.com 613-226-5041 Ottawa, Ontario Canada I began turning in 2000. Obviously I have a lace fetish. This I blame on Binh Pho, whose seminar in Albany I attended
Coil Winder Instructions.
 Page Coil Winder Instructions. Before we can build our wind turbine there are a few tools we need to make. We ll need to make moulds for the magnet rotors and the stator, and we need to make a coil winder.
Ice Cream Cone Pen Made with a European Kit by Bill Jacob
 Ice Cream Cone Pen Made with a European Kit by Bill Jacob Equipment needed: Lathe (no brainer) Drill press or equivalent Calipers Drill chuck with #1 or #2 MT Square Choose your colors of wood you desire.
Legacy Slimline Pencil Kit
 Description: The model is considered one of the most basic pen kits and is a great starter kit for those new to pen turning. Many experienced pen turners use the kit to make elaborate and unusual pens
Easy Woodturning. "It's Our Turn!" Made In America
 Easy Woodturning owner S MANUAL "It's Our Turn!" Made In America Just like every product we have ever made, your Easy Chuck is 100% designed and manufactured in America by Easy Wood Tools. The Easy Chuck
Basic Turning Spindle to Bowl
 Basic Turning Spindle to Bowl 7/23/12 8:23 AM Beads and coves all you can do, yes there are flat places and V cuts, but what are they but parts of a bead or a cove. That is all you can do on a lathe. One
Benoit Averly Demo # Eli Avisera Demo #1 Demo #2 Demo #3 Demo #4 Demo #5 Demo #6 Richard Findley Demo 1 Demo 2 Demo Demo
 Benoit Averly Demo #1 Little Boxes with a French Accent How to turn little boxes using the skew a the main tool. Demo #2 Hut and Flat Boxes Turning larger hut and flat boxes. This is the next step. The
How to Construct the 8-Point Star by Jay S. Helland
 How to Construct the 8-Point Star by Jay S. Helland 1-5-2013 The photos in these instructions were not taken in consequential order but provide the reader the general idea of the processed used. The process
Building a shaft less Crush/Grind Pepper mill Chuck Ellis
 Building a shaft less Crush/Grind Pepper mill Chuck Ellis First off, I don t want you guys laughing at my drawing I m a better turner than I am a graphic artist. This is a rough sketch very rough of my
MATERIALS & TOOLS REQUIRED INTRODUCTION. Before you start turning, read and understand this entire procedure.
 INTRODUCTION This set of instructions shows one method to turn mills.there are many other possible variations and techniques. NOTE: These instructions are specific to 'Chef Specialties' mechanism. For
The following Instructions are for making an indexed Chuck to create bowls which have 3,4 or 5 equi distance bowls with a possible 6th within.
 The Off-Centre Chuck. Ornamental Turners Group Australia th Update 8 June 2010 The following Instructions are for making an indexed Chuck to create bowls which have 3,4 or 5 equi distance bowls with a
Segmented Bowl Making Presentation (Polychromatic Stave-Type Bowl Making) by Jay Helland Lee s Summit, Missouri
 by Jay Helland Lee s Summit, Missouri") Segmented Bowl Making Presentation (Polychromatic Stave-Type Bowl Making) by Jay Helland Lee s Summit, Missouri In Remembrance of George Sonnie Sharrar Oct. 2, 1914-Dec. 25,2007 (Patternmaker, Master Bowl
Segmented Bowl Making Presentation (Polychromatic Stave-Type Bowl Making) by Jay Helland Lee s Summit, Missouri In Remembrance of George Sonnie Sharrar Oct. 2, 1914-Dec. 25,2007 (Patternmaker, Master Bowl
WOOD TOY NEWS SANDING DRUMS & JIGS ISSUE
 WOOD TOY NEWS SANDING DRUMS & JIGS ISSUE toymakingplans.com June 11, 2014 Wednesday How to Make a Sanding Drum Jig for Smarter Toymaking. By Imants Udris Udie Our discussion begins based on the 5 piece
A Quick-Change Gearbox For The 7x Minilathe
 A Quick-Change Gearbox For The 7x Minilathe Richard Hagenbuch 10 August 2002 This article describes how to a build a quick-change gearbox for your 7X minilathe. I'll describe one that I built as a prototype
Making a Windsor Stool
 Brian Clifford A Windsor Stool - page 1 Making a Windsor Stool The Windsor style The Windsor style is the name of a particular type of traditional English chair. Within this style there are a variety of
Turning a Duck by Fred Holder
 Turning a Duck by Fred Holder Back in 2004, Guilo Marcolongo, a turner from Australia, demonstrated how to turn a Daffy Duck at the Utah Symposium. I decided to try one. Here s my process, with some photos
Presentation by Vic Buxton Valley Wood Turners Meeting April 10, 2012
 Presentation by Vic Buxton Valley Wood Turners Meeting April 10, 2012 1 Segmented wood turning is much more than gluing together pieces of wood. It is about creating exciting objects that challenge you
1. Mount between centers round cut tenons on both ends (same diameter).
.") LONG NECK HOLLOWFORM Jim Terry Piedmont Triad Woodturners Association Turning this hollow form presents some interesting challenges in mounting and holding a turning. Both top and bottom are completely
LONG NECK HOLLOWFORM Jim Terry Piedmont Triad Woodturners Association Turning this hollow form presents some interesting challenges in mounting and holding a turning. Both top and bottom are completely
Wood Duck Nest Box Design & Assembly Directions
 Wood Duck Nest Box Design & Assembly Directions Instructions, Illustrations & Photos Courtesy of MWDI and Scott Jasion, Harford County Chapter, Ducks Unlimited Side door opening design for easy mounting
Makin Shavins. Hard to comprehend. A Woodturning Newsletter
 1. O C T O B E R 2 0 1 6 Makin Shavins A Woodturning Newsletter Hard to comprehend. This is a piece from the recent SWAT show in WACO Texas. Just a piece from the gallery, which is free to enter and free
My favorite turnings are TURNING A FIVE-SIDED BOX. Design brings regular polygons to life. Ted Rasmussen. Prepare the stock
 TURNING A FIVE-SIDED BOX Design brings regular polygons to life Ted Rasmussen Polygonal lidded boxes by Ted Rasmussen with five, seven, and nine sides; ambrosia maple with African blackwood finials. Largest
Demonstration Bob Rosand October 20, 2007 by Bob Gunther
 Demonstration Bob Rosand October 20, 2007 by Bob Gunther Overview: Bob Rosand has been a woodturner for more than 25 years. He teaches, demonstrates and writes articles on many topics pertaining to woodturning.
TURNING TOOLS CARVING TOOLS
 Multi Jig SVS-50 (37592) TURNING TOOLS Square and skew chisels with straight or curved edges. Max width 32 mm (1¼"). Parting tools Beading tools Roughing gouges Max width 50 mm (2"). CARVING TOOLS Gouges,
Instruction Sheet MCHE 365 & I-Tech 344 Lathe & Mill Machining Operations Pencil Organizer Project, FALL 2015
 Instruction Sheet MCHE 365 & I-Tech 344 Lathe & Mill Machining Operations Pencil Organizer Project, FALL 2015 1 Always flip to 1 st page & leave your drawings & instructions on your Machine at end of class.
2 Cylinder Slidevalve Steam Engine
 2 Cylinder Slidevalve Steam Engine By Thor Hansen After making a slide valve engine that I managed to get running I decided to try and make a 2-cylinder version. Since the first one was a vertical steam
Building Bigger Things. Woodworking Tools and Machinery. Marking Gauge. Thumb Screw. Stop Screw. Shoe. Beam. Pin. Head. Face Plate
 Woodworking Tools and Machinery Pin Shoe Face Plate Thumb Screw Head Stop Screw Beam Marking Gauge A marking gauge is used to mark a uniform width on a board. The steel combination square discussed in
Legacy Slimline Touch Pen Kit
 Description: The model is considered one of the most basic pen kits and is a great starter kit for those new to pen turning. Many experienced pen turners use the kit to make elaborate and unusual pens
Specifications: Hole Sizes: Selector Pin Hole: 3/8 (0.375 ) Trigger Pin Hole: 5/32 (0.156 ) Hammer Pin Holes: 5/32 (0.156 )
 Trigger Pin Hole: 5/32 (0.156 ) Hammer Pin Holes: 5/32 (0.156 )") 80% Arms AR-15 Jig manual Thank you for purchasing our AR- 15 jig. This precision self- aligning jig will allow you to finish your 80% Arms and other 80% lowers using only a drill press and a few common
80% Arms AR-15 Jig manual Thank you for purchasing our AR- 15 jig. This precision self- aligning jig will allow you to finish your 80% Arms and other 80% lowers using only a drill press and a few common
Basic Box Making by Alan Hewitt
 Whilst it is possible to make boxes in many different ways I will introduce you to my method of box making. I am indebted to many of the top wood-turners for their demonstrations of box making, and the
FORWARD FUSELAGE SIDES & REAR TOP SKINS
 FORWARD FUSELAGE SIDES & REAR TOP SKINS WORK REPORT Step No. Check Parts / Tools Qty Preparations. 1 [ ] 6F5-3 Upper Front Longerons 2 2 [ ] 6F5-5 Heel Support 1 3 [ ] 6F5-2 Front Floor Skin 1 3 [ ] Firewall
User s Manual. A highly versatile chuck featuring easy to attach and release jaws for midi- and full-sized woodworking lathes
 User s Manual Barracuda 5 Quick-Change Jaw System Chuck A highly versatile chuck featuring easy to attach and release jaws for midi- and full-sized woodworking lathes #CSCBARR5 IMPORTANT: Read this manual
How to make tailwheel shock rubber donuts and aluminum shims with formed flange
 How to make tailwheel shock rubber donuts and aluminum shims with formed flange The following shows how to form a flange on the inner hole of aluminum shims to go between the rubber donuts for the tailwheel
How to install backchecks
 How to install backchecks Note: All pictures can be enlarged for better clarification. Revision 7 8/2009 Backchecks wear out in a piano much like brake pads in an automobile. While wear is a valid reason
SEGMENTED TURNING. Segmenting 101
 SEGMENTED TURNING Segmenting 101 The greatest difference between segmented turning and traditional turning is the turner must decide what final form the turning will take even before the first cut is made.
[Fig1: Cutting PVC pipe into 2-1/2 sections. The PVC is clamped to the miter gauge to keep the pipe from rotating into the blade]
![[Fig1: Cutting PVC pipe into 2-1/2 sections. The PVC is clamped to the miter gauge to keep the pipe from rotating into the blade]](/thumbs/81/83706824.jpg "[Fig1: Cutting PVC pipe into 2-1/2 sections. The PVC is clamped to the miter gauge to keep the pipe from rotating into the blade]") Inside/Outside Angel Ornament Introduction Inside/Outside turning is a technique where four square pieces of wood are held together temporarily and turned, then the pieces are rotated 180 and glued, then
Inside/Outside Angel Ornament Introduction Inside/Outside turning is a technique where four square pieces of wood are held together temporarily and turned, then the pieces are rotated 180 and glued, then
SAFETY INFORMATION PACKET
 WILLOWCREEK MIDDLE SCHOOL SAFETY INFORMATION PACKET GENERAL SHOP SAFETY 1 WIDE BELT SANDER 2 BAND SAW 3 MITER SAW 4 UP- CUT SAW 4 PLANER 6 TABLE SAW 7 DRILL PRESS 8 LATHE 8 DISK / VERTICAL BELT SANDER
Cut two squares of 1/2 to 3/4 stock that are the exact size of your coaster blanks. Stacking Coasters
 Stacking Coasters Main: Maple and Corian nested stacking coasters. Introduction My wife asked for more coasters. We have a nice quartet of square glass ones I had gotten at the ACC Craft Fair years ago,
Mark Mazzo Finger Lakes Woodturners December 15, FLWT Demonstration Hollowing Techniques
 Mark Mazzo Finger Lakes Woodturners December 15, 2011 FLWT Demonstration Hollowing Techniques Mark Mazzo 12/15/2011 1 Turning a closed or semi-closed form through a small opening Developed and popularized
By Larry Brown & Charles Webb
 By Larry Brown & Charles Webb Page 1 of 16 SAFETY: Wood turning can be Hazardous so you should take precautions to minimize the risk of an accident. I always wear safety glasses when turning. On large
Thin Walled Turning and Surface Design Techniques
 Thin Walled Turning and Surface Design Techniques Mark Mazzo Finger Lakes WoodTurners November 18, 2010 11/18/2010 1 Thin-Walled Turning Why Thin? Not to show off turning prowess Facilitates later surface
How is vacuum measured? Vacuum is measured in inches of mercury. Our atmosphere will support a column of mercury 30 inches tall.
 This document assumes the person attempting to make and use a vacuum chuck has a working knowledge of various power tools, hand tools, and wood lathes. There are NO safety warnings contained within. If
Guild of Oregon Woodworkers Shop Safety Test
 Guild of Oregon Woodworkers Shop Safety Test You must pass the Test with an 80% or better and self-correct it to 100% Make sure you put the answers under the correct portion of the answer sheet for the
Display Case (for J&S)
") Display Case (for J&S) This is constructed of maple plywood with solid maple (soft maple) edge banding. It was made to fit between a door and a kitchen cabinet, and has an elegant circular taper between
Display Case (for J&S) This is constructed of maple plywood with solid maple (soft maple) edge banding. It was made to fit between a door and a kitchen cabinet, and has an elegant circular taper between
Legacy Magnet Pen Kit
 Description: The Magnet pen model is a variation of the Slimline pen and considered one of the most basic pen kits and is a great starter kit for those new to pen turning. Sometimes called the Refrigerator
Notes for Making Wood Rings With Stainless Steel Insert Centers
 Notes for Making Wood Rings With Stainless Steel Insert Centers Background These notes describe how to make a ring with a stainless steel (SS) insert and a wood exterior band. They also include information
ALAN CARTER STUDIO 7 Cane Creek Circle, Fairview, NC
 ALAN CARTER STUDIO 7 Cane Creek Circle, Fairview, NC 28730 630-390-8821 apcarter@sbcglobal.net www.alancarterstudio.com TURNING SMALL GOBLETS As a follow up to my thin stem article, here s a how-to on
Instructions for Turning Laminated Bracelets
 Instructions for Turning Laminated Bracelets 1. Start with Design 1. Make a paper template circle for the bracelet. Use this to check the fit on the person you are making the bracelet for. After checking
This go-round puts kids in orbit
 This go-round puts kids in orbit By DAVID A. GATTIS You DON'T NEED NASA to put your kids in orbit. They'll really get a blast out of this attachment that adds whiz-around variety to the backand-forth motion
Woodline USA Woodline Spacer Fence System
 Woodline USA Woodline Spacer Fence System MADE IN THE USA Includes: (1) ¼ Spacer Fence (1) 3/8 Spacer Fence (1) ½ Spacer Fence (1) Hardware Package (1) 3 Piece Brass bar set (2) Setup Blocks Visit Us Online
Assembly. Insert stem and then fix/lock using the grub screw as in picture.
 Assembly Parts list: (Boxed set) Body inc hinge plate x1 M33 x 3.5 16 tpi + depth stop collar x1 1 stem + collar x1 HSS cutter x1 Bristol handle x1 Twist handle x1 4mm Allen key x1 3mm Allen key x 1 Instruction
Denise M. DeRose Handled Clamshell Handbag
 Denise M. DeRose Handled Clamshell Handbag Materials: Wood 2 discs between 6 and 9 in diameter -- 4/4, 6/4 or 8/4 1 piece of thin hardwood ¼ inch thick and 4 x 10 Wood for waste blocks Supplies Small piece
Gouge Jig SVD-186 (SVD-186)
") Gouge Jig SVD-186 (SVD-186) TURNING TOOLS Bowl gouges Spindle gouges Turning cutters CARVING TOOLS Curved gouges Spoon-shaped gouges Back bent gouges Down bent gouges Curved V-tools Max tool width 36 mm
Gouge Jig SVD-186 (SVD-186) TURNING TOOLS Bowl gouges Spindle gouges Turning cutters CARVING TOOLS Curved gouges Spoon-shaped gouges Back bent gouges Down bent gouges Curved V-tools Max tool width 36 mm
Turning between centers - another way
 Turning between centers - another way There has been a fair amount of discussion of turning between centers and questions always pop up and it seems like we've never really sat down and discussed the process
Artistic Woodturners Meeting of 12 August 2017
 Artistic Woodturners Meeting of 12 August 2017 Meeting was called to order by Norm Freeman. One visitor, Mike Francis, president of Azalea Woodturners, was recognized. 25 members attended. Business portion
The Simple Birdhouse Ornament
 The Simple Birdhouse Ornament There are a number of techniques for constructing birdhouse Christmas ornaments and the resulting ornaments vary from simple to very ornate and complicated. It has been my
Lumber Smith. Assembly Manual. If you are having problems assembling the saw and need assistance, please contact us at:
 Lumber Smith Assembly Manual If you are having problems assembling the saw and need assistance, please contact us at: 804-577-7398 info@lumbersmith.com 1 Step 1 Safety Carefully read the Owners Manual.
Segmented Bowl Making Presentation (Polychromatic Stave-Type Bowl Making) by Jay Helland
 by Jay Helland") Segmented Bowl Making Presentation (Polychromatic Stave-Type Bowl Making) by Jay Helland More Woodworker than Wood Turner George Sonnie Sharrar About Your Safety Working with wood is inherently dangerous!
Segmented Bowl Making Presentation (Polychromatic Stave-Type Bowl Making) by Jay Helland More Woodworker than Wood Turner George Sonnie Sharrar About Your Safety Working with wood is inherently dangerous!
Installation Instruction
 Installation Step 1 Cut Upper Guide and Lower Tracks to opening size Step 2 Mount Upper Track to soffit or ceiling. Use appropriate mounting hardware for your field conditions. NOTE: The Lower Track is
How I built my Breezy pieces
 How I built my Breezy pieces Segment Pro to start with I started with the Segment Pro software. My talent with this program is poor; I can t wait to get to the St Louis Symposium to get some better understanding
Lidded box double axis
 Lidded box double axis The Wood: Avoid the pith or take a chance. Select an interesting grain pattern or decorate the plain grain. Turn a cylinder with grain parallel to the axis. See the graphic below
HIT-30 ALUMINUM DOOR SERIES OWNERS MANUAL
 HIT-30 ALUMINUM DOOR SERIES OWNERS MANUAL INSTALL LOCKS LATCHES LEVERS / PADDLES INDICATORS STRIKES Every Installation Is A Self-Portrait Of The Person Who Did It! Autograph Your Work With Excellence!
About.com :
 http://woodworking.about.com/gi/dynamic/offsite.htm?sit...//www.popularwoodworking.com/features/fea.asp%3fid=1088 (1 of 8)1/28/2004 12:05:01 AM Modern Storage Tower The last thing I want to do when starting
SE5a Instrument Board part 2 - rev 1.1
 SE5a Instrument Board part 2 - rev 1.1 Fuel (Petrol) Valve This valve uses two circular name plates, eight brass screws, one black plastic base, copper wire and two black plastic risers. You can pick any
Shopsmith Woodworking Academy Notes
 Shopsmith Woodworking Academy Notes The Ins And Outs Of Using Woodturning Chisels We re often asked... What lathe chisels do I need to get started in wood turning and how is each used? Well, the answer
Technicians of Terror. This is the air valve we make to use with our air
 These are pictures of our scissor prop. Technicians of Terror http://www.halloweenfear.com/scissorprop.html props. This is the air valve we make to use with our air This pictures the duel door closer cylinders
A H M 531 The Civil Engineering Center
 Title Page Introduction 2 Objectives 2 Theory 2 Fitting 3 Turning 5 Shaping and Grinding 7 Milling 8 Conclusion 11 Reference 11 1 Introduction Machining Machining is a manufacturing process in which a
Complete Dovetail Jig Instructions
 Complete Dovetail Jig Instructions 15 18 4 3 1 12 13 8 19 17 16 6 14 5 9 11 10 2 9 PARTS LIST - Complete Dovetail Jig Introduction Your new dovetail jig will cut Full Through Dovetails and three varieties
Stage 2: Preparing the door (read in conjunction with Hole Drilling Options on back of Template).
.") There are three stages to fitting the CL100 mortise case: Stage 1: Marking out the position of the lock. Stage 2: Preparing the door by mortising and drilling holes. Stage 3: Fitting lock, door furniture,
There are three stages to fitting the CL100 mortise case: Stage 1: Marking out the position of the lock. Stage 2: Preparing the door by mortising and drilling holes. Stage 3: Fitting lock, door furniture,
Digital Patterns. Designed by Steve Good
 WWW.SCROLLSAWWORKSHOP.BLOGSPOT.COM Digital Patterns Designed by Steve Good Hundreds of free Patterns Stencil Printer Jigsaw Puzzle Templates DVD s Key Chain Pattern Printer Video Tutorials Reviews Community
Metal Aircraft Landing Light Installation Instructions
 Metal Aircraft Landing Light Installation Instructions This landing light kit was designed for the Thorp T-18 as a method of installing a halogen landing light in the leading edge of the outer bay of the
Building Tips This model can be built using the following types of adhesives:
 Page 1 Building Tips This model can be built using the following types of adhesives: Epoxy (with or without microballons) Odorless cyanoacrylate (CA) with accelerator UHU Creativ for Styrofoam (or UHU
Astro-Physics Inc. 400QMD Lubrication/Maintenance Guide
 Astro-Physics Inc. 400QMD Lubrication/Maintenance Guide The following guidelines should be followed to lubricate the three main parts of the 400QMD mount. The QMD stands for Quartz Micro-Drive controller.
Newsletter. March Next Meeting April 14, 2007 To be announced. Minutes of the March 10, 2007 Meeting by Dick Kostelnick. Volume 13 Number 3
 March 2007 Newsletter Volume 13 Number 3 Visit Our Home Page www.homemetalshopclub.org Statement of Purpose: Membership is open to all those interested in machining metal and tinkering with machines. The