Pierce Carving. Richard Morris
|
|
|
- Robyn Fox
- 5 years ago
- Views:
Transcription


1 Pierce Carving Richard Morris


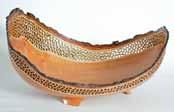
2 Photo 1 This is the project for this Demo Would you like to add a little artistic flair to your wood turnings? Have you been thinking about ways to spice up your work? Want to add that WOW factor to your turnings? Do you want that How did you do that response from others? I have just the project for you. As you will see this works for all types of turned vessels, bowls, vases, hollow spheres, anything turned thin, 1/8 or less. They can be solid wood, segmented, or even natural edge vessels. You will be limited only by your imagination. This article is a tremendous thought starter. I use a high speed dental drill and techniques that really simplify the process. You can be cranking out more artistic pieces in no time. Note: There is a list of tools and products used at the end of this article. Photo 2 NSK 850A Dental Tool I would like to thank two of my mentors, Barry Harding and Binh Pho. Safety I use a magnifying lens head piece when piercing. I also have a fan blowing air away from me to keep the smoke out of my eyes. You will be piercing a small hole through the wood. You need to be cautious of where your other hand is holding the work. Getting Started Photo 3 My Piercing Tool Stand In this article I will discuss a few design aspects of incorporating pierce carving into your design. I will cover positive and negative space. There are several ways to get a design or pattern on the wood as we will discuss. You will find out which tools are needed and how to use them. So lets have some fun. Photo 1 shows the project we are using for this handout. Tools Needed Lets start with the piercing tool. I use a NSK 850A pneumatic dental drill. This tool does not need oil as the bearings are sealed. It operates at 320,000 RPM s at 35 PSI of air. The tool only accepts 1/16 shank burs. See Photo 2. Requires 1.5 CFM at 35 PSI. There are many brands of turbo carvers on the market, this is the one I like and use. I feel it delivers a bit more torque. Suppliers for these are listed at the end Photo and 169L Burs of the article. Pierce Carving - Page 2


3 Photo 5 Bur Packaging You will need a way to turn the air on and off. Also a way to adjust the air pressure to 35 PSI. I have a tool stand that has air hookup fittings, a regulator, an on and off valve, and a place to hold the tool when not in use. See Photo 3. This unit came from GRS Tools. My unit originally had a variable speed foot control. After an hour or so I would notice the tool not cutting as well as it was. Then I noticed my foot was relaxing off of the foot control, so I removed it. Just remember to hold the tool until you can turn off the air manually. Now lets discuss the carbide burs used in the tool. They are 1/16 shank and solid carbide. The burs used are the same ones the dentist s use. The primary bur I use is a 169L, the 699L is similar. The L stands for long. The 699 bur has a flute cutting length of 4.2 mm. The L has a cutting length of 6 mm, See Photo 4. This will allow you to pierce a bit thicker wall thickness. The 169L bur is a tapered fissure bur. The bur is only.9 mm diameter at the tip. The tip is blunt and not pointed, but still pierces the wood easily. Photo 5 shows the bur packaging with part numbers. There are other styles of burs as you find uses for them. Photo 6 Example Compressor Kobalt You need a compressor that will deliver at least 2 CFM, cubic feet per minute, at 35 PSI, pounds per square inch. Most compressors with at least a 3/4 HP, horse power, motor will be adequate. My compressor delivers 17 CFM, at 90 PSI. This is a bit overkill but I use it for other things such as sanding. Photo 7 Example Compressor from Northern Tool Photo 6 shows an example of another compressor sold by Lowes, # It is a 1.5 HP with a 3 gallon tank. Max air presurre is 155 PSI. It will deliver 2.6 CFM at 90 PSI and 4 CFM at 40 PSI. The cost is $ at the time of this writing. Photo 7 shows an example compressor sold by Northen Tool, # It is 1 HP with a 3 gallon tank. Max air presure is 125 PSI. It will deliver 2.4 CFM at 90 PSI and 3.7 CFM at 40 PSI. The cost is $99.00 at the time of this writing. Now lets discuss being able to see the fine detail work that you will be doing. I use a magnifying lens head Pierce Carving - Page 3


4 Photo 8 Magnifying Visor and Lens Photo 9 Head mounted light piece, like the one in Photo 8. This a system that fits on you head like a visor. You will purchase the visor and a lens separately. There are different lenses available based upon your vision and distance where you will hold the work from your eyes. You will need to try different lenses until you find the right one. You will be able to see better with this than anyone will be able to see with the naked eye. Minor flaws will not be noticed as easily this way. You will need a lot of good lighting. Your hand and the tool will cause shadows that will make it hard to control the closeness of the tool to the wood. I use light coming from several directions. Try to place lighting overhead, shining on the front, and from both sides. For the light shining on the front I use a light that is on a strap that fits around my head, see Photo 9. I just place it around the band of the magnifying lens. If you can t see the point where your tool is cutting you will make mistakes. Adjust the lighting or the position you are holding the piece so you have the best possible view of where you are working. The dental drill turns so fast it does more burning than it does cutting. The oils in the wood will gum up the flutes of the bur. As this happens the cutting speed of the tool slows down. This feels like the bit is getting dull, but it is not. The flutes need to be cleaned every few minutes, time depending on the type of wood you are using. The wood will never dull the bur as it is solid carbide. To clean the bur just run it along a piece of soft steel or other metal. I use a small stainless or brass brush, See Photo 10. You can mount the brush to a block of wood so you can clean the flutes with one hand, eliminating having to put your piece down while cleaning the flutes. Photo 10 Flute Cleaning Brush As there is smoke it needs to be removed to keep it out of you eyes. Place a fan so it blows over your shoulder, sort of from the rear, so it blows the smoke away from your face. Don t place the fan in front of your face as it will blow the smoke into your eyes. You will need a comfortable place to work. You should have a table top with a soft pad to protect the wood surface. You will be spending hours setting at the table working in close quarters. Make it as comfortable as possible. Pierce Carving - Page 4


5 Design Photo 11 Positive Space Photo 12 Negative Space Photo 13 Using Positive and Negative Space Photo 14 Draw Art on by Hand with a Pencil Photo 15 Royalty Free Line Art Here we will discuss the design of your piercing. This can be images, patterns, following the grain of the wood, or totally random. We also need to cover the way the image will stand out. You can use positive or negative space or a combination of both. Positive space is where you will pierce around the image making it stand out prominently, See Photo 11. You have a solid image with the background being pierced. Negative space is where you pierce the image and leave the background solid, See Photo 12. The image stands out less prominently. Doing a combination almost hides the image only displaying it when looked at a certain way, See Photo 13. Here the image and background are both pierced leaving a thin outline of the image. You can almost miss the image if not paying close attention. How do we get our design or image on the wood? There are several ways. First you can draw the image on with a pencil, lead from the pencil sands off easier than ink from a pen. If you are good enough you can draw you own original art onto your pierce, See Photo 14. If you can t draw you can find an image you like. This can be a line drawing or picture you found in a magazine, or the web, or from purchased royalty free software, See Photo 15. There are several titles of these available. There are hard copy line art drawings as well as a CD with the drawings electronically. The files are in multiple formats. The image can be applied to your piece by transferring with carbon paper. Place a piece of carbon paper behind your image and tape it on the work piece. Trace the image and this will leave the carbon from the paper on the wood See Photo 16. Photo 16 Applying Image with Carbon Paper You can print an image from a laser printer or copy it from a copier. The image must be from dry ink and not liquid ink like from an ink jet printer. Tape the image on the wood upside down, with the ink touching the wood, See Photo 17. You can see the image through the paper. The image on the paper needs to Pierce Carving - Page 5


6 be a mirror image of what you want on the wood. You can rub Zylene over the paper and wetting it, See Photo 18 and 19. Photo 17 Dry Ink Image Upside Down Rub the paper with a squeeze or plastic card like a credit card, See Photo 20. This will help the Zylene release the ink from the paper on to the wood. Remove the tape and paper from the wood and the image will be on the wood, See Photo 21. Photo 18 Rub Zylene Over Image Photo 19 There are commercially available transfer pens with a felt tip that is full of Zylene for this purpose, See Photo 22. When my pens get empty or drys out I refill them with Zylene from a can. But you can just use a Q-tip soaked with Zylene to rub the back of the paper. Continue this until all of your design is on the wood. Photo 20 Rub the paper with A Plastic Card Photo 21 Remove Paper and Tape to Reveal Image You may not want a design on the wood. It may be just as simple as piercing the sap wood around a natural edge bowl, See Photo 23. Here pencil a line approximately 1/8 from the heart wood and the bark. You will pierce randomly in between the pencil lines. If your piece has dark heart wood and light sap wood this produces a dramatic effect. You could also just pierce a band around the rim, See Photo 24. Draw two lines around the rim. The first about 1/8 down from the top and another below that to define the width of the band you want. The type of design is only limited by your own imagination. You can really have fun with this. Time to Pierce Photo 22 Blender Pen Now that we have our design on the wood it is time to pierce the first hole. It will be almost impossible to describe in words how to pierce carve. A video, or hands on learning, would be much better at conveying the information. But I will give it a try. Photo 23 pierce the sap wood or rim Photo 24 With all of the safety concerns covered above and all of the required tools setup lets start. The piercing tool needs to be perpendicular to the wood at all times Pierce Carving - Page 6


7 Photo 25 Keep Tool Perpendicular to the Wood Photo 26 Pierce a Hole while piercing, See Photo 25. This will be a constant struggle to maintain. If you don t do this the amount of wood left between the holes will be thinner on one side than the other. Also when the piercing is completed you can see the leaning cuts. Before piercing my art work I practice on a piece of scrap to hone my piercing. If you don t your art work may have a spot that looks like a beginner worked on it as the rest of the work will get better. On the piece we are using for this handout lets pierce a hole, See Photo 26. Push the bur through the wood. Moving clockwise make a free form hole that is a bit wiggly, looking like an amoeba. An amoeba is a single cell organism with no definite shape, just kind of free form. Start away from the image about the distance you want the size of your hole to be. With a wiggly motion work back toward and against the image. Complete the hole by working back to the beginning of the piercing. There will be some burs and a black edge around the hole, See Photo 26. Clean this up a bit by moving the bur counter clockwise around the hole, See Photo 27. Photo 27 Move Counter Clockwise to Clean Up Burs Photo 28 Each Hole will Follow Previous Holes Cut another hole next to the one just completed. The second hole will follow a portion of the first hole and so on. See Photo 28. While you continue piercing you will always try to maintain an even wall thickness with a cut that is perpendicular to the surface of the piece, See Photo 29. As I said this will be an on going effort for ever. Always start a hole away from the previous holes and work back toward the existing holes then back to the starting point. Each hole is free form except where it follows the previous holes. Photo 29 Try to Maintain An Even Wall Thickness Try not to line up all of the cuts in a row. Try to make them look a bit like a brick wall, where on the second round the hole splits the two below it, See Photo 30. Now you will follow a portion of the other holes with the bur. As the cutting slows down clean the bur. As you can see in Photo 26 the bur is gummed up. Run the rotating bur over the brush to remove the gum. Clean the Pierce Carving - Page 7


8 bur when ever the cutting speed slows down. While piercing remember to maintain awareness of where the hand is that is holding the work piece. Believe me it is very easy to forget and pierce your hand or a finger. This does hurt, but will not bleed as the bur is so hot it cauterizes the hole in your hand or finger. Photo 30 Make a Pattern Look Like a Brick Pattern Continue piercing until your eyes get tired, or just before. For me this is about 60 to 90 minutes. If I go past this my chances of making a mistake increase significantly. Take a short break or work on something else for a while. Continue piercing until art piece is complete. Photo 31 Pencil and Scorch Marks Left After Piercing Photo 32 Sand with 400 Grit to Remove Marks After completion there are still pencil or carbon marks on the piece. There will also be scorch marks from the heat generated by the rotating bur, See Photo 31. Now you need to lightly sand the pencil marks and scorched areas off with 400 grit sandpaper, See Photo 32. Sand inside and out as there will be scorch marks on both sides. Look the piece over and critique your work, See Photo 33. Make mental notes as to areas that do not look 100%. Work on these issues on the next piece. You will always be striving to get better and better. You will never reach perfection in your eyes, although others will think so as they are not looking through the magnifying visor. Photo 33 The Finished Piece Pierce Carving - Page 8
9 Tools Tools and Suppliers Suppliers NSK 850 A Dental Drill Tree Line - # Binh Pho rotary-system.html Stand and Regulator Tree Line - # Binh Pho - Carbide Burs - 1/16 699L 169L and 699L Tree Line - #221-S003 Binh Pho - Blender Pen with Zylene Chartpak Colorless Blender Pen Zylene in a can Home Depot Magnifying Visor and Lens Tree Line - # Head Light Home Depot Small Stainless or Brass Brushes Home Depot Line Art Books and CDs Tree Line - # Stainless Steel and Brass Brushes Home Depot Compressors Home Depot, Lowes, Northern Tools Pierce Carving - Page 9
10 Quick List of Steps 1. Create a work space with a table and a soft top. 2. Setup adequate lighting and a fan to blow the smoke away. 3. Acquire the tools needed, piercing tool with regulator stand, burs, compressor, magnifying visor, wire brush and a head lamp. 4. Get royalty free line art if needed. Draw your images onto your wood, trace on with carbon paper or apply with Zylene. 5. Get your work piece and determine what type of design you want. This may be positive and negative spaces. Might be following the sap wood or a pierced rim. What ever your thoughts take. 6. Connect the air to the piercing tool. 7. Turn on the lights and fan. 8. Turn on the piercing tool. 9. Remember where your hands and fingers are. Keep them out of the way of the bur. 10. Put on the magnifying visor. 11. Pierce your first hole. Start away from the line and work back towards it, then return back to the starting point. Cut in a clockwise direction. Make the shape a free form like an Amoeba. Remember to maintain the piercing tool perpendicular to the wood surface. 12. Clean the hole by going counter clockwise. 13. Cut the next hole. Start away from the last hole and work back toward the last hole. Complete the hole by returning to the starting point. 14. Over lap the cuts in a pattern kind of like a brick wall. 15. Continue until finished or your eyes get tired. If tired take a short break and come back to it later. 16. When finished you need to sand, 400 grit, to remove pencil and scorch marks. Sand both sides 17. Finish as desired. 18. Critique your work to help you improve on the next piece. Pierce Carving - Page 10
Carved Feet Made Simple. Richard Morris
 Carved Feet Made Simple Richard Morris rlmorris3@aol.com www.richardmorrisart.com 812-989-9079 Photo 1 Leave 3/4 for the feet to be carved Photo 2 Reverse turn centering tool Would you like to add a little
Thin Walled Turning and Surface Design Techniques
 Thin Walled Turning and Surface Design Techniques Mark Mazzo Finger Lakes WoodTurners November 18, 2010 11/18/2010 1 Thin-Walled Turning Why Thin? Not to show off turning prowess Facilitates later surface
Bullet Pen Casing. Contributed by: David Bell. This tutorial was downloaded from.
 Bullet Pen Casing Contributed by: David Bell This tutorial was downloaded from http://www.penturners.org The International Association of Penturners - 2014 This tutorial is designed around the bullet casing
Between Turns. May Stump The Pro... Upcoming Dates. Michigan Association of Woodturners A chapter of the American Association of Woodturners
 Between Turns C O N T A C T U S : President: Michigan Association of Woodturners A chapter of the American Association of Woodturners Tom Mogford 810-629-6176 Vice President: V O L U M E 2 2, I S S U E
Subtractive Wax Working
 Society of North American Goldsmiths Artists Designers Jewelers Metalsmiths January 2010 15 TECHNICAL ARTICLE Please note the following correction to the Technical Article TIG Welding for Metalsmiths,
LU6X-130 Instructions and Parts List (including LU6X Basic) Operating Instructions
 Operating Instructions") LORTONE LU6X-130 Item # 061-092 LU6X Basic Item # 061-090 LU6X-130 Instructions and Parts List (including LU6X Basic) Operating Instructions Introduction The LU6X is one the most versatile pieces of equipment
LORTONE LU6X-130 Item # 061-092 LU6X Basic Item # 061-090 LU6X-130 Instructions and Parts List (including LU6X Basic) Operating Instructions Introduction The LU6X is one the most versatile pieces of equipment
EASY BREAD/ CUTTING BOARDS
 PLANS BY DEEPLY SOUTHERN HOME EASY BREAD/ CUTTING BOARDS DIFFICULTY LEVEL: EASY TOOLS REQUIRED 18V ONE+ RANDOM ORBIT SANDER 18V ONE+ CORNER CAT FINISH SANDER 18V ONE+ LITHIUM-ION DRILL KIT 18V ONE+ ORBITAL
Contents. pages 20-24: Installing Edge sinks into. custom laminate countertops page 8: Installing Edge sinks into postform laminate countertops
 Contents pages 2-8: Installing Edge sinks into custom laminate countertops page 8: Installing Edge sinks into postform laminate countertops pages 9-14: Installing Acrylic sinks into custom laminate countertops
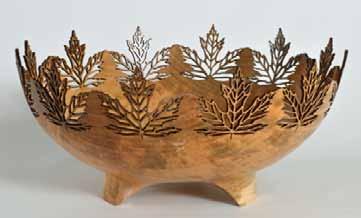
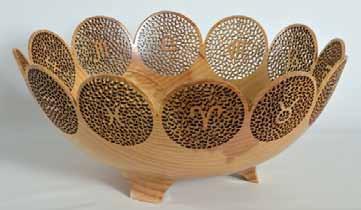
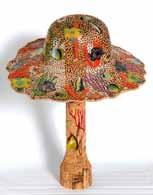
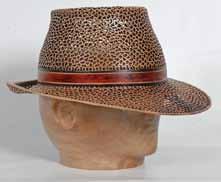
Malcolm Zander malcolmzander.com Ottawa, Ontario Canada
 Malcolm Zander mzander@magma.ca malcolmzander.com 613-226-5041 Ottawa, Ontario Canada I began turning in 2000. Obviously I have a lace fetish. This I blame on Binh Pho, whose seminar in Albany I attended
How to Make a 400 BC Greek Oenochoe Style Wine Pourer
 How to Make a 400 BC Greek Oenochoe Style Wine Pourer The purpose of the demonstration is to show how to make a hollow form wine pourer in the style of ancient Greek pottery. Live demonstration on the
Cardboard Model Buildings
 Cardboard Model Buildings Get more model kits from http://www.modelbuildings.org PRINTING & ASSEMBLY TIPS: These OO designs can easily be resized by reducing the print percentage as follows: OO scale is
Windsor Chair Online. Assembly Instructions
 Windsor Chair Online Assembly Instructions Date: 1/4/2007 Other Chairs Offered Philadelphia Arm Chair New England Comb Back Sackback d Arm Chair Bow Back Side Chair Fan Back Side Chair Page 1 Table of
Notice: New Catalog in Development. (Please scroll down to view the old version)
") Notice: New Catalog in Development (Please scroll down to view the old version) Change Search Info ETA.This version of the Greenbarn catalog has served us well for many years, but it is quite "long in
Notice: New Catalog in Development (Please scroll down to view the old version) Change Search Info ETA.This version of the Greenbarn catalog has served us well for many years, but it is quite "long in
Jimmy s 2 nd demonstration was what he called an African Drum style box made from Iroko with a cocobolo insert in the lid with inlaid sterling silver.
 Jimmy s 2 nd demonstration was what he called an African Drum style box made from Iroko with a cocobolo insert in the lid with inlaid sterling silver. He started by roughing out the block with a roughing
White charcoal is made by charring the wood at a relatively low temperature for some time, then, near the end of the process, raising the kiln
 White charcoal is made by charring the wood at a relatively low temperature for some time, then, near the end of the process, raising the kiln temperature to about 1000 degree Celsius to make the wood
The Simple Birdhouse Ornament
 The Simple Birdhouse Ornament There are a number of techniques for constructing birdhouse Christmas ornaments and the resulting ornaments vary from simple to very ornate and complicated. It has been my
Making a snap lid box By Jeffrey A Lavine
 Making a snap lid box By Jeffrey A Lavine Some call them boxes, some call them lidded bowls, others call them vessels or containers but whatever you call them they are both enjoyable and a challenge to
Notes for Making Wood Rings With Stainless Steel Insert Centers
 Notes for Making Wood Rings With Stainless Steel Insert Centers Background These notes describe how to make a ring with a stainless steel (SS) insert and a wood exterior band. They also include information
A candle stick addresses transferring and reproducing dimensions from a plan and breaking the project into steps.
 Activities Discussion These projects allow more skill development including making items to match a drawing, sizing projects to specific dimensions, and just trying fun stuff for the first time! A candle
Shopsmith Woodworking Academy Notes
 Shopsmith Woodworking Academy Notes The Ins And Outs Of Using Woodturning Chisels We re often asked... What lathe chisels do I need to get started in wood turning and how is each used? Well, the answer
1. Mount between centers round cut tenons on both ends (same diameter).
.") LONG NECK HOLLOWFORM Jim Terry Piedmont Triad Woodturners Association Turning this hollow form presents some interesting challenges in mounting and holding a turning. Both top and bottom are completely
LONG NECK HOLLOWFORM Jim Terry Piedmont Triad Woodturners Association Turning this hollow form presents some interesting challenges in mounting and holding a turning. Both top and bottom are completely
VASE FLYING-WING A BARK-EDGED. Kevin Felderhoff. Wood selection. 36 American Woodturner August 2017
 A BARK-EDGED FLYING-WING VASE Kevin Felderhoff I enjoy turning endgrain pieces and have found that the most dramatic wood grain comes from logs or branches with irregular shapes far from round. The flying-wing
Vacuforming Plastic for Thin Castings Brian Meek 2007 V1.0
 Vacuforming Plastic for Thin Castings Brian Meek 2007 V1.0 One of the limitations of hand carving wax forms for lost wax casting is the difficulty of creating forms that are light enough to be easily worn.
Mr. & Mrs. H. Dumpty
 Mr. & Mrs. H. Dumpty 2004 Robyn R. Warne All Rights Reserved. Page 1 of 6 Mr. & Mrs. H. Dumpty List of supplies 2 - unfinished wood eggs 2 - unfinished wood egg cups gesso JW etc. Right Step Sealer sandpaper
Metal Aircraft Landing Light Installation Instructions
 Metal Aircraft Landing Light Installation Instructions This landing light kit was designed for the Thorp T-18 as a method of installing a halogen landing light in the leading edge of the outer bay of the
Coat Rack. Materials: Directions:
 Coat Rack 2x2 wooden poplar (foundation of the rack) 3/4 inch diameter wood dowels (5-8 depending on how many arms you want) 1/4 inch dowel screw 1/4 inch drill bit Power drill Ruler Pencil Paint/spray
Demonstration Bob Rosand October 20, 2007 by Bob Gunther
 Demonstration Bob Rosand October 20, 2007 by Bob Gunther Overview: Bob Rosand has been a woodturner for more than 25 years. He teaches, demonstrates and writes articles on many topics pertaining to woodturning.
Wooden Faceplates. Tapping on the Lathe
 Wooden Faceplates There are lots of turning jobs where spending some time on set-up makes the turning go quicker and easier. Making Wooden Faceplates is one way to make set-ups and jigs for turning. As
Makin Shavins. Hard to comprehend. A Woodturning Newsletter
 1. O C T O B E R 2 0 1 6 Makin Shavins A Woodturning Newsletter Hard to comprehend. This is a piece from the recent SWAT show in WACO Texas. Just a piece from the gallery, which is free to enter and free
January Instructions Willem van Aelst Study 2008 David Jansen. For the Video Link, Please see Page 3
 January Instructions Willem van Aelst Study 2008 David Jansen For the Video Link, Please see Page 3 Historical Information To start the painting we first need to establish the Ground. The ground is the
Turning Penguin and Chick Ornaments
 Turning Penguin and Chick Ornaments INTRODUCTION I was looking for a way to use turning, power carving and painting to make a Christmas Ornament. Penguins have become popularized by television, movies
Designed for Vectric by Michael Tyler
 Project Tutorial Compatible with Current Version of: Featuring compatibility with nearly all CNC Machines Hinged Spoon Rest Designed for Vectric by Michael Tyler It is our pleasure to provide our customers
Assembly Instructions: Bencher Skylark
 Assembly Instructions: Bencher Skylark Tools Required: Pop Rivet Tool Tape Measure Hex Wrenches Screwdriver Several Disposable Rags Two Saw Horses Several boxes or bowls to hold fasteners and small parts
An All-Balsa Sportster
 An All-Balsa Sportster A REMARKABLE FLIER OF UNIQUE DESIGN THAT WILL GIVE YOU MANY ENJOYABLE BUILDING AND FLYING HOURS By STAN D. MARSH Contributions by Felix Gutmann This model was designed primarily
Activity Instructions - Classroom Wind Farm
 Wind Power - Classroom Wind Farm Activity Instructions - Classroom Wind Farm The purpose of this activity is for students to build their own windmill generator, which will then be one unit of the classroom
Artistic Woodturners Meeting of 12 August 2017
 Artistic Woodturners Meeting of 12 August 2017 Meeting was called to order by Norm Freeman. One visitor, Mike Francis, president of Azalea Woodturners, was recognized. 25 members attended. Business portion
WOOD TOY NEWS. July 23, 2013 Tuesday
 WOOD TOY NEWS Make your own perfect turntable for spray painting toys with these useful tips. And it s fast, fun and easy to build! by Imants Udris Watch the video on our website at : http://www.toymakingplans.com/website/how-to/
Rosalina Accessories Tutorial Version March 2011 Martyn
 Rosalina Accessories Tutorial Version 1.0 - March 2011 Martyn Star Brooch Feel free to experiment with these dimensions, you should make a template you are happy with, the method still works. 1) Creating
Building Tips This model can be built using the following types of adhesives:
 Page 1 Building Tips This model can be built using the following types of adhesives: Epoxy (with or without microballons) Odorless cyanoacrylate (CA) with accelerator UHU Creativ for Styrofoam (or UHU
Rotary Engraving Fact Sheet
 Rotary Engraving Fact Sheet Description Rotary engraving is the term used to describe engraving done with a rotating cutting tool in a motorized spindle. The tool, or cutter, cuts into the surface of the
BONDO PROCESS. Installation Guide.
 BONDO PROCESS Installation Guide www.karran.com BONDO PROCESS This Installation Guide demonstrates simple methods and proven techniques for seamlessly installing Karran undermount sinks in laminate countertops.
Umbrella Inserts and Stubby Screens
 ADHESIVE ANCHORING SPECIALISTS Umbrella Inserts and High Performance Adhesive Systems for Fastening to Hollow Base Materials DESCRIPTION/ADVANTAGES Hollow Block Fastening with A7+ Adhesive Umbrella Inserts
Michael Werner July 19, 2008 Demonstration By Bob Gunther Photographs by Tina Collison and Dave Vizard
 Michael Werner July 19, 2008 Demonstration By Bob Gunther Photographs by Tina Collison and Dave Vizard Overview: Michael Werner was born and grew up in Switzerland. Making things was a family tradition
SUPPLIES OTHER SUPPLIES Marco 12 Teddy Bear Pattern
 SUPPLIES Fat ¼ yd of 1 sparse, straight mohair 4 x 4 piece of wool felt or ultrasuede 10mm black glass eyes (1 pair) 2 1 ¼ Joint discs 4 1 ½ Joint discs 4 1 ¾ Joint discs Jointing hardware of choice (5
Special Brushes for Metals, Wood and Hard Plastics
 Pneumatic Surface Finisher Save time sanding and polishing. 4 wide face is ideal for finishing stainless steel, metals, wood and synthetics. PNEUMATIC SURFACE FINISHER / ACCESSORIES / SPECIAL BRUSHES The
GTS Music diy-guitar.com
 GTS Music diy-guitar.com IB Jem Style Kit GTS Music 313 Strachan St. Port Hope, Ontario L1A 0C2 Canada sales@diyguitarkits.net Please read these instructions carefully before beginning in order to have
Top Polishing Instructions
 Top Polishing Instructions Materials Needed: For 2014 - Recommend Metabo PE12-175 7" Polisher NSI Solutions 300 grit turbo pad NSI Solutions 500 grit turbo pad NSI Solutions 1000 grit turbo pad NSI Solutions
Hollow metal clay forms are typically built over organic cores like. Coreless Construction: Rethinking the Metal Clay
 PROJECT INTERMEDIATE METAL CLAY Coreless Construction: Rethinking the Metal Clay Build this four-sided pendant using forethought and a 3-D template. by Cindy Ambrose FCT-MWON0216_ART17 Hollow metal clay
Openwork. Pendant. Bezel-Set Cabochon. with Free Form. open spaces and a bezel-set stone. Frame a dimensional design accented with.
 ADVANCED Openwork Pendant with Free Form Bezel-Set Cabochon FCT-CRON0316_ART105 Frame a dimensional design accented with open spaces and a bezel-set stone. by Deb Fitz To create the focal point of my pendant,
RFS Class II Rocket Assembly Instructions
 RFS Class II Rocket Assembly Instructions Instructions by: Loc Precision Photos by: Great Lakes Space Port Sheboygan Education Foundation, Inc. Welcome and thank you for joining the Rockets for Schools
Omarshauntedtrail.com. Obtained from. Tombstones
 http://www.home.earthlink.net/~tekvov/id1.html Tools Tombstones 1. Permanent black marker 2. Small bowl to mix paint in 3. paper towels 4. 1/4 to 1/2 inch pain brushes 5. 4 inch paint brush or 6. Roller
PanelKeeper GL1500 Kit
 Rudy's ** Removable side panel cover retainer system ** PanelKeeper GL1500 Kit Installs in about 10 minutes per side - No tools required! Both sides included Prevents loss of detachable panels Stop losing
SCULL HANDLES AND GRIPS INSTRUCTION BOOKLET
 SCULL HANDLES AND GRIPS INSTRUCTION BOOKLET Contents Section I: Scull Grip Replacement: Fixed Handle or 10 cm Length Adjustment System Refer to this section if you need to replace the grips on your fixed
Designed for Vectric by Michael Tyler. Antique telephone
 Project Tutorial Compatible with Current Version of: Featuring compatibility with nearly all CNC Machines Vintage Candlestick Telephone Clock Designed for Vectric by Michael Tyler It is our pleasure to
How to make a classic wooden fishing lure
 How to make a classic wooden fishing lure By Tim Kubetz 1. The first step in the bait-making process is to choose a design for your lure and the type of wood to use. There is much room for creative freedom
Perhaps the best thing about. Three bowls slightly rearranged Twisted Possibilities
 Three bowls slightly rearranged Twisted Possibilities By Malcolm Tibbetts Lacewood Ribbon, 13 7½" Perhaps the best thing about segmented turning is the total lack of restrictions; there is no end to the
TRAINING MANUAL. Part INTRODUCTION TO TWIST DRILLS
 PRESTO INTERNATIONAL UK LTD TRAINING MANUAL Part 2 INTRODUCTION TO TWIST DRILLS - 1 - DEFINITION:- A rotary end cutting tool having two or more cutting lips, and having two or more spiral (helical) or
Car Construction E-Book
 Physics Lecture 14 - Building the Simple But Fast (SBF) Car-Part 1 Introduction The following lecture uses information from the Car Construction E-Book on the Virtual Race CD. This Lecture does not, however,
Umbrella Inserts and Stubby Screens
 ADHESIVE ANCHORING SPECIALISTS Umbrella Inserts and Stubby Screens High Performance Adhesive Systems for Fastening to Hollow Base Materials DESCRIPTION/ADVANTAGES Hollow Block Fastening with A7 Adhesive
End-On-End Dovetails D4R - CHAPTER 12
 D4R - CHAPTER End-On-End Dovetails 4 While you have the router set up for half-blind dovetails, it is a good time to try end-on-end dovetails. If you have not yet routed half-blind dovetails or read through
FLAT TO FABULOUS Make a Bowl from a Single Flat Board - Or How to Eat Salad off of Scrap Wood
 FLAT TO FABULOUS Make a Bowl from a Single Flat Board - Or How to Eat Salad off of Scrap Wood Let s face it: Woodworkers are frugal people. In fact, if you are anything like me, you have a hard time throwing
SUPPLIES OTHER SUPPLIES Carson 10 Teddy Bear Pattern
 SUPPLIES Fat 1/8 yd of 5/8 faux fur or mohair (sample is faux fur) 5 x 5 piece of wool felt for paw pads 11mm black glass eyes (1 pair) Small piece white felt (optional) eye whites 2 1 1/8 Joint discs
129 KITCHEN BASE CABINET 480
 129 KITCHEN BASE CABINET 480 There are two sorts of kitchen cabinets: base cabinets, which sit on the floor, and wall cabinets. Base cabinets provide both storage space and work surfaces. They often house
1Use the metal file to smooth
 Yamato: Step-by-step 85 Parts of the bridge and the hull a b c d e f a Part of the bridge b Part of the bridge c Part of the bridge d Radar x 2 e Part of the bridge x 2 f Wire Recommended tools and materials
Wood Lathe Safety Rules
 Wood Lathe Safety Rules A wood lathe is used to produce round objects like spindles and bowls. The work to be turned is usually mounted on the lathe between the headstock (drive) spindle and the tailstock.
Woodcarving 101 presents a short introduction to woodcarving. This guide covers safety, knife strokes, carving styles, and finishing techniques.
 WOODCARVING 101 Woodcarving 101 presents a short introduction to woodcarving. This guide covers safety, knife strokes, carving styles, and finishing techniques. Carving safety Getting started A few techniques
WOOD TOY NEWS. May 23, 2014 Friday. Imants Udris is the Contributing Editor and Photographer for this issue of Wood Toy News.
 WOOD TOY NEWS How to Router and Paint Wood Toys May 23, 2014 Friday toymakingplans.com Master Toymaker Imants Udris shows us how to router and paint the Freaky Fords. In this Wood Toy News and accompanying
Foam Core Construction
 Tools Tips and Tricks X-Acto knife and blades Your most important tool for working with foam core will be an X-Acto knife with plenty of sharp blades. When choosing a knife, get one with replaceable blades
Gouge Jig SVD-186 (SVD-186)
") Gouge Jig SVD-186 (SVD-186) TURNING TOOLS Bowl gouges Spindle gouges Turning cutters CARVING TOOLS Curved gouges Spoon-shaped gouges Back bent gouges Down bent gouges Curved V-tools Max tool width 36 mm
Gouge Jig SVD-186 (SVD-186) TURNING TOOLS Bowl gouges Spindle gouges Turning cutters CARVING TOOLS Curved gouges Spoon-shaped gouges Back bent gouges Down bent gouges Curved V-tools Max tool width 36 mm
How to install backchecks
 How to install backchecks Note: All pictures can be enlarged for better clarification. Revision 7 8/2009 Backchecks wear out in a piano much like brake pads in an automobile. While wear is a valid reason
MAGNUM BOARD INTERIOR INSTALLATION GUIDELINES
 TECHNICAL BULLETIN No.: 090509-1405 Subject: Issue Date: September 4, 2009 Issue No.: II MAGNUM BOARD INTERIOR INSTALLATION GUIDELINES 1. CUTTING MAGNUM BOARD You can easily cut Magnum Board with carbide
For Barrel Tapers. Installation and Operating Instructions For use with small combination belt & disk sanders. Assembled Taper Tool
 Tim s Taper Tool For Barrel Tapers Installation and Operating Instructions For use with small combination belt & disk sanders Assembled Taper Tool Your taper tool is capable of making barrel tapered shafts.
WOW! Forest of Home. Ways to discover Forest of Light at home! Forest of Light:
 WOW! Forest of Light @ Home Ways to discover Forest of Light at home! Forest of Light: Forest of Light was initially inspired by our Sensory Friendly playtimes, in which we offer the museum to children
Traditional Grinding & Polishing
 Traditional Grinding & Polishing Grinding Wheels 3.2 Discs 3.4 Polishing & Buffing Powders 3.5 Felt Buffers 3.7 SECTION 3 Grinding Wheels RADIAC / NATIONAL SILICON CARBIDE WHEELS A high quality, made in
==================================================================================================
 ================================================================================================== All That Glitters is not GOLD, Brass Cleaning By Ace of Hearts, SASS #77697 SASS Chronicle 2014-5-May.pdf
Drill Bits & Hole Saws
 F o r P Drill Bits & Hole Saws r o f e s s i o n a l s. Klein drill bits provide accuracy and consistency for professionals. Made of top-of-the-line materials for longer-lasting performance, Klein drill
Kaszazz Alcohol Ink Art Markers
 Kaszazz Alcohol Ink Art Markers Exclusive to Kaszazz, these markers contain alcohol based ink which is permanent on most surfaces. Selecting colours for your next project is easy - each marker matches
HOGNOSE PSALTERY KIT Assembly Instructions
 HOGNOSE PSALTERY KIT Assembly Instructions WOOD PARTS 1 Plywood Top (Soundhold Pre-Cut) 1 Plywood Bottom 2 Pin Blocks 1 Short Side 1 Long Side 1 Bridge 1 Scrap of Plywood HARDWARE 1 L-Handle Tuning Wrench
ALL-STAR GRINDER G-8 MANUAL
 ALL-STAR GRINDER G-8 MANUAL IMPORTANT SAFETY INSTRUCTIONS READ ALL INSTRUCTIONS FOR PERSONAL SAFETY THIS MACHINE MUST BE PROPERLY GROUNDED The power cord of this machine is equipped with a three-prong
SUPPLIES. OTHER SUPPLIES Marking pen Masking tape Aleene s Stop Fraying Toothpick Basic sewing supplies (See Tools link at
 SUPPLIES 30 x 9 piece of 5/8 curly matted mohair 7 x 6 piece of wool felt or ultrasuede 8 mm black glass eyes (1 pair) 6-1 fiberboard discs (neck & front legs) 4-1 ¼ fiberboard discs (rear legs) 5 Cotterpins
SAW-PIERCING. 79. Fig. 29. Placing new blade in saw-frame.
 SAW-PIERCING. 79 First make a full-size drawing of the hinge, then by means of transfer paper transfer the design of the butt end to the copper or brass. Then lay out the knuckles as shown in Fig. 28,
Online Workshop Seasons in my Garden Fall
 Online Workshop Seasons in my Garden Fall Welcome to my studio. I am so excited that you could join me today to share in my passion thread painting. All the threads needed to complete Seasons in My Garden
LINOLEUM BLOCK PRINTING ANDY WARHOL REVISITED ANIMAL PRINTS
 LINOLEUM BLOCK PRINTING ANDY WARHOL REVISITED ANIMAL PRINTS DESIGNING THE COMPOSITION 4 X 4 6 X 9 OUTLINE TEMPLATE choose soft Mars Carve or denser linoleum 4 X 4 HAS 2 SIDES to design, cut & print (4
Caution: Always use safety glasses or a full face shield when turning anything on a lathe.
 May 26, 2009 Making a 6 Peppermill Page 1 Acknowledgment is given to Jackie Johnson from Nashville, TN for providing the original instructions and method for this article. The design of this mill can be
QUALITY EDGE. by Susan Woods, managing editor. New technologies achieve superior laser cutting edge quality, eliminating secondary operations
 QUALITY EDGE by Susan Woods, managing editor New technologies achieve superior laser cutting edge quality, eliminating secondary operations Today s lasers can cut sheet metal, even thick plate, and achieve
Basic Users Manual for Tecnai-F20 TEM
 Basic Users Manual for Tecnai-F20 TEM NB: This document contains my personal notes on the operating procedure of the Tecnai F20 and may be used as a rough guide for those new to the microscope. It may
Lidded box double axis
 Lidded box double axis The Wood: Avoid the pith or take a chance. Select an interesting grain pattern or decorate the plain grain. Turn a cylinder with grain parallel to the axis. See the graphic below
Hands On. 6 Here, three pieces of thermoplastic are cut to the designated die size. I make one layer of the die at a time.
 Hands On Jan s method of creating die forms is both effective and fascinating. Her demonstration includes essential information, such as constructing a well-made die, forming metal with the hydraulic press,
How-to-Install. Laminate Countertops and Sheet Laminate. FREE brochure Reverso en español
 FREE brochure Reverso en español How-to-Install Laminate Countertops and Easy to install instructions provided inside Multiple colors available for unique design options Durable and easy to care for Accessory
THE DIPPING TECHNIQUE
 THE DIPPING TECHNIQUE An Alternative Finishing Technique By B. L. Herm Ely INTRODUCTION: A good finish should excite the senses. When touched with the finger tips, the finish should feel silky smooth.
Part Seven. FrankenCasing Overview
 Part Seven FrankenCasing Overview Though a very unique term, it is quite fitting to the practice that it describes. Like the good doctor Frankenstein, the art of FrankenCasing follows the steps of taking
Central New York Rocket Team Challenge 2018 Rocket Assembly Instructions
 Central New York Rocket Team Challenge 2018 Rocket Assembly Instructions Note: These instructions vary from those provided by the manufacturer of the rocket kits. There is also considerable varying discussion
POWER CARVERS/ACCESSORIES
 16 POWER CARVERS/ACCESSORIES Foredom Tools and Accessories Foredom No. 8 handpiece - slim handpiece. Chuck guard sleeve protects fingers and permits close work. Slides back when changing accessories. Includes
DIY PCB TUTORIAL. What you will need:
 DIY PCB TUTORIAL DISCLAIMER: MAKING PRINTED CIRCUIT BOARDS AT HOME INVOLVES THE USE OF DANGEROUS CHEMICALS AND POWER TOOLS. THIS TUTORIAL IS INTENDED FOR PEOPLE WHO ALREADY HAVE EXPERIENCE MAKING PRINTED
Legacy Slimline Touch Pen Kit
 Description: The model is considered one of the most basic pen kits and is a great starter kit for those new to pen turning. Many experienced pen turners use the kit to make elaborate and unusual pens
Two-Piece Hollow Form Turning Hollowing Without the Hassle
 Two-Piece Hollow Form Turning Hollowing Without the Hassle Finger Lakes Woodturners January 17, 2013 1 Hollow Turning Usually turning a closed or semi-closed form through a small opening Can be done using
Mission Embossible. Tools. Materials: Copper sheeting Ammonia Pickling vinegar Newspapers Copper powder Nail polish or shelac
 Mission Embossible Jazz up your décor with copper Materials: Tools Copper sheeting Ammonia Pickling vinegar Newspapers Copper powder Nail polish or shelac Stylus Abrasive scrub pad Nail Scissors or tin
Hands On. 6 Here, three pieces of thermoplastic are cut to the designated die size. I make one layer of the die at a time.
 Hands On Jan s method of creating die forms is both effective and fascinating. Her demonstration includes essential information, such as constructing a well-made die, forming metal with the hydraulic press,
Berea Hardwoods Survival Ballpoint Pen
 Berea Hardwoods Co., Inc. Pencil Instructions 18745 Sheldon Road Middleburg Heights, Ohio 44130 Toll Free 1-877-736-5487 Survival Ballpoint Pen (Berea #1602/x-xxx- x) Needed: Mandrel-A Bushing-61A Drills-
Unique Glass Colors. Margot Clark and Dr. Saulius Jankauskas present. Unique Glass Colors Products:
 Unique Glass Colors Margot Clark and Dr. Saulius Jankauskas present This lesson is designed to introduce you into the fascinating world of fired glass. We will be Marbling with Metallics, learning to Control