Quantum Sliding Door. Features & Benefits. Trend Windows & Doors Design Manual Q-Mk-1 May 2014
|
|
|
- Violet Hodge
- 5 years ago
- Views:
Transcription
1 Quantum Sliding Door Features & Benefits 110


.")
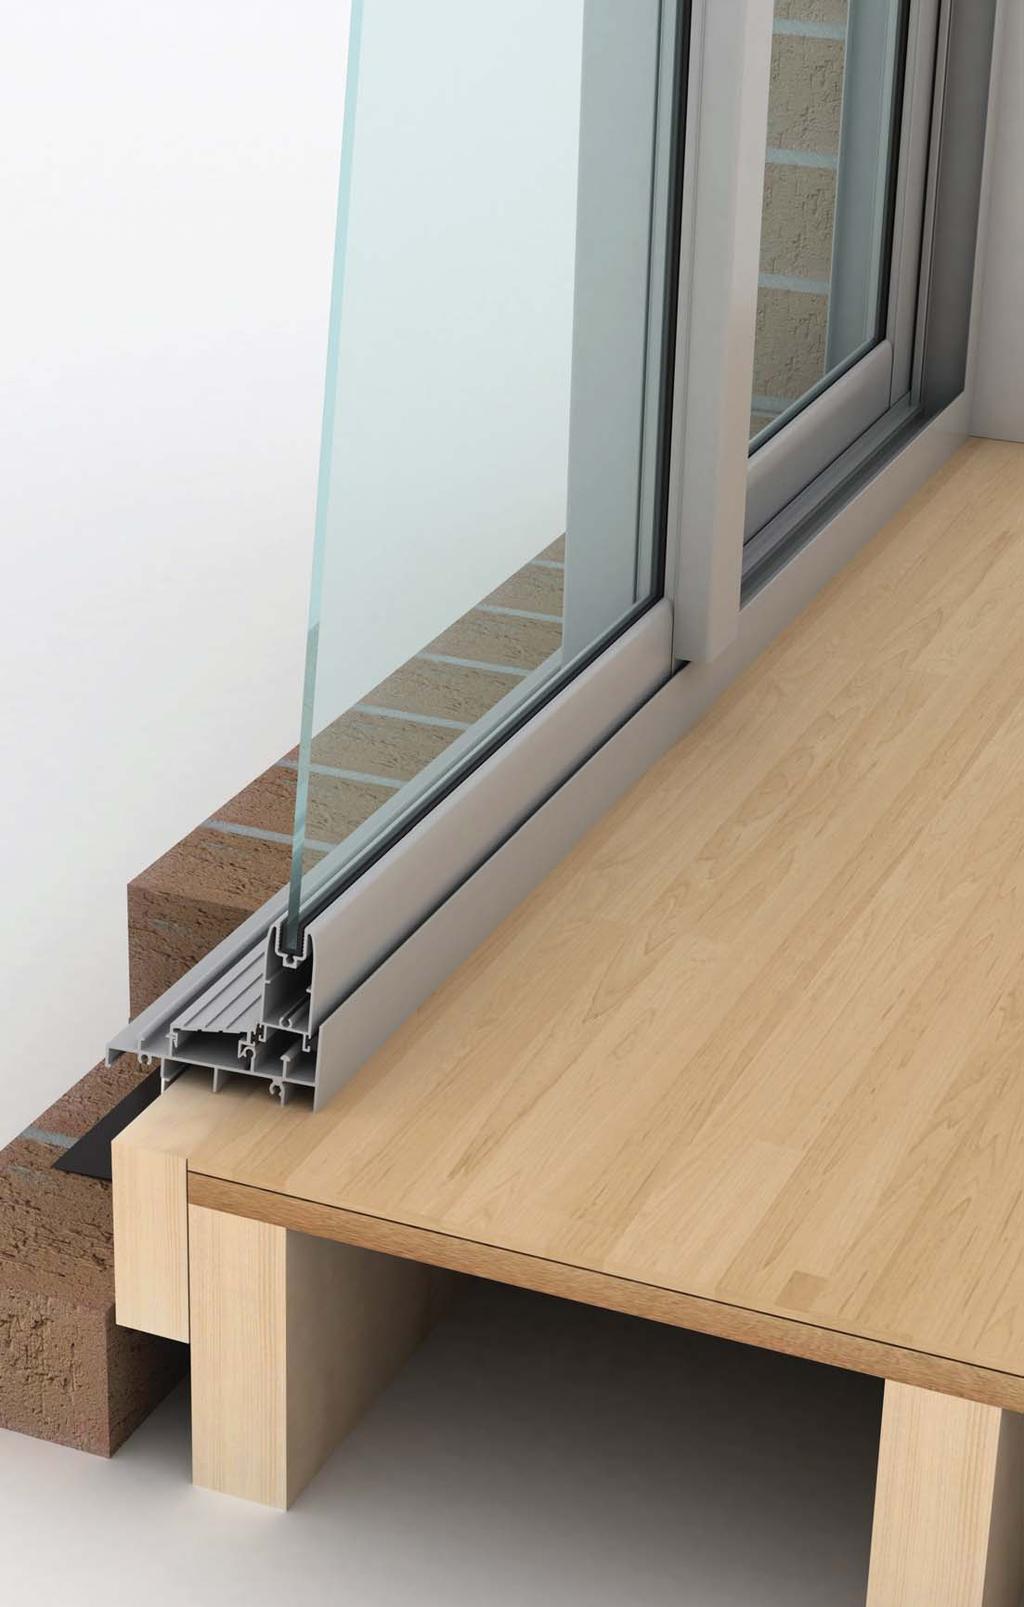
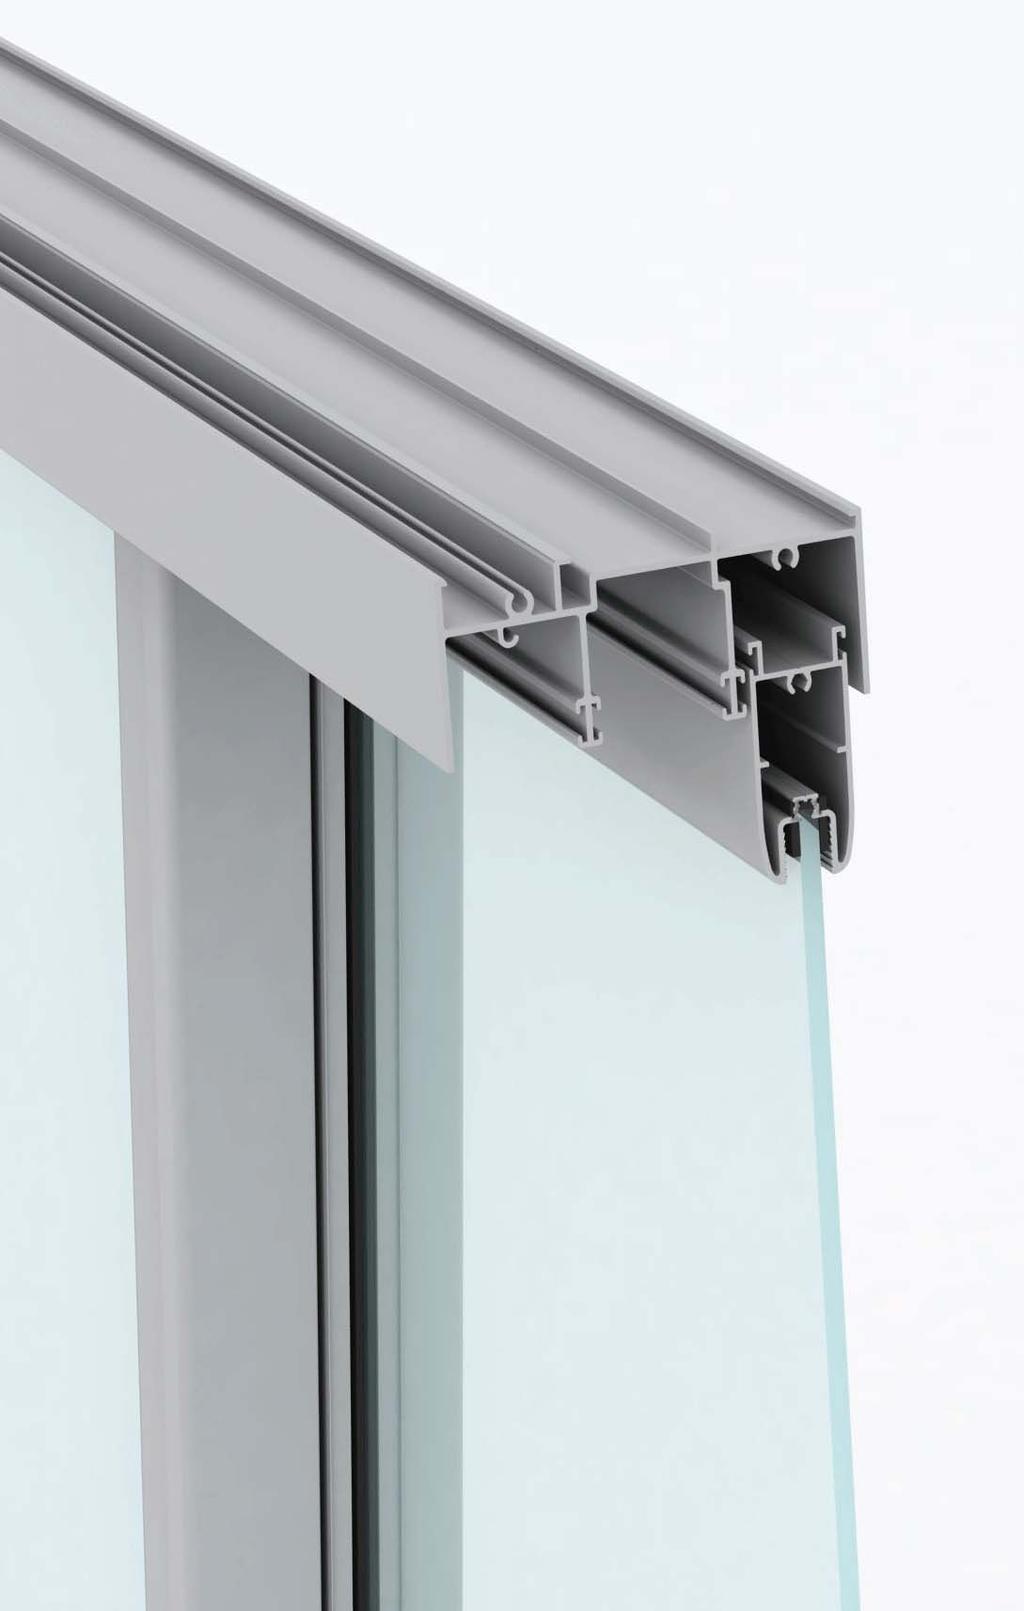
2 FRAME Robust 102mm semi commercial aluminium door frame. Combine with windows or can be used in integrated with Trend s Crestlite commercial applications. PANELS 50mm wide aluminium door panel sash section. Individual panels can measure up to 2700mm high and 1500mm wide. Panels can be reversed*. Operating panels are removable - by lifting the sash up into the head. Panel punched holes are fitted with infill caps. Heavy duty double bogey roller system. Five types of interlockers are available. *Striker holes in jamb will be visible. SILL Aluminium threshold features the Easyrider sill which is ideal for wheelchair access. Protected rolling track an extruded aluminium splayed threshold protects both glass door and fly door rolling tracks. GLAZING & ENERGY EFFICIENCY All Trend Windows and Doors comply with Australian Standards AS1288. Glazing options from 4mm single glazed to 18mm insulated glazed units (IGUs). Available in a range of glazing options. Safety Grade A toughened glass as standard. Energy efficiency options available to help reduce home energy consumption. All glazing options are Window Energy Rating Scheme (WERS) rated - providing a wide range of energy efficient solutions. ACOUSTICS Acoustic solutions available for improved noise reduction. High R w ratings available. WIND & WATER RATINGS All Trend Windows and Doors are designed to meet and surpass 700Pa wind velocity rating and 150Pa water penetration rating and comply with Australian Standards AS2047. Pascal deflection rates up to 2200Pa. Sliding Door rated at an air infiltration of 1.33L/s m


3 SECURITY Dead lock supplied as standard. Optional barrier, security and Prowler Proof screens available. BUSHFIRE Xtreme Bushfire Protection option available. Xtreme options have been tested by CSIRO to meet BAL-40 - compliant to AS within Australian Standards AS HARDWARE Infinity Satin Chrome hardware supplied as standard** Optional Slimline and Dura handles are available Optional colours available are: - Pearl White - Stone Beige - Anodic Natural Matt - Gloss Black Door locks can be keyed alike to other Quantum door products for ease of use. Heavy duty dual roller system. **Infinity D handle supplied as standard (See picture top right hand corner) BUILD-IN ACCESSORIES 180 non-load bearing couplers. 135 non-load bearing corner couplers. 100mm aluminium architraves for replacement door installations. Adjustable storm mould. Extruded aluminium 180 mullion covers to hide load bearing posts. OPTIONS Glazing options also available in bar layout styles: - Colonial - Federation - Ovolo glazing bar style* Wide range of powder coating colours. Customised WERS ratings. Variety of sizes and custom made options available. Variety of configuration options available. *Ovolo only available in single glazing. DELIVERY Protective wrapping for delivery to site comes standard for all Quantum products. 112
4 113
5 Quantum Sliding Door Installation 114

6 Sliding Door - Installation Building In Detail Brick Veneer - 240mm wall INSTALLING FRAME CORRECTLY Fit flashing to door surround (refer to drawing below). Measure the frame opening to ensure that there is sufficient room for the product and additional packing. Stud Opening: Height = Frame Size + 40mm Width = Frame Size + 60mm Secure aluminum door by nailing through reveal into studwork - fixing at 450mm maximum centres. Sill bricks should be at least 10mm clear of door frame to allow settlement in brick veneer construction. Header beam should be at least 12mm clear of door frame. Do not permit weight of eaves or arch bars to bear on any window or door frame. (Windows and doors are not load bearing.) To ensure the satisfactory long term performance of doors, sill must be fully supported. Ensure outside finish does not block sill drainage holes. OUTSIDE FLASHING HEADER 12mm CLEARANCE NO PACKING STUD OPENING = + 40mm SOFFIT LINING QUAD BY BUILDER 10mm CLEARANCE BETWEEN SOFFIT LINING AND DOOR HEAD HEAD TIMBER REVEAL TIMBER ARCHITRAVE JAMB TIMBER REVEAL PACKING FIXINGS AT 450mm CENTRES STUD STUD SILL FLOORING FLASHING BRICK SILL FLASHING SILL TILE SHIMS AT 450mm MAX CTRS. CONCRETE SLAB STUD OPENING = + 60mm 115
7 Sliding Door - Installation Building In Detail Brick Veneer - 240mm wall Sump Sill INSTALLING FRAME CORRECTLY Fit flashing to door surround (refer to drawing below). Measure the frame opening to ensure that there is sufficient room for the product and additional packing. Stud Opening: Height = Frame Size + 40mm Width = Frame Size + 60mm Secure aluminum door by nailing through reveal into studwork - fixing at 450mm maximum centres. Sill bricks should be at least 10mm clear of door frame to allow settlement in brick veneer construction. Header beam should be at least 12mm clear of door frame. Do not permit weight of eaves or arch bars to bear on any window or door frame. (Windows and doors are not load bearing.) To ensure the satisfactory long term performance of doors, sill must be fully supported. Ensure outside finish does not block sill drainage holes. OUTSIDE FLASHING HEADER 12mm CLEARANCE NO PACKING STUD OPENING = + 40mm SOFFIT LINING QUAD BY BUILDER 10mm CLEARANCE BETWEEN SOFFIT LINING AND DOOR HEAD HEAD TIMBER REVEAL SILL SUMPSILL 65.0 TIMBER ARCHITRAVE FLOORING JAMB TIMBER REVEAL PACKING FIXINGS AT 450mm CENTRES STUD FLASHING STUD SILL TILE STUD OPENING = + 60mm BRICK SILL SHIMS AT 450mm MAX CTRS. FLASHING CONCRETE SLAB 116
8 Sliding Door - Installation Building In Detail Double Brick - 280mm wall INSTALLING FRAME CORRECTLY Fit flashing to door surround (refer to drawing below). Measure the frame opening to ensure that there is sufficient room for the product and additional packing. Brick Opening: Height = Frame Size + 3mm Width = Frame Size + 3mm Secure aluminum doors using building lug into mortor - fixing at 50mm max centres Sill bricks should be at least10 mm clear of window frame. Do not permit weight of eaves or arch bars to bear on any window or door frame. (Windows and doors are not load bearing.) To ensure the satisfactory long term performance of doors, sill must be fully supported. Ensure outside finish does not block sill drainage holes. OUTSIDE FLASHING STEEL LINTEL CAVITY FIXING BLOCK CEMENT RENDER HEAD CEMENT RENDER BUILDING IN LUGS AT 450mm CENTRES BRICK OPENING = + 3mm FLASHING FLOORING JAMB MORTAR SILL TILE SILL SHIMS AT 450mm MAX CTRS. BRICK OPENING = + 3mm BRICK SILL REBATED CONCRETE FLOOR SLAB FLASHING 117

9 Sliding Door - Installation Building In Detail Double Brick - 280mm wall Sump Sill INSTALLING FRAME CORRECTLY Fit flashing to door surround (refer to drawing below). Measure the frame opening to ensure that there is sufficient room for the product and additional packing. Brick Opening: Height = Frame Size + 3mm Width = Frame Size + 3mm Secure aluminum doors using building lug into mortor - fixing at 450mm max centres Sill bricks should be at least10 mm clear of window frame. Do not permit weight of eaves or arch bars to bear on any window or door frame. (Windows and doors are not load bearing.) Ensure outside finish does not block sill drainage holes. OUTSIDE FLASHING STEEL LINTEL CAVITY FIXING BLOCK CEMENT RENDER HEAD CEMENT RENDER BUILDING IN LUGS AT 450mm CENTRES BRICK OPENING = + 3mm FLOORING JAMB FLASHING SILL SUMPSILL 65.0 MORTAR SILL TILE BRICK SILL SHIMS AT 450mm MAX CTRS. REBATED CONCRETE FLOOR SLAB BRICK OPENING = +3mm FLASHING 118

10 Sliding Door - Installation Building In Detail Double Brick - 280mm wall Prepared Opening INSTALLING FRAME CORRECTLY Fit flashing to door surround (refer to drawing below). Measure the frame opening to ensure that there is sufficient room for the product and additional packing. Brick Opening: Height = Frame Size + 3mm Width = Frame Size + 3mm Secure aluminum doors using building lug into mortor - fixing at 450mm max centres Sill bricks should be at least10 mm clear of window frame. Do not permit weight of eaves or arch bars to bear on any window or door frame. (Windows and doors are not load bearing.) To ensure the satisfactory long term performance of doors, sill must be fully supported. Ensure outside finish does not block sill drainage holes. OUTSIDE FLASHING STEEL LINTEL CAVITY FIXING BLOCK CEMENT RENDER CEMENT RENDER HEAD BRICK OPENING = +3mm FLOORING JAMB FIXING AT 450mm CENTRES FLASHING SILL SILL TILE SHIMS AT 450mm MAX CTRS. BRICK OPENING = + 3mm BRICK SILL REBATED CONCRETE FLOOR SLAB FLASHING 119
.")
11 Sliding Door - Installation Building In Detail Blockwork INSTALLING FRAME CORRECTLY Measure the frame opening to ensure that there is sufficient room for the product and additional packing. Blockwork Opening: Height = Frame Size + 80mm Width = Frame Size + 20mm Fit subframe to opening and seal fixings. Fit window to subframe (screw or pop-rivet). Do not permit weight of eaves or arch bars to bear on any window or door frame. (Windows and doors are not load bearing.) To ensure the satisfactory long term performance of doors, sill must be fully supported. Ensure outside finish does not block sill drainage holes. BLOCKWORK OPENING = FRAME HEIGHT + 80mm OUTSIDE SEALANT FIXING 450 CENTRES HEAD SILL FIXING 450 CENTRES PACKER SEALANT SUBHEAD SUBSILL FIXING 450 CENTRES FLOORING 101,6 FIXING 450 CENTRES 35 JAMB ANGLE TRIM FIXING 450 CENTRES RENDER BLOCKWORK (SEALED OR PRETREATED AS PER BLOCKWORK SUPPLIER S SPECIFICTION - TO PREVENT WATER PENETRATION) FIXING 450 CENTRES SEALANT PACKER BLOCKWORK (SEALED OR PRETREATED AS PER BLOCKWORK SUPPLIER S SPECIFICTION - TO PREVENT WATER PENETRATION) BLOCKWORK OPENING = + 20mm NDER 120

12 Sliding Door - Installation Building In Detail Cladding on Studwall INSTALLING FRAME CORRECTLY Fit flashing to door surround (refer to drawing below). Measure the frame opening to ensure that there is sufficient room for the product and additional packing. Stud Opening: Height = Frame Size + 40mm Width = Frame Size + 60mm Secure aluminum door by nailing through reveal into studwork - fixing at 450mm maximum centres. Header beam should be at least 12mm clear of window frame. Do not permit weight of eaves or arch bars to bear on any window or door frame. (Windows and doors are not load bearing.) To ensure the satisfactory long term performance of doors, install sill support (refer to drawings below). Ensure outside finish does not block sill drainage holes. OUTSIDE HEADER NO PACKING TIMBER REVEAL HEAD STUD OPENING = + 40mm TIMBER ARCHITRAVE TIMBER REVEAL PACKING FIXINGS AT 450mm CENTRES FLASHING JAMB WALL CLADDING FLOORING SILL SILL SUPPORT STUD OPENING = + 60mm FLASHING 121

13 Sliding Door - Installation Building In Detail Cladding on Studwall Sump Sill INSTALLING FRAME CORRECTLY Fit flashing to door surround (refer to drawing below). Measure the frame opening to ensure that there is sufficient room for the product and additional packing. Stud Opening: Height = Frame Size + 40mm Width = Frame Size + 60mm Secure aluminum door by nailing through reveal into studwork - fixing at 450mm maximum centres. Header beam should be at least 12mm clear of window frame. Do not permit weight of eaves or arch bars to bear on any window or door frame. (Windows and doors are not load bearing.) To ensure the satisfactory long term performance of doors, install sill support (refer to drawings below). Ensure outside finish does not block sill drainage holes. OUTSIDE HEADER NO PACKING TIMBER REVEAL HEAD STUD OPENING = + 40mm TIMBER ARCHITRAVE FLOORING JAMB TIMBER REVEAL PACKING FIXINGS AT 450mm CENTRES FLASHING WALL CLADDING SILL 65.0 SUMPSILL SILL SUPPORT STUD OPENING = + 60mm FLASHING 122

14 Sliding Door - Installation Building In Detail Hebel Power Panel INSTALLING FRAME CORRECTLY Fit flashing to door surround (refer to drawing below). Measure the frame opening to ensure that there is sufficient room for the product and additional packing. Stud Opening: Height = Frame Size + 40mm Width = Frame Size + 60mm Secure aluminum door by nailing through reveal into studwork - fixing at 450mm maximum centres. Header beam should be at least 12mm clear of window frame. Do not permit weight of eaves or arch bars to bear on any window or door frame. (Windows and doors are not load bearing.) Caulking between render and frame To ensure the satisfactory long term performance of doors, sill must be fully supported. Ensure outside finish does not block sill drainage holes OUTSIDE FLASHING 12mm CLEARANCE HEADER NO PACKING SOFFIT LINING TIMBER REVEAL STUD OPENING = + 40mm QUAD BY BUILDER 10mm CLEARANCE BETWEEN SOFFIT LINING AND WINDOW HEAD HEAD TIMBER ARCHITRAVE JAMB TIMBER REVEAL PACKING FIXINGS AT 450mm CENTRES STUD STUD RENDER SILL FLOORING HEBEL POWER PANEL FLASHING SILL TILE HEBEL POWER PANEL STUD OPENING = + 60mm 123

15 Sliding Door - Installation Building In Detail Hebel Power Panel Sump Sill INSTALLING FRAME CORRECTLY Fit flashing to door surround (refer to drawing below). Measure the frame opening to ensure that there is sufficient room for the product and additional packing. Stud Opening: Height = Frame Size + 40mm Width = Frame Size + 60mm Secure aluminum door by nailing through reveal into studwork - fixing at 450mm maximum centres. Header beam should be at least 12mm clear of window frame. Do not permit weight of eaves or arch bars to bear on any window or door frame. (Windows and doors are not load bearing.) Caulking between render and frame To ensure the satisfactory long term performance of doors, sill must be fully supported. Ensure outside finish does not block sill drainage holes OUTSIDE FLASHING 12mm CLEARANCE HEADER NO PACKING SOFFIT LINING TIMBER REVEAL STUD OPENING = + 40mm QUAD BY BUILDER 10mm CLEARANCE BETWEEN SOFFIT LINING AND WINDOW HEAD HEAD SILL SUMPSILL 65.0 TIMBER ARCHITRAVE FLOORING JAMB TIMBER REVEAL PACKING FIXINGS AT 450mm CENTRES HEBEL POWER PANEL FLASHING STUD STUD RENDER SILL TILE STUD OPENING = + 60mm HEBEL POWER PANEL 124
16 125
17 Quantum Sliding Door Cross Sectional Views 126
18 Sliding Door - Cross Sectional View Two Panel FX outside outside
19 Sliding Door - Cross Sectional View Two Panel FX outside
20 Sliding Door - Cross Sectional View Two Panel FX Double Glazed outside outside
21 Sliding Door - Cross Sectional View Two Panel FX Double Glazed outside
22 Sliding Door - Cross Sectional View Three Panel FXF outside outside
23 Sliding Door - Cross Sectional View Three Panel FXF outside
24 Sliding Door - Cross Sectional View Three Panel FXF outside
25 Sliding Door - Cross Sectional View Four Panel FXXF outside
Architectural Information Page: Series 541 Sliding Door Introduction
 Design Features Architectural Information Page: 71. 1 Introduction Date: Oct 04 Replaces: Aug 03 Scale: Not to scale 1. Successfully tested for compliance with Australian Standard AS 2047. 2. Optional
Design Features : INTRODUCTION SERIES 704 ARCHITECTURAL SlideMASTER SLIDING DOOR. Australian registered design.
 INTRODUCTION DATE DEC 07 REPLACES JUN 06 SCALE NOT TO SCALE Design Features : Series 704 has been designed as an internal sliding door that can be fabricated in numerous configurations: 'XF', 'FX', 'FXF',
Design Features INTRODUCTION SERIES 702 PERFORMANCE SlideMASTER SLIDING DOOR. Australian Registered Design
 Design Features INTRODUCTION DATE JUN 06 REPLACES NOV 04 SCALE NOT TO SCALE This high performance sliding door has been tested for compliance with the relevant Australian Standards. Achieved a very high
Architectural Information Page: Series 514 Double-hung Window Standard Wrap Around Sash Introduction
 Design Features Architectural Information Page: 22. 1 Standard Wrap Around Sash Introduction Scale: Not to scale 1. Successfully tested for compliance with Australian Standard AS 2047. 2. Optional mullion
Alfresco LIVING. Just got better DESIGNERLINE PRODUCT RANGE QUEENSLAND
 Alfresco LIVING Just got better DESIGNERLINE PRODUCT RANGE QUEENSLAND Introducing Dowell DESIGNERLINE WINDOWS AND DOORS RANGE - 2 - Dowell DesignerLine Bi-fold Door and Window Opened European Hinge System
KEY FEATURES. SPECIALTY SERIES 533 SoundOUT SLIDING DOOR
 SPECIALTY SERIES 533 SoundOUT SLIDING DOOR This product has been specially designed to reduce noise infiltration through sliding door openings. The SoundOUT sliding door system is designed to be installed
R E S I D E N T I A L S E R I E S
 Photo courtesy of James Hardie Australia. Windows Supplied by Hanlon Windows. DATE: NOVEMBER 2009 REPLACES: AUGUST 2003 KEY FEATURES / PERFORMANCE CHARACTERISTICS Replaces: aug 03 Scale: not to scale DStacker
Series 514 Residential Double Hung Window
 Photo courtesy of Vista Windows DATE: NOVEMBER 2009 REPLACES: AUGUST 2003 KEY FEATURES / PERFORMANCE CHARACTERISTICS Replaces: aug 03 Scale: not to scale Successfully tested for compliance with AS 2047.
Series 601 MAGNUM Sliding Window
 Photo courtesy of David Reid Homes. Windows supplied by Lifestyle Windows. DATE: NOVEMBER 2009 REPLACES: AUGUST 2003 KEY EATURES / PERORMANCE CHARACTERISTICS Scale: NOT TO SCALE Tested for compliance with
Architectural Information Page: Series 602 Magnum Sliding Window Introduction. Design Features : Date: Aug 03 Replaces: Scale: Not to scale
 Design eatures : Architectural Information Page: 17. 1 Introduction Date: Aug 03 Replaces: Scale: Not to scale This high performance sliding window has been designed to complement our existing high quality
Series 517 Residential Awning Window
 Series 517 RESIDENTIAL SERIES Photo courtesy of Vista Windows DATE: NOVEMBER 2009 REPLACES: AUGUST 2003 RESIDENTIAL SERIES Series 517 KEY FEATURES / PERFORMANCE CHARACTERISTICS Replaces: aug 03 Scale:
LEADING WINDOW & DOOR SYSTEMS
 intec LEADING WINDOW & DOOR SYSTEMS Wintec Aluminium Since our beginning in 1997, we have developed a range of window and door products that are innovative, functional and stylish. Wintec Aluminium windows
182.1 INTRODUCTION SERIES 462 ARCHITECTURAL COMMERCIAL SLIDING WINDOW. Design Features : Australian Registered Design.
 INTRODUCTION DATE JUN 06 REPLACES NOV 04 SCALE NOT TO SCALE Design Features : The 26mm thick heavy duty sliding window sashes have been fitted into custom head and sill and jamb inlay adaptor that snaps
Series 525 LouvreMASTER Adjustable Louvre Window
 Series 525 LouvreMASTER Adjustable Louvre Window DESIGNER SERIES Photo courtesy of Hanlon Windows Australia DATE: NOVEMBER 2009 REPLACES: AUGUST 2003 DESIGNER SERIES Series 525 KEY EATURES / PERORMANCE
Series 618 MAGNUM Sliding Door
 Photo courtesy of Portland Aluminium & Glass. Designer Form & Function Building Design. Builder Beasley Construction Pty Ltd DATE: NOVEMBER 2009 REPLACES: OCTOBER 2007 KEY FEATURES / PERFORMANCE CHARACTERISTICS
The WANZ Guide to Window Installation
 The WANZ Guide to Window Installation as described in E2/AS1 Amendment 5 1 October 2012 Ver. 1.2 Window Association of New Zealand Page 2 of 74 Contents Overview Page 5 Objective Page 5 Scope Page 5 Opening
Architectural Information Series 614 ClearVENT Double-hung Window Design Features Australian registered design
 Architectural Information Page: 27. 1 Introduction Design Features This full vision vertical sliding sashless double-hung window has been designed to complement our existing quality product range including:
173.1 INTRODUCTION SERIES 453 RESIDENTIAL DOUBLE-HUNG WINDOW INTO FRAMING. Australian Registered Design. Design Features :
 INTRODUCTION DATE JUN 06 REPLACES NOV 04 SCALE NOT TO SCALE Design Features : Vertical sliding double-hung sashes inlaid directly into shopfront framing. Flyscreens tuck into dedicated recess in the jamb
Series Residential Sliding Window
 Series 502-504 RESIDENTIAL SERIES Photo courtesy of MidCity Windows DATE: NOVEMBER 2009 REPLACES: AUGUST 2003 RESIDENTIAL SERIES Series 502-504 KEY FEATURES / PERFORMANCE CHARACTERISTICS Replaces: aug
Series 704 SlideMASTER Sliding Door
 SlideMASTER Sliding Door Photo courtesy of Portland Aluminium and Glass DATE: MAY 2013 REPLACES: MARCH 2008 Series 704 KEY FEATURES/PERFORMANCE CHARACTERISTICS Scale: not to scale The Series 704 SlideMASTER
Series 702 SlideMASTER Sliding Door
 SlideMASTER Sliding Door ARCHITECTURAL SERIES Photo Courtesy of Portland Aluminium and Glass DATE: MAY 2013 REPLACES: MARCH 2008 ARCHITECTURAL SERIES KEY FEATURES/PERFORMANCE CHARACTERISTICS SCALE: not
STOPOREN FACADE SYSTEM TIMBER WINDOW JOINERY - HEAD DETAIL
 INTERNAL LINING TIMBER LINTEL AS PER NZS 3604 FLEXIBLE FLASHING TAPE INSTALLED OVER AT AIRSEAL ON CORNERS PEF ROD GAP 7.5-8mm APPROX 35 RENDER 20mm DRAINED & VENTED CAVITY - BATTENS AT 300-600mm MAX.CTRS.
System for 2+ Level Buildings
 Issued Sept 205 Contact Info@symonite.co.nz System for 2+ Level Buildings Typical Details Issued: September 205 TYPICAL DETAILS CONTENTS.0 TYPICAL VERTICAL JOINTS 2.0 EXT. CORNER / TYPICAL HORIZONTAL JOINT
Series 424 CentreGLAZE Framing
 Series 424 CentreGLAZE Framing Double Glazed 102mm COMMERCIAL SERIES Photo courtesy of All Weather Windows DATE: MAY 2013 REPLACES: MARCH 2008 COMMERFIAL FRAMING Series 424 KEY FEATURES/PERFORMANCE CHARACTERISTICS
The WANZ Guide to Window Installation. as described in E2/AS1 Amendment 7
 The WANZ Guide to Window Installation as described in E2/AS1 Amendment 7 1 November 2017 Version 1.4 0800 397 263 technical@altus.co.nz The WANZ Guide to Window Installation as described in E2/AS1 Amendment
Best Barns USA. the Brookhaven 10' x 16' Assembly Book. revised March 23, 2016
 Best Barns USA Assembly Book revised March 23, 2016 the Brookhaven 10' x 16' Manufactured by Reynolds Building Systems, Inc. 205 Arlington Drive Greenville, PA 16125 724-646-3775 This manual is copyrighted.
Series 626 FrontGLAZE Framing
 Double Glazed 150mm COMMERCIAL FRAMING Charles Sturt University Learning Commons Building. Architect: JWP (Jovaras Westland Partnership). Windows by DLG Aluminium & Glazing. DATE: MAY 2013 REPLACES: MARCH
INSTALLATION INSTRUCTIONS FOR A&L PRODUCTS
 INSTALLATION INSTRUCTIONS FOR A&L PRODUCTS AUGUST 2017 1 RECOMMENDED BUILDING IN-DETAIL Should you require further information, please contact A&L Windows on 1800 441 414 2 IMPORTANT IMPORTANT Allow Vinyl
Definitions and Design Considerations... W-CR-2
 General Information SECTION DIRECTORY Definitions and Design Considerations... W-CR-2 Combination Assembly Recommendations and Limitations Typical Sealant... W-CR-4 Single-Unit Opening... W-CR-4 Two-Way
Installation Guide. Evolve bi-fold. 8. Door restrictor- optional p9. 1. Before you start p2. 9. Adjustment. 2. Measuring and surveying p2
 Evolve bi-fold Installation Guide 1. Before you start p2 8. Door restrictor- optional p9 2. Measuring and surveying p2 3. Configuration details p4 4. Installation p5 5. Glazing p5 6. Glazing packer details
Series 464 Sashless Double-Hung Window
 Series 464 Sashless Double-Hung Window ARCHITECTURAL SERIES Photo courtesy of Evolution Windows & Doors DATE: MAY 2013 REPLACES: MARCH 2008 ARCHITECTURAL SERIES Series 464 KEY FEATURES/PERFORMANCE CHARACTERISTICS
Installation Recommendations for Finless Frame Doors
 Installation Recommendations for Finless Frame Doors These installation recommendations are made available by MI Windows and Doors, LLC (MI) to assist with the integration of finless or flange sliding
WINDOW JAMB FITTED SILL FLASHING GOES BEHIND SILL FIXING FIN AND AT LEAST 3 BRICK COURSES DOWN (LAP IF NECESSARY) WEEP HOLES ABOVE FLASHING
 WEEP HOLES ABOVE FLASHING") upvc Window upvc Window Brick Veneer Applications Cavity Brick Applications IMPOR TANT Ensure building loads do not bear on window WINDOW FITTED Ensure building loads do not bear on window FOR ALTERNATE
upvc Window upvc Window Brick Veneer Applications Cavity Brick Applications IMPOR TANT Ensure building loads do not bear on window WINDOW FITTED Ensure building loads do not bear on window FOR ALTERNATE
ASS 70 FD folding / sliding door. Installation Guide
 ASS 70 FD folding / sliding door Installation Guide IMPORTANT! These doors should be fitted by competent and trained installers. Please read these instructions thoroughly before beginning the installation.
 TARANAKIPINE WEATHERBOARD SYSTEM Installation information and technical drawings TIMBER WEATHERBOARDS NATURALLY BETTER FOR MORE THAN A CENTURY www.taranakipine.co.nz 1 CONTENTS May 2015 For the latest
Curtain Wall Installation Guide
 Curtain Wall Installation Guide Curtain Wall Installation Guide 1 IMPORTANT NOTICES! Important Notices & Information Manufacturer s Notes: The building envelope must be correctly prepared with weather
Acceptable Standards of Domestic Construction
 Truss or Rafter Roof Batten Triple grip fastener (for roof trusses) Foil lined Insulation blanket Top plate Sprocket Brick tie Top plate strapping at 1200mm max. cts. Note: Holding down straps should be
WINDOW INSTALLATION GUIDE
 WINDOW INSTALLATION GUIDE SAWDAC is not responsible for or liable for any use or misuse of the information contained in this window installation guide. Window Installation Guide This guide provides basic
patio door installation guide
 patio door installation guide Measuring & surveying p2 Mechanical jointing p5 Installation p5 Hardware adjustment p7 Sealing of outer frame p7 Cleaning p7 Walk through clearances p8 Minimum and maximum
SERIES 5001 SLIDING GLASS DOOR PATIO DOORS INSTALLATION GUIDE
 PATIO DOORS INSTALLATION GUIDE These instructions cover general installation conditions. Improper installation could affect your doors operation and warranty. Deviations from these instructions should
Vinyl Windows and Doors Manufactured by Pella Corporation
 Vinyl Windows and Doors Manufactured by Pella Corporation Part Number: V981255 2009 Pella Corporation INSTALLATION INSTRUCTION - INSTRUCCIONES DE INSTALACIÓN FOR BOW WINDOWS WITHOUT HEAD AND SEAT BOARD
Pocket Door Kit PD1 / PD2 Installation Instructions. Kit Contents.
 Pocket Door Kit PD1 / PD2 Installation Instructions Kit Contents. 1, Create Rough Opening In Stud Wall Construct rough opening ensuring all sides are square and level. Rough opening should be; Height =
Dear Contractor, I am glad that you are interested in our window rebate program.
 Dear Contractor, I am glad that you are interested in our window rebate program. I have included three documents with this letter. One is our form to indicate your intention to participate in the program.
C.00. Ullrich Aluminium Co. Ltd. Ulltraclad Aluminium Cladding September Wall Batten Elevation. Horizontal battens between verticals at soffit
 Horizontal battens between verticals at soffit 2 C.04 600 600 600 600 Cavity batten at 600 mm centres 1 C.03 Batten fixing points 1 C.04 1 C.07 1 C.12 1 C.13 1 C.14 Meter Box Window 1 C.08 1 C.09 800 800
PELLA INSTALLATION INSTRUCTIONS - ADVANCED PERFORMANCE Nail Fin, Nail Fin with J-Channel and EnduraClad Exterior Trim with Nail Fin Windows
 PELLA INSTALLATION INSTRUCTIONS - ADVANCED PERFORMANCE Nail Fin, Nail Fin with J-Channel and EnduraClad Exterior Trim with Nail Fin Windows THE FOLLOWING INSTALLATION METHODS ARE INCLUDED IN THIS BOOKLET:
Qualital Guide Windows and Doors Installation Aluminium-Timber Windows and Doors Aluminium Windows and Doors
 1 Qualital Guide Windows and Doors Installation Aluminium-Timber Windows and Doors Aluminium Windows and Doors 2 Table of Context 3 4 5-9 10 11-12 13-16 17-20 21 22 23 24 25 26 27 28 29-34 35 Section One
SovereignSeries. SovereignSeries
 2 SovereignSeries Overview 21 Awning and Casement Windows 22 Sliding and Stacking Windows and Doors 32 inged Doors 50 Bi-fold and Inline Bi-fold Windows and Doors 62 SovereignSeries 2 SovereignSeries
INSTALLATION SHOP DRAWINGS FOR MINNEAPOLIS, MN
 MINNEAPOLIS, MN 2-0- 2-- General Notes Abbreviations Deviations from Architectural Specifications Deviations from Architectural Drawings ALUM. = ALUMINUM B.O. = BY OTHERS CONT. = CONTINUOUS. = CLEARANCE
Storefront Installation Guide INSTALLATION INSTRUCTIONS
 STOREFRONT General Notes 1. Check contract documents and shop drawings, and understand and clarify any Field Verify Notes, approvals of drawings, and products required to be familiar with the project.
Liniar Window. installation guide
 Liniar Window installation guide This installation guide is designed to show you the best way to fit Liniar windows, and covers all styles of window made from Liniar s lead-free 70mm PVCu profile. Not
Sliding Doors S l i d i n g W i n d o w s R o l l e r S h u t t e r s
 Sliding Doors S l i d i n g W i n d o w s R o l l e r S h u t t e r s The SALIENT 55 sliding window system The SALIENT 70 sliding window and door system The SALIENT 90 heavy-duty sliding door and window
INSTALLATION INSTRUCTIONS - INSTRUCCIONES DE INSTALACION FOR HURRICANESHIELD IMPACT-RESISTANT DOUBLE-HUNG, SINGLE-HUNG AND SIMULATED-HUNG
 2008 Pella Corporation Part Number: 80ED0101 INSTALLATION INSTRUCTIONS - INSTRUCCIONES DE INSTALACION FOR HURRICANESHIELD IMPACT-RESISTANT DOUBLE-HUNG, SINGLE-HUNG AND SIMULATED-HUNG Instrucciones en español
INSTALLATION INSTRUCTION - INSTRUCCIONES DE INSTALACIÓN FOR CLAD CASEMENT & AWNING WINDOW VENTANA DE DOS HOJAS CON REVESTIMIENTO
 2008 Pella Corporation Part Number: 801P0101 INSTALLATION INSTRUCTION - INSTRUCCIONES DE INSTALACIÓN FOR CLAD CASEMENT & AWNING WINDOW VENTANA DE DOS HOJAS CON REVESTIMIENTO Corner Corner Top Fin Corner
Flashing Materials. Rough Opening Preparation
 Installation Instructions for CertainTeed New Construction Windows Handling vinyl windows CAUTION: Always store vinyl windows and doors in an upright position on a slight angle. Never lay them flat or
UNIT 5: EXTERIOR DOORS AND WINDOWS
 KEY CONCEPTS 1. Identify tools needed for exterior door and window installation 2. Last step to weather proofing the home 3. Steps to installing exterior doors and windows 4. Maintenance and safety of
Heavy Wall Applied Stop Tube Frame and Door Installation
 INSTALLATION INSTRUCTIONS Heavy Wall Applied Stop Tube Frame and Door Installation Read all instructions before beginning installation. These instructions are provided to help prevent installation problems
XL JOINERY LTD LA PORTE VISTA MODULAR 3 ASSEMBLY INSTRUCTIONS
 XL JOINERY LTD LA PORTE VISTA MODULAR 3 2090mm High x 4687mm Wide ASSEMBLY INSTRUCTIONS READ AND UNDERSTAND THESE INSTRUCTIONS FULLY PRIOR TO STARTING INSTALLATION. IT IS STRONGLY RECOMMENDED THAT A COMPETENT
4256HM JAMES HARDIE MONOLITHIC CLADDING
 4256HM JAMES HARDIE MONOLITHIC CLADDING 1. GENERAL This section relates to the supply and fixing of fibre cement flush finish cladding: - James Hardie Monotek Sheet for textured coating systems - James
CLEAR GLASS WALL SYSTEMS
 PRODUCT DATA SHEET SERIES SI3000C CLEAR GLASS WALL SYSTEMS Clean, Uninterrupted Views Series SI3000C Clear Glass Walls eliminate vertical stiles, allowing for maximum transparency, natural daylighting,
Technical Guide M. MMultiSlide Doors. Technical Guide M1
 Technical Guide M MultiSlide Doors M Technical Guide M1 Loewen MultiSlide MultiSlide doors provide large dramatic openings for the transition from indoor and outdoor living spaces. With an easy, smooth
Method of Build 1. General
 Method of Build 1 General GLAZED ELEVATIONS Viso Double Glazed in glazed form differs from many other systems as the vertical joints can have Viso dry joints or the unique HIDDEN mullion post between glazed
Installation - Sub Cills
 Installation - Sub Cills Fitting of Subcill Drainage paths through the sub-cill can be seen on the illustration alongside so care must be taken to ensure they are not obstructed and that screw fixings
VINYL REPLACEMENT WINDOW INSTALLATION STANDARDS
 VINYL REPLACEMENT WINDOW INSTALLATION STANDARDS BEFORE you start to remove the existing windows Place clean drop cloths in all work areas. Re-measure the opening to ensure the new window will fit. Remove
INSTALLATION INSTRUCTIONS IMPERVIA SLIDING PATIO DOOR WITH FINS
 2008 Pella Corporation Part Number: 803V0101 INSTALLATION INSTRUCTIONS IMPERVIA SLIDING PATIO DOOR WITH FINS Installation Instructions for Typical Wood Frame Construction. These instructions were developed
Vertical Slider Section Detail
 Vertical Slider Section Detail PRODUCT GUIDE Main & Bead Profiles 128 42 69 VS01 - Outer frame 150 139 210 189 60 52 52 52 48 30 42 60 18 72 90 18 60 VS02 - Cill VS14 - Cill 18 VS03 - Top Sash VS04 - Standard
INSTALLATION INSTRUCTIONS DOUBLE-HUNG WINDOW WITH FINS
 2012 Pella Corporation INSTALLATION INSTRUCTIONS DOUBLE-HUNG WINDOW WITH FINS Part Number: 802L0105 Installation Instructions for Typical Wood Frame Construction. These instructions were developed tested
INSTALLATION INSTRUCTIONS IMPERVIA (Vent and Fixed) AWNING, CASEMENT, and LARGE AWNING WINDOW WITH FINS
 AWNING, CASEMENT, and LARGE AWNING WINDOW WITH FINS") 2012 Pella Corporation Part Number: 80WH0101 INSTALLATION INSTRUCTIONS IMPERVIA (Vent and Fixed) AWNING, CASEMENT, and LARGE AWNING WINDOW WITH FINS Installation Instructions for Typical Wood Frame Construction.
2012 Pella Corporation Part Number: 80WH0101 INSTALLATION INSTRUCTIONS IMPERVIA (Vent and Fixed) AWNING, CASEMENT, and LARGE AWNING WINDOW WITH FINS Installation Instructions for Typical Wood Frame Construction.
Installation Guide for Andersen Architectural Clad Hinged Windows
 Guide for Andersen Architectural Clad Hinged Windows Congratulations! You have just purchased one of the many fine Andersen products. Proper assembly, installation and maintenance are essential if the
Sun Windows General Information New Construction Hinged Door Installation Instructions
 A G H F H H A. Apply Weather Resistive Barrier B. Apply Bottom Flashing Tape C. Install Sill Pan End Caps & Pan D. Caulk Sides & Top Nailing Surface, Set Door, Fasten E. Apply Side Flashing Tape F. Apply
ES2. fully integrated screening system for bifold doors. load balancing technology. tough PVC-coated polyester mesh.
 ES2 fully integrated screening system for bifold doors load balancing technology tough PVC-coated polyester mesh tight technology ES2 BIFOLD DOOR SCREENING SYSTEM ES2: DOOR SCREENING SYSTEM BIFOLDING HARDWARE
Installation of Fiberglass Windows
 Installation of Fiberglass Windows Before you begin please read and understand these installation instructions. The following installation instructions are recommended by Norwood and failure to follow
InStallatIon InStruCtIonS for vinyl 2-lIte PatIo door assembled
 InStallatIon InStruCtIonS for vinyl -lite PatIo door assembled tools & materials you Will need: Measuring Tape Pencil Shims Square Hammer or Mallet Level Drill & Drill bits: 6", 8", 5 6", 7 6" Utility
1200 SERIES 2 PANEL DOOR rev.1 DETAILED INSTALLATION INTRUCTIONS
 1200 SERIES 2 PANEL DOOR 10.2013 rev.1 DETAILED INSTALLATION INTRUCTIONS GENERAL: Door elevations shown in these instructions are as viewed from the outside. X denotes the active or moving panel(s). O
Method of Build 1. Fire. Sound
 Method of Build 1 General Viso Fire & Acoustic in the solid form differs from most other systems as it can be erected using 12.5mm & 15.0mm boards within the same Aluminium framework. Also hidden fix board
Air Infiltration The amount of air leaking in and out of a building through cracks in walls, windows, and doors.
 Air Infiltration The amount of air leaking in and out of a building through cracks in walls, windows, and doors. Aluminum Clad Sill Heavy extruded aluminum over wood that provides a long lasting, weatherproof
How to operate (folding)
") How to operate (folding) LEFT HAND STACKING OUTWARD OPENING How to operate (folding) RIGHT HAND STACKING OUTWARD OPENING LOCK BOTH LEVER HANDLE AND FLAT HANDLE UTILISING THE D-HANDLE LOCATED ABOVE THE
How to operate (folding) LEFT HAND STACKING OUTWARD OPENING How to operate (folding) RIGHT HAND STACKING OUTWARD OPENING LOCK BOTH LEVER HANDLE AND FLAT HANDLE UTILISING THE D-HANDLE LOCATED ABOVE THE
Assembly Book. 10' x 12' the Cambridge II. revised June 13, 2014
 Assembly Book revised June 13, 2014 the Cambridge II 10' x 12' Manufactured by Reynolds Building Systems, Inc. 205 Arlington Drive Greenville, PA 16125 724-646-3775 This manual is copyrighted. Under the
CLEAR GLASS WALL SYSTEMS
 CLEAR GLASS WALL SYSTEMS SERIES SI3000C Clean, uninterrupted views. Series SI3000C Clear Glass Walls create a seamless wall with uninhibited views. Clear Glass Walls eliminate vertical stiles, allowing
3-LITE PATIO DOOR INSTALLATION INSTRUCTIONS
 3-LITE PATIO DOOR INSTALLATION INSTRUCTIONS IMPORTANT: Read the instructions and familiarize yourself with the door parts and pieces before beginning assembly and installation. TOOLS NEEDED: Tape Measure
FOLDING DOOR - FOR FACTORY ASSEMBLED JAMBS WITH APPLIED SILL
 FOLDING DOOR - FOR FACTORY ASSEMBLED JAMBS WITH APPLIED SILL READ SPECIFIC INSTALLATION INSTRUCTIONS COMPLETELY BEFORE STARTING ANY INSTALLATION Failure to install and maintain our product according to
Series 7650 Installation Instructions Sliding Glass Door
 Series 7650 Installation Instructions Sliding Glass Door Things to Know Before You Start Things to Know Before You Start Removal of Old Fenestration Products Ensure any old fenestration products are removed
Series 7600 Installation Instructions Aluminum Multi-Slide Door (Pocketing)
") Series 7600 Installation Instructions Aluminum Multi-Slide Door (Pocketing) Things to Know Before You Start Things to Know Before You Start Removal of Old Fenestration Products Ensure any old fenestration
Series 7600 Installation Instructions Aluminum Multi-Slide Door (Pocketing) Things to Know Before You Start Things to Know Before You Start Removal of Old Fenestration Products Ensure any old fenestration
InSTallaTIon InSTruCTIonS For 4-lITe PaTIo Door unassembled
 InSTallaTIon InSTruCTIonS For 4-lITe PaTIo Door unassembled Measuring Tape Pencil Shims Drill & Drill bits: 6", 8", 5 6", 7 6" Tools & materials You Will need: Square Hammer or Mallet Level Stiff Putty
Material Description Qty Units Cost Total SQUARE FOOTAGE TOTAL Area 1692 sqft
 Material Report for plan: Willowdale A Page 1 of 7 SQUARE FOOTAGE TOTAL Area 1692 sqft EXCAVATION & FOUNDATION EXCAVATION & BACKFILL Conc. Footing (volume) 5 m³ 122.50 612.50 Conc. Footing (length) 6"x20"
western window systems westernwindowsystems.com installation instructions non-pocket 2-1/4 panels
 series 2600 multi-slide non-pocket 2-1/4 panels windowsystems.com windowsystems.com movement, which can cause warping and other problems. Frame kit components: Each door will have a head assembly, a threshold
Ulltraclad Aluminium Cladding. Contents. 1.0 General Information Design Information Installation Information 7. 4.
 Ulltraclad Aluminium Cladding Contents 1.0 General Information 2 2.0 Design Information 4 3.0 Installation Information 7 4.0 Maintenance 10 5.0 Health & Safety 10 1 1.0 General Information 1.1 Introduction
InstallatIon InstructIons for 2-lIte PatIo Door unassembled
 InstallatIon InstructIons for -lite PatIo Door unassembled tools & materials You will need: Measuring Tape Pencil Shims Drill & Drill bits: 6", 8", 5 6", 7 6" Utility Knife High-Performance Premium Silicone
Series 620 CentreGLAZE Framing
 CentreGLAZE Framing Single Glazed 150mm COMMERCIAL SERIES Photo courtesy of Queensland Windows DATE: MAY 2013 REPLACES: MARCH 2008 COMMERFIAL FRAMING KEY FEATURES/PERFORMANCE CHARACTERISTICS Replaces:
WEB BASED CORE APPLICATION SPECIFIC INSTALLATION INFORMATION AND METHODS
 CORE WEB BASED CORE APPLICATION SPECIFIC INSTALLATION INFORMATION AND METHODS Removing Old Windows Part I - Frame In Although all possible measures have been taken to insure the accuracy of the material
Installation Instructions
 TEL: 09 579-8895 FAX: 09 579-2933 EMAIL: sales@nzfiredoors.co.nz NZ Fire Doors Ltd, 89 Gavin Street, Ellerslie, PO Box 12709, Penrose 1642, Auckland, New Zealand. www.nzfiredoors.co.nz Installation Instructions
Pocket Door Installation Instructions
 Installation Instructions Before getting started: Read instructions thoroughly. Be sure that you have the necessary tools and materials before starting the installation. Consult your local building code
MAX Bifold Door. [ [ Bifold Door
 MAX TM 1 Bifold Door 225 EDGE Architectural Glazing Systems: MAX Technical Manual, January 2015 225 2 Some typical configurations are depicted below from 2 to panel doors. Many more panel configurations
VINYL WINDOWS (new construction or replacement) page 2. VINYL PATIO DOORS pages WOOD CLAD WINDOWS (new construction).page 5 WOOD CLAD WINDOWS
 page 2. VINYL PATIO DOORS pages WOOD CLAD WINDOWS (new construction).page 5 WOOD CLAD WINDOWS") RECOMMENDED INSTALLATION INSTRUCTIONS Please choose the appropriate instructions for the product(s) you are using. Read the instructions thoroughly before beginning the installation process. All instructions
RECOMMENDED INSTALLATION INSTRUCTIONS Please choose the appropriate instructions for the product(s) you are using. Read the instructions thoroughly before beginning the installation process. All instructions
Sun Windows General Information New Construction Sliding Door Installation Instructions H F
 A G B D C H F H E H A. Apply Weather Resistive Barrier B. Apply Bottom Flashing Tape C. Install Sill Pan End Caps & Pan D. Caulk Sides & Top Nailing Surface, Set Door, Fasten E. Apply Side Flashing Tape
INSTALLATION GUIDE WOOD PIVOTING CIRCLE/ OVAL
 WOOD PIVOTING CIRCLE/ OVAL READ SPECIFIC INSTALLATION INSTRUCTIONS COMPLETELY BEFORE STARTING ANY INSTALLATION Failure to install and maintain our product according to these instructions will VOID any
SELECT. Tilt/Turn Window & Swing Door Installation Guide SERIES 70
 Tilt/Turn Window & Swing Door Installation Guide SELECT SERIES 70 Introduction... 3 Tools Required... 4 Installation Instructions... 5 Operation and Maintenance... 7 Hinge Adjustments... 10 Door Hinge
WOOD OUT SWING AWNING, CASEMENT, & HOPPER WINDOW
 WOOD OUT SWING AWNING, CASEMENT, & HOPPER WINDOW INSTALLATION GUIDE READ SPECIFIC INSTALLATION INSTRUCTIONS COMPLETELY BEFORE STARTING ANY INSTALLATION Failure to install and maintain our product according
Folding Sliding door system
 Folding Sliding door system Installation guide V1.1 Nov 2014 p2 This document is offered as guidance for WarmCore folding sliding door installations - for full survey and installation guidelines please
MULTISLIDE DOORS INSTALLATION GUIDE & SITE PREPARATION
 MULTISLIDE DOORS INSTALLATION GUIDE & SITE PREPARATION TOOLS AND SUPPLIES 1 TOOLS CHECK LIST 1. laser level 2. hammer 3. pry bars 4. ladders 5. utility knife 6. screw gun 7. applicator foam gun 8. "j"
Best Barns USA. Regency Deluxe. 8' x 12' Assembly Book. revised February 15, 2017
 Best Barns USA Assembly Book revised February 15, 2017 Regency Deluxe 8' x 12' Manufactured by Reynolds Building Systems, Inc. 205 Arlington Drive, Greenville, PA 16125 This manual is copyrighted. Under