A Thrown Together Sheet Metal Finger Brake
|
|
|
- Jeffery McGee
- 6 years ago
- Views:
Transcription
1 A Thrown Together Sheet Metal Finger Brake By R.G. Sparber Copyleft protects this document 1. Background A few weeks ago I attended our monthly Valley Metal Club 2 meeting. As usual, I was treated with an inspiring presentation about something new to me. In this case, it was Bill Townsend and Bret Chilcott talking about sheet metal bending. I was so inspired that I wanted to go out and buy a 3 in 1 sheet metal machine 3 at Harbor Freight. Part of the talk was how to remanufacture this machine so it actually works well. Since Harbor Freight was near the meeting site, I decided to drop in and see what they were talking about. Besides the price, I was stopped by the size and weight of the machine. I would have to get rid of a machine or two in order to make room. It was time to start thinking about plan B : making my own finger brake. Most of the time, I enjoy making things with a fair amount of precision. This time I decided to see if I could make a usable machine with minimal planning and precision. 1 You may freely copy and distribute this document but please do not modify it. 2 The club is based in and around Phoenix, AZ. See 3 See June 2, 2010 Page 1 of 12 R.G. Sparber


2 The finished Machine The brake is built from a length of 3/16 thick 3 x 3 angle which I found on the side of the road a few years ago. The handle came from a steel fence I wrecked out last year. All other bits were from my junk pile. No fasteners were used in this design. Although I do have a very nice stick welder that would be appropriate for this thickness of steel, I wanted to see if I could get away with my Harbor Freight MIG welder because it is so easy to set up and use. June 2, 2010 Page 2 of 12 R.G. Sparber

3 I cut the fingers from a plate of ½ steel pulled from a scrap yard. It was bent but I was able to cut a 3 wide strip from it that was flat. You can t see it from this angle, but the back ends of these fingers were flame cut. The guy was in a big hurry. It may not look so good, but it will have no effect on how the brake works. My plan is to clamp one or more of these fingers down on the brake to bend any width from ½ up to 8½ in steps of ½. Focusing on What is Important This brake cannot be completely slapped together. Two things have to be right. For starters, the two pieces of angle must be on the same plane when the brake is open. This is easy to do by clamping both angles to the same flat plate. The second critical element is the hinge. If it is not set true, the movable part of the brake will bind up. Alignment of the hinge was accomplished by putting the movable part of the table in my mill vise and machining a notch in each end that was wide and deep. June 2, 2010 Page 3 of 12 R.G. Sparber


4 The resulting V accurately holds a short piece of ½ rod as shown above. The C clamp is needed until I can weld the rod in place. Next I cut some blocks for the fixed part of the table. They had to be notched so weldment on the pivot rods would not hit them. A length of threaded rod was used to hold these blocks in place until they could be welded. Note that the ends of the angle have been machined true. This is necessary in order to prevent binding of the hinge. June 2, 2010 Page 4 of 12 R.G. Sparber

5 Here is a close up of the second hinge. I thought I had figured the width correctly but discovered that an additional ¼ of width was needed on the fixed part of the table. Not a problem just tacked on a scrap of steel. Now, we have the pivot pins aligned with the movable part of the table and pads ready to accept the pivot arms. I then took two blocks of steel and drilled the two holes a bit under ½. I then reamed them to ½. The pins are a nice sliding fit. It is just a matter of welding the two together. No binding. Here is the finished brake. A small block has been welded to the vertical part of the fixed table. The block is held in my bench vise so there is no need to make a support for it. June 2, 2010 Page 5 of 12 R.G. Sparber


6 Machining the Fingers The next step was to make the fingers. I set my angle table to about 20 and then milled a bevel. Here you see the cut about half way through. I m using 3 clamps but still don t feel that this is strong enough for serious hogging. Instead I took only 0.05 per pass. Sure it took a while but at least it stayed put. I moved the front clamp as needed to let the cutter pass. I was unable to mill all the way to the right end due to limitations in my X axis. I could have removed my vise and had room to shift the assembly over but that seemed like a lot of work. June 2, 2010 Page 6 of 12 R.G. Sparber

7 Here I am slicing up the beveled plate into fingers. You can see the flame cut edge of the plate. The block of paraffin wax is placed such that the blade cuts it before entering the plate. The wax works well as a cutting lubricant and doesn t make the mess of oil. As each finger is cut, I cleaned it up on my belt sander. I started by cutting the ½ wide finger and then moved on to the wider fingers. In this way I didn t end up trying to clamp a short length of plate in order to cut the ½ finger. Instead the last cut was the 4 wide finger which was easy to clamp. June 2, 2010 Page 7 of 12 R.G. Sparber


8 Time to try out the finger brake. I have clamped a square to the fixed table. To its left is my ½ wide finger which is holding down a strip of ½ sheet metal. The finger is back from the pivot line by the thickness of that stainless steel plate that you see all the way to the left. I lifted the movable table and now have my first 90 bend. Note that I have avoided a fancy finger clamp. I plan to just clamp each finger individually. June 2, 2010 Page 8 of 12 R.G. Sparber


9 June 2, 2010 Page 9 of 12 R.G. Sparber

10 Not bad for a first try. I was going to add a section on the theory of bending sheet metal but found an excellent article in Wikipedia: The key thing to realize is that the finger clamping the sheet metal is defining one tangent of an arc that will be created as you lift the movable table. As the arc is formed, it draws material from the unclamped sheet metal. The surface of the movable table defines the second tangent of this arc. This is all spelled out nicely under the heading of Bending Allowance in the above article. June 2, 2010 Page 10 of 12 R.G. Sparber


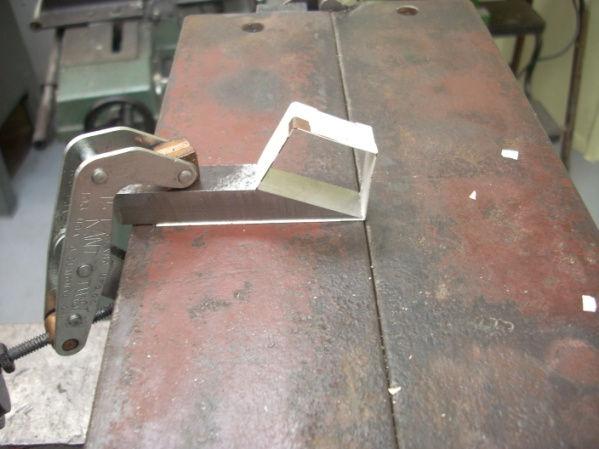
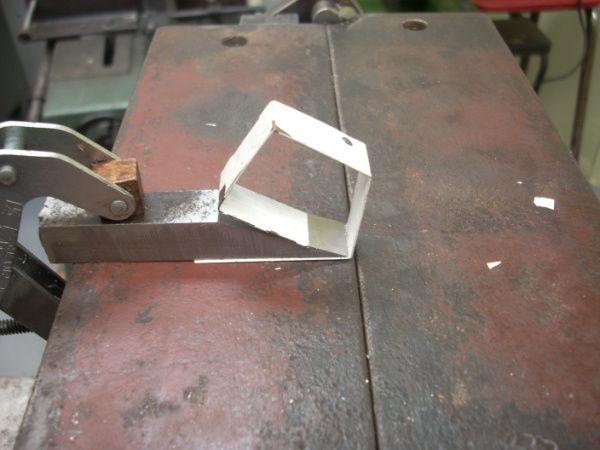
11 My First Real Project One of the things made at the club meeting was a fastener sorting tray. I really liked the idea so decided to try and make one. The inside of this tray is 5 so I used my 1 and 4 fingers for those bends. The open space flanking these fingers is room for the adjacent sides of the tray. One source for more information on how to use a finger brake is YouTube.com. Just search for finger brake metal bending. The diagonal crease was formed on my small vise mounted V brake. June 2, 2010 Page 11 of 12 R.G. Sparber
12 Conclusion Using scrap metal and very little planning, I have built a serviceable small finger brake. Alignment was accomplished primarily by milling two V s in the movable table and all other parts referenced them. The result is a pivot that does not bind. I can bend any width from ½ to 8½ in ½ steps. Maybe now I can stop buying small project boxes and make my own. Acknowledgements I wish to thank Bill Townsend and Bret Chilcott for opening my eyes to sheet metal bending. Thanks to my faithful friend Larry Gill who is one tough editor. Rick Sparber rgsparber@aol.com June 2, 2010 Page 12 of 12 R.G. Sparber
Fitting the Clapper To the Clapper Box
 Fitting the Clapper To the Clapper Box by R.G. Sparber 08/17/2008 Copyleft protects this article. The quality of the cut made by my shaper will depend heavily on how well I fit the clapper to the clapper
A Captured Fastener, version 1.2
 A Captured Fastener, version 1.2 By R. G. Sparber Copyleft protects this document. 1 I needed to be able to fasten two pieces of 16 gage 1" steel tubing together. There shall be no loose parts and no tools
Making Cam Action Edge Clamps, version 2 *
 Making Cam Action Edge Clamps, version 2 * By R. G. Sparber 01/15/2008 Copyleft protects this article. The idea of making these clamps came from Brian Lamb. They work great. If you have more money than
The Lowly Bench Block, version 2
 The Lowly Bench Block, version 2 By R. G. Sparber Copyleft protects this document. 1 Have you ever thumbed through a tool catalog and seen reasonably priced tools that have absolutely no apparent value?
Sheet Metal Brake Plans for a 6' Sheet Metal Brake
 Sheet Metal Brake Plans for a 6' Sheet Metal Brake,1752'8&7,21 Thank you for purchasing the sheet metal brake plans. The plans include a complete list of material needed and easy to follow steps to build
The Start of an Idea for a Shaper Vise, version 4
 The Start of an Idea for a Shaper Vise, version 4 By R. G. Sparber Copyleft protects this document. 1 Initial Design I guess this saves time, but can t be sure. Rather than making a prototype in my shop,
How a Lock-down Vise Works, and Doesn t
 How a Lock-down Vise Works, and Doesn t By R. G. Sparber Copyleft protects this document. 1 In theory, a lock-down vise clamps and forces the part down on the vise ways with a single turn of the vise handle.
An Improved Tool Support for a Harbor Freight Tool Grinder, version 2.2
 An Improved Tool Support for a Harbor Freight Tool Grinder, version 2.2 By R. G. Sparber Copyleft protects this document. 1 Advisory This article was written with a hobby machinist a bit above novice in
A Countersink Gage, version 1.0
 A Countersink Gage, version 1.0 By R. G. Sparber Protected by Creative Commons. 1 Marv Klotz recently presented a very nice design for a countersink gage on the Home Made Tools site: http://www.homemadetools.net/forum/countersink-gage-56314
Machining The Clapper Pin and Hole, Version 2
 Machining The Clapper Pin and Hole, Version 2 By R. G. Sparber 08/27/2008 Copyleft protects this article. Since I do metal working as a hobby, I am more interested in the journey than the destination.
Rebuilding the Ram Ways on my Gingery Shaper, version 1.1
 Rebuilding the Ram Ways on my Gingery Shaper, version 1.1 By R. G. Sparber Copyleft protects this document. 1 The original Gingery Shaper was designed more than 20 years ago. Many people have built them
Ratcheting and Angled Leg Vises. Ratcheting Parallel Guide
 Ratcheting and Angled Leg Vises Ratcheting Parallel Guide In Scott Landis s The Work Bench Book there is a drawing of a ratchet mechanism for a parallel guide. It was one of those little tidbits I tend
Rockin' the Rockers. Ed Hollingsworth
 Rockin' the Rockers Ed Hollingsworth I'm spending my spare time these days rebuilding a 1974 Triumph TR6. I had the well-worn 2.5 liter straight six engine all apart, and was assessing the toll that 40
Type 316SS Backed Conveyor Strip Brush Nylon Bristles, 6" O'all HT, 2' Lg, 3/16" Backing
 How to modify your MK101. First off, the MK101 tile saw is a fantastic tile saw, without any modifications what so ever. That being said, all tile saws tend to have a significant amount of overspray which
Note - the nose ribs and are thinner than the main ribs. These nose ribs will use a thinner rib cap than the ribs. This is per design.
 Stabilizer rev 1.2 The SE5a stabilizer is the heartbeat of the tail and is recreated like the full scale version. All tail pieces depend on the stabilizer. It uses the steel fittings, pulleys, inspection
Fence Hardware Instructions (Right-Handed Version)
") S I M P L Y C L A S S I C Fence Hardware Instructions (Right-Handed Version) 8 1. 1/4-20 x 1" wing bolt (x2) 2. Bearing washer (x2) 3. Arm lock (x2) 4. Fence (not included) 5. Fence sleeve (x2) 6. Arm
S I M P L Y C L A S S I C Fence Hardware Instructions (Right-Handed Version) 8 1. 1/4-20 x 1" wing bolt (x2) 2. Bearing washer (x2) 3. Arm lock (x2) 4. Fence (not included) 5. Fence sleeve (x2) 6. Arm
END FRAMES. End frames built using pressure treated 2x4 (1 1/2" x 3 1/2") 36" 34" 7/16" pilot hole. 5 1/2" x 1/2" lag bolt 8" wheel 23"
 36 34 7/16 pilot hole. 5 1/2 x 1/2 lag bolt 8 wheel 23") END FRAMES End frames built using pressure treated 2x4 (1 1/2" x 3 1/2") 23" 17 1/2" (B) (B) Measure from the bottom of your stone to 1" below the lip to get your measurement. 17 1/2"(B) 36" 34" 1/2" flat
END FRAMES End frames built using pressure treated 2x4 (1 1/2" x 3 1/2") 23" 17 1/2" (B) (B) Measure from the bottom of your stone to 1" below the lip to get your measurement. 17 1/2"(B) 36" 34" 1/2" flat
Make a Safe. Description. Lesson Objectives. Assumptions. Terminology
 Youth Explore Trades Skills Make a Safe Description Welding is a vast area in the metalworking field and a widely used joining process for metal. In this activity plan students will learn how to MIG weld
Metals can be bought from suppliers in standardized forms and sizes, such as round,
 1.4 METAL CUTTING BAND SAWS: Metals can be bought from suppliers in standardized forms and sizes, such as round, rectangular or square bar stock or in the form of large sheets (plates). Bar stock normally
Drill, Tap, and Counterbore
 Drill, Tap, and Counterbore Version 3 By R. G. Sparber Copyleft protects this document. 1 This article deals with drilling, tapping, and counterboring holes for someone new to the hobby of metalworking.
Build a Stout Workbench
 Build a Stout Workbench Tail vise is at the heart of this versatile bench by chris gochnour I ve done a fair amount of handplaning during my 32 years as a professional furniture maker, and I ve found that
Precision Steel Car s 100 T Steel Coil Car
 Precision Steel Car s 100 T Steel Coil Car Precision Steel Car www.precisionsteelcar.com info@precisionsteelcar.com Paul Vernon: (513) 571-5739 Revised 4/30/2009 Contents of Kit Main Tube Side Frame 2
INTRODUCTION. EqunioxRoof.com. Pro Tip
 INSTALLATION MANUAL INTRODUCTION The Equinox Louvered Roof System is designed to be installed in an aluminum frame. All these sections are 1/8" thick extruded aluminum. All engineering for this system
Building a Universal Panorama Head
 Building a Universal Panorama Head Fig 1: Universal Panohead This paper describes the process of building a universal panorama bracket. The intention is to describe the process I used rather than provide
Reducing X and Y Axis Backlash on a RF-30 Mill/Drill, version 1.1
 Reducing X and Y Axis Backlash on a RF-30 Mill/Drill, version 1.1 By R. G. Sparber Copyleft protects this document. 1 Conclusion My X axis backlash went from 0.038 inches down to 0.006 inches. My Y axis
A Metal Polishing Jig. By Norm Berls
 A Metal Polishing Jig By Norm Berls Why make a metal polishing jig Objective: polish small steel parts to a mirror-like finish. Silicon Carbide abrasive paper works well under certain conditions. Paper
AMETAL SHAPER is indispensable for certain METAL SHAPER FOR YOUR SHOP. By S. S. Miner
 METAL SHAPER FOR YOUR SHOP By S. S. Miner AMETAL SHAPER is indispensable for certain machining operations where flat surfaces must be produced within very close limits, such as machining flats on castings,
28 mm. 18 mm. 14 mm. 10 mm Length to fit. 7 mm. 16 mm. 7.5 mm. 18 mm 10 mm 25 mm. 3 mm.032 Brass. Wire. Figure 1: Ground Throw Components
 Modified Slanser Ground Throw Switchstand Bill Johnson of the Sunrise Division of the NMRA has demonstrated and documented the Slanser Ground Throw mechanism on several occasions. His design requires the
PROJECT PLAN TOOL CHEST
 BUILD IT WITH ROCKLER PROJECT PLAN TOOL CHEST FEATURING ROCKLER S BUILD QUESTIONS? Go to www.rockler.com or call 800-279-4441 Stock # Item 63420 1/4" x 24" x 30" Baltic Birch Plywood 63446 1/2" x 24" x
Fence Wire Bender. Description: Tools: Materials: Procedure: Notes: Name: Date:
 Fence Wire Bender Name: Date: Description: Small tool used to bend wire around another piece of wire for a fence. Processes used to build a wire bender are drilling, cutting and bending. Practices hot
Al & Gary's Illusionist Heart
 Al & Gary's Illusionist Heart Plans and Instructions by: Albert Herwig and Gary A. Emerich Al & Gary's Illusionist Heart As Al Would Say: It's a pendant Now it's a heart Our pictures are in there My children'
A Tale of Two Budget Moxons
 The two budget Moxons one with hardware the author made, and one with hardware she purchased. Within the hand-tool woodworking community, there has been all kinds of buzz recently about Moxon vises. So
Comparing a Wimberley Toolholder with a Diamond Tool Holder, Version 2
 Comparing a Wimberley Toolholder with a Diamond Tool Holder, Version 2 By R. G. Sparber Copyleft protects this document 1. Background I have been the happy owner of a Diamond Tool Holder for over 10 years.
Fairlane Front Suspension Install Sheet
 1966-1967 Fairlane Front Suspension Install Sheet 1-866-925-1101 Read and understand these instructions before starting any work! 1966-1967 Fairlane Front Suspension Installation Instructions Thank you
Making a 1911 frame from scratch the easy way. 7 parts make up the frame in a 1911 pistol,
 Making a 1911 frame from scratch the easy way. 7 parts make up the frame in a 1911 pistol, The rails and fire control block- needs to be as strong as a standard one piece frame The grip sides (2 off) -
OPERATION, PARTS & MAINTENANCE MANUAL MODELS HB73-16 HB97-18 HB97-16 HB97-12 HB HB HB HB145-18
 OPERATION, PARTS & MAINTENANCE MANUAL MODELS HB73-16 HB97-18 HB97-16 HB97-12 HB121-18 HB121-16 HB121-14 HB145-18 Proudly Made in the USA 2 3 4 FOREWORD This manual has been prepared for the owner and operators
TIN KNOCKER TK 2248 BOX & PAN BRAKE INSTRUCTIONS & PARTS DIAGRAM TK 2248 BOX & PAN BRAKE
 TIN KNOCKER 1 TK 2248 BOX & PAN BRAKE INSTRUCTIONS & PARTS DIAGRAM TK 2248 BOX & PAN BRAKE Sheet Metal Equipment Sales Inc. Dean P. O'Connell, President Green Bay, Wisconsin Phone - (920)-662-9966 Fax
Lumber Smith. Assembly Manual. If you are having problems assembling the saw and need assistance, please contact us at:
 Lumber Smith Assembly Manual If you are having problems assembling the saw and need assistance, please contact us at: 804-577-7398 info@lumbersmith.com 1 Step 1 Safety Carefully read the Owners Manual.
Exploration of a Student Project in a Materials Processing Course
 Paper ID #8093 Exploration of a Student Project in a Materials Processing Course Prof. Somnath Chattopadhyay, Georgia Southern University c American Society for Engineering Education, 2013 EXPLORATION
129 KITCHEN BASE CABINET 480
 129 KITCHEN BASE CABINET 480 There are two sorts of kitchen cabinets: base cabinets, which sit on the floor, and wall cabinets. Base cabinets provide both storage space and work surfaces. They often house
Building Rudy Kouhoupt s Walking-Beam Engine
 Building Rudy Kouhoupt s Walking-Beam Engine Some time ago I came across a copy of Rudy Kouhoupt s article: "Build this Walking-Beam Engine" (Popular Mechanics August 1969), and decided to try and make
Building a Slip Joint Folder By Steve Culver, Master Smith Part 1 of 2
 Building a Slip Joint Folder By Steve Culver, Master Smith steve@culverart.com www.culverart.com Part 1 of 2 This is part 1of 2 of Building a Slip Joint Folder by Steve Culver, Master Smith. This is a
Sniffing Out Static Error on a Gingery Shaper
 Sniffing Out Static Error on a Gingery Shaper By R. G. Sparber Copyleft protects this document. 1 Lots of things move on a shaper. Anywhere there is wanted movement; there is the potential for unwanted
MODEL 83 Pail Handler
 MORSE MFG. CO., INC. 727 West Manlius Street P.O. Box 518 East Syracuse, NY 13057-0518 Phone: 315-437-8475 Fax: 315-437-1029 Email: service@morsemfgco.com Website: www.morsemfgco.com COPYRIGHT 2005 MORSE
Improving a Harbor Freight 6"" Digital Caliper, version 1
 Improving a Harbor Freight 6"" Digital Caliper, version 1 By R. G. Sparber Copyleft protects this document.1 Scope This article explains how I took the caliper apart and improved its "fit fit and finish".
From the Original Woodworker s Notebook
 From the Original Woodworker s Notebook By Ronald Woodhull VERTICAL MITER FIXTURE A NOTE ON SAFETY Safety is the responsibility of all woodworkers. Do not attempt any project or procedure without all safety
No. 412, 414, 416 Operations Manual
 No. 412, 414, 416 Operations Manual CARE: Occasional oiling of moving parts with machine oil will ease operation and extend the life of the brake. Occasionally check and tighten the lower beam bracket
Model: 3-IN-1/1067x1.5 Model: 3-IN-1/1320x1.5
 SHEARER/PRESS BRAKE/ SLIP ROLL Model: 3-IN-1/1067x1.5 Model: 3-IN-1/1320x1.5 OPERATION MANUAL 1. USES This machine is used for shearing and bending low carbon plate (mild steel) or the other metal materials
Making an Omega Nut. By R. G. Sparber. Copyleft protects this document. 1
 Making an Omega Nut By R. G. Sparber Copyleft protects this document. 1 An "Omega nut" is a variation on the idea of a T-nut. While a T-nut slides into a T- slot on a mill table, an Omega-nut slides into
LocoGear. Technical Bulletin - 14 November 28, 2003 Copyright 2003 by LocoGear LIVE STEAM CASTINGS. Tech Bulletin - 14
 LIVE STEAM CASTINGS LocoGear Tech Bulletin - 14 John D.L. Johnson 3879 Woods Walk Blvd Lake Worth, FL 33467-2359 jjohnson@locogear.com www.locogear.com Technical Bulletin - 14 November 28, 2003 Copyright
Build a Rolling Tool Tote
 The rolling tool tote design calls for readily available materials: a cheap hand truck (it could be an axle and two wheels), 3/4 and 1/2 thick plywood, 1/4 thick MDF (you could use plywood or hardboard)
HINGE TOOL SET-UP, ADJUSTMENT AND TROUBLESHOOTING GUIDE
 HINGE TOOL SET-UP, ADJUSTMENT AND TROUBLESHOOTING GUIDE HINGE TOOL FORMING SET-UP High Level Process (For detailed information, reference Detailed Instructions): 1. Inspect and assemble tool (if required).
METAL BENDER OPERATING & MAINTENANCE INSTRUCTIONS Model Nos: CCB1 & CCB2 Part Nos: & CCB2 CCB1
 METAL BENDER Model Nos: CCB1 & CCB2 Part Nos: 7630073 & 7630074 CCB2 CCB1 OPERATING & MAINTENANCE INSTRUCTIONS 1206 1 The Compact Bender allows you to economically make a variety of bends in flat, square,
Rorty No.2 Tube Bender.
 Copyright. This entire Manual is copyrighted to Rorty Design, with all rights reserved. No part may be transferred or copied by any means whatsoever, without the express written permission of Rorty Design.
FixPad - Create and Assembly instructions
 6 7 8 2 9 10 4 3 5 11 1 B.o.m- Bill Of Materials Part No. Part name Production technology File name Martial Info Number of parts Supplier 1 persex sheet Laser cutting, bending Flat pattern base Flat pattern
BEAST THE. Tube and Pipe Notcher Operating Instructions. Notches In Bends Straight Notches. Angled Notches. Offset Notches
 Copyright (c) 2007 J D SQUARED INC. www.jd2.com THE BEAST Tube and Pipe Notcher Operating Instructions Notches In Bends Straight Notches Angled Notches PATENT PENDING Offset Notches Assembly After unpacking
Shoulder Plane. dovetailed. fine tools. Make an heirloom tool and learn the secret to creating double dovetails in metal it s easier than you think.
 fine tools dovetailed Shoulder Plane Make an heirloom tool and learn the secret to creating double dovetails in metal it s easier than you think. I ve always been fascinated by old, metal hand planes.
Hinge Mortising Jig. One of the make it or break it parts of building a. 6 ShopNotes No. 74
 Hinge Mortising Jig A Mortise for a Hinge. Quick, clean, and accurate that s the only way to describe the mortise you get with a trim router and this hinge mortising jig. One of the make it or break it
1949 to 1954 Chevrolet Dual Master Cylinder Conversion
 1949 to 1954 Chevrolet Dual Master Cylinder Conversion This document is a one stop shop to getting your brake system updated on your old Chevy. Whether you re going with a disc conversion or just sticking
Building a vertical wobbler
 Building a vertical wobbler I wanted to build a simple steam engine that would also run on compressed air. At Chris Heapy s website (http://easyweb.easynet.co.uk) I found drawings of a small double acting
Battery Terminal Puller
 Battery Terminal Puller Name: Date: Description: Students will be able to construct a Battery Terminal Puller. Students will focus on using cold metal skills, layout skills, and forming the metal into
Part# 85200, 86200, 85095, 86095, TC200,TT200,TC095,TT095
 Part# 85200, 86200, 85095, 86095, TC200,TT200,TC095,TT095 Bag Hardware: (8) 5/16 x 1 ½ Allen flat head (14) 3/8 x 1 Hex bolt G5 (2) ½ x 2 ½ Hex Bolt G5 (6) 5/16 flange nuts (14) 3/8 flange nuts (2) ½ stove
Basic Digital Read-Out Functionality on a Mill
 Basic Digital Read-Out Functionality on a Mill By R. G. Sparber Copyleft protects this document 1. There is a running joke among owners of Digital Read-Out (DRO) What is the cleanest thing in any shop?
MINI-LATHE QUICK CHANGE TOOL POST
 MINI-LATHE QUICK CHANGE TOOL POST Cutting and assembly details Machinists should familiarize themselves with the contents of this section before jumping in to the drawings. Many details are described here
Agricultural Mechanics and Technology Power Tool Safety Rules
 Agricultural Mechanics and Technology Power Tool Safety Rules Name: BAND SAW Use: Cutting curves, circles and irregular shapes. 1. Use clean SHARP blades. 2. The teeth should always point DOWN. 3. Adjust
Quick-Release Sliding Tail Vise 05G30.01
 Quick-Release Sliding Tail Vise 05G30.01 U.S. Des. Pat. No. D671,812 U.S. Pat. No. 9,050,710 Introduction The Veritas Quick-Release Sliding Tail Vise is a reworked version of the well-known tail vise that
Steel Framed Miter Saw Bench
 Steel Framed Miter Saw Bench Version 1.1 How to build Steel Framed Miter Saw Bench With easy to follow step-by-step instructions, you will be able to cut, assemble, and finish your very own steel miter
Making it Dead Flat and Square
 Making it Dead Flat and Square By R. G. Sparber Copyleft protects this article 1. Introduction Open up your favorite machine tool catalog and you can find precision straight edges accurate to a degree
1964 ½ Mustang Front Suspension Installation Instructions
 1964 ½ - 1970 Mustang Front Suspension Installation Instructions 1-800-984-6259 www.totalcostinvolved.com All engine installations with this front end will require a rear sump oil pan. 289-302 Small Block
A Reference Guide. Continuous Hinge, Inventory and Service Worldwide Est End Play Design Engineering with Standard Continuous Hinges
 Hinge Width Paint Clearance Knuckle Length End Play Design Engineering with Standard Continuous Hinges A Reference Guide Knuckle Dear Design Engineer or Purchasing Agent, We frequently see blueprints for
GlideRite Retractable Cover System For Hot Spot Spas (SE & SLX only)
") List of Contents Quantity Description 12 #10 x 1 ½ Flat Head Phillips Screw (see pg. 2) 2 #10 x ½ Pan Head Phillips Screw (see pg. 2) 8 ¼ x 2 ½ Lag Bolt (see pg. 2) 7 ¼ 20 x 5 / 8 Hex Head Bolt (see pg.
List of Contents Quantity Description 12 #10 x 1 ½ Flat Head Phillips Screw (see pg. 2) 2 #10 x ½ Pan Head Phillips Screw (see pg. 2) 8 ¼ x 2 ½ Lag Bolt (see pg. 2) 7 ¼ 20 x 5 / 8 Hex Head Bolt (see pg.
Hardware and Components:
 Hardware and Components: (A) 4X 5/16 x 1 Carriage Bolt (B) 2X 5/16 x 2-1/4 Carriage Bolt (C) 2X 5/16 x 3-1/4 Hex Bolt (D) 2X 5/16 x 3/4 Hex Bolt (E) 2X 5/16 x 1-1/4 Hex Bolt (F) 5/16 x 2-1/4 Hex Bolt (G)
Ford Pick Up Rear leaf Spring Kit Installation Instructions
 1948-1956 Ford Pick Up Rear leaf Spring Kit Installation Instructions 1-800-984-6259 www.totalcostinvolved.com Parts 48 inch leaf (2) springs (4) U-bolts 3/8-24 x l 1/4bolts (16) & nuts (2) 1/2-20 x 4
Shay Cab - Floor & Roof
 Shay Cab - Floor & Roof Nelson Riedel Nelson@NelsonsLocomotive.com Initial: 1/20/04 Last Revised: 06/06/2004 Cab Floor: A cab floor was made at the same time as the tender floor. I was unhappy with some
Butterfly Leaf Dining Table Plans
 Butterfly Leaf Dining Table Plans Part 1 An attractive dining table with a secret: the leaf folds and stores inside the table. Season 1, Episode 7 P a g e 2 I first saw a butterfly leaf table in a back
Javelin Integra Inspired Design Precision Engineering
 Javelin Integra Inspired Design Precision Engineering USER INSTRUCTIONS Thank you for choosing the Keencut Javelin Integra. Every effort has been made to bring you a precision engineered product with the
How to make tailwheel shock rubber donuts and aluminum shims with formed flange
 How to make tailwheel shock rubber donuts and aluminum shims with formed flange The following shows how to form a flange on the inner hole of aluminum shims to go between the rubber donuts for the tailwheel
Patrol Box Plans by David J. Yarusso Troop 609
 Patrol Box Plans by David J. Yarusso Troop 609 Materials List: 1. One 4 x8 sheet of ½ thick cabinet grade (birch or oak) or AC plywood. If using AC grade, use the A grade surface on the outside for a clean
INSTALLING YOUR NEW SPRING LIFT ARM KIT
 INSTALLING YOUR NEW SPRING LIFT ARM KIT 1. Measure the distance that the roof is to be raised. [If your lift system is completely non-functional, you will need to calculate or estimate this distance as
Operating, Servicing, and Safety Manual Model " Foot Shear CAUTION: Read and Understand
 Operating, Servicing, and Safety Manual Model 3000 52" Foot Shear CAUTION: Read and Understand These Operating, Servicing, and Safety Instructions, Before Using This Machine. SAFETY The purpose of the
IBEX 1132 REAR AXLE UCA TRUSS GOAT BUILT IBEX REAR AXLE UPPER CONTROL ARM BRACKET/TRUSS
 GOAT BUILT IBEX REAR AXLE UPPER CONTROL ARM BRACKET/TRUSS Thank you for purchasing Ibex chassis kit components, before starting your build, we recommend that you read through these instructions to familiarize
GlideRite Retractable Cover System For HotSpring & Tiger River Spas (except Classic & pre-2000 Landmark Spas)
") List of Contents Quantity Description 12 #10 x 1 ½ Flat Head Phillips Screw (see pg. 2) 2 #10 x ½ Pan Head Phillips Screw (see pg. 2) 8 ¼ x 2 ½ Lag Bolt (see pg. 2) 7 ¼ 20 x 5 / 8 Hex Head Bolt (see pg.
List of Contents Quantity Description 12 #10 x 1 ½ Flat Head Phillips Screw (see pg. 2) 2 #10 x ½ Pan Head Phillips Screw (see pg. 2) 8 ¼ x 2 ½ Lag Bolt (see pg. 2) 7 ¼ 20 x 5 / 8 Hex Head Bolt (see pg.
Sawhorses. for the Shop. Three horses that cover all of your shop needs
 w J ANUARY/FEBRUARY 2003 Sawhorses for the Shop Three horses that cover all of your shop needs BY CHRISTIAN BECKSVOORT Sawhorses are an indispensable part of my shop equipment. No matter what the process
WPS crew Doors Installation instructions
 WPS-132-133 crew Doors Installation instructions ORDER OF INSTALLATION FOR A COMPLETE ENCLOSURE OF A CREW WPS (Weather Protection System) IS AS FOLLOWS: 1. Heater 2. Rear Thresholds - Right Hand & Left
A Cross Drilling Tape, Version 1.2
 A Cross Drilling Tape, Version 1.2 By R. G. Sparber Copyleft protects this document. 1 Here is my cross drilling tape measure: When I need to cross drill a piece of pipe, there are two options. I can pull
Jigsaw Puzzle Tray. Premium Plan. In this plan you ll find: America s leading woodworking authority
 America s leading woodworking authority Premium Plan In this plan you ll find: Step-by-step construction instruction. A complete bill of materials. Construction drawings and related photos. Tips to help
Bed Extension Kit 16 Instructions
 The premier source of tooling, parts, and accessories for bench top machinists. Bed Extension Kit 16 Instructions This kit converts a 7 10, 7 12, and 7 14 mini lathe manufactured by SIEG (including those
Absolute Cheapskate Way To Start Making Knives
 Absolute Cheapskate Way To Start Making Knives Let me start by saying I am a newbie and I don't have all the answers but I can tell you how to have a little fun doing this. If you absolutely have the fever
N. 15th Street, Middlesboro, KY FLIP TARP DUMP BODY INSTALLATION INSTRUCTIONS
 1-800-248-7717 1002 N. 15th Street, Middlesboro, KY 40965 FLIP TARP DUMP BODY INSTALLATION INSTRUCTIONS Congratulations on your purchase of a Mountain Flip Tarp Dump Body tarping system. With tarping systems
Introduction to Manufacturing Processes
 Introduction to Manufacturing Processes Products and Manufacturing Product Creation Cycle Design Material Selection Process Selection Manufacture Inspection Feedback Typical product cost breakdown Manufacturing
Introduction to Carpentry Power Tools
 Youth Explore Trades Skills Introduction to Carpentry Power Tools Description s use power tools every day, and the ability to use these tools correctly and safely is paramount. In this Activity Plan, students
Tortoise Switch Machines, Mounted Horizontally
 Tortoise Switch Machines, Mounted Horizontally by David King Have you ever used the Tortoise Switch Machines manufactured by Circuitron. These are a wonderful stall motor slow motion switch machine that
Continue gluing the remaining top parts ensuring the angled piece is glued well. Set aside and let dry. See photo below
 Radiator rev 1.1 The SE5a s radiator is one of the most recognized radiators in WW1. It is one of the components that defines the SE5a. The original SE5a has seen multiple radiator designs used during
Retractable Screen Installation Instructions For Vinyl and Aluminum Clad and Wood In-Swing Hinged Doors (See separate instructions for sliding doors)
") Retractable Screen Installation Instructions For Vinyl and Aluminum Clad and Wood In-Swing Hinged Doors (See separate instructions for sliding doors) IMPORTANT: Please read before you begin. Table of Contents
Retractable Screen Installation Instructions For Vinyl and Aluminum Clad and Wood In-Swing Hinged Doors (See separate instructions for sliding doors) IMPORTANT: Please read before you begin. Table of Contents
Mechanical Frappe Press
 Mechanical Frappe Press Operation Manual CONTENTS OPERATIONAL INSTRUCTIONS PRECAUTIONS PART NAMES INCLUDED ITEMS BASIC OPERATION MAINTENANCE REPLACEMENT PARTS Thank you for using The Frapptastic Five Mechanical
MODEL T " BENCH SHEAR INSTRUCTIONS
 MODEL T10051 12" BENCH SHEAR INSTRUCTIONS 1. Overloading this tool can cause injury from flying parts if the tool breaks. Do not exceed the tool capacities. 2. NEVER operate the bench shear without the
Making A Limited Range Jacobs Flex Collet, version 2
 Making A Limited Range Jacobs Flex Collet, version 2 By R. G. Sparber Copyleft protects this document.1 Recently I had the great fortune of receiving a Tapmatic 50X tapping head. It can drive taps as small
Crafter. Hinge INCRA. Any Hinge, Any Size, Any Project! OWNER S MANUAL SAFETY. Please read this owner s manual and keep it at hand for reference.
 INCRA Hinge Crafter OWNER S MANUAL Any Hinge, Any Size, Any Project! SAFETY Important safety instructions for using the INCRA HingeCrafter Please read this owner s manual and keep it at hand for reference.
SE5a Instrument Board part 2 - rev 1.1
 SE5a Instrument Board part 2 - rev 1.1 Fuel (Petrol) Valve This valve uses two circular name plates, eight brass screws, one black plastic base, copper wire and two black plastic risers. You can pick any
Making a Pan Brake "Folder with fingers" for home
 Making a Pan Brake "Folder with fingers" for home By Simso Taken from: http://www.woodworkforums.com/showthread.php?t=45792 Okay, just a quick overview of what were dealing with here. Grahame posted up