A Metal Polishing Jig. By Norm Berls
|
|
|
- Randolf Garrett
- 5 years ago
- Views:
Transcription
1 A Metal Polishing Jig By Norm Berls
2 Why make a metal polishing jig Objective: polish small steel parts to a mirror-like finish. Silicon Carbide abrasive paper works well under certain conditions. Paper needs to be stretched tight against a hard flat surface. Steel part needs to be held steady or rounded corners result.
3 About Silicon Carbide Abrasive Paper Needs to be wetted with water to work best. Available in grits from 80 to Abrasive paper comes in 9 X 11 inch sheets
4 Design goals and decisions Hold the abrasive paper so that it won t slip. The holding clamp for the part must be movable to different parts of the abrasive paper. Jig will be 14 inches long and 7.5 inches wide. Jig will be a table top tool for hand polishing.


5 The Polishing Jig & Materials Brown : wood Blue : 1018 Pink: Steel Alloy Yellow: Drill Rod

6 The back view

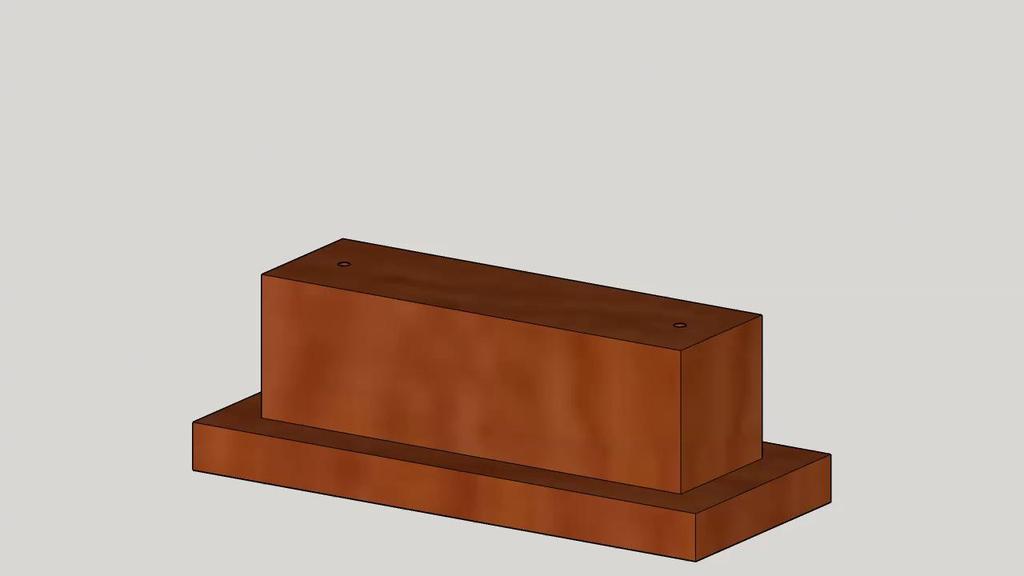
7 Wood Base Layers of plywood glued together. Held to edge of work table with C clamps.

8 Jig Base Fasteners Metal jig base fastens to wood base with allthread and hex nuts.

9 Jig base Cut slots for retaining abrasive paper. Abrasive paper drapes over center of table.

10 Clamping Shelves Shelf extensions on abrasive paper clamps fit into slots on jig base. Shelf extensions are smaller than the jig base slots. Custom turned thumb screws serve three purposes: 1. Hold abrasive paper taught 2. Keep abrasive paper from slipping 3. Allow fresh part of abrasive paper to be moved into position.


11 Base Clamping Screws The thumb screws that clamp the shelves to the base are custom made. The small part is threaded to fit the jig base. The wider part forces the shelves into the base.

12 Clamping Shelves: an end view Shelf extensions fit into base slots and clamp abrasive paper into jig. The extensions reach deeper than the depth of the slots. This pinches the abrasive paper. It also leaves a little free room between the extensions and the base where the abrasive paper hangs down.

13 Clamp Assembly SHCS s hold face at appropriate distance from base. Custom thumb screw forces face towards base by screwing into base. Clamp rides on two vertical drill rods. Clamp and work piece can be easily removed from jig just by lifting them up they are not fastened on but the large thumb screw has to be completely removed to do this.

14 Clamp Assembly: an edge view Left side of custom thumb screw barrel has a larger diameter than the right side. Right side is threaded. Workpiece is held at the very bottom of the clamp.

15 Two Fasteners SHCS hold hand pad assembly to workpiece clamp.

16 Palm Block. The polishing jig is a hand powered tool. Metal extension sits on top of workpiece clamp Wood cap sits on top of extension. Wood cap allows easy pushing of workpiece against abrasive paper.

17 Two Assemblies Workpiece clamp mounts on slider assembly.
18 Horizontal Slide Assembly Vertical pins for the clamp assembly are not fastened together. Different sized clamp assemblies can be made and fitted by moving the vertical pins further apart. Different clamp assemblies can accommodate things like V block clamps for holding round workpieces. Vertical pin holders slide back and forth along the horizontal drill rods.

19 Horizontal Slide Assembly: bottom view Note the small pins sticking out of the horizontal slide assembly. These fit into the jig base and allow the whole horizontal slide assembly to be moved to different positions on the jig base. This allows the jig to make use of unused parts of the abrasive paper.

20 Jig Base: closeup Note the row of holes in this closeup of the jig base. The pins from the horizontal slide assembly fit into these holes. The horizontal slide assembly is not fastened to the jig base. It can be picked up and moved at will.
21 One More Thing The horizontal drill rods are silver soldered into the right end block of the horizontal slide assembly. These same drill rods are simply inserted into the left end block and can be pulled out easily. This potentially allows a different set of vertical slide pins to be fitted to the jig. The vertical pins are silver soldered into the horizontal sliders.
22
23 The End
CAM SYSTEM. Eccentric self-locking clamping devices. Set. CAM SYSTEM t. CAM SYSTEM t. Set. CAM SYSTEM s pag CAM SYSTEM s pag.
 Eccentric self-locking CAM SYSEM Set CAM SYSEM t pag. 12 CAM SYSEM t pag. 126 Set CAM SYSEM s pag. 127 CAM SYSEM s pag. 128 EDGE CLAMP pag. 130 123 CAM-SYSEM eccentric self-locking he CAM SYSEM has been
Installation instructions for FC17 Forward Controls for Triumph Rocket III Roadster
 Installation instructions for FC17 Forward Controls for Triumph Rocket III Roadster It is highly recommended that you use a thread lock compound such as Loctite brand on all threads to keep them from vibrating
Assembly Instructions 10 X 10 Aluminum Roof Support
 Assembly Instructions 10 X 10 Aluminum Roof Support Aluminum Roof Support Bolt Package 16-5/16 X 2 ¼ SS Bolt 24-5/16 X 1 SS Bolt 40-5/16 SS Nylon Lock Nuts 16-5/16 SS Flat Washers 28-4 ½ Wood Screws 36-1
Quill Stop V2 Installation Guide 11/16/2014
 Thank you for purchasing the Quill Stop for the Sieg X3 (Grizzly G0463) and SX3 (Grizzly G0619) mills. Your feedback is always appreciated. Please email questions and comments to gregpriest@cox.net. What
v1.0 ASSEMBLY GUIDE Mia Wide Bookcase
 v1.0 ASSEMBLY GUIDE Mia Wide Bookcase Components Upon unpacking your bookcase from it s delivery box, you should have the pieces shown. Follow the steps on the next pages to assemble your new bookcase.
P.O. Box 8400 Green Bay, WI (920)
") P.O. Box 8400 Green Bay, WI 54308-8400 (920) 468-2165 Change Notice No. 112 Implemented By: KI-Pembroke Notification By: Scott Vissers Date: 03/15/10 Component Product Title: Series XXI Lateral Filing
P.O. Box 8400 Green Bay, WI 54308-8400 (920) 468-2165 Change Notice No. 112 Implemented By: KI-Pembroke Notification By: Scott Vissers Date: 03/15/10 Component Product Title: Series XXI Lateral Filing
Assembly and installation help
 Assembly and installation help A supplement to the directions The Purpose of this tutorial is to expand (not replace) upon the directions that come with the system and to help provide shortcuts, the first
ASSEMBLY GUIDE. Mia Narrow Bookcase
 ASSEMBLY GUIDE Mia Narrow Bookcase Components: Upon unpacking your bookcase from it s delivery box, you should have the pieces shown. Follow the steps on the next pages to assemble your new bookcase. Step
The Start of an Idea for a Shaper Vise, version 4
 The Start of an Idea for a Shaper Vise, version 4 By R. G. Sparber Copyleft protects this document. 1 Initial Design I guess this saves time, but can t be sure. Rather than making a prototype in my shop,
Assembly Instructions 10 X 10 Aluminum Frame Building
 Assembly Instructions 10 X 10 Aluminum Frame Building 27 97 9 8 47 36 74 52 10 10 X 10 Square Building W/ Dome Includes: The Steel Entry Door with a Dead Bolt Lock assembly and Aluminum Door Frame. Metal
Strata. urniture. Adriana Instructions. Parts in the Arm Box: Parts in the Body Box: Watch our assembly videos at
 1A Watch our assembly videos at www.strataf.com/videos Parts in the Arm Box: Arm - Outside View Arm - Inside View 1B Parts in the Body Box: Back Deck x 1 Seat Deck x 1 with the Feet attached Back Panel
PRE-ENGINEERED HORSE STALL SYSTEMS SDFD SLIDING DOOR c/w FOLD-DOWN GRILL. & Assembly. Installation Instructions
 PRE-ENGINEERED HORSE STALL SYSTEMS 4800 SDFD SLIDING DOOR c/w FOLD-DOWN GRILL & Assembly Installation Instructions 4800 SDFD Sliding Door c/w Fold-Down Grill Components - 1 3 /4" x 2" x 88" channels (2)
Installation Guide. Mounting Kit for Mounting Philips Avalon CTS Cordless Fetal Transducer System on Wall, 2'' Post, Rail, or Slide-on Mounting Plate
 Installation Guide Mounting Kit for Mounting Philips Avalon CTS Cordless Fetal Transducer System on Wall, 2'' Post, Rail, or Slide-on Mounting Plate The purpose of this guide is to: 1. Describe mounting
mila-wall (Series100) General Operating Instructions page 1 of 15
 General Operating Instructions page 1 of 15") mila-wall (Series100) General Operating Instructions page 1 of 15 Step #1: Before setting up walls, lower adjustable leveling feet on each panel approximately 1". This will allow access to the threaded
mila-wall (Series100) General Operating Instructions page 1 of 15 Step #1: Before setting up walls, lower adjustable leveling feet on each panel approximately 1". This will allow access to the threaded
Closet Wall Drawer Unit
 88 5531 751 Closet Wall Drawer Unit A. B. C. Shelf D. E. F. For assembly see instructions in carton 88 5531 752. 88 5531 752 Closet Wall Drawer Unit G. H. I. Plinth M. Bottom L. N. 2 pc. J. K. O. Drawer
Installation for Full Size Polaris Ranger Crew Doors
 Installation for Full Size Polaris Ranger Crew Doors Order of Installation: Heater Doors Wiper on to Windshield Windshield Top & Back Panel Note: Most of the steps in these instructions need to be repeated
Lok Fast Column Clamp General Information
 Lok Fast Column Clamp General Information Gates Lok-Fast Column Clamp Has These Advantages: Can Be Job Built Gang Formed No Loose Pieces Designed For Rapid Placement of Concrete Rapid Locking Action 3
WOLF LOOM DOUBLE BACK BEAM
 WOLF LOOM DOUBLE BACK BEAM Assembly Instructions Find out more at schachtspindle.com Schacht Spindle Company 6101 Ben Place Boulder, CO 80301 p. 303.442.3212 f. 303.447.9273 2017 Schacht Spindle Company,
Pro-Doweling Kit USER S MANUAL #840. Visit us at
 Pro-Doweling Kit USER S MANUAL #840 99 Washington Street Melrose, MA 02176 Phone 781-665-1400 Toll Free 1-800-517-8431 Visit us at www.testequipmentdepot.com Please read this manual carefully and thoroughly
INSTALLATION INSTRUCTIONS
 INSTALLATION INSTRUCTIONS TOOLS REQUIRED Rechargeable, variable speed drill 3/8 diameter drill bit 3 Robertson bits #0, #1 and #2 Slot screwdriver Non marring hammer with 1 head Level Caulk or sealant
 America s leading woodworking authority To download these plans, you will need Adobe Reader installed on your computer. If you want to get a free copy, visit: http://adobe.com/ reader. Having trouble downloading
Installation Instructions for Solar Snow Pad (SSP-T-3)
") Installation Instructions for Solar Snow Pad (SSP-T-3) Warning- Do not use this product on solar arrays where the calculated array snow loads exceed 50 pounds per square foot (psf). Most solar panels are
Installation Instructions for Solar Snow Pad (SSP-T-3) Warning- Do not use this product on solar arrays where the calculated array snow loads exceed 50 pounds per square foot (psf). Most solar panels are
MULTI-ACTIVITY PLAY TABLE
 ASSEMBLY INSTRUCTIONS! WARNING: CHOKING HAZARD - Small parts. Not for children under 3 years.! CAUTION: Adult assembly required. C 2006 Melissa and Doug, Inc. All Rights Reserved www.melissaanddoug.com
POP PLUS / SPIDER SET-UP INSTRUCTIONS
 POP PLUS / SPIDER SET-UP INSTRUCTIONS 1 Place system frame on floor with screws indicating top. Expand upwards & outwards and secure frame connectors. Pop-Up display systems are made to be set-up and taken
NEXUS SERIES CABINETS
 NEXUS SERIES CABINETS STANDARD BASE ASSEMBLY INSTRUCTIONS Also applies to: Galaxy Series, Nexus Series, Ridgeline Series, Statesman Series, and Waterford Series FOR YOUR INFORMATION: These assembly instructions
Desk/Wall-Mount Rack
 Desk/Wall-Mount Rack Patent(s) Pending Installation Instructions Post P/N: 119-1752 119-1781 119-1782 119-4014 Frame P/N: 119-1591 119-1754 119-1755 Kit Contents (2) Frames (4) Posts Assembly Hardware
Track Rack. * Track Racks are not lockable
 The Track Rack s unique staggered, sliding hook design creates the greatest parking efficiency while still providing easy access to any particular bike. When adding or removing a bike to the rack, simply
Kai Installation Instructions
 Kai Installation Instructions Before Beginning Installation Read through the entire instruction thoroughly A minimum of 2 people are required for this assembly These instructions reflect typical assemblies;
Horizontal Cable Systems
 ALUMINUM RAILING INSTALLATION INSTRUCTIONS v2012 orizontal Cable Systems 1) Check Contents Of Packages: Verify that all parts have arrived and that they match the packing list. 1A) Coastal applications:
Hip Roof Canopy Instructions
 Hip Roof Canopy Instructions - PUT SAFETY FIRST. NOT COMPLYING WITH THE PROCEDURES AND PRECAUTIONS OUTLINED IN THIS MANUAL MAY RESULT IN PERSONAL INJURY AND WILL INVALIDATE THE WARRANTY.. Before attempting
Setup. The Faraday Cage is available in two types of configurations. Cage for mounting to a full perimeter enclosure on series tables.
 Faraday CageSetup, 2017 Setup The Faraday Cage is available in two types of configurations. Cage for mounting to a full perimeter enclosure on 63-500 series tables. Cage with a base plate for use on a
INSTALLATION INSTRUCTIONS GRILLE GUARD FORD ESCAPE
 INSTALLATION INSTRUCTIONS GRILLE GUARD 08-010 FORD ESCAPE PARTS LIST: 1 Grille Guard 4 10-1.50mm x 30mm Hex Bolts 1 Driver/Left Frame Mounting 4 10mm Lock Washers 1 Passenger/Right Frame Mounting 6 10mm
CHICKEN COOP & CHICKEN RUN. Tools required for assembly (not included)
") CHICKEN COOP & CHICKEN RUN ASSEMBLY MANUAL SKU# 6839 Tools required for assembly (not included) Distributed by: TRACTOR SUPPLY COMPANY 0 VIRGINIA WAY, BRENTWOOD, TN 3707 For customer support, call: -888-376-960
CHICKEN COOP & CHICKEN RUN ASSEMBLY MANUAL SKU# 6839 Tools required for assembly (not included) Distributed by: TRACTOR SUPPLY COMPANY 0 VIRGINIA WAY, BRENTWOOD, TN 3707 For customer support, call: -888-376-960
7902 Dado Jig. Owners Manual Please Read Carefully! Hardware List: 7902 Parts List:
 7902 Dado Jig Owners Manual Please Read Carefully! 7902 Dado Jig Hardware List: Identify and verify that you have all of the hardware shown below prior to assembly. Please read the instructions at least
IMPORTANT: WILL NOT FIT COUNTRYMAN MODELS
 Part #1410-0102-07 2 3 1 IMPORTANT: WILL NOT FIT COUNTRYMAN MODELS Apply masking tape around the bottom grille opening and across the bottom of the upper facto ry grille.. Open the hood and remove the
Entryway Locker 17 ½ 25 ½
 Copyright 2015 Shanty-2-Chic.com T Entryway Locker his old world entryway locker is loaded with possibilities. Two adjustable shelves allow you to customize the storage to fit your needs. Even better,
American Morse Equipment
 American Morse Equipment Thank you for purchasing an American Morse Porta Paddle-II Kit. We redesigned the original Porta Paddle for ease of assembly & provide all parts finished and ready for assembly,
STEVENS SUBPLATES. STEVENS ENGINEERING, INC. TOLL-FREE WEB FAX
 STEVENS SUBPLATES Spacing of hole patterns on Stevens accessories is identical to the pattern on Stevens Subplates. Insertion of the pull dowels thru bushed holes in the accessory into corresponding bushed
Tools: Sharpie, Square, Vise, Hack saw, Ruler, Punch, Hammer, File. 2. Cut the stock Place stock in vise and cut with hack saw
 Purpose: MAKE CATAPULT ARM Step 1 Tools: Sharpie, Square, Vise, Hack saw, Ruler, Punch, Hammer, File Materials: Flat aluminum ½ inch stock (see picture below) Gloves required 1. Pick up the aluminum ½
a.k.a. casegoods instructions
 a.k.a. casegoods instructions a a.k.a. workwall installation IMPORTANT NOTES Failure to install product according to installation instruction will result in loss of warranty. Tools required for assembly
Plans. Easy-to-Build Full-size Deluxe Murphy Bed Plan. For more plans, tools and hardware visit rockler.com
 Easy-to-Build Full-size Deluxe Murphy Bed Plan Build a full-size Deluxe Murphy Bed complete with decorative molding and matching side cabinets! Plans For more plans, tools and hardware visit rockler.com
Melamine Plastic Laminate. Toilet Partition Installation Manual
 Melamine Plastic Laminate Toilet Partition Installation Manual PHONE: FAX: 1-866-317-2786 ATTENTION DO NOT MIX FASTENER PACKS EACH FASTENER PACK HAS THE NECESSARY BOLTS, BARRELS AND SCREWS TO INSTALL THE
SuperTrack Parts List
 SuperTrack Parts List [indicates number for 6 lane tracks] SuperTrack Installation Instructions www.supertimer.com 1-800-654-2088 1 Track Instruction Manual (this booklet) 2 Start sections [3] Start Gate
Hinge Mortising Jig. One of the make it or break it parts of building a. 6 ShopNotes No. 74
 Hinge Mortising Jig A Mortise for a Hinge. Quick, clean, and accurate that s the only way to describe the mortise you get with a trim router and this hinge mortising jig. One of the make it or break it
MINI-LATHE QUICK CHANGE TOOL POST
 MINI-LATHE QUICK CHANGE TOOL POST Cutting and assembly details Machinists should familiarize themselves with the contents of this section before jumping in to the drawings. Many details are described here
GAGING AND INSPECTION
 Fixture Plates...75 Fixturing Towers...76 CMM Fixturing Kits... 77-78 Clamping Components... 79-80 Standoffs and Locators... 81-82 Magnetic Components... 83-84 Height Adjustment...84 Positioners...85 Clamp
Copyright Black Box Corporation. All rights reserved Park Drive Lawrence, PA Fax
 Copyright 2004. Black Box Corporation. All rights reserved. 1000 Park Drive Lawrence, PA 15055-1018 724-746-5500 Fax 724-746-0746 JANUARY 2004 RF500A RF507A RF514A RF521A RF501A RF508A RF515A RF522A RF502A
Quick-Release Sliding Tail Vise 05G30.01
 Quick-Release Sliding Tail Vise 05G30.01 U.S. Des. Pat. No. D671,812 U.S. Pat. No. 9,050,710 Introduction The Veritas Quick-Release Sliding Tail Vise is a reworked version of the well-known tail vise that
HOW TO MAKE A SPIRAL NORTH POLE. By Ben Vukonich (Helenaguy) & Craig Dye
 & Craig Dye") HOW TO MAKE A SPIRAL NORTH POLE By Ben Vukonich (Helenaguy) & Craig Dye MATERIALS FOR THIS PROJECT 6 or 8 white acrylic globe w/ 3 neck dia. www.superiorlighting.com ¼ plywood for dividers 7/16 chipboard
HOW TO MAKE A SPIRAL NORTH POLE By Ben Vukonich (Helenaguy) & Craig Dye MATERIALS FOR THIS PROJECT 6 or 8 white acrylic globe w/ 3 neck dia. www.superiorlighting.com ¼ plywood for dividers 7/16 chipboard
Mount to the Wall INSTALLATION MANUAL
 Mount to the Wall 15 Locate the Wooden Studs This step applies to wooden stud wall installation only. Determine and mark the exact locations of two stud centers on the wall. Wooden studs should be spaced
PVC Fencing Install Instructions
 PVC Fencing Install Instructions Step 1-Pounding the Galvanized Steel Posts Call your local area utility company to come mark underground lines before any digging or pounding any posts into the ground.
INSTRUCTIONS High Tech II Unit Assembly
 INSTRUCTIONS High Tech II Unit Assembly The following instruction is a guideline, illustrating suggested methods, assembly sequence, and tool selection. Actual assembly may vary by each situation. Careful
* Drill and 3/32" drill bit: for drilling holes in the factory plastic upper for the screws to secure the brackets (factory upper installation only)
") * Two slider windows (four sliders windows for the 4-door kit) * Four brackets to secure the windows to the upper door frames (8 brackets for the 4-door kit) * Weatherstrip to seal the windows to the half
* Two slider windows (four sliders windows for the 4-door kit) * Four brackets to secure the windows to the upper door frames (8 brackets for the 4-door kit) * Weatherstrip to seal the windows to the half
Playground Assembly Instructions
 Before You Begin Playground Assembly Instructions Locate the playground set on firm, level ground. Assemble the playground on or close to its permanent location Two people are recommended to assemble the
INSTRUCTION MANUAL LEG PRESS OPTION OF ELITE GYM
 INSTRUCTION MANUAL LEG PRESS OPTION OF ELITE GYM QUESTION? As a quality home gym supplier we are committed to your complete satisfaction. If you have questions, or find missing or damaged parts, we will
Entrance Cabinet Plans
 Entrance Cabinet Plans www.andrewharriswoodwork.com Page 1 of 19 Introduction I have tried to ensure all steps are covered in these plans but if you find any errors in the plans or have a question then
PRE-ENGINEERED HORSE STALL SYSTEMS 4884 HSD STANDARD SLIDING DOOR. & Assembly. Installation Instructions
 PRE-ENGINEERED HORSE STALL SYSTEMS 4884 HSD STANDARD SLIDING DOOR & Assembly Installation Instructions 4884 HSD Standard Sliding Door Components Some Considerations When Choosing Your Stall System - 1
The Astronomical League
 The Astronomical League www.astroleague.org Library Telescope Modifications Check the collimation with the eyepiece cap provided (the one with the hole in its center) before starting on any modifications.
43107 Rhino Jerry Can Holder Rhino Jerry Can Holder - Horizontal
 Important: Please read these instructions carefully prior to installation. Check the contents of kit before commencing fitment and report any discrepancies. Clean the alloy tray prior to installation.
TOOLS REQUIRED Metal Wood Wood and Metal Screws. #16 Drill #12-24 Tap. 1/8 Drill
 DEVICES COVERED IN THIS DOCUMENT: 4700S Surface Vertical Rod Device 4700SF Fire Exit Surface Vertical Rod Device TOOLS REQUIRED Metal Wood Wood and Metal Screws Sex Bolts #7 Drill ¼ -20 Tap #16 Drill #12-24
INSTALLING YOUR NEW SPRING LIFT ARM KIT
 INSTALLING YOUR NEW SPRING LIFT ARM KIT 1. Measure the distance that the roof is to be raised. [If your lift system is completely non-functional, you will need to calculate or estimate this distance as
Two Panel Frameless Bypass Door
 INSTALLATION INSTRUCTIONS Two Frameless Bypass Door Series 00 Please Record Model Number From Carton Label Here Please read these instructions carefully to familiarize yourself with the required tools,
ATLANTIS RAIL Contact Information
 ATLANTIS RAIL Contact Information Customer Service (800) 541-6829 (508) 732-9191 Spectrum System Installation Instructions Atlantis Rail s Spectrum System is an easy to install, universal cable railing
Jabiru Installation instructions
 Page 1 of 5 s Step Description 1 Mark out centre line of the installation 2 Align centre line of installation with the centre line of the "Front Panel Cut out" template. Align "FLOOR" on template with
Delrin Cone T-Handle Spring Stop w/pad...9 Screw Jack Large Toggle Clamp w/pad...9 Adjustable Ball Positioner...14
 Distributed by Rapp Industrial Sales INDEX Aluminum Fixture Plates...4 Pin Rest...11 Acrylic Plates...4 Thread Adapter...11 Fixturing Towers...5 Delrin Cone...11 CMM Fixturing Kits...6-7 Magnetic Rest
PVC Swift/Skeiner Tutorial
 PVC Swift/Skeiner Tutorial Windmill Arm Base The swift/skeiner is assembled in 3 pieces: the base, the arm, and the windmill. The three pieces can be taken apart so that the swift/skeiner can be stored
Assembly & Disassembly Guide
 Carvable Jaw Block Assembly & Disassembly Guide quincy\prod. Setup info\jawkits\jawkit setup guide P/N CARV-95, REV C 02/18/03 Index: Page Revision History... 1 Sec. Carvlock/ Fixture Vise 1.0 Jaw Block
SHOREMASTER CANOPY TABLE OF CONTENTS
 SHOREMASTER CANOPY PAGE TABLE OF CONTENTS SECTION OWNERS MANUAL Canopy Models: 1684, 16108, 2596, 30108, 40108, 40120, 50120, 20855, 30966, 40966,401066, 501066, 701066. All Hydraulic Lifts 2 Introduction
Ford Pick Up Rear leaf Spring Kit Installation Instructions
 1948-1956 Ford Pick Up Rear leaf Spring Kit Installation Instructions 1-800-984-6259 www.totalcostinvolved.com Parts 48 inch leaf (2) springs (4) U-bolts 3/8-24 x l 1/4bolts (16) & nuts (2) 1/2-20 x 4
M2 Assembly. M2 Sub-Assemblies mm Belt Sub-Assembly mm Belt Sub-Assembly Spider Sub-Assembly... 4
 M2 Assembly Table of Contents M2 Sub-Assemblies... 3 630mm Belt Sub-Assembly... 3 702mm Belt Sub-Assembly... 3 Spider Sub-Assembly... 4 Idler Bolt Sub-Assembly... 8 Y Motor Sub-Assembly... 9 X Motor Sub-Assembly...
Pickup Box Utility Rack Package Installation (Instruction ID: )
") 017 Chevrolet Colorado Pickup - WD (VIN S) Canyon, Colorado Accessory Installation Manual N America Document ID: 3966961 Pickup Box Utility Rack Package Installation (Instruction ID:3144879) Installation
017 Chevrolet Colorado Pickup - WD (VIN S) Canyon, Colorado Accessory Installation Manual N America Document ID: 3966961 Pickup Box Utility Rack Package Installation (Instruction ID:3144879) Installation
Strata. urniture. Addison Instructions. Parts in the Arm Box: Parts in the Body Box: Watch our assembly videos at
 1A Watch our assembly videos at www.strataf.com/videos.html Parts in the Arm Box: Arm - Outside View Arm - Inside View Corbels x 4 1B Parts in the Body Box: Back Deck x 1 Seat Deck x 1 Back Panel x 1 with
BABY WOLF LOOM. Assembly Instructions for Knocked-Down Looms
 BABY WOLF LOOM Assembly Instructions for Knocked-Down Looms BEFORE YOU BEGIN Please read through the directions before beginning to assemble your loom. Unpack the loom parts carefully. Do not throw away
PREASSEMBLED ELEMENTS FOR LIFTING AND SLIDING DOORS
 PROFILE SYSTEM PRE-ASSEMBLED ELEMENTS FOR LIFTING AND SLIDING DOORS s r ood gni d i l s dna gni t f i l r o f s t neme l e de l bme s s a - er P PREASSEMBLED ELEMENTS FOR LIFTING AND SLIDING DOORS MINITEC
LAN Locker Adjustable Shelves
 Adjustable Shelves LAN LOCKER ADJUSTABLE SHELVES * Adjustable Shelves are available for LAN LOCKER widths: 24, 30, 48, 60, and 72. * When installing more than one Adjustable Shelf, it is recommended that
KIT. Assembly Instructions. HayDay, LLC
 KIT Assembly Instructions HayDay, LLC 1-800-732-1654 www.stablegrazer.com Read completely through the assembly instructions before starting assembly. The Stable Grazer Kit comes in two boxes. Remove all
790XL Dado Jig Owners Manual Please Read Carefully!
 790XL Dado Jig Owners Manual Please Read Carefully! 790XL Dado Jig Hardware List: Identify and verify that you have all of the hardware shown below prior to assembly. Tools needed for assembly: #2 & 3
400GTO Lubrication Guide
 400GTO Lubrication Guide Lubrication Guidelines for the following equatorial mounting: 400GTO Servo with GTOCP2 or CP3 Controller For other 400 models please review other postings as they become available.
786 Kurka Jig Owners Manual
 7 Kurka Jig Owners Manual Please Read Carefully! 7 Parts List Parts listed in this box are shown in photos in the instructions. Part Description Quantity 7B Jig Plate Set, pieces..................... Six
L.L.Bean. Wooden Slat Bed
 L.L.Bean Wooden Slat Bed Thank you for purchasing our Slat Bed. Assembly of this product requires A Phillips head screwdriver. We have found it helpful to have a second person present in at least one step
STANDARD GRAVITY BOX TARP INSTALLATION
 OPERATORS MANUAL Rev. 9.9.2016 STANDARD GRAVITY BOX TARP INSTALLATION J. & M. Mfg. Co., Inc. 284 Railroad Street - P.O. Box 547 Fort Recovery, OH 45846 Ph: (419) 375-2376 Fax: (419) 375-2708 www.jm-inc.com
!! " # $ % & '! ( ) * +, -
 * +, -") !! " # $ % & '! ( ) * +, - North Pegasus This carton contains: (1) Instruction package. Response Curves North Creek Cabinet Handbook North Creek Wiring Guide (2) 6 oz. Rolls of Dacron stuffing. (1) Tube
!! " # $ % & '! ( ) * +, - North Pegasus This carton contains: (1) Instruction package. Response Curves North Creek Cabinet Handbook North Creek Wiring Guide (2) 6 oz. Rolls of Dacron stuffing. (1) Tube
NX7 SERIES 5-1/2 HANDRAIL
 STORAGE & HANDLING The handrails are shipped unassembled. Upon receipt, immediately check all material for any damage that may have occurred in transit and verify that all of the items and quantities are
QWALL 4 ACRYLIC SHOWER WALL INSTALLATION INSTRUCTIONS
 QWALL 4 ACRYLIC SHOWER WALL INSTALLATION INSTRUCTIONS IMPORTANT DreamLine TM reserves the right to alter, modify or redesign products at any time without prior notice. For the latest up-to-date technical
DIY Rustic Dresser Addicted2DIY.com
 DIY Rustic Dresser Addicted2DIY.com *Before beginning this project, please read through all of the plans as well as the blog post associated with this project. Always use safety precautions whenever using
Curve Generation with a sub-diameter tool.
 Curve Generation with a sub-diameter tool. By John Nichol www.nicholoptical.co.uk Starting with a flat blank, one of the more efficient ways of generating a concave curve on its surface is to use a sub-diameter
TABLE OF CONTENTS REQUIRED TOOLS
 TABLE OF CONTENTS SECTION SECTION TITLE PAGE NO. 1 2 3 4 5 Assembling Mounting Structure Installing Bicycle Supports Mounting Rack to Wall Adding Sections Customizing Rack Configuration REQUIRED TOOLS
V blocks. Materials. V-block
 V blocks I needed a pair of identical V-blocks to clamp the Bonelle/Quorn toolholder. I wanted to mill the sides of the tool holder parallell to the mandrel and bar bed centre lines. To get two identical
Connector Technology, Shelf Supports Connection Fittings
 MODULAR Connection fitting for recess mounting Finish: Burnished : For recess mounting The plate should allways be installed so that the supporting plate butts against the end of the recess. For rapid
Side Winder R o u t e r L i f t.
 Woodpeckers PRECISION WOODWORKING TOOLS Side Winder R o u t e r L i f t. INSTALLATION INSTRUCTIONS The wrench handle must be pointing left in order to fully insert or remove it. Lift Wrench Once fully
QWALL 5.2 (2 Back Panels)
") QWALL 5. ( Back Panels) SHOWER ACRYLIC WALL INSTALLATION INSTRUCTIONS IMPORTANT DreamLine TM reserves the right to alter, modify or redesign products at any time without prior notice. For the latest up-to-date
QWALL 5. ( Back Panels) SHOWER ACRYLIC WALL INSTALLATION INSTRUCTIONS IMPORTANT DreamLine TM reserves the right to alter, modify or redesign products at any time without prior notice. For the latest up-to-date
Strata. urniture. Mission Rim Instructions. Parts in the Arm Box: Parts in the Body Box:
 1A Watch our assembly videos at www.strataf.com/videos.html Parts in the Arm Box: Arm - Outside View Arm - Inside View Corbels x 4 1B Parts in the Body Box: Back Deck x 1 Seat Deck x 1 with the Feet attached
Calf-Tel Pen System Assembly Instructions
 Calf-Tel Pen System Assembly Instructions (Instructions work for 4, 6, and the 7 Pen Systems) 1 ASSEMBLY OF PEN FRONT AND WALLS START THE ASSEMBLY BY LINING UP THE TWO UNI-DIRECTIONAL ARROWS IN THE TOP,
Electric Skein Winder
 Electric Skein Winder Assembly and Use Package Contents 1 - Triangular Body (w/ motor) 1 - Cross Arm 1 - Left Foot (w/ yarn guide) 1 - Right Foot 1 - Adjustable Finger (w/ yarn clip) 3 - Adjustable Fingers
Giraud Tool Company, Inc.
 Motor Upgrade for Gracey Trimmer This package is intended to allow the user to upgrade their Gracey trimmer with a higher rpm motor and convenience features not found in the production offering. This upgrade
Before returning this product to the store of purchase
 Before returning this product to the store of purchase Contact Dee Zee if you experience the following problems: Missing Parts Installation Problems/Questions Warranty Questions 1.800.779.2102 Hours of
Installation Instructions for. Before You Begin TOOLS REQUIRED
 Composite Railing System STEP-BY-STEP Installation Instructions for Spectrum Composite Railing Virtually maintenance free 20-year warranty EverNew Spectrum Railing system is designed to work with a number
HOW TO TUNE A QB SERIES CO2 AIRGUN FOR NOOBS.
 THE UK CHINESE AIRGUN FORUM PRESENTS... HOW TO TUNE A QB SERIES CO2 AIRGUN FOR NOOBS. DISCLAIMER: THE FOLLOWING GUIDE WILL IMPROVE THE PERFORMANCE AND SMOOTHNESS OF THESE AIRGUNS, IT IS ESSENTIAL THAT
Assembly Instructions
 Selling Station Assembly Instructions View from above without top A B C D Rounded finished corners on A & D Square unfinished 3-sides on B & C Selling Station Components (2) 2' x 6' Side s Have a channel
Model 209 Fireback Replacement
 Model 209 Fireback Replacement Please read all the instructions before you begin the procedure. Confirm that you have all the necessary tools and materials. If you have any questions, technical support