Articulating Retina Monitor. Created by Phil Herlihy
|
|
|
- Mercy Armstrong
- 6 years ago
- Views:
Transcription
1 Articulating Retina Monitor Created by Phil Herlihy
2 Last updated on :00:12 PM EST
3 Guide Contents Guide Contents Introduction - Tools, Parts and Pitfalls Preparing Your Lamp Preparing The ipad Back Panel Final Assembly Page 3 of 23
4 Introduction - Tools, Parts and Pitfalls Have you ever wanted to have an adjustable articulating monitor for your desk? Maybe your desk is a bit on the small side, but you could really use an extra screen? This rad little project is for you! The idea is to take your Retina Display, mount it in an ipad shell, and mount that onto your lamp! To start, you'll need to gather some parts. Adafruit Qualia Bare Board ( LG LP097QX1 - ipad 3/4 Retina Display ( Mini DisplayPort to DisplayPort Cable ( (HDMI to DisplayPort will not work, must be pure DisplayPort.) Hampton Bay Architect's Lamp (22 in. Matte Black) ( 12V-9V 1A Power Supply ( (With Barrel Jack) ipad 3/4 Back Cover or Donor ipad 1/2/3/4 Front Glass/Digitizer (That matches your chosen back panel -- Optional) Some important notes about the back cover. For a perfect out-of-the-box fit with the Retina Display, you can use an ipad 3 or 4 backing. They're a little expensive (65 $US+). If you want the device to seal, you'll also need a glass/digitizer panel, which can be had for cheap, but is an additional expense. On ebay and other online markets, the ipad 3/4 back panel is sometimes called a "battery cover", which is technically correct, but isn't an obvious thing to search. You'll also need the Retina Display mounting screws for the ipad 3/4. This guide uses a broken ipad 2 as a donor for it's back panel and digitizer. For the ipad 2 back panel, there are a couple slight modifications that need to be done for the Retina Display to mount properly, but otherwise, it works. When searching for a donor ipad 2, liquid spills are your best option. This means that the front glass and back panel are intact, and you can recycle the innards. It's also important to note, you cannot use the ipad 2 Screen as your Retina Display. You have to use the 3/4 Screen. The last option for the back panel is to use an ipad 1 back panel. These are plentiful online, and cheap. The big difference is that the 1 back panel is tapered (not mostly flat like the later models), and the Retina Display will not match any of the display mounting holes on the back panel. Some mounting hardware: 4x - 2x8mm Machine Screws 2x - 3x12mm Machine Screws 2x - #3 Crush Washer 4x - #3 Plastic Washer Page 4 of 23
5 2x - #3 Metric Hex Nut 4x - #2 Plastic Washer 4x - #2 Metric Hex Nut Zipties in your favorite color! Finally, some to o ls: Grinder/Dremel Tool with Metal Cutting Discs Power Drill With Hole-Drilling Bits Needlenose Pliers Wire Cutters Screwdriver (matching the head of your machine screws) Sharpie or Fine Tip Permanent Marker Page 5 of 23

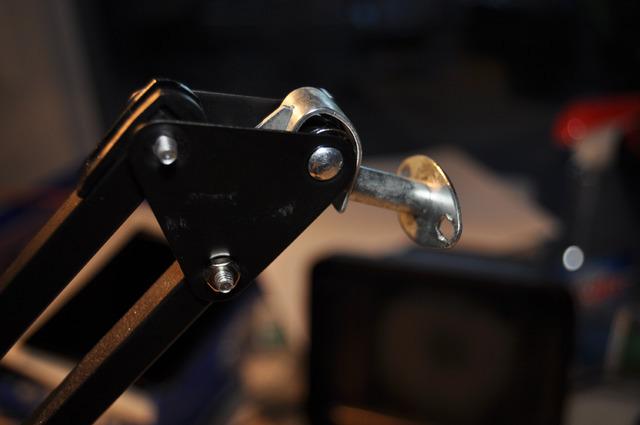
6 Preparing Your Lamp With that out of the way, let's get into it! First, you want to snip the AC wire at the top of the lamp, about an inch from where it goes into the head. You can now pull it out of the body of the lamp. Now, select a drill bit for your drill that's just around the same size as the head of the two silver rivets that are holding the lamp head onto the arm. Page 6 of 23

7 Page 7 of 23
, so use your needlenose pliers and straighten it out. https://learn.")
8 Awesome! I'd save the head of the lamp for another cool project. We won't need it here! Last bit for the lamp for now. The oval bracket that was holding the head before is slightly curved (to be flush with the lamp head), so use your needlenose pliers and straighten it out. Page 8 of 23

9 Preparing The ipad Back Panel This part of the guide is written specific to the ipad 2 Back Panel! Okay, onto the ipad 2 Back Panel preparations. First, make sure that you've removed all of the electronics, and core pieces from your ipad. You want a clean, empty back panel, and a clean front glass/digitizer. The Retina Display will clash with the Back Panel in the two corners that are on the same side as the rear facing camera. The corner that is closer to the rear facing camera will have to have some of the aluminum removed. Grab your Dremel, and cut along the orange line I have marked in this photo. Page 9 of 23

10 For the corner on the same side, but closer to the dock connector, a small section must be ground down. You should not cut this piece competely off, as it will be good to have support underneath the Retina Display's mounting bracket. You should shave a millimeter or two down. The area is marked with orange marker here. Page 10 of 23

11 Next, place the screen into the back panel, and observe where the ribbon cable will need to exit the case. You will need to make a cut with your Dremel to pass this cable through the case, and out to the Qualia board. Page 11 of 23
 The Retina Display ribbon cable is delicate. It can easily be torn or damaged, so take care when handling it. https://learn.adafruit.")
12 Once the cut is made, verify that your ribbon fits well, and is not flexed. (Ignore that second cut below the main one. It's not necessary.) The Retina Display ribbon cable is delicate. It can easily be torn or damaged, so take care when handling it. Page 12 of 23

13 Using the ribbon as your guide, place your Qualia bareboard where you should mount it on the back of the ipad back panel. The ribbon should not flex or bend in a strange way. Try to align it so that it goes straight into the Qualia. Page 13 of 23

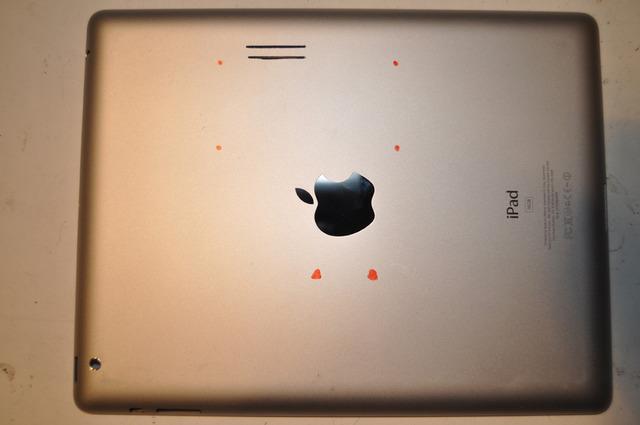
14 Now, use your fine tipped marker to mark where the mounting holes line up. Another method is to place the board on an 8x11 sheet of paper, and create a drilling stencil. Then, hold the back panel up to the head of your lamp, and mark where you need to drill the holes for the lamp mount. The ideal place for the lamp is not dead center, but slightly offset towards the side with the rear facing camera. Page 14 of 23

15 Page 15 of 23

16 If you're happy with how the marks look, go ahead and drill 'em! The two large holes are #3 Metric, and the smaller ones are for the #2. Be careful not to overdrill the holes. Now, take a strip of thick tape, and completely cover the bottom of the Qualia. This is to prevent it from shorting out on the aluminum of the back panel. You can poke some small holes in the tape so that the screws will go through it easily. Page 16 of 23

17 Okay, you're ready to attach the Qualia! Put a 2x8mm screw through each of the holes for the Qualia in the back panel, with the heads on the inside of the ipad. Place a #2 plastic washer on each of the machine screws. Now, drop the Qualia board onto the screws, and secure it with the #2 metric hex nuts. Page 17 of 23

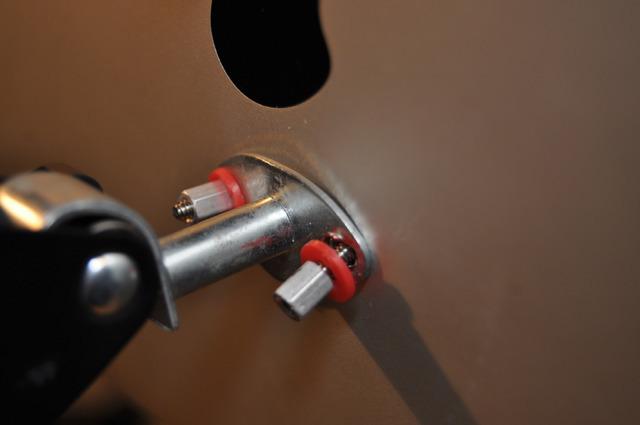
18 Place a #3 washer on each 3x12mm machine screw. Then, thread those through the ipad back panel, with the heads on the inside of the case (same as before). Place your back panel onto the lamp head, and thread the screws through the bracket. place your #3 crush washers onto the screws, then another set of #3 plastic washers, and finally cap them with the #3 metric hex nuts. Tighten it up, and it's mounted! Page 18 of 23

19 Page 19 of 23
20 Page 20 of 23

21 Final Assembly Woo! We're into the home stretch. It's time to place your screen into the ipad back panel. The best way to do this is to tilt it in, while feeding the ribbon through the hole you cut. The ribbon cable isn't incredibly malleable, so it will require some manuvering to guide it into the Qualia connector. Once it's in, connect up your DisplayPort and Power Supply cables and give it a test run! If everything looks good, you can screw the panel in. If you're using the ipad 2 Back Panel, you should apply a dab of hot glue in both of the bottom corners (since you can't screw those in). Then, pop your front glass on. If the double stick tape on the glass is worn out from it's initial removal, it's a good idea to refresh it. You can run the cables down the arm, and use those zipties to hold them down. Make sure to leave some slack around the joint, so the screen can adjust freely. Page 21 of 23

22 Hurray! Your lamp buddy is complete!! Celebratory dancing!! Now, for some glamor shots. This works really great in both portrait and landscape configurations. Page 22 of 23


23 Last Updated: :00:14 PM EST Page 23 of 23
24 Page 24 of 23
Written By: Brett Hartt
 Replace the battery in your ipad 3 4G. Written By: Brett Hartt ifixit CC BY-NC-SA www.ifixit.com Page 1 of 36 INTRODUCTION When your ipad can't stay awake for longer than a few hours, it is time to replace
User Instructions Multiline Otter Scoreboard Caddy Assembly
 List of parts: User Instructions Multiline Otter Scoreboard Caddy Assembly Single Caddy Double Caddy 1 1 Base assembly with attached wheels 2 4 1 1 2 4 4 8 10 20 12 Uprights (60 or 74 aluminum extrusion)
Written By: Sam Lionheart
 Replace the SIM Board in your ipad 4 GSM. Written By: Sam Lionheart ifixit CC BY-NC-SA www.ifixit.com Page 1 of 29 INTRODUCTION Use this guide to replace the SIM Board. TOOLS: SIM Card Eject Tool (1) iopener
Written By: Brett Hartt
 Replacing the Wi-Fi antenna in the third generation ipad Written By: Brett Hartt ifixit CC BY-NC-SA www.ifixit.com Page 1 of 31 INTRODUCTION Wireless internet is awesome. A third generation ipad without
Written By: Walter Galan
 ipad 3 Wi-Fi Dock Connector Replacement Replace the dock connector in your ipad 3 Wi-Fi. Written By: Walter Galan ifixit CC BY-NC-SA www.ifixit.com Page 1 of 29 INTRODUCTION Use this guide to replace the
Written By: Walter Galan
 ipad 4 CDMA SIM Board Replacement Replace the SIM Board in your ipad 4 CDMA. Written By: Walter Galan ifixit CC BY-NC-SA www.ifixit.com Page 1 of 33 INTRODUCTION Use this guide to replace the SIM Board.
Written By: Walter Galan
 Replace the logic board in your ipad 3 Wi-Fi. Written By: Walter Galan ifixit CC BY-NC-SA www.ifixit.com Page 1 of 29 INTRODUCTION Use this guide to replace the logic board. TOOLS: iopener (1) Phillips
Ribcage Installation. Part 2 - Assembly. Back-Bone V1.06
 Ribcage Installation Part 2 - Assembly Back-Bone V1.06 Contents Section 1 Before You Get Started... 2 Included With Your Kit:... 2 Figure: A... 3 CAUTION!... 4 Note:... 4 Tools Required... 5 Section 2:
OpenROV. Guide 3 - Electronics. We will now move to the assembly of the electronics that will control the ROV. Written By: OpenROV
 OpenROV Guide 3 - Electronics We will now move to the assembly of the electronics that will control the ROV. Written By: OpenROV 2017 openrov.dozuki.com Page 1 of 33 INTRODUCTION We will introduce soldering
Continue gluing the remaining top parts ensuring the angled piece is glued well. Set aside and let dry. See photo below
 Radiator rev 1.1 The SE5a s radiator is one of the most recognized radiators in WW1. It is one of the components that defines the SE5a. The original SE5a has seen multiple radiator designs used during
Written By: Brett Hartt
 ipad 3 4G LCD Replacement Removing the LCD Written By: Brett Hartt ifixit CC BY-NC-SA www.ifixit.com Page 1 of 25 INTRODUCTION The third generation ipad loses a lot of luster when its gorgeous retina display
ipad 2 GSM Right Cellular Data Antenna Replacement
 ipad 2 GSM Right Cellular Data Antenna Replacement Replace the right cellular data antenna in your ipad 2 GSM. Written By: Brett Hartt ifixit CC BY-NC-SA www.ifixit.com Page 1 of 43 INTRODUCTION Use this
001-Component-build. Build the following Contraptor components before assembly:
 001-Component-build Build the following Contraptor components before assembly: http://www.contraptor.org/make-linear-rail-v2#assembly http://www.contraptor.org/make-linear-bearings-v2#assembly http://www.contraptor.org/make-sliding-elements#assembly
SuperTrack Parts List
 SuperTrack Parts List [indicates number for 6 lane tracks] SuperTrack Installation Instructions www.supertimer.com 1-800-654-2088 1 Track Instruction Manual (this booklet) 2 Start sections [3] Start Gate
The build should take around 2 to 3 hours. However, by leaving yourself more time you can go at a relaxed pace and be sure not to miss anything.
 Before We Start Before we jump into building your Picade, make sure you have everything to hand. I know you're eager to jump right into the construction, but we need to get set up properly first! 1. Prepare
ipad 3 4G Home Button Control Board Replacement
 ipad 3 4G Home Button Control Board Replacement Replace the home button control board in your ipad 3. Written By: Brett Hartt ifixit CC BY-NC-SA www.ifixit.com Page 1 of 28 INTRODUCTION This guide will
ipad 3 4G Home Button Assembly Replacement
 ipad 3 4G Home Button Assembly Replacement Replace the home button assembly in your ipad 3 4G. Written By: Brett Hartt ifixit CC BY-NC-SA www.ifixit.com Page 1 of 29 INTRODUCTION Use this guide to replace
(6) Plastic Retainers. Passenger/Right. Passenger/Right Support Brackets
 Plastic Retainers. Passenger/Right. Passenger/Right Support Brackets") PART#R102580 PARTS LIST: 1 Driver/Left HD Running Board 4 8mm Bolt/Nut Plates 1 Passenger/Right HD Running Board 4 8mm Plastic Retainers 2 Driver/Left & Center Mount Bracket 14 8mm-1.25 x 30mm Hex Bolts
PART#R102580 PARTS LIST: 1 Driver/Left HD Running Board 4 8mm Bolt/Nut Plates 1 Passenger/Right HD Running Board 4 8mm Plastic Retainers 2 Driver/Left & Center Mount Bracket 14 8mm-1.25 x 30mm Hex Bolts
1.9 KIT # Fits Aerotech 1.9 diameter rockets. Uses coupler and payload tube included with select Aerotech Kits. Ebay Parts List Description.
 KIT #0545.9 Fits Aerotech.9 diameter rockets. Uses coupler and payload tube included with select Aerotech Kits. Ebay Parts List P/N Description Qty 5405.9 Ebay Laser Cut Sheet Thin 5406.9 Ebay Laser Cut
Written By: Walter Galan
 Replace the Logic Board in your ipad 4 Wi-Fi. Written By: Walter Galan ifixit CC BY-NC-SA www.ifixit.com Page 1 of 32 INTRODUCTION Use this guide to replace the logic board. TOOLS: iopener (1) Phillips
ipad 2 Wi-Fi EMC 2415 Front Panel Replacement
 ipad 2 Wi-Fi EMC 2415 Front Panel Replacement Replace the Front Panel in your ipad 2 Wi-FI EMC 2415. Written By: Walter Galan ifixit CC BY-NC-SA www.ifixit.com Page 1 of 31 INTRODUCTION Note: this is a
Note - the nose ribs and are thinner than the main ribs. These nose ribs will use a thinner rib cap than the ribs. This is per design.
 Stabilizer rev 1.2 The SE5a stabilizer is the heartbeat of the tail and is recreated like the full scale version. All tail pieces depend on the stabilizer. It uses the steel fittings, pulleys, inspection
SE5a Instrument Board part 2 - rev 1.1
 SE5a Instrument Board part 2 - rev 1.1 Fuel (Petrol) Valve This valve uses two circular name plates, eight brass screws, one black plastic base, copper wire and two black plastic risers. You can pick any
PAC-12 Kit Contents. Tools Needed Soldering iron Phillips screwdriver Wire stripper Wrenches, 7/16 and 1/2 Terminal crimp tool Pliers Solder
 PAC-2 Kit Contents Part Quantity Screws: 8/32 x 3/8 Screws: 8-32 x 5/6 Screw: 8-32 x /4 #8 internal tooth washers #8 solder lug ring terminals Bolt: Aluminum, /4-20 x.5 /4 internal tooth washer Nut: Aluminum
Installation Instruction
 Tools Needed for Assembly Stud finder (for wood stud wall) Pencil Mark Electric drill Wood Stud Wall Installation Step 1. Locate the Wood Studs Installation Instruction Drill bit (for wood stud wall) Masonry
Series 1500 Aluminum Door Canopy
 Series 500 Aluminum Door Canopy with Sidewings It is our recommendation that you read instructions carefully prior to assembly and installation. Series 500 with Sidewings mounting bar (A) top trim (B)
Series 1100 Aluminum Door Canopy
 Series 00 Aluminum Door Canopy with Support Arms It is our recommendation that you read instructions carefully prior to assembly and installation. Series 00 with Support Arms MOUNTING BAR (A) TOP TRIM
Assembly Instructions: Bencher Skylark
 Assembly Instructions: Bencher Skylark Tools Required: Pop Rivet Tool Tape Measure Hex Wrenches Screwdriver Several Disposable Rags Two Saw Horses Several boxes or bowls to hold fasteners and small parts
Articulating TV/Monitor Grommet/Clamp Desk Mount Model: DE300S (Butterfly Series)
") t Articulating TV/Monitor Grommet/Clamp Desk Mount Model: DE300S (Butterfly Series) Instruction Manual Images may different from actual product Disclaimer It is Dyconn s intention to have all the correct
t Articulating TV/Monitor Grommet/Clamp Desk Mount Model: DE300S (Butterfly Series) Instruction Manual Images may different from actual product Disclaimer It is Dyconn s intention to have all the correct
Written By: Walter Galan
 ipad 2 CDMA Camera Bracket Replacement Replace the camera bracket in your ipad 2 CDMA. Written By: Walter Galan ifixit CC BY-NC-SA www.ifixit.com Page 1 of 29 INTRODUCTION Use this guide to replace the
ipad 2 GSM Home Button Assembly Replacement
 ipad 2 GSM Home Button Assembly Replacement This guide will show you how to replace the home button assembly in your ipad 2. Written By: Scott Head ifixit CC BY-NC-SA www.ifixit.com Page 1 of 29 INTRODUCTION
Thor Audi A4/S4 Skid Plate Installation Instructions
 Thor Audi A4/S4 Skid Plate Installation Instructions Parts List: 1 Aluminum Skid Plate 2 Aluminum Side Wings 10 10mm Flat Washers 3 8mm Flat Washers 3 8mm Speed Clips 2 10x40mm Bolts 3 8x35mm Bolts 2 Rivet-nuts
4-Door Rear XHD Armor Fenders
 Page 1/10 Part #11615.02 Page 2/10 1 4 2 3 5 Components 1. Left Rear Fender (1) 2. Right Rear Fender (1) 3. Left Rear Guard (1) 4. Right Rear Guard (1) 5. License Plate Bracket (1) OMIX-ADA TECHNICAL SUPPORT
Bushwacker Jeep Flat Style Fender Flares Front Pair
 Bushwacker Jeep Flat Style Fender Flares Front Pair Note: These instructions involve cutting parts of your vehicle. Please read all instructions prior to starting. Installation Time: 3-4 Hours Tools Required:
AUTOMATIC ADVANCE MANUAL
 AUTOMATIC ADVANCE MANUAL AVL Looms, Inc. 3851 Morrow Lane, Suite #9 Chico, CA 95928-8305 530 893-4915 530 893-1372 fax # info@avlusa.com www.avlusa.com Copyright 2009 TABLE OF CONTENTS Page # I. Parts.........................
Hatchback Wing Riser Kit
 Hatchback Wing Riser Kit 2015-06-11 Thank you for purchasing this PERRIN product for your car! Installation of this product should only be performed by persons experienced with installation of aftermarket
Written By: Adam O'Camb
 iphone XR Display Assembly Replacement Replace a cracked or faulty LCD screen in your iphone XR. Written By: Adam O'Camb ifixit CC BY-NC-SA www.ifixit.com Page 1 of 23 INTRODUCTION If your iphone XR screen
BT-55 KIT # Ebay Parts List P/N Description Qty. Fits diameter rockets (33mm or BT-55)
") KIT #10543 BT-55 Ebay Parts List P/N Description Qty 15403 33mm Ebay Laser-cut Sheet 1 13016 AC-33 (single) 1 13004 33mm Coupler with hole 1 10129 AT-33mm/2 with hole (for Ebay) 1 13066 Weld Nut for Rail
KIT #10543 BT-55 Ebay Parts List P/N Description Qty 15403 33mm Ebay Laser-cut Sheet 1 13016 AC-33 (single) 1 13004 33mm Coupler with hole 1 10129 AT-33mm/2 with hole (for Ebay) 1 13066 Weld Nut for Rail
INSTALLATION INSTRUCTIONS 6 OVAL BENT END SIDEBARS DODGE RAM 1500, CREW CAB PART#: /241533B
 PARTS LIST: 1 Driver/Left Sidebar 24 8mm x 24mm x 2mm Flat Washers 1 Passenger/Right Sidebar 12 8mm Lock Washers 3 Driver/left, Passenger Center and Rear 6 8mm Hex Nuts 3 INSTALLATION INSTRUCTIONS 6 OVAL
Can-Do Can Crusher. America s leading woodworking authority. Step by Step construction instruction. A complete bill of materials.
 America s leading woodworking authority Can-Do Can Crusher Step by Step construction instruction. A complete bill of materials. Exploded view and elevation drawings. How-to photos with instructive captions.
After the canopy hinge is square with the firewall and the nut plates are installed you can set up the hinge mounts. Start by clamping a 1/16 tongue
 Written by: Sean Cole September 19, 2008 When fitting the stiffener use 3/32 clecos to hold it in place, it makes a smaller hole and is easier to work with. Only use the amount needed to hold the stiffener
BMW X5 OEM RUNNING BOARD PART#SBBW
 INSTALLATION INSTRUCTIONS 2014-2016 BMW X5 OEM RUNNING BOARD PART#SBBW-146-74 QTY HARDWARE 1 Driver Side OEM Running Board 1 Passenger Side OEM Running Board 8 Rivet Pin 1 Page Step 1: Verify all parts
Applications: Section 1: Getting Started Tools Needed: BEFORE
 Installation of KBD Body Kits Porsche GT 3 Look/Style 2 Piece Polyurethane Front Bumper & Lip Applications: Porsche 996: 1999-2001 Porsche Boxster 986: 1997-2004 Page 1 Tools Needed: Philips Head Screwdriver
IPad mini REPAIR GUIDE. Version Edition
 IPad mini REPAIR GUIDE Version 1 2016 Edition IPad Mini REPAIR GUIDE LCD AND DIGITIZER REPLACEMENT RiAna Soto Repair Training Specialist rsoto@cellairis.com FOR EVERY REPAIR MAKE SURE TO COMPLETE, INITIAL,
The Useless Machine. DIY Soldering Edition. Instruction Guide v0004
 The Useless Machine DIY Soldering Edition Instruction Guide v0004 TM For the best outcome, follow each step in order. We recommend reading this guide entirely before you get started. Tools required: Soldering
Passenger/Right Center and Rear Support Brackets. Driver/Left Center and
 PARTS LIST: 1 Driver/Left HD Running Board 24 8mm x 24mm OD x 2mm Flat Washers 1 Passenger/Right HD Running Board 12 s 3 Driver/Left front, passenger center/rear Support Brackets 6 8mm-1.25 Hex Nuts 3
7878 K940. Checkpoint Antenna. Kit Instructions. Issue B
 7878 K940 Checkpoint Antenna Kit Instructions Issue B Revision Record Issue Date Remarks A July 7, 2009 First issue B Nov2013 Revised the Checkpoint installation procedures for 7878 and 7874 scanners Added
MALEKO WALL-MOUNT FAUCET INSTALLATION
 SKU(s): 934146 BEFORE YOU BEGIN We recommend consulting a professional if you are unfamiliar with installing bathroom fixtures and plumbing. Signature Hardware accepts no liability for any damage to the
GlideRite Retractable Cover System For Hot Spot Spas (SE & SLX only)
") List of Contents Quantity Description 12 #10 x 1 ½ Flat Head Phillips Screw (see pg. 2) 2 #10 x ½ Pan Head Phillips Screw (see pg. 2) 8 ¼ x 2 ½ Lag Bolt (see pg. 2) 7 ¼ 20 x 5 / 8 Hex Head Bolt (see pg.
List of Contents Quantity Description 12 #10 x 1 ½ Flat Head Phillips Screw (see pg. 2) 2 #10 x ½ Pan Head Phillips Screw (see pg. 2) 8 ¼ x 2 ½ Lag Bolt (see pg. 2) 7 ¼ 20 x 5 / 8 Hex Head Bolt (see pg.
FRONT BUMPER INSTALLATION INSTRUCTIONS Toyota 4Runner
 Aluminess Products Inc 9402 Wheatlands Ct. #A Santee, CA 92071 619-449-9930 FRONT BUMPER INSTALLATION INSTRUCTIONS 2003-2009 Toyota 4Runner Please read before beginning Stainless steel hardware may bind
INSTALL/REMOVAL INSTRUCTIONS: WINDOW REGULATOR
 REMOVAL/INSTALL OF WINDOW REGULATOR (740-666) Lincoln Town Car 1990 94 General Tech Tips: Use painter s tape rather than duct tape to secure window. It will not damage paint or leave sticky residue. A
Mac mini Model A1283 Speaker Replacement
 Mac mini Model A1283 Speaker Replacement Written By: Walter Galan ifixit CC BY-NC-SA www.ifixit.com Page 1 of 14 INTRODUCTION Restore sound to your mini by replacing the speaker. TOOLS: Jimmy (1) Phillips
Connecting a Warp Feed to an Intelliframe
 Connecting a Warp Feed to an Intelliframe So you want to trigger your Warp Feed every time you pull the trigger? Sounds like a great idea! This step by step picture story will guide you through this process.
GlideRite Retractable Cover System For HotSpring & Tiger River Spas (except Classic & pre-2000 Landmark Spas)
") List of Contents Quantity Description 12 #10 x 1 ½ Flat Head Phillips Screw (see pg. 2) 2 #10 x ½ Pan Head Phillips Screw (see pg. 2) 8 ¼ x 2 ½ Lag Bolt (see pg. 2) 7 ¼ 20 x 5 / 8 Hex Head Bolt (see pg.
List of Contents Quantity Description 12 #10 x 1 ½ Flat Head Phillips Screw (see pg. 2) 2 #10 x ½ Pan Head Phillips Screw (see pg. 2) 8 ¼ x 2 ½ Lag Bolt (see pg. 2) 7 ¼ 20 x 5 / 8 Hex Head Bolt (see pg.
YJ DeFenders. These installation instructions apply to the following Poison Spyder products:
 INSTALLATION INSTRUCTIONS INST-13-02-070_A YJ DeFenders IMPORTANT: Thank you for purchasing this Poison Spyder product. Please read through this entire document before proceeding with installation. If
Obtained from Omarshauntedtrail.com
 http://www.scary-terry.com/dancskele/dancskele.htm This is a how-to for making a set of dancing skeletons for your Halloween window display. It uses a pair of cheap, glow-in-the-dark plastic skeletons
WILLIS WALL-MOUNT FAUCET INSTALLATION
 SKU(s): 924620 BEFORE YOU BEGIN We recommend consulting a professional if you are unfamiliar with installing bathroom fixtures and plumbing. Signature Hardware accepts no liability for any damage to the
RC4WD Diablo V2 Instruction Manual
 Version 1.1 RC4WD Diablo V2 Instruction Manual Thank you for your purchase. Welcome to the RC4WD family. This kit is a combination of many specially engineered and manufactured parts. Enjoy your build.
Written By: Jeff Suovanen
 iphone 8 Battery Replacement Replace the battery in your iphone 8 if it has failed, swollen, or no longer holds sufficient charge. Written By: Jeff Suovanen ifixit CC BY-NC-SA www.ifixit.com Page 1 of
Epson WorkForce DS-510 Color Document Scanner - clicking sound, mulitple page feed broken
 Epson WorkForce DS-510 Color Document Scanner - clicking sound, mulitple page feed broken There is a jointed shaft that controls multi-page feed operations and one of the joints rounds out. This will show
Telecaster Wiring Kits Please Read All Instructions Before Beginning. Tools you will need: Soldering tips: Removing Current Wiring: Step 1. Step 2.
 Telecaster Wiring Kits Please Read All Instructions Before Beginning. Tools you will need: Soldering Iron (35 watt preferably) Solder Wet Sponge Wire Clippers Wire Strippers 3/8 Drill Bit 5/32 Drill Bit
ROTUNDA WALL-MOUNT FAUCET INSTALLATION
 SKU(s): 919045 BEFORE YOU BEGIN We recommend consulting a professional if you are unfamiliar with installing bathroom fixtures and plumbing. Signature Hardware accepts no liability for any damage to the
PrintrBot NinjaFlex Extruder Upgrade
 PrintrBot NinjaFlex Extruder Upgrade Created by Ruiz Brothers Last updated on 2015-11-08 06:00:17 PM EST Guide Contents Guide Contents Overview Get the Gear Head Extruder 3D Printing 3D Printing with NinjaFlex
TOYOTA MOTOR EUROPE CA Products Division Tel : Fax :
 TOYOTA MOTOR EUROPE CA Products Division Tel : + 32 2 745 26 77 Fax : + 33 2 745 26 99 Ordering part numbers Comments Part Numbers Wooden floor one hatch PZ449-D3C42-11 one hatch with carpet PZ449-D3C42-01
Before returning this product to the store of purchase
 Before returning this product to the store of purchase Contact Dee Zee if you experience the following problems: Missing Parts Installation Problems/Questions Warranty Questions 1.800.779.2102 Hours of
Clearview Railing System Installation Instructions
 Clearview Railing System Installation Instructions Disclaimer: AGS Stainless, Inc. has its Clearview Railing Systems designed by a professional engineer to meet the requirements of the latest national
Assembly Instructions
 Assembly Instructions Note: Prior to assembly, be sure to remove all printing pads from the printed parts and also be sure to sort through and organize all of your hardware before assembly this will help
MTS-SP100. RENOGY Pole Mount System E Philadelphia St, Ontario, CA Version: 1.2
 MTS-SP100 RENOGY Pole Mount System 2775 E Philadelphia St, Ontario, CA 91761 1-800-330-8678 1 Version: 1.2 Important Safety Instructions Please save these instructions. This manual contains important safety,
AM8 Printer A metal frame for your Anet A8 By Pheneeny v1.0 April 20, 2017
 AM8 Printer A metal frame for your Anet A8 By Pheneeny v1.0 April 20, 2017 Please read this entire document before printing parts or building this frame Disclaimer: This guide is for informational purposes
Mounting the 6 or 12 Indexer on PRS Gantry Tools
 Page 1 Mounting the 6 or 12 Indexer on PRS Gantry Tools About this guide: This document illustrates several options for mounting an indexer onto your ShopBot. You can choose the technique that works best
"The Stick" Assembly Instructions
 Back to Main Page "The Stick" Assembly Instructions In Japanese (pdf): right click and save target as. Introduction: Hello and thank you for buying a Stick chassis from TCS. We appreciate your business
Sea Doo Spark Engine Access Kit
 Sea Doo Spark Engine Access Kit PART# - RS4-130-EAK APPLICATION(S): Sea Doo Spark. 2up & 3up Models. We strongly recommend the use of a service manual to familiarize yourself with the various components
Step 1: Gather your parts!
 Step 1: Gather your parts! Show All Items The #mearm was designed with economy in mind. It is understood that laser cutters aren't the most common tools but there are more of them out there now than
Ford Super Duty 4x4 CB Antenna Installation 2004 F250 4x4 XLT Sport Back to 2004 F250 Main Page
 Ford Super Duty 4x4 CB Antenna Installation 2004 F250 4x4 XLT Sport Back to 2004 F250 Main Page I wanted to install a CB in my truck but I didn't particularly like any of the typical antenna installation
Sole Fitness E95 Elliptical Trainer TurnKey Delivery and Setup Training
 Sole Fitness E95 Elliptical Trainer TurnKey Delivery and Setup Training Delivery Requirements Ground delivery Inside delivery to customer-specified location Unpack and assemble machine, and remove packing
Make an Altoids Flashlight.
 Make an Altoids Flashlight by JoshuaZimmerman on July 12, 2012 Table of Contents Make an Altoids Flashlight 1 Intro: Make an Altoids Flashlight 2 Step 1: Parts 2 Step 2: LED Holder 3 Step 3: Prepare Your
Tools: Sharpie, Square, Vise, Hack saw, Ruler, Punch, Hammer, File. 2. Cut the stock Place stock in vise and cut with hack saw
 Purpose: MAKE CATAPULT ARM Step 1 Tools: Sharpie, Square, Vise, Hack saw, Ruler, Punch, Hammer, File Materials: Flat aluminum ½ inch stock (see picture below) Gloves required 1. Pick up the aluminum ½
Leafy Greens Spinner Construction Manual
 Leafy Greens Spinner Construction Manual University of Houston Conrad N. Hilton College Food Science Lab Materials list: Base and Armature Approximately 8-1 PVC cut into sections o 3-22.5 o 2-7 o 2-4 o
J D SQUARED INC. NOTCH MASTER Tube and Pipe Notcher Operating Instructions
 Copyright (c) 2006 J D SQUARED INC. www.jd2.com NOTCH MASTER Tube and Pipe Notcher Operating Instructions Angled Notches PATENT PENDING Straight Notches Offset Notches Tube Clamp Slider Tube Clamp Exploded
Read Below! Read Below! Read Below! Read Below! Read Below! Read Below! STOP READ TIPS BELOW TO MAKE ASSEMBLY MUCH EASIER
 Read Below! Read Below! Read Below! Read Below! Read Below! Read Below! STOP READ TIPS BELOW TO MAKE ASSEMBLY MUCH EASIER Here are some guidelines to help make assembling your unit much easier: -Read and
Canon EOS 5D Mark III Main Board
 Canon EOS 5D Mark III Main Board Replacement This guide should help you get to the brains of your favorite workhorse Canon camera. Written By: Matthew Zeller ifixit CC BY-NC-SA www.ifixit.com Page 1 of
PS4. Ragnarok Flex Modchip Installation Instructions.
 PS4 Ragnarok Flex Modchip Installation Instructions Revised 11/25/2013 Tools needed PS4 Controller Viking PS4 Ragnarok Flex modchip DIY Kit (includes mod chip, LED board, and LED lense) Two diodes (included
TOOL LIST FOR TAILGATE HIDDEN LATCH & LINK ASSY FOR FORD FLARESIDE TRUCKS
 TOOL LIST FOR TAILGATE HIDDEN LATCH & LINK ASSY FOR 53-87 FORD FLARESIDE TRUCKS Vise Grip Clamps C-clamps Sharpie Marker Ball Peen Hammer Center Punch 3/8 or 1/2 Drill 5/32, 7/32, 9/32, and 3/8 Drill Bits
MULTI-ACTIVITY PLAY TABLE
 ASSEMBLY INSTRUCTIONS! WARNING: CHOKING HAZARD - Small parts. Not for children under 3 years.! CAUTION: Adult assembly required. C 2006 Melissa and Doug, Inc. All Rights Reserved www.melissaanddoug.com
F-F-Fiddle Assembly Instructions
 F-F-Fiddle Assembly Instructions Bout Bridge Neck Machine Heads/Tuners Truss Rod Strings An open-source FFF 3d-printable electric violin. 1. Assemble materials 5 3 8 1 9,10, 11 7 4 2 6 PARTS 1. Bout part
KASTLE v1.5 - Assembly Guide
 last update: 14. 12. 2017 KASTLE v1.5 - Assembly Guide bastl-instruments.com INTRODUCTION Welcome to the assembly guide for the Kastle kit - mini modular synthesizer. It is suitable for beginners. It is
Support. (3)Passenger Support. Brackets. (2) Running Board (example only)
Passenger Support. Brackets. (2) Running Board (example only)") IB(5,4)) RUNNING BOARD PARTS LIST: Item QTY Description Item QTY Description #01 2 Running Board(use for left or right) #10 12 8mm Lock Washers #02 3 Driver Mounting (/Center/Rear) #11 6 8mm Hex Nuts #03
IB(5,4)) RUNNING BOARD PARTS LIST: Item QTY Description Item QTY Description #01 2 Running Board(use for left or right) #10 12 8mm Lock Washers #02 3 Driver Mounting (/Center/Rear) #11 6 8mm Hex Nuts #03
Assembly Instructions
 Assembly Instructions Note: Prior to assembly, be sure to remove all printing pads from the printed parts and also be sure to sort through and organize all of your hardware before assembly this will help
SAM. Model: STV-C65 LCD Mobile Visualized Stand Instruction Manual. Weight Capacity: 1251bs / 56.7kg Suits LCD Flat Panel Display: 42"-55" Page 20
 SAM Model: STV-C65 LCD Mobile Visualized Stand Instruction Manual Weight Capacity: 1251bs / 56.7kg Suits LCD Flat Panel Display: 42"-55" 20 Step 6 LCD Mobile Lift Stand Model: STV-C65 Cable management
tinycylon Assembly Instructions Contents Written by Dale Wheat Version August 2016 Visit dalewheat.com for the latest update!
 tinycylon Assembly Instructions Written by Dale Wheat Version 2.1 10 August 2016 Visit dalewheat.com for the latest update! Contents Assembly Instructions...1 Contents...1 Introduction...2 Quick Start
10" E-Series D-Series - Pair. kit includes (14) (4) (4) It is strongly recommended that this product be installed by a professional.
 (4) (4) It is strongly recommended that this product be installed by a professional.") 2014 GMC 1500 grille installation instructions 10" E-Series D-Series - Pair kit includes (14) (14) (4) 5 /16-18x 5 /8 Button Socket 5 /16-18 Low Profile Nylock Nut M6-1.0x30mm Button Head Socket (14) (4)
2014 GMC 1500 grille installation instructions 10" E-Series D-Series - Pair kit includes (14) (14) (4) 5 /16-18x 5 /8 Button Socket 5 /16-18 Low Profile Nylock Nut M6-1.0x30mm Button Head Socket (14) (4)
(W) INSTALLATION INSTRUCTIONS 3" ROUND & 4" OVAL SIDEBAR (90-DEG BENT END) DODGE RAM 1500 QUAD CAB PART #DZ /DZ /DZ /DZ
 INSTALLATION INSTRUCTIONS 3 ROUND & 4 OVAL SIDEBAR (90-DEG BENT END) DODGE RAM 1500 QUAD CAB PART #DZ /DZ /DZ /DZ") (W) INSTALLATION INSTRUCTIONS 3" ROUND & 4" OVAL SIDEBAR (90-DEG BENT END) PART #DZ 372231/DZ 372233/DZ 372237/DZ 372239 PARTS LIST: 3" ROUND & 4" OVAL SIDEBAR (90-DEG BENT END) Qty Description Qty Description
(W) INSTALLATION INSTRUCTIONS 3" ROUND & 4" OVAL SIDEBAR (90-DEG BENT END) PART #DZ 372231/DZ 372233/DZ 372237/DZ 372239 PARTS LIST: 3" ROUND & 4" OVAL SIDEBAR (90-DEG BENT END) Qty Description Qty Description
Repairing Apple Wireless Keyboard without destroying it.
 Repairing Apple Wireless Keyboard without destroying it. An Apple keyboard with non-functioning keys may be due to damaged traces on the two thin sheets of plastic inside, called the membrane. This is
Page 1 of 5 Instructions for Fitting Lower Grille to S Type Jaguar. Part Code 9048
 Page 1 of 5 Instructions for Fitting Lower Grille to S Type Jaguar. Part Code 9048 To fit this grille you will need: Torch, 10mm spanner, 10mm socket with extension, T30 torx bits, Screwdrivers, Pliers,
A524 ASSEMBLY & INSTALLATION INSTRUCTIONS BELLADONNA PENDANT CASTLETON, VERMONT USA SYNCHRONICITYLIGHTING.COM Rev A 1 OF 7
 1 OF 7 COMPONENT PARTS A B Canopy Mounting Bracket C Anchor (4) D #10 Wood Screw (4) E F G H Safety Cable Ground Screw Cupped Washer Safety Cable screw I Gripper (2) J Barrel Knob (4) K L Lightbar Fixture
Articulating TV/Monitor Wall Mount Model: WA300S (Butterfly Series)
") P Articulating TV/Monitor Wall Mount Model: WA300S (Butterfly Series) Instruction Manual Images may different from actual product Disclaimer It is Dyconn s intention to have all the correct information
P Articulating TV/Monitor Wall Mount Model: WA300S (Butterfly Series) Instruction Manual Images may different from actual product Disclaimer It is Dyconn s intention to have all the correct information
Joiner Kit For Models N388, C450, E402B, E411T, E415H, E440T, E442B, E521T and E522B
 Joiner Kit For Models N388, C450, E402B, E411T, E415H, E440T, E442B, E521T and E522B KIT COMPONENTS Part Illustration Description Rear Bracket Front Lower Bracket Front Upper Bracket KIT APPLICATION This
Cable Tray Kit: - Cable Tray - Cable Tray Cover - Power Block Support (x2) Top Support Kit: (x2) - 2 Top Supports. Quantities are per bench
 Top Support Kit: (x2) - 2 Top Supports. Quantities are per bench") Parts Included (per back to back bench) Column Kit: (x2) - 1 LH & 1 RH Column - Control Box - Hand Switch Cable Tray Kit: - Cable Tray - Cable Tray Cover - Power Block Support (x2) Depth Support Kit: -
Parts Included (per back to back bench) Column Kit: (x2) - 1 LH & 1 RH Column - Control Box - Hand Switch Cable Tray Kit: - Cable Tray - Cable Tray Cover - Power Block Support (x2) Depth Support Kit: -
Written By: Evan Noronha
 Replace the logic board in an ipad Air LTE. Written By: Evan Noronha ifixit CC BY-NC-SA www.ifixit.com Page 1 of 50 INTRODUCTION Follow the steps in this guide to replace the logic board in an ipad Air
Team Xecuter Joycon Mod By: XxWiReDxX
 Team Xecuter Joycon Mod By: XxWiReDxX Works With Every Switch SX OS Works with every Nintendo Switch and every firmware version! Play Every Game With SX OS you can play all your favorite games straight