Zeiss Axioskop II. The AIF's "routine" light microscope. (Installed 8/24/04)AxioCam installed July 11th 2005
|
|
|
- Jack Fletcher
- 5 years ago
- Views:
Transcription
AxioCam installed July 11th 2005 Featuring: Phase Contrast Darkfield")

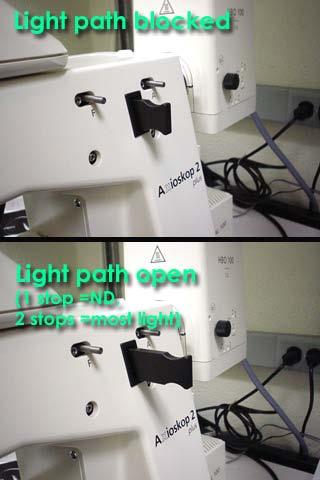
1 Zeiss Axioskop II The AIF's "routine" light microscope. (Installed 8/24/04)AxioCam installed July 11th 2005 Featuring: Phase Contrast Darkfield DIC/Nomarski Brightfield Fluorescent filters for Dapi, FITC,Rhodamine Default Objectives: Available upon request: 2.5x objective 1.25x objective 10x objective 5x objective 25x Oil Lens 20x air objective 40x Oil Lens 63x oil objective 100v Oil Lens
.")

2 Instructions: 1. Turning on the Microscope: 1. SIGN INTO LOGBOOK. 2. Turn on the Mercury Arc Lamp (under the microscope table). THIS MUST BE TURNED ON FIRST. 3. Turn on the transmitted light halogen lamp. 4. Turn on the computer. 5. Select the correct objective for your application. 2. Microscope Configuration:
 D Darkfield I for DIC (10x and less) I/H for Brightfield 2 for Phase 2 (20x, 25x) II for DIC (40x) 3 For Phase 3")
3 1. The fluorescence filter turret has several positions that may be used for different imaging applications. Brightfield - no filters are in the light path DAPI FITC Texas-Red DIC analyzer 2. The condenser turret has multiple positions which may be used: 1 for Phase 1(10x) D Darkfield I for DIC (10x and less) I/H for Brightfield 2 for Phase 2 (20x, 25x) II for DIC (40x) 3 For Phase 3 (63x, 100x) III For DIC (63x, 100x) 3. Be sure not to close the Iris Diaphragm too much, it is a common mistake made by many people. If the Iris is closed too much the resulting images will have greatly reduced resolution. 4. The neutral density filters are on the right side of the microscope and settings include (from front to rear): 1.5% ND (reduces light by 1.5%) 6 % ND 25% ND" Diffusion Filter -Should ALWAYS stay in the light path.


4 5. The transmitted light may be adjusted several ways. The 3200 K setting is bright and should be used to collect a color correct image. Simply, the sample isn't yellowed as it could be with a lower light setting. 3. Using the Microscope: 1. Place the slide on the stage and use oil if the objective is an oil immersion lens only! 2. The condenser lens must be in the light path when using objectives greater than 5x.

5 3. Focus on your sample. 4. When the sample is in focus align the scope for Koehler illumination, the simple 4 step process described here. 5. You are now ready to image using the digital camera. 4. Using the Axiocam and Zeiss Axiovision Software: 1. Log on to USER account. 2. Doubleclick the Axiovision software icon. 3. Click the workflow toolbar icon to display the following bar along the left side of the computer screen.

6 5. Switch beam splitter to camera (100% eyes or camera)


7 6. The camera preview mode has three settings: Slow, Medium and Fast. 7. The fast will allow a video-rate display with very low resolution, whereas the slow setting offers the best resolution (for focusing etc.) Though the slow setting seems to lag behind the actual movement it is suggested that you use it to do your image focusing with it. To change this mode use the pulldown list located near the video camera icon of the preview window. *On the bottom of the image window you must configure the objective magnification. It is extremely important to set this for the objective you are using if you plan on using the Zeiss Software to add a scalebar. If you do not do this your scaling information will be wrong and we'll have no way of determining the scale factor later. 8. Click the "Live" button to start the live preview. 10. Click the "Live Properties" button to display the image properties window. This window has multiple tabs for adjusting various settings: The first and second tabs, Display and Adjust are the most commonly used.


8 Display tab: The display tab should show a straight black line above the RGB histograms, if it is curved it will affect the image display. To set the line properly just click the "Linear" button. Adjust Tab: The Adjust window is used for setting exposure times and white balance. After focusing on the sample it is a good idea to set the exposure time. Click the "Measure" button to do this.
9 To set the white balance, click "Interactive" and then use the eyedropper tool to select a white region on the image. If no white area is present move the field, select the white area and return to your sample. Image Acquisition: Once the exposure time and white balance have been set you only need to focus the specimen and then click the "Snap" button on the left panel. We suggest that you immediately save the image to your user folder which is located within the C:\user-files\ folder. Scales may be applied to the image immediately. Note that these will be "burned" into.tif files and cannot be removed. * Saving and opening files with proper scaling information: The files saved as.tif or.zvi will contain the scaling information which was configured above. The pixel dimensions are also posted on the AIF website. To open.zvi files use either the imagej plugin (doesn't recognize scaling information) or download the free Zeiss Axiovision LE software available at: Frame/cbe917247da02a1cc1256e Shutdown: 1. Save images (CD, USB key chain, Zip) 2. Log off of computer. 3. Turn off Scope and HG lamp*. (*Only if no other users have signed up to use the scope within the proceeding 2 hours or more.) 4. Turn off camera (switch). 6. Using DIC/Nomarski and Polarized Light:


10 1. Align the Prisms 7. Using Fluorescence: 1. Select the correct filter from the turret. 2. Close or turn off the transmitted light, you may use this trick- 3. Open fluorescent light path by moving slider:
11
AxioVision 4.5 Brightfield Image Capture Procedure
 AxioVision 4.5 Brightfield Image Capture Procedure 1. STARTING-UP PROCEDURE: Remove blue dust cover and place on shelf under microscope. Turn on the halogen lamp by pushing the switch at the back right
Nikon E800 Operating Instructions.
 Nikon E800 Operating Instructions. You can request electronic copies of this manual by contacting lshats@jhsph.edu Copies are also available on the JHU MMI Department web site. Please send your comments
Nikon E800 Operating Instructions.
 Nikon E800 Operating Instructions. You can request electronic copies of this manual by contacting imaging@fhcrc.org. Copies are also available on the Scientific Imaging web site. Please send your comments
Zeiss Axiovert 135 Fluorescence Microscope Quick Guide / Operations Manual (v. 1.0 February 09)
") University of Chicago Integrated Light Microscopy Core Dr. Vytas Bindokas, Director http://digital.bsd.uchicago.edu By: Christine Labno, Assistant Director Room: AB-129 Phone: 4-9040 Zeiss Axiovert 135
University of Chicago Integrated Light Microscopy Core Dr. Vytas Bindokas, Director http://digital.bsd.uchicago.edu By: Christine Labno, Assistant Director Room: AB-129 Phone: 4-9040 Zeiss Axiovert 135
Characterization Microscope Nikon LV150
 Characterization Microscope Nikon LV150 Figure 1: Microscope Nikon LV150 Introduction This upright optical microscope is designed for investigating up to 150 mm (6 inch) semiconductor wafers but can also
Nikon E800 Microscope. Operating Instructions
 Nikon E800 Microscope Operating Instructions B Watson 12/2005 Table of contents: 1. The Nikon E800 Microscope 2. Turning the system ON and OFF 3. Selecting the light path 4. Operating in transmitted light
Motorized Axio Observer Start-up instructions
 Start-up instructions 1. If using fluorescence turn on Fluorescent light source. TL light Source (Hal 100) 2. Turn on microscope using switch on lower left side of the microscope. 3. If imaging, turn on
Zeiss Axio Imager.A1 manual
 Zeiss Axio Imager.A1 manual Power-up protocol 1. Mercury lamp 2. Power strip on shelf 3. Computer The Mercury lamp should always be first-on and last-off. This prevents any electrical surges caused by
BX-61: Brightfield Instruction /Continue to scroll for Fluorescent Instuctions
 BX-61: Brightfield Instruction /Continue to scroll for Fluorescent Instuctions Starting up: Schematic of Olympus BX-61. 1. Turn on Olympus microscope power box (left of microscope) with toggle switch on
Widefield-NikonEclipseTE200-ORCA Nikon Eclipse TE200 Inverted Microscope with Hamamatsu 1394 Orca-ER Cooled CCD Camera and Micromanager Software
 Widefield-NikonEclipseTE200-ORCA Nikon Eclipse TE200 Inverted Microscope with Hamamatsu 1394 Orca-ER Cooled CCD Camera and Micromanager Software September 2007 Check website for most current User Guide
Zeiss LSM 880 Protocol
 Zeiss LSM 880 Protocol 1) System Startup Please note put sign-up policy. You must inform the facility at least 24 hours beforehand if you can t come; otherwise, you will receive a charge for unused time.
INSTRUCTIONS FOR COURSE WORK 4 (AxioVert) Instructor: Anne Vaahtokari (MIU) 1. Purpose of the work
 Instructor: Anne Vaahtokari (MIU) 1. Purpose of the work") INSTRUCTIONS FOR COURSE WORK 4 (AxioVert) Instructor: Anne Vaahtokari (MIU) 1. Purpose of the work In this work, you will get familiar with an inverted epifluorescence microscope. Also, you will learn
INSTRUCTIONS FOR COURSE WORK 4 (AxioVert) Instructor: Anne Vaahtokari (MIU) 1. Purpose of the work In this work, you will get familiar with an inverted epifluorescence microscope. Also, you will learn
EPIFLUORESCENCE &/OR BRIGHTFIELD MICROSCOPY
 EPIFLUORESCENCE &/OR BRIGHTFIELD MICROSCOPY TURN ON THE FOLLOWING EQUIPMENT The fluorescent light (if needed) The power strip for the microscope and accessories The CoolSNAP HQ camera on the right (Turn
Using the Nikon TE2000 Inverted Microscope
 Wellcome Trust Centre for Human Genetics Molecular Cytogenetics and Microscopy Core Using the Nikon TE2000 Inverted Microscope Fluorescence image acquisition using Scanalytic s IPLab software and the B&W
SHORT INSTRUCTIONS FOR OPERATING LSM1/2 (Zeiss LSM510) AT CIAN Version 1.4, September 2014
 AT CIAN Version 1.4, September 2014") CIAN LSM1 or LSM2 short instructions, version 1.4, September 2014 page 1 of 6 SHORT INSTRUCTIONS FOR OPERATING LSM1/2 (Zeiss LSM510) AT CIAN Version 1.4, September 2014 Before starting To work with LSM1
CIAN LSM1 or LSM2 short instructions, version 1.4, September 2014 page 1 of 6 SHORT INSTRUCTIONS FOR OPERATING LSM1/2 (Zeiss LSM510) AT CIAN Version 1.4, September 2014 Before starting To work with LSM1
CAPTURING IMAGES ON THE HIGH-MAGNIFICATION MICROSCOPE
 University of Virginia ITC Academic Computing Health Sciences CAPTURING IMAGES ON THE HIGH-MAGNIFICATION MICROSCOPE Introduction The Olympus BH-2 microscope in ACHS s microscope lab has objectives from
Simplified Instructions: Zeiss Brightfield Microscope S1000
 Contents General Microscope Set-Up Adjust Illumination Focus Condenser Open Software Image Capture Settings Shading & Color Corrections Image Capture & Viewing Scaling and Measurements Synopsis of Other
Zeiss AxioImager.Z2 Brightfield Protocol
 Zeiss AxioImager.Z2 Brightfield Protocol 1) System Startup Please note put sign-up policy. You must inform the facility at least 24 hours beforehand if you can t come; otherwise, you will receive a charge
Training Guide for Carl Zeiss AxioZoom V16 Stereo Microscope
 Training Guide for Carl Zeiss AxioZoom V16 Stereo Microscope ZEN 2012 Optical Imaging & Vital Microscopy Core Baylor College of Medicine (2017) Power ON Routine 1 2 If you require fluorescence imaging,
Quick Guide for Zeiss 710 Laser Scanning Confocal MGH Cancer Center
 Quick Guide for Zeiss 710 Laser Scanning Confocal MGH Cancer Center For any questions or concerns, please contact: Linda Nieman lnieman@mgh.harvard.edu Office: (617) 643-9684 Cell: (512) 565-8076 Chenyue
Zeiss Deconvolution Microscope: A Quick Guide
 Zeiss Deconvolution Microscope: A Quick Guide Start-up Uncover microscope. Do not put dust cover on the floor. Plug in both cameras. The default camera is the AxioCam HRm (monochrome camera) for fluorescence
Brightfield Microscopy and Image Acquisition on Spotcam1. by Ryan Taylor/Nancy Kleene Last modified 10/02/05 by Birgit Ehmer
 Brightfield Microscopy and Image Acquisition on Spotcam1 by Ryan Taylor/Nancy Kleene Last modified 10/02/05 by Birgit Ehmer Log onto the computer. Enter your username and password to log onto the server.
Olympus IX71 Microscope and DP71 Camera Instructions
 Olympus IX71 Microscope and DP71 Camera Instructions Microscopy in Medicine (MiM) Core Emory University Department of Medicine 1 Olympus IX71 Image Capture Procedure 2 3 1. STARTING-UP PROCEDURE: Remove
Quick Guide for Zeiss 710 Laser Scanning Confocal MGH Cancer Center
 Quick Guide for Zeiss 710 Laser Scanning Confocal MGH Cancer Center For any questions or concerns, please contact: Linda Nieman lnieman@mgh.harvard.edu Office: (617) 643-9684 Cell: (512) 565-8076 Chenyue
Nikon Eclipse Ti A1-A Confocal Operating Manual. Start-up. Microscope
 Nikon Eclipse Ti A1-A Confocal Operating Manual Start-up 1. Turn on Excite Fluorescent light power supply- metal halide. a. Cool down as for mercury bulb b. Wheel closed liquid light guide 2. Turn on power
Zeiss Axioplan 2 imaging microscope and Axiovision software
 Zeiss Axioplan 2 imaging microscope and Axiovision software Microscopes 1 and 2 in room B501b User Guide Molecular Imaging Unit University of Helsinki www.miu.helsinki.fi 20.5.2010 1 GENERAL... 1 1.1...
Instructions for Making On-Line Reservations for Microscopes in NB11-204
 Instructions for Making On-Line Reservations for Microscopes in NB11-204 1. Log into Mail using Mail.swmed.edu 2. Log in using your university id and password. 3. Click the Calendar Tab at the top right
QUICKSTART GUIDE: WIDEFIELD WF3 Zeiss Cell Observer Live Cell Imaging System (SAF, ROOM 409) Imperial College London
 Imperial College London") Imperial College London Facility for Imaging by Light Microscopy QUICKSTART GUIDE: WIDEFIELD WF3 Zeiss Cell Observer Live Cell Imaging System (SAF, ROOM 409) Observing Life As It Happens Startup procedure...
Imperial College London Facility for Imaging by Light Microscopy QUICKSTART GUIDE: WIDEFIELD WF3 Zeiss Cell Observer Live Cell Imaging System (SAF, ROOM 409) Observing Life As It Happens Startup procedure...
DIC Imaging using Laser Scanning Microscopes (LSMs) on Axio Imager Stands
 on Axio Imager Stands") DIC Imaging using Laser Scanning Microscopes (LSMs) on Axio Imager Stands Differential Interference Contrast (DIC) imaging is a technique used to increase contrast in brightfield images. In confocal systems,
DIC Imaging using Laser Scanning Microscopes (LSMs) on Axio Imager Stands Differential Interference Contrast (DIC) imaging is a technique used to increase contrast in brightfield images. In confocal systems,
Olympus Fluoview 1000S Spectral Confocal Microscope Introduction to the NRI-MCDB Microscopy Facility Spectral Confocal Microscope
 Olympus Fluoview 1000S Spectral Confocal Microscope Introduction to the NRI-MCDB Microscopy Facility Spectral Confocal Microscope Improved Optics More Lasers 405 diode 440 diode 488 Argon 515 Argon 559
Everest System / Slidebook Operating Procedures
 Everest System / Slidebook Operating Procedures NOTICE: This guide is meant to supplement training, not replace it. All users must be trained first hand by a core employee. Training of others in your lab
DIC Imaging using Laser Scanning Microscopes (LSM) on Inverted Stands
 on Inverted Stands") DIC Imaging using Laser Scanning Microscopes (LSM) on Inverted Stands Differential Interference Contrast (DIC) imaging is a technique used to increase contrast in brightfield images. In confocal systems,
DIC Imaging using Laser Scanning Microscopes (LSM) on Inverted Stands Differential Interference Contrast (DIC) imaging is a technique used to increase contrast in brightfield images. In confocal systems,
Zeiss AxioObserver with ApoTome
 Zeiss AxioObserver with ApoTome Quick Start User Guide LSU Health Sciences Center-Shreveport Research Core Facility (RCF) Microscopy Table of Contents 1 Start up the system.. Page 3 2 Touch screen controller
Nikon TE300 Eclipse Wide-Field Microscope
 Nikon TE300 Eclipse Wide-Field Microscope User Guide LSU Health Science Center-Shreveport Research Core Facility 1 User manual for Nikon Elements software Equipment: Nikon TE300 Eclipse microscope Photometrics
Olympus xcellence Software - basic user guide
 Olympus xcellence Software - basic user guide This is a basic overview of setting up time lapse experiments using Olympus's xcellence software on BIU's IX81 inverted phase contrast system - the software
Operating Checklist for using the Laser Scanning Confocal Microscope. Leica TCS SP5.
 Smith College August 2010 Operating Checklist for using the Laser Scanning Confocal Microscope Leica TCS SP5. CONTENT, page no. Startup, 1 Initial set-up, 1 Software, 2 Microscope Specimen observation
Contents STARTUP MICROSCOPE CONTROLS CAMERA CONTROLS SOFTWARE CONTROLS EXPOSURE AND CONTRAST MONOCHROME IMAGE HANDLING
 Operations Guide Contents STARTUP MICROSCOPE CONTROLS CAMERA CONTROLS SOFTWARE CONTROLS EXPOSURE AND CONTRAST MONOCHROME IMAGE HANDLING Nikon Eclipse 90i Operations Guide STARTUP Startup Powering Up Fluorescence
personal DELTAVISION (pdv)
") GUIDELINES AND HINTS Version 1.3 (March 2015) personal DELTAVISION (pdv) Epifluorescence microscope from Applied Precision Inc.: The microscope can be found in room 1.320. For details see the architectural
GUIDELINES AND HINTS Version 1.3 (March 2015) personal DELTAVISION (pdv) Epifluorescence microscope from Applied Precision Inc.: The microscope can be found in room 1.320. For details see the architectural
Quick Start Guide. Leica SP5 X
 Quick Start Guide Leica SP5 X Please note: Some of the information in this guide was taken from Leica Microsystems Leica TCS SP5 LAS AF Guide for New Users. This work is licensed under the Creative Commons
Nikon C1si Spectral Laser Scanning Confocal Microscope. User Guide
 Nikon C1si Spectral Laser Scanning Confocal Microscope User Guide Contents: C1Si Turn-On/ShutDown Procedures... 2 Overview... 4 Setup for epi-illumination to view through the eyepieces:... 5 Setup for
Photography Protocol. Software: ZEN Blue 2012
 Photography Protocol Hardware: Zeiss Axio Imager.A2 or Imager.M2 microscope 10x eye piece 20x / 0.45 dry lens 40x / 0.75 dry lens 63x / 0.95 dry lens 100x / 1.4 oil lens AxioCam MRc camera Software: ZEN
Guide to Confocal 5. Starting session
 Guide to Confocal 5 Remember that when booking and before starting session you can check for any problems at https://www.bris.ac.uk/biochemistry/uobonly/cif/index.html Starting session Switch on microscope
Leica DB LB Research microscope and Studo Lite Imaging software
 Leica DB LB Research microscope and Studo Lite Imaging software Room B523 User Guide Molecular Imaging Unit University of Helsinki www.miu.helsinki.fi 9.4.2008 1 GENERAL USER INFORMATION... 1 2 SETTINGS
2/4/15. Brightfield Microscopy! It s all about Magnification..! or is it?!
 Brightfield Microscopy It s all about Magnification.. or is it? 1 What actually does go into chosing a microscope Choice depends on what you need the microscope to do. Do you want to magnify stained specimens?
OPERATING INSTRUCTIONS
 Zeiss LSM 510 M eta Confocal M icroscope OPERATING INSTRUCTIONS Starting the System: 1. Turn the black knob on the laser box one-quarter turn from Off to On. You will hear the laser cooling mechanisms
Takeoff Guide Tutorial to get started with the AxioVision Imaging System (Based on Release 4.8 June 2009)
") Takeoff Guide Tutorial to get started with the AxioVision Imaging System (Based on Release 4.8 June 2009) This Takeoff Guide has been prepared for Carl Zeiss by Imaging Associates Ltd. www.imas.co.uk Copyright
Takeoff Guide Tutorial to get started with the AxioVision Imaging System (Based on Release 4.8 June 2009) This Takeoff Guide has been prepared for Carl Zeiss by Imaging Associates Ltd. www.imas.co.uk Copyright
Jeol JEM Responsible personell: Endy ( ) Online booking is compulsory!
 Online booking is compulsory!") Jeol JEM 1230 Responsible personell: Endy (45279377) Online booking is compulsory! After training you will have access to working alone on the instrument. All insertion of samples is done by responsible
Jeol JEM 1230 Responsible personell: Endy (45279377) Online booking is compulsory! After training you will have access to working alone on the instrument. All insertion of samples is done by responsible
Ch. 1 - Installation Guidelines
 Ch. 1 - Installation Guidelines Table of Contents Ch. 1 - Installation Guidelines Introduction... 8 The Image-Pro Driver Interface... 8 Installing the SPOT Image-Pro Driver... 8 Image-Pro Driver Supplement
Things to check before start-up.
 Byeong Cha Page 1 11/24/2009 Manual for Leica SP2 Confocal Microscope Enter you name, the date, the time, and the account number in the user log book. Things to check before start-up. Make sure that your
PIXERA InStudio Software Package
 PIXERA InStudio Software Package Background InStudio is a comprehensive imaging capture and manipulation software program from Pixera. It combines the features of the original ViewfinderPro and StudioPro
Nikon Ti-E Microscope Manual. Rightmire Hall Ohio State University. Director: Tony Brown Rightmire
 Nikon Ti-E Microscope Manual Rightmire Hall Ohio State University Director: Tony Brown Rightmire 060 292-1205 brown.2302@osu.edu Facility Manager: Paula Monsma Rightmire 062 293-0939 292-1367 monsma.1@osu.edu
Leica SP8 TCS Users Manual
 Version : 07/08/0 Leica SP8 TCS Users Manual Start up:. Turn the PC Microscope, Scanner Power, Laser Power, and the Laser Emission key to on (bottom right of desk).. Turn on the fluorescent lamp (top left
QUICKSTART GUIDE: WIDEFIELD HWF1 Zeiss Cell Observer Live Cell Imaging System (HAMMERSMITH, L BLOCK, ROOM 314) Imperial College London
 Imperial College London") Imperial College London Facility for Imaging by Light Microscopy QUICKSTART GUIDE: WIDEFIELD HWF1 Zeiss Cell Observer Live Cell Imaging System (HAMMERSMITH, L BLOCK, ROOM 314) Observing Life As It Happens
Imperial College London Facility for Imaging by Light Microscopy QUICKSTART GUIDE: WIDEFIELD HWF1 Zeiss Cell Observer Live Cell Imaging System (HAMMERSMITH, L BLOCK, ROOM 314) Observing Life As It Happens
Training Guide for Carl Zeiss LSM 880 with AiryScan FAST
 Training Guide for Carl Zeiss LSM 880 with AiryScan FAST ZEN 2.3 Optical Imaging & Vital Microscopy Core Baylor College of Medicine (2018) Power ON Routine 1 2 Turn ON Main Switch from the remote control
Zeiss LSM 780 Protocol
 Zeiss LSM 780 Protocol 1) System Startup F Please note the sign-up policy. You must inform the facility at least 24 hours beforehand if you can t come; otherwise, you will receive a charge for unused time.
Training Guide for Carl Zeiss LSM 7 MP Multiphoton Microscope
 Training Guide for Carl Zeiss LSM 7 MP Multiphoton Microscope ZEN 2009 Optical Imaging & Vital Microscopy Core Baylor College of Medicine (2017) Power ON Routine 1 2 Turn Chameleon TiS laser key from Standby
Operation Guide for the Leica SP2 Confocal Microscope Bio-Imaging Facility Hunter College October 2009
 Operation Guide for the Leica SP2 Confocal Microscope Bio-Imaging Facility Hunter College October 2009 Introduction of Fluoresence Confocal Microscopy The first confocal microscope was invented by Princeton
SOP: Polyvar Met Light Microscope
 SOP Polyvar Met Light Microscope Page 1 of 8 SOP: Polyvar Met Light Microscope 1. Scope 1.1 This document describes the standard operating procedure (SOP) for the Polyvar Met Light Microscope. 2. Table
LEICA TCS SP5 AOBS TANDEM USER MANUAL
 LEICA TCS SP5 AOBS TANDEM USER MANUAL STARTING THE SYSTEM...2 THE LAS AF SOFTWARE...3 THE «ACQUIRE» MENU...5 CHOOSE AND CREATE A SETTING...6 THE CONTROL PANEL...8 THE DMI6000B MICROSCOPE...10 ACQUIRE ONE
The following units are required for an ApoTome imaging workstation:
 V VKN fã~öé=^åèìáëáíáçå=jççìäéë= ^éçqçãé= déåéê~ä= The ApoTome software module controls the ApoTome hardware (control box and slider) and coordinated image acquisition using a digital camera, such as the
Leica DMI 4000 tutorial
 Leica DMI 4000 tutorial Before using the Leica DMI 4000, You will need to put down your name on the reservation system = 1 Welcome to the Leica DMI4000 Microscope tutorial How to start up the system (p.3)
Operating Instructions for Zeiss LSM 510
 Operating Instructions for Zeiss LSM 510 Location: GNL 6.312q (BSL3) Questions? Contact: Maxim Ivannikov, maivanni@utmb.edu 1 Attend A Complementary Training Before Using The Microscope All future users
Standard Operating Procedure
 CENTER FOR NANOSCALE SCIENCE AND ENGINEERING Standard Operating Procedure Microscope Software Brian Wajdyk Page 1 of 6 Important Images are not to be saved to the computer. They will be deleted without
START-UP PROCEDURE 1 THE MICROSCOPE STAND 3 OBJECTIVES 5 STARTING WITH LAS (SOFTWARE) AND SETTING UP THE MICROSCOPE STAND 7
 AND SETTING UP THE MICROSCOPE STAND 7") Leica DMI AF6000LX Table of contents START-UP PROCEDURE 1 THE MICROSCOPE STAND 3 OBJECTIVES 5 STARTING WITH LAS (SOFTWARE) AND SETTING UP THE MICROSCOPE STAND 7 ACQUIRE MODULE 6 SETTING THE LIGHTPATH 6
Leica DMI AF6000LX Table of contents START-UP PROCEDURE 1 THE MICROSCOPE STAND 3 OBJECTIVES 5 STARTING WITH LAS (SOFTWARE) AND SETTING UP THE MICROSCOPE STAND 7 ACQUIRE MODULE 6 SETTING THE LIGHTPATH 6
LSM 510 Training Notes
 LSM 510 Training Notes Turning on the system Turn on the arc lamp, found on the bench top left of the microscope. This supplies light for epifluorescence for viewing your samples through the microscope.
SHORT GUIDE TO LASER MICRODISSECTION USING THE PALM COMBI SYSTEM
 SHORT GUIDE TO LASER MICRODISSECTION USING THE PALM COMBI SYSTEM Turning ON the PALM DuoFlex Combi system 1. Turn on the three power point switches on the wall. From right to left: mercury lamp, microscope
LSM 510 Meta Training Notes
 LSM 510 Meta Training Notes Turning on the system Turn on X-Cite power supply. This supplies light for epifluorescence for viewing your samples through the microscope. Turn on the remote control switch.
Leica TCS SP8 Quick Start Guide
 Leica TCS SP8 Quick Start Guide Leica TCS SP8 System Overview Start-Up Procedure 1. Turn on the CTR Control Box, EL6000 fluorescent light source for the microscope stand. 2. Turn on the Scanner Power
b. Turn the power switch and key to on position for blue laser.
 OLYMPUS FLUOVIEW 300 CONFOCAL MICOSCOPE OPERATION PROCEDURE 1. Turn ON microscope in this order: 1) Turn on mercury lamp (Note: once the mercury lamp is turned off, DO NOT turn it back on for at least
ZEISS LSM 710 CONFOCAL MICROSCOPE USER MANUAL
 ZEISS LSM 710 CONFOCAL MICROSCOPE USER MANUAL START THE SYSTEM... 2 START ZEN SOFTWARE... 3 SET THE TEMPERATURE AND THE CO2 CONTROLLERS... OBSERVATION AT OCULARS... 5 STATIF PRESENTATION... 6 ACQUIRE ONE
Leica SP8 TCS Users Manual
 Leica SP8 TCS Users Manual Follow the procedure for start up and log on as posted in the lab. Please log on with your account only and do not share your password with anyone. We track and confirm usage
User manual for Nikon Elements software
 User manual for Nikon Elements software Equipment: Nikon TE300 Eclipse microscope ANDOR Neo/Zyla B&W camera (default) DS Fi2 color camera Sign in on the sign in sheet; please use both your given name and
Very short introduction to light microscopy and digital imaging
 Very short introduction to light microscopy and digital imaging Hernan G. Garcia August 1, 2005 1 Light Microscopy Basics In this section we will briefly describe the basic principles of operation and
Proudly serving laboratories worldwide since 1979 SPECIFICATIONS
 www.ietltd.com Proudly serving laboratories worldwide since 1979 SPECIFICATIONS Scan RDI Specifications System Components Main analytical console Laser Module CRT Printer Data Manager Motorized stage (option)
Zeiss LSM 510 Confocor III Training Notes. Center for Cell Analysis & Modeling
 Zeiss LSM 510 Confocor III Training Notes Center for Cell Analysis & Modeling Confocor 3 Start Up Go to System Module Turn on Main Switch, System/ PC, and Components Switches Do you need the arc lamp?
Confocal 510 Tutorial
 Confocal 510 Tutorial You will have to log on in order to use the microscope. You will be charged according the time you are logged in, so please don t forget to log out after you are done. If you don
Dante (Microscope) & Beatrice (Guide) Orth Lab
 & Beatrice (Guide) Orth Lab") Dante (Microscope) & Beatrice (Guide) Orth Lab Olympus IX81 Widefield Microscope User Guide v. 1.2 (11/2014) Objectives 4x/0.13NA UPLFLN Semi Apo 10x/0.4NA PH UPLAPO Plan Apo 20x/0.8NA PH UPLAPO Plan Apo
Dante (Microscope) & Beatrice (Guide) Orth Lab Olympus IX81 Widefield Microscope User Guide v. 1.2 (11/2014) Objectives 4x/0.13NA UPLFLN Semi Apo 10x/0.4NA PH UPLAPO Plan Apo 20x/0.8NA PH UPLAPO Plan Apo
Widefield 1. Switching on
 Widefield 1 Switching on 1. Ignite DG5 lamp - must be switched on first (if previous user has switched off, wait 30 min before igniting) 2. Wait 5s and then turn on the main DG5 controller switch. 3. DG5
MIF ZEISS VIOLET CONFOCAL ZEN 2009 PROTOCOL
 MIF ZEISS VIOLET CONFOCAL ZEN 2009 PROTOCOL START-UP On the Switchbox, turn both black switches to the ON position. Wait for the microscope to boot up completely (watch the screen on the side of the microscope).
Leica TCS SL Confocal Training. Neuroscience Imaging Core Staff. Core Director. Facility Manager
 Leica TCS SL Confocal Training Neuroscience Imaging Facility The Ohio State University Rightmire Hall 614-292-1367 Staff Core Director Anthony Brown, Ph. D. 060 Rightmire Hall 614-292-1205 brown.2302@osu.edu
Imaging Introduction. September 24, 2010
 Imaging Introduction September 24, 2010 What is a microscope? Merriam-Webster: an optical instrument consisting of a lens or combination of lenses for making enlarged images of minute objects; especially:
AxioVision User's Guide. Release 4.1
 AxioVision User's Guide Release 4.1 Number of this manual: B 48-0038 e 10.2003 Date of issue: 10.2003 Carl Zeiss Vision draws the User's attention to the fact that the information and references contained
Quick Guide. LSM 5 MP, LSM 510 and LSM 510 META. Laser Scanning Microscopes. We make it visible. M i c r o s c o p y f r o m C a r l Z e i s s
 LSM 5 MP, LSM 510 and LSM 510 META M i c r o s c o p y f r o m C a r l Z e i s s Quick Guide Laser Scanning Microscopes LSM Software ZEN 2007 August 2007 We make it visible. Contents Page Contents... 1
Using the AmScope Microscope Cameras
 Using the AmScope Microscope Cameras Part 1 Setup. In order to use the camera, you will need: a) the camera system; b) a computer running the camera software. The camera system is contained in a Pelican
Microscope Confocal LSM510 META
 Microscope Confocal LSM510 META Welcome to the Zeiss LSM 510 Meta Confocal tutorial. Before using the LSM 510 META, Log off any other computer that is open with your personal login. You will need to put
TRAINING MANUAL. Olympus FV1000
 TRAINING MANUAL Olympus FV1000 September 2014 TABLE OF CONTENTS A. Start-Up Procedure... 1 B. Visual Observation under the Microscope... 1 C. Image Acquisition... 4 A brief Overview of the Settings...
MetaMorph Imaging Handbook Update 6/4/13
 MetaMorph Imaging Handbook Update 6/4/13 Startup FIRST turn on mercury lamp (Fluorescence) Computer and monitor Qimaging Camera (on top) Uniblitz Shutters-2 Halogen Lamp (Transmitted Light) Computer Login
LSM 710 Confocal Microscope Standard Operation Protocol
 LSM 710 Confocal Microscope Standard Operation Protocol Basic Operation Turning on the system 1. Switch on Main power switch 2. Switch on System / PC power button 3. Switch on Components power button 4.
Nasmyth Ultraview Vox User Protocol
 Nasmyth Ultraview Vox User Protocol Switch on all wall sockets labelled Nasmyth, switch camera on (power supply located on table behind monitor), switch on laser switch in laser rack, switch computer on
Leica Confocal - 2. Instructions for Leica SP2 Confocal Equipped with Visible Laser Lines
 Leica Confocal - 2 Instructions for Leica SP2 Confocal Equipped with Visible Laser Lines Imaging Technology Group Revised as of 08/2011 by Dianwen Zhang (Email: zhangdw@illinois.edu) Revision History Authors
BRIGHTFIELD Olympus TH4-200 Olympus TH4-200 Please keep objectives off touching to avoid their loosening or damage.
 BRIGHTFIELD 1. Remove the microscope cover. 2. Dial the brightness adjustment knob (1) of Olympus TH4-200 halogen light source down to MIN. 3. Turn on the Olympus TH4-200 halogen light switch for transmitted
ZEISS LSM510META confocal manual
 ZEISS LSM510META confocal manual Switching on the system 1) Switch on the Remote Control button located on the table to the right of the microscope. This is the main switch for the whole system including
Image-Pro Plus 7.0 Product Note
 Image-Pro Plus 7.0 Product Note Automated Microscope Configuration Introduction Cameras, software, shutters, stages, objectives, filters, turrets there are a lot of components in an automated microscopy
Nikon. King s College London. Imaging Centre. N-SIM guide NIKON IMAGING KING S COLLEGE LONDON
 N-SIM guide NIKON IMAGING CENTRE @ KING S COLLEGE LONDON Starting-up / Shut-down The NSIM hardware is calibrated after system warm-up occurs. It is recommended that you turn-on the system for at least
MAKE SURE YOUR SLIDES ARE CLEAN (TOP & BOTTOM) BEFORE LOADING DO NOT LOAD SLIDES DURING SOFTWARE INITIALIZATION
 BEFORE LOADING DO NOT LOAD SLIDES DURING SOFTWARE INITIALIZATION") Olympus VS120-L100 Slide Scanner Standard Operating Procedure Startup 1) Red power bar switch (behind monitor) 2) Computer 3) Login: UserVS120 account (no password) 4) Double click: WAIT FOR INITIALIZATION
Olympus VS120-L100 Slide Scanner Standard Operating Procedure Startup 1) Red power bar switch (behind monitor) 2) Computer 3) Login: UserVS120 account (no password) 4) Double click: WAIT FOR INITIALIZATION
Microscopy from Carl Zeiss
 Microscopy from Carl Zeiss Contents Page Contents... 1 Introduction... 1 Starting the System... 2 Introduction to ZEN Efficient Navigation... 5 Setting up the microscope... 10 Configuring the beam path
Adobe Studio on Adobe Photoshop CS2 Enhance scientific and medical images. 2 Hide the original layer.
 1 Adobe Studio on Adobe Photoshop CS2 Light, shadow and detail interact in wild and mysterious ways in microscopic photography, posing special challenges for the researcher and educator. With Adobe Photoshop
Cell Biology and Bioimaging Core
 Cell Biology and Bioimaging Core Leica TCS SP5 Operating Instructions Starting up the instrument 1. First, log in the log book located on the confocal desk. Include your name, your lab s PI, an account
Standard Operating Procedure (SOP) for Shared Equipment: Spinning Disk Confocal Microscope
 for Shared Equipment: Spinning Disk Confocal Microscope") Standard Operating Procedure (SOP) for Shared Equipment: Spinning Disk Confocal Microscope This document is to be used as a supplementary guide and not as a replacement for formal training. DO NOT operate
Standard Operating Procedure (SOP) for Shared Equipment: Spinning Disk Confocal Microscope This document is to be used as a supplementary guide and not as a replacement for formal training. DO NOT operate
Reichert Univar Manual
 Reichert Univar Manual Translated from the 11/1975 German language edition, with slight modifications. William R. Porter San Marcos CA USA 2017 v 1.3 Notes This is a very slightly-modified, new (2017)