Each of the three aspects of the triangle relate to light and how it enters and interacts with the camera.
|
|
|
- Ethelbert Weaver
- 6 years ago
- Views:
Transcription
1 Learning about Exposure - The Exposure Triangle Bryan Peterson has written a book titled Understanding Exposure which is worth a read if you re wanting to venture out of the Auto mode on your digital camera and experiment with it s manual settings. In it Bryan illustrates the three main elements that need to be considered when playing around with exposure by calling them the exposure triangle. Each of the three aspects of the triangle relate to light and how it enters and interacts with the camera. The three elements are: 1. ISO - the measure of a digital camera sensor s sensitivity to light 2. Aperture - the size of the opening in the lens when a picture is taken 3. Shutter Speed - the amount of time that the shutter is open Is is at the intersection of these three elements that an image s exposure is worked out. Most importantly - a change in one of the elements will impact the others. This means that you can never really isolate just one of the elements alone but always need to have the others in the back of your mind. Some metaphors for understanding the digital photography exposure triangle: Many people describe the relationship between ISO, Aperture and Shutter Speed using different metaphors to help us get our heads around it. Let me share a couple. A quick word of warning first though - like most metaphors - these are far from perfect and are just for illustrative purposes:


2 The Window Imagine your camera is like a window with shutters that open and close. Aperture is the size of the window. If it s bigger more light gets through and the room is brighter. Shutter Speed is the amount of time that the shutters of the window are open. The longer you leave them open the more that comes in. Now imagine that you re inside the room and are wearing sunglasses (hopefully this isn t too much of a stretch). Your eyes become desensitized to the light that comes in (it s like a low ISO). There are a number of ways of increasing the amount of light in the room (or at least how much it seems that there is. You could increase the time that the shutters are open (decrease shutter speed), you could increase the size of the window (increase aperture) or you could take off your sunglasses (make the ISO larger). Ok - it s not the perfect illustration - but you get the idea.
3 Sunbaking Another way that a friend recently shared with me is to think about digital camera exposure as being like getting a sun tan. Now getting a suntan is something I always wanted growing up - but unfortunately being very fair skinned it was something that I never really achieved. All I did was get burnt when I went out into the sun. In a sense your skin type is like an ISO rating. Some people are more sensitive to the sun than others. Shutter speed in this metaphor is like the length of time you spend out in the sun. The longer you spend in the sun the increased chances of you getting a tan (of course spending too long in the sun can mean being over exposed). Aperture is like sunscreen which you apply to your skin. Sunscreen blocks the sun at different rates depending upon it s strength. Apply a high strength sunscreen and you decrease the amount of sunlight that gets through - and as a result even a person with highly sensitive skin can spend more time in the sun (ie decrease the Aperture and you can slow down shutter speed and/or decrease ISO). As I ve said - neither metaphor is perfect but both illustrate the interconnectedness of shutter speed, aperture and ISO on your digital camera. NB: A third metaphor that I ve heard used is the Garden Hose (the width of the hose is aperture, the length that the hose is left on is shutter speed and the pressure of the water (the speed it gets through) is ISO. Bringing It All Together Mastering the art of exposure is something that takes a lot of practice. In many ways it s a juggling act and even the most experienced photographers experiment and tweak their settings as they go. Keep in mind that changing each element not only impacts the exposure of the image but each one also has an impact upon other aspects of it (ie changing aperture changes depth of field, changing ISO changes the graininess of a shot and changing shutter speed impacts how motion is captured). The great thing about digital cameras is that they are the ideal testing bed for learning about exposure. You can take as many shots as you like at no cost and they not only allow you to shoot in Auto mode and Manual mode - but also generally have semi-automatic modes like aperture priority and shutter priority modes which allow you to make decisions about one or two elements of the triangle and let the camera handle the other elements.
4 A lot more can be said about each of the three elements in the exposure triangle. I ve already written a post on ISO and in the coming week or so will tackle both shutter speed and aperture in greater depth. ISO Settings in Digital Photography Grant (a reader of DPS) asks - I m confused about ISO. What is the best setting to choose? Should I always choose the lowest one? Thanks for the question Grant. Before I attempt to answer it let me give a quick definition of ISO: What is ISO? In traditional (film) photography ISO (or ASA) was the indication of how sensitive a film was to light. It was measured in numbers (you ve probably seen them on films - 100, 200, 400, 800 etc). The lower the number the lower the sensitivity of the film and the finer the grain in the shots you re taking. In Digital Photography ISO measures the sensitivity of the image sensor. The same principles apply as in film photography - the lower the number the less sensitive your camera is to light and the finer the grain. Higher ISO settings are generally used in darker situations to get faster shutter speeds (for example an indoor sports event when you want to freeze the action in lower light) - however the cost is noisier shots. I ll illustrate this below with two elargements of shots that I just took - the one on the left is taken at 100 ISO and the one of the right at 3200 ISO (click to enlarge to see the full effect).

5 (you can see larger sized images of both shots here for the 100 ISO and here for the 3200 ISO) 100 ISO is generally accepted as normal and will give you lovely crisp shots (little noise/grain). Most people tend to keep their digital cameras in Auto Mode where the camera selects the appropriate ISO setting depending upon the conditions you re shooting in (it will try to keep it as low as possible) but most cameras also give you the opportunity to select your own ISO also. When you do override your camera and choose a specific ISO you ll notice that it impacts the aperture and shutter speed needed for a well exposed shot. For example - if you bumped your ISO up from 100 to 400 you ll notice that you can shoot at higher shutter speeds and/or smaller apertures. When choosing the ISO setting I generally ask myself the following four questions: 1. Light - Is the subject well lit? 2. Grain - Do I want a grainy shot or one without noise? 3. Tripod - Am I use a tripod?
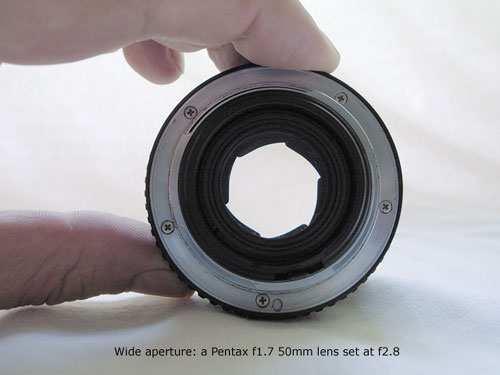
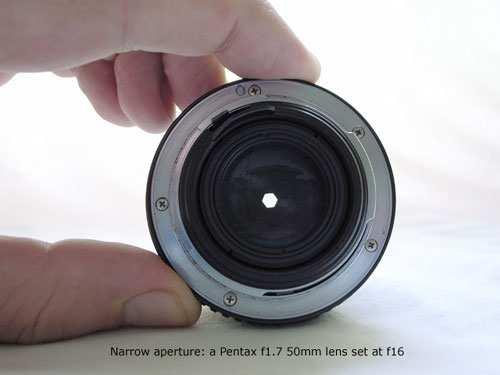
6 4. Moving Subject - Is my subject moving or stationary? If there is plenty of light, I want little grain, I m using a tripod and my subject is stationary I will generally use a pretty low ISO rating. However if it s dark, I purposely want grain, I don t have a tripod and/or my subject is moving I might consider increasing the ISO as it will enable me to shoot with a faster shutter speed and still expose the shot well. Of course the trade off of this increase in ISO will be noisier shots. Situations where you might need to push ISO to higher settings include: Indoor Sports Events - where your subject is moving fast yet you may have limited light available. Concerts - also low in light and often no-flash zones Art Galleries, Churches etc- many galleries have rules against using a flash and of course being indoors are not well lit. Birthday Parties - blowing out the candles in a dark room can give you a nice moody shot which would be ruined by a bright flash. Increasing the ISO can help capture the scene. ISO is an important aspect of digital photography to have an understanding of if you want to gain more control of your digital camera. Experiment with different settings and how they impact your images today. What is Aperture? Put most simply - Aperture is the size of the opening in the lens when a picture is taken. When you hit the shutter release button of your camera a hole opens up that allows your cameras image sensor to catch a glimpse of the scene you re wanting to capture. The aperture that you set impacts the size of that hole. The larger the hole the more light that gets in - the smaller the hole the less light. Aperture is measured in f-stops. You ll often see them referred to here at Digital Photography School as f/number - for example f/2.8, f/4, f/5.6,f/8,f/22 etc. Moving from one f-stop to the next doubles or halves the size of the amount of opening in your lens (and the amount of light getting through). Keep in mind that a change in shutter speed from one stop to the next doubles or halves the amount of light that
7 gets in also - this means if you increase one and decrease the other you let the same amount of light in - very handy to keep in mind). One thing that causes a lot of new photographers confusion is that large apertures (where lots of light gets through) are given f/stop smaller numbers and smaller apertures (where less light gets through) have larger f-stop numbers. So f/2.8 is in fact a much larger aperture than f/22. It seems the wrong way around when you first hear it but you ll get the hang of it. Depth of Field and Aperture There are a number of results of changing the aperture of your shots that you ll want to keep in mind as you consider your setting but the most noticeable one will be the depth of field that your shot will have. Depth of Field (DOF) is that amount of your shot that will be in focus. Large depth of field means that most of your image will be in focus whether it s close to your camera or far away (like the picture to the left where both the foreground and background are largely in focus - taken with an aperture of f/22). Small (or shallow) depth of field means that only part of the image will be in focus and the rest will be fuzzy (like in the flower at the top of this post (click to enlarge). You ll see in it that the tip of the yellow stems are in focus but even though they are only 1cm or so behind them that the petals are out of focus. This is a very shallow depth of field and was taken with an aperture of f/4.5). Aperture has a big impact upon depth of field. Large aperture (remember it s a smaller number) will decrease depth of field while small aperture (larger numbers) will give you larger depth of field.


8 It can be a little confusing at first but the way I remember it is that small numbers mean small DOF and large numbers mean large DOF. Let me illustrate this with two pictures I took earlier this week in my garden of two flowers. The first picture below (click them to enlarge) on the left was taken with an aperture of f/22 and the second one was taken with an aperture of f/2.8. The difference is quite obvious. The f/22 picture has both the flower and the bud in focus and you re able to make out the shape of the fence and leaves in the background. The f/2.8 shot (2nd one) has the left flower in focus (or parts of it) but the depth of field is very shallow and the background is thrown out of focus and the bud to the right of the flower is also less in focus due to it being slightly further away from the camera when the shot was taken. The best way to get your head around aperture is to get your camera out and do some experimenting. Go outside and find a spot where you ve got items close to you as well as far away and take a series of shots with different aperture settings from the smallest setting to the largest. You ll quickly see the impact that it can have and the usefulness of being able to control aperture. Some styles of photography require large depths of field (and small Apertures) For example in most landscape photography you ll see small aperture settings (large numbers) selected by photographers. This ensures that from the foreground to the horizon is relatively in focus. On the other hand in portrait photography it can be very handy to have your subject perfectly in focus but to have a nice blurry background in order to ensure
9 that your subject is the main focal point and that other elements in the shot are not distracting. In this case you d choose a large aperture (small number) to ensure a shallow depth of field. Macro photographers tend to be big users of large apertures to ensure that the element of their subject that they are focusing in on totally captures the attention of the viewer of their images while the rest of the image is completely thrown out of focus. The following guest tip on The Beauty Of Large Aperture In Digital Photography was submitted by Amy Renfrey - author of the Digital Photography Success ebook. In digital photography there is one thing that, for crisp images, you simply must know about. And that s the proper use of your aperture. When you use your aperture the right way in your digital photography you can really influence a lot of creative factors. What I am about to tell you will help your digital photography a lot, because you ll be discovering a professional digital photography technique. In digital photography there are measurements of light control called ISO, Shutter speed, E/V and Aperture. The most important thing to start with in digital photography is to get your head around aperture and how it controls many creative aspects of digital photography. As you know digital photography images depend on just the right amount of light falling on to the sensor. An aperture, measured in F stops, is a crucial aspect to how much light the camera gets. A large aperture allows a lot more light to fall onto the sensor, and when this happens you have the freedom of using a faster shutter speed. This is especially handy in situations of low light and fast movement, such as indoor sports or a water fall at the end of the day. That s why larger apertures and fast action shots indoors need to go hand in hand. By widening your aperture you have a better chance of the movement being frozen in time and the camera won t have time to think about camera shake. If done right, you ll find good sharp images of freeze frame shots without any blur at all. In your digital photography you should also know that also a large aperture can give you a crisp depth of field. It gives you the opportunity to have your background out of focus giving you clearer focus for the subject close up. (You should always use macro lenses for very short depth of field because you get more clarity and sharpness. You can get in closer too, without the subject blurring as it would have without the macro lens.) Portrait photography works well this way.
10 On the other hand, a small aperture in your digital photography gives you the opportunity to get a slower shutter speed because once light is reduced onto the sensor, the shutter speed will respond. A smaller aperture in digital photography increases the depth of field because it influences the focal length. When you have an increased depth of field you will notice much sharper images in long distance shots such as landscapes and cityscapes. So if you are having any challenges with lighting and movement then try this digital photography tip! When taking a photograph, there are really only three controls that matter on a camera: focus, shutter speed and aperture. Focus is reasonably obvious; you can quickly spot when a picture is out of focus. Likewise shutter speed is easy to understand since it is measured in fractions of a second. However aperture is a mystery to most people, because it is usually explained using technical jargon and its effects are not immediately obvious. In this tutorial I ll attempt to explain how changing the aperture affects how your photograph will look, and how you can use those effects creatively to take better pictures. The aperture is literally that a hole through which light passes after it enters the lens. The size of this hole can be altered, allowing a greater or smaller amount of light to pass through.
11
12 Aperture is used in conjunction with shutter speed to control exposure, as explained in last month s tutorial. However it is also the primary means of controlling something called depth of field. If you take a photo of someone at a range of about three metres with a normal automatic compact camera, in good light with the lens zoomed in about half way, you ll usually find that objects about 1.5m in front of the subject, and for about four or five metres behind the subject, also appear sharp. This distance, from the closest point of acceptable sharpness to the most distant, is the depth of field. By altering the size of the aperture, we can control the size of this depth of field, either reducing it so that only our subject is in focus, or expanding it so that an entire landscape can appear sharp. If you have an older camera lying about, take a look at the lens. It should have a movable ring for controlling the aperture setting, labelled with numbers from about F2 to F22. It will also have a ring for adjusting the focus distance, usually calibrated in feet and metres. Alongside that scale, you ll usually find lines marked with the same numbers as the aperture ring, but in pairs either side of the distance indicator mark, with the larger F-numbers toward the outside. This is done to help estimate the depth of field at a particular distance and aperture setting; on the distance scale everything between the two lines for a given aperture setting will be acceptably sharp. Unfortunately this feature is missing from most modern auto-focus, auto-aperture lenses.

13 Explaining exactly why changing the size of the aperture alters the depth of field is going to get a little bit technical, but I ve always found that it s a lot easier to understand and remember something if you know how it works. Don t worry, I m not going to go into the maths here, but I am going to inflict a couple of diagrams on you.
14 This is a highly simplified diagram of the arrangement of lens, aperture and sensor inside your camera. In this first diagram, our subjects are the three spots, red, green and blue, which are at different distances from the camera. The camera lens is focused on the green spot, which means that light from the green spot passes through the aperture and the lens and is focused on the CCD. Light from the red and blue spots also passes through the aperture and lens, but light from the red spot focuses a short distance in front of the CCD, while light from the blue spot would focus a short distance behind it. The light from these other spots still hits the CCD, but due to light scattering it is unfocused and spread over a wide area. What this means is that the red and blue spots will appear as large blurred spots on the final image, while the green spot will be sharp and in focus. The size of the blurred area of the red and blue spots is called the circle of confusion.
15 In this diagram we have the same setup, and the coloured spots are the same distance from the lens, but this time the aperture has been reduced to just a small hole. Again the lens is focused on the green spot, and the red and blue spots are out of focus. However the narrow aperture restricts the light scattering and the relative angles of the light paths, and as a result the circles of confusion are much smaller. This makes the red and blue spots in the final image appear much sharper. They are still out of focus, but the effect is not so noticeable. To make circles of confusion as large as in the first image, the red and blue spots would have to be much further away from the green one. The easiest way to demonstrate the effect of changing depth of field is with some example shots. For some reason I ve never been able to explain, every photography textbook I ve ever read, and even my university lecturer, used photos of a row of chess pieces to illustrate this, so just to be different I m going to use my favourite model cars.
16 This shot was taken using a medium telephoto lens set on a focal length of 43mm, and the front of the Aston Martin DB5 (the silver one in the middle), the point on which the camera is focused, is approximately one metre from the camera. The aperture is set to f4, which is the maximum for this lens, producing the smallest possible depth of field. As you can see only the right front wing of the Aston Martin and the back of the Lotus Esprit (the red one at the front) are in focus. The depth of field for this shot is about 10cm.
17 By reducing the aperture by two stops to f8, the depth of field is slightly increased, to about 20cm. Now the lettering on the Lotus tyres is readable, although the classic 1937 Jaguar SS100 (the green one) is still very blurred.

18 Reducing the aperture to its smallest setting of f22 maximises the depth of field. In this shot everything looks sharp. You can even read the number plate on the Jaguar. There are several situations where controlling depth of field is important. The most common is portrait photography. As I mentioned at the start, portraits shot on an automatic camera using a medium aperture usually have a lot of sharp foreground and background detail, which can distract attention away from the main subject.

19 As you can see in this shot, which was taken using an aperture of f22, the model is in focus, but so is the background, which unfortunately makes it look like she has a tree growing out of the top of head.

20 By increasing the aperture to f5.6, we can make sure that only the subject is in focus. A blurred background is much less distracting, and the distance between the subject and the background is far more apparent. Another situation in which depth of field is an important issue is landscape photography. Here it is often important to get the maximum depth of field possible, so it is usual to use the smallest possible aperture. This shot was taken using and aperture of f22, to ensure that both the foreground and distant background are in focus.
 have much greater depth of field than longer focal lengths.")
21 Focal length and depth of field The focal length of your lens, in other words how much you zoom in on your subject, also has a large effect on depth of field. Generally short focal lengths (wide-angle settings) have much greater depth of field than longer focal lengths. This is one reason why, when taking a portrait shot, it s a good idea to step back a bit and zoom in rather than using a wide angle lens up close. I ll cover this in more depth in my next tutorial.

22 Hyperfocal distance This is a specialised technique of landscape photography which involves manually focusing the camera to the closest point where the depth of field makes everything in the shot sharp. Again, I ll cover this topic in more detail in a future tutorial. Introduction to Shutter Speed in Digital Photography Previously I ve introduced the concept of the Exposure Triangle as a way of thinking about getting out of Auto Mode and exploring the idea of manually adjusting the exposure of your shots. The three main areas that you can adjust are ISO, Aperture and Shutter speed. I ve previously looked at making adjustments to ISO and now want to turn our attention to shutter speed. What is Shutter Speed? As I ve written elsewhere, defined most basically - shutter speed is the amount of time that the shutter is open. In film photography it was the length of time that the film was exposed to the scene you re photographing and similarly in digital photography shutter speed is the length of time that your image sensor sees the scene you re attempting to capture. Let me attempt to break down the topic into some bite sized pieces that should help digital camera owners trying to get their head around shutter speed:

23 Shutter speed is measured in seconds - or in most cases fractions of seconds. The bigger the denominator the faster the speed (ie 1/1000 is much faster than 1/30). In most cases you ll probably be using shutter speeds of 1/60th of a second or faster. This is because anything slower than this is very difficult to use without getting camera shake. Camera shake is when your camera is moving while the shutter is open and results in blur in your photos. If you re using a slow shutter speed (anything slower than 1/60) you will need to either use a tripod or some some type of image stabilization (more and more cameras are coming with this built in). Shutter speeds available to you on your camera will usually double (approximately) with each setting. As a result you ll usually have the options for the following shutter speeds - 1/500, 1/250, 1/125, 1/60, 1/30, 1/15, 1/8 etc. This doubling is handy to keep in mind as aperture settings also double the amount of light that is let in - as a result increasing shutter speed by one stop and decreasing aperture by one stop should give you similar exposure levels (but we ll talk more about this in a future post). Some cameras also give you the option for very slow shutter speeds that are not fractions of seconds but are measured in seconds (for example 1 second, 10 seconds, 30 seconds etc). These are used in very low light situations, when you re going after special effects and/or when you re trying to capture a lot of movement in a shot). Some cameras also give you the option to shoot in B (or Bulb ) mode. Bulb mode lets you keep the shutter open for as long as you hold it down.
 or letting the moving object intentionally blur (giving it a sense of movement).")
24 When considering what shutter speed to use in an image you should always ask yourself whether anything in your scene is moving and how you d like to capture that movement. If there is movement in your scene you have the choice of either freezing the movement (so it looks still) or letting the moving object intentionally blur (giving it a sense of movement). To freeze movement in an image (like in the surfing shot above) you ll want to choose a faster shutter speed and to let the movement blur you ll want to choose a slower shutter speed. The actual speeds you should choose will vary depending upon the speed of the subject in your shot and how much you want it to be blurred. Motion is not always bad - I spoke to one digital camera owner last week who told me that he always used fast shutter speeds and couldn t understand why anyone would want motion in their images. There are times when motion is good. For example when you re taking a photo of a waterfall and want to show how fast the water is flowing, or when you re taking a shot of a racing car and want to give it a feeling of speed, or when you re taking a shot of a star scape and want to show how the stars move over a longer period of time etc. In all of these instances choosing a longer shutter speed will be the way to go. However in all of these cases you need to use a tripod or you ll run the risk of ruining the shots by adding camera movement (a different type of blur than motion blur). Focal Length and Shutter Speed - another thing to consider when choosing shutter speed is the focal length of the lens you re using. Longer focal lengths will accentuate the amount of camera shake you have and so you ll need to choose a faster shutter speed (unless you have image stabilization in your lens or camera). The rule of thumb to use with focal length in non image stabilized situations) is to choose a shutter speed with a denominator that is larger than the focal length of the lens. For example if you have a lens that is 50mm 1/60th is probably ok but if you have a 200mm lens you ll probably want to shoot at around 1/250.
25 Bringing it Together - Remember that thinking about Shutter Speed in isolation from the other two elements of the Exposure Triangle (aperture and ISO) is not really a good idea. As you change shutter speed you ll need to change one or both of the other elements to compensate for it. For example if you speed up your shutter speed one stop (for example from 1/125th to 1/250th) you re effectively letting half as much light into your camera. To compensate for this you ll probably need to increase your aperture one stop (for example from f16 to f11). The other alternative would be to choose a faster ISO rating (you might want to move from ISO 100 to ISO 400 for example).
PHOTOGRAPHY Mohamed Nuzrath [MBCS]
![PHOTOGRAPHY Mohamed Nuzrath [MBCS]](/thumbs/80/82228500.jpg "PHOTOGRAPHY Mohamed Nuzrath [MBCS]") PHOTOGRAPHY Mohamed Nuzrath [MBCS] Coordinator HND IT / Senior Lecturer IT BCAS Kandy Campus Freelance Photographer Freelance Web/Software Developer PHOTOGRAPHY PHOTO - Light GRAPHY Drawing PHOTOGRAPHY
PHOTOGRAPHY Mohamed Nuzrath [MBCS] Coordinator HND IT / Senior Lecturer IT BCAS Kandy Campus Freelance Photographer Freelance Web/Software Developer PHOTOGRAPHY PHOTO - Light GRAPHY Drawing PHOTOGRAPHY
An Introduction to. Photographic Exposure: Aperture, ISO and Shutter Speed
 An Introduction to Photographic Exposure: Aperture, ISO and Shutter Speed EXPOSURE Exposure relates to light and how it enters and interacts with the camera. Too much light Too little light EXPOSURE The
Beyond the Basic Camera Settings
 Beyond the Basic Camera Settings ISO: the measure of a digital camera s sensitivity to light APERTURE: the size of the opening in the lens when a picture is taken SHUTTER SPEED: the amount of time that
Mastering Y our Your Digital Camera
 Mastering Your Digital Camera The Exposure Triangle The ISO setting on your camera defines how sensitive it is to light. Normally ISO 100 is the least sensitive setting on your camera and as the ISO numbers
Moving Beyond Automatic Mode
 Moving Beyond Automatic Mode When most people start digital photography, they almost always leave the camera on Automatic Mode This makes all the decisions for them and they believe this will give the
About Me. Randolph Community College Two year degree in Portrait and Studio Management Portraits, Wedding, Events Landscapes with boats - favorite
 About Me Randolph Community College Two year degree in Portrait and Studio Management Portraits, Wedding, Events Landscapes with boats - favorite Things Forgotten Check camera settings before each session
Camera Triage. Portrait Mode
 Camera Triage So, you have a fancy new DSLR camera? You re really excited! It probably cost a small fortune. It s gotta be good, right? It better be good, right? Maybe you re having a ton of fun with your
A Beginner s Guide To Exposure
 A Beginner s Guide To Exposure What is exposure? A Beginner s Guide to Exposure What is exposure? According to Wikipedia: In photography, exposure is the amount of light per unit area (the image plane
Shutter Speed. Introduction. Lesson Four. A quick refresher:
 Introduction Last week we introduced the concept of the Exposure Triangle and the goal to achieve correct exposure in our images, in other words...the image has enough light to best show off our subject
UNDERSTANDING MACRO PHOTOGRAPHY
 VITAL UNDERSTANDING MACRO PHOTOGRAPHY Beyond the Basics Mahmood Anwar Understanding macro photography There are so many things in our world you want to get close to and photograph. Find out how to set
As can be seen in the example pictures below showing over exposure (too much light) to under exposure (too little light):
 to under exposure (too little light):") Hopefully after we are done with this you will resist any temptations you may have to use the automatic settings provided by your camera. Once you understand exposure, especially f-stops and shutter speeds,
Hopefully after we are done with this you will resist any temptations you may have to use the automatic settings provided by your camera. Once you understand exposure, especially f-stops and shutter speeds,
CAMERA BASICS. Stops of light
 CAMERA BASICS Stops of light A stop of light isn t a quantifiable measurement it s a relative measurement. A stop of light is defined as a doubling or halving of any quantity of light. The word stop is
Aperture, Shutter Speed and ISO
 Aperture, Shutter Speed and ISO Before you start your journey to becoming a Rockstar Concert Photographer, you need to master the basics of photography. In this lecture I ll explain the 3 parameters aperture,
So far, I have discussed setting up the camera for
 Chapter 3: The Shooting Modes So far, I have discussed setting up the camera for quick shots, relying on features such as Auto mode for taking pictures with settings controlled mostly by the camera s automation.
Until now, I have discussed the basics of setting
 Chapter 3: Shooting Modes for Still Images Until now, I have discussed the basics of setting up the camera for quick shots, using Intelligent Auto mode to take pictures with settings controlled mostly
Love Your Camera (Introduction to D-SLR)
") Love Your Camera (Introduction to D-SLR) Photography Workshops and Tours in New York City Phone: (646) 736-3231 Email: info@rememberforever.co Web: www.rememberforever.co Copyright 2009-2013 - Remember
Love Your Camera (Introduction to D-SLR) Photography Workshops and Tours in New York City Phone: (646) 736-3231 Email: info@rememberforever.co Web: www.rememberforever.co Copyright 2009-2013 - Remember
To start there are three key properties that you need to understand: ISO (sensitivity)
") Some Photo Fundamentals Photography is at once relatively simple and technically confusing at the same time. The camera is basically a black box with a hole in its side camera comes from camera obscura,
Some Photo Fundamentals Photography is at once relatively simple and technically confusing at the same time. The camera is basically a black box with a hole in its side camera comes from camera obscura,
Seniors Photography Workshop
 Seniors Photography Workshop Some images stand out from the crowd & make viewers say WOW! Today we will look at how you can give your images that WOW Factor.. So let s think about what makes an
Introduction to camera usage. The universal manual controls of most cameras
 Introduction to camera usage A camera in its barest form is simply a light tight container that utilizes a lens with iris, a shutter that has variable speeds, and contains a sensitive piece of media, either
Digital camera modes explained: choose the best shooting mode for your subject
 Digital camera modes explained: choose the best shooting mode for your subject On most DSLRs, the Mode dial is split into three sections: Scene modes (for doing point-and-shoot photography in specific
aperture, shutter speed
 CUDGEGONG C A M E R A C L U B aperture, shutter speed and ISO exposure When you think of the craft or art of photography, you must immediately think of exposure. Exposure is a critical element that determines
Elements of Exposure
 Elements of Exposure Exposure refers to the amount of light and the duration of time that light is allowed to expose film or a digital-imaging sensor. Exposure is controlled by f-stop, shutter speed, and
Tips for Digital Photographers
 Choosing and Introduction to and (f-stop) Two basic controls change how much light hits the sensor in your camera: shutter speed and f-stop. Shutter speed affects how long light is allowed into the camera
Buxton & District U3A Digital Photography Beginners Group
 U3A Group Lesson 7: Controlling exposure / focal length / perspective / composition for a better picture & Taking Pictures of people 3 December 2013 Programme Buxton & District 19 September Exploring your
Autofocus Problems The Camera Lens
 NEWHorenstein.04.Lens.32-55 3/11/05 11:53 AM Page 36 36 4 The Camera Lens Autofocus Problems Autofocus can be a powerful aid when it works, but frustrating when it doesn t. And there are some situations
How This Works: Aperture size is counted in f- stops. i.e. those little numbers engraved on the lens barrel like:
 Aperture Aperture is the lens opening inside a lens. The size of the diaphragm opening in a camera lens REGULATES amount of light passes through onto the sensor inside the camera. Aperture size is counted
Camera controls. Aperture Priority, Shutter Priority & Manual
 Camera controls Aperture Priority, Shutter Priority & Manual Aperture Priority In aperture priority mode, the camera automatically selects the shutter speed while you select the f-stop, f remember the
Aperture Explained. helping you to better understand your digital SLR camera SLR PHOTOGRAPHY GUIDE
 Aperture Explained helping you to better understand your digital SLR camera SLR PHOTOGRAPHY GUIDE WELCOME 1 helping you to better understand your digital SLR camera. This 4 part series will cover Aperture,
Using Your Camera's Settings: Program Mode, Shutter Speed, and More
 Using Your Camera's Settings: Program Mode, Shutter Speed, and More Here's how to get the most from Program mode and use an online digital SLR simulator to learn how shutter speed, aperture, and other
FOCUS, EXPOSURE (& METERING) BVCC May 2018
 BVCC May 2018") FOCUS, EXPOSURE (& METERING) BVCC May 2018 SUMMARY Metering in digital cameras. Metering modes. Exposure, quick recap. Exposure settings and modes. Focus system(s) and camera controls. Challenges & Experiments.
FOCUS, EXPOSURE (& METERING) BVCC May 2018 SUMMARY Metering in digital cameras. Metering modes. Exposure, quick recap. Exposure settings and modes. Focus system(s) and camera controls. Challenges & Experiments.
Get the Shot! Photography + Instagram Workshop September 21, 2013 BlogPodium. Saturday, 21 September, 13
 Get the Shot! Photography + Instagram Workshop September 21, 2013 BlogPodium Part One: Taking your camera off manual Technical details Common problems and how to fix them Practice Ways to make your photos
PTC School of Photography. Beginning Course Class 2 - Exposure
 PTC School of Photography Beginning Course Class 2 - Exposure Today s Topics: What is Exposure Shutter Speed for Exposure Shutter Speed for Motion Aperture for Exposure Aperture for Depth of Field Exposure
TAKING BETTER PHOTOS ON ANY DEVICE
 TAKING BETTER PHOTOS ON ANY DEVICE Sarah Dudik Public Information & Marketing HOW TO TAKE BETTER PHOTOGRAPHS The device you use isn t as important as how you are looking through it Any device can be used
To do this, the lens itself had to be set to viewing mode so light passed through just as it does when making the
 CHAPTER 4 - EXPOSURE In the last chapter, we mentioned fast shutter speeds and moderate apertures. Shutter speed and aperture are 2 of only 3 settings that are required to make a photographic exposure.
1 / 9
 WWW.RICHIEHUG.COM 1 / 9 A Beginner's Guide to Digital Photography Version 1.2 By Richie Hug November 24, 2016. Most people owning a digital camera have never used other settings than just the AUTO mode.
Nikon D750 ISO 200 1/60 sec. f/ mm lens
 Nikon D750 ISO 200 1/60 sec. f/16 20 35mm lens 10 Creative Focus Sometimes tack-sharp focus isn t what you want for an image or for an entire image to tell the story you envision. What you focus on and
mastering manual week one
 THE PURPOSE OF THIS WORKSHOP IS TO PUT THE POWER AND CONTROL OF THE CAMERA INTO YOUR OWN HANDS. When we shoot in automatic, we are at the mercy of the camera s judgment and decisions. Learning the techniques
21 Go-to Shooting Settings
 21 Go-to Shooting Settings JOSHUA DUNLOP Train Your Photography Instinct The purpose of this guide is to hand you the settings you need to start taking the control back from your camera. If you can memorise
THE PHOTOGRAPHER S GUIDE TO DEPTH OF FIELD
 THE PHOTOGRAPHER S GUIDE TO DEPTH OF FIELD A Light Stalking Short Guide Cover Image Credit: Thomas Rey WHAT IS DEPTH OF FIELD? P hotography can be a simple form of art but at the core is a complex set
Presented to you today by the Fort Collins Digital Camera Club
 Presented to you today by the Fort Collins Digital Camera Club www.fcdcc.com Photography: February 19, 2011 Fort Collins Digital Camera Club 2 Film Photography: Photography using light sensitive chemicals
Chapter 6-Existing Light Photography
 Chapter 6-Existing Light Photography All of these images were taken with available light. Painting with light-using available light Photography that includes artificial light which naturally exists in
Photography Help Sheets
 Photography Help Sheets Phone: 01233 771915 Web: www.bigcatsanctuary.org Using your Digital SLR What is Exposure? Exposure is basically the process of recording light onto your digital sensor (or film).
Tips for Digital Photographers
 Introduction to In my Tips for Digital Photographers outlining shutter speed and f-stop settings we discuss how these two settings are a basis for good creative photography. Shutter speed combined with
The Basic SLR
 The Basic SLR ISO Aperture Shutter Speed Aperture The lens lets in light. The aperture is located in the lens and is a set of leaf like piece of metal that can change the size of the hole that lets in
Topic 1 - A Closer Look At Exposure Shutter Speeds
 Getting more from your Camera Topic 1 - A Closer Look At Exposure Shutter Speeds Learning Outcomes In this lesson, we will look at exposure in more detail: ISO, Shutter speed and aperture. We will be reviewing
Exposure settings & Lens choices
 Exposure settings & Lens choices Graham Relf Tynemouth Photographic Society September 2018 www.tynemouthps.org We will look at the 3 variables available for manual control of digital photos: Exposure time/duration,
Illustrated Lecture Series;
 Presents Illustrated Lecture Series; Understanding Photography Photo Basics: Exposure Modes, DOF and using Shutter Speed Exposure; the basics We have seen that film and digital CCD sensors both react to
Depth Of Field or DOF
 Depth Of Field or DOF Why you need to use it. A comparison of the values. Image compression due to zoom lenses. Featuring: The Christmas decorations I forgot to pack away My sloping table, kitchen uplighter
Aperture & ƒ/stop Worksheet
 Tools and Program Needed: Digital C. Computer USB Drive Bridge PhotoShop Name: Manipulating Depth-of-Field Aperture & stop Worksheet The aperture setting (AV on the dial) is a setting to control the amount
DIGITAL PHOTOGRAPHY CAMERA MANUAL
 DIGITAL PHOTOGRAPHY CAMERA MANUAL TABLE OF CONTENTS KNOW YOUR CAMERA...1 SETTINGS SHUTTER SPEED...2 WHITE BALANCE...3 ISO SPEED...4 APERTURE...5 DEPTH OF FIELD...6 WORKING WITH LIGHT CAMERA SETUP...7 LIGHTING
Name Digital Imaging I Chapters 9 12 Review Material
 Name Digital Imaging I Chapters 9 12 Review Material Chapter 9 Filters A filter is a glass or plastic lens attachment that you put on the front of your lens to protect the lens or alter the image as you
These aren t just cameras
 Roger Easley 2016 These aren t just cameras These are computers. Your camera is a specialized computer Creates files of data Has memory Has a screen display Has menus of options for you to navigate Your
THE REAL REASON YOU SHOULD BE USING MANUAL MODE
 Photzy THE REAL REASON YOU SHOULD BE USING MANUAL MODE Quick Guide Written by Kent DuFault THE REAL REASON YOU SHOULD BE USING MANUAL MODE // PHOTZY.COM 1 If you do a Google search on using a camera s
or, How do I get this thing to do what I want? Copyright 2016 Paul Fisher
 or, How do I get this thing to do what I want? Copyright 2016 Paul Fisher So just what are the basic camera operations we re going to discuss? Set up. How do you have your camera configured ISO setting
Comparison of the diameter of different f/stops.
 LESSON 2 HANDOUT INTRODUCTION TO PHOTOGRAPHY Summer Session 2009 SHUTTER SPEED, ISO, APERTURE What is exposure? Exposure is a combination of 3 factors which determine the amount of light which enters your
ISO 200 1/500 sec. f/11 82mm lens
 4 ISO 200 1/500 sec. f/11 82mm lens The Creative Zone Taking Your Photography to the Next Level The Creative zone is the name given by Canon to the shooting modes that offer you the greatest amount of
All About Aperture by Barry Baker
 All About Aperture by Barry Baker Aperture Selection and Creative Control There is a pleasing and more creative alternative to taking your photographs in the automatic or program mode, and that is to use
The goal of this weekly challenge is to get comfortable with adjusting the shutter speed and ISO.
 The goal of this weekly challenge is to get comfortable with adjusting the shutter speed and ISO. ISO is really just a setting to determine how quickly an image will be captured, the higher the ISO the
capture the tree Capture Your Holidays with Katrina Kennedy
 Capture Your Holidays with Katrina Kennedy LESSON 2 capture the tree LESSON 2 OBJECTIVES: At the end of this lesson you will be able to: Create a photo of your Christmas tree using a slow shutter speed.
Lesson 1 Course Notes
 4 Week Online Photography Course An Introduction to Digital Photography A Guide to Getting the Best from Your Digital Camera Lesson 1 Course Notes By David Taylor Click Here to Book Course PAGE 2 Introduction
A BEGINNER S GUIDE TO PHOTOGRAPHY CHEATSHEET
 A BEGINNER S GUIDE TO PHOTOGRAPHY Cameras are complicated. It took me a ton of trial and error before I started to capture some pretty spectacular images. This cheatsheet is the reference guide I wish
Chapter 11-Shooting Action
 Chapter 11-Shooting Action Interpreting Action There are three basic ways of interpreting action in a still photograph: Stopping action (42) Blurring movement Combining both in the same image Any
Introductory Photography
 Introductory Photography Basic concepts + Tips & Tricks Ken Goldman Apple Pi General Meeting 26 June 2010 Kenneth R. Goldman 1 The Flow General Thoughts Cameras Composition Miscellaneous Tips & Tricks
PHIL MORGAN PHOTOGRAPHY
 Including: Creative shooting Manual mode Editing PHIL MORGAN PHOTOGRAPHY A free e-book to help you get the most from your camera. Many photographers begin with the naïve idea of instantly making money
PHOTOGRAPHING THE ELEMENTS
 PHOTOGRAPHING THE ELEMENTS PHIL MORGAN FOR SOUTH WEST STORM CHASERS CONTENTS: The basics of exposure: Page 3 ISO: Page 3 Aperture (with examples): Pages 4-7 Shutter speed: Pages 8-9 Exposure overview:
Objective: to give you some understanding of why you might push more than just the big shiny silver button...
 Objective: to give you some understanding of why you might push more than just the big shiny silver button... Why am I making this presentation? Simply put: to share understanding What will we cover? Aperture
Study guide for Photography / Understanding the SLR Camera
 Study guide for Photography / Understanding the SLR Camera The most important technical step to a good print is a good negative. The key to a good negative is correct film exposure. Three variables control
EXPOSURE Light and the Camera
 EXPOSURE Light and the Camera EXPOSURE OVER EXPOSURE = TOO MUCH LIGHT is hitting the sensor UNDER EXPOSURE = NOT ENOUGH LIGHT is hitting the sensor Exposure (the amount of light hitting the sensor)
Autumn. Get Ready For Autumn. Technique eguide. Get Ready For
 Get Ready For Autumn Blink and you may have missed it, but our summer is behind us again and we re back into the short days and long nights of autumn. For photography however, the arrival of autumn means
Film Cameras Digital SLR Cameras Point and Shoot Bridge Compact Mirror less
 Film Cameras Digital SLR Cameras Point and Shoot Bridge Compact Mirror less Portraits Landscapes Macro Sports Wildlife Architecture Fashion Live Music Travel Street Weddings Kids Food CAMERA SENSOR
Lens Openings & Shutter Speeds
 Illustrations courtesy Life Magazine Encyclopedia of Photography Lens Openings & Shutter Speeds Controlling Exposure & the Rendering of Space and Time Equal Lens Openings/ Double Exposure Time Here is
Failure is a crucial part of the creative process. Authentic success arrives only after we have mastered failing better. George Bernard Shaw
 PHOTOGRAPHY 101 All photographers have their own vision, their own artistic sense of the world. Unless you re trying to satisfy a client in a work for hire situation, the pictures you make should please
Your objective: maximum control, maximum manageability
 Your objective: maximum control, maximum manageability Know how the light works Know how photography works Know the camera you re using Making the most of what you have to work with. ISO This is the first
AF Area Mode. Face Priority
 Chapter 4: The Shooting Menu 71 AF Area Mode This next option on the second screen of the Shooting menu gives you several options for controlling how the autofocus frame is set up when the camera is in
Know Your Digital Camera
 Know Your Digital Camera With Matt Guarnera Sponsored by Topics To Be Covered Understanding the language of cameras. Technical terms used to describe digital camera features will be clarified. Using special
EXPOSURE TIPS. Camera shake causing blurry pictures
 EXPOSURE TIPS Camera shake causing blurry pictures Hold your camera steady Digital cameras are usually held away from the body to view the LCD screen to compose the picture. This is less steady than the
Camera Mechanics & camera function. Daily independent reading:pgs. 1-5 Silently read for 10 min. Note taking led by Mr. Hiller
 Camera Mechanics & camera function Daily independent reading:pgs. 1-5 Silently read for 10 min. Note taking led by Mr. Hiller Focused Learning Target: We will be able to identify the various parts of the
Photographer s Handbook. Event Edition
 Photographer s Handbook Event Edition Content 1.0 Events 1.1 Corporate 1.2.0 Birthdays 1.2.1 Kids Party 1.2.2 Adults Party 1.3 Dinner & Dance 1.4 PA and Government 2.0 Terms and Conditions 2.1 For Clients
Camera Exposure Modes
 What is Exposure? Exposure refers to how bright or dark your photo is. This is affected by the amount of light that is recorded by your camera s sensor. A properly exposed photo should typically resemble
1. This paper contains 45 multiple-choice-questions (MCQ) in 6 pages. 2. All questions carry equal marks. 3. You can take 1 hour for answering.
 in 6 pages. 2. All questions carry equal marks. 3. You can take 1 hour for answering.") UNIVERSITY OF MORATUWA, SRI LANKA FACULTY OF ENGINEERING END OF SEMESTER EXAMINATION 2007/2008 (Held in Aug 2008) B.Sc. ENGINEERING LEVEL 2, JUNE TERM DE 2290 PHOTOGRAPHY Answer ALL questions in the answer
UNIVERSITY OF MORATUWA, SRI LANKA FACULTY OF ENGINEERING END OF SEMESTER EXAMINATION 2007/2008 (Held in Aug 2008) B.Sc. ENGINEERING LEVEL 2, JUNE TERM DE 2290 PHOTOGRAPHY Answer ALL questions in the answer
Working with your Camera
 Topic 5 Introduction to Shutter, Aperture and ISO Learning Outcomes In this topic, you will learn about the three main functions on a DSLR: Shutter, Aperture and ISO. We must also consider white balance
This has given you a good introduction to the world of photography, however there are other important and fundamental camera functions and skills
 THE DSLR CAMERA Before we Begin For those of you who have studied photography the chances are that in most cases you have been using a digital compact camera. This has probably involved you turning the
Photographer... and you can too.
 Izzy Learned to be a Photographer... and you can too. A story about photography basics by Bruce Philpott My granddaughter, Izzy, was visiting us when she was eleven years old and she looked at a photo
Capturing God s Creation Through The Lens An Adult Discipleship Course at Grace January 2013
 Capturing God s Creation Through The Lens An Adult Discipleship Course at Grace January 2013 Donald Jin donjin@comcast.net Course Overview Jan 6 Setting The Foundation Introduction and overview Understanding
Shooting Manual. Set your shooting mode to M
 Shooting Manual WHY Shooting Manual Set your shooting mode to M Shooting Manual 3 variables that determine your exposure: 1. ISO 2. Aperture 3. Shutter Speed Shooting Manual 1. ISO The camera s general
ACTION AND PEOPLE PHOTOGRAPHY
 ACTION AND PEOPLE PHOTOGRAPHY These notes are written to complement the material presented in the Nikon School of Photography Action and People Photography class. Helpful websites: Nikon USA Nikon Learn
Understanding Your Camera 2: UUU200
 Understanding Your Camera 2: UUU200 Your 2 Understanding Camera Your Understanding Camera 2 Exposure & Metering Metering & Exposure Objective Objective After completing this class, the student will have
Working with your Camera
 Topic 1 Commanding the Mode Dial Learning Outcomes In this topic, you will learn more about how to control the functions on your mode dial. We touched on this before but I want to go through these in detail
Improve Your Photography by using Simple Camera Settings and Techniques
 Improve Your Photography by using Simple Camera Settings and Techniques Francis J Pullen 2012 +44 (0)7768 364 567 images@francispullen.co.uk www.francispullen.co.uk Introduction Digital Cameras offer tremendous
Quick Tips for Taking Better Portraits
 JANUARY 5, 2019 BEGINNER Quick Tips for Taking Better Portraits Suggested Lens choices, exposure settings and focus modes Featuring GARY SMALL D300, AF-S NIKKOR 24-85mm f/2.8-4d IF lens, 1/30 sec., f/2.8,
KNOW YOUR CAMERA LEARNING ACTIVITY - WEEK 9
 LEARNING ACTIVITY - WEEK 9 KNOW YOUR CAMERA Tina Konradsen GRA1 QUESTION 1 After reading the appropriate section in your prescribed textbook From Snapshots to Great Shots, please answer the following questions:
HOW TO SHOOT IN FULL MANUAL
 T HE FOLLOWING IS A FREE PREVIEW OF THE HOW TO SHOOT IN FULL MANUAL ONLINE COURSE BY N ICK C ARVER This is just 1 of 6 lesson guides from this course. Be sure to check out the free video here. All of my
Table of Contents. 1.Choosing your Camera. 2. Understanding your Camera Which Camera DSLR vs Compact...8
 1.Choosing your Camera 1.3. Which Camera...7 1.4. DSLR vs Compact...8 1.5. Best entry level DSLR's...9 1.6. Best Compact Cameras...10 1.7.Best Hybrid Camera...11 2. Understanding your Camera 2.1 Introducing
IMAGES OF MOVING SUBJECTS
 IMAGES OF MOVING SUBJECTS Capturing images of a scene where one or more subjects are in motion Charles Ginsburgh - Fotoclave 2017 (November 4 th, 2017 ) As you view these Images, think about What the Story
Digital Photography Level 3 Camera Exposure Settings
 The basics of Photography Digital Photography Level 3 Camera Exposure Settings We are now going into photographic shoot modes that are common to most cameras. Some cameras may have more modes and some
Photography Basics. Innovative Storytelling
 Photography Basics Innovative Storytelling 11 Tips for Taking Better Pictures #1: Take a LOT of pictures! Film taught us to be frugal with the photos we took because development was expensive. Digital
Introduction to Digital Photography
 Introduction to Digital Photography with Nick Davison Photography is The mastering of the technical aspects of the camera combined with, The artistic vision and creative know how to produce an interesting
Aperture Priority Mode
 Chapter 3: Shooting Modes for Still Images 23 The Program Shift function is available only in Program mode; it works as follows. Once you have aimed the camera at your subject, the camera displays its
Topic 2 - A Closer Look At Exposure: ISO
 Getting more from your Camera Topic 2 - A Closer Look At Exposure: ISO Learning Outcomes In this lesson, we will revisit the concept of ISO and the role it plays in your photography and by the end of this
6.098 Digital and Computational Photography Advanced Computational Photography. Bill Freeman Frédo Durand MIT - EECS
 6.098 Digital and Computational Photography 6.882 Advanced Computational Photography Bill Freeman Frédo Durand MIT - EECS Administrivia PSet 1 is out Due Thursday February 23 Digital SLR initiation? During