Cutting and Assembling Instructions for your Replica U.S. Lighthouse Service Pennant
|
|
|
- Beverley Harrell
- 5 years ago
- Views:
Transcription

1


2 Table of Contents List of Materials Pre-assembly Information..... Cutting Instructions Sewing Instructions Bottom Border Top Border Steps in Pictures Hoist End Lighthouse Symbol Grommets Mini Flag Sonja Selboe Biography Cutting and Assembling Instructions for your Replica U.S. Lighthouse Service Pennant Published by the United States Lighthouse Society A Nonprofit Historical & Educational Organization < Copyright 2016 by the United States Lighthouse Society. No portion of this booklet may be reproduced without permission of the U.S. Lighthouse Society Point No Point Road NE, Hansville, WA Phone: (415) info@ushs.org The U.S. Lighthouse Society also publishes The Keeper s Log journal, a resource management and information service for people who care deeply about the restoration and preservation of the country s lighthouses and lightships.
3 List of Materials: Patterns: Paper flag pattern - Included Paper reinforcing piece pattern - Included Cardstock Lighthouse pattern Included also included mini cardstock lighthouse pattern for mini flag Fabric: - can be purchased at marine supply stores Red Sure Last (60 inches wide) 2/3 yard Blue - Sure Last 1/6 yard White 6.5 oz. or 8 oz. - Weather Max (60 inches wide) 5/6 yard Thread UV Protection Polyester or Nylon Z69 (very important to have UV protection) also available at marine supply stores Size 16 sewing needle Iron Pins Pencil Blue Painter s Masking Tape Brass Grommets - Size No. 4 with ½ inch diameter opening Optional - Fusible bonding web lightweight bonding is recommended and can be purchased at craft stores, fabric stores, quilting stores, or online. 2
 border last. (Point is the fly end) 4.")

 on the blue lighthouse")
4 Pre-assembly Information SEWING STEPS: 1. Sew bottom border first. 2. Sew top border second. 3. Sew hoist (header end) border last. (Point is the fly end) 4. Sew all four rows of stitching on each border before working on next border. THREAD: White thread and long stitches are used on red borders for visual clarity in this manual. Normally you would use thread color that matches fabric color though it s not mandatory. However, you should use blue thread (or other dark color, such as black) on the blue lighthouse symbol. NEEDLE: Use a size 16 needle and a sewing machine. 3
5 Cutting Instructions: 1. Cut white triangle 50 inches long from center of hoist edge to point Length along fly edge will be inches from hoist edge to point Height of hoist end 28 inches 2. Cut a second partial flag about 24 inches long measuring from the point. This is a reinforcing piece that will help to keep the flag from fraying at the juncture of the two red borders. Point No Point and New Dungeness light stations have both added this extra piece, and it has worked well. 4
 One strip 7 inches wide and 32 inches long 7 x 32 (for hoist edge) Excess length will be trimmed away later. 4.")
6 Cutting Instructions Continued: 3. Cut three red strips Two strips 7 inches wide and 56 inches long 7 x 56 (for fly edges) One strip 7 inches wide and 32 inches long 7 x 32 (for hoist edge) Excess length will be trimmed away later. 4. Press paper pattern to eliminate folds. Lay pattern on fabric and secure with painter s masking tape and trace with pencil and straight edge. 5. Cut one each of the above. Stitch reinforcing piece to triangle. Straight stitch can be used on three sides. 6. Zigzag stitch the exposed edge as shown. 5


7 Sewing Instructions: Press ½ inch seam allowance on all long edges of red strips. Iron should not be too hot or fabric will melt. Just hot enough to slightly crease the fabric. Author used silk setting. Fold in half lengthwise matching pressed edges. Pin along matched edges. Press along fold. 6


8 Bottom Border: First Sewing Step: Sew reinforcing triangle to flag around all three sides. The side that won t be covered by borders should be sewn close to edge of fabric. Zigzag stitch is best. Including a reinforcing piece is strongly recommended to keep the flag from fraying at the juncture of the two red borders! Carefully pin bottom border to flag. It s important that white fabric lay right along crease of red border and that long border edges line up with each other on opposite sides. Move and re-pin as needed to achieve this. Before pinning all the way to the point, trim away border seam allowances about 9 inches from the point on both sides of the bottom border. This will eliminate bulk when adding top red border. Finish pinning to the point. Make sure border and flag fabrics lie smoothly before sewing. 7


9 Sew ⅛ inch from hem edge and again ¼ inch from first row of stitching. Sew again in same manner along folded border edge. Sew all four rows of stitching before attaching second border. After bottom border is completely attached and all four rows are stitched, trim excess fabric all the way to the point. We suggest that you draw a line with pencil and ruler to provide a cutting guide so you don t cut off any of the white fabric or the point. 8

10 Top Border Attach top red border strip following instructions for bottom border, but DO NOT TRIM AWAY SEAM ALLOWANCE or excess fabric near the point until you see how much you need to cover the point. Leave just enough fabric at the tip to allow ½ to ¾ inch to be turned under as a hem to enclose the point. Dash line indicates edge of hem allowance that has been folded over the point See figures 1 through 8 on next page for procedure. At the tip of point, wrap one side of border over raw edge before sewing so raw edges are enclosed or covered. Trim that side as needed to fit the point. Then pin carefully and trim, perhaps several times, until the border edges match and you have a point at fly end. It won t be a sharp point because it s not possible to get a sharp point with so many layers of fabric in that small space. When point is finished, all raw edges should be enclosed by the top border. If you follow the pictured steps, you will achieve this. Sew long edges as described for bottom border. 9


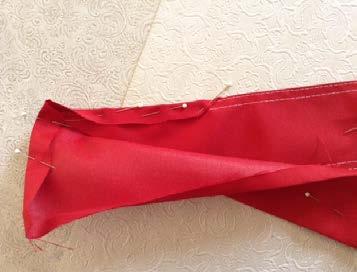


11 Bottom Border Steps in Pictures:


12 + Hoist End 9. Trim excess border fabric from hoist end. Pin and sew border to hoist end in same manner as two previous borders. Pin carefully and precisely. Make sure hoistend fabric lies along border crease. 10. Border width is the same as the fly edge borders. Be sure to enfold all raw edges in one of the hems before sewing. Trim 11. excess fabric to fit fly edges. You ll have to trim at an angle to fit the flag s angle. Sew along both sides the same as done on fly borders
13 + Lighthouse Symbol Method using iron-on bonding Purchase a light weight fusible bonding web. This can be found at craft stores, fabric stores, quilting stores, or online. Follow package directions, except do not pre-wash fabric and do not peel off paper after first bonding step. Cut a blue piece of fabric large enough for two lighthouses. Cut bonding paper to just a little smaller than size of fabric piece, so you don t get bonding glue on your iron. Quilter s tip! - Put a file folder under fabric and bonding paper to keep from getting bonding glue on ironing board. Remember, do not peel off bonding paper yet. Also, allow to cool completely before handling so bond does not separate. First you will trace the lighthouse pattern on the paper twice and cut out the lighthouse and windows. Then you will peel off the paper. Place one lighthouse so base is 4 ¾ inches from hoist border and evenly spaced between top and bottom borders. Press until bonded to flag per package instructions. Place second lighthouse on other side of flag, lining it up with first lighthouse. Holding flag up to a window helps you see the first lighthouse easier. Tape in place with painter s easy-remove masking tape (blue in color). Press until bonded to flag but don t press masking tape. Again, cool completely before handling or bond will separate. Stitch around edges of lighthouse and around each window. Zigzag works well. You may also want to stitch around the windows with a small straight stitch. Since we can t vouch yet for how bonding holds up in all kinds of weather, you may want to add some extra lines of stitching the length of the lighthouse symbol. 12


14 Method without iron-on bonding - Using lighthouse pattern made of card stock, trace on blue fabric using a white fine-point marker. One suggested brand: Uniball SIGNO; Pigment Ink UM-153; White Trace the five windows and cut them carefully. Candle all outer edges of the lighthouse CAREFULLY to form a melted bead along the edge. Fraycheck might also work, but we didn t try that. Do not attempt to candle the window edges. You ll end up with misshapen rectangles. CANDLING is the process where edge fabric is run quickly along edge of candle flame or stove to melt edge slightly to form a hard bead. The bead will be hot for a few moments, so do not touch until it cools. The bead helps prevent fraying in the wind. Practice candling on a fabric scrap first to become comfortable and adept at the process. * Position one lighthouse in place and pin or tape with painter s easy-remove masking tape. * Sew around edge with long machine stitch or hand stitch in place. * Position second lighthouse on other side of flag PRECISELY opposite first lighthouse, pin or tape, and sew both in place. It s tricky, but you can do it! If you discover a better way of attaching first lighthouse symbol, then lining them up together, please let the USLHS know so the information can be shared with other lighthouse groups. SEW. around and close to edge of lighthouse; around and close to edge of each cut out window; from top to bottom of lighthouse about five or six times, or sew across lighthouses horizontally with lines about 1 inch apart. * It s important to sew extra lines so wind does not get between lighthouse symbols and flag fabric. + Lighthouse Symbol 13


15 Grommets: Be sure to get BRASS (non-rusting) grommets and NOT brass-plated steel grommets. Use a heavy-duty grommet tool to install grommets at top and bottom corners of hoist edge. Grommets should be ¾ inch from edge so flag clips can secure flag to rope. Flag shown has been flying for two years so grommets are no longer shiny. Note that they are not rusty which is why you must use brass. Size No. 4 grommets with a ½ inch diameter opening are recommended Suggested sources for grommets and installation are hardware stores, marine supply stores, canvas and awning makers, etc. For historic purposes, we suggest you write the year the flag was made in the corner of the hoist end in permanent marker. It is recommended, when not in use, that the flag be rolled around a cardboard tube, or other similar round item at least 2 inches in diameter. Tie around the center with a wide shoestring or similar soft material (such as a ribbon). Folding is not recommended as creases can damage the fabric over time. Making a Quilt Wrap to store the flag keeps flag clean and in a roll for storing. Search for Quilt Wrap on the internet to easily find a pattern online. We highly recommend this method and used a pipe insulation tube. Swim noodles are also good. Buy them at end of summer when they go on sale. Both are easily cut to the length needed, about 30 inches. We bought 85-inch wide muslin. Then you only need one yard to make a Quilt Wrap. The flag can also be hung for storage on a wall, indoors, out of direct sunlight. 14

16 Mini Flag: Friends of Point No Point Lighthouse, Hansville, WA, made small flags from fabric leftover to sell in the lighthouse museum store for $12.00 each and recouped the initial cost of fabric. Other fabrics can also be used if the flags are for indoor use only. Dimensions were: Length 16 Height 9 ¼ Border strip width 1 (strip is cut 2 inches wide and folded in half) Lighthouse 4 ⅝ high Instead of cutting out the tiny windows, windows were made by zigzag stitching with white thread in the window rectangles traced from the pattern. Smaller grommets were used in the corners. We made them with the lighthouse symbol on one side only, but some people complained about that. So we suggest you put a lighthouse on each side. 15

17 Sonja Selboe: Sonja has been sewing for most of her life, making clothing for herself and her family, including lots of mending and altering. In recent years Sonja has volunteered her sewing skills to various charitable organizations in her community, including the Point No Point Light Station, WA where she is a docent. One of the items on display at the Point No Point Lighthouse Museum is a historical U.S. Lighthouse Service pennant, which Sonja was immediately drawn to. As someone who sews, she was curious about how this artifact was made and what materials had been used. Upon closer examination, Sonja discovered obvious wear patterns and that the old wool pennant had became very tattered and discolored having been exposed to the harsh elements while in use. Obviously, this historic relic could never be used again. So with her interest peaked, Sonja set her sights on recreating the pennant as closely to the original as possible. Her first step was to enlist the services of a specialty marine fabric store in Seattle who advised her on which fabric would hold up well in extreme wind, sun, and rain. Then, using the historical pennant for measurements, she developed a pattern and then hand-made the more durable pennant taking special care to reinforce it where necessary. This pennant is now proudly flying at Point No Point Light Station, WA. Although the materials are different, the end result was an exact replica of a U.S. Lighthouse Service pennant, just like those that would have flown at every light station in the U.S. After seeing the splendid results, Sonja realized that other light stations around the country might want (and should have) a replica pennant to proudly fly. Since she could not possibly make the many hundreds necessary on her own, she decided to write a manual so other lighthouse organizations could make replica pennants, which for her was a very rewarding experience. The theory was that there should be at least one person involved with a particular lighthouse that sews, to which a project like this would appeal. Sonja has long been fascinated by lighthouses, their locations, and the kind of people drawn to be keepers. She has visited many lighthouses around the U.S., and cares deeply that these maritime treasures and their history be preserved for generations to come. 16
School & Crayon Totes
 LeisureArtsLibrary.com Sewing #803361 School & Crayon Totes Basic Tote Design by Nancy Burdette 2 Variations by Paula Hagerman Approx Design Size: 12" x 13 3 /4" each Click Here to sign up for the FREE
Prima Diva. .Style, function and loads of compliments That s what the Stella Sling Bag brings!!
 .Style, function and loads of compliments That s what the Stella Sling Bag brings!! Supplies: 1/2 Yard Main Print (Outside of wallet, Outside of pockets, optional strap, etc..) 5/8 Yard Accent Print (Lining
Bowled Over Bag. Supplies Needed. Notes. Swatches. Special Thanks To
 Supplies Needed Main fabric (front, back, and side panels) 1yd Contrasting fabric and lining 2 yds 20in Coats heavyweight metal zipper 2/3 of a yard of VELCRO FABRIC FUSION brand fastener Dual duty xp
Growler Getter. Supplies: ½ yard main fabric. ½ yard Insul-Shine. 8 x 10 piece of Fusible Fleece 2. ¼ yard or fat quarter of coordinating fabric
 Supplies: ½ yard main fabric ½ yard Insul-Shine 8 x 10 piece of Fusible Fleece 2 ¼ yard or fat quarter of coordinating fabric 1 9 x 12 sheet of Steam-A-Seam 2 1 yard nylon cord 1 cord stop Coordinating
GEESE AMONG THE STARS
 P REVERSE PAPER PIECING GEESE AMONG THE STARS Foundation Paper Piecing Made Easy Lap Size or Miniature Designed by Annis Clapp Machine Quilted by Donna Akins fastsew Ultimate Seam Guide GEESE AMONG THE
furoshiki casserole carrier a sewing pattern by
 a sewing pattern by furoshiki casserole carrier This project is inspired by the Japanese art of furoshiki, which makes squares of cloth into bags and carriers by strategically folding and tying. This patchwork
Cat's Night Out. Prepare Templates: Prepare templates as directed on the Template Pages.
 Quilt by Lucy A. Fazely & Michael L. Burns Finished Quilt: 78" x 80-1/2" - Finished Block Size: 6" to 12" Nature's Studio fabrics by Classic Cottons - Style #3644 Fabric Requirements: Based on 44" wide
SINGER PROJECTS Sewing Machine Mat with Pockets PROJECT SKILL LEVEL:
 SINGER PROJECTS Sewing Machine Mat with Pockets This handy sewing machine mat with pockets not only helps protect your table surface, it keeps your go-to notions right at your fingertips. The four pockets
GHOSTS & GHOULS. This is a free pattern provided by The Red Boot Quilt Company 2017 STRICTLY NOT FOR RESALE OR DISTRIBUTION
 GHOSTS & GHOULS This is a free pattern provided by The Red Boot Quilt Company 2017 STRICTLY NOT FOR RESALE OR DISTRIBUTION The Red Boot Quilt Company GHOSTS & GHOULS Wall-hanging 40 1/2in square Trick
mermaid quilt a sewing pattern by
 a sewing pattern by mermaid quilt This project is a simple and straightforward piece for applique lovers. I personally designed it for a coworker s daughter -- a sweet little girl who s current obsession
Daisies & Dots A Piece O Cake Pattern by Becky Goldsmith and Linda Jenkins featuring our Daisies & Dots fabric collection from Robert Kaufman.
 Daisies & Dots A Piece O Cake Pattern by Becky Goldsmith and Linda Jenkins featuring our Daisies & Dots fabric collection from Robert Kaufman. 2010 Piece O Cake Designs Finished size: 52 1/2" x 52 1/2"
Hot Pads with Ribbon & Decorative Stitch Accents
 Published on Sew4Home Hot Pads with Ribbon & Decorative Stitch Accents Editor: Liz Johnson Friday, 01 September 2017 1:00 Hot pads provide a great small surface to experiment with some embellishment. Obviously,
The Panty Pack Skill Level: Intermediate
 The Panty Pack Skill Level: Intermediate http://www.pellonprojects.com Designed By Michelle Dorsey Sewn By Michelle Dorsey What girly girl wouldn t want a special bag to hold her delicate undies when she
Bound and Determined:
 Think You Don t Have Time to Create Beautiful Quilts? From quick-quilt adaptations of classic patterns to fun, fresh novelty designs, McCall s Quick Quilts provides you with a treasury of time- and effort-saving
PINWHEEL STAR WORKSHOP QUILT
 PINWHEEL STAR WORKSHOP QUILT Finished Size: 9" x 9" FABRIC REQUIREMENTS fat quarter or less of each fabric Fabric A - Medium (or dark) print for center star Fabric B - Dark (or medium) print for pinwheels,
Photo location courtesy of Judith Batty. McCallsQuilting.com McCall s Quick Quilts 1
 Photo location courtesy of Judith atty. McCallsQuilting.com 017 McCall s Quick Quilts 1 Changing Lanes simple patches of color make this unusual quilt quick & colorful Designed and Sewn by Stephanie Sheridan
Sawtooth Star Ornament with Applique Center
 Sawtooth Star Ornament with Applique Center Sawtooth Star with Applique Center Ornament/2 To make one Sawtooth Star Ornament with Applique Center you will need: 8 square of White or light colored background
Stars and Stripes. Finished Quilt Size: 65½" x 65½" Finished Block Size: 13" x 13"
 Stars and Stripes Finished Quilt Size: 65½" x 65½" Finished Block Size: 13" x 13" The red-white-and-blue color scheme gets you ready to celebrate all of those patriotic holidays! Materials Yardage is based
Pear Basket. Fabric Requirements. Cutting Guide
 Pear Basket Fabric Requirements Note: if the Pear Christmas Wall Hanging was made, you will not have to make the half-square triangles. Trim the extra ones made in the pear quilt to 1-3/4" x 1-3/4". You
Kimono Collection MATERIALS. Finished quilt size CUTTING
 Kimono Collection Colourful Japanese fabrics take the place of traditional paper in these tiny origami kimonos and a simple nine-patch quilt shows them off to perfection. MATERIALS Nine pieces of assorted
A SPOOKY SLEEPOVER. This is a free pattern provided by The Red Boot Quilt Company The Red Boot Quilt Company
 A SPOOKY SLEEPOVER The Red Boot Quilt Company The Red Boot Quilt Company A SPOOKY SLEEPOVER Approx. Size 38 1/2in x 57 1/2in BEFORE THE FUN BEGINS Please read all instructions before you begin. Abbreviations.
Project: Batik Triangles Table Topper
 Like to make the most of everything? Experiment with our challenge to create something special from a specific set of materials. DESIGNER: MONIQUE DILLARD OF OPEN GATE QUILTS (OPENGATEQUILTS.COM) 20 6
INSTRUCTIONS BFC716 QIH LEOPARD BAG
 INSTRUCTIONS BFC716 QIH LEOPARD BAG This bag can be done in many ways! You can stitch it as I did the medium size bag shown at the end of this document (with the Orange trim). For this bag I embroidered
General Instructions for Quilted Projects
 General Instructions for Quilted Projects Projects Designed Exclusively For Licensed Martha Pullen ~ Teaching Beginning Sewing Teachers 2003 Martha Pullen Company, Inc. General Instructions for Quilted
Kitchen Curtains with Ribbon Ties
 Published on Sew4Home Kitchen Curtains with Ribbon Ties Editor: Liz Johnson Wednesday, 27 September 2017 1:00 Curtain panels are a perfect beginner project. They're fast, super simple, and you get a great
Applique Fun F Applique Fun Collection Project Instructions. World s Largest Supplier of Stock Embroidery Designs
 F70307 Applique Fun Collection Project Instructions CD Holder Baby Book Summer Flag Embellished Box Click on Photo for Project Instructions Birthday Placemat & Treat Bag Kitchen Towel Daycare Quilt Software
P118 CONFETTI. Finished Size: 16" x 16" or 40" x 40" Designed by Annis Clapp. fast2sew Ultimate Seam Guide
 P8 CONFETTI Finished Size: 6" x 6" or 40" x 40" Designed by Annis Clapp fastsew Ultimate Seam Guide CONFETTI Read all instructions carefully before starting. Prewash and iron fabrics. All strips are cut
Linda Brown, Sue Dittler, Sandy Miller, Lucy Ricardo, and Carole Thommen
 Linda Brown, Sue Dittler, Sandy Miller, Lucy Ricardo, and Carole Thommen Edited by: Sharon Reilly Teena Livsey YO-YO s especially ornament balls By: Lucy Ricardo Supply list: Scraps of fabric 1 ½ circle
2015 Amanda Clark. Adding Christmas decorations is optional, but it does add a beautiful touch of sparkle to your finished Christmas tree.
 2015 Amanda Clark This Christmas tree is made using fabric triangles. The triangles are first sewn together on a sewing machine, and then folded and hand stitched into place. Finally, the folded triangles
Impulse. 1/4 yard each very dark green (A), dark green (B),
, dark green (B),") design by LUCY A. FAZELY & MICHAEL L. BURNS Purple/Blue Impulse 12" x 12" Block Make 12 Blue/Green Impulse 12" x 12" Block Make 12 Orange/Red/Green Impulse 12" x 12" Block Make 12 Red/Purple Impulse 12"
design by LUCY A. FAZELY & MICHAEL L. BURNS Purple/Blue Impulse 12" x 12" Block Make 12 Blue/Green Impulse 12" x 12" Block Make 12 Orange/Red/Green Impulse 12" x 12" Block Make 12 Red/Purple Impulse 12"
Benartex Bows Table Runner A Foundation Pieced Design Skill Level: Beginner
 Benartex Bows Table Runner A Foundation Pieced Design Skill Level: Beginner Designed By Alexandra Henry Sewn By Alexandra Henry http://www.artbyalexa.com Use Pellon Stitch-N-Tear Lite to foundation piece
Folk-Art Dish Garden
 Folk-Art Dish Garden Designed by Kim Diehl Finished quilt size: 20½" x 24½" Finished center block size: 11½" x 15½" ~ 1 ~ Materials ⅝ yard of tan print #1 for background 1 chubby sixteenth (9" x 11") each
Six FUN! projects for those who are new to sewing, returning to sewing or just want to sharpen basic skills.
 Six FUN! projects for those who are new to sewing, returning to sewing or just want to sharpen basic skills. 1. Clutter Control Bags 2. 3-Button Book Cover 3. Fabric Stash Pincushion 4. Pocket Tissue Case
BEAR PAW MUG RUG Skill Level: Beginner
 BEAR PAW MUG RUG Skill Level: Beginner Designed & Stitched By Alexandra Henry The bear paw is a traditional quilt block pattern. Use it to make this easy little mug rug to brighten your morning coffee.
A SPOOKY SLEEPOVER. The Red Boot Quilt Company
 A SPOOKY SLEEPOVER The Red Boot Quilt Company www.theredbootquiltcompany.com A SPOOKY SLEEPOVER Approx. Size 38 1/2in x 57 1/2in BEFORE THE FUN BEGINS Please read all instructions before you begin. Abbreviations.
EVERYDAY BISCUITS. Finished Size: 42" x 60" Designed by Annis Clapp P101
 EVERYDAY BISCUITS Finished Size: 42" x 60" Designed by Annis Clapp P101 P101 EVERYDAY BISCUITS Please read all instructions carefully before beginning. Do not prewash fabrics. Dark fabrics should be checked
Medallion Table Runner. Fabric Requirements. *For separate backing fabric - ¼ yard for runner fabric and. Includes backing.
 Medallion Table Runner Fabric Requirements Fabric 1 1/4 yard 2203-03 (P#50) Fabric 2 1 yard* 8868-02 (P#51) Includes backing Fabric 3 1/4 yard 2204-04 (P#52) Fabric 4 1/4 yard 6740-06 (P#80) Fabric 5 3/4
LOG CABIN BLOCK REVERSE PAPER PIECING. Foundation Paper Piecing Made Easy P102. by Annis Clapp
 P REVERSE PAPER PIECING LOG CABIN BLOCK Foundation Paper Piecing Made Easy This new technique for paper piecing is made possible with the help of an Ultimate Seam Guide. All sewing is done by placing the
Free Tutorial: 2 Hour Laminated Shower Curtain
 Quilters Corner 518 West State Street Ithaca, New York 14850 Authorized PFAFF & Baby Lock sewing machine dealer 607-266-0850 www.e-quilterscorner.com Free Tutorial: 2 Hour Laminated Shower Curtain Before
SCRAPPY DAISIES. The Red Boot Quilt Company
 SCRAPPY DAISIES The Red Boot Quilt Company www.theredbootquiltcompany.com SCRAPPY DAISIES Approx. Size 70 1/2in x 70 1/2in This is a free pattern provided by The Red Boot Quilt Company 2018 STRICTLY NOT
Project: Spruce It Up Throw
 Designer: karen montgomery Assemble an entire forest of these easy pine trees in no time. They re simply pieced backgrounds topped with fusible appliqué. of Meredith Corporation. Meredith Corporation 2012.
Like to make the most of everything? Experiment with our challenge to create something special from a specific set of materials.
 Like to make the most of everything? Experiment with our challenge to create something special from a specific set of materials. + = 4 fat q uarters 1 fat quarter 2 1 Fabrics are from the Pumpkin Patch
Sher Hastings Designs. Angled Stripes Table Runner PDF Pattern. Finished size: 12 1/2 by 31 inches. So fun, so easy! Makes a great gift!
 Angled Stripes Table Runner PDF Pattern So fun, so easy! Makes a great gift! Finished size: 12 1/2 by 31 inches Sher Hastings Designs Page 1 Introduction: This is so fun and easy! Make them up in holiday
Section 1, Center Section Make One. Fabric Fabric # of Cutting Directions ID Location Strips
 Please read all instructions carefully prior to beginning quilt. All piecing uses a very accurate scant quarter inch seam allowance. In this quilt, accuracy is absolutely critical, so sew several sample
Bon Voyage - bag pattern -
 ~~~ Bon Voyage Bag Pattern ~~~ 2014 Geta Grama; www.romanianquiltstudio.com Bon Voyage - bag pattern - Size: 18 wide at top; 21 wide at bottom; 15'' tall (without straps); 5'' deep; two interior pockets;
Beginning Level (9-11 Years)
") OKLAHOMA COOPERATIVE EXTENSION SERVICE 4-H Fabrics & Fashions Construction Items Beginning Level (9-11 Years) Division of Agricultural Sciences and Natural Resources Oklahoma State University OKLAHOMA
OKLAHOMA COOPERATIVE EXTENSION SERVICE 4-H Fabrics & Fashions Construction Items Beginning Level (9-11 Years) Division of Agricultural Sciences and Natural Resources Oklahoma State University OKLAHOMA
This is an original pattern not intended for sale.
 I enjoy taking classic patterns and giving them a contemporary feel. I ve always admired orange peel quilts, and came up with a design for a lap quilt using two charm packs and machine appliqué. The gentle
 www.studioefabrics.com Holiday Wall Hanging Holiday Wall Hanging featuring fabrics from the Winter Essentials II collection from Finished Quilt Size 46" x 46" Desgined by Carl Hentsch Fabric Requirements
featuring ALIGNED COLLECTION BY AGF STUDIO MONDRIATION FREE PATTERN
 featuring ALIGNED COLLECTION BY AGF STUDIO MONDRIATION FREE PATTERN MONDRIATION QUILT DESIGNED BY AGF STUDIO FABRICS DESIGNED BY AGF STUDIO CAP-A-7000 INTERCONNECTED CAP-A-7001 SLANTED CAP-A-7002 HYPHENATED
2016 Courtesy of Art Gallery Quilts LLC. All Rights Reserved.
 ST YL E NAME 2016 Courtesy of Art Gallery Quilts LLC. All Rights Reserved. CONSTRUCTION Sew all rights sides together with ¼"seam allowance. Arrange the triangles together in rows. QUILT DESIGNED BY AGF
Sandi Blackwell s So Proudly We Hail
 Sandi Blackwell s So Proudly We Hail Designer: Sandi Blackwell www.stitchedbuy.com So Proudly We Hail Size 63 x 80 So Proudly We Hail A Square-agonals Design 63 x80 This pattern is constructed using the
DOUBLE POT HOLDER. Materials
 DOUBLE POT HOLDER My favorite pot holder was a double pot holder that I received as a gift years ago. This pot holder has places for your hands at each end with quilter fabric between. It is made with
Original Recipe. Let s Go Trippin by Polly Monica
 Original Recipe Let s Go Trippin by Polly Monica Hello again! I m Polly from Aunt Polly s Porch blog {auntpollysporch.blogspot.com} and I m so happy to be sharing my designs again on the Moda Bake Shop!
Notes - Please wash, dry & iron your fabric before beginning. - Sew all seams with an accurate 1/4 seam allowance. CUTTING INSTRUCTIONS
 Notes - Please wash, dry & iron your fabric before beginning. - Sew all seams with an accurate 1/4 seam allowance. CUTTING INSTRUCTIONS Indicates fabric pattern is directional on strips Fabric A: Horizontal
WAQA Community Quilts Block of the Month. March Broken Dishes block, using Cinderella Square half square triangle construction.
 WAQA Community Quilts Block of the Month. March 2014 Broken Dishes block, using Cinderella Square half square triangle construction. Cinderella Square (makes eight half square triangle squares). 1. Cut
free pattern featuring aligned COLLECTION BY AGF STUDIO
 free pattern featuring aligned COLLECTION BY AGF STUDIO QUILT DESIGNED BY AGF STUDIO FABRICS DESIGNED BY AGF STUDIO CAP-A-7000 Interconnected CAP-A-7001 Slanted CAP-A-7002 Hyphenated CAP-A-7003 Lineup
Floral Half Apron with Slash Pockets
 Published on Sew4Home Floral Half Apron with Slash Pockets Editor: Liz Johnson Monday, 03 July 2017 1:00 It may be a half apron, but it s full of pretty details. For yourself or as a delightfully easy
Insulated Water Bottle Carrier
 Insulated Water Bottle Carrier Keep your drink cool with this stylish insulated water bottle carrier. The unique hands-free design is ideal for walking and hiking. Personalize yours with your favorite
56 American Quilter November by Bonnie Sabel
 56 American Quilter November 2011 by Bonnie Sabel Christmas is a time for enchantment twinkling decorations magically transport our imagination to a time of innocent anticipation. Twin granddaughters recently
*All seam allowances are 1/4 unless otherwise noted. All pattern pieces include the seam allowance.
 Kelley Crossbody Bag Supplemental Instructions to Online Video Course www.craftygemini.com http://craftygemini.com/2016cgbagclub 2015 Crafty Gemini LLC. All rights reserved. *This pattern cannot be photocopied,
Beyond Horizons. align here. Fabric Requirements:
 Beyond Horizons Featuring Radiant fabric collection by RaNae Merrilll for Blank Quilting Quilt designed by RaNae Merrill for Blank Quilting Fabric Requirements: Radiant Collection 2 Panels - 6730 Navy
Creative Living with Sheryl Borden 6100 Series. Sewing & Fashion - Section I
 Creative Living with Sheryl Borden 6100 Series Sewing & Fashion - Section I Table of Contents Sewing & Fashion It s Hip to Be Square...I-3 Whirlin Dervish...I-3 Crayon Rolls...I-4 An Easy Way to Draw a
Wrap your favorite novel in a quilted cover to protect it and turn heads. It adjusts to fit any size paperback and has a handy bookmark.
 DESIGNED & QUILTED BY CINZIA ALLOCCA Mini Quilt Bookwrap SPECIFICATIONS Skill Level: Confident Beginner Bookwrap Size: 17" x 9" (excluding ties and bookmark) Wrap your favorite novel in a quilted cover
Harmony Rose by Susan Edmonson
 Harmony Rose by Susan Edmonson 44" x 52" Harmony Roseby Harmony Rose Collection Featuring fabrics from the by for by Materials E60-1385-TAN E60-1386-TAN E60-1387-GRAY E60-1388-TAN E60-1389-RED E60-1390-RED
Greek Square Table Runner
 Greek Square Table Runner Quilt Finished Size: 70-1/2" x 25-1/2" Block Finished Size: 12" Printing Options: Printer-Friendly Web Page or PDF Fabric Requirements: Dark: 1 yard Medium: 3/4 yard Light: 3/4
SCRAPPY BEARS. The Red Boot Quilt Company
 SCRAPPY BEARS The Red Boot Quilt Company www.theredbootquiltcompany.com SCRAPPY BEARS Approx. size 27 1/2in x 27 1/2in This is a free pattern provided by The Red Boot Quilt Company 2018 STRICTLY NOT FOR
Osman Tie. By: burdastyle.
 Osman Tie By: burdastyle http://www.burdastyle.com/projects/osman-tie The Osman tie is the perfect Valentine s Day gift for you or your loved one! Make it your business to get tied up in this creation!
Happy Winter Snowman Quilt
 1 Happy Winter Snowman Quilt This quilt is sure to become a classic addition to your décor at Christmas time. Rows of fun snowmen and loving hearts are highlighted against a deep blue winter sky. The quilt
Show Off Your Plates" Tote Tutorial
 Show Off Your Plates" Tote Tutorial We are excited to welcome our newest blog contributor Kris Thompson! Kris has been collecting Row-By-Row Experience fabric license plates and she has designed a fun
By Laurie Pessetto. Create your pattern. The decorative fabric will be on the edges of the circle layers.
 By Laurie Pessetto Create an elegant, soft, travel pouch to protect jewelry from damage and keep it organized even when your suitcase gets tossed into a plane or trunk! Skill Level Good sewing skills,
Whale Appliqué Hand Towels: Make Hand Washing Fun for Kids
 Published on Sew4Home Whale Appliqué Hand Towels: Make Hand Washing Fun for Kids Editor: Liz Johnson Friday, 29 September 2017 1:00 Wash your hands! As we move into cold and flu season, this is the strongest
BAUBLES & BEADS. Quick & Easy Machine Piecing Techniques P109. FINISHED SIZE: 73 1/2" x 87" Designed by Annis Clapp Machine Quilted by Donna Akins
 BAUBLES & BEADS P109 Quick & Easy Machine Piecing Techniques FINISHED SIZE: 73 1/2" x 87" Designed by Annis Clapp Machine Quilted by Donna Akins fast2sew Ultimate Seam Guide BAUBLES & BEADS Read all instructions
Cut 1 lightweight interfacing
 1 2 A note on interfacing for this bag: This pattern is intended to produce a slouchy bag, so you will want to look carefully at your fabrics before you decide on which interfacing and stabilisers to use.
BUTTERFLY GARDEN. The Red Boot Quilt Company
 BUTTERFLY GARDEN The Red Boot Quilt Company www.theredbootquiltcompany.com BUTTERFLY GARDEN Approx. Size 89 1/2in length x 92 1/2in width BEFORE THE FUN BEGINS Please read all instructions before you begin.
DOTTI. The Red Boot Quilt Company
 DOTTI The Red Boot Quilt Company www.theredbootquiltcompany.com DOTTI Approx. Size 52 1/2in x 52 1/2in This is a free pattern provided by The Red Boot Quilt Company 2018 STRICTLY NOT FOR RESALE OR DISTRIBUTION
Football Cornhole Bags
 Football Cornhole Bags Skill level - Beginner/Easy By Lucy Fazely Technique: Applique Brand: Dual Duty XP Crafting time: An Evening Materials Dual Duty XP general purpose, colors #3690 Purple and #7540
Easy Doll Blanket Pattern Courtesy of A Jot and A Journal
 Easy Doll Blanket Pattern Courtesy of A Jot and A Journal Every special little girl in your life will enjoy wrapping her favorite doll in this cozy blanket custom made just for her. This quick and easy
Canadian Quilters Association Pattern: Quilting Tools Tote Bag
 Canadian Quilters Association Pattern: Quilting Tools Tote Bag Description: * Size: 24 x 28", storage for: 6 x 24" ruler and 18 x 24" cutting mat, and all other equipment. * Easy to carry to workshops
 Summer Breeze Finished Quilt Size 65" x 65" Featuring fabrics from the Summer Bouquet collection by Page 2 of 6 Materials Additional Materials & Supplies Fabric Requirements 5773-66 (Large Floral) 5774-66
PROJECT PREPARATION FOR FEMININE HYGIENE KITS
 PROJECT PREPARATION FOR FEMININE HYGIENE KITS See below for recent updates to these instructions The pattern and instructions were downloaded from sewinpeace.blogspot.com under Tutorials, then Cloth Feminine
Pillow Trapunto. by Barbara E. Lies DISCOVER. Barbara E. Lies. Finished Dimensions: 14" x 18" Skill Level: Challenging
 Barbara E. Lies DISCOVER Pillow Trapunto by Barbara E. Lies Finished Dimensions: 14" x 18" Skill Level: Challenging Garden Party, 14" x 18", by Barbara E. Lies May 2014 American Quilter 33 DISCOVER Barbara
Creative Sewing. Quilt Block Pillow Instructions and Visual Aid
 Creative Sewing Quilt Block Pillow Instructions and Visual Aid 1. You will need (2) 3 wide strips of fabric that will coordinate well with a T-Shirt of your choice. Place the strips right sides together
Sapphire Sapphire Fabric Requirements: Cutting Directions:
 Quilt Designed by Deb Mosa Finished Quilt Approx. x - Finished Block Size: x Sapphire fabrics by Exclusively Quilters - Style #90 Fabric Requirements: Based on wi fabric -/ yards large (#00-0) yards (#00-)
FREE PROJECT SHEET DESIGNED WITH LOVE BY
 FREE PROJECT SHEET DESIGNED WITH LOVE BY QUILT DESIGNED WITH LOVE BY PAT BRAVO FABRICS DESIGNED BY AGF IN-HOUSE STUDIO AND PAT BRAVO FOR ART GALLERY FABRICS Finished Size: 62 ½ " 57" FABRIC REQUIREMENTS
SPRING MANDALA Cushion
 SPRING MANDALA Cushion The Red Boot Quilt Company SPRING MANDALA Quilt The Red Boot Quilt Company www.theredbootquiltcompany.com SPRING MANDALA QUILT & CUSHION Approx. size Quilt 56 1/2in x 56 1/2in Cushion
Circus Circus. Just Color! Fabric and Materials Needed. Featurning fabric from the Circus Circus collection. /Artworks! Licensing
 Circus Circus Panel: 2018-17 Flags and Blocks: 2019-11 Lt. Blue Tossed: 2020-11 Red Tossed: 2020-88 Yellow Print: 2021-4 Lt. Blue Tonal: 2023-11 *Med. Blue Tonal: 2023-17 Lime Tonal: 2023-66 Red Tonal:
Select nine fabrics that go nicely together. 1 light, 4 medium, and 4 dark prints.
 Kathy s Version of the Disappearing Nine Patch Quilt 46 ½ x 64 ½ This version uses nine fabrics, is stripped pieced, and has side borders only. As simple as pie to make and yet so warm and cozy. Use the
Below is an updated Materials List followed by instructions for the added option of interfacing the Tote and Handbag with Timtex!.
 Chelsea Bags New! Instructions for interfacing the Chelsea Bags with Timtex!. Below is an updated Materials List followed by instructions for the added option of interfacing the Tote and Handbag with Timtex!.
Fast Gift Wrap Sleeves in Felt & Cotton
 Published on Sew4Home Fast Gift Wrap Sleeves in Felt & Cotton Editor: Liz Johnson Thursday, 07 December 2017 1:00 Slice, stitch, tie, give. Just four steps to fast and festive (and reusable!) gift wrap
Picnic Stars Table Topper
 Free Project for more basic quilting resources and patterns visit landauerpub.com Picnic Stars Table Topper A free project from Landauer Publishing from Thimbleberries Four Seasons of Calendar Table Toppers
Quilt-Along-With-Me! Geo Dreams Quilt
 Quilt-Along-With-Me! Geo Dreams Quilt Pattern & Series by Amanda from 3and3quarters.net FINAL QUILT SIZE 145cm x 145cm (57 x 57 ) 1 The Geo Dreams quilt is a generously sized lap quilt made up of four
pattern BONUS Ruffled Halter By LiesL Gibson {from page 41}
 ruffled halter This adorable halter has a simple pull-on style that s easy and fun for summer, featuring a casing formed by the first ruffle for a clean, uncluttered finish. For other fun looks, try making
The Lydia Bag, featuring 2018 Pantone Color of the Year: Ultra Violet
 Published on Sew4Home The Lydia Bag, featuring 2018 Pantone Color of the Year: Ultra Violet Editor: Liz Johnson Monday, 29 January 2018 1:00 Sometimes you just need something simple! This beautiful bag
Finishes Size: 95" x 95" 2000, 2015, RJR Fabrics. All rights reserved. r
 Finishes Size: 9" x 9" 000, 0, RJR Fabrics. All rights reserved. r0.06- New Moon features a mariner s compass block alternated with a traditional pineapple block. Set side-by-side and with carefully shaded
Finished Size: 71" x 82"
 Finished Size: 71" x 82" Fabric Requirements 38020-12 38027-11 38020-14 38022-14 38021-11 38023-13 Fabric 1 Fabric 5 Fabric 9 Fabric 13 Fabric 17 Background Fabric 21 Strip Set 1 ⅓ yd. ⅓ yd. 38021-12 38025-11
Design, pattern, text and images are 2017 Anna Maria Horner and are intended for personal use.
 Introducing the Snuggle & Play Dress inspired by my feisty, littlest girl, Mary Anna, who loves being able to get dressed by herself every morning. The ease and comfort of the stretch knit top of the dress
COUNTRY BLOCKS SAMPLER
 COUNTRY LOCKS SAMPLER Finished Size: 53 x 73 Designed by Annis Clapp P112 P112 COUNTRY LOCKS SAMPLER General Instructions Complete instructions, full-size appliqué patterns and quilting templates are given
Sewing Spools Wall Quilt
 Sewing Spools Wall Quilt Display a four-block wall hanging showcasing thread spool and sewing machine designs in your sewing space. Fabrics are from the Winsome collection by Kim Diehl for Henry Glass
Alternating Four Patch Quilt: 43 x 51 inches 20 blocks, 8 inch finished
 Free Pattern by Shirley Sandoz of Mystery Bay Quilt Design www.mysterybayquiltdesign.com or email shirley@mysterybayquiltdesign.com Alternating Four Patch Quilt: 43 x 51 inches 20 blocks, 8 inch finished
featuring LETTERS COLLECTION AGF STUDIO
 featuring LETTERS FREE PATTERN COLLECTION BY AGF STUDIO QUILT DESIGNED BY AGF STUDIO FABRICS DESIGNED BY AGF STUDIO CAP-L-3000 ROSES & LETTERS CAP-L-3001 LOVE PUZZLE CAP-L-3002 XOXOXO CAP-L-3003 LOVE LIFE