Monitoring of Irrigation Projects using BHUVAN web Services NWA, Pune
|
|
|
- Mabel Rodgers
- 5 years ago
- Views:
Transcription
1 Monitoring of Irrigation Projects using BHUVAN web Services NWA, Pune 30th June, Field Data The field data required is name of the canal, name of the parent canal, design offtake chainage, design canal length, CCA/ICA of corresponding canal, design irrigation potential for the entire project (Table-1). Table 1.Field data Required for online monitoring S.No Name of Canal Name of parent canal Design offtake chainage (km) Design canal length (km) CCA (ha) ICA (ha) Design irrigation potential (ha) 2.2 Satellite Data The satellite data covering the study area will be available in Bhuvan website. The data is available under corresponding project and can be accessed by selecting the project. The specifications of the satellite data are shown in Table-2. Table 2.Specifications of Satellite Data Satellite Sensor Spatial Resolution Level of Product Cartosat-1/ Cartosat-2 Panchoromatic 2.5 m/1 m Orthorectified product

2 3 Overview of Online Monitoring The basic processes involved in this study are collection of field data, accessing of Bhuvan website through authorised login, creation of field database, digitisation of canal network, editing of canal network, field visit for ground truth, etc. The following figure shows the flowchart of methodology for online monitoring of AIBP projects. Flowchart of methodology for online monitoring of AIBP projects Page 3
3 4 Procedural Steps for Derivation of Canal Network Follow the sequence of the steps given below for satellite based derivation of canal network using Bhuvan web services: 1. Type the following URL name for accessing the AIBP module on Bhuvan website " 2. Scroll down 'Applications' list and Click on Irrigation theme (encircled in Red colour) Page 4
 The")

4 The following SatAIBP icon appears in the web page 3. Now click on SatAIBP icon (encircled in Red colour) The following SatAIBP main page appears. 4. Click on link "Click here for AIBP Monitoring Portal" at the bottom of the page. Page 5
 iii. AIBP Phase-III (Online Monitoring) - To be executed by CWC twice in a year. 5. To log in to AIBP Phase-III, the user can click on any one of the following links: \"login\" or \" AIBP Phase-III (Online Monitoring)\".")
5 The following page with below mentioned three links appears: i. AIBP Phase-I... Static database of 53 projects can be accessed under this link (Studies carried out by NRSC) ii. AIBP Phase-II... Static database of 50 projects can be accessed under this link (Studies carried out by NRSC) iii. AIBP Phase-III (Online Monitoring) - To be executed by CWC twice in a year. 5. To log in to AIBP Phase-III, the user can click on any one of the following links: "login" or " AIBP Phase-III (Online Monitoring)". Click on link " AIBP Phase-III (Online Monitoring) ". Page 6

6 The following message appears on the web page. 6. Click on "Ok" in the message box Page 7

7 The following Bhuvan authentication page appears The Bhuvan signin has three levels of login options: i. Central : This login is only for officers located at Head quarters, CWC. The users of central login can have access to all the projects in Phase-III. ii. Regional: This login is only for officers located at Monitoring Directorate of specific region (North/south/Central/East/West). The users of regional login can have access to all the projects under their jurisdiction. iii. Field Monitoring Directorate: This login is only for officers located at concerned Field monitoring directorate. The users of this login can have access to the concerned projects only. Page 8

8 7. The user has to enter the username and password. Eg. Username: team 1 Password: team1 After login, the following page appears. Then select a project either directly from the 'Irrigation Project' drop down list or using 3 dropdown menus sequentially state, river basin and irrigation project. Eg. i. State : Rajasthan ii. River Basin iii. Irrigation Project : Narmada : Narmada Page 9
9 After selecting the project, click on "View". This view button changes to "Remove" button. To remove the contents of the current displayed project click on "Remove" button. 8. The cartosat data of the selected project appears as shown below. The red outlines above shows the different options available and are described below: i) The 1 st folder, 'Cartosat -1' contains satellite images and corresponding satellite Date Of Pass (DOP) the selected project. If the project area is also covered by Cartosat-2 data it will be shown as 'Cartosat-2' folder. The latest satellite image is by default checked. To display other images check on respective dates. To view the dates of pass of an image, check the corresponding DOP layer. Page 10

10 ii) The 2nd folder, 'Phase-1 Layers' (or 'Phase-2 Layers') contains satellite image, canal network, structures and project boundary layers of that particular project. If the selected project was covered under Phase-1 the folder name appears as 'Phase-1 Layers'. If the selected project was covered under Phase-2 the folder name appears as 'Phase-2 Layers'. If the selected project was not covered under Phase-1 or Phase-2 no folder is displayed. To view the content, click on the corresponding check boxes. iii) Immediately below the folders Activate Swipe, Deactivate Swipe, Canal Details and Progress buttons are available. 'Activate Swipe' tool helps in comparing the progress of the project during the different periods of satellite images of acquisition. Click on "Activate swipe" button and place cursor over the image portion, as the user moves the cursor from left to right, the image overlaid on top becomes transparent to view the bottom image as shown below. As the user moves the cursor from left end to right end, the bottom image can be viewed and vice versa. 'Deactivate Swipe' to end the swipe mode click on this button. Page 11
.")
11 If the Cartosat image is available in Phase-1, to compare the progress of the project from Phase- 1 to Phase-3, this swipe tool can be used. First, check the 'Cartosat Image-Phase1' check box and then click on 'Activate swipe' button (by default latest image in Cartosat-1 folder' is checked on). Now place the cursor over the image portion and move left to right to view the bottom image(pahse-1) as shown below. To end the swipe mode click on 'Deactivate Swipe' button. Page 12

12 To compare any other pair of images, first uncheck all other layers and check the necessary images. Then activate swipe. 'Canal Details' button helps to view the list of canals and related field and satellite derived information of the selected project. This table contains two modules namely 'Field Data Create/Update' and 'Canal Digitization'. 'Field Data Create/Update' module is used for creation or updation of canal network field data. 'Canal Digitization' module is used for digitisation of canal network. This module also contain facility to 'Export to Shapefile' and 'Export to CSVfile'. The spatial data (digitised canal network) can be exported into shapefile format and non-spatial data (tabular data) can be exported into CSVfile. Page 13


13 The 'Progress' button, if clicked a table appears as shown below. This table contains physical progress and financial progress radio buttons. By default physical progress button is selected. Note: Physical and financial progress formats are as given in CWC Monitoring repots. The information to be filled by CWC officials after assessing the project progress using satellite data. The user can add necessary information on progress of the project by using the tools described below. The user can add new row by clicking on '+' tool. After entering necessary information press enter. Add new row save Delete row Edit selected row Page 14

14 To edit any row click on the row and then click on 'edit row' tool, after editing is completed press enter. To delete any row click on the row and then click on 'delete row' tool. To save the entered data click on 'save' tool. The user can bring cursor over the tool to get tooltip information. iv) The "Canal Network" check box, if checked shows the entire canal network of the project along with names of canal network (if already available). v) The project officers wishes to convey any specific remarks about a feature to the State/Central level officers, a facility is provided which shown in the rectangular outline(refer figure shown below). This facility can be activated by clicking on "Activate" button. More detailed description is given in step.19. Page 15


15 vi) Below the Remarks box, two buttons are available namely "Upload Files' and 'Download Files' Upload Files: Project related files can be uploaded. If the user clicks on this button the following dialog box appears. The files can be selected by clicking on 'Browse' button The user can upload the files as 'project specific' or 'others' Project specific: The radio button is to chosen for uploading a file of a particular project. Others: The radio button is to chosen for uploading a file of general nature. Example, a table format of financial progress or a proforma, which is useful for all projects. Page 16
, CE(PMO), MoWR. Private: Can be viewed only by the user who uploads the files.")

16 Public: Can be viewed by all AIBP users of CWC (includes Field and Regional Directorates(M), CE(PMO), MoWR). Protected: Can be viewed by Field Directorate and its corresponding Regional Directorate (M), CE(PMO), MoWR. Private: Can be viewed only by the user who uploads the files. After deciding about the user accessibility, category type should be selected from the available types: Documents, Maps, Monitoring Reports, Tables and Others. Finally click on "upload' button. Download Files: Click on this button to view the list of available files. To download a file, click on 'file name'. To delete the files click on 'delete' (Files can be deleted only by users who uploaded them). vii) Mobile app Field Data: The check box "Mobile app Field Data", if checked displays markers on the satellite image at different locations where field photographs and ancillary information is available. If the user clicks on any marker, it shows the photograph taken at the location and Page 17
 Bhuvan-AIBP Discussion Forum: Click on this hyper link to go to exclusive Bhuvan-AIBP discussion Forum. In this forum all AIBP users can post queries and answers related to their projects.")
17 associated remarks. The details regarding mobile application are discussed in section 5 (Field visit for ground truth verification). viii) Bhuvan-AIBP Discussion Forum: Click on this hyper link to go to exclusive Bhuvan-AIBP discussion Forum. In this forum all AIBP users can post queries and answers related to their projects. ix) A "Find" option at top left of the page provides a search facility. The user has option to search either by city or latitude and longitude (in decimal degrees). Eg. City Name : Hyderabad Latitude and Longitude :24.9,71.5 Page 18

 Clicking on 'My Layers' will list the external layers added by the")
18 If the user enters 24.9,71.5 and click on 'Go', a marker appears on the place of search as shown below. x) Clicking on 'My Layers' will list the external layers added by the user. The user can add external layer (shape file) using the 'Add Layer' facility as shown below. Page 19

19 9. Now to start creating canal network, click on "Canal Details" button. The following message appears showing no data is available. This message appears first time where no data is available. To start creation of new canal network layer, 2 steps are to be done in sequence: i. Field database creation and ii. Canal digitisation 10. First click on radio button "Field data create/update" The following table appears Page 20
20 The table contains the columns as shown below: Canal No. - Canal Serial number (To be entered by user) Canal name - Name of the canal (To be entered by user) Parent canal - Name of parent canal (To be entered by user) Canal type - Type of canal (To be selected by user) Design chainage - Designed chainage of canal in km (To be entered by user) Design Length - Designed length of canal in km (To be entered by user) Sat chainage - Satellite derived chainage of canal in km (To be entered by user) Sat length - Satellite derived length of canal in km (Computed by System) Balance Length No of Gaps - Satellite derived gap lengths in canal in km (Computed by System) - Satellite derived number of gaps in canal (Computed by System) Sat Progress - Satellite derived progress in length of canal in % (Estimated as satellite derived length divided by Design length of a canal - To be entered by user) CCA -CCA of corresponding canal in Ha (To be entered by user) ICA - ICA of corresponding canal in Ha (To be entered by user) Design IP - Design Irrigation Potential of canal in Ha (To be entered by user) Sat IP - Satellite derived IP of canal in Ha (To be entered by user) Remarks - Remarks if any (To be entered by user) Page 21
21 11. Click on "+" tool for adding a new canal Add new row save Delete row Edit selected row A new row is created as shown below for entering the details of the canal. The columns with white background are to be entered by user and yellow background are automatically computed by system as mentioned above. 12. Now enter the necessary details of the canal and press 'Enter'. The entire row changes into yellow background and cannot be edited. To edit a row, select the row by clicking on it and press tool as shown above (step 11) Page 22


22 13. After entering the details of a canal the next step is digitisation of canal. To start digitisation click on the radio button 'Canal Digitisation'. The table appears as shown below. 14. To start digitisation of the canal click on button 'Create' located at the end of the row (as shown above). The following set of new facilities appear (shown in red outline box) Page 23
23 The tools are described below. Draw canal End canal Modify Segment Split segment Delete segment Snap segment None - To digitise a canal - To stop the digitisation of canal - To edit already digitised canal (line vertices can be adjusted) - To split canal line segment - To delete canal line segment - To snap canal line segment - To close the editing tasks Below the editing tools two button are available. Save clear - To save canal line after digitisation is completed - To remove contents of canal To draw canal, click on 'Draw canal' radio button. The cursor changes into cyan colour circle, start digitising along the canal and finish digitisation by Double-clicking the mouse. Page 24

24 Once the user chooses to click on 'Draw canal' radio button, a box appears top left corner of the screen (red outline) displaying length of the segment digitised. After digitisation of a canal, click on 'End canal' button to stop digitisation of canal. To modify the line segment, click on 'Modify segment' and select the line segment to be edited. The line changes in to editable mode with vertices as shown below. Hold the vertice and move to the desired place. To split a line segment, click on 'split segment' and draw across the line segment to split the line segment into two separate line segments. Page 25

25 To delete a line segment, click on 'delete segment' and click on the line segment which the user want to delete. A message appears "Are you sure you want to Delete the Feature". Click on 'OK' will delete the selected segment as shown below. To snap two line segments which are digitised as shown below Page 26
26 Click on 'Snap segment' and then click on any one line. The line segment changes in to snapping mode as shown below. Hold the end vertice of the line (snap mode) and drag towards the other line segment and drop it so that both the lines join together. A message appears "Are you sure you want to Merge the Features". Click on 'OK' will merge two segments into one segment. Finally to save the canal digitised, click on 'Save' button. 15. The same steps can be repeated for other canals by entering the details of canals and digitisating the canals. 16. Once a canal is digitised and to carry out any editing work of the canal line again click on 'Canal Details' button. The table appears as shown below. But at the end of the corresponding canal row 'edit' button appears instead of 'create' button. Page 27


27 17. Click on 'edit' button for any editing of corresponding canal. The tools appears as shown below. The functionality of these tools are same as described above(step.14). Page 28

28 After editing work is completed, click on 'save' button to save the editing work. If the user has wrongly digitised canal and want to delete the entire canal, click on 'Delete Canal' button. 18. To view only specific canals already digitised, the user can click on 'Canal Details' button. The Table containing canal list appears as shown below. Now click on the specific canal name listed in the table, the digitised canal appears on the image screen. The Canal.No and canal name appears on the image along with canal. A button 'ClearDisplay' appears below the 'Canal Details' button. To remove the displayed canals click on 'Cleardisplay' button. If the user wants to view all the canals in the project which are already digitised click on check box 'Canal Network'. The user can view all the canals in the project (already described in iv of step.8). Page 29

29 19. The project officers wishes to convey any specific remarks about a feature to the State/Central level officers, clicking on "Activate" button as shown below. For example, the user wants to convey that the road bridge on the canal is recently completed. Click on 'Activate' button and then click on location of road crossing the canal. The following table appears. Page 30

30 The table shows latitude and longitude of the location in decimal degrees and the user name. These rows cannot be edited. The other two rows namely 'Subject' and 'Remarks' are editable. The user can enter the necessary information and click on 'submit' button. Click on 'Deactivate' button to close the activation mode. 20. To view the remarks added, user should check the 'Marked Points' check box. A yellow colour marker appears. Click on the marker, the remarks appears shown below. The remarks can be edited by the same user who has posted it, but not after reply posted by the concerned users. The remarks can be accessed by the concerned user and reply can be posted by clicking on the 'Reply' hyperlink as shown below. The user can remove the 'Marked point' by clicking on 'Delete Marked point'. Page 31

31 21. After finishing the session,click on "Logout" '". a.:::..ac...tof.at l e _oa..zou O..fJOt'_OtCfJOll sc.. u yt n I! -..,.,.,...,,... ọ.... -,..._ Page I
32 5 Field Visit for Ground Truth Verification NRSC has developed a mobile application for smart mobile phones which will be made available to CWC officers and project officials. The users need to install this application in their mobile phones to use in the field visit. The mobile application helps in transferring the field photographs taken during field visit for ground truth verification process along with related text information to Bhuvan server automatically. The photographs taken in a specific project at a specified location will be geolocated in the corresponding Cartosat satellite image accurately. The photographs taken in field along with remarks, if uploaded through mobile can be viewed in the Cartosat image with near real time at location where the photograph taken (based on latitude and longitude values). The salient features of the mobile application are listed below: x It is highly configurable, customizable and user-friendly. x The spatial as well as non-spatial data for point, line and polygon features can be collected in the field. x Multiple field photographs can be collected along with the field parameters. x Provision is made to send the data later in the absence of GPRS connectivity at the time of data collection. x Server programs are designed to receive the data and populate the database and file system. x Visualization mechanisms are provided for the repository with search and query operations and overlaying the data on Bhuvan. Page 33


33 Architecture Design Overall Architecture Design of Mobile App The above figure shows the overall architecture with all salient elements participating in the process from the field deployed mobile device to the server and visualization infrastructure. The data collected by the mobile device using the developed application and in-built GPS and camera, is transferred in near real time using GPRS via the cellular network. The cellular network gateways deliver the data to the central facility via internet in the form of or http upload protocols. The architecture makes extensive use of XMLs both in configuring the collection profiles as well as encapsulating the collected samples. The received data including the GIS feature data is organized in RDBMS and files in appropriate formats like PostGIS, Shapefiles and KMLs apart from the original XML format. Suitable software programs enable the integration of field data with visualization vehicles like Bhuvan portal. Page 34
. -- -- +- I I I I I I I.")

34 Work Flow The work flow of field data collection using smart phone (android OS) I I I I I I I.a: I ;E: I... I c "- I ::.51 I I I I I Ị._, _ Upload Send 'ailed Pace Send Later I I I "----, I I Upload Send later Pace Page I
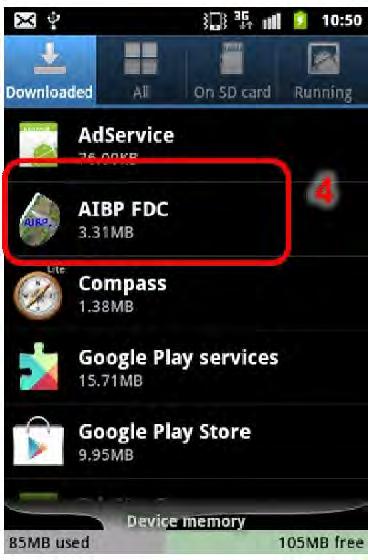
35 5.1 Mobile specifications The following are the specifications required for mobile phones to be used in ground truth verification x x x x x x x x x x x x GSM Smartphone with 2G and 3G capability Android OS version 2.3 or above 800MHz or higher processor Internal memory of 1GB or more Micro SD card (4GB or more) Capacitive touch screen 3-inch or larger 2G GPRS/ EDGE, 3G, WiFi, Bluetooth Built-in GPS Built-in camera with 2MP resolution or higher USB/ Mini/ Micro-USB interface Standard battery (Li-ion 1350 mah or better) Required cables and accessories The following mobiles are tested using the application developed for AIBP project. x Samsung Galaxy Y, x x Samsung S Duos, Galaxy Ace, x Galaxy SII/ SIII, or similar models in other brands running Android OS version 2.3 or above 5.2 Procedural Steps for Field Visit using Mobile App The mobile application developed by NRSC was named as Field Data Collection (FDC) app AIBPFDC version Installation of Software The mobile app will be provided either through Bhuvan website or CD or any other media consists of a winzip file. Follow the steps given below for installing the mobile app. Page 36


36 1. Copy the winzip file in to PC and the file can be uncompressed by right clicking the mouse button and select Extract here. 2. The FDC app AIBP FDC v 1.1 consist of two folders. a. Doc folder consist of documentation file/ manual. b. Software folder- consists of apk file. Page 37


37 3. The 'apk' file is shown below. Connect smart phone to PC using USB cable. The 'apk' file must be copied into the SD Card of the mobile (i.e.) root folder. 4. Scroll the smart phone from top to bottom on the touch screen and tap on the USB connected option to connect to the PC. Page 38


38 5. Tap Connect storage to PC button to connect the smart phone. This connection allows to copy files between the computer and Android's SD card. 6. Click on OK. Now SD Card of the smart phone can be accessed as external drive in the PC. 7. Copy the file from PC. 8. Paste into root folder of SD Card of the smart phone. See the figure as given below. Page 39

. 10.")


39 9. Now, in smart phone click on Disconnect storage from PC to disconnect the device from computer (PC). 10. Double click on 'AIBPFDC.apk' file in smart phone to install mobile app. 11. Click on Package installer. 12. Click on "Install" button. Page 40
.")


40 13. After installation, click on Open to open the app or click on Done (The mobile screen appears as shown on right side image). Now click on "AIBPFDC" icon to open the app Preparation of Device Switch off auto-rotation of the mobile screen: Scroll the screen from top to bottom which opens a GUI with option to switch-off. Tap on the auto-rotation icon to de-highlight (i.e.) switch-off auto-rotation. Page 41


41 Change camera resolution to 640X480 in mobile s camera: 1. Click on the camera icon on screen. 2. Click on camera setting. 3. Scroll for camera resolution and tap on the resolution icon for drop down menu. 4. set the lowest resolution. Page 42

42 5.2.3 Mobile app Home Page The mobile app home page (FDC: Start Menu page) appears as shown below. The process of collection of field photographs with location information and related details involves the following three steps sequentially. i) The user has to enter his/her details using "Application Config Settings" button. This entry of user details is one time job for a person for a particular project. These details have to be changed whether person or project changes. ii) The user has to choose "select profile type" button and then enter related details such head works, canal, etc. iii) The user has to collect field data using "Collect Field Fata" such as GPS (latitude and longitude) reading and capture a photograph. The user has the option of sending the data immediately or at a later time. Page 43

 The user details are part of Application Configuration setting page and they are entered by user and the process is one time")
43 The steps ii and iii have to be repeated for each point of observation. In the absence of mobile network availability the collected photograph and data can be sent to the server at a later time using "Send already collected Data" button. Use "Exit" button to close the field data collection session Application Configuration Settings (User Details) The user details are part of Application Configuration setting page and they are entered by user and the process is one time job until user or project changes. The details are Device ID, Observer Name, Device mobile number, Organisation, etc that are entered by user. Steps: 1. Application Config. Setting >> 2. Enter the details >> 3. Save Changes Page 44

44 5.2.5 Profile Type The user must select the profile type for field data collection categorized into 8 types. They are Head Works, Canal, Irrigation Structures, CD Structures, Other Structures, Lift Scheme, Other works and Bhuvan POI (for details of profiles refer section 5.4). Then tap on "Done". Page 45

45 5.2.6 Collect Field Data (collection, save and send) The page of "Collect Field Data" appears as shown below. Page 46
 4. Pick Point 5. Picked Lat/Long. Info displayed in list box 6. Click on Take Photo 7. Click on Capture button 8.")
46 To collect field data following steps to be carried out sequentially (refer figures given below). 1. Click on Collect Field Data" 2. Select the Feature Type 3. Wait till Lat/Long appears (ensure accuracy value as 10 or below) 4. Pick Point 5. Picked Lat/Long. Info displayed in list box 6. Click on Take Photo 7. Click on Capture button 8. Click on Save to save photo 9. First Photo is displayed 10. Second photo is displayed 11. Enter the text related to captured photos Page 47


47 Page 48


48 12. Enter the observation details 13. Click on Save button to save collected observations 14. Message box appears and click on OK 15. The Send button gets enabled to click and click on Send 16. Alert appears Data sending Started 17. After sending the collected data to central server message box appears, click on OK to collect next observation. Page 49


49 If user does not know about internet connectivity and click on send button, a message box appears as shown below; further user can opt for send later option. 17a. Message appears stating No NetWork Click on OK 18. Click on Send Later 19. Message appears with Data saved for sending Later. Page 50


50 5.2.7 Send Already Collected Data Once the internet connectivity is restored, user can follow the step 3 to If user knows that there is no internet connectivity then Send Later option can be opted, Click on Send Later". 2. Message box appears Data saved for sending later, Click on OK button. (as already explained in steps 18 and 19). 3. Once the internet connectivity is restored click on Send Already Collected Data button in startup page. 4. Click on upload Send Later samples. 5. This page lists send later samples and user can select only one at a time to send collected data to central server, Click on radio button against the sample. 6. Click on Send button. 7. Message box appears with upload started message, click on OK. Once the data is uploaded into central server message box appears with Uploaded data Successfully, click on OK to send next observation. Page 51


51 Page 52


52 In case, if there is internet connectivity failure during sending process. The send fail data automatically appear in upload failed data. The following are steps to be followed to "Upload send Failed Samples". 1. once the internet connectivity is restored click on Send Already Collected Data button in startup page. 2. Click on upload Send Failed samples. 3. This page lists send failed samples and user can select only one at a time to send collected data to central server, Click on radio button against the sample. 4. Click on Send button. 5. Message box appears with upload started message, click on OK. Once the data is uploaded into central server message box appears with Uploaded data Successfully, click on OK to send next observation. Page 53

53 5.2.8 Other Functions in FDC Page If the user selects "Collect Field Data" button before choosing profile type the following alert message appears. Page 54

54 If the user wants to clear or delete the current point photograph and details, click on "Reset" button. If the user clicks on "Home" button without saving the current point photograph and details will be deleted and Mobile app home page( FDC start Menu page) appears. Page 55


55 If the user skips the mandatory steps, the following alerts appear. If the user wants to enter specific details or name under "others" type, category text box option can be used. Page 56

56 5.2.9 Un-installation of Software The steps for un-installation of software are given below. 1. Click on Setup button. 2. Click on Applications button. 3. Click on Manage Application button. 4. Select the application, Click on AIBPFDC. 5. If the application is not properly close then click on Force Stop. 6. Click on OK button to restart the application. 7. Click on Uninstall. 8. Click on OK button to start uninstall process. 9. After uninstall the application a message box appears with uninstall finish, click on OK. Note: To force stop the application follow the steps from 1 to 6 of uninstall procedure. Page 57


57 Page I
58 5.3 AIBP Profiles and Parameters List of profiles available and parameters under each profile in the AIBP mobile application developed by NRSC are as given below. Profiles 1. Head works 2. Canal 3. Irrigation structures 4. CD structures 5. Other structures 6. Lift scheme 7. Other works 8. Bhuvan POI Profile 1:Head works Parameter name: Type Parameter name: Physical status Parameter name: Remarks - Dam, weir, barrage, others - progress, completed - Enter text Profile 2:Canal Parameter name: Name Parameter name: parent canal Name Parameter name: canal Type - Enter text - Enter text - Main canal, Branch canal, Distributory, Branch distributory, sub-distributory, Major, Minor, Lateral, Sub-minor, Sub-lateral. Page 59
59 Parameter name: Physical status Parameter name: Lining Parameter name: View direction Parameter name: Remarks - Earth work, sectioning, lining, completed, gap - Lined, unlined - upstream, downstream - Enter text Profile 3:Irrigation structures Parameter name: Type Parameter name: canal name Parameter name: Physical status Parameter name: Remarks - Cross Regulator, Head Regulator, Drop, Escape, others - Enter text - Progress, completed, pending - Enter text Profile 4:CD structures Parameter name: Type Parameter name: canal name Parameter name: Physical status Parameter name: Remarks - Aqueduct, Syphon, super passage, canal syphon, under tunnel, box culvert, pipe culvert, others - Enter text - Progress, completed, pending - Enter text Profile 5:Other structures Parameter name: Type Parameter name: canal name Parameter name: Physical status Parameter name: Remarks - Road bridge, Rail bridge, others - Enter text - Progress, completed, pending - Enter text Profile 6:Lift scheme Parameter name: Source Type Parameter name: Source name - River, Reservoir, Canal, others - Enter text Page 60
60 Parameter name: Approach channel Parameter name: Pump house Parameter name: Lift canal Parameter name: Delivery Cistern Parameter name: Remarks - Progress, completed, pending - Progress, completed, pending - Progress, completed, pending - Progress, completed, pending - Enter text Profile 7:Any other works Parameter name: Type Parameter name: canal name Parameter name: Physical status Parameter name: Remarks - Enter text - Enter text - Progress, completed, pending - Enter text Page 61


61 6 Description of Other Bhuvan Tools 2D Bhuvan, a web mapping service application, provides a highly responsive, intuitive mapping interface with detailed imagery and embedded map data. It is based on the OpenLayers Open Source Project which offers powerful, user-friendly mapping technology to organize the satellite data and map data. Some of the functional capabilities of Bhuvan 2D are Map Navigation, Map Panning, its ability to add a point, polygon, line on the terrain, add drawings, measure area and distance on the terrain homepage, from their current location on the Bhuvan geo-portal.. Page 62
62 Home: The Home icon on the top right hand side corner of the page, takes the user back Help: The Help icon on the top right hand corner of the page gives detailed instructions to the users about using and navigating on Bhuvan 2D. Tool Button: The Tool Button on the top right hand corner of the page, when clicked, expands to display 7 different tools. These seven tools perform the following functions: Zoom-In: This tool helps the users to zoom-in to a particular location from their current location on the 2D map. Zoom-Out: This tool helps the users to zoom-out to a particular location from their current location on the 2D map. Full- Extent: The Full-Extent tool helps to zoom out of the current location of the user to the maximum extent of the map. Fixed Zoom-In: This tool helps the users to zoom-in to a particular location in a fixed manner, from their current location on the 2D map. Users can zoom into a location at a fixed level of zoom, at a time. Fixed Zoom-Out: This tool helps the users to zoom-out to a particular location in a fixed manner, from their current location on the 2D map. Users can zoom out from a location, at a fixed level of zoom, at a time. Go Back to Previous Extent: This tool takes the users to the immediate previous location accessed by them on the Bhuvan 2D map. With the help of this button, users can go back to all the pages they had accessed, in the backward order. Go to the Next Extent: This tool takes the users to the pages accessed by them on the Bhuvan 2D Map, in a forward manner. Page 63
63 Overview Map: The Overview Map feature displays an additional view of the earth, with a position indicator that corresponds to the user s current view inside the 2D map. This shows a miniature overview of the user s current location on the map, and also reflects the change on the overview map as the user navigates on the 2D map. Navigational Tools: 1. Left arrow: to change the map direction to the left. 2. Up arrow: to change the map direction upwards. 3. Right arrow: to change the map direction to the right 4. Down arrow: to change the map direction downwards. 5. Zoom controller: to zoom in/out freely on the map. Navigational Map: This functionality overlays the WMS layers of rediff map on the Indian boundary. Users need to click on the Navigational Map icon to view the Rediff maps of the Indian region. Area Measurement : The Area tool allows you to define an area of map and obtain its exact measurements. Page 64
64 x x x x Click on the Area Measurement tool which is located on top of the 2D map Use the mouse to draw on the map such that it covers the area you desire The area of the selected region is now displayed. To stop selecting points, just double click. Distance Measurement : The Distance Measurement tool allows you to measure the horizontal distance between two or more points on the map x Mark the measure area using your mouse. x Every area marked will then display the distance between the points marked. x To stop selection, just double click. x This value is displayed in the altitude and distance units x Pan : x You can use the Pan functionality to view different locations on the plane, in a panoramic effect, by scrolling the map as required. Page 65
65
66


67 \\ +=6:-t:n:::-ou vt"':a"='"n seta Gateway to Indian Earth Observation
AUIG2 User s Manual (ALOS/ALOS-2 Consolidated Edition)
") AUIG2 User s Manual (ALOS/ALOS-2 Consolidated Edition) Ver. No. First edition AUIG2 User s Manual (ALOS/ALOS-2 Consolidated Edition) Revision History Revision Date Revised Pages Revision Details A 2014/11/19
AUIG2 User s Manual (ALOS/ALOS-2 Consolidated Edition) Ver. No. First edition AUIG2 User s Manual (ALOS/ALOS-2 Consolidated Edition) Revision History Revision Date Revised Pages Revision Details A 2014/11/19
ExpoM - ELF User Manual
 ExpoM - ELF User Manual Version 1.4 ExpoM - ELF User Manual Contents 1 Description... 4 2 Case and Interfaces... 4 2.1 Overview... 4 2.2 Multi-color LED... 5 3 Using ExpoM - ELF... 6 3.1 Starting a Measurement...
Timekeeper/Statistical tool for Basketball Sponsor: Prof. Wayne Dyksen & MSU Basketball Team Spring User Guide
 Timekeeper/Statistical tool for Basketball Sponsor: Prof. Wayne Dyksen & MSU Basketball Team Spring 2004 User Guide Team 2 Edward Bangs Bryan Berry Chris Damour Kim Monteith Jonathan Szostak 1 Table of
User Manual. This User Manual will guide you through the steps to set up your Spike and take measurements.
 User Manual (of Spike ios version 1.14.6 and Android version 1.7.2) This User Manual will guide you through the steps to set up your Spike and take measurements. 1 Mounting Your Spike 5 2 Installing the
Manager Client. User Guide V
 Manager Client User Guide V1.25 www.mobiletornado.com pushtoexperience Introduction Manager Client provides the ability to manage communications within an organisation, view mobile devices live and historic
Example Application C H A P T E R 4. Contents
 C H A P T E R 4 Example Application This chapter provides an example application of how to perform steady flow water surface profile calculations with HEC-RAS. The user is taken through a step-by-step
PlanIt! for Photographers ALL-IN-ONE PLANNING APP FOR LANDSCAPE PHOTOGRAPHERS QUICK USER GUIDES
 PlanIt! for Photographers ALL-IN-ONE PLANNING APP FOR LANDSCAPE PHOTOGRAPHERS QUICK USER GUIDES User Interface Overview Title Bar Ephemeris Pager Page Indicator Info Window Scene Pin Map with Info Overlay
1. What is SENSE Batch
 1. What is SENSE Batch 1.1. Introduction SENSE Batch is processing software for thermal images and sequences. It is a modern software which automates repetitive tasks with thermal images. The most important
Hydraulics and Floodplain Modeling Managing HEC-RAS Cross Sections
 WMS 10.1 Tutorial Hydraulics and Floodplain Modeling Managing HEC-RAS Cross Sections Modify cross sections in an HEC-RAS model to use surveyed cross section data v. 10.1 Objectives Build a basic HEC-RAS
nvision Actuals Drilldown (Non-Project Speedtypes) Training Guide Spectrum+ System 8.9 November 2010 Version 2.1
 Training Guide Spectrum+ System 8.9 November 2010 Version 2.1") nvision Actuals Drilldown (Non-Project Speedtypes) Training Guide Spectrum+ System 8.9 November 2010 Version 2.1 Table of Contents Introduction. Page 03 Logging into Spectrum.Page 03 Accessing the NVision
nvision Actuals Drilldown (Non-Project Speedtypes) Training Guide Spectrum+ System 8.9 November 2010 Version 2.1 Table of Contents Introduction. Page 03 Logging into Spectrum.Page 03 Accessing the NVision
EOS 80D (W) Wireless Function Instruction Manual ENGLISH INSTRUCTION MANUAL
 Wireless Function Instruction Manual ENGLISH INSTRUCTION MANUAL") EOS 80D (W) Wireless Function Instruction Manual ENGLISH INSTRUCTION MANUAL Introduction What You Can Do Using the Wireless Functions This camera s wireless functions let you perform a range of tasks wirelessly,
EOS 80D (W) Wireless Function Instruction Manual ENGLISH INSTRUCTION MANUAL Introduction What You Can Do Using the Wireless Functions This camera s wireless functions let you perform a range of tasks wirelessly,
Manual Web Portal pettracer GPS cat collar Version 1.0
 Page 1 / 10 Table of Content System Overview... 3 How the pettracer system works... 3 Live Tracking Mode (Real Time)... 3 Passive Tracking Mode... 3 Web portal access via Smartphone and Web browser...
Module 1C: Adding Dovetail Seams to Curved Edges on A Flat Sheet-Metal Piece
 1 Module 1C: Adding Dovetail Seams to Curved Edges on A Flat Sheet-Metal Piece In this Module, we will explore the method of adding dovetail seams to curved edges such as the circumferential edge of a
Go Daddy Online Photo Filer
 Getting Started and User Guide Discover an easier way to share, print and manage your photos online! Online Photo Filer gives you an online photo album site for sharing photos, as well as easy-to-use editing
ISCapture User Guide. advanced CCD imaging. Opticstar
 advanced CCD imaging Opticstar I We always check the accuracy of the information in our promotional material. However, due to the continuous process of product development and improvement it is possible
The ideal K-12 science microscope solution. User Guide. for use with the Nova5000
 The ideal K-12 science microscope solution User Guide for use with the Nova5000 NovaScope User Guide Information in this document is subject to change without notice. 2009 Fourier Systems Ltd. All rights
LinkAlign-60RPT Set-up and Operation Manual
 LinkAlign-60RPT Set-up and Operation Manual LinkAlign Setup and Operation Proprietary, Nextmove Technologies Page 1 LinkAlign Setup and Operation Proprietary, Nextmove Technologies Page 2 Description of
Downloading Imagery & LIDAR
 Downloading Imagery & LIDAR 333 Earth Explorer The USGS is a great source for downloading many different GIS data products for the entire US and Canada and much of the world. Below are instructions for
ZONESCAN net Version 1.4.0
 ZONESCAN net.0 REV 1. JW ZONESCAN net 2 / 56 Table of Contents 1 Introduction... 5 1.1 Purpose and field of use of the software... 5 1.2 Software functionality... 5 1.3 Function description... 6 1.3.1
----STAR S86 GPS Receiver. User Guide. SOUTH CO., Ltd.
 ----STAR S86 GPS Receiver User Guide SOUTH CO., Ltd. www.southsurveying.com Sales@SOUTHsurveying.com 2 CONTENTS Chapter 1 Introduction... 1 STAR S86 GPS - System Summary... 1 Technical Specification...
Apple Photos Quick Start Guide
 Apple Photos Quick Start Guide Photos is Apple s replacement for iphoto. It is a photograph organizational tool that allows users to view and make basic changes to photos, create slideshows, albums, photo
AreaSketch Pro Overview for ClickForms Users
 AreaSketch Pro Overview for ClickForms Users Designed for Real Property Specialist Designed specifically for field professionals required to draw an accurate sketch and calculate the area and perimeter
Welcome to JigsawBox!! How to Get Started Quickly...
 Welcome to JigsawBox!! How to Get Started Quickly... Welcome to JigsawBox Support! Firstly, we want to let you know that you are NOT alone. Our JigsawBox Customer Support is on hand Monday to Friday to
CONTENTS NCOMPAS MEDIA 1 USER MANUAL
 2015 CONTENTS INSTALLATION & ADMINISTRATION... 4 INTRODUCTION... 4 INSTALLATION INSTRUCTIONS... 4 MANAGE THE DATABASE PATH... 5 LOGGING IN... 6 CREATING AND EDITING USERS... 6 MANAGING THE MEDIA PATH...
SKF TKTI. Thermal Camera Software. Instructions for use
 SKF TKTI Thermal Camera Software Instructions for use Table of contents 1. Introduction...4 1.1 Installing and starting the Software... 5 2. Usage Notes...6 3. Image Properties...7 3.1 Loading images
Hydraulics and Floodplain Modeling Managing HEC-RAS Cross Sections
 v. 9.1 WMS 9.1 Tutorial Hydraulics and Floodplain Modeling Managing HEC-RAS Cross Sections Modify cross sections in an HEC-RAS model to use surveyed cross section data Objectives Build a basic HEC-RAS
AmericaView EOD 2016 page 1 of 16
 Remote Sensing Flood Analysis Lesson Using MultiSpec Online By Larry Biehl Systems Manager, Purdue Terrestrial Observatory (biehl@purdue.edu) v Objective The objective of these exercises is to analyze
Submittal Exchange Design Team User Guide
 Submittal Exchange Design Team User Guide Version 17 November 2017 Contents About This Guide... 9 Access/Permissions... 11 What is Submittal Exchange for Design?... 11 How Can I Get Submittal Exchange
Setup and Walk Through Guide Orion for Clubs Orion at Home
 Setup and Walk Through Guide Orion for Clubs Orion at Home Shooter s Technology LLC Copyright by Shooter s Technology LLC, All Rights Reserved Version 2.5 September 14, 2018 Welcome to the Orion Scoring
Endurance R/C Wi-Fi Servo Controller 2 Instructions
 Endurance R/C Wi-Fi Servo Controller 2 Instructions The Endurance R/C Wi-Fi Servo Controller 2 allows you to control up to eight hobby servos, R/C relays, light controllers and more, across the internet
How to import and sync your Scrivener projects from your computer via Dropbox?
 SCRIVO PRO HOW TO CREATE AND SYNC SCRIVENER PROJECTS Scrivo Pro can create, import and sync Scrivener projects on your ipad or iphone. This document explains how to create and sync your Scrivener projects
creation stations AUDIO RECORDING WITH AUDACITY 120 West 14th Street
 creation stations AUDIO RECORDING WITH AUDACITY 120 West 14th Street www.nvcl.ca techconnect@cnv.org PART I: LAYOUT & NAVIGATION Audacity is a basic digital audio workstation (DAW) app that you can use
Google Earth Workshop Version 5
 Google Earth Workshop Version 5 From the Mitchell Home Page (http://mitchell.needham.k12.ma.us) Technology > For Teachers > Prof Dev > Google Earth Getting to Know Google Earth Taken from Google Earth
An Escape Room set in the world of Assassin s Creed Origins. Content
 An Escape Room set in the world of Assassin s Creed Origins Content Version Number 2496 How to install your Escape the Lost Pyramid Experience Goto Page 3 How to install the Sphinx Operator and Loader
User Manual Veterinary
 Veterinary Acquisition and diagnostic software Doc No.: Rev 1.0.1 Aug 2013 Part No.: CR-FPM-04-022-EN-S 3DISC, FireCR, Quantor and the 3D Cube are trademarks of 3D Imaging & Simulations Corp, South Korea,
Copyright 2014 SOTA Imaging. All rights reserved. The CLIOSOFT software includes the following parts copyrighted by other parties:
 2.0 User Manual Copyright 2014 SOTA Imaging. All rights reserved. This manual and the software described herein are protected by copyright laws and international copyright treaties, as well as other intellectual
Evaluation Chapter by CADArtifex
 The premium provider of learning products and solutions www.cadartifex.com EVALUATION CHAPTER 2 Drawing Sketches with SOLIDWORKS In this chapter: Invoking the Part Modeling Environment Invoking the Sketching
Falsework & Formwork Visualisation Software
 User Guide Falsework & Formwork Visualisation Software The launch of cements our position as leaders in the use of visualisation technology to benefit our customers and clients. Our award winning, innovative
Produced by Mr B Ward (Head of Geography PGHS)
") Getting to Know Google Earth The following diagram describes some of the features available in the main window of Google Earth. 9. Sun - Click this to display sunlight across the landscape. 1. Search panel
Getting to Know Google Earth The following diagram describes some of the features available in the main window of Google Earth. 9. Sun - Click this to display sunlight across the landscape. 1. Search panel
User Manual for Grass Snap (Android Version)
") User Manual for Grass Snap (Android Version) Grass Snap is a useful tool when monitoring your pastures and grasslands. Grass Snap will take you through the monitoring process step-by-step. Grass Snap meets
User Manual for Grass Snap (Android Version) Grass Snap is a useful tool when monitoring your pastures and grasslands. Grass Snap will take you through the monitoring process step-by-step. Grass Snap meets
RosterPro by Demosphere International, Inc.
 RosterPro by INDEX OF PAGES: Page 2 - Getting Started Logging In About Passwords Log In Information Retrieval Page 3 - Select Season League Home Page Page 4 - League Player Administration Page 5 - League
Accessing e-books with your e-reader
 e-reader 1 Accessing e-books with your e-reader What you need to know about library e-books is that each one is protected by Digital Rights Management (DRM). This means that access to e-books is restricted
Getting Started. with Easy Blue Print
 Getting Started with Easy Blue Print User Interface Overview Easy Blue Print is a simple drawing program that will allow you to create professional-looking 2D floor plan drawings. This guide covers the
Manual. ios App. Ver2.2. v Mall Drive, Commack, NY (P) (F)
 (F)") Manual Ver2.2 ios App v1.6 73 Mall Drive, Commack, NY 11725 631-864-1000 (P) 631-543-8900 (F) www.accu-scope.com info@accu-scope.com Contents CHAPTER 1: SYSTEM REQUIREMENT & SOFTWARE -------------------------------------
Manual Ver2.2 ios App v1.6 73 Mall Drive, Commack, NY 11725 631-864-1000 (P) 631-543-8900 (F) www.accu-scope.com info@accu-scope.com Contents CHAPTER 1: SYSTEM REQUIREMENT & SOFTWARE -------------------------------------
Altair Avionics Corporation Monitor Link Program
 Altair Avionics Corporation Monitor Link Program Altair Avionics Monitor Link Program MLP User s Guide By Tyler Dawbin Approved By: Doug Thompson, General Manager David L. Fetherston, Manager Engineering
Module 2: Radial-Line Sheet-Metal 3D Modeling and 2D Pattern Development: Right Cone (Regular, Frustum, and Truncated)
") Inventor (5) Module 2: 2-1 Module 2: Radial-Line Sheet-Metal 3D Modeling and 2D Pattern Development: Right Cone (Regular, Frustum, and Truncated) In this tutorial, we will learn how to build a 3D model
Inventor (5) Module 2: 2-1 Module 2: Radial-Line Sheet-Metal 3D Modeling and 2D Pattern Development: Right Cone (Regular, Frustum, and Truncated) In this tutorial, we will learn how to build a 3D model
ImageBrowser EX User Guide
 ImageBrowser EX User Guide ImageBrowser EX CameraWindow CEL-SS4RA0 Basic Advanced Manual Conventions and Navigation Conventions in This Manual Manual Navigation Supported Operating Environm System Requirem
CTI Products RadioPro Dispatch Demo Installation and Test Drive Document # S For Version 8 Software
 CTI Products RadioPro Dispatch Demo Installation and Test Drive Document # S2-61570-801 For Version 8 Software Contact Us Support, replacement part ordering, and service may be arranged by contacting our
Share My Design Space Project to Facebook or Pinterest?
 How Do I Share My Design Space Project to Facebook or Pinterest? We love it when our members share the projects they create daily with their Cricut machines, materials, and accessories. Design Space was
How To Handbook For Learners
 How To Handbook For Learners 2017 Contents 3 How do I log in? 4-5 How do I watch a video? 6-9 How do I take an assessment? 10-11 How do I review an assessment I have just written? 12-13 How do I review
Mac User s Manual for the CamRanger, CamRanger Share, and CamRanger PT Hub & Tripod. Supports Mac OS 10.7/Lion, 10.8/Mountain Lion, and Mavericks
 Mac User s Manual for the CamRanger, CamRanger Share, and CamRanger PT Hub & Tripod Supports Mac OS 10.7/Lion, 10.8/Mountain Lion, and Mavericks Table of Contents CamRanger Hardware... 3 CamRanger Registration...
CAST Application User Guide
 CAST Application User Guide for DX900+ Electromagnetic Multilog Sensor U.S. Patent No. 7,369,458. UK 2 414 077. Patents Pending 17-630-01-rev.b 05/24/17 1 Copyright 2017 Airmar Technology Corp. All rights
General Workflow Instructions for capturing 360 images using Theta V, editing in Photoshop, and publishing to Google StreetView
 General Workflow Instructions for capturing 360 images using Theta V, editing in Photoshop, and publishing to Google StreetView This document attempts to give step-by-step instructions for capturing and
ZONESCAN net Version 1.4.1
 ZONESCAN net REV 3 JW ZONESCAN net 2 / 59 Table of Contents 1 Introduction... 5 1.1 Purpose and field of use of the software... 5 1.2 Software functionality... 5 1.3 Function description... 6 1.3.1 Structure...
Enhanced Push-to-Talk Application for iphone
 AT&T Business Mobility Enhanced Push-to-Talk Application for iphone Standard Version Release 8.3 Table of Contents Introduction and Key Features 2 Application Installation & Getting Started 2 Navigating
Physical Inventory System User Manual. Version 19
 Physical Inventory System User Manual Version 19 0 Physical Inventory System User Manual 1 Table of Contents 1. Prepare for Physical Inventory... 2. Chapter 1: Starting Inventory... 2.1. CDK/ADP... 3.
VARIANT: LIMITS GAME MANUAL
 VARIANT: LIMITS GAME MANUAL FOR WINDOWS AND MAC If you need assistance or have questions about downloading or playing the game, please visit: triseum.echelp.org. Contents INTRODUCTION... 1 MINIMUM SYSTEM
FoamWorks Introduction. David Mrozinski 848 W. Borton Road Essexville, Michigan 48732
 FoamWorks 4.0 Introduction Quick Start Registration Registration Menus Files Save a Cut Profile Load a Cut Profile Close Profile/G-code Restore Default Cut Profile Exit Setup Setup Parameters Generate
SECTION GEOGRAPHIC INFORMATION SYSTEM (GIS)
") PART 1 - GENERAL 1.1 DESCRIPTION SECTION 11 83 01 A. Provide all labor, materials, manpower, tools and equipment required to furnish, install, activate and test a new Geographic Information System (GIS).
PART 1 - GENERAL 1.1 DESCRIPTION SECTION 11 83 01 A. Provide all labor, materials, manpower, tools and equipment required to furnish, install, activate and test a new Geographic Information System (GIS).
Kodiak Corporate Administration Tool
 AT&T Business Mobility Kodiak Corporate Administration Tool User Guide Release 8.3 Table of Contents Introduction and Key Features 2 Getting Started 2 Navigate the Corporate Administration Tool 2 Manage
Four Simple Steps to Get Started
 Four Simple Steps to Get Started This guide provides an overview of the important features and instructions for how to set up and operate the Spectra Precision SP90m GNSS receiver. 1. Unpack and check
Context-Aware Planning and Verification
 7 CHAPTER This chapter describes a number of tools and configurations that can be used to enhance the location accuracy of elements (clients, tags, rogue clients, and rogue access points) within an indoor
Legacy FamilySearch Overview
 Legacy FamilySearch Overview Legacy Family Tree is "Tree Share" Certified for FamilySearch Family Tree. This means you can now share your Legacy information with FamilySearch Family Tree and of course
Overview... 3 Starting the Software... 3 Adding Your Profile... 3 Updating your Profile... 4
 Page 1 Contents Overview... 3 Starting the Software... 3 Adding Your Profile... 3 Updating your Profile... 4 Tournament Overview... 5 Adding a Tournament... 5 Editing a Tournament... 6 Deleting a Tournament...
Quick start guide M3 Sonar
 Quick start guide M3 Sonar Creating an image mosaic using Photoshop and Geographic Imager 2013, Kongsberg Mesotech Ltd. 922-20007005 M3 Sonar Quick start guide Creating an image mosaic using Photoshop
SETTOPSURVEY, S.L. Bofarull 14, Barcelona (Spain) Phone: (+34) Fax: (+34)
 Phone: (+34) Fax: (+34)") USER MANUAL v.5 Settop Repeater 2 Index SETTOP Repeater... 3 Control Software... 5 SETTINGS: Configuration... 7 RADIO... 8 INTERNET SETUP: Configuration of the internet protocols... 10 CELLULAR MODEM:
USER MANUAL v.5 Settop Repeater 2 Index SETTOP Repeater... 3 Control Software... 5 SETTINGS: Configuration... 7 RADIO... 8 INTERNET SETUP: Configuration of the internet protocols... 10 CELLULAR MODEM:
Quick Start Training Guide
 Quick Start Training Guide To begin, double-click the VisualTour icon on your Desktop. If you are using the software for the first time you will need to register. If you didn t receive your registration
Next Back Save Project Save Project Save your Story
 What is Photo Story? Photo Story is Microsoft s solution to digital storytelling in 5 easy steps. For those who want to create a basic multimedia movie without having to learn advanced video editing, Photo
Hytera. PD41X Patrol Management System. Installation and Configuration Guide
 Hytera PD41X Patrol Management System Installation and Configuration Guide Documentation Version: 01 Release Date: 03-2015 Copyright Information Hytera is the trademark or registered trademark of Hytera
User Manual (v3.3 July 2017)
") CropVIEW User Manual (v3.3 July 2017) A Product of Pessl Instruments GmbH Werksweg 107 8160 Weiz 1 Weather, growth and yield under full control Welcome among CropVIEW users! Thanks for choosing Pessl Instrumentes
CropVIEW User Manual (v3.3 July 2017) A Product of Pessl Instruments GmbH Werksweg 107 8160 Weiz 1 Weather, growth and yield under full control Welcome among CropVIEW users! Thanks for choosing Pessl Instrumentes
We recommend downloading the latest core installer for our software from our website. This can be found at:
 Dusk Getting Started Installing the Software We recommend downloading the latest core installer for our software from our website. This can be found at: https://www.atik-cameras.com/downloads/ Locate and
AutoCAD 2D. Table of Contents. Lesson 1 Getting Started
 AutoCAD 2D Lesson 1 Getting Started Pre-reqs/Technical Skills Basic computer use Expectations Read lesson material Implement steps in software while reading through lesson material Complete quiz on Blackboard
House Design Tutorial
 House Design Tutorial This House Design Tutorial shows you how to get started on a design project. The tutorials that follow continue with the same plan. When you are finished, you will have created a
Hyperion System 9 Financial Data Quality Management. Quick Reference Guide
 Hyperion System 9 Financial Data Quality Management Quick Reference Guide Hyperion FDM Release 9.2.0. 2000 2006 - Hyperion Solutions Corporation. All rights reserved. Hyperion, the Hyperion logo and Hyperion
ID Photo Processor. Batch photo processing. User Guide
 ID Photo Processor Batch photo processing User Guide 2015 Akond company 197342, Russia, St.-Petersburg, Serdobolskaya, 65a Phone/fax: +7(812)384-6430 Cell: +7(921)757-8319 e-mail: info@akond.net http://www.akond.net
GD&T Administrator Manual v 1.0
 The GD&T Professional Edition GD&T Administrator Manual v 1.0 800-886-0909 Effective Training Inc. www.etinews.com Introduction to the GD&T Administrator s Manual There are two Administration programs
CAD Tutorial. CAD Detail Windows. In this tutorial you ll learn about: CAD Detail Windows Exploding and Modifying a CAD Block
 CAD Tutorial In this tutorial you ll learn about: CAD Detail Windows Exploding and Modifying a CAD Block Creating a New CAD Block CAD Detail from View Creating a Plot Plan CAD Detail Windows CAD Details
Module 1G: Creating a Circle-Based Cylindrical Sheet-metal Lateral Piece with an Overlaying Lateral Edge Seam And Dove-Tail Seams on the Top Edge
 Inventor (10) Module 1G: 1G- 1 Module 1G: Creating a Circle-Based Cylindrical Sheet-metal Lateral Piece with an Overlaying Lateral Edge Seam And Dove-Tail Seams on the Top Edge In Module 1A, we have explored
Getting Started Guide
 SOLIDWORKS Getting Started Guide SOLIDWORKS Electrical FIRST Robotics Edition Alexander Ouellet 1/2/2015 Table of Contents INTRODUCTION... 1 What is SOLIDWORKS Electrical?... Error! Bookmark not defined.
MASA. (Movement and Action Sequence Analysis) User Guide
 User Guide") MASA (Movement and Action Sequence Analysis) User Guide PREFACE The MASA software is a game analysis software that can be used for scientific analyses or in sports practice in different types of sports.
MASA (Movement and Action Sequence Analysis) User Guide PREFACE The MASA software is a game analysis software that can be used for scientific analyses or in sports practice in different types of sports.
User Manual. User Manual. Version Last change : March Page 1 ID station User Manual
 User Manual Version 7.4.3 Last change : March 2017 Page 1 Introduction This is the user manual of the new fastid, the biometric ID and passport photo system. This user guide helps you in everyday use.
SIMS Autumn Census COMPLETION Document for Primary Schools
 SIMS Autumn Census COMPLETION Document for Primary Schools Census Day 5 th October 2017 1 Contents Overview... 3 Census Flow Chart... 5 Preparation Document... 6 Check SIMS Version... 6 SIMS Backup...
Image 1: old fashion leather albums. Image 2: slides and photo album
 The Terra Map How-To serie The geoalbum A bit of history A photographic album, or photo album, is a collection of photographs, generally in a book. Some book-form photo albums have compartments which the
Cricut Design Space App for ipad User Manual
 Cricut Design Space App for ipad User Manual Cricut Explore design-and-cut system From inspiration to creation in just a few taps! Cricut Design Space App for ipad 1. ipad Setup A. Setting up the app B.
SMALL OFFICE TUTORIAL
 SMALL OFFICE TUTORIAL in this lesson you will get a down and dirty overview of the functionality of Revit Architecture. The very basics of creating walls, doors, windows, roofs, annotations and dimensioning.
Scanner Utility for Microsoft Windows Version 9.6. User's Guide
 P3PC-E892-03EN Scanner Utility for Microsoft Windows Version 9.6 User's Guide For Use with Microsoft Windows 98, Windows Me, Windows 2000 and Windows XP Introduction Thank you for purchasing the "Scanner
User Guidelines for Downloading Calibre Books on Android with Talkback Enabled
 Download User Guidelines for Downloading Calibre Books on Android with Talkback Enabled Before you start - Things you need to know You can register two devices (i.e. a phone and a tablet) to use for downloading
Use the and buttons on the right to go line by line, or move the slider bar in the middle for a quick canning.
 How To Use The IntelliQuilter Help System The user manual is at your fingertips at all times. Extensive help messages will explain what to do on each screen. If a help message does not fit fully in the
DRCR.net Image Acquisition Protocol
 DRCR.net Image Acquisition Protocol Optical Coherence Tomography Angiography (OCT-A) Using: Optovue AngioVue Version 3.0 August 14, 2017 DRCR.net OCT-A Optovue AngioVue Procedure Manual 3.0 8-14-17 Table
House Design Tutorial
 House Design Tutorial This House Design Tutorial shows you how to get started on a design project. The tutorials that follow continue with the same plan. When you are finished, you will have created a
ARCHICAD Introduction Tutorial
 Starting a New Project ARCHICAD Introduction Tutorial 1. Double-click the Archicad Icon from the desktop 2. Click on the Grey Warning/Information box when it appears on the screen. 3. Click on the Create
1. Creating geometry based on sketches 2. Using sketch lines as reference 3. Using sketches to drive changes in geometry
 4.1: Modeling 3D Modeling is a key process of getting your ideas from a concept to a read- for- manufacture state, making it core foundation of the product development process. In Fusion 360, there are
AutoCAD Civil 3D 2009 ESSENTIALS
 AutoCAD Civil 3D 2009 ESSENTIALS SDC PUBLICATIONS Schroff Development Corporation www.schroff.com Better Textbooks. Lower Prices. Alignments and Profiles Section 2: Profiles In this section you learn how
v Introduction Images Import images in a variety of formats and register the images to a coordinate projection WMS Tutorials Time minutes
 v. 10.1 WMS 10.1 Tutorial Import images in a variety of formats and register the images to a coordinate projection Objectives Import various types of image files from different sources. Learn how to work
User Guide for TWAIN / DirectX interface for GRYPHAX USB 3.0 cameras
 User Guide for TWAIN / DirectX interface for GRYPHAX USB 3.0 cameras The TWAIN & DirectX driver for PROGRES GRYPHAX USB 3.0 cameras enables user to operate with TWAIN and DirectX supported 3 rd party software
Input of Precise Geometric Data
 Chapter Seven Input of Precise Geometric Data INTRODUCTION PLAY VIDEO A very useful feature of MicroStation V8i for precise technical drawing is key-in of coordinate data. Whenever MicroStation V8i calls
Field Device Manager Express
 Honeywell Process Solutions Field Device Manager Express Software Installation User's Guide EP-FDM-02430X R430 June 2012 Release 430 Honeywell Notices and Trademarks Copyright 2010 by Honeywell International
Aerospace Sensor Suite
 Aerospace Sensor Suite ECE 1778 Creative Applications for Mobile Devices Final Report prepared for Dr. Jonathon Rose April 12 th 2011 Word count: 2351 + 490 (Apper Context) Jin Hyouk (Paul) Choi: 998495640
Inventor-Parts-Tutorial By: Dor Ashur
 Inventor-Parts-Tutorial By: Dor Ashur For Assignment: http://www.maelabs.ucsd.edu/mae3/assignments/cad/inventor_parts.pdf Open Autodesk Inventor: Start-> All Programs -> Autodesk -> Autodesk Inventor 2010
Edge Blender Controller
 Edge Blender Controller Calibration Manual Version 2017 V1 Contents Contents INTRODUCTION 1 FEATURES 1 OS AND HARDWARE 1 INSTALLATION 2 INSTALLATION 2 UNINSTALLATION 4 INTERFACE 6 COMMUNICATION 7 CONFIG