Go Daddy Online Photo Filer
|
|
|
- Samuel Snow
- 6 years ago
- Views:
Transcription

1 Getting Started and User Guide
2 Discover an easier way to share, print and manage your photos online! Online Photo Filer gives you an online photo album site for sharing photos, as well as easy-to-use editing tools to make sure your photos look their very best. You can even order high quality prints directly from your album and have them delivered right to your door! Best of all, Online Photo Filer provides login-free photo sharing at your personal domain name*, so your friends and family don't have to hassle with signing up or logging in just to view your pictures. It's the perfect solution for sharing, printing and storing all your favorite images! Overview With Online Photo Filer, you can: Store and manage photos and images in one place. Improve your photos with easy-to-use photo editing features. And, if you aren't happy with the edits you've made, you can restore your image to its original state Share your photos with anyone without requiring them to provide an address or log in. Keep sensitive photos or images private with password-protected galleries. Purchase high-quality prints and T-Shirts directly from the photo gallery available to you and your visitors. Entertain your visitors with custom photo slideshows. RSS Feeds Choose from over 100 themes for your photo gallery perfect whether you re welcoming a new baby or adding photos from the big game. Display your photos on other Web sites! Create a custom photo badge with your choice of layout, color and more and use the HTML code we provide you to show your photos on other Web sites. Enjoy the features you want simple photo-sharing, high-quality prints, and more without the hassle of 'login' sharing. Features Sharing your favorite photos should be fun and easy so why post your pictures on a site that asks your friends and family to sign up for their service or log in to their site in order to see your pictures? Online Photo Filer provides top-quality photo sharing, printing and storage features, without the hassles and annoyances you ll find on other sites. Online Photo Filer includes: Login-free photo sharing. Purchase options for high-quality prints and T-Shirts, delivered directly to your door! Simple, effective photo editing features, including the ability to return images to their original state Password Protection for galleries. Custom photo slideshows. RSS Feeds Permalinks to Galleries and Photos More than 100 photo gallery themes Display your photos on other Web sites! Create a custom photo badge with your choice of layout, color and more and use the HTML code we provide you to show your photos on other Web sites. Mobile-friendly galleries Secure Links to Photos/Images available.


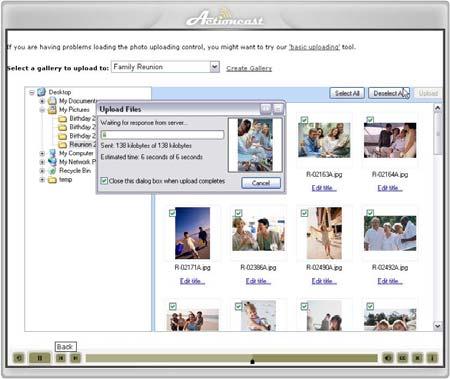
3 Online Photo Filer Tour Creating Galleries Online Photo Filer allows you to create photo galleries that you can use to organize your photos. You can create multiple galleries and then upload your photos to those galleries. When you create photo galleries, you can give them unique names and specify options for them, such as making them accessible to all visitors, private, or only accessible by password. Uploading Photos Using the Basic Method You have the option of uploading your photos individually, using the basic uploading method. Or, you can run the Image Uploader ActiveX control to upload multiple images at once. When you upload photos using the basic method, you browse to locate each photo you want to upload and then upload the photos. If you ran the Image Uploader ActiveX control, you can switch to the basic method at any time by clicking the "basic uploading" hyperlink.


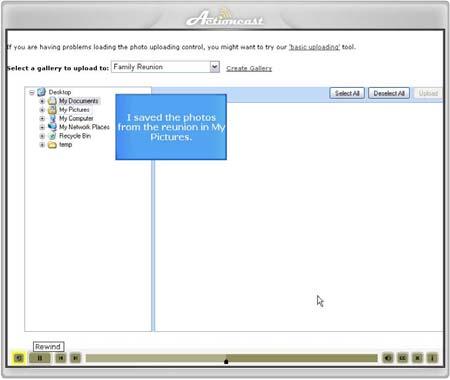
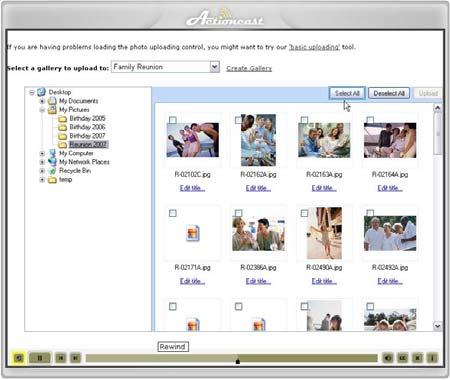
4 Uploading Photos With Image Uploader You have the option of uploading multiple images at once using the Image Uploader ActiveX control or uploading photos individually using the basic uploading method. With the Image Uploader control, you can navigate to your photos using the tree view to locate the folder with your photos. When you open the folder, you can select to upload all photos or select the checkboxes of the photos you want to upload. Cropping Photos Cropping a photo allows you to select a portion of the photo to keep and then trims off the remaining area of the photo. When cropping a photo, you can select Orientation and Size options for maintaining the size proportions of the photo. If the option you want to use is not available, use the Freeform option to select the portion you want to keep.


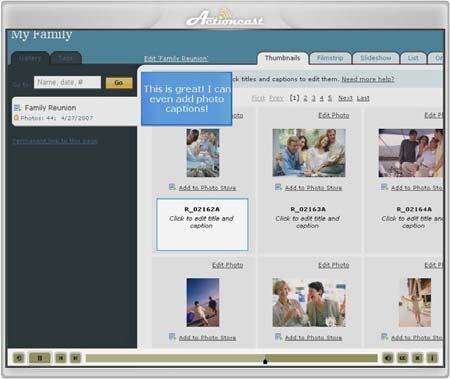
5 Editing Photos You can edit your photos by adjusting the brightness and contrast, removing red-eye, or rotating them. If you edit a photo, you can restore the original photo at any time because Online Photo Filer keeps an original version of all your edited photos. You restore the photo by clicking "Restore Original." Viewing Photos as Thumbnails The Thumbnail view displays thumbnail-sized versions of your photos. The title that displays below the photo can be changed from the Filmstrip page, where you can also add a caption. The title and caption display for visitors when they visit your gallery, so you may want to make them descriptive. From the view, you can click "Edit Photo" to access editing options.


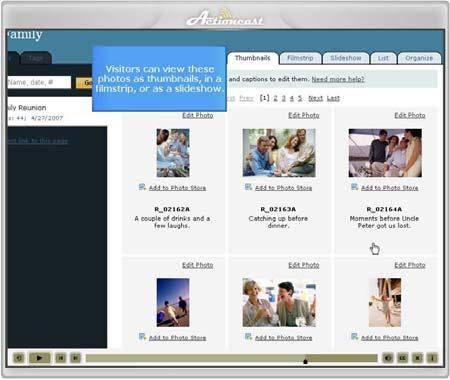
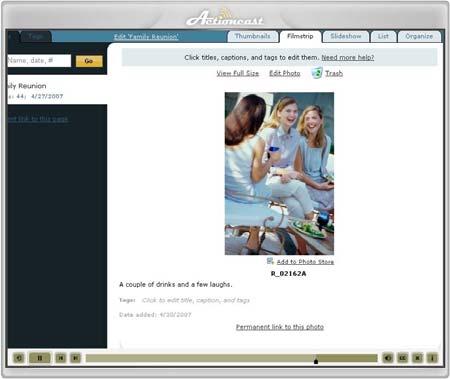
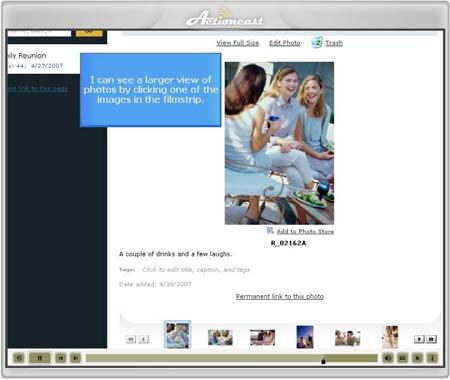
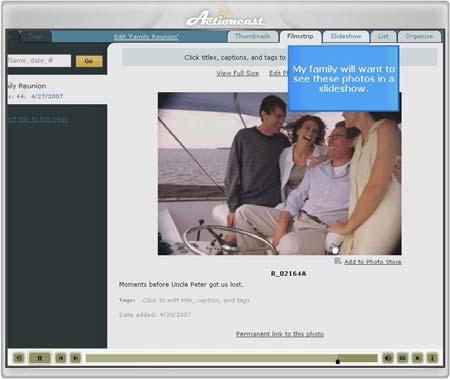
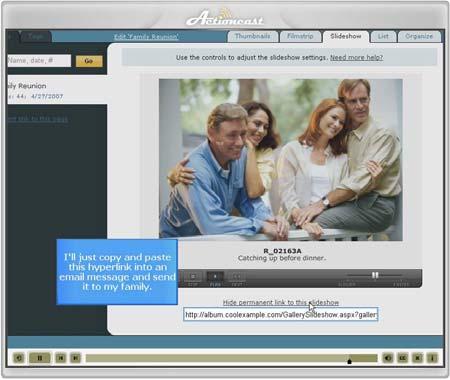
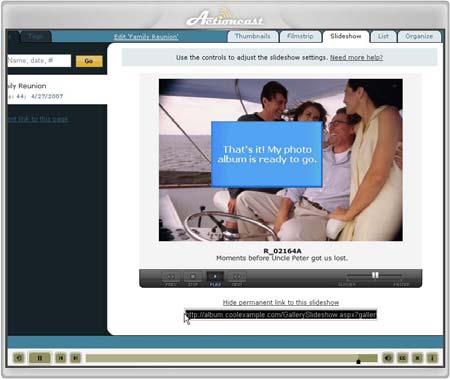
6 Viewing Photos in a Filmstrip The Filmstrip view displays one photo at a time, as a filmstrip. You can change the photo by selecting the smaller photo below the filmstrip or by clicking the right or left arrows to move to the next or previous photo. You can change the title that displays below the photo, add a photo caption, and add a tag. The title and caption display for visitors when they visit your gallery, so you may want to make them descriptive. Tags allow you to assign keywords to the photos so that you can easily locate all photos that share the same tag. Viewing Photos in a Slideshow The Slideshow view displays your photos in a slideshow. Use the slideshow controls to manually advance through slides, play and stop the slideshow, and adjust the speed at which the slideshow plays.


7 Viewing a List of Photos The List view displays a list of the file names or titles, as well as small thumbnail images, of your photos in the selected gallery. Click the title to open it in the Filmstrip view. Or, you can delete photos by dragging them to the trash can. Organizing Photos Organize photos by moving them to other galleries, applying keyword tags or phrases to them, or deleting them. Simply select the photos you want to apply an action to and select an action from the list. Click Organize Photo to access options for dragging photos to new locations in the gallery, sort them alphabetically, or sort them by date.


8 Selecting a Web Site Theme You can select a theme to establish the look and feel of your photo album Web site, and you can select a theme for each of your galleries. You can change your theme at any time. Ordering Prints of Photos Through Photo Store Online Photo Filer includes a Photo Store that allows you to order prints of photos from your galleries and have them delivered right to your door. Your gallery visitors can also order photos and have them delivered, which is perfect for relatives who live far away who want to watch your kids as they grow up! You can add a photo frame and select options for the type of print you want. You specify the size, type of photo finish, and quantity.


9 Working With Online Photo Filer Getting Started Setting Up Your Online Photo Filer Account In this Actioncast, learn how to set up and use Online Photo Filer.

10
11
12
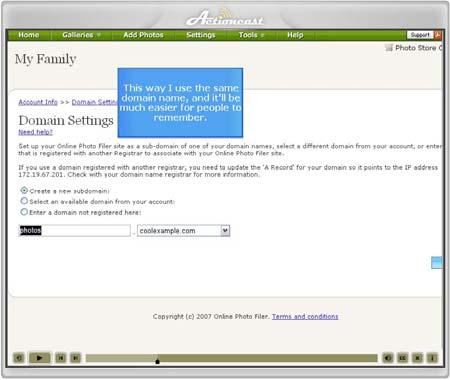
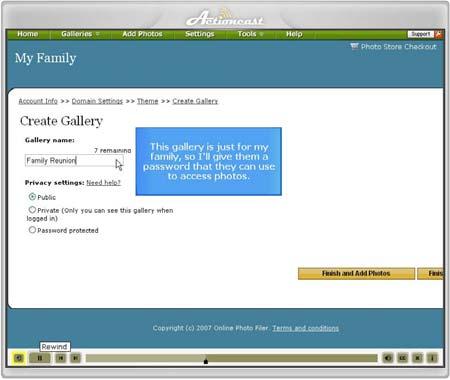
13 Launching Online Photo Filer for the First Time and Setting Account Information The first time you launch Online Photo Filer, you complete your login and account information. To Launch Online Photo Filer for the First Time and Set Account Information 1. Log in to your Account Manager. 2. From the My Products section, click Online Photo Filer Accounts. 3. Click Setup Account. 4. On the End User License Agreement page, click the Accept hyperlink. 5. On the Account Information page, enter the following: Site title for the photo gallery The name you want to give to your gallery Web site. address The address you want to use to access your account. User Name The name you want to use to access your account. Password The password you want to use to access your account. Confirm password The password you entered in the Password field. 6. Click Next. 7. On the Domain Settings page, specify one of the following: Create a new subdomain Allows you to add a subdomain to one of the domains in your list. Select an available domain from your account Allows you to select from a list of domains for this account. Enter a domain not registered here Allows you to enter the domain name. NOTE: If you enter a domain that you registered with another registrar, please update the "A Record" for your domain so it points to the IP address For more information, contact your domain registrar. 8. Click Next. 9. Select the theme you want to apply to your photo album, and then click Next. 10. In the Gallery name field, enter the name you want to use for your first photo gallery. 11. In the Privacy settings area, select one of the following: Public Makes the gallery available for public view. Private Makes the gallery private so only you can view it. Password Protected Allows you to create a password to limit gallery accessibility only to visitors who enter the correct password. 12. Click Finished to create your gallery and add photos later, or click Finish and add photos to add photos to your gallery now.
14 Working With Photos Restoring Edited Photos Online Photo Filer keeps an original version of all your edited photos. You can restore the original photo at any time. For more information about editing photos, see Cropping Photos or Rotating and Flipping Photos. To Restore an Edited Photo 2. Click the name of the gallery you want to view. 3. Click the Edit Photo hyperlink for the photo you want to edit. 4. Click Restore Original. NOTE: The Restore Original hyperlink only displays for photos you edited. 5. Click Save. Adding and Editing Photo Captions and Titles By default, Online Photo Filer uses the photo's file name as the title, but you can edit it at any time. You can also add and edit a photo caption. If you use the Image Uploader control to add photos, you can edit the title before you upload the photo. For more information, see the "To Add Photos to a Photo Gallery Using the Image Uploader" section in Adding Photos to Photo Galleries. To Add or Edit a Photo Caption and Title from the Photo Gallery 2. Click the name of the gallery you want to view. 3. Click the title below the photo. The title displays in a text box, and a caption text box displays below it. 4. Edit the title and enter or edit the caption. 5. Click Save. Cropping Photos Crop photos by specifying the width to height ratio you want to maintain and then selecting the portion of the photo you want to keep. When you crop the photo, only the portion you selected remains. You can also edit photos by rotating or flipping the image. For more information, see Rotating and Flipping Photos.
15 While making changes, you can start over at any time by clicking the Reset button. If you edit a photo without saving, the next time you try to edit a photo, Online Photo Filer gives you the option of resuming the editing session for the unsaved photo. Online Photo Filer keeps an original version of all your edited photos. You can restore the original photo at any time. For more information, see Restoring Edited Photos. To Crop a Photo 2. Click the name of the gallery you want to view. 3. Click the Edit Photo hyperlink for the photo you want to edit. 4. Go to the Crop tab. 5. From the Orientation area, select whether you want to maintain the size ratio in landscape or portrait format. 6. From the Size area, select an option for maintaining the width to height ratio of the photo. 7. Using your mouse, select the portion of the photo you want to keep. When you crop the photo, this portion will be the only part of the photo remaining. 8. Click the Crop button. NOTE: If you need to start over at any time, click the Reset button. 9. Click Save. Rotating and Flipping Photos You can edit photos by either rotating them left or right 90 degrees at a time or flipping them vertically or horizontally. You can also edit photos by cropping them. For more information, see Cropping Photos. While making changes, you can start over at any time by clicking the Reset button. If you edit a photo without saving, the next time you try to edit a photo, Online Photo Filer gives you the option of resuming the editing session for the unsaved photo. Online Photo Filer keeps an original version of all your edited photos. You can restore the original photo at any time. For more information, see Restoring Edited Photos. To Rotate or Flip a Photo 2. Click the name of the gallery you want to view. 3. Click the Edit Photo hyperlink for the photo you want to edit. 4. To rotate or flip the photo, click one of the following: Rotate Left Rotates the photo 90 degrees to the left (counterclockwise). Rotate Right Rotates the photo 90 degrees to the right (clockwise). Flip Horizontal Flips the photo horizontally (sideways). Flip Vertical Flips the photo vertically (up and down).
16 NOTE: If you need to start over at any time, click the Reset button. 5. Click Save. Viewing Tags Associated With Photos You can "tag" photos with keywords that describe the photo. When you need to find the photos that share a specific tag, perform a search for them, and all photos tagged with that keyword display in the list. For more information about adding tags, see Adding Keyword Tags to Photos. For more information about searching for photos tagged with a specific keyword, see Searching for Tagged Photos. The tags display when you view the photo as a Filmstrip. You can also view all of the tags associated with your photos and the number of times the tag has been used. To View Tags Associated With Photos 2. Click the Tags tab. The tags display in the left pane. You can change the way you view the photos by clicking the Thumbnails, Filmstrip, Slideshow, or List tabs. Removing Red-eye in Photos You can use the red-eye tool to remove the appearance of red or glowing eyes from photos. To Remove Red-eye From a Photo 2. Click the name of the gallery you want to view. 3. Click the Edit Photo hyperlink for the photo you want to edit. 4. Go to the Edit tab. 5. From the Edit area, click Remove Red Eye. 6. Select the portion of the photo that contains the red eye. 7. Click the Remove Red-eye button, which is beneath the photo. 8. Click Save. Adding Keyword Tags to Photos In Online Photo Filer, you can "tag" photos with keywords that describe the photos. Tag photos individually, or from the Manage Galleries page, tag all photos in selected galleries. For more information about tagging photos in photo galleries, see Adding Keyword Tags to All Photos in a Gallery. To find the photos that share a specific tag, perform a search for the keyword, and all photos tagged with that keyword display in the list. For more information about searching for specific photos, see Searching for Tagged Photos. To Add Tags to a Photo
17 2. Click the name of the gallery you want to view. 3. Click the Filmstrip tab. 4. Click the photo you want to add a tag to. 5. Click the photo's tag text. The title displays in the text box, and text box fields display for the description and tags. 6. In the Tags field, enter the keywords. 7. Click Save. Creating Photo Badges of Multiple Photos You can share your pictures on other Web sites by creating HTML or Flash photo badges of a single photo or multiple photos. For your photo badge, select from public photos that you tagged with a specific value or photos from any of your public galleries. Depending on the type of badge you create, you can also specify badge details, such as the layout, color, and number of photos to display on the badge. After you create the badge, we provide the HTML code to copy and paste into the Web pages where you want the badge to display. For more information about creating a photo badge for an individual photo, see Creating HTML Photo Badges of Individual Photos. For more information about creating a Flash photo badge, see Creating Flash Photo Badges. NOTE: Photo badges use the first photo(s) in your gallery. You can change the photos that display in your badge by reorganizing the order in which they display in your gallery. For more information, see Organizing Photos in Photo Galleries. You can save badges and display the badge code or view badge details, such as the date saved, at any time. To view your saved badges, see Viewing Your Saved Badges. To Create a Photo Badge of Multiple Photos 1. From the Tools menu, select Create Badge. 2. On the Select a Badge page, select HTML Gallery Badge, and then click Next. 3. On the Select Photos page, select from one of the following: Public Photos from your gallery Indicates you want to use public photos from a specific gallery and allows you to select the gallery. Public photos tagged with Indicates you want to use public photos that have a specific tag and allows you to select the tag. 4. Click Next. 5. On the Set Layout page, specify the following: Display title Allows you to specify whether you want the site title to display on the badge. Number of photos to display Allows you to select the number of photos you want to display on the badge. Arrange photos by Allows you to determine the order in which photos display on the badge. Turn paging on Allows you to specify whether visitors can advance through the entire gallery to view photos or only view the number of photos you selected to display from the Number of photos to display list. 6. Click Next. 7. On the Select Background Color page, select the color from the palette or enter the color values, and then click Finish.
18 8. From the Here is the code area, select and copy the code, and then paste it into the code on your Web page. 9. To save the badge, in the Badge name field, enter the name and click Save. Creating Photo Badges of Individual Photos You can share your pictures on other Web sites by creating HTML or Flash photo badges for a single photo or multiple photos. For your photo badge, select from public photos that you tagged with a specific value or photos from one of your public galleries. Depending on the type of badge you create, you can also specify badge details, such as the layout, color, and number of photos to display on the badge. After you create the badge, we provide the HTML code to copy and paste into the Web pages where you want the badge to display. For more information about creating a photo badge of multiple photos, see Creating HTML Photo Badges of Multiple Photos. For more information about creating a Flash photo badge, see Creating Flash Photo Badges. NOTE: Photo badges use the first photo(s) in your gallery. You can change the photos that display in your badge by reorganizing the order in which they display in your gallery. For more information, see Organizing Photos in Photo Galleries. You can save badges and display the badge code or view badge details, such as the date saved, at any time. To view your saved badges, see Viewing Your Saved Badges. To Create a Photo Badge of an Individual Photo 1. From the Tools menu, select Create Badge. 2. On the Select a Badge page, select HTML Single Image badge, and then click Next. 3. On the Select Photos page, select one of the following: Public photos from your gallery Indicates you want to use a public photo from a specific gallery and allows you to select the gallery. Public photos tagged with Indicates you want to use a public photo that has a specific tag and allows you to select the tag. 4. Click Next. 5. On the Set Layout page, specify the following: Display title Allows you to specify whether you want the site title to display on the badge. Photo size Allows you to select the size of the photos that display on the badge. 6. Click Next. 7. On the Select Background Color page, select the color from the palette or enter the color values, and then click Finish. 8. From the Here is the code area, select and copy the code, and then paste it into the code on your Web page. 9. To save the badge, in the Badge name field, enter the name and click Save. Viewing Your Saved Badges You can create and save badges in Online Photo Filer and then view your badge list on the Saved Badges page. The badge list displays the badge name, date saved, and the actions you can perform for the badge.
19 You can also view the code for a badge or delete badges. For more information about accessing the badge code, see Displaying Code for Saved Badges. For more information about deleting badges, see Deleting Your Saved Badges. To View Saved Badges 1. Click Tools. 2. Click Manage Badges. The badge list displays. Creating Flash Photo Badges You can share your pictures from your Online Photo Filer on other Web sites by creating HTML or Flash photo badges for a single photo or multiple photos. For your photo badge, select from public photos that you tagged with a specific value or photos from one of your public galleries. Depending on the type of badge you create, you can also specify badge details, such as the layout, color, and number of photos to display on the badge. After you create the badge, we provide the HTML code to copy and paste into the Web pages where you want the badge to display. For more information about creating a photo badge of multiple photos, see Creating HTML Photo Badges of Multiple Photos. For more information about creating a photo badge for individual photos, see Creating HTML Photo Badges of Individual Photos. NOTE: Photo badges use the first photo(s) in your gallery. You can change the photos that display in your badge by reorganizing the order in which they display in your gallery. For more information, see Organizing Photos in Photo Galleries. You can save badges and display the badge code or view badge details, such as the date saved. To view your saved badges, see Viewing Your Saved Badges. To Create a Flash Photo Badge 1. From the Tools menu, select Create Badge. 2. On the Select a Badge page, select Flash Gallery badge, and then click Next. 3. On the Select Photos page, select one of the following: Public photos from your gallery Indicates you want to use a public photo from a specific gallery and allows you to select the gallery. Public photos tagged with Indicates you want to use a public photo that has a specific tag and allows you to select the tag. 4. Click Next. 5. On the Set Layout page, specify the following: Display title Specify whether you want the site title to display on the badge. Number of photos to display Select the number of photos you want to display on the badge. Shuffle Speed Set the frequency with which the photos cycle. 6. Click Next. 7. On the Select Background Color page, select the color from the palette or enter the color values, and then click Finish.
20 8. From the Here is the code area, select and copy the code, and then paste it into the code on your Web page. 9. To save the badge, in the Badge name field, enter the name and click Save. Viewing Photos on the Thumbnails, Filmstrip, Slideshow, List, or Organize Tabs When viewing your photos in Online Photo Filer, you can select the style in which you want your photos to display. To View Photos on the Thumbnails, Filmstrip, Slideshow, List, or Organize Tabs 2. Click the name of the gallery you want to view. 3. Change the view by clicking one of the following tabs: Thumbnails Displays the photos as thumbnails. Filmstrip Displays photos in a filmstrip. Click a photo to view it or click the arrows to view the previous or next photo in the filmstrip. Slideshow Displays photos in a slideshow. Use the controls below the slideshow to stop, play, or view the previous or next photo in the slideshow. In addition, you can adjust the speed of the slideshow using the slider. List Lists the filenames of the photos in the gallery and includes a small thumbnail of each photo. Organize Allows you to rearrange the order in which the photos display in the gallery, add tags to photos, and delete photos. The photos display in the view you selected. Displaying Code for Saved Badges You can add a badge from your Online Photo Filer to your Web page by copying and pasting the code for the badge into the code for your Web page. Use the Get Code feature to display the code for a saved badge so you can copy it. To Display the Code for a Saved Badge 1. Click Tools. 2. Click Manage Badges. 3. Click Get Code. Changing the Contrast in Photos You can enhance or decrease photo details by changing the contrast. When you specify to change the photo's contrast, Online Photo Filer creates several thumbnails with different contrast levels applied to them. Select the thumbnail you want to use and apply the change. To Change the Contrast on a Photo
21 2. Click the name of the gallery you want to view. 3. Click the Edit Photo hyperlink for the photo you want to edit. 4. Click Decrease Contrast or Increase Contrast. 5. Select the photo you want to use, and then click Apply. 6. Click Save. Changing the Brightness in Photos You can enhance or decrease photo lighting by changing the brightness. When you selects to change the photo's brightness, Online Photo Filer creates several thumbnails with different brightness levels applied to them. Select the thumbnail you want to use and apply the change. To Change the Brightness on a Photo 2. Click the name of the gallery you want to view. 3. Click the Edit Photo hyperlink for the photo you want to edit. 4. Click Decrease Brightness or Increase Brightness. 5. Select the photo you want to use, and then click Apply. 6. Click Save. Deleting Your Saved Badges If you no longer want to keep a badge that you created and saved in your Online Photo Filer account, you can delete it. To Delete a Saved Badge 1. Click Tools. 2. Click Manage Badges. 3. Click Delete for the badge you want to delete. 4. Click OK to confirm you want to delete the badge. Editing and Deleting Keyword Tags for Photos To Edit or Delete Keyword Tags for Photos 2. Click the name of the gallery you want to view. 3. Click the Filmstrip tab. 4. Click the photo you want to edit the tags for. 5. Click the tag text. The title displays in the text box, and text box fields display for the description and Tags. 6. In the Tags field, edit or delete the keywords. NOTE: You can only edit or delete keywords from the Galleries tab. You cannot edit or delete keywords from the Tags tab. 7. Click Save.
22 ing Public Photos From Online Photo Filer, you can public photos to your friends and family. Compose the message by specifying the address, your name, the subject of the , and the message body. To Public Photos 2. Click the name of the photo gallery that contains the photo you want to send. 3. Click the photo you want to send. 4. Click Photo. 5. In the To field, enter the address to which you want to send the photo. 6. In the From field, enter your name. 7. In the Subject field, enter the subject of the message. 8. In the Message field, enter the message body. 9. In the Enter code shown above field, enter the security access code that displays above the field. 10. Click Send . Searching for Galleries or Tagged Photos With Online Photo Filer, you can search for a specific gallery by entering a keyword or phrase in the "Go to" field. You can also look for specific photos by searching for a tag. Tags are keywords that describe the photo. When you perform a search for a specific gallery or tag, all galleries or photos tagged with the keyword display in the list. To Search for a Gallery 2. In the Go to field, enter a keyword or phrase related to the gallery you want to search for. 3. Click Go. To Search for Tagged Photos 2. Go to the Tags tab. 3. In the Go to field, enter the tag or keyword you want to search for. 4. Click Go. Protecting Your Photos on the Internet If you send photos using the Internet, it is possible for someone to steal them and print or use them elsewhere. You can take measures to protect your photos, but there is no completely secure method for stopping determined thieves. The problem is that there are many ways that your images can be stolen and it is impossible to block most methods. NOTE: The securest and safest method of protecting valuable digital images is to refrain from sending them through the Internet or posting them online. Here are some measures you can take to protect your photos and deter people from printing or using your images:
23 Watermark your photos with an overlay containing another image or copyright information. A watermark can be a visible logo or invisibly embedded into the image. A watermark in the image doesn't stop someone from taking your photos, but a watermark is difficult to remove and remains on the photo when it is printed. Place an embedded GIF over your photo using a style sheet so right-clicking on the image saves a transparent GIF rather than your photo. Reduce the resolution and print size to distort the photo if someone prints it. Embed your image files in Java Applets or Flash files to make it difficult to copy your photos. In addition, we recommend that you include copyright information in all correspondence regarding your photos. All of these are ways you can protect your photos. However, it is still possible for people to print or use your images if you exchange them using the Internet. Specifying Your Favorite Photos Specifying your favorite photos allows you to view a list of your favorites in the Photo Store. From there, you can select which of your favorites you want to print and place an order. To Specify Your Favorite Photos 2. Click the name of the gallery you want to view. 3. Click Mark as favorite. NOTE: To remove photos from your list of favorites, click Unmark as favorite. Converting BMP files to JPG files Converting your BMP images to JPG allows you to order prints of the converted photos in Photo Store or use them in a flash slideshow. To Convert a BMP File to a JPG File 1. From the Tools menu, select Convert Bitmaps. 2. From the list of bitmaps, do one of the following: o To specify individual bitmaps, select the bitmaps you want to convert. o To select all bitmaps, click All. o To deselect all bitmaps, click None. 3. Click Convert to jpeg. 4. To return to the main page, click Home. Uploading Photos by If you enabled the Upload via feature in your Online Photo Filer account, you can photos for automatic upload to your account. For more information about enabling upload via , see Enabling Upload via . You photos to either of the address listed in the address field on your Upload via tab. You can upload via by using your domain name, or username, in the To field.
24 For more information about locating your Online Photo Filer address, see Viewing Your Online Photo Filer Address. To Photos to Your Account for Uploading 1. In your account, compose a new message. 2. In the To field, enter your Online Photo Filer address. You have two addresses to choose from. You can select the address that is easier for you to remember. 3. In the Subject field, enter your security code. 4. Attach the photo and send the message. Sharing Permanent Links to Photos and Photo Galleries Online Photo Filer creates permanent hyperlinks for your public photo galleries and photos, which are valid for as long as your photos and photo galleries are in your photo album. Share these links with friends and family so they can always views your photos. You can share permanent links to public photo galleries and photos. You can also share permanent links to photos that have a specific tag associated with them. To Share a Permanent Link to Your Photo Gallery 2. Click the name of the gallery you want to share. 3. Click Permanent link to this page. The permanent link displays in the text box below the hyperlink. 4. Select the URL. 5. Copy and paste the URL in an , add it to a Web page, or send it in a message. NOTE: Hide the link by clicking "Hide permanent link to this page." To Share a Permanent Link to a Photo 2. Click the name of the gallery that contains the photo. 3. Click Filmstrip. 4. Click the photo you want to share. 5. Click the Permanent link to this photo hyperlink, which displays above the Filmstrip controls. The permanent link displays in the text box. 6. Select the URL. 7. Copy and paste the URL in an , add it to a Web page, or send it in a message. NOTE: Hide the link by clicking "Hide permanent link to this page." To Share a Permanent Link to Tagged Photos 2. Click Tags. 3. Click the name of the tag you want to share. 4. Click Permanent link to this page. The permanent link displays in the text box below the hyperlink. 5. Select the URL. 6. Copy and paste the URL in an , add it to a Web page, or send it in a message.
25 NOTE: Hide the link by clicking "Hide permanent link to this page." Adding Photos to Photo Galleries You can upload your photos individually using the Basic Uploading Tool, or you can upload multiple photos at once with the Advanced Uploading Tool. NOTE: The Advanced Uploading Tool requires the Image Uploader ActiveX control. To use the Advanced Uploading Tool, follow the directions on the Add Photos page. If you do not see any information under '2. Select and upload your photos', you must re-install the Image Uploader ActiveX control or use the Basic Uploading Tool. If you use the Basic Uploading Tool, individual files you upload can be up to 50MB in size. When using the Advanced Uploading Tool, Online Photo Filer uploads your files in pairs; it uploads the first two files, then the next two, and so forth. The combined file size of each pair can be up to 50MB. You can upload photos in the JPG, BMP, or GIF file formats. To Add Photos to a Photo Gallery Using the Basic Uploading Tool 1. Click Add Photos. 2. Click basic uploading tool. 3. From the Select a gallery to upload to list, select the gallery you want to upload the photos to. 4. Click Browse, and then locate and select the photo. 5. Click Upload. To Add Photos to a Photo Gallery Using the Advanced Uploading Tool 1. Click Add Photos. 2. If this is the first time you've accessed the Add Photos page, follow the instructions for running the Image Uploader ActiveX control. 3. From the Select a gallery to upload to list, select the gallery you want to upload the photos to. 4. Click Browse. 5. Locate and select the file(s) you want to upload, and then click Open. To select multiple files, hold the Ctrl or Shift key while selecting the files you want to upload. 6. Click Upload. Creating a Photo Montage With the Montage feature in Online Photo Filer, you can create a custom slideshow presentation. You can arrange your selected photos in any sequence, select transitions between photos, and even add a music track. Note:The photos you add to your montage must be from public galleries. You can't add photos from private or password protected galleries. To Create a Photo Montage 1. From your Home page, go to the Montage tab. 2. Click Create Montage.
26 3. Enter a title for your Montage. 4. Click Create. 5. You can add photos to your montage using either of the following methods: Drag and Drop Click on the photo you want to add and, while holding down your mouse button, drag the image to the main screen on the left and release your mouse button. Add Photos Select the photos you want to add and click Add Photos. 6. If you want to add a music track to your montage, go to the Add Music tab and select a style from the list. 7. If you want to edit the title of your montage, go to the Settings tab and enter the new title. 8. To save your montage, click Save. If you want to clear your photos and begin again, click Clear Photos. To Apply Transitions Between Photos in Your Montage 1. To add a transition between photos, select the transitions icon below the photo you want the transition to display after. Select a transition and click apply. 2. To apply a transition to all photos, select the transition icon, click Apply to Photos, then click Apply. Managing Settings Changing Your Password To Change Your Password 1. Click Settings. 2. Go to the Account Settings tab. 3. Click the Edit hyperlink for editing your password. 4. In the Old password field, enter the old password. 5. In the New password and New password again fields, enter your new password. 6. Click Save. Changing Your Domain You set your domain information when you launch Online Photo Filer for the first time. You can change the domain at any time. To Change Your Domain 1. Click Settings. 2. Go to the Domain Settings tab. 3. Click the Edit hyperlink for editing your domain. 4. From the Domain Settings area, select one of the following: Create a new subdomain
27 Allows you to add a subdomain and select the site for which you want to use the subdomain. Select an available domain from your account Allows you to select from a list of domains associated with your account. Enter a domain not registered here Allows you to enter a domain name that you registered at a different account NOTE: If you enter a domain that you registered with another registrar, please update the "A Record" for your domain so it points to the IP address For more information, contact your domain registrar. 5. Click Save. Changing Your User Name To Change Your User Name 1. Click Settings. 2. Go to the Account Settings tab. 3. Click the Edit hyperlink for your user name. 4. In the Login Name field, enter the user name you want to use to log in to your account. 5. Click Save. Changing Your Address To Change Your Address 1. Click Settings. 2. Go to the Account Settings tab. 3. In the Address field, edit your address. 4. Click Save. Editing Your Web Site's Title To Edit Your Web Site's Title 1. Click Settings. 2. In the Site Title field, edit the title of your Web site. 3. Click Save. Setting Photo Album Themes In Online Photo Filer, you can select a theme to establish the look and feel of your photo album. You can also set themes for individual galleries. For more information, see Setting Gallery Themes. To narrow the list of themes that display, you can filter the list by category and color. Online Photo Filer always displays the five themes that most closely match the criteria you sorted by. To Set a Photo Album Theme 1. Click Settings.
28 2. Go to the Default Theme tab. 3. Filter the list of themes you want to view by selecting an option from one of the following lists: Category Allows you to view all themes associated with a specific category. Color Allows you to view all themes associated with a specific color. 4. Click the theme you want to use. 5. Click Save. NOTE: You can preview the theme by clicking the Theme Preview hyperlink. Showing or Hiding Photo Store You can specify whether or not you want to allow visitors to purchase prints of your photos. If you allow visitors to purchase prints, they can add photos to Photo Store and specify the options for printing them. If you hide Photo Store, visitors cannot purchase prints. To Show or Hide Photo Store 1. Click Settings. 2. To show or hide Photo Store, select or clear the Allow visitors to order prints checkbox. 3. Click Save. Changing the Default View From the Site Settings area in Online Photo Filer, you can customize your view to default to galleries or tags, and you can select to default to the Thumbnail, Filmstrip, Slideshow, or List tab. You can also specify the number of photos that display in the Thumbnail tab. You can view 6, 12, 24, or 48 at a time. To Change the Number of Photos to Display on the Thumbnails Tab 1. Click Settings. 2. From the Default Group View list, specify whether you want your view to default to your galleries or tags. 3. From the Default Photo View list, specify whether you want your view to default to the Thumbnail, Filmstrip, Slideshow, or List tab. 4. From the View list, select the number of thumbnails you want to display. 5. Click Save. Setting Site Preferences You set your site preferences when you launch Online Photo Filer for the first time. You can edit the preferences at any time. To Set Site Preferences 1. Click Settings. 2. In the Site Title field, edit the title of your Web site.
29 3. From the Default Group View list, specify whether you want your view to default to your galleries or tags. 4. From the Default Photo View list, specify whether you want your view to default to the Thumbnail, Filmstrip, Slideshow, or List tab. 5. From the View list, select the number of photos you want to display on the Thumbnails view. 6. To allow visitors to order prints of your photos, select Allow visitors. 7. Click Save. Viewing Your Online Photo Filer Address To View Your Address for Upload via 1. Click Settings. 2. Go to the Upload via tab. Your Online Photo Filer address is listed in the address area. Creating and Editing Photo Galleries Password Protecting Photo Galleries You can password protect photo galleries so that visitors can only view them if they have the password. NOTE: If you use the same password for multiple galleries, visitors will be able to access all galleries that use that password. You can also make your photo galleries private so that visitors won't be able to see them on your Web site. For more information about making a photo gallery private, see Making Photo Galleries Private. To Password Protect a Photo Gallery 2. Click the name of the gallery you want to password protect. 3. Click the Edit <Gallery name> hyperlink for the gallery you want to edit, where the gallery name is the name of the gallery you selected. The hyperlink is located between the Tags and Thumbnails tabs. 4. From the Privacy Settings area, select Password protected. 5. In the Enter Password field, enter the password. 6. Click Update. Making Photo Galleries Private You can make your photo galleries private so that visitors won't be able to see them on your Web site. You can also password protect photo galleries so that visitors can only view them if they have the password. For more information about password protecting photo galleries, see Password Protecting Photo Galleries. To Make a Photo Gallery Private
30 2. Click the name of the gallery you want to make private. 3. Click the Edit <Gallery name> hyperlink for the gallery you want to edit, where the gallery name is the name of the gallery you selected. The hyperlink displays between the Tags and Thumbnails tabs. 4. From the Privacy settings area, select Private. 5. Click Update. Editing Photo Galleries On the General tab, you can edit a photo gallery's name and privacy settings, and from the Gallery Theme tab, you can change the gallery's theme. For more information about changing gallery themes, see Setting Gallery Themes. To Edit a Photo Gallery 2. Click the name of the gallery you want to edit. 3. Click the Edit <Gallery name> hyperlink for the gallery you want to edit, where the gallery name is the name of the gallery you selected. The hyperlink displays between the Tags and Thumbnails tabs. 4. Edit the fields. For more information about completing the fields, see Creating Photo Galleries. 5. Click Update. Setting Gallery Themes By default, your Online Photo Filer gallery themes are the same as your site theme. You can change the gallery theme to customize the look and feel of your galleries. To narrow the list of themes that display, you can filter the list by category and color. Online Photo Filer always displays the five themes that most closely match the criteria you sorted by. To Set a Gallery Theme 1. From the Galleries menu, select Manage Galleries. 2. Select the gallery or galleries for which you want to change the theme. 3. From the Apply this action list, select Change Theme. 4. Click Go. 5. Filter the list of themes you want to view by selecting an option from one of the following lists: Category Allows you to view all themes associated with a specific category. Color Allows you to view all themes associated with a specific color. 6. Click the theme you want to set. 7. Click Save. Creating Photo Galleries
31 Photo galleries in Online Photo Filer help you organize your photos into categories of your choice. You can create multiple galleries and then upload your photos to those galleries. You can make your photo galleries public so that anyone can view them, private so they are hidden from public view, or password protected so they can only be accessed if the visitor enters the correct password. For private or password protected galleries, an icon displays below the name of the gallery to indicate it is protected. Move your cursor over the icon to view the tooltip for the icon. You can create a gallery and add photos later, or you can create the gallery and add photos now. For more information about adding photos at a later time, see Adding Photos to Photo Galleries. To Create a Photo Gallery 1. From the Galleries menu, select Create Gallery. 2. In the Gallery name field, enter the name you want to use for the gallery. 3. In the Privacy settings area, select one of the following: Public Makes the gallery available for public view. Private Makes the gallery private so only you can view it. Password Protected Makes the gallery accessible only to visitors who enter the correct password. 4. Click Create Gallery to create your gallery and add photos later, or click Create and add photos to add photos to your gallery now. Adding Keyword Tags to All Photos in a Gallery In Online Photo Filer, you can "tag" photos with keywords that describe the photos. From the Manage Galleries page, tag all photos in selected galleries, or open the Filmstrip view to tag photos individually. For more information about tagging photos individually, see Adding Keyword Tags to Photos. To find the photos that share a specific tag, perform a search for the keyword, and all photos tagged with that keyword display in the list. For more information about searching for specific photos, see Searching for Tagged Photos. To Add Tags to All Photos in a Gallery 1. From the Galleries menu, select Manage Galleries. 2. Select the gallery or galleries for which you want to add keyword tags. 3. From the Apply this action list, select Tag All Photos and click Go. 4. In the Enter tags section, enter the tags you want to apply to the photos in the selected galleries. 5. Click Add Tags. Deleting Photo Galleries Before deleting photo galleries, you should move the photos to another gallery or they will be deleted, too. For more information about moving photos, see Organizing Photos in Photo Galleries. To Delete a Photo Gallery
32 1. From the Galleries menu, select Manage Galleries. 2. Select the gallery or galleries you want to delete. 3. From the Apply this action list, select Delete. 4. Click Go. 5. In the Delete Galleries dialog box, type Yes. 6. Click OK. Deleting Photos From Photo Galleries You can delete photos in your Online Photo Filer from either the Organize or List tab. From the Organize tab, you can also rearrange the order in which photos display or move photos to another gallery. For more information, see Rearranging Photos in Photo Galleries or Moving Photos Between Photo Galleries. To Delete Photos from the Organize Tab 2. Click the name of the photo gallery that contains the photo you want to delete. 3. Go to the Organize tab. 4. Click the photos to select them. 5. From the Apply this action list, select Delete Photos. 6. If you selected to delete less than 10 photos, click OK. or If you selected to delete more than 10 photos, enter yes, and then click OK. To Delete Photos from the List Tab 2. Click the name of the photo gallery that contains the photo you want to delete. 3. Go to the List tab. 4. Move your pointer over the photo you want to delete, and when the pointer changes to a move cursor, click the photo and drag it to the trash can. 5. Click OK to confirm the deletion. Organizing Photos in Photo Galleries In Online Photo Filer, you can change the order in which your photos display in photo galleries, move them to other galleries, tag them with keywords or phrases, or delete them. To rearrange photos, sort them alphabetically or by date or drag them to a new location on the Order Gallery Photos page. For more information about moving or deleting photos, see Moving Photos Between Photo Galleries or Deleting Photos From Photo Galleries. To Rearrange Photos in Photo Galleries 2. Click the name of the photo gallery that contains the photos you want to move. 3. Go to the Organize tab. 4. Click Organize Photos. 5. Drag the photo you want to move to the new location within the gallery. or Apply an action from the Organize photos by list: Photo Name A-Z Rearranges photos alphabetically by the file name, from A to Z.
33 Photo Name Z-A Rearranges photos alphabetically by the file name, from Z to A. Date Uploaded (most recent first) Rearranges photos by date, with the most recently added photo displaying first. Date Uploaded (oldest first) Rearranges photos by date, with the oldest photo displaying first. 6. Click Save. NOTE: You can click Reset to restore the photos to their original order for this session. Deleting All Keyword Tags From All Photos in a Gallery In Online Photo Filer, you can remove keyword tags from individual photos or remove them from all photos in selected galleries. For more information about deleting tags from individual photos, see Editing and Deleting Keyword Tags for Photos. To Delete Tags From All Photos in a Gallery 1. From the Galleries menu, select Manage Galleries. 2. Select the gallery or galleries for which you want to remove keyword tags. 3. From the Apply this action list, select Delete Tags from Photos and click Go. 4. Enter yes to confirm you want to remove the tags from all photos in the selected gallery or galleries. 5. Click OK. Moving Photos Between Photo Galleries You can move all photos from one gallery in your Online Photo Filer to another gallery, or you can select the photos you want to move and specify which gallery you want to move them to. To Move All Photos from One Gallery to Another 1. From the Galleries menu, select Manage Galleries. 2. Select the gallery or galleries you want to move photos from. 3. From the Apply this action list, select Move Photos. 4. Click Go. 5. From the Move photos to list, select the gallery to which you want to move the photos. 6. Click Move Photos. To Select and Move Photos Between Photo Galleries 2. Click the name of the photo gallery that contains the photos you want to move. 3. Go to the Organize tab. 4. Click the photos to select them. NOTE: When selecting which photos to move, click a photo to select it, click a photo again to deselect it, or click Select All or Unselect All to select or deselect all photos. 5. From the Apply this action list, select Move Photos. 6. Click Go.
Getting Started Guide. Getting Started With Go Daddy Photo Album. Setting up and configuring your photo galleries.
 Getting Started Guide Getting Started With Go Daddy Photo Album Setting up and configuring your photo galleries. Getting Started with Go Daddy Photo Album Version 2.1 (08.28.08) Copyright 2007. All rights
iphoto Getting Started Get to know iphoto and learn how to import and organize your photos, and create a photo slideshow and book.
 iphoto Getting Started Get to know iphoto and learn how to import and organize your photos, and create a photo slideshow and book. 1 Contents Chapter 1 3 Welcome to iphoto 3 What You ll Learn 4 Before
Introduction to: Microsoft Photo Story 3. for Windows. Brevard County, Florida
 Introduction to: Microsoft Photo Story 3 for Windows Brevard County, Florida 1 Table of Contents Introduction... 3 Downloading Photo Story 3... 4 Adding Pictures to Your PC... 7 Launching Photo Story 3...
Managing images with NewZapp
 Managing images with NewZapp This guide is for anyone using the NewZapp Fixed editor as opposed to the Drag and Drop editor. The Image Manager is where images are uploaded and stored in your NewZapp account
Impress Guide. Chapter 4 Adding and Formatting Pictures
 Impress Guide Chapter 4 Adding and Formatting Pictures Copyright This document is Copyright 2005 2012 by its contributors as listed below. You may distribute it and/or modify it under the terms of either
Copyright Notice. Trademarks
 Copyright Notice All rights reserved. No part of this publication may be reproduced, stored in a retrieval system, or transmitted in any form or by any means, electronic, mechanical, photocopying, recording,
Impress Guide Chapter 4 Adding and Formatting Pictures
 Impress Guide Chapter 4 Adding and Formatting Pictures This PDF is designed to be read onscreen, two pages at a time. If you want to print a copy, your PDF viewer should have an option for printing two
iphoto Objective Course Outline
 iphoto Objective In this class participants will learn how iphoto creates a photo center for photo organization by using rolls and albums. Participants will also learn the built-in editing tools. Participants
Apple Photos Quick Start Guide
 Apple Photos Quick Start Guide Photos is Apple s replacement for iphoto. It is a photograph organizational tool that allows users to view and make basic changes to photos, create slideshows, albums, photo
Table of Contents. Vizit s Carousel Menu Gallery Play Favorite Remove Rotate Fill Screen Friends Block Lock Screen Settings Reply Share
 User Guide Table of Contents VIZIT, VIZITME.COM, VIZIT SEE.TOUCH.FEEL, and the Vizit logo are trademarks and/or registered trademarks of Isabella Products, Inc. Other marks are owned by their respective
Chapter 4 Adding and Formatting Pictures
 Impress Guide Chapter 4 Adding and Formatting Pictures OpenOffice.org Copyright This document is Copyright 2007 by its contributors as listed in the section titled Authors. You can distribute it and/or
digitization station DIGITAL SCRAPBOOKING 120 West 14th Street
 digitization station DIGITAL SCRAPBOOKING 120 West 14th Street www.nvcl.ca techconnect@cnv.org DIGITAL SCRAPBOOKING With MyMemories Suite 6 The MyMemories Digital Scrapbooking software allows you to create
ADOBE BRIDGE. Help and tutorials
 ADOBE BRIDGE Help and tutorials September 2013 Contents What s new... 1 What s new in Adobe Bridge CC... 2 What s new in Adobe Bridge CS6... 4 Adobe Bridge... 5 About Adobe Bridge... 6 Start Adobe Bridge...
Getting Started. with Easy Blue Print
 Getting Started with Easy Blue Print User Interface Overview Easy Blue Print is a simple drawing program that will allow you to create professional-looking 2D floor plan drawings. This guide covers the
Imaging Features Available in HTML5. it just makes sense
 Imaging Features Available in HTML5 it just makes sense August, 2018 Imaging Features Available in HTML5 As part of the 5.2 SP1 release, the Images functionality is now available in HTML5 and provides
Davis Art Images: Create and Share Slideshows
 Davis Art Images: Create and Share Slideshows Davis Art Images, you can create and curate custom sets of images to use in your art room with Tags. Your Tagged Image Sets can then be viewed and presented
Quick Start Training Guide
 Quick Start Training Guide To begin, double-click the VisualTour icon on your Desktop. If you are using the software for the first time you will need to register. If you didn t receive your registration
ACDSee Pro 3 tutorials: Pro 3 overview for new users
 In ACDSee Pro Photo Manager 3, the Manage, View, Process and s help to accelerate your photography workflow. You can easily switch between modes depending where you are in your workflow. To switch between
TECHNOTravel. For Microsoft Word & PowerPoint 2010 Student Workbook. TECHNOeBooks Project-based Computer Curriculum ebooks.
 TECHNOTravel For Microsoft Word & PowerPoint 2010 Student Workbook TECHNOeBooks Project-based Computer Curriculum ebooks www.bepublishing.com Copyright 1993 2010. TechnoKids Inc. in partnership with B.E.
Progeny Imaging Veterinary
 Progeny Imaging Veterinary User Guide V1.14 and higher 00-02-1605 Rev. K1 ECN: ECO052875 Revision Date: 5/17/2017 Contents 1. About This Manual... 6 How to Use this Guide... 6 Text Conventions... 6 Getting
Apple iphoto 4 ITS Technology & Learning Services Dr. Luanne Fose Revised April 29, 2004
 Apple iphoto 4 ITS Technology & Learning Services Dr. Luanne Fose Revised April 29, 2004 Table of Contents Introduction...1 Importing Photos From Your Digital Camera...1 Importing Photos From Other Sources...2
Gloucester County Library System
 1 Gloucester County Library System Gloucester County Library System 2 DIGITAL PHOTO ORGANIZING AND EDITING USING PICASA 3.9 FROM GOOGLE To Download the FREE Picasa 3.9 Program from Google G O T O T H E
Basics Pictures Media Bar
 Basics 1 The right pictures can make your publication stand out from the crowd. In this tutorial, we ll show you how to: Add and replace pictures. Use the Media Bar. Pan, zoom, and crop pictures. Apply
Photoshop CC 2018 Essential Skills
 Photoshop CC 2018 Essential Skills Adobe Photoshop Creative Cloud 2018 University Information Technology Services Learning Technology, Training, Audiovisual and Outreach Copyright 2018 KSU Division of
Section 4 Digital Imagery/ Photo
 Section 4 Digital Imagery/ Photo Library of Congress Teaching with Primary Sources at Governors State University Section 4 1 ALPHABET SOUP AND GRAPHICS Working with photographs, maps, and other images
PosterArtist Quick Guide
 PosterArtist Quick Guide Create posters in four easy steps STEP STEP STEP STEP Use Auto Design to Create Posters Simply select a poster type and a design image to automatically create high-quality posters.
Submittal Exchange Design Team User Guide
 Submittal Exchange Design Team User Guide Version 17 November 2017 Contents About This Guide... 9 Access/Permissions... 11 What is Submittal Exchange for Design?... 11 How Can I Get Submittal Exchange
Photoshop CS2. Step by Step Instructions Using Layers. Adobe. About Layers:
 About Layers: Layers allow you to work on one element of an image without disturbing the others. Think of layers as sheets of acetate stacked one on top of the other. You can see through transparent areas
PackshotCreator 3D User guide
 PackshotCreator 3D User guide 2011 PackshotCreator - Sysnext All rights reserved. Table of contents 4 4 7 8 11 15 18 19 20 20 23 23 24 25 26 27 27 28 28 34 35 36 36 36 39 42 43 44 46 47 Chapter 1 : Getting
ArcSoft PhotoImpression Table of Contents:
 ArcSoft PhotoImpression Table of Contents: 1. Welcome to PhotoImpression 2. Highlights of PhotoImpression 3. System Requirements 4. Installing PhotoImpression 5. Working with PhotoImpression Getting Started
Photo Story Tutorial
 Photo Story Tutorial To create a new Photo Story Project: 1. Start 2. Programs 3. Photo Story 4. Begin a New Story 5. Next 6. Import Pictures 7. Click on your Flash Drive s name from the window on the
Lesson 4: Inserting and Modifying Clip Art and Photos
 CNET tech sites: Price comparisons Product reviews Tech news Downloads Site map Home Your Courses Your Profile Logout FAQ Contact Us About Lesson 4: Inserting and Modifying Clip Art and Photos PowerPoint
Creating a Slide Show with Background Music in Adobe Lightroom January 2017 Maryann Flick
 Creating a Slide Show with Background Music in Adobe Lightroom January 2017 Maryann Flick Adobe Lightroom is widely used by many photographers for image organization and editing. If you are already using
Learn More about TechnoPhotoshop SAMPLE
 Learn More about TechnoPhotoshop Session 2 Filtering Fun In this session, students are introduced to Photoshop photo editing software. To start, they learn about the program environment. Afterwards, they
Sense. 3D scanning application for Intel RealSense 3D Cameras. Capture your world in 3D. User Guide. Original Instructions
 Sense 3D scanning application for Intel RealSense 3D Cameras Capture your world in 3D User Guide Original Instructions TABLE OF CONTENTS 1 INTRODUCTION.... 3 COPYRIGHT.... 3 2 SENSE SOFTWARE SETUP....
Introduction. Let s get started...
 Introduction Welcome to PanoramaPlus 2, Serif s fully-automatic 2D image stitcher. If you re looking for panorama-creating software that s quick and easy to use, but doesn t compromise on image quality,
Photoshop: a Beginner s course. by: Charina Ong Centre for Development of Teaching and Learning National University of Singapore
 Photoshop: a Beginner s course by: Charina Ong Centre for Development of Teaching and Learning National University of Singapore Table of Contents About the Workshop... 1 Prerequisites... 1 Workshop Objectives...
Adding Graphics to a Presentation
 8 Adding Graphics to a Presentation LESSON SKILL MATRIX Skill Exam Objective Objective Number Adding a Picture to a Slide Formatting Graphical Elements Resize graphical elements. 3.1.3 Apply styles to
PackshotAlto range User guide
 PackshotAlto range User guide 2011 PackshotCreator - Sysnext All rights reserved. Table of contents 3 3 4 6 7 10 14 17 17 17 17 19 19 22 23 24 25 26 27 28 28 28 31 34 35 36 38 39 Chapter 1 : Getting started
Creating Digital Stories for the Classroom
 Using Photo Story 3 to Create a Digital Story Creating Digital Stories for the Classroom When you open Photo Story 3 you have a few options. To begin a new story select the option Begin a New Story and
Digital Projection Entry Instructions
 The image must be a jpg file. Raw, Photoshop PSD, Tiff, bmp and all other file types cannot be used. There are file size limitations for competition. 1) The Height dimension can be no more than 1080 pixels.
The Main Screen. Viewing Area - show the photos that were selected in the Source List.
 iphoto 11 The Main Screen Source List - This is where the Library, Events and Albums are identified. It is the place where photos can be organized and accessed. The Source List can also contain the slideshows,
Chapter 1: Getting started Installation... 1 Adobe Help... 1 Resources... 2
 USER GUIDE Copyright 2007 Adobe Systems Incorporated. All rights reserved. Adobe Photoshop Lightroom for Windows and Macintosh If this guide is distributed with software that includes an end user agreement,
Lab for Working with Adobe Photoshop
 Lab for Working with Adobe Photoshop Try the tasks listed with one of the sample images supplied (You will find them in the Course Materials section of Blackboard as the file sample_images.zip. You will
User Manual Veterinary
 Veterinary Acquisition and diagnostic software Doc No.: Rev 1.0.1 Aug 2013 Part No.: CR-FPM-04-022-EN-S 3DISC, FireCR, Quantor and the 3D Cube are trademarks of 3D Imaging & Simulations Corp, South Korea,
Digital Projection Entry Instructions
 The image must be a jpg file. Raw, Photoshop PSD, Tiff, bmp and all other file types cannot be used. There are file size limitations for competition. 1) The Height dimension can be no more than 1080 pixels.
Digital Photography 1
 Digital Photography 1 Photoshop Lesson 1 Photoshop Workspace & Layers Name Date Default Photoshop workspace A. Document window B. Dock of panels collapsed to icons C. Panel title bar D. Menu bar E. Options
User Guide. Version 1.2. Copyright Favor Software. Revised:
 User Guide Version 1.2 Copyright 2009-2010 Favor Software Revised: 2010.05.18 Table of Contents Introduction...4 Installation on Windows...5 Installation on Macintosh...6 Registering Intwined Pattern Studio...7
To Easily Navigate this Presentation See that the Full Page is Showing and then Use Page Up and Page Down Keys or Right and Left Keyboard Arrow Keys
 Top Left Top Right To Easily Navigate this Presentation See that the Full Page is Showing and then Use Page Up and Page Down Keys or Right and Left Keyboard Arrow Keys Bottom Left Bottom Right Unite with
Basic Tutorials Series: Import A Photograph. RenoWorks Support Team Document #HWPRO0003
 Basic Tutorials Series: Import A Photograph RenoWorks Support Team Document #HWPRO0003 Import A Photograph 2 1 Import Your Own Photograph The Photo Import Wizard The Photo Import Wizard is the first tool
Chapter 14 Inserting Bitmapped Images
 Chapter 14 Inserting Bitmapped Images Introduction This chapter explains how to insert and size bitmapped images in R&R reports. This information is presented in the following sections: Importing an Image
Welcome to Weebly. Setting up Your Website. Write your username here:
 Welcome to Weebly Setting up Your Website Write your username here: You will need to remember enter this username each time you log in, so you may want to write it somewhere else that is safe and easy
iphoto Getting Started Learn how to import and organize your photos, and create a photo slideshow and book
 iphoto Getting Started Learn how to import and organize your photos, and create a photo slideshow and book 1 ontents hapter 1 4 Welcome to iphoto 4 Using This ocument 5 What s New in iphoto 6 Finding Out
Adobe Photoshop CS2 Workshop
 COMMUNITY TECHNICAL SUPPORT Adobe Photoshop CS2 Workshop Photoshop CS2 Help For more technical assistance, open Photoshop CS2 and press the F1 key, or go to Help > Photoshop Help. Selection Tools - The
Adding Graphics to a Presentation
 8 Adding Graphics to a Presentation LESSON SKILL MATRIX Skill Exam Objective Objective Number Inserting and Formatting Images Adding Shapes to Slides Display gridlines. Crop images. Resize images. Apply
1 ImageBrowser Software User Guide 5.1
 1 ImageBrowser Software User Guide 5.1 Table of Contents (1/2) Chapter 1 What is ImageBrowser? Chapter 2 What Can ImageBrowser Do?... 5 Guide to the ImageBrowser Windows... 6 Downloading and Printing Images
Materials Tutorial. Setting Materials Defaults
 Materials Tutorial Materials display on the surfaces of objects in 3D views and can make a 3D view appear highly realistic. When applied to most objects, material quantities will also be calculated in
Key Terms. Where is it Located Start > All Programs > Adobe Design Premium CS5> Adobe Photoshop CS5. Description
 Adobe Adobe Creative Suite (CS) is collection of video editing, graphic design, and web developing applications made by Adobe Systems. It includes Photoshop, InDesign, and Acrobat among other programs.
Created by Eugene Stephens iphoto 11. To start iphoto: - Double-click Macintosh HD. Go to Applications > iphoto. Layout
 iphoto 11 To start iphoto: - Double-click Macintosh HD. Go to Applications > iphoto. Layout Library Viewing Area Search Zoom Toolbar - Library Library of imported photos & video clips, folders, albums,
STUDENT USER S MANUAL
 Cleveland State University College of Education and Human Services CSU eportfolio STUDENT USER S MANUAL (Use this manual if you are keeping your entire portfolio on the eportfolio system and using the
Kaltura CaptureSpace Lite Desktop Recorder: Editing, Saving, and Uploading a Recording
 Kaltura CaptureSpace Lite Desktop Recorder: Editing, Saving, and Uploading a Recording For this handout, we will be editing the Screen Recording we created in the Kaltura CaptureSpace Lite Desktop Recorder
User Guide. Version 1.4. Copyright Favor Software. Revised:
 User Guide Version 1.4 Copyright 2009-2012 Favor Software Revised: 2012.02.06 Table of Contents Introduction... 4 Installation on Windows... 5 Installation on Macintosh... 6 Registering Intwined Pattern
Manual. ios App. Ver2.2. v Mall Drive, Commack, NY (P) (F)
 (F)") Manual Ver2.2 ios App v1.6 73 Mall Drive, Commack, NY 11725 631-864-1000 (P) 631-543-8900 (F) www.accu-scope.com info@accu-scope.com Contents CHAPTER 1: SYSTEM REQUIREMENT & SOFTWARE -------------------------------------
Manual Ver2.2 ios App v1.6 73 Mall Drive, Commack, NY 11725 631-864-1000 (P) 631-543-8900 (F) www.accu-scope.com info@accu-scope.com Contents CHAPTER 1: SYSTEM REQUIREMENT & SOFTWARE -------------------------------------
Windows INSTRUCTION MANUAL
 Windows E INSTRUCTION MANUAL Contents About This Manual... 3 Main Features and Structure... 4 Operation Flow... 5 System Requirements... 8 Supported Image Formats... 8 1 Installing the Software... 1-1
How to Build a LimeSurvey: The Basics for Beginners
 1 How to Build a LimeSurvey: The Basics for Beginners Login and view a list of your surveys. We will give you 3 templates to start with. These are the ethics compliant templates you need to protect participant
Creating a Frame by Frame Animation for PhotoStory
 Creating a Frame by Frame Animation for PhotoStory There are an unlimited number of animation styles that you can create using the PhotoShop Elements software. Depending on the type of animation you want,
First English edition for Ulead COOL 360 version 1.0, February 1999.
 First English edition for Ulead COOL 360 version 1.0, February 1999. 1992-1999 Ulead Systems, Inc. All rights reserved. No part of this publication may be reproduced or transmitted in any form or by any
Version 4.2 For WINDOWS
 SIGMA Photo Pro User Guide Companion Processing Software for SIGMA Digital Cameras Version 4.2 For WINDOWS I M P O R T A N T : Please Read Before You Start Thank you very much for purchasing this SIGMA
Guidance on Using Scanning Software: Part 5. Epson Scan
 Guidance on Using Scanning Software: Part 5. Epson Scan Version of 4/29/2012 Epson Scan comes with Epson scanners and has simple manual adjustments, but requires vigilance to control the default settings
Materials Tutorial. Chapter 6: Setting Materials Defaults
 Setting Materials Defaults Chapter 6: Materials Tutorial Materials display on the surfaces of objects in 3D views and can make a 3D view appear highly realistic. When applied to most objects, material
Introducing Photo Story 3
 Introducing Photo Story 3 SAVE YOUR WORK OFTEN!!! Page: 2 of 22 Table of Contents 0. Prefix...4 I. Starting Photo Story 3...5 II. Welcome Screen...5 III. Import and Arrange...6 IV. Editing...8 V. Add a
Cricut Design Space App for ipad User Manual
 Cricut Design Space App for ipad User Manual Cricut Explore design-and-cut system From inspiration to creation in just a few taps! Cricut Design Space App for ipad 1. ipad Setup A. Setting up the app B.
Top Storyline Time-Saving Tips and. Techniques
 Top Storyline Time-Saving Tips and Techniques New and experienced Storyline users can power-up their productivity with these simple (but frequently overlooked) time savers. Pacific Blue Solutions 55 Newhall
Worksheet II Technology Exploration III Grade 9 Subject ICT0130
 Worksheet II Technology Exploration III Grade 9 Subject ICT0130 Section Date Name ID Score/20 True or False: If you are installing ilife on Mac without an internal Super drive, idvd will install by default.
The original image. Let s get started! The final effect.
 Non-Destructive Infrared Glow Effect In this Photoshop tutorial, we ll learn how to quickly and easily add a dream-like infrared glow effect to an image, and we ll do it non-destructively using Smart Filters
Introduction to Photoshop: Basic Editing & Prepare Images for the Web
 Introduction to Photoshop: Basic Editing & Prepare Images for the Web 1 LEARNING OBJECTIVES Basic tools in Photoshop & Use of Bridge Prepare images for print and web use TOPICS COVERED Photoshop Interface
Using Adobe Photoshop
 Using Adobe Photoshop 6 One of the most useful features of applications like Photoshop is the ability to work with layers. allow you to have several pieces of images in the same file, which can be arranged
Recitation 2 Introduction to Photoshop
 Recitation 2 Introduction to Photoshop What is Adobe Photoshop? Adobe Photoshop is a tool for creating digital graphics either by starting with a scanned photograph or artwork or by creating the graphics
Fotini. Software User s Guide
 Fotini Software User s Guide Table of Contents What is Fotini? How is Fotini set up on my computer? Getting Started How do I? Start the program End the program Open an album See photo details Move to the
Companion Processing Software for SIGMA Digital Cameras. Version 4.1 For Macintosh
 SIGMA Photo Pro User Guide Companion Processing Software for SIGMA Digital Cameras Version 4.1 For Macintosh I M P O R T A N T : Please Read Before You Start Thank you very much for purchasing this SIGMA
Instructions for Finding and Inserting Photos into Documents
 Instructions for Finding and Inserting Photos into Documents To find and use project photos for documents and presentation, the easiest way is to use the Photoshop Album. The Photoshop Album must be accessed
BOOK BUILDING. for beginners. Lightroom Tutorial by Mark Galer
 BOOK BUILDING for beginners Lightroom Tutorial by Mark Galer Contents Part One: Preparing the Book Part Two: Page Layout Design Ideas Create a Collection Choose your Images Sequence your Images Title your
Photoshop CS6 automatically places a crop box and handles around the image. Click and drag the handles to resize the crop box.
 CROPPING IMAGES In Photoshop CS6 One of the great new features in Photoshop CS6 is the improved and enhanced Crop Tool. If you ve been using earlier versions of Photoshop to crop your photos, you ll find
PhotoStory 3 Tutorial
 PhotoStory 3 Tutorial http://www.microsoft.com/windowsxp/using/digitalphotography/photostory/default.mspx Photostory is one of Microsoft's best kept secrets. This free software package is on your CD or,
Software Guide for Windows ZoomBrowser EX PhotoStitch
 Software Guide for Windows ZoomBrowser EX PhotoStitch Special Features Transfer Images and Movies Insert Text ABC Save Still Images From Movies Edit Movies A Print Images Back Up to a CD Attach Images
uiulearn TUTORIAL INTEGRATIONS> HOW TO USE PANOPTO (STUDENT)
") uiulearn TUTORIAL INTEGRATIONS> HOW TO USE PANOPTO (STUDENT) This tutorial covers how to record a Panopto video for your course. IN ORDER TO DO THIS, YOUR INSTRUCTOR MUST COMPLETE SEVERAL STEPS TO ALLOW
uiulearn TUTORIAL INTEGRATIONS> HOW TO USE PANOPTO (STUDENT) This tutorial covers how to record a Panopto video for your course. IN ORDER TO DO THIS, YOUR INSTRUCTOR MUST COMPLETE SEVERAL STEPS TO ALLOW
Accessing e-books with your e-reader
 e-reader 1 Accessing e-books with your e-reader What you need to know about library e-books is that each one is protected by Digital Rights Management (DRM). This means that access to e-books is restricted
The ideal K-12 science microscope solution. User Guide. for use with the Nova5000
 The ideal K-12 science microscope solution User Guide for use with the Nova5000 NovaScope User Guide Information in this document is subject to change without notice. 2009 Fourier Systems Ltd. All rights
For customers in USA This device complies with Part 15 of the FCC rules. Operation is subject to the following two conditions:
 User manual For customers in North and South America For customers in USA This device complies with Part 15 of the FCC rules. Operation is subject to the following two conditions: (1) This device may not
METRO TILES (SHAREPOINT ADD-IN)
") METRO TILES (SHAREPOINT ADD-IN) November 2017 Version 2.6 Copyright Beyond Intranet 2017. All Rights Reserved i Notice. This is a controlled document. Unauthorized access, copying, replication or usage
METRO TILES (SHAREPOINT ADD-IN) November 2017 Version 2.6 Copyright Beyond Intranet 2017. All Rights Reserved i Notice. This is a controlled document. Unauthorized access, copying, replication or usage
ADD A REALISTIC WATER REFLECTION
 ADD A REALISTIC WATER REFLECTION In this Photoshop photo effects tutorial, we re going to learn how to easily add a realistic water reflection to any photo. It s a very easy effect to create and you can
Adobe Photoshop CS5 Tutorial
 Adobe Photoshop CS5 Tutorial GETTING STARTED Adobe Photoshop CS5 is a popular image editing software that provides a work environment consistent with Adobe Illustrator, Adobe InDesign, Adobe Photoshop
Paint Shop Pro Photo Xi: advanced features
 Paint ShoP Pro Photo Xi for PhotograPherS 11 Paint Shop Pro Photo Xi: advanced features tonal controls Most of the processes mentioned in the previous section deal with single-button operations that perform
Adobe Photoshop CS5 Layers and Masks
 Adobe Photoshop CS5 Layers and Masks Email: training@health.ufl.edu Web Page: http://training.health.ufl.edu Adobe Photoshop CS5: Layers and Masks 2.0 Hours The workshop will cover creating and manipulating
Google Photos Online Basics
 Google Photos Online Basics Click here to return to the Computer Club s website Adding new photos to your Google Photos - Three Ways Google Photos Uploader From Google Photos website click upload for individual
PowerPoint 2016: Formatting Pictures. Introduction
 PowerPoint 2016: Formatting Pictures Introduction There are a variety of ways to format the pictures in your slide show. The picture tools in PowerPoint make it easy to personalize and modify the images
On completion of this exercise you will have:
 Prerequisite Knowledge To complete this exercise you will need; to be familiar with the SolidWorks interface and the key commands. basic file management skills the ability to rotate views and select faces
TABLE OF CONTENTS. Logging into the Website Homepage and Tab Navigation Setting up Users on the Website Help and Support...
 TABLE OF CONTENTS Logging into the Website...02 Homepage and Tab Navigation...03 Setting up Users on the Website...08 Help and Support...10 Uploding and Managing Photos...12 Using the Yearbook Ladder...16
QSL Studio. QSL Card Setting Procedure & Specs. Version 1.0
 73 QSL Studio QSL Card Setting Procedure & Specs Version 1.0 (Desktop Section - QSL Studio) 1. ebabel QSL Studio is not a design tool, the users must upload their cards as a finish art work. 2. The image
Celtx Studios Owner's Manual January 2011
 January 2011 Get the most out of Celtx Studios with the latest version of Celtx - available free at http://celtx.com Screen captures are made using Windows OS. Some image dialogs differ slightly on Mac