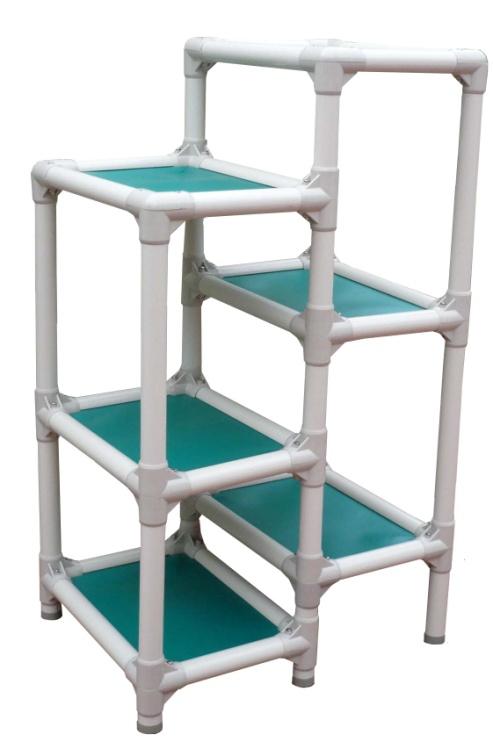
3 Nest Cat Tower Parts List
|
|
|
- Phoebe Fowler
- 5 years ago
- Views:
Transcription

 3.")
Short 11 (12) 2 ¾ panhead screws")
 Fabric Mats (2)")
 Long side slotted frame (6)")
 bottom corners (12)")
 (24) lock nuts (18) bottom corners")

1 3 at Tower Parts List (3) Fabric mats (6) leg caps 3.25 (2) PVC leg pipe (2) PVC leg pipe (2) PVC leg pipe (6) 3.25 PVC leg pipe (6) Long PVC Slotted frame pipe (6)Short 11 (12) 2 ¾ panhead screws with locknuts (12) 2 ½ machine screws With locknuts Parts List- (3) Fabric Mats (2) PVC leg pipe (2) PVC leg pipe (2) PVC leg pipe (6) 3.25 PVC leg pipe (6) Long side slotted frame (6) Short side slotted frame (6) leg caps (6) top corners (18) bottom corners (12) machine screws (2 ½ ) (12) Panhead screws (2 ¾ ) (24) lock nuts (18) bottom corners Tools Needed Phillips Head Screwdriver, 7/16 Wrench or Adjustable Wrench, level & rubber mallet. Flat surface to work on. (6) top corners Patent# US A
 3.25 legs Individual cat owners.")
2 Top Nest A Nest Tower Diagram (9 nest shown) Top Nest B Kuranda Bed Guarantees: We guarantee the structural integrity of the frame and fabric of our beds for a period of one year from date of purchase. As such Kuranda will replace *fabrics and frame parts, including legs and corner fittings, at no charge. () 3.25 legs Individual cat owners. We will replace frame parts and *fabric damaged by purchaser's cats to the point of not being useable at no charge for a period of one year from date of purchase. This warranty includes chewing or scratching of legs and corner fittings. Multiple fabric replacements will be handled on a case by case basis. Boarding kennels, veterinary hospitals, shelters, trainers, and breeders: We will replace frame parts damaged by client cats to the point of not being useable at no charge for a period of one year from date of purchase. This warranty includes chewing or scratching of legs and corner fittings. We will replace at no charge Cordura nylon, Ballistic nylon, and 40 oz solid vinyl fabrics for a period of 1 year from date of purchase. *Textilene vinyl weave replacements are excluded from this warranty. Please call us if you have any questions or Kuranda USA, PO Box 6651 Annapolis MD

 TOP A Assemble (1) Top Nest A using 4 top")
 TOP B Assemble (1) Top Nest B using 2 top &")
 2 ¾")

3 Step 1. Assemble the Nests Fig. 1-B Fig. 1-C Fig. 1-A Insert the fabric into the channel on each length of frame pipe. There are 2 long sides and 2 short sides for each nest. See Fig 1-A (1) TOP A Assemble (1) Top Nest A using 4 top corners, 4 bottom corners and 8) 2 ½ machine screws. See Fig 1-B (1) TOP B Assemble (1) Top Nest B using 2 top & bottom corners with 4) 2 ½ machine screws (Fig 1-B) on one side. On the remaining 2 corners connect 2 bottom corners with 2) 2 ¾ panhead screws. See Fig 1-C. Type C For each of the remaining Nests Type C, assemble each corner combining 2 bottom corner pieces with 2) 2 ¾ panhead screws. See Fig 1-C
 remaining 3.")
 of the legs and insert into the bottom corner of a Nest Type C.")
 legs into the center openings.")
4 Step 2. Assemble the Insert a leg cap onto (4) of the 3.25 legs and insert into the bottom corners of a Nest Type C and place Nest on the floor. Using a level, tap gently with a rubber mallet to make sure the nest is secure and level. Insert the (2) remaining 3.25 legs into the topside corners, and the (2) legs on the opposite topside corners. See Fig 2 A Fig. 2 -A Nest Type C legs Nest Type C Fig. 2 -B Insert a leg cap into (2) of the legs and insert into the bottom corner of a Nest Type C. Place this nest over the Nest inserting the two bottom corner openings onto the 2 Nest upright 3.25 legs. Using a level, tap gently with a rubber mallet to make sure the nest is secure and level. Insert (2) legs into the center openings. Insert (2) legs into the outside corner openings See Fig 2 B Place a Nest Type C onto the (2) and (2) legs of the Nest. Using a level, tap gently with a rubber mallet to make sure the nest is secure and level. Insert (2) legs into the center openings of the top nest. See Fig. 3-A Type C Nest Fig. 3 -A
")


5 Step 3. Stack the Nests to Assemble the Tower Continue to stack the nests and build the tower by Inserting (2) legs into the center openings, and (2) legs onto both of the outside corners of the tower. Add each Nest type C tapping as necessary to secure and level each nest into place. See Fig 3-B Type C Fig. 3 -B Step 4. Add the Top Nests TOP B Place Top Nest B to complete one side of the tower. Insert the remaining (2) legs into the corner openings. Level and secure into place. See Fig 3-C TOP A Fig. 3 -C TOP B Place Top Nest A to complete the final level of the tower. Level and secure into place. See Fig. 3-D Fig. 3 -D


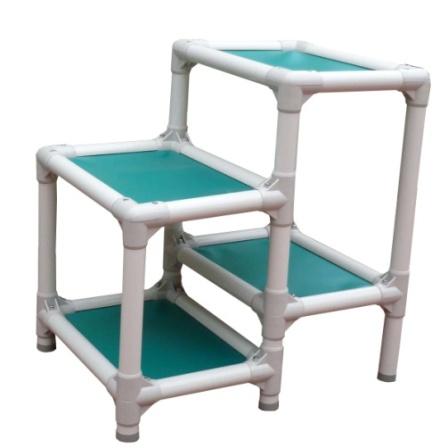
6 7 Tiers 30Wx21Lx56H Kuranda USA, PO Box 6651 Annapolis MD Tiers 30Wx21Lx66H 9 Tiers 30Wx21Lx76H 2 Tiers 20Wx15Lx24H 3 Tiers 30Wx21Lx16H 4Tiers 30Wx21Lx26H nest #6 5 Tiers 30Wx21Lx36H Cat Bed 20Wx15Lx14H 6 Tiers 30Wx21Lx46H
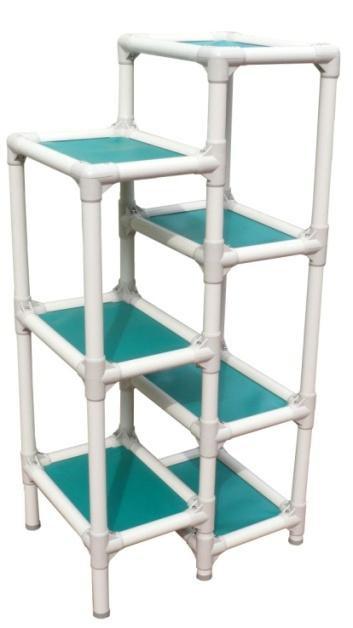
9 Nest Cat Tower Parts List
 9 at Tower Parts List (9) Fabric mats (6) leg caps (64) 2 ¾ panhead screws 3.25 (18) Long (18)Short 11 with locknuts (12) PVC leg pipe (14) PVC leg pipe (2) PVC leg pipe (2) PVC leg pipe (6) 3.25 PVC leg
DEPTH-KIT-785 Seat Depth Extension
 Parts Required: 2 x Seat Frame Plugs 1.5 or 3 1 x Elevation Rod 18.5 or 20 2 x Attachment Rods 18.5 or 20 3 x Vinyl Straps color and width specific Tools Used: Sissors 2 x ½ Wrench Soft Tip Hammer or Mallet
O-Sullivan King 4 Poster Bed O-Sullivan Queen 4 Poster Bed Parts and Hardware List
 Parts and Hardware List A. Left Headboard Post 1 pc B. Right Headboard Post 1 pc C. Left Footboard Post 1 pc D. Right Footboard Post 1 pc E. Headboard Panel 1 pc F. Footboard Rail 1 pc. Spindles 4 pcs
PLEASE CHECK ALL BOXES FOR HARDWARE BEFORE DISCARDING WARRANTY AND USER INFORMATION CAN BE FOUND AT THE END OF THESE INSTRUCTIONS
 Thank you for purchasing the SleepSafe Safety Bed. With proper care, your bed will provide years of safe use. Carefully unpack all the contents of your bed and verify that all parts are included using
Footprint Mobile Assembly Instructions
 Footprint Mobile Assembly Instructions 1998754 Revision -1 Complete Series Master Packet If you have any questions concerning these instructions, please call Kimball Office Customer Service. 20 Kimball
PLEASE CHECK ALL BOXES FOR HARDWARE BEFORE DISCARDING
 Thank you for purchasing the SleepSafe Safety Bed. With proper care, your bed will provide years of safe use. Carefully unpack all the contents of your bed and verify that all parts are included using
F l a t S c r e e n A R M S I n s t a l l a t i o n
 ITEM NUMBERS (1) #TOACAORG16 (2) #TOACAORG20 (3) #TOACATRP24 (4) #TOACATRP30 (5) #TOACATRPDS (6) #TOACATRPSS TOOLS REQUIRED (1) 3/8 Wrench (not provided) (2) Phillips head screwdriver (not provided) (1)
MAG-CONV Basic, 48, 48R & Midline Front Mount
 Parts Required: Tools Used: Mag Wheels Brakes Brake Rods Mounting Bracket Anti Tippers 7/16" Wrench Screw Driver Rubber Mallet 5/8 Wrench 5mm Allen Wrench Step Execution Figures 1 Remove front 5" total
INSTRUCTION MANUAL MANUAL DE INSTRUCCIONES
 INSTRUCTION MANUAL MANUAL DE INSTRUCCIONES Model Number/ No. de Modelo: WDB101 CLOTHES DRYER STACKING BRACKET CAUTION: BEFORE USE, PLEASE READ AND FOLLOW ALL SAFETY RULES AND OPERATING INSTRUCTIONS. Avanti
TOOLS REQUIRED FOR ASSEMBLY. Rubber Mallet or Plastic Tip Hammer PARTS REQUIRED FOR ASSEMBLY OF SINGLE ENTRY STARTER.
 TOOLS REQUIRED FOR ASSEMBLY Rubber Mallet or Plastic Tip Hammer Top Cover Support PARTS REQUIRED FOR ASSEMBLY OF SINGLE ENTRY STARTER Back Stop Divider Closed 'L' Upright Slotted Reinforcement Support
PLEASE CHECK ALL BOXES FOR HARDWARE BEFORE DISCARDING WARRANTY AND USER INFORMATION CAN BE FOUND AT THE END OF THESE INSTRUCTIONS
 Thank you for purchasing the SleepSafe Safety Bed. With proper care, your bed will provide years of safe use. Carefully unpack all the contents of your bed and verify that all parts are included using
L.L.Bean. Wooden Slat Bed
 L.L.Bean Wooden Slat Bed Thank you for purchasing our Slat Bed. Assembly of this product requires A Phillips head screwdriver. We have found it helpful to have a second person present in at least one step
#11178 Providence ARBOR
 #11178 Providence ARBOR ASSEMBLY INSTRUCTIONS TOOLS NEEDED Drill with #2 Phillips Bit (recommended) or Phillips Screwdriver Ruler Hammer or Mallet ARBOR TOP ASSEMBLY (Refer to Drawing 1) (Make 2) On clean
Owner s Manual XM-7617 POWER TOWER
 Owner s Manual XM-767 POWER TOWER Table of Contents Important Safety Information Before You Start Assembly Parts List Exploded View 3 5-0 Important Safety Information NOTE: Hand tighten bolts and nylon
INSTRUCTION BOOKLET #C20
 INSTRUCTION BOOKLET #C0 WARNING! ALL MURPHY/WALLBED SYSTEMS CONTAIN STORED ENERGY. FAILURE TO USE AND FOLLOW THESE INSTRUCTIONS DURING THE INSTALLATION PROCESS COULD RESULT IN SEVERE PERSONAL INJURY TO
TITAN INDUSTRIAL RACK 4-FOOT TALL / 3-SHELF
 TITAN INDUSTRIAL RACK 4-FOOT TALL / 3-SHELF DXST4500 IMPORTANT: Please read this manual carefully before assembling this storage rack and save it for reference INSTRUCTION MANUAL 3 TABLE OF CONTENTS TECHNICAL
Jenny Legs Assembly Instructions
 Jenny Legs Assembly Instructions R EXTENDED PHILLIPS BIT MM ALLEN WRENCH 6MM HEX DRIVE /" 007 Steelcase Inc. Grand Rapids, MI 90 U.S.A. Printed in U.S.A. Page of 6 88000 Rev F Jenny Club Instructions:
OWNER S MANUAL Table Tennis Table Patent Pending
 OWNER S MANUAL Table Tennis Table Patent Pending Be sure to write your model number and serial number here for future reference. You can find these numbers printed on the bottom of the table. MODEL # T8266
Copy OWNER S MANUAL MODEL N Keep this Identification Number in case you must contact our Customer Service Department.
 MODEL N 80055 OWNER S MANUAL Copy Keep this Identification Number in case you must contact our Customer Service Department. REGISTER YOUR LIFETIME PRODUCT TODAY! There are benefits to registering your
PROFILE Flat Panel Console System Installation Manual
 PROFILE Flat Panel Console System Installation Manual Table of Contents Page Introduction... 2 Important Safety Information...3, 4 Installation Overview... 4, 5, 6 Single Sided/Single Unit... 7 Double
This instruction manual is an in-depth look and explanation of how to assemble and install the Murphy Bed properly and efficiently.
 This instruction manual is an in-depth look and explanation of how to assemble and install the Murphy Bed properly and efficiently. Don t be put off by the size of the instruction manual as the large diagrams
PLEASE CHECK ALL BOXES FOR HARDWARE BEFORE DISCARDING
 SleepSafe Thank you for purchasing the SleepSafe Safety Bed. With proper care, your bed will provide years of safe use. Carefully unpack all the contents of your bed and verify that all parts are included
INSTALLATION INSTRUCTIONS
 INSTALLATION INSTRUCTIONS For Wallbed models: Do-It-Yourself BOOKLET #C90 WARNING! ALL MURPY/WALLBED SYSTEMS CONTAIN STORED ENERGY. FAILURE TO USE AND FOLLOW THESE INSTRUCTIONS DURING THE INSTALLATION
Select Lab Adjustable Height Workstation
 Assembly Instructions Select Lab Adjustable Height Workstation Mobile version is shown. Also available without casters. Contents Important User Information.............................. 2 Safety Precautions....................................
L.L.Bean. Platform Bed
 L.L.Bean Platform Bed Thank you for purchasing our Platform Bed. Assembly of this product requires a Phillips head and a flat head screwdriver. We have found it helpful to have a second person present
INSTRUCTION BOOKLET #C21. For Wallbed models: KING SIZE
 For Wallbed models: KING SIZE INSTRUCTION BOOKLET #C1 WARNING! ALL MURPHY/WALLBED SYSTEMS CONTAIN STORED ENERGY. FAILURE TO USE AND FOLLOW THESE INSTRUCTIONS DURING THE INSTALLATION PROCESS COULD RESULT
3,500/4,500lb. Vertical Cable Feighner Lift
 3,500/4,500lb. Vertical Cable Feighner Lift CAUTION - PUT SAFETY FIRST 1. Before attempting to install or operate this lift, study and fully understand the proper operating procedures and safety precautions
#11179 Wellington ARBOR
 #11179 Wellington ARBOR Assembly INSTRUCTIONS TOOLS NEEDED Tape Measure Variable Speed Drill with #2 Phillips Bit (recommended) or Phillips Screwdriver Hammer or Mallet ARBOR SIDE PANEL ASSEMBLY (Refer
GlideRite Retractable Cover System For HotSpring & Tiger River Spas (except Classic & pre-2000 Landmark Spas)
") List of Contents Quantity Description 12 #10 x 1 ½ Flat Head Phillips Screw (see pg. 2) 2 #10 x ½ Pan Head Phillips Screw (see pg. 2) 8 ¼ x 2 ½ Lag Bolt (see pg. 2) 7 ¼ 20 x 5 / 8 Hex Head Bolt (see pg.
List of Contents Quantity Description 12 #10 x 1 ½ Flat Head Phillips Screw (see pg. 2) 2 #10 x ½ Pan Head Phillips Screw (see pg. 2) 8 ¼ x 2 ½ Lag Bolt (see pg. 2) 7 ¼ 20 x 5 / 8 Hex Head Bolt (see pg.
3 D Printer Enclosure Assembly Instructions
 3 D Printer Enclosure Assembly Instructions Tools Required: 2.5 mm Allen wrench (included) Phillips screwdriver Adjustable Wrench Parts Included: Plexiglas Back with fan and filters installed (29.5 x 35.5
INSTRUCTION BOOKLET #34. For Wallbed models: KING SIZE SIERRA WITH STORAGE HEADBOARD
 For Wallbed models: KING SIZE SIERRA WITH STORAGE HEADBOARD INSTRUCTION BOOKLET #34 WARNING! ALL MURPHY/WALLBED SYSTEMS CONTAIN STORED ENERGY. FAILURE TO USE AND FOLLOW THESE INSTRUCTIONS DURING THE INSTALLATION
Queen Wingback Bed King Wingback Bed
 Parts and Hardware List A. Side Rails with Attachment Hooks 2 pcs B. Foot Rail 1 pc C. Head Rail 1 pc D. Center Support Slat 1 pc E. Leg Supports 3 pcs F. Support Slats 4 pcs G. Flat Washers 8 pcs H. Lock
CORRIDOR 6521 EXECUTIVE DESK
 CORRIDOR 6521 Product Registration Registering your new BDI product allows us to send you important product updates, service information and helpful hints related to your BDI products. Register today and
#11179 Wellington ARBOR
 #11179 Wellington ARBOR Assembly INSTRUCTIONS TOOLS NEEDED Tape Measure Variable Speed Drill with #2 Phillips Bit (recommended) or Phillips Screwdriver Hammer or Mallet ARBOR SIDE PANEL ASSEMBLY (Refer
Select Lab Fixed Height Workstation
 Assembly Instructions Select Lab Fixed Height Workstation Contents Important User Information.............................. 2 Safety Precautions.................................... 3 Required Tools........................................
Sit Down Table Assembly Instructions
 Sit Down Table Assembly Instructions Parts that come with your sit down table A B C D E F G H I J K L M N Extension leaf Table with cutout for machine Two table legs One table leg with long support One
ASSEMBLY OF THE KNOCKED-DOWN LADDERS: 8 to 12 STEPS STANDARD TOP AND SAFELOCK REQUIRED TOOLS
 ASSEMBLY OF THE KNOCKED-DOWN LADDERS: 8 to 12 STEPS STANDARD TOP AND SAFELOCK REQUIRED TOOLS SAFETY GLASSES 7/16" WRENCH OR SOCKET STEP LADDER OF APPROPRIATE HEIGHT (2) 9/16" WRENCHES OR SOCKETS RUBBER
For additional assistance call
 The following pages will help guide you through the process of assembling your new 48 custom prize wheel. Choose an assembly area with plenty of room to lay your pieces on the floor and also a bench or
PixMate Flat Panel Mount Cart PM7UL-47JF
 PixMate Flat Panel Mount Cart PM7UL-47JF Form E-467 ev. 10/10 MONITO WEIGHT OF 70 lbs. 145 lbs. Caution: The user of this product should exercise caution when moving the PixMate Cart. Any sudden stop could
GlideRite Retractable Cover System For Hot Spot Spas (SE & SLX only)
") List of Contents Quantity Description 12 #10 x 1 ½ Flat Head Phillips Screw (see pg. 2) 2 #10 x ½ Pan Head Phillips Screw (see pg. 2) 8 ¼ x 2 ½ Lag Bolt (see pg. 2) 7 ¼ 20 x 5 / 8 Hex Head Bolt (see pg.
List of Contents Quantity Description 12 #10 x 1 ½ Flat Head Phillips Screw (see pg. 2) 2 #10 x ½ Pan Head Phillips Screw (see pg. 2) 8 ¼ x 2 ½ Lag Bolt (see pg. 2) 7 ¼ 20 x 5 / 8 Hex Head Bolt (see pg.
Essential Lab Workstation
 Assembly Instructions Essential Lab Workstation Contents Important User Information...........................2 Required Tools.....................................3 Hardware Parts List.................................3
Extensive cable management on a footprint that fits on a 24-inch floor tile.
 RM945A-R2 Elite Rack Manager Extensive cable management on a footprint that fits on a 24-inch floor tile. Holds up to 1000 pounds. Customer Support Information Order toll-free in the U.S.: Call 877-877-BBOX
Please Do Not Return This Product To The Store!
 MODEL NOS. T8512 TOURNAMENT SERIES 3 TABLE TENNIS TABLE OWNER'S MANUAL 1. Read this manual carefully before starting assembly. Read each step completely before beginning each step. 2. Some smaller parts
Franklin Mills Stackable Movable Lateral Instructions
 Franklin Mills Stackable Movable Lateral Instructions Table of Contents: Table of contents...1 Tools Required...2 Stationary Shelving Assembly...3-7 Mobile Shelving Assembly...8-16 Rail Assembly...8-11
Assembly Instructions
 Laminate/Phenolic & 1 Pc Butcherblock Tops Before you begin, please make sure all parts and proper quantities are included. (See on next page) Any parts damaged during shipment must be reported within
WEIGHT ADJUSTABLE ESPREE. Model 2ESP-WA-C48- Model 2ESP-WA-C60- 2ESP-WA Rev B 8/17 ASSEMBLY AND OPERATION
 WEIGHT ADJUSTABLE ESPREE PNEUMATIC TABLE BASE 2ESP-WA Rev B 8/17 Model 2ESP-WA-C48- Model 2ESP-WA-C60- = SLV, BLK or WHT ASSEMBLY AND OPERATION PARTS AND TOOLS PLEASE REVIEW these instructions before beginning
3/8-16 x 3/4 cap screw. 3/8-16 hex nut for above screws. 1/4-20 x 3/4 socket cap screw. 3/16 short arm hex key (not to scale)
") Super Slab Roller 24, 30 and 36 models Worktable Assembly Directions P.O. Box 89 Cheney, WA 99004 USA 509.235.9200/800.23.7896 Fax: 509.235.9203 www.northstarequipment.com Revised September, 2006. All
Super Slab Roller 24, 30 and 36 models Worktable Assembly Directions P.O. Box 89 Cheney, WA 99004 USA 509.235.9200/800.23.7896 Fax: 509.235.9203 www.northstarequipment.com Revised September, 2006. All
Basic Installation HOFFMANN KEY HOFFMANN KEY. Page Revised: DEC. 2017
 Basic Installation Frame Assembly If you received the shutter disassembled, you will first have to assemble the frame. All frames are routed to accept a Hoffmann Key. Position the four frame pieces face
HZ8864A0TX / HZ8864B0TX. Metal/Glass Sliding-Door Display Cabinet. Assembly Instructions PO: Each shelf supports up to lb.
 HZ8864A0TX / HZ8864B0TX Metal/Glass Sliding-Door Display Cabinet Assembly Instructions For assistance with assembly, contact: Southern Enterprises Inc. Customer Service: 1-800-633-5096 service@seidal.com
Assembly Instructions
 18' W x 10' H or 12' H Peak Style Frame Assembly Assembly Instructions Before you start: 2+ individuals recommended for assembly, approximate time 3 hours. Recommended tools: Power Drill, Safety Glasses,
Assembly Instructions
 Assembly Instructions Frame Models Lotz (10000), Madison (2644), Vancouver (2710), Boston (2715), San Juan (2717), Marlowe (2719), Arlington (2722), Monticello (2730), Avalon (2750) & Tucson (2770) Tel:
Therma-Tru Door Gallery Setup Instructions Swing Unit with Hardware Kit - Hardware Part # MADGSWU15 (Swing Unit) Part # MADGHKSU10 (Hardware Kit)
 Part # MADGHKSU10 (Hardware Kit)") Swing Unit with Hardware Kit - Hardware Tools Included: 4mm Allen Wrench, 6mm Allen Wrench, 8mm T-Handle Allen Wrench (1) 3/4" Drill Bit, (1) 7/32" Drill Bit and Hole Template Guide Tools Required: Phillips
Swing Unit with Hardware Kit - Hardware Tools Included: 4mm Allen Wrench, 6mm Allen Wrench, 8mm T-Handle Allen Wrench (1) 3/4" Drill Bit, (1) 7/32" Drill Bit and Hole Template Guide Tools Required: Phillips
Kenwood Dining Table. Installation Instructions for Kenwood Dining Table KW-1242-K
 Kenwood Dining Table Installation Instructions for Kenwood Dining Table KW-1242-K 1 IMPORTANT Contents Please consult your Crystal Fire instruction manual for detailed instructions Required and important
Diva Acoustical Ceiling
 Installation Instructions Diva Acoustical Ceiling CONTENTS Important User Information...........................2 Safety Precautions.................................3 Required Tools....................................3
SeeMeCNC Guides. Step 2. REV2 Rostock Max v3 Base Assembly. Second edition Rostock Max v3 assembly guide. Written By: JJ Johnson
 SeeMeCNC Guides Step 2. REV2 Rostock Max v3 Base Assembly Second edition Rostock Max v3 assembly guide. Written By: JJ Johnson INTRODUCTION This assembly guide will walk you though the steps of assembly
Colonial Classic Bar
 88 5528 991 Colonial Classic Bar IMPORTANT NOTE Carefully remove all the parts from the carton and put them individually on a soft cloth to prevent scratches or other damages occuring to the wood parts.
Braxton 7-pc Dining Set (Chair) Model # BRA7PD-E
 Model # BRA7PD-E") LOT NUMBER: DATE PURCHASED: / / Braxton 7-pc Dining Set (Chair) ADULT ASSEMBLY REQUIRED If you have any questions regarding assembly or if parts are missing, DO NOT return this item to the store where
LOT NUMBER: DATE PURCHASED: / / Braxton 7-pc Dining Set (Chair) ADULT ASSEMBLY REQUIRED If you have any questions regarding assembly or if parts are missing, DO NOT return this item to the store where
Table of Content. Sayl Disassembly for Recycling
 Y Sayl Disassembly for Recycling Table of Content 1. Work Chair Disassembly... 2 2. Side Chair Disassembly...17 3. Work Stool Footring Disassembly... 22 1 Y Sayl Disassembly for Recycling Work Chair Disassembly
O W N E R ' S M A N U A L
 TABLE TENNIS TABLE MODEL NOS. T861 T861B O W N E R ' S M A N U A L 1. Read this manual carefully before starting assembly. Read each step completely before beginning each step.. Some smaller parts may
ABRI Fixed Classic Roof / Single Rail System Step by Step Assembly Instructions
 ABRI Fixed Classic Roof / Single Rail System Step by Step Assembly Instructions Before You Begin These installation instructions will lead you through the process of installing your new shelter. The installation
Assembly Instructions Eggstreme Chicken Coops
 Assembly Instructions Eggstreme Chicken Coops Tools Needed Drill/Driver #2 screwdriver bit Pliers Scissors or wire cutter 3/4 wrench Parts List PO Box 1340 Henderson, TX 75653 800-527-1459 To insure a
Motorized or Crank Operated Fortress Zipper Track Shade with Housing and Side Track Installation Instructions
 Motorized or Crank Operated Fortress Zipper Track Shade with Housing and Side Track Installation Instructions Tools Needed Drill 3/8 Metal Drill Bit ¼ Masonry Drill Bit Measuring Tape Pencil 4 Level Phillips
Continuum Frame Assembly Instructions
 Continuum Frame Assembly Instructions Copyright January 1, 2017 Jim M. Bagley, GraceWood, Inc (Reproduction Prohibited) Version 2.2 Table of Contents Continuum Frame Table of Contents... i Warranty...ii
Assembly Instructions
 Unite Panel System Hinge Door July 2016 #12 x / slotted hex washer head bolt Figure 1 threshold bracket frame Detail F threshold bracket threshold bracket (installed) #12 x / slotted hex washer head bolt
Arc Trainer Main Frame Assembly
 Arc Trainer Main Frame Assembly Kit No. 610AK019-4 Kit No. 630AK019-4 NOTE: This instruction sheet describes how to replace the main frame assembly in the Arc Trainer 610A. Tools Required 3/16 Allen wrench
INDUSTRIAL BOLTLESS SHELVING Model No: CS5501
 INDUSTRIAL BOLTLESS SHELVING Model No: CS5501 Part No: 6600615 ASSEMBLY INSTRUCTIONS GC04/13 INTRODUCTION Thank you for purchasing this CLARKE Shelving Unit. Before attempting to use the product, it is
PFW 6851 Display Wall Mount, Turn & Tilt 80 kg INSTALLATION INSTRUCTIONS
 Display Wall Mount, Turn & Tilt 80 kg INSTALLATION INSTRUCTIONS 9531-007-Z00-01 Table of Contents Warning Statements 2 Parts List 3 Installation Tools 3 Wood Stud Installation 5 Concrete Surface Installation
IDR assembly instructions:
 IDR assembly instructions: Required Tools: 2 X 12mm Open End Wrench 14mm open end wrench #2 Phillips Head Screw Driver (Drill with adjustable torque clutch recommended) 8mm nut driver (Supplied in IDR-AK)
INSTALL LOAD BED TRACKS
 Universal LOAD BED TRAY & Load BArs TRBU001 / KRLBUNI1 INSTALL TIME: 2.5 Hours READ ME FIRST: Thank you for purchasing a Front Runner Slimline II Load Bed Rack or Load Bar Kit. Your Kit will contain the
Mat Instructions: Rubber Hinge
 P.O. Box 459 Rosemount, MN 55068 Tel: 651 423 1174 Toll Free: 800 824 3348 Fax: 651 423 1310 Toll Free 800 310 9853 Connecting Sections: REESE ENTERPRISES, INC. Mat Instructions: Rubber Hinge www.reeseusa.com
4Post Shelving Assembly Instructions
 4Post Shelving Assembly Instructions ATTENTION: BEFORE STARTING ASSEMBLY, DETERMINE WHICH STYLE OF SHELVING IS TO BE BUILT AND FIND THE CORRESPONDING SECTION OF THE INSTRUCTIONS. READ ALL INSTRUCTIONS
Riverside. Windhaven Queen Storage Bed Assembly Instructions
 Queen Storage Bed Page 1 of 7 2 pcs. 4 pcs. 4 pcs. 4 pcs. 2 pcs. 5/0 Queen Storage Bed 50773 -- 5/0 Storage Footboard w/platform Note: The 50773 Storage Footboard can be used with the 50770 Panel Headboard
TITAN INDUSTRIAL RACK 6-FOOT TALL / 4-SHELF
 TITAN INDUSTRIAL RACK 6-FOOT TALL / 4-SHELF DXST10000 IMPORTANT: Please read this manual carefully before assembling this storage rack and save it for reference INSTRUCTION MANUAL 3 TABLE OF CONTENTS
VYTEX PREMIUM SLIDING GLASS DOOR. Table of Contents. Precautions and Safety 2. Tools Required...3. Inspect and Prepare Door...4
 VYTEX PREMIUM SLIDING GLASS DOOR Table of Contents Precautions and Safety 2 Tools Required...3 Inspect and Prepare Door...4 Hardware and Parts Check List....4 Master Frame Assembly 5 Master Frame Installation..7
ASSEMBLY GUIDE. Mia Narrow Bookcase
 ASSEMBLY GUIDE Mia Narrow Bookcase Components: Upon unpacking your bookcase from it s delivery box, you should have the pieces shown. Follow the steps on the next pages to assemble your new bookcase. Step
Find out more at schachtspindle.com Schacht Spindle Company 6101 Ben Place Boulder, CO p f
 WOLF STROLLER FL3051 Assembly Instructions folded ready to travel open ready to weave For installation on Wolf Pup, Wolf Pup LT, Baby Wolf, and Mighty Wolf Looms Find out more at schachtspindle.com Schacht
Xceed ASSEMBLY MANUAL
 Xceed ASSEMBLY MANUAL Table of Contents / Registration Congratulations on your commitment to fitness and your purchase of the Bowflex Xceed home gym. Before assembling your Bowflex Xceed home gym please
Important Loading Information. Tools Required. Meridian Lateral Files Instructions
 Y Meridian Lateral Files Instructions! WARNING Failure to observe stated capacities below will result in unsafe usage conditions, causing possible product damage or personal injury. Important Loading Information
JSP60617 KIA EXPRESS SERVICE TOOL KIT
 JSP60617 KIA EXPRESS SERVICE TOOL KIT 60617-CAT TABLE OF CONTENTS JSP60617 Cart Inventory List...3 JSP60617 Cart Drawer Layout...4 Top Lid/Drawer Details...5 Drawer #1 Details...6 Drawer #2 Details...7
Riverside. Oakmont Queen Storage Bed Assembly Instructions
 Queen Storage Bed Page 1 of 7 8 pcs. 8 pcs. 1 pc. 1 pc. 8 pcs. 8 pcs. 8 pcs. 8 pcs. 1 pc. 1 pc. 20270 --5/0 Sleigh Headboard 20274 --5/0-6/6 Bed Rails 20273 -- 5/0 Storage Footboard, Panels, Slats Queen
MODEL# SLA001-3 "SLIDE & LOCK" A-FRAME POOL LADDER
 MODEL# SLA001-3 "SLIDE & LOCK" A-FRAME POOL LADDER IMPORTANT INSTRUCTIONS: : Read all instructions carefully & completely to become familiar with parts, assembly, safety and proper use of this product.
Riverside. Harbor Hill Queen Storage Bed Assembly Instructions
 Queen Storage Bed Page 1 of 7 8 pcs. 8 pcs. 1 pc. 2 pcs. 3 pcs. 3 pcs. 4 pcs. 4 pcs. 4 pcs. 1 pc. 1 pc. 8 pcs. 8 pcs. 8 pcs. 2 pcs. 8 pcs. 1 pc. 25770 -- 4/6-5/0 Panel Headboard (NOTE: the 25775 Leather
TOOLS REQUIRED: HARDWARE INCLUDED: 13MM FLAT WRENCH FOR LEVELING THE STRUCTURE RATCHET WITH 5MM HEX BIT FOR CORNER SCREWS ON TOP TRAVERSE BEAMS
 1 TOOLS REQUIRED: RATCHET WITH 5MM HEX BIT FOR CORNER SCREWS ON TOP TRAVERSE BEAMS 13MM FLAT WRENCH FOR LEVELING THE STRUCTURE RUBBER MALLET FOR INSERTING PANELS 8MM HEX BIT WITH EXTENSION FOR HEX BOLT
Speaker Mount Center Channel Speaker Adapter (PAC-301)
") I N S T R U C T I O N M A N U A L Speaker Mount Center Channel Speaker Adapter () The Speaker Mount Center Channel Speaker Adapter () uses the same interface as the Side Speaker Adapter and can be used
I N S T R U C T I O N M A N U A L Speaker Mount Center Channel Speaker Adapter () The Speaker Mount Center Channel Speaker Adapter () uses the same interface as the Side Speaker Adapter and can be used
TERRACE / TERRACE CONCEPT Retractable Classic Roof / Double Rail System Step by Step Assembly Instructions
 TERRACE / TERRACE CONCEPT Retractable Classic Roof / Double Rail System Step by Step Assembly Instructions Before You Begin These installation instructions will lead you through the process of installing
compile system INSTALLATION GUIDE Updated January 2019
 INSTALLATION GUIDE Updated January 09 compile system Table of Contents Panels 0 Quick Connect Clips 0 Lock Clips 0 Panel Trims 0 Privacy Glass 0 Post Base Covers 04 Electrical 04 Power Distribution Harness
Please Do Not Return This Product To The Store!
 MODEL NO. T8176 QUICK SERVE 3000 TABLE TENNIS TABLE OWNER'S MANUAL 1. Read this manual carefully before starting assembly. Read each step completely before beginning each step. 2. Some smaller parts may
Jasper Chrome & Glass Desk Model # ODUS-CGTD
 LOT NUMBER: DATE PURCHASED: / / Jasper Chrome & Glass Desk ADULT ASSEMBLY REQUIRED DUE TO THE PRESENCE OF SMALL PARTS, SHARP POINTS, SHARP EDGES AS RECEIVED If you have any questions regarding assembly
Riverside. Harbor Hill King Storage Bed Assembly Instructions
 King Storage Bed Page 1 of 7 8 pcs. 8 pcs. 1 pc. 2 pcs. 6 pcs. 3 pcs. 4 pcs. 4 pcs. 4 pcs. 1 pc. 1 pc. 2 pcs. 8 pcs. 8 pcs. 8 pcs. 8 pcs. 25780 -- 6/0-6/6 Panel Headboard (NOTE: the 25785 Leather Headboard
PFT CABLE GYM INSTRUCTION MANUAL
 PFT CABLE GYM INSTRUCTION MANUAL QUESTION? As a quality home gym supplier we are committed to your complete satisfaction. If you have questions, or find missing or damaged parts, we will guarantee your
Steel Frame Assembly
 Steel Frame Assembly The Alpha Steel Frame is adaptable as vertical or horizontal bed. Note: A leg connector rod extension bar is required for a horizontal bed. Hardware Card #3 is used for Steel Frame
Chapter 6 Frame And Lens Repairs
 Chapter 6 Frame And Lens Repairs 6.1 General Information All maintenance on the frame of the EXO Full-Face mask can be accomplished with common hand tools. 6.2 Lens Replacement Tools required: Dow DC-111
Rockwell 4-in-1 Sliding Door
 Rockwell 4-in-1 Sliding Door ASSEMBLY INSTRUCTIONS ROCKWELL 4-IN-1 SLIDING DOOR Recommended Tools Drill with Phillips Bit Socket Wrench with 7/16 Socket Rubber Mallet Adjustable Square ROCKWELL 4-IN-1
HEAVY DUTY 11 STEEL CABINET
 HEAVY DUTY STEEL CABINET ASSEMBLY INSTRUCTIONS ONE DRAWER BASE CABINET 05-206 Parts List Part No Description Qty Image ONE DRAWER BASE CABINET Part No Description Qty Image SB- Cabinet Body EH-0 Euro Hinge
REVIEW ENTIRE INSTALLATION GUIDE. This step gives you the opportunity to contact your dealer to answer any questions before you begin.
 Cabriolet Shelter (Retractable Roof) Step by Step Assembly Instructions Before You Begin These installation instructions will lead you through the process of installing your new shelter. The installation
M10 x 75mm Sockethead Cap Screws. 5mm Fender Washer (12) Included - (8) Required. #10 x 2.5" PH Wood Screws. (30) Included - (24) Required
 Included - (8) Required. #10 x 2.5 PH Wood Screws. (30) Included - (24) Required") Door System Unit - Hardware Tools Included: (2) 2mm Allen Wrenches, (2) 3mm Allen Wrenches, (2) 4mm Allen Wrenches, (2) 6mm Allen Wrenches, and (1) 8mm T-Handle Allen Wrench Tools Required: Phillips Screwdriver,
Door System Unit - Hardware Tools Included: (2) 2mm Allen Wrenches, (2) 3mm Allen Wrenches, (2) 4mm Allen Wrenches, (2) 6mm Allen Wrenches, and (1) 8mm T-Handle Allen Wrench Tools Required: Phillips Screwdriver,
LOCKN LOAD FIRST TIME INSTALLATION
 LOCKN LOAD TM TRACK MOUNTING KIT NISSAN NAVARA D40 2004-2015 2 BAR TRACK HEAVY DUTY ROOF RACK SYSTEM MAX VEHICLE ROOF LOAD RATING: 100KG TOTAL LOAD EQUALS WEIGHT OF ROOF RACKS + ACCESSORIES + CARGO FIRST
P a r k c o n s o l e s i n k a s s e m b l y i n s t r u c t i o n s
 P a r k c o n s o l e s i n k a s s e m b l y i n s t r u c t i o n s Before You Begin: Professional installation by two-person crew is required for this fixture. Install water supply and drain piping
Universal Barricade Assembly Instructions
 Universal Barricade Assembly Instructions (Part # 3000668-M) Table of Contents I. Introduction 2 II. Placement of the Universal Center Pivot Barricade 2 III. Component Identification 3 IV. Assembly 4 Page
Thanks for shopping with Improvements! Wood Single Chaise Lounge Item #425994
 Thanks for shopping with Improvements! Wood Single Chaise Lounge Item #425994 Note: Read these instructions carefully before assembling. Find a clean, smooth area on which to work, such as a carpet, in