CONSTRUCTION GUIDE IR Alarm. Robobox. Level I
|
|
|
- Ethel Morton
- 5 years ago
- Views:
Transcription

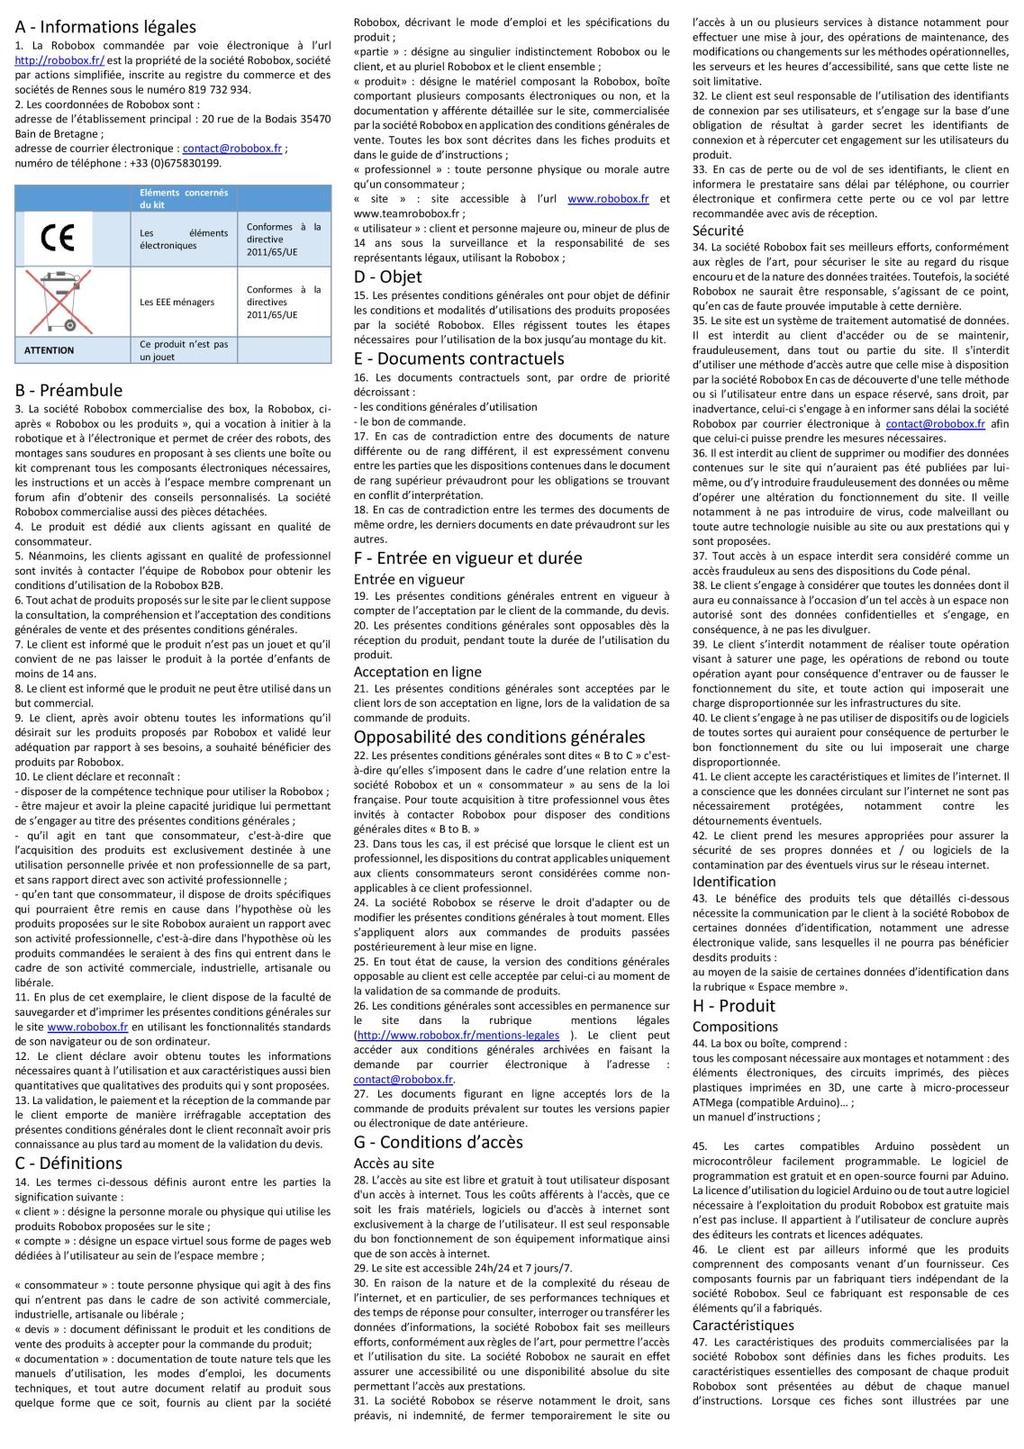
1 CONSTRUCTION GUIDE Robobox Level I


2 This month s montage is an that will allow you to detect any intruder. When a movement is detected, the alarm will turn its LEDs on and buzz to a personalized tune. 1X Buzzer 1X Uno Card Pièces 1X PIR Sensor 5X Male Female cables 1X Breadboard 1X LED 1X Resistor 4X Male Male cables Instructions We suggest that you follow these instructions step by step. Additional details are available on your member space on Robobox.io. Please don t hesitate to ask any question, we will answer them promptly. Good luck!
3 Step 3 Step 1 Step 2 _0_ 1NTR0DUCT10N Go to and enter the username and password you received by . Next go to General to download the drivers for your card if you haven t already done so. Open and execute the file. In the same folder, download the Arduino software version corresponding to your operating system. Once installed, launch it and plug in your card. Let s now check your Robobox UNO : - Go to Tools, then ports and choose your card (ex: COM4) - Be sure that in Tools/Card, Arduino Uno is selected - Now go to: File/Examples/Basics/Blink In the window that just opened click on upload. Step 4 Wait until Done Uploading shows at the bottom of the window. You should now see the LED close to the pin 13 blink. Now unplug the card and check the content of your box

.")


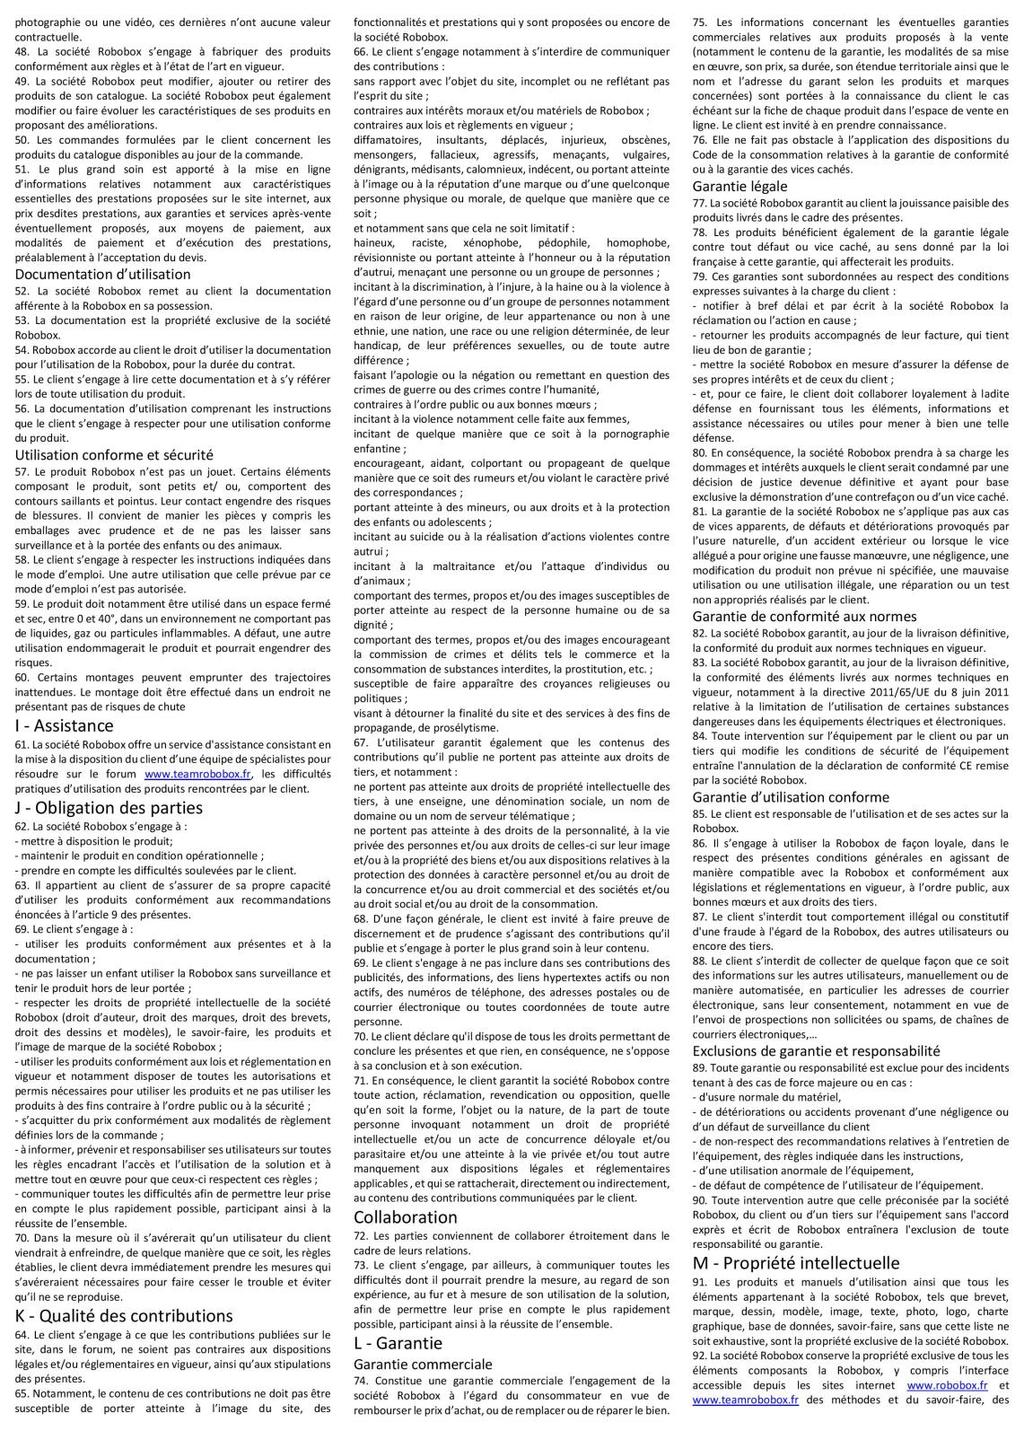
4 Step 7 Step 6 Step 5 _1_ M0NT4GE 2 1 Place your Robobox UNO close to the breadboard. Current flows on the breadboard along the 1 and 2 axis as shown with the arrow ( ). Dessins réalisés avec A C B Place the IR sensor so that the 3 pins show on your right and the sphere shows heads up. Plug in 3 Male-Female cables, we will call the cable on the top A, the middle one B and the bottom one C. 2 1 Plug the LED on the two leftmost column of your breadboard (ZAZZ) with the shortest leg on the left and the longest on the right. Next use a resistor to bridge side 1 and 2. Short Long
 and the other one from pin # 5 to the LED s longest leg (red cable).")


5 Step 10 Step 9 Step 8 _1_ M0NT4GE GND 5 Take 2 Male Male cables and plug one from the GND to the resistor (black cable) and the other one from pin # 5 to the LED s longest leg (red cable). Now plug the A wire from the PIR sensor to the pin marked 5V on the Robobox UNO, plug the B wire to pin # 2 and finally wire C to GND. A C B Next, plug two Male Female cables to the buzzer, link the one with the buzzer s longest leg to the Robobox UNO on pin 6. Join the one with the shortest leg to the third GND pin. That s it! You re done with the montage, let s now program this alarm!
6 Etape 11 _2_ PR0GR4MM1NG We will now go through the software instruction, that is to say the code that will be sent to our circuit. This code will enable us to get any behavior wewant from our circuit. In order to write this code we will need to launch Arduino. You will then need to type the program in the big white window at the center of the screen. You can copy / paste the lines below but we advise you to read and understand the explanations. Have fun! int ledpin = 5; // Pin that is linked to the LED int inputpin = 2; // Pin used to communicate with the PIR sensor int pinspeaker = 6; // Pin used to communicate with the buzzer int pirstate = LOW; int val = 0; First we will define global variables, which are variables that will be used throughout the program. We set up pin 5 to give instructions to the LED, the pin communicating with the PIR sensor will be pin 2 and the buzzer will be controlled via pin 6. You see that these values are the pins on which the different component are plugged. We therefore inform our card that we will use these pins to communicate with these items. This abstraction helps us understand more easily the code that will follow. The double dash : // that you see after the first lines of command are comments which means they will not be taken into account by the compiler. It is good practice to add them to your code to increase readability and remind you of your thought process.
7 Step 12 _2_ PR0GR4MM1NG We could also add Const in front of int when we declare these variables to indicate that these values will not change throughout the program. The PIR sensor can output two values : LOW when no movement is detected and HIGH when a movement is seen. We will initialize the value at LOW since this is the default value for our program. Finally we set up val at 0 (we will see its use later). void setup() { pinmode(ledpin, OUTPUT); pinmode(inputpin, INPUT); pinmode(pinspeaker, OUTPUT); } We define the ledpin to be an output We define the inputpin of the sensor to be an input We define the buzzer s pin as an output Setup() is a function that you will always find in your Arduino programs, it is only executed once and is used to define all the general parameters of our programs. For instance, here we define how our card should behave with the sensors and actuators: pinmode(ledpin, OUTPUT) indicates that the information will go from the Robobox UNO and towards the LED, whereas pinmode(inputpin,input) sets data to go from the sensor to the Robobox UNO.
8 Step 13 _2_ PR0GR4MM1NG void playtune (long length, int freq) { length *= 1000; int period = (1.0 / freq) * ; long time_elapsed = 0; while (time_elapsed< length) { digitalwrite(pinspeaker,high); delaymicroseconds(period / 2); digitalwrite(pinspeaker, LOW); delaymicroseconds(period / 2); time_elapsed = time_elapsed + period; } } Let us now write our first function! We want to create a function that will turn on the buzzer and play a sound at a certain frequency and for a certain length. Frequency (in Hertz) sets whether the sound is high or low pitch. Thus our function will look like playtune( length, freq), and we will be able to change these parameters as we wish. First we will initialize some variables : - Since the program computes values in milliseconds, we need to multiply the value by 1000 to get the value in seconds - We adjust how often we send a sound to adjust to the input frequency. - We initialize the time_elapsed variable
9 _2_ PR0GR4MM1NG Then, we instantiate a loop, which means our program will repeat what is within the brackets of this loop. There are different types of loop with different syntaxes, in this loop we will : - Turn the buzzer on (digitalwrite(pinspeaker, HIGH)) - Wait for some time - Turn the buzzer off (digitalwrite(pinspeaker, LOW)) - Wait again for some time - Finally increment the time_elapsed variable to keep track of the time that has elapsed since the beginning or our function. We repeat these steps until time_elapsed has reach the time set in length. Don t worry if you don t make sense of all of this so far, this was just your first lesson! We will have time to go back to these structures and commands during the coming months! Program Starts No Movement detected? Yes Turn LED on Turn Buzzer on Turn LED & Buzzer off
10 Etape 14 _2_ PR0GR4MM1NG void loop(){ val = digitalread(inputpin); if (val == HIGH) { digitalwrite(ledpin, HIGH); playtune(300, 160); delay(150); } else { digitalwrite(ledpin, LOW); playtune(0, 0); delay(300); } } Now we will write the core of our program : the endless loop. This means that everything between the brackets of this loop will repeat as long as the circuit is supplied with power. First we will give our variable val the value of the state of the PIR sensor, this means HIGH if a movement is seen or LOW if nothing is detected. Then if our circuit detects a movement, that is to say if val == HIGH, we will ask our program to : - Turn the LED on : digitalwrite(ledpin, HIGH) - Play a tune for 0.3 seconds at 160 hertz : playtune(300,160) - Wait for 150 milliseconds If the circuit doesn t detect anything, it should : - Turn the LED off: digitalwrite(ledpin, LOW) - Play nothing : playtune(0, 0) - Wait 300 milliseconds
11 _2_ PR0GR4MM1NG And that s it! We re done! You just need to copy these lines in the Arduino compiler and click on the upload button. Your Robobox UNO, when plugged will process all this code and will be ready for use. After a few seconds for calibration, your alarm will detect any intruder! PS: you can adjust the sensitivity of your alarm by moving the two potentiometers of the PIR sensor. If you alarm turns on two often, adjust their position until you find the right behavior. On your right is the ideal position for the two potentiometers: Delay Sensibilité Too easy? Then try to do the following : - Play 3 different sounds when a movement is seen - Turn the alarm on only when 3 consecutive movement are seen within ten seconds Share your results or ask for help on Robobox.io/members...COMPLETED
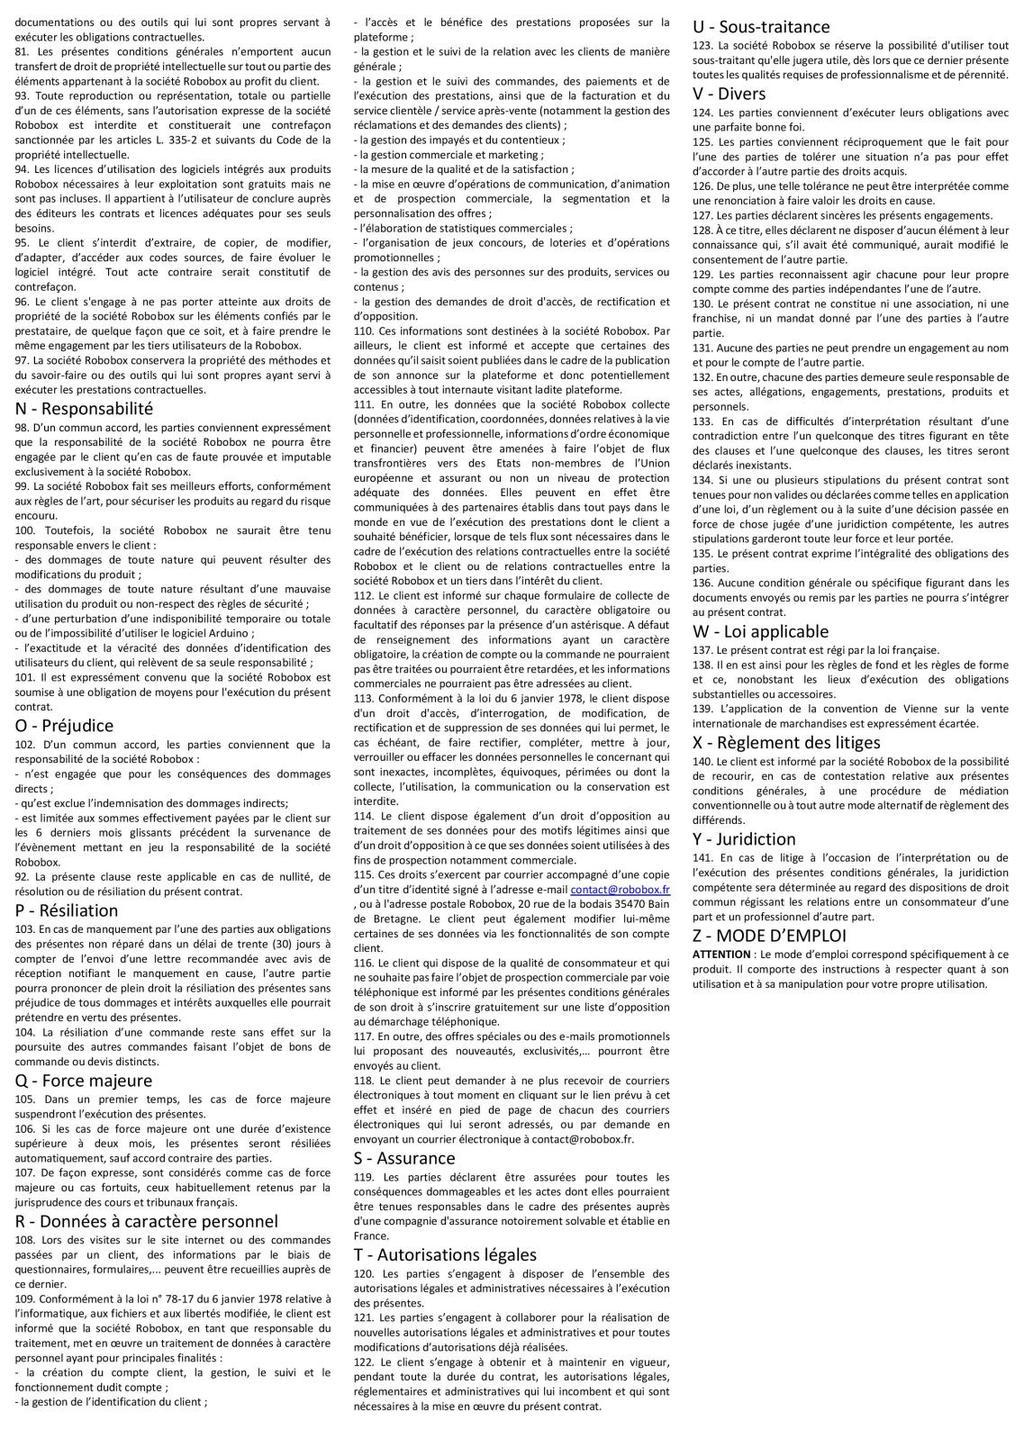
12 _3_ ELECTR0N1C _CONC3PTS Here we will go a bit deeper on some key electronic concept seen in this first montage. I The Charge (Q) : In our cables and any conductor electrons are moving. These electrons are almost weightless but have a negative charge. This charge is measured in Coulombs and we will call it Q. II The current (I) : The current measures the movement of electrons in our circuit. The more electrons or the quicker they move, the higher the intensity. This intensity is measured in Ampères. The general formula is : Q / t = I. (where t is time in seconds). The current is the same all over the circuit. For instance : If we measure a 10 Coulomb current during 5 seconds, the intensity will be 10/5 = 2 Ampères. III Tension (V or U) : This represents (in a direct current circuit) a relative difference of potential between two points. In the circuit below, the tension between point a and c is 5V whereas the tension between a and b is 2V and 3V between b and c. You see that (a - b) + (b - c) = a-c IV The resistance (R) : In the circuit to the right we divided the tension in two thanks to two items called R1 and R2. Those are resistors and their goal is to limit the current that flows through the circuit but they can also divide the current as is shown in this example. 5v 0v R1 R2 a 2v b 3v c When resistors are set in series (as is above) the total resistance is equal to the sum of the individual resistances : Rtotal = R1 + R2. In our example we see that the difference of potential between b and c is 3V where it is only 2V between a and b. This means that R2 has a stronger resistance that R1. Actually R1 is worth 2/5 of the total circuit resistance where R2 is worth 3/5.
13 _3_ ELECTR0N1C _CONC3PTS The relation between resistance, tension, and current is defined by Ohm s law which states that I = V / R. Thus in the previous example, if R1 = 10 Ohm then : R1 = 10 = 2 5 Rtotal Rtotal = = 25 R2 = 3 Rtotal = 15 5 By applying Ohm s law we find that the current is : V Rtotal = 5 25 = 0.2Ampères The IR alarm montage was a bit more complex and introduces new elements that we describe below. In our circuit, le IR sensor has 3 pins, two in charge of supplying current (5V & GND) and one which sends information to the pin 2 of our Robobox Uno. Our LED receives 5V but a 330Ohm resistor in series lowers the current to 5/330 = 0,01515A (15,15mA). You see that the resistor s position ( before or after the LED) doesn t impact its behavior since the current is the same all over the circuit. 330Ohm RESET A5 D0 A4 D1 A3 D2 A2 D3 A1 D4 A0 VCC GND GND AREF XLAT1 AVCC XLAT2 D13 D5 (PWM) D12 D6 (PWM) D11 (PWM) D7 D10 (PWM) D8 D9 (PWM) 5v Some of these electronics (LED, Buzzer, sensor, PIR) incorporate a built-in resistor which allows them to be used without an additional resistor. LED Buzzer IR Sensor
14
15
16
CONSTRUCTION GUIDE Robotic Arm. Robobox. Level II
 CONSTRUCTION GUIDE Robotic Arm Robobox Level II Robotic Arm This month s robot is a robotic arm with two degrees of freedom that will teach you how to use motors. You will then be able to move the arm
You'll create a lamp that turns a light on and off when you touch a piece of conductive material
 TOUCHY-FEELY LAMP You'll create a lamp that turns a light on and off when you touch a piece of conductive material Discover : installing third party libraries, creating a touch sensor Time : 5 minutes
Programming 2 Servos. Learn to connect and write code to control two servos.
 Programming 2 Servos Learn to connect and write code to control two servos. Many students who visit the lab and learn how to use a Servo want to use 2 Servos in their project rather than just 1. This lesson
Coding with Arduino to operate the prosthetic arm
 Setup Board Install FTDI Drivers This is so that your RedBoard will be able to communicate with your computer. If you have Windows 8 or above you might already have the drivers. 1. Download the FTDI driver
EE-110 Introduction to Engineering & Laboratory Experience Saeid Rahimi, Ph.D. Labs Introduction to Arduino
 EE-110 Introduction to Engineering & Laboratory Experience Saeid Rahimi, Ph.D. Labs 10-11 Introduction to Arduino In this lab we will introduce the idea of using a microcontroller as a tool for controlling
For this exercise, you will need a partner, an Arduino kit (in the plastic tub), and a laptop with the Arduino programming environment.
, and a laptop with the Arduino programming environment.") Physics 222 Name: Exercise 6: Mr. Blinky This exercise is designed to help you wire a simple circuit based on the Arduino microprocessor, which is a particular brand of microprocessor that also includes
Physics 222 Name: Exercise 6: Mr. Blinky This exercise is designed to help you wire a simple circuit based on the Arduino microprocessor, which is a particular brand of microprocessor that also includes
Arduino Sensor Beginners Guide
 Arduino Sensor Beginners Guide So you want to learn arduino. Good for you. Arduino is an easy to use, cheap, versatile and powerful tool that can be used to make some very effective sensors. This guide
Objectives: Learn what an Arduino is and what it can do Learn what an LED is and how to use it Be able to wire and program an LED to blink
 Objectives: Learn what an Arduino is and what it can do Learn what an LED is and how to use it Be able to wire and program an LED to blink By the end of this session: You will know how to use an Arduino
Lab 2: Blinkie Lab. Objectives. Materials. Theory
 Lab 2: Blinkie Lab Objectives This lab introduces the Arduino Uno as students will need to use the Arduino to control their final robot. Students will build a basic circuit on their prototyping board and
Lesson 3: Arduino. Goals
 Introduction: This project introduces you to the wonderful world of Arduino and how to program physical devices. In this lesson you will learn how to write code and make an LED flash. Goals 1 - Get to
Arduino Lesson 1. Blink. Created by Simon Monk
 Arduino Lesson 1. Blink Created by Simon Monk Guide Contents Guide Contents Overview Parts Part Qty The 'L' LED Loading the 'Blink' Example Saving a Copy of 'Blink' Uploading Blink to the Board How 'Blink'
Lab 5: Arduino Uno Microcontroller Innovation Fellows Program Bootcamp Prof. Steven S. Saliterman
 Lab 5: Arduino Uno Microcontroller Innovation Fellows Program Bootcamp Prof. Steven S. Saliterman Exercise 5-1: Familiarization with Lab Box Contents Objective: To review the items required for working
Lecture 6. Interfacing Digital and Analog Devices to Arduino. Intro to Arduino
 Lecture 6 Interfacing Digital and Analog Devices to Arduino. Intro to Arduino PWR IN USB (to Computer) RESET SCL\SDA (I2C Bus) POWER 5V / 3.3V / GND Analog INPUTS Digital I\O PWM(3, 5, 6, 9, 10, 11) Components
Rodni What will yours be?
 Rodni What will yours be? version 4 Welcome to Rodni, a modular animatronic animal of your own creation for learning how easy it is to enter the world of software programming and micro controllers. During
HAW-Arduino. Sensors and Arduino F. Schubert HAW - Arduino 1
 HAW-Arduino Sensors and Arduino 14.10.2010 F. Schubert HAW - Arduino 1 Content of the USB-Stick PDF-File of this script Arduino-software Source-codes Helpful links 14.10.2010 HAW - Arduino 2 Report for
FABO ACADEMY X ELECTRONIC DESIGN
 ELECTRONIC DESIGN MAKE A DEVICE WITH INPUT & OUTPUT The Shanghaino can be programmed to use many input and output devices (a motor, a light sensor, etc) uploading an instruction code (a program) to it
INA169 Breakout Board Hookup Guide
 Page 1 of 10 INA169 Breakout Board Hookup Guide CONTRIBUTORS: SHAWNHYMEL Introduction Have a project where you want to measure the current draw? Need to carefully monitor low current through an LED? The
CONSTRUCTION GUIDE Capacitor, Transistor & Motorbike. Robobox. Level VII
 CONSTRUCTION GUIDE Capacitor, Transistor & Motorbike Robobox Level VII Capacitor, Transistor & Motorbike In this box, we will understand in more detail the operation of DC motors, transistors and capacitor.
Arduino Workshop 01. AD32600 Physical Computing Prof. Fabian Winkler Fall 2014
 AD32600 Physical Computing Prof. Fabian Winkler Fall 2014 Arduino Workshop 01 This workshop provides an introductory overview of the Arduino board, basic electronic components and closes with a few basic
MAE106 Laboratory Exercises Lab # 1 - Laboratory tools
 MAE106 Laboratory Exercises Lab # 1 - Laboratory tools University of California, Irvine Department of Mechanical and Aerospace Engineering Goals To learn how to use the oscilloscope, function generator,
Workshop 9: First steps in electronics
 King s Maths School Robotics Club Workshop 9: First steps in electronics 1 Getting Started Make sure you have everything you need to complete this lab: Arduino for power supply breadboard black, red and
Programming a Servo. Servo. Red Wire. Black Wire. White Wire
 Programming a Servo Learn to connect wires and write code to program a Servo motor. If you have gone through the LED Circuit and LED Blink exercises, you are ready to move on to programming a Servo. A
CONSTRUCTION GUIDE Light Robot. Robobox. Level VI
 CONSTRUCTION GUIDE Light Robot Robobox Level VI The Light In this box dedicated to light we will discover, through 3 projects, how light can be used in our robots. First we will see how to insert headlights
Arduino: Sensors for Fun and Non Profit
 Arduino: Sensors for Fun and Non Profit Slides and Programs: http://pamplin.com/dms/ Nicholas Webb DMS: @NickWebb 1 Arduino: Sensors for Fun and Non Profit Slides and Programs: http://pamplin.com/dms/
Computational Crafting with Arduino. Christopher Michaud Marist School ECEP Programs, Georgia Tech
 Computational Crafting with Arduino Christopher Michaud Marist School ECEP Programs, Georgia Tech Introduction What do you want to learn and do today? Goals with Arduino / Computational Crafting Purpose
TWEAK THE ARDUINO LOGO
 TWEAK THE ARDUINO LOGO Using serial communication, you'll use your Arduino to control a program on your computer Discover : serial communication with a computer program, Processing Time : 45 minutes Level
MICROCONTROLLERS BASIC INPUTS and OUTPUTS (I/O)
") PH-315 Portland State University MICROCONTROLLERS BASIC INPUTS and OUTPUTS (I/O) ABSTRACT A microcontroller is an integrated circuit containing a processor and programmable read-only memory, 1 which is
PH-315 Portland State University MICROCONTROLLERS BASIC INPUTS and OUTPUTS (I/O) ABSTRACT A microcontroller is an integrated circuit containing a processor and programmable read-only memory, 1 which is
Arduino Setup & Flexing the ExBow
 Arduino Setup & Flexing the ExBow What is Arduino? Before we begin, We must first download the Arduino and Ardublock software. For our Set-up we will be using Arduino. Arduino is an electronics platform.
J. La Favre Using Arduino with Raspberry Pi February 7, 2018
 As you have already discovered, the Raspberry Pi is a very capable digital device. Nevertheless, it does have some weaknesses. For example, it does not produce a clean pulse width modulation output (unless
Disclaimer. Arduino Hands-On 2 CS5968 / ART4455 9/1/10. ! Many of these slides are mine. ! But, some are stolen from various places on the web
 Arduino Hands-On 2 CS5968 / ART4455 Disclaimer! Many of these slides are mine! But, some are stolen from various places on the web! todbot.com Bionic Arduino and Spooky Arduino class notes from Tod E.Kurt!
THE INPUTS ON THE ARDUINO READ VOLTAGE. ALL INPUTS NEED TO BE THOUGHT OF IN TERMS OF VOLTAGE DIFFERENTIALS.
 INPUT THE INPUTS ON THE ARDUINO READ VOLTAGE. ALL INPUTS NEED TO BE THOUGHT OF IN TERMS OF VOLTAGE DIFFERENTIALS. THE ANALOG INPUTS CONVERT VOLTAGE LEVELS TO A NUMERICAL VALUE. PULL-UP (OR DOWN) RESISTOR
Lab 2.4 Arduinos, Resistors, and Circuits
 Lab 2.4 Arduinos, Resistors, and Circuits Objectives: Investigate resistors in series and parallel and Kirchoff s Law through hands-on learning Get experience using an Arduino hat you need: Arduino Kit:
.:Twisting:..:Potentiometers:.
 CIRC-08.:Twisting:..:Potentiometers:. WHAT WE RE DOING: Along with the digital pins, the also has 6 pins which can be used for analog input. These inputs take a voltage (from 0 to 5 volts) and convert
Basics before Migtrating to Arduino
 Basics before Migtrating to Arduino Who is this for? Written by Storming Robots Last update: Oct 11 th, 2013 This document is meant for preparing students who have already good amount of programming knowledge,
isys-4004 GUI interface - V2.1 Power up Initialize Peripheral Start Measurement YES LED flashes red Object available LED blinking
 isys-4004 GUI interface - V2.1 Power up Initialize Peripheral Start Measurement Mode Object available YES LED flashes red NO LED blinking isys-4004 distance sensor GUI description content 1. connecting
The µbotino Microcontroller Board
 The µbotino Microcontroller Board by Ro-Bot-X Designs Introduction. The µbotino Microcontroller Board is an Arduino compatible board for small robots. The 5x5cm (2x2 ) size and the built in 3 pin connectors
EGG 101L INTRODUCTION TO ENGINEERING EXPERIENCE
 EGG 101L INTRODUCTION TO ENGINEERING EXPERIENCE LABORATORY 7: IR SENSORS AND DISTANCE DEPARTMENT OF ELECTRICAL AND COMPUTER ENGINEERING UNIVERSITY OF NEVADA, LAS VEGAS GOAL: This section will introduce
Arduino An Introduction
 Arduino An Introduction Hardware and Programming Presented by Madu Suthanan, P. Eng., FEC. Volunteer, Former Chair (2013-14) PEO Scarborough Chapter 2 Arduino for Mechatronics 2017 This note is for those
A servo is an electric motor that takes in a pulse width modulated signal that controls direction and speed. A servo has three leads:
 Project 4: Arduino Servos Part 1 Description: A servo is an electric motor that takes in a pulse width modulated signal that controls direction and speed. A servo has three leads: a. Red: Current b. Black:
MICROCONTROLLERS BASIC INPUTS and OUTPUTS (I/O)
") PH-315 Portland State University MICROCONTROLLERS BASIC INPUTS and OUTPUTS (I/O) ABSTRACT A microcontroller is an integrated circuit containing a processor and programmable read-only memory, 1 which is
PH-315 Portland State University MICROCONTROLLERS BASIC INPUTS and OUTPUTS (I/O) ABSTRACT A microcontroller is an integrated circuit containing a processor and programmable read-only memory, 1 which is
smraza Getting Start Guide Contents Arduino IDE (Integrated Development Environment)... 1 Introduction... 1 Install the Arduino Software (IDE)...
... 1 Introduction... 1 Install the Arduino Software (IDE)...") Getting Start Guide Contents Arduino IDE (Integrated Development Environment)... 1 Introduction... 1 Install the Arduino Software (IDE)...1 Introduction... 1 Step 1: Get an Uno R3 and USB cable... 2 Step
Getting Start Guide Contents Arduino IDE (Integrated Development Environment)... 1 Introduction... 1 Install the Arduino Software (IDE)...1 Introduction... 1 Step 1: Get an Uno R3 and USB cable... 2 Step
The Robot Builder's Shield for Arduino
 The Robot Builder's Shield for Arduino by Ro-Bot-X Designs Introduction. The Robot Builder's Shield for Arduino was especially designed to make building robots with Arduino easy. The built in dual motors
PLAN DE FORMACIÓN EN LENGUAS EXTRANJERAS IN-57 Technology for ESO: Contents and Strategies
 Lesson Plan: Traffic light with Arduino using code, S4A and Ardublock Course 3rd ESO Technology, Programming and Robotic David Lobo Martínez David Lobo Martínez 1 1. TOPIC Arduino is an open source hardware
Analog Feedback Servos
 Analog Feedback Servos Created by Bill Earl Last updated on 2018-01-21 07:07:32 PM UTC Guide Contents Guide Contents About Servos and Feedback What is a Servo? Open and Closed Loops Using Feedback Reading
Pulse Width Modulation and
 Pulse Width Modulation and analogwrite ( ); 28 Materials needed to wire one LED. Odyssey Board 1 dowel Socket block Wire clip (optional) 1 Female to Female (F/F) wire 1 F/F resistor wire LED Note: The
Workshops Elisava Introduction to programming and electronics (Scratch & Arduino)
") Workshops Elisava 2011 Introduction to programming and electronics (Scratch & Arduino) What is programming? Make an algorithm to do something in a specific language programming. Algorithm: a procedure
Workshops Elisava 2011 Introduction to programming and electronics (Scratch & Arduino) What is programming? Make an algorithm to do something in a specific language programming. Algorithm: a procedure
Experiment 1: Robot Moves in 3ft squared makes sound and
 Experiment 1: Robot Moves in 3ft squared makes sound and turns on an LED at each turn then stop where it started. Edited: 9-7-2015 Purpose: Press a button, make a sound and wait 3 seconds before starting
PIR Motion Detector Experiment. In today s crime infested society, security systems have become a much more
 PIR Motion Detector Experiment I. Rationale In today s crime infested society, security systems have become a much more necessary and sought out addition to homes or stores. Motion detectors provide a
Controlling Your Robot
 Controlling Your Robot The activities on this week are about instructing the Boe-Bot where to go and how to get there. You will write programs to make the Boe-Bot perform a variety of maneuvers. You will
Arduino STEAM Academy Arduino STEM Academy Art without Engineering is dreaming. Engineering without Art is calculating. - Steven K.
 Arduino STEAM Academy Arduino STEM Academy Art without Engineering is dreaming. Engineering without Art is calculating. - Steven K. Roberts Page 1 See Appendix A, for Licensing Attribution information
CPSC 226 Lab Four Spring 2018
 CPSC 226 Lab Four Spring 2018 Directions. This lab is a quick introduction to programming your Arduino to do some basic internal operations and arithmetic, perform character IO, read analog voltages, drive
INTRODUCTION to MICRO-CONTROLLERS
 PH-315 Portland State University INTRODUCTION to MICRO-CONTROLLERS Bret Comnes, Dan Lankow, and Andres La Rosa 1. ABSTRACT A microcontroller is an integrated circuit containing a processor and programmable
La Malinette is an open source project by Reso-nance Numérique Programming Interactivity Kit
 La Malinette is an open source project by Reso-nance Numérique http://malinette.info Programming Interactivity Kit La Malinette is a pedagogical tool under free license to discover and learn to build
100UF CAPACITOR POTENTIOMETER SERVO MOTOR MOTOR ARM. MALE HEADER PIN (3 pins) INGREDIENTS
 INGREDIENTS") 05 POTENTIOMETER SERVO MOTOR MOTOR ARM 100UF CAPACITOR MALE HEADER PIN (3 pins) INGREDIENTS 63 MOOD CUE USE A SERVO MOTOR TO MAKE A MECHANICAL GAUGE TO POINT OUT WHAT SORT OF MOOD YOU RE IN THAT DAY Discover:
05 POTENTIOMETER SERVO MOTOR MOTOR ARM 100UF CAPACITOR MALE HEADER PIN (3 pins) INGREDIENTS 63 MOOD CUE USE A SERVO MOTOR TO MAKE A MECHANICAL GAUGE TO POINT OUT WHAT SORT OF MOOD YOU RE IN THAT DAY Discover:
Application Note. Communication between arduino and IMU Software capturing the data
 Application Note Communication between arduino and IMU Software capturing the data ECE 480 Team 8 Chenli Yuan Presentation Prep Date: April 8, 2013 Executive Summary In summary, this application note is
Adafruit 16-Channel Servo Driver with Arduino
 Adafruit 16-Channel Servo Driver with Arduino Created by Bill Earl Last updated on 2015-09-29 06:19:37 PM EDT Guide Contents Guide Contents Overview Assembly Install the Servo Headers Solder all pins Add
Milli Developer Kit Reference Application Published on Silver Spring Networks STAGE (
 Milli Developer Kit Example Application PART 1 Example CoAP Server Sensor Implementation With The Milli Dev Kit Get the Milli Developer Kit Temperature Sensor Reference Application on GitHub [1] This reference
Welcome to Arduino Day 2016
 Welcome to Arduino Day 2016 An Intro to Arduino From Zero to Hero in an Hour! Paul Court (aka @Courty) Welcome to the SLMS Arduino Day 2016 Arduino / Genuino?! What?? Part 1 Intro Quick Look at the Uno
Servo Sweep. Learn to make a regular Servo move in a sweeping motion.
 Servo Sweep Learn to make a regular Servo move in a sweeping motion. We have seen how to control a Servo and also how to make an LED Fade on and off. This activity will teach you how to make a regular
Application Note AN 157: Arduino UART Interface to TelAire T6613 CO2 Sensor
 Application Note AN 157: Arduino UART Interface to TelAire T6613 CO2 Sensor Introduction The Arduino UNO, Mega and Mega 2560 are ideal microcontrollers for reading CO2 sensors. Arduino boards are useful
Setup Download the Arduino library (link) for Processing and the Lab 12 sketches (link).
 for Processing and the Lab 12 sketches (link).") Lab 12 Connecting Processing and Arduino Overview In the previous lab we have examined how to connect various sensors to the Arduino using Scratch. While Scratch enables us to make simple Arduino programs,
Lab 12 Connecting Processing and Arduino Overview In the previous lab we have examined how to connect various sensors to the Arduino using Scratch. While Scratch enables us to make simple Arduino programs,
Experiment 1 Identification of Components and Breadboard Realization
 Experiment 1 Identification of Components and Breadboard Realization Aim: Introduction to the lab and identification of various components and realization using bread board. Hardware/Software Required:
Lecture 4: Basic Electronics. Lecture 4 Brief Introduction to Electronics and the Arduino
 Lecture 4: Basic Electronics Lecture 4 Page: 1 Brief Introduction to Electronics and the Arduino colintan@nus.edu.sg Lecture 4: Basic Electronics Page: 2 Objectives of this Lecture By the end of today
Internet of Things Student STEM Project Jackson High School. Lesson 2: Arduino and LED
 Internet of Things Student STEM Project Jackson High School Lesson 2: Arduino and LED Lesson 2: Arduino and LED Time to complete Lesson 60-minute class period Learning objectives Students learn about Arduino
Exercise 2-2. Four-Wire Transmitter (Optional) EXERCISE OBJECTIVE DISCUSSION OUTLINE. Ultrasonic level transmitter DISCUSSION
 EXERCISE OBJECTIVE DISCUSSION OUTLINE. Ultrasonic level transmitter DISCUSSION") Exercise 2-2 Four-Wire Transmitter (Optional) EXERCISE OBJECTIVE Become familiar with HART point-to-point connection of a four-wire transmitter. DISCUSSION OUTLINE The Discussion of this exercise covers
Exercise 2-2 Four-Wire Transmitter (Optional) EXERCISE OBJECTIVE Become familiar with HART point-to-point connection of a four-wire transmitter. DISCUSSION OUTLINE The Discussion of this exercise covers
Internet of Things Student STEM Project Jackson High School. Lesson 3: Arduino Solar Tracker
 Internet of Things Student STEM Project Jackson High School Lesson 3: Arduino Solar Tracker Lesson 3 Arduino Solar Tracker Time to complete Lesson 60-minute class period Learning objectives Students learn
LED + Servo 2 devices, 1 Arduino
 LED + Servo 2 devices, 1 Arduino Learn to connect and write code to control both a Servo and an LED at the same time. Many students who come through the lab ask if they can use both an LED and a Servo
APDS-9960 RGB and Gesture Sensor Hookup Guide
 Page 1 of 12 APDS-9960 RGB and Gesture Sensor Hookup Guide Introduction Touchless gestures are the new frontier in the world of human-machine interfaces. By swiping your hand over a sensor, you can control
CURIE Academy, Summer 2014 Lab 2: Computer Engineering Software Perspective Sign-Off Sheet
 Lab : Computer Engineering Software Perspective Sign-Off Sheet NAME: NAME: DATE: Sign-Off Milestone TA Initials Part 1.A Part 1.B Part.A Part.B Part.C Part 3.A Part 3.B Part 3.C Test Simple Addition Program
USER MANUAL SERIAL IR SENSOR ARRAY5
 USER MANUAL SERIAL IR SENSOR ARRAY5 25mm (Serial Communication Based Automatic Line Position Detection Sensor using 5 TCRT5000 IR sensors) Description: You can now build a line follower robot without writing
Intelligent Systems Design in a Non Engineering Curriculum. Embedded Systems Without Major Hardware Engineering
 Intelligent Systems Design in a Non Engineering Curriculum Embedded Systems Without Major Hardware Engineering Emily A. Brand Dept. of Computer Science Loyola University Chicago eabrand@gmail.com William
Table of Contents. 2 P a g e
 1 P a g e Table of Contents Preface... 4 This document Scope... 4 Important Safety Rules - MUST READ FIRST... 4 Section I The Basics... 6 I.1 - Basics Parts... 6 I.2 - About Resistors... 7 Resistor - Ohm
Lesson 13. The Big Idea: Lesson 13: Infrared Transmitters
 Lesson Lesson : Infrared Transmitters The Big Idea: In Lesson 12 the ability to detect infrared radiation modulated at 38,000 Hertz was added to the Arduino. This lesson brings the ability to generate
Attribution Thank you to Arduino and SparkFun for open source access to reference materials.
 Attribution Thank you to Arduino and SparkFun for open source access to reference materials. Contents Parts Reference... 1 Installing Arduino... 7 Unit 1: LEDs, Resistors, & Buttons... 7 1.1 Blink (Hello
// Parts of a Multimeter
 Using a Multimeter // Parts of a Multimeter Often you will have to use a multimeter for troubleshooting a circuit, testing components, materials or the occasional worksheet. This section will cover how
Arduino Digital Out_QUICK RECAP
 Arduino Digital Out_QUICK RECAP BLINK File> Examples>Digital>Blink int ledpin = 13; // LED connected to digital pin 13 // The setup() method runs once, when the sketch starts void setup() // initialize
Boe-Bot robot manual
 Tallinn University of Technology Department of Computer Engineering Chair of Digital Systems Design Boe-Bot robot manual Priit Ruberg Erko Peterson Keijo Lass Tallinn 2016 Contents 1 Robot hardware description...3
INTRODUCTION to MICRO-CONTROLLERS
 PH-315 Portland State University INTRODUCTION to MICRO-CONTROLLERS Bret Comnes and A. La Rosa 1. ABSTRACT This laboratory session pursues getting familiar with the operation of microcontrollers, namely
INTRODUCTION to MICRO-CONTROLLERS
 PH-315 Portland State University INTRODUCTION to MICRO-CONTROLLERS Bret Comnes, Dan Lankow, and Andres La Rosa 1. ABSTRACT A microcontroller is an integrated circuit containing a processor and programmable
Sten-Bot Robot Kit Stensat Group LLC, Copyright 2013
 Sten-Bot Robot Kit Stensat Group LLC, Copyright 2013 Legal Stuff Stensat Group LLC assumes no responsibility and/or liability for the use of the kit and documentation. There is a 90 day warranty for the
Lab 06: Ohm s Law and Servo Motor Control
 CS281: Computer Systems Lab 06: Ohm s Law and Servo Motor Control The main purpose of this lab is to build a servo motor control circuit. As with prior labs, there will be some exploratory sections designed
Objective of the lesson
 Arduino Lesson 5 1 Objective of the lesson Learn how to program an Arduino in S4A All of you will: Add an LED to an Arduino and get it to come on and blink Most of you will: Add an LED to an Arduino and
Peek-a-BOO Kit JAMECO PART NO / / Experience Level: Beginner Time Required: 1+ hour
 Peek-a-BOO Kit JAMECO PART NO. 2260076/2260084/2260092 Experience Level: Beginner Time Required: 1+ hour Make a ghost that reacts to an approaching object in the room. When idle, the ghost will keep its
EGG 101L INTRODUCTION TO ENGINEERING EXPERIENCE
 EGG 101L INTRODUCTION TO ENGINEERING EXPERIENCE LABORATORY 6: INTRODUCTION TO BREADBOARDS DEPARTMENT OF ELECTRICAL AND COMPUTER ENGINEERING UNIVERSITY OF NEVADA, LAS VEGAS GOAL: This section introduces
Introduction 1. Download socket (the cable plugs in here so that the GENIE microcontroller can talk to the computer)
") Introduction 1 Welcome to the magical world of GENIE! The project board is ideal when you want to add intelligence to other design or electronics projects. Simply wire up your inputs and outputs and away
Introduction 1 Welcome to the magical world of GENIE! The project board is ideal when you want to add intelligence to other design or electronics projects. Simply wire up your inputs and outputs and away
CNC Router Parts CNC Router Parts 2.2 kw Plug and Play Spindle / VFD System CRP800 Set Up Guide
 Step 1: Congratulations on your purchase of the 2.2 kw Plug and Play Spindle / VFD System! The first step in setting up your Spindle will be to physically connect your VFD to your CRP800 Control Unit with
The Discussion of this exercise covers the following points: Differential-pressure transmitter. Differential-pressure transmitter
 Exercise 2-1 Two-Wire Transmitter EXERCISE OBJECTIVE Become familiar with HART point-to-point connection of a two-wire transmitter. DISCUSSION OUTLINE The Discussion of this exercise covers the following
User Interface Engineering FS 2013
 User Interface Engineering FS 2013 Input Fundamentals 23.09.2013 1 Last Week Brief Overview of HCI as a discipline History of the UI Product perspective Research perspective Overview of own research as
Introduction to. An Open-Source Prototyping Platform. Hans-Petter Halvorsen
 Introduction to An Open-Source Prototyping Platform Hans-Petter Halvorsen Contents 1.Overview 2.Installation 3.Arduino Starter Kit 4.Arduino TinkerKit 5.Arduino Examples 6.LabVIEW Interface for Arduino
Prelab: Introduction and Greenhouse Construction
 Prelab: Introduction and Greenhouse Construction In this lab, you will create a PID control system that will regulate temperature and humidity of a greenhouse-like enclosure. You will learn the concepts
A Day in the Life CTE Enrichment Grades 3-5 mblock Programs Using the Sensors
 Activity 1 - Reading Sensors A Day in the Life CTE Enrichment Grades 3-5 mblock Programs Using the Sensors Computer Science Unit This tutorial teaches how to read values from sensors in the mblock IDE.
Ultimate Actuator Drivebox 30A Quick start guide
 2016 Ultimate Actuator Drivebox 30A Quick start guide info@e-tronix.cz e-tronix s.r.o. 1.1.2016 OBSAH Identification... 3 Serial Number... 3 Manufacturer and reseller contact... 4 Before Start... 4 UAD30A
Part (A) Using the Potentiometer and the ADC* Part (B) LEDs and Stepper Motors with Interrupts* Part (D) Breadboard PIC Running a Stepper Motor
 Using the Potentiometer and the ADC* Part (B) LEDs and Stepper Motors with Interrupts* Part (D) Breadboard PIC Running a Stepper Motor") Name Name (Most parts are team so maintain only 1 sheet per team) ME430 Mechatronic Systems: Lab 5: ADC, Interrupts, Steppers, and Servos The lab team has demonstrated the following tasks: Part (A) Using
Name Name (Most parts are team so maintain only 1 sheet per team) ME430 Mechatronic Systems: Lab 5: ADC, Interrupts, Steppers, and Servos The lab team has demonstrated the following tasks: Part (A) Using
Adafruit 16-Channel PWM/Servo HAT & Bonnet for Raspberry Pi
 Adafruit 16-Channel PWM/Servo HAT & Bonnet for Raspberry Pi Created by lady ada Last updated on 2018-03-21 09:56:10 PM UTC Guide Contents Guide Contents Overview Powering Servos Powering Servos / PWM OR
Two Hour Robot. Lets build a Robot.
 Lets build a Robot. Our robot will use an ultrasonic sensor and servos to navigate it s way around a maze. We will be making 2 voltage circuits : A 5 Volt for our ultrasonic sensor, sound and lights powered
ZX Distance and Gesture Sensor Hookup Guide
 Page 1 of 13 ZX Distance and Gesture Sensor Hookup Guide Introduction The ZX Distance and Gesture Sensor is a collaboration product with XYZ Interactive. The very smart people at XYZ Interactive have created
Robotic Manipulation Lab 1: Getting Acquainted with the Denso Robot Arms Fall 2010
 15-384 Robotic Manipulation Lab 1: Getting Acquainted with the Denso Robot Arms Fall 2010 due September 23 2010 1 Introduction This lab will introduce you to the Denso robot. You must write up answers
Build a Mintronics: MintDuino
 Build a Mintronics: MintDuino Author: Marc de Vinck Parts relevant to this project Mintronics: MintDuino (1) The MintDuino is perfect for anyone interested in learning (or teaching) the fundamentals of
HC-SR501 Passive Infrared (PIR) Motion Sensor
 Motion Sensor") Handson Technology User Guide HC-SR501 Passive Infrared (PIR) Motion Sensor This motion sensor module uses the LHI778 Passive Infrared Sensor and the BISS0001 IC to control how motion is detected. The
Handson Technology User Guide HC-SR501 Passive Infrared (PIR) Motion Sensor This motion sensor module uses the LHI778 Passive Infrared Sensor and the BISS0001 IC to control how motion is detected. The
IET BBC micro:bit class session A sun exposure alarm
 IET BBC micro:bit class session A sun exposure alarm This activity is incremental and builds on each step. Worked examples are shown but it is feasible for students to come up with other working solutions.