Arduino Digital Out_QUICK RECAP
|
|
|
- Stella Taylor
- 6 years ago
- Views:
Transcription
1 Arduino Digital Out_QUICK RECAP
; // the loop() method runs over and over again, // as long as the Arduino has power void loop() digitalwrite(ledpin, HIGH); // set the LED on delay(1000); // wait for a second")
2 BLINK File> Examples>Digital>Blink int ledpin = 13; // LED connected to digital pin 13 // The setup() method runs once, when the sketch starts void setup() // initialize the digital pin as an output: pinmode(ledpin, OUTPUT); // the loop() method runs over and over again, // as long as the Arduino has power void loop() digitalwrite(ledpin, HIGH); // set the LED on delay(1000); // wait for a second or 1000 milliseconds digitalwrite(ledpin, LOW); // set the LED off delay(1000); // wait for a second or 1000 milliseconds
3 Arduino Digital In and Out


4 Pull Up Resistor A pull-up resistor weakly pulls the voltage of the wire it is connected to towards its voltage source level when the other components on the line are inactive. When all other connections on the line are inactive, they are highimpedance and act like they are disconnected Arduino will read HIGH until circuit is activated and it will switch to LOW. Pull Down Resistor A pull-down resistor is connected to ground, and holds the logic signal near zero volts when no other active device is connected. Arduino will read LOW until circuit is activated and it will switch to HIGH.
 // initialize the LED pin as an output: pinmode(ledpin, OUTPUT); // initialize the pushbutton pin as an input: pinmode(buttonpin, INPUT); void loop() // read the state")
5 FILE> Examples>Digital>Button DIGITAL IN_BUTTON int buttonpin = 2; // the number of the pushbutton pin int ledpin = 13; // the number of the LED pin int buttonstate = 0; // variable for reading the pushbutton status void setup() // initialize the LED pin as an output: pinmode(ledpin, OUTPUT); // initialize the pushbutton pin as an input: pinmode(buttonpin, INPUT); void loop() // read the state of the pushbutton value: buttonstate = digitalread(buttonpin); // check if the pushbutton is pressed. // if it is, the buttonstate is HIGH: if (buttonstate == HIGH) // turn LED on: digitalwrite(ledpin, HIGH); else // turn LED off: digitalwrite(ledpin, LOW);
6 ARDUINO_Internal Pull Up Resistor int buttonpin = 2; // the number of the pushbutton pin int ledpin = 13; // the number of the LED pin int buttonstate = 0; // variable for reading the pushbutton status void setup() // initialize the LED pin as an output: pinmode(ledpin, OUTPUT); // initialize the pushbutton pin as an input: pinmode(buttonpin, INPUT); //turns on the pullup resistor on buttonpin digitalwrite(buttonpin, HIGH); arduino 1.0.1: void setup() // initialize the LED pin as an output: pinmode(ledpin, OUTPUT); // initialize the pushbutton pin as an input: pinmode(buttonpin, INPUT_PULLUP ); void loop() // read the state of the pushbutton value: buttonstate = digitalread(buttonpin); // check if the pushbutton is pressed. // if it is, the buttonstate is HIGH: if (buttonstate == HIGH) // turn LED on: digitalwrite(ledpin, HIGH); else // turn LED off: digitalwrite(ledpin, LOW);
7 Arduino Analog In and Out
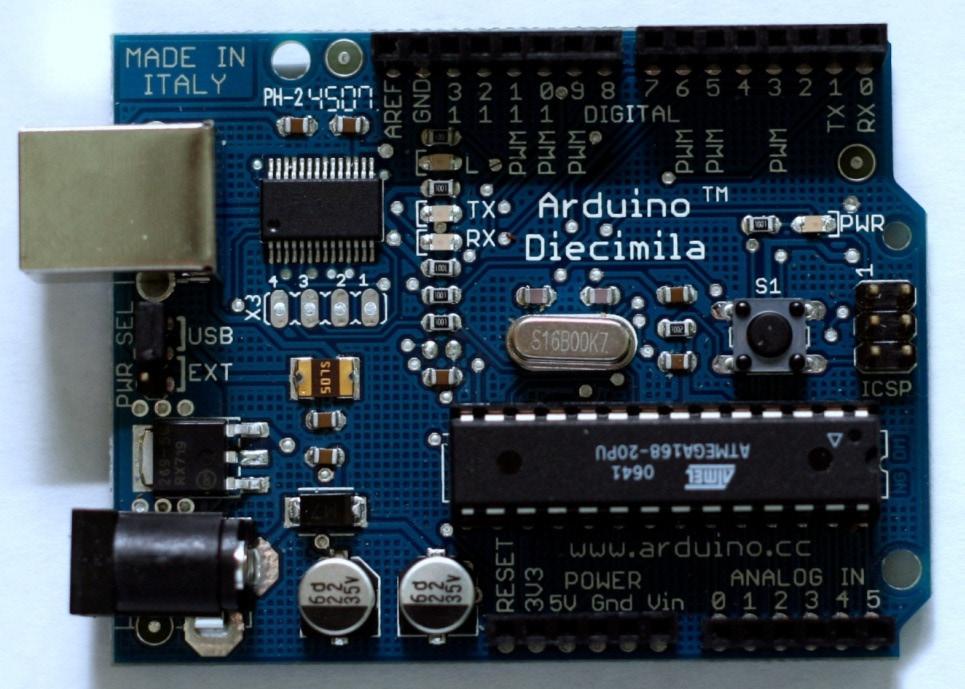
8 DIGITAL AND ANALOG I/O ON THE BOARD A OUT A OUT DIGITAL I/O A O U T ANALOG IN
 to a digital number proportional to the magnitude of the")
 per reading.")
9 ANALOG DIGITAL CONVERTERS (ADCs) _ADC is an electronic device that converts an input analog voltage (or current) to a digital number proportional to the magnitude of the voltage or curren _Arduino has a built in 10-bit ADC which keeps checking the value of the voltage input and returns back the values. It takes ( s) per reading. 10,000 readings / sec.

10 Pulse Width Modulation(PWM) _Digital way of getting an analog current supply. _ a PWM variable-power scheme switches the power quickly between fully on and fully off _Pulse: sudden increase and decrease in current flow. _ The term duty cycle describes the proportion of on time to the regular interval or period of time; a low duty cycle corresponds to low power, because the power is off for most of the time _Low (0-255) High
11 DIGITAL I/O pinmode(pin#, INPUT/OUTPUT); //assigns pin as input or output digitalwrite(pin#, STATE: HIGH/LOW); //OUTPUT digitalread(pin#); //INPUT ANALOG I/O analogwrite(pin#, the duty cycle: 0 (always off)-255 (always on)); //OUTPUT analogread(pin#); //INPUT
12 ANALOG OUT_PWM int analogpin = 9; void setup() Serial.begin(9600); void loop() analogwrite(analogpin, 0); //0% delay(1000); analogwrite(analogpin, 64); //25% delay(1000); analogwrite(analogpin, 127); //50% delay(1000); analogwrite(analogpin, 191); //75% delay(1000); analogwrite(analogpin, 255); //100% delay(1000);
13 Voltage Divider How is it used with Arduino? point between the fixed pulldown or pullup resistor and the variable resistor is connected to the analog input of a microcontroller Why do you need it? fixed resistor scales the values of variable resistor by referencing two voltages: 5V and 0V. fixed resistor Values are LOW to HIGH variable resistor
 Serial.")
14 ANALOG IN_variable resistor FILE> Examples> Analog> AnalogInput int sensorpin = 0; // select the input pin for the potentiometer int ledpin = 9; // select the PWM pin for the LED int sensorvalue = 0; // variable to store the value coming from the sensor void setup() Serial.begin(9600); void loop() // read the value from the sensor sensorvalue = analogread(sensorpin); //prints sensor value to program notification area using Serial.print or Serial.println Serial.println(sensorValue); delay(500); // turn the ledpin on according to potentiometer s modulation analogwrite(ledpin, sensorvalue);
15 int sensorpin = 0; int ledpin = 9; Scaling Values_Software // select the input pin for the potentiometer // select the PWM pin for the LED int sensorvalue = 0; // variable to store the value coming from the sensor int outputdata = 0; // Assigning integer value to the variable outputdata void setup() Serial.begin(9600); void loop() // read the value from the sensor sensorvalue = analogread(sensorpin); // map it to the range of the analog out outputdata = map(sensorvalue, 0, 1023, 0, 255); // turn the ledpin on according to potentiometer s modulation analogwrite(ledpin, sensorvalue);
16 SERVOS
17 SERVO TYPES Regular Servo: _Can only rotate from _position can be tracked by rotation angle _direction can be controlled by incrementing or descreasing rotation angle. Continous Rotation: _lose position tracking _gain rotation, speed, and direction
18 FILE> Examples>Servo> Sweep SERVOS_SWEEP #include <Servo.h> Servo myservo; // create servo object to control a servo // a maximum of eight servo objects can be created int pos = 0; // variable to store the servo position void setup() myservo.attach(9); // attaches the servo on pin 9 to the servo object void loop() for(pos = 0; pos < 180; pos ++) //goes from 0 degrees to 180 degrees in steps of 1 degree myservo.write(pos); // tell servo to go to position in variable pos delay(15); // waits 15ms for the servo to reach the position for(pos = 180; pos>=1; pos--) // goes from 180 degrees to 0 degrees myservo.write(pos); // tell servo to go to position in variable pos delay(15); // waits 15ms for the servo to reach the position
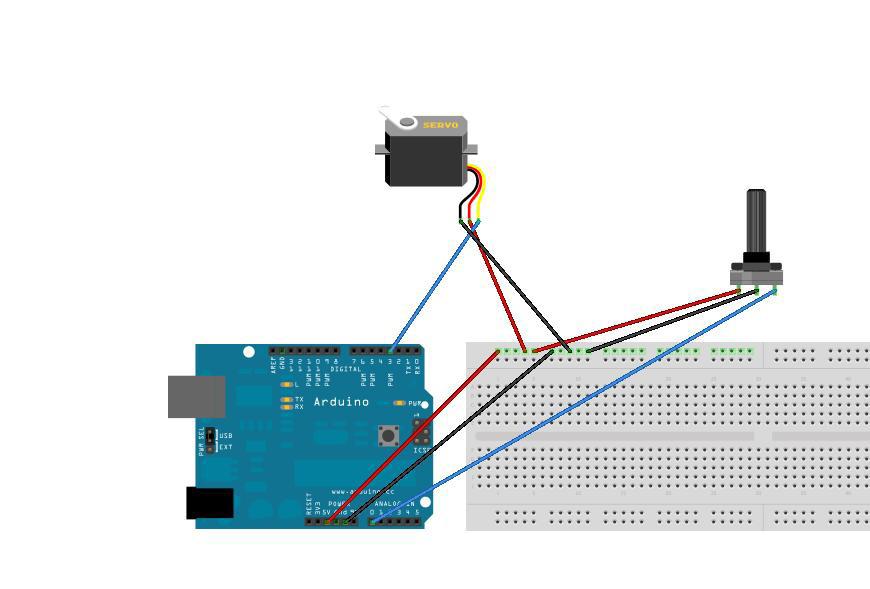
19 SERVOS_using variable resistor #include <Servo.h> Servo myservo; //create servo object to control a servo int potpin = 0; // analog pin used to connect the potentiometer int val = 0; // variable to read the value from the analog pin void setup() myservo.attach(2); // attaches the servo on pin 2 to the servo object void loop() val = analogread(potpin); // reads the value of the potentiometer (value between 0 and 1023) val = map(val, 0, 1023, 0, 180); // scale it to use it with the servo (value between 0 and 180) myservo.write(val); // sets the servo position according to the scaled value delay(15); // waits for the servo to get there
20 SERIAL COMMUNICATION Bits, Bytes, Data Rates and Protocols ASCI interpretation Using terminal to view serial Data Serial Out from Arduino Serial In to Processing, PD, Max/MSP, Flash

21 SERIAL COMMUNICATION _creates a data stream by sending one bit at a time _occurs sequentially H...E...L...L...O The first to be recieved is H then E and so on.
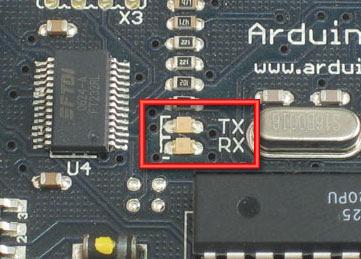
22 SERIAL COMMUNICATION_ARDUINO RX Receiving Data TX Transmitting Data
23 Time to Talk with Arduino board! _Program to let Arduino say Hello World! _Baud Rate is the rate at which data is sent and recieve, must be synced between the two devices that are communicating _Bit per second (baud rate) _Note that this communication baud rate is independent of the upload process, which is fixed at bps.
24 Sending Serial Data Serial.println( something ); print and println is writing data to the serial port. println writes a \n(newline) at the end of each statement equivalant to a serial.write(); in other programming langauages
25 int val = 0; void setup() Serial.begin(9600); void loop() val = analogread(0); Serial.print(val); Serial.println(); Sending Serial Data to Processing IDE PROCESSING CODE: import processing.serial.*; Serial myport; String instring; float val; int lf = 10; void setup() size(200, 200); String portname = Serial.list()[0]; myport = new Serial(this, portname, 9600); myport.clear(); void draw() // Create object from Serial class // Data received from the serial port // ascii code for linefeed background(255); // Set background to white val = map(val, 0, 1023, 0, 255); fill(int(val)); //typecast float to int rect(50, 50, 100, 100); /*built in function within processing called when data is available which can be set with buffer() to only trigger after a certain number of data elements are read and can be set with bufferuntil() to only trigger after a specific character is read to be used with one of the Read() functions*/ void serialevent(serial p) myport.bufferuntil(lf); instring = p.readstring(); print( received: +instring); val = float(instring); println( val); //buffer until linefeed (println) //typecast string type to float
26 Arduino_receiving data via Serial.Available int incomingbyte = 0; // for incoming serial data void setup() Serial.begin(9600); // opens serial port, sets data rate to 9600 bps void loop() // send data only when you receive data: if (Serial.available() > 0) // read the incoming byte: incomingbyte = Serial.read(); // say what you got: Serial.print( I received: ); Serial.println(incomingByte); else Serial.println( Nothing );


27 SERIAL READ_switch case Code:
28 EXAMPLES > CONTROL> SWITCHCASE2 void setup() // initialize serial communication: Serial.begin(9600); // initialize the LED pins: for (int thispin = 2; thispin < 7; thispin++) pinmode(thispin, OUTPUT); SERIAL READ_switch case void loop() // read the sensor: if (Serial.available() > 0) int inbyte = Serial.read(); /*do something different depending on the character received. The switch statement expects single number values for each case; in this exmaple, though, you re using single quotes to tell the controller to get the ASCII value for the character. For example a = 97, b = 98, and so forth:*/ switch (inbyte) case a : digitalwrite(2, HIGH); break; case b : digitalwrite(3, HIGH); break; case c : digitalwrite(4, HIGH); break; case d : digitalwrite(5, HIGH); break; case e : digitalwrite(6, HIGH); break; default: // turn all the LEDs off: for (int thispin = 2; thispin < 7; thispin++) digitalwrite(thispin, LOW);
29 SERIAL FLUSH Flushes the buffer of serial port, when sending or recieving any call to Serial method will return only data received after all the most recent call to Serial.flush(): Serial.println( Hello! ); Serial.flush(); will pass Hello! \n to Serial buffer before doing anything else to the Serial buffer.
Disclaimer. Arduino Hands-On 2 CS5968 / ART4455 9/1/10. ! Many of these slides are mine. ! But, some are stolen from various places on the web
 Arduino Hands-On 2 CS5968 / ART4455 Disclaimer! Many of these slides are mine! But, some are stolen from various places on the web! todbot.com Bionic Arduino and Spooky Arduino class notes from Tod E.Kurt!
Lecture 6. Interfacing Digital and Analog Devices to Arduino. Intro to Arduino
 Lecture 6 Interfacing Digital and Analog Devices to Arduino. Intro to Arduino PWR IN USB (to Computer) RESET SCL\SDA (I2C Bus) POWER 5V / 3.3V / GND Analog INPUTS Digital I\O PWM(3, 5, 6, 9, 10, 11) Components
HAW-Arduino. Sensors and Arduino F. Schubert HAW - Arduino 1
 HAW-Arduino Sensors and Arduino 14.10.2010 F. Schubert HAW - Arduino 1 Content of the USB-Stick PDF-File of this script Arduino-software Source-codes Helpful links 14.10.2010 HAW - Arduino 2 Report for
TWEAK THE ARDUINO LOGO
 TWEAK THE ARDUINO LOGO Using serial communication, you'll use your Arduino to control a program on your computer Discover : serial communication with a computer program, Processing Time : 45 minutes Level
Yihao Qian Team A: Aware Teammates: Amit Agarwal Harry Golash Menghan Zhang Zihao (Theo) Zhang ILR01 Oct.14, 2016
 Zhang ILR01 Oct.14, 2016") Yihao Qian Team A: Aware Teammates: Amit Agarwal Harry Golash Menghan Zhang Zihao (Theo) Zhang ILR01 Oct.14, 2016 Individual Progress For sensors and motors lab, I was in charge of the servo and force
Yihao Qian Team A: Aware Teammates: Amit Agarwal Harry Golash Menghan Zhang Zihao (Theo) Zhang ILR01 Oct.14, 2016 Individual Progress For sensors and motors lab, I was in charge of the servo and force
Arduino. AS220 Workshop. Part II Interactive Design with advanced Transducers Lutz Hamel
 AS220 Workshop Part II Interactive Design with advanced Transducers Lutz Hamel hamel@cs.uri.edu www.cs.uri.edu/~hamel/as220 How we see the computer Image source: Considering the Body, Kate Hartman, 2008.
J. La Favre Using Arduino with Raspberry Pi February 7, 2018
 As you have already discovered, the Raspberry Pi is a very capable digital device. Nevertheless, it does have some weaknesses. For example, it does not produce a clean pulse width modulation output (unless
.:Twisting:..:Potentiometers:.
 CIRC-08.:Twisting:..:Potentiometers:. WHAT WE RE DOING: Along with the digital pins, the also has 6 pins which can be used for analog input. These inputs take a voltage (from 0 to 5 volts) and convert
Analog Feedback Servos
 Analog Feedback Servos Created by Bill Earl Last updated on 2018-01-21 07:07:32 PM UTC Guide Contents Guide Contents About Servos and Feedback What is a Servo? Open and Closed Loops Using Feedback Reading
Computational Crafting with Arduino. Christopher Michaud Marist School ECEP Programs, Georgia Tech
 Computational Crafting with Arduino Christopher Michaud Marist School ECEP Programs, Georgia Tech Introduction What do you want to learn and do today? Goals with Arduino / Computational Crafting Purpose
Coding with Arduino to operate the prosthetic arm
 Setup Board Install FTDI Drivers This is so that your RedBoard will be able to communicate with your computer. If you have Windows 8 or above you might already have the drivers. 1. Download the FTDI driver
Assignments from last week
 Assignments from last week Review LED flasher kits Review protoshields Need more soldering practice (see below)? http://www.allelectronics.com/make-a-store/category/305/kits/1.html http://www.mpja.com/departments.asp?dept=61
Servo Sweep. Learn to make a regular Servo move in a sweeping motion.
 Servo Sweep Learn to make a regular Servo move in a sweeping motion. We have seen how to control a Servo and also how to make an LED Fade on and off. This activity will teach you how to make a regular
100UF CAPACITOR POTENTIOMETER SERVO MOTOR MOTOR ARM. MALE HEADER PIN (3 pins) INGREDIENTS
 INGREDIENTS") 05 POTENTIOMETER SERVO MOTOR MOTOR ARM 100UF CAPACITOR MALE HEADER PIN (3 pins) INGREDIENTS 63 MOOD CUE USE A SERVO MOTOR TO MAKE A MECHANICAL GAUGE TO POINT OUT WHAT SORT OF MOOD YOU RE IN THAT DAY Discover:
05 POTENTIOMETER SERVO MOTOR MOTOR ARM 100UF CAPACITOR MALE HEADER PIN (3 pins) INGREDIENTS 63 MOOD CUE USE A SERVO MOTOR TO MAKE A MECHANICAL GAUGE TO POINT OUT WHAT SORT OF MOOD YOU RE IN THAT DAY Discover:
Introduction to. An Open-Source Prototyping Platform. Hans-Petter Halvorsen
 Introduction to An Open-Source Prototyping Platform Hans-Petter Halvorsen Contents 1.Overview 2.Installation 3.Arduino Starter Kit 4.Arduino TinkerKit 5.Arduino Examples 6.LabVIEW Interface for Arduino
Arduino: Sensors for Fun and Non Profit
 Arduino: Sensors for Fun and Non Profit Slides and Programs: http://pamplin.com/dms/ Nicholas Webb DMS: @NickWebb 1 Arduino: Sensors for Fun and Non Profit Slides and Programs: http://pamplin.com/dms/
URM37 Ultrasonik Mesafe Sensörü - Arduino - Raspberry Pi - LattePanda Uyumlu - DFRobot
 URM37 Ultrasonik Mesafe Sensörü - Arduino - Raspberry Pi - LattePanda Uyumlu - DFRobot URM37 V4.0 Ultrasonic Sensor Contents [ hide ] 1 Introduction 2 Specification 3 PinOut 4 Tutorial 4.1 Button for RS232/TTL
Interfacing with Other Programming Environments _Processing, _MAXMSP, _PureData,
 + + + Interfacing with Other Programming Environments _Processing, http://processing.org/ _MAXMSP, http://cycling74.com/ _PureData, http://puredata.info/ Using the Firmata Library Firmata a generic protocol
Preface. If you have any problems for learning, please contact us at We will do our best to help you solve the problem.
 Preface Adeept is a technical service team of open source software and hardware. Dedicated to applying the Internet and the latest industrial technology in open source area, we strive to provide best hardware
Learning Objectives. References 10/26/11. Using servos with an Arduino. EAS 199A Fall 2011
 Using servos with an Arduino EAS 199A Fall 2011 Learning Objectives Be able to identify characteristics that distinguish a servo and a DC motor Be able to describe the difference a conventional servo and
You'll create a lamp that turns a light on and off when you touch a piece of conductive material
 TOUCHY-FEELY LAMP You'll create a lamp that turns a light on and off when you touch a piece of conductive material Discover : installing third party libraries, creating a touch sensor Time : 5 minutes
Using Servos with an Arduino
 Using Servos with an Arduino ME 120 Mechanical and Materials Engineering Portland State University http://web.cecs.pdx.edu/~me120 Learning Objectives Be able to identify characteristics that distinguish
1. Introduction to Analog I/O
 EduCake Analog I/O Intro 1. Introduction to Analog I/O In previous chapter, we introduced the 86Duino EduCake, talked about EduCake s I/O features and specification, the development IDE and multiple examples
Attribution Thank you to Arduino and SparkFun for open source access to reference materials.
 Attribution Thank you to Arduino and SparkFun for open source access to reference materials. Contents Parts Reference... 1 Installing Arduino... 7 Unit 1: LEDs, Resistors, & Buttons... 7 1.1 Blink (Hello
Lecture 4: Basic Electronics. Lecture 4 Brief Introduction to Electronics and the Arduino
 Lecture 4: Basic Electronics Lecture 4 Page: 1 Brief Introduction to Electronics and the Arduino colintan@nus.edu.sg Lecture 4: Basic Electronics Page: 2 Objectives of this Lecture By the end of today
Arduino Sensor Beginners Guide
 Arduino Sensor Beginners Guide So you want to learn arduino. Good for you. Arduino is an easy to use, cheap, versatile and powerful tool that can be used to make some very effective sensors. This guide
Arduino Programming Part 3
 Arduino Programming Part 3 EAS 199A Fall 2011 Overview Part I Circuits and code to control the speed of a small DC motor. Use potentiometer for dynamic user input. Use PWM output from Arduino to control
Introduction to Mechatronics Programming a robot
 Introduction to Mechatronics Programming a robot Lecturer Filippo Sanfilippo Faculty of Aalesund University College, Norway @fisa Filippo Sanfilippo 1 Filippo Sanfilippo 2 Content of today s lecture! Programming
Arduino Microcontroller Processing for Everyone!: Third Edition / Steven F. Barrett
 Arduino Microcontroller Processing for Everyone!: Third Edition / Steven F. Barrett Anatomy of a Program Programs written for a microcontroller have a fairly repeatable format. Slight variations exist
Figure 1. Digilent DC Motor
 Laboratory 9 - Usage of DC- and servo-motors The current laboratory describes the usage of DC and servomotors 1. DC motors Figure 1. Digilent DC Motor Classical DC motors are converting electrical energy
URM37 V3.2 Ultrasonic Sensor (SKU:SEN0001)
") URM37 V3.2 Ultrasonic Sensor (SKU:SEN0001) From Robot Wiki Contents 1 Introduction 2 Specification 2.1 Compare with other ultrasonic sensor 3 Hardware requierments 4 Tools used 5 Software 6 Working Mode
URM37 V3.2 Ultrasonic Sensor (SKU:SEN0001) From Robot Wiki Contents 1 Introduction 2 Specification 2.1 Compare with other ultrasonic sensor 3 Hardware requierments 4 Tools used 5 Software 6 Working Mode
Design with Microprocessors Year III Computer Science 1-st Semester
 Design with Microprocessors Year III Computer Science 1-st Semester Lecture 9: Microcontroller based applications: usage of sensors and actuators (motors) DC motor control Diligent MT motor/gearbox 1/19
Experiment 1: Robot Moves in 3ft squared makes sound and
 Experiment 1: Robot Moves in 3ft squared makes sound and turns on an LED at each turn then stop where it started. Edited: 9-7-2015 Purpose: Press a button, make a sound and wait 3 seconds before starting
Community College of Allegheny County Unit 7 Page #1. Analog to Digital
 Community College of Allegheny County Unit 7 Page #1 Analog to Digital "Engineers can't focus just on technology; they need to develop their professional skills-things like presenting yourself, speaking
Arduino Advanced Projects
 Arduino Advanced Projects Created as a companion manual to the Toronto Public Library Arduino Kits. Arduino Advanced Projects Copyright 2017 Toronto Public Library. All rights reserved. Published by the
ABCs of Arduino. Kurt Turchan -
 ABCs of Arduino Kurt Turchan - kurt@trailpeak.com Bio: Kurt is a web designer (java/php/ui-jquery), project manager, instructor (PHP/HTML/...), and arduino enthusiast, Kurt is founder of www.trailpeak.com
LED + Servo 2 devices, 1 Arduino
 LED + Servo 2 devices, 1 Arduino Learn to connect and write code to control both a Servo and an LED at the same time. Many students who come through the lab ask if they can use both an LED and a Servo
Arduino Control of Tetrix Prizm Robotics. Motors and Servos Introduction to Robotics and Engineering Marist School
 Arduino Control of Tetrix Prizm Robotics Motors and Servos Introduction to Robotics and Engineering Marist School Motor or Servo? Motor Faster revolution but less Power Tetrix 12 Volt DC motors have a
Programming a Servo. Servo. Red Wire. Black Wire. White Wire
 Programming a Servo Learn to connect wires and write code to program a Servo motor. If you have gone through the LED Circuit and LED Blink exercises, you are ready to move on to programming a Servo. A
Operating Mode: Serial; (PWM) passive control mode; Autonomous Mode; On/OFF Mode
 passive control mode; Autonomous Mode; On/OFF Mode") RB-Dfr-11 DFRobot URM V3.2 Ultrasonic Sensor URM37 V3.2 Ultrasonic Sensor uses an industrial level AVR processor as the main processing unit. It comes with a temperature correction which is very unique
RB-Dfr-11 DFRobot URM V3.2 Ultrasonic Sensor URM37 V3.2 Ultrasonic Sensor uses an industrial level AVR processor as the main processing unit. It comes with a temperature correction which is very unique
Lab 5: Arduino Uno Microcontroller Innovation Fellows Program Bootcamp Prof. Steven S. Saliterman
 Lab 5: Arduino Uno Microcontroller Innovation Fellows Program Bootcamp Prof. Steven S. Saliterman Exercise 5-1: Familiarization with Lab Box Contents Objective: To review the items required for working
MICROCONTROLLERS BASIC INPUTS and OUTPUTS (I/O)
") PH-315 Portland State University MICROCONTROLLERS BASIC INPUTS and OUTPUTS (I/O) ABSTRACT A microcontroller is an integrated circuit containing a processor and programmable read-only memory, 1 which is
PH-315 Portland State University MICROCONTROLLERS BASIC INPUTS and OUTPUTS (I/O) ABSTRACT A microcontroller is an integrated circuit containing a processor and programmable read-only memory, 1 which is
Basics before Migtrating to Arduino
 Basics before Migtrating to Arduino Who is this for? Written by Storming Robots Last update: Oct 11 th, 2013 This document is meant for preparing students who have already good amount of programming knowledge,
Servomotor Control with Arduino Integrated Development Environment. Application Notes. Bingyang Wu Mar 27, Introduction
 Servomotor Control with Arduino Integrated Development Environment Application Notes Bingyang Wu Mar 27, 2015 Introduction Arduino is a tool for making computers that can sense and control more of the
Microcontrollers and Interfacing
 Microcontrollers and Interfacing Week 07 digital input, debouncing, interrupts and concurrency College of Information Science and Engineering Ritsumeikan University 1 this week digital input push-button
Arduino and Servo Motor
 Arduino and Servo Motor 1. Basics of the Arduino Board and Arduino a. Arduino is a mini computer that can input and output data using the digital and analog pins b. Arduino Shield: mounts on top of Arduino
CURIE Academy, Summer 2014 Lab 2: Computer Engineering Software Perspective Sign-Off Sheet
 Lab : Computer Engineering Software Perspective Sign-Off Sheet NAME: NAME: DATE: Sign-Off Milestone TA Initials Part 1.A Part 1.B Part.A Part.B Part.C Part 3.A Part 3.B Part 3.C Test Simple Addition Program
MICROCONTROLLERS BASIC INPUTS and OUTPUTS (I/O)
") PH-315 Portland State University MICROCONTROLLERS BASIC INPUTS and OUTPUTS (I/O) ABSTRACT A microcontroller is an integrated circuit containing a processor and programmable read-only memory, 1 which is
PH-315 Portland State University MICROCONTROLLERS BASIC INPUTS and OUTPUTS (I/O) ABSTRACT A microcontroller is an integrated circuit containing a processor and programmable read-only memory, 1 which is
Understanding the Arduino to LabVIEW Interface
 E-122 Design II Understanding the Arduino to LabVIEW Interface Overview The Arduino microcontroller introduced in Design I will be used as a LabVIEW data acquisition (DAQ) device/controller for Experiments
B RoboClaw 2 Channel 30A Motor Controller Data Sheet
 B0098 - RoboClaw 2 Channel 30A Motor Controller (c) 2010 BasicMicro. All Rights Reserved. Feature Overview: 2 Channel at 30Amp, Peak 60Amp Battery Elimination Circuit (BEC) Switching Mode BEC Hobby RC
FABO ACADEMY X ELECTRONIC DESIGN
 ELECTRONIC DESIGN MAKE A DEVICE WITH INPUT & OUTPUT The Shanghaino can be programmed to use many input and output devices (a motor, a light sensor, etc) uploading an instruction code (a program) to it
Rodni What will yours be?
 Rodni What will yours be? version 4 Welcome to Rodni, a modular animatronic animal of your own creation for learning how easy it is to enter the world of software programming and micro controllers. During
arduino experimentation kit Arduino Experimenter s Kit SketchBoard Edition
 ARDX arduino experimentation kit Arduino Experimenter s Kit SketchBoard Edition ARDX Open-Source Arduino Instruction Guide Document Revision: Nov 18 2015 A Few Words ABOUT THIS KIT The overall goal of
Application Note AN 157: Arduino UART Interface to TelAire T6613 CO2 Sensor
 Application Note AN 157: Arduino UART Interface to TelAire T6613 CO2 Sensor Introduction The Arduino UNO, Mega and Mega 2560 are ideal microcontrollers for reading CO2 sensors. Arduino boards are useful
Experimenter s Guide for Arduino
 ARDX experimentation kit for arduino Experimenter s Guide for Arduino (ARDX) A Few Words ABOUT THIS KIT The overall goal of this kit is fun. Beyond this, the aim is to get you comfortable using a wide
Electronic Prototyping
 Electronic Prototyping Introduc2on to Arduino use Lesson 2 PhD Student Licia Di Pietro 08/05/18 Laboratorio Tecnologie Biomediche 1 Outline What is Arduino? Arduino hardware Arduino DUE Pin mapping Terminology
INTRODUCTION to MICRO-CONTROLLERS
 PH-315 Portland State University INTRODUCTION to MICRO-CONTROLLERS Bret Comnes and A. La Rosa 1. ABSTRACT This laboratory session pursues getting familiar with the operation of microcontrollers, namely
Sidekick Basic Kit for Arduino V2 Introduction
 Sidekick Basic Kit for Arduino V2 Introduction The Arduino Sidekick Basic Kit is designed to be used with your Arduino / Seeeduino / Seeeduino ADK / Maple Lilypad or any MCU board. It contains everything
INA169 Breakout Board Hookup Guide
 Page 1 of 10 INA169 Breakout Board Hookup Guide CONTRIBUTORS: SHAWNHYMEL Introduction Have a project where you want to measure the current draw? Need to carefully monitor low current through an LED? The
Lab 06: Ohm s Law and Servo Motor Control
 CS281: Computer Systems Lab 06: Ohm s Law and Servo Motor Control The main purpose of this lab is to build a servo motor control circuit. As with prior labs, there will be some exploratory sections designed
Experiment 1 Identification of Components and Breadboard Realization
 Experiment 1 Identification of Components and Breadboard Realization Aim: Introduction to the lab and identification of various components and realization using bread board. Hardware/Software Required:
6Circuit Worksheets SIK BINDER //93
 6Circuit Worksheets SIK BINDER //93 Tier 1 Difficulty Circuit #1 Blink LED Ohm s Law: V = I * R I = V / R R = V / I How is this circuit, or a circuit like it, used in everyday life? Provide at least three
Programming 2 Servos. Learn to connect and write code to control two servos.
 Programming 2 Servos Learn to connect and write code to control two servos. Many students who visit the lab and learn how to use a Servo want to use 2 Servos in their project rather than just 1. This lesson
Application Note AN 102: Arduino I2C Interface to K 30 Sensor
 Application Note AN 102: Arduino I2C Interface to K 30 Sensor Introduction The Arduino UNO, MEGA 1280 or MEGA 2560 are ideal microcontrollers for operating SenseAir s K 30 CO2 sensor. The connection to
Setup Download the Arduino library (link) for Processing and the Lab 12 sketches (link).
 for Processing and the Lab 12 sketches (link).") Lab 12 Connecting Processing and Arduino Overview In the previous lab we have examined how to connect various sensors to the Arduino using Scratch. While Scratch enables us to make simple Arduino programs,
Lab 12 Connecting Processing and Arduino Overview In the previous lab we have examined how to connect various sensors to the Arduino using Scratch. While Scratch enables us to make simple Arduino programs,
Mechatronics Engineering and Automation Faculty of Engineering, Ain Shams University MCT-151, Spring 2015 Lab-4: Electric Actuators
 Mechatronics Engineering and Automation Faculty of Engineering, Ain Shams University MCT-151, Spring 2015 Lab-4: Electric Actuators Ahmed Okasha, Assistant Lecturer okasha1st@gmail.com Objective Have a
INTRODUCTION to MICRO-CONTROLLERS
 PH-315 Portland State University INTRODUCTION to MICRO-CONTROLLERS Bret Comnes, Dan Lankow, and Andres La Rosa 1. ABSTRACT A microcontroller is an integrated circuit containing a processor and programmable
.:Getting Started:..:(Blinking LED):.
:.") CIRC-01.:Getting Started:..:(Blinking LED):. WHAT WE RE DOING: LEDs (light emitting diodes) are used in all sorts of clever things which is why we have included them in this kit. We will start off with
CIRC-01.:Getting Started:..:(Blinking LED):. WHAT WE RE DOING: LEDs (light emitting diodes) are used in all sorts of clever things which is why we have included them in this kit. We will start off with
THE INPUTS ON THE ARDUINO READ VOLTAGE. ALL INPUTS NEED TO BE THOUGHT OF IN TERMS OF VOLTAGE DIFFERENTIALS.
 INPUT THE INPUTS ON THE ARDUINO READ VOLTAGE. ALL INPUTS NEED TO BE THOUGHT OF IN TERMS OF VOLTAGE DIFFERENTIALS. THE ANALOG INPUTS CONVERT VOLTAGE LEVELS TO A NUMERICAL VALUE. PULL-UP (OR DOWN) RESISTOR
Robotic Arm Assembly Instructions
 Robotic Arm Assembly Instructions Last Revised: 11 January 2017 Part A: First follow the instructions: http://www.robotshop.com/media/files/zip2/rbmea-02_-_documentation_1.zip While assembling the servos:
Robotycs - YLab Robotics Group Toy Hacking Workshop Part 2 November 11, 2015
 Robotycs - YLab Robotics Group Toy Hacking Workshop Part 2 November 11, 2015 Robot Talk Ross Lunan What do we build Robots with? With whatever you can find in your junk-box, get from lots of suppliers
EE 314 Spring 2003 Microprocessor Systems
 EE 314 Spring 2003 Microprocessor Systems Laboratory Project #9 Closed Loop Control Overview and Introduction This project will bring together several pieces of software and draw on knowledge gained in
02 Digital Input and Output
 week 02 Digital Input and Output RGB LEDs fade with PWM 1 Microcontrollers utput ransducers actuators (e.g., motors, buzzers) Arduino nput ransducers sensors (e.g., switches, levers, sliders, etc.) Illustration
INTRODUCTION to MICRO-CONTROLLERS
 PH-315 Portland State University INTRODUCTION to MICRO-CONTROLLERS Bret Comnes, Dan Lankow, and Andres La Rosa 1. ABSTRACT A microcontroller is an integrated circuit containing a processor and programmable
Pulse Width Modulation and
 Pulse Width Modulation and analogwrite ( ); 28 Materials needed to wire one LED. Odyssey Board 1 dowel Socket block Wire clip (optional) 1 Female to Female (F/F) wire 1 F/F resistor wire LED Note: The
EE-110 Introduction to Engineering & Laboratory Experience Saeid Rahimi, Ph.D. Labs Introduction to Arduino
 EE-110 Introduction to Engineering & Laboratory Experience Saeid Rahimi, Ph.D. Labs 10-11 Introduction to Arduino In this lab we will introduce the idea of using a microcontroller as a tool for controlling
Date Issued: 12/13/2016 iarmc.06: Draft 6. TEAM 1 - iarm CONTROLLER FUNCTIONAL REQUIREMENTS
 Date Issued: 12/13/2016 iarmc.06: Draft 6 TEAM 1 - iarm CONTROLLER FUNCTIONAL REQUIREMENTS 1 Purpose This document presents the functional requirements for an accompanying controller to maneuver the Intelligent
PWM CONTROL USING ARDUINO. Learn to Control DC Motor Speed and LED Brightness
 PWM CONTROL USING ARDUINO Learn to Control DC Motor Speed and LED Brightness In this article we explain how to do PWM (Pulse Width Modulation) control using arduino. If you are new to electronics, we have
CONSTRUCTION GUIDE Robotic Arm. Robobox. Level II
 CONSTRUCTION GUIDE Robotic Arm Robobox Level II Robotic Arm This month s robot is a robotic arm with two degrees of freedom that will teach you how to use motors. You will then be able to move the arm
Arduino Application: Speed control of small DC Motors
 Arduino Application: Speed control of small DC Motors ME 120 Mechanical and Materials Engineering Portland State University http://web.cecs.pdx.edu/~me120 Learning Objectives Be able to describe the use
keyestudio keyestudio Mini Tank Robot
 keyestudio Mini Tank Robot Catalog 1. Introduction... 1 2. Parameters... 1 3. Component list... 1 4. Application of Arduino... 2 5. Project details... 12 Project 1: Obstacle-avoidance Tank... 12 Project
Sten-Bot Robot Kit Stensat Group LLC, Copyright 2013
 Sten-Bot Robot Kit Stensat Group LLC, Copyright 2013 Legal Stuff Stensat Group LLC assumes no responsibility and/or liability for the use of the kit and documentation. There is a 90 day warranty for the
For this exercise, you will need a partner, an Arduino kit (in the plastic tub), and a laptop with the Arduino programming environment.
, and a laptop with the Arduino programming environment.") Physics 222 Name: Exercise 6: Mr. Blinky This exercise is designed to help you wire a simple circuit based on the Arduino microprocessor, which is a particular brand of microprocessor that also includes
Physics 222 Name: Exercise 6: Mr. Blinky This exercise is designed to help you wire a simple circuit based on the Arduino microprocessor, which is a particular brand of microprocessor that also includes
Notes on Firmata Communication Protocol
 Notes on Firmata Firmata is an Arduino library that simplifies communication over the USB serial port. Firmata can be added to any Arduino project, but the "Standard Firmata" sketch provides functions
CONSTRUCTION GUIDE IR Alarm. Robobox. Level I
 CONSTRUCTION GUIDE Robobox Level I This month s montage is an that will allow you to detect any intruder. When a movement is detected, the alarm will turn its LEDs on and buzz to a personalized tune. 1X
CONSTRUCTION GUIDE Capacitor, Transistor & Motorbike. Robobox. Level VII
 CONSTRUCTION GUIDE Capacitor, Transistor & Motorbike Robobox Level VII Capacitor, Transistor & Motorbike In this box, we will understand in more detail the operation of DC motors, transistors and capacitor.
About Arduino: About keyestudio:
 About Arduino: Arduino is an open-source hardware project platform. This platform includes a circuit board with simple I/O function and program development environment software. It can be used to develop
µchameleon 2 User s Manual
 µchameleon 2 Firmware Rev 4.0 Copyright 2006-2011 Starting Point Systems. - Page 1 - firmware rev 4.0 1. General overview...4 1.1. Features summary... 4 1.2. USB CDC communication drivers... 4 1.3. Command
The µbotino Microcontroller Board
 The µbotino Microcontroller Board by Ro-Bot-X Designs Introduction. The µbotino Microcontroller Board is an Arduino compatible board for small robots. The 5x5cm (2x2 ) size and the built in 3 pin connectors
Drawbot DC Motor Servo Motor Creative Design 03 Interactive Digital Prototyping Junior Software Academy. 10 Drowbot 121 MIC
 + - + - 3.3v Gnd scl L293D MIC 1n4 03 10. 11. 12. 13. 14. Drawbot DC Motor Servo Motor Creative Design 03 Interactive Digital Prototyping 120 Junior Software Academy 10 Drowbot 121 WEEK 10 Drawbot LESSON
NAMASKAR ROBOT-WHICH PROVIDES SERVICE
 Int. J. Elec&Electr.Eng&Telecoms. 2014 V Sai Krishna and R Sunitha, 2014 Research Paper ISSN 2319 2518 www.ijeetc.com Vol. 3, No. 1, January 2014 2014 IJEETC. All Rights Reserved NAMASKAR ROBOT-WHICH PROVIDES
BEYOND TOYS. Wireless sensor extension pack. Tom Frissen s
 LEGO BEYOND TOYS Wireless sensor extension pack Tom Frissen s040915 t.e.l.n.frissen@student.tue.nl December 2008 Faculty of Industrial Design Eindhoven University of Technology 1 2 TABLE OF CONTENT CLASS
Veyron Servo Driver (24 Channel) (SKU:DRI0029)
 (SKU:DRI0029)") Veyron Servo Driver (24 Channel) (SKU:DRI0029) From Robot Wiki Contents 1 Introduction 2 Specifications 3 Pin Definitions 4 Install Driver o 4.1 Windows OS Driver 5 Relationship between Steering Angle
Veyron Servo Driver (24 Channel) (SKU:DRI0029) From Robot Wiki Contents 1 Introduction 2 Specifications 3 Pin Definitions 4 Install Driver o 4.1 Windows OS Driver 5 Relationship between Steering Angle
CPSC 226 Lab Four Spring 2018
 CPSC 226 Lab Four Spring 2018 Directions. This lab is a quick introduction to programming your Arduino to do some basic internal operations and arithmetic, perform character IO, read analog voltages, drive
ENGN/PHYS 207 Fall 2018 Assignment #5 Final Report Due Date: 5pm Wed Oct 31, 2018
 ENGN/PHYS 207 Fall 2018 Assignment #5 Final Report Due Date: 5pm Wed Oct 31, 2018 Circuits You ll Build 1. Instrumentation Amplifier Circuit with reference offset voltage and user selected gain. 2. Strain
INTRODUCTION TO THE ARDUINO MICROCONTROLLER
 INTRODUCTION TO THE ARDUINO MICROCONTROLLER Hands-on Research in Complex Systems Shanghai Jiao Tong University June 17 29, 2012 Instructor: Thomas E. Murphy (University of Maryland) Assisted by: Hien Dao
RESET SIK GUIDE SCL SCA AREF GND ~11 ~10 13 RX TX ~9 8 7 ~6 ~5 4 ~3 DIGITAL (PWM~) 7-15V ON
 7-15V ON") .V V IOREF -V A POWER ANALOG IN A A A A A VIN ~ ~ SCL SDA AREF ISP ~ ON DIGITAL (PWM~) ~ ~ ~ SIK GUIDE SCL SCA AREF ~ ~ Your guide to the SparkFun Inventor s Kit for the SparkFun RedBoard ~ ~ ~ ~ DIGITAL
.V V IOREF -V A POWER ANALOG IN A A A A A VIN ~ ~ SCL SDA AREF ISP ~ ON DIGITAL (PWM~) ~ ~ ~ SIK GUIDE SCL SCA AREF ~ ~ Your guide to the SparkFun Inventor s Kit for the SparkFun RedBoard ~ ~ ~ ~ DIGITAL
Lesson4 Obstacle avoidance car
 Lesson4 Obstacle avoidance car 1 Points of this section The joy of learning, is not just know how to control your car, but also know how to protect your car. So, make you car far away from collision. Learning
Intelligent Systems Design in a Non Engineering Curriculum. Embedded Systems Without Major Hardware Engineering
 Intelligent Systems Design in a Non Engineering Curriculum Embedded Systems Without Major Hardware Engineering Emily A. Brand Dept. of Computer Science Loyola University Chicago eabrand@gmail.com William
4WD Mobile Platform SKU:ROB0022
 4WD Mobile Platform SKU:ROB0022 Contents [hide] 1 Function Introduction 1.1 STEP1: Assemble Robot 1.2 STEP2: Debug Motor 1.3 STEP3:Install Upper Plate 1.4 STEP4: Debug Ultrasonic Sensor and Servo 1.5 STEP5: