Disclaimer. Arduino Hands-On 2 CS5968 / ART4455 9/1/10. ! Many of these slides are mine. ! But, some are stolen from various places on the web
|
|
|
- Rose Caldwell
- 5 years ago
- Views:
Transcription

1 Arduino Hands-On 2 CS5968 / ART4455 Disclaimer! Many of these slides are mine! But, some are stolen from various places on the web! todbot.com Bionic Arduino and Spooky Arduino class notes from Tod E.Kurt! ladyada.net Arduino tutorials by Limor Fried 1
2 Getting Input (Digital) Switches Why do we need the pull down resistor? 2

3 Another Switch A Switch 3

4 Using a Switch Using digitalread() 4
5 digitalread(pin); // constants won't change. They're used here to set pin numbers: const int buttonpin = 2; // the number of the pushbutton pin const int ledpin = 13; // the number of the LED pin // variables hold values that will change: int buttonstate = 0; // variable for reading the pushbutton status void setup() { pinmode(ledpin, OUTPUT); // initialize the LED pin as an output: pinmode(buttonpin, INPUT); // initialize the pushbutton pin as an input: } void loop(){ buttonstate = digitalread(buttonpin); // read the state of the pushbutton value: } if (buttonstate == HIGH) { // buttonstate HIGH means pressed digitalwrite(ledpin, HIGH); } // turn LED on: else { digitalwrite(ledpin, LOW); }// turn LED off: } Moving on! Write a program that reads the value on an input pin! Use the button to change from blinking fast to blinking slow 5

6 Moving on 6


7 Make Your Own Switches 7
8 8
;! reads an analog pin! returns a digital value between 0-1023!")
9 Analog Input on Arduino! Our version uses ATMega328p! six ADC inputs (Analog to Digital Converter)! Voltage range is 0-5v! Resolution is 10 bits (digital values between )! In other words, 5/ mV is the smallest voltage change you can measure! analogread(pin);! reads an analog pin! returns a digital value between ! analog pins need no pinmode declaration 9
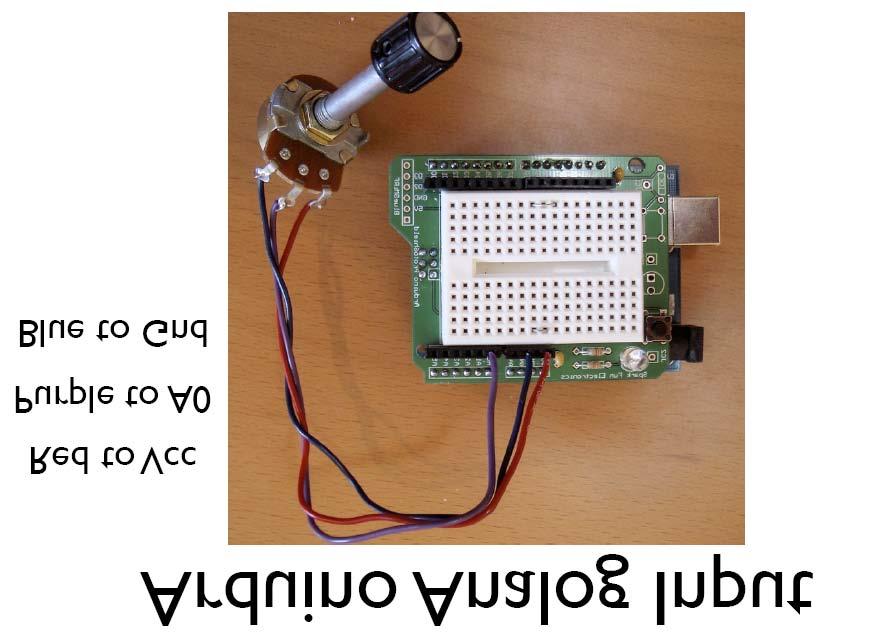
10 10
11 int sensorpin = 0; // select the input pin for the potentiometer int ledpin = 13; // select the pin for the LED int sensorvalue = 0; // variable to store the value coming from the sensor void setup() { pinmode(ledpin, OUTPUT); // declare the ledpin as an OUTPUT: // Note that you don t need to declare the Analog pin it s always input } void loop() { sensorvalue = analogread(sensorpin); // read the value from the sensor: digitalwrite(ledpin, HIGH); // turn the ledpin on delay(sensorvalue); // stop the program for <sensorvalue> milliseconds: digitalwrite(ledpin, LOW); // turn the ledpin off: delay(sensorvalue); // stop the program for for <sensorvalue> milliseconds: } Moving on! Write a program to read an analog value from a pot and use that value to control the brightness of an LED! Fade the LED by turning the pot! Useful function is map(value, fromlow, fromhigh, tolow, tohigh); y = map(x, 0, 1023, 50, 150);! Also remember analogwrite(pin,value);! PWM value from
12 potfade int potpin = 0; // the analog input pin from the pot int ledpin = 9; // pin for LED (a PWM pin) int val; // Variable to hold pot value void setup () { pinmode(ledpin, OUTPUT); pinmode(potpin, INPUT); } // declare ledpin as output // potpin is in input void loop() { val = analogread(potpin); //read the value from the pot val = map(val, 0, 1023, 100, 255); // map to reasonable values analogwrite(ledpin, val); } 12
13 13
14 14
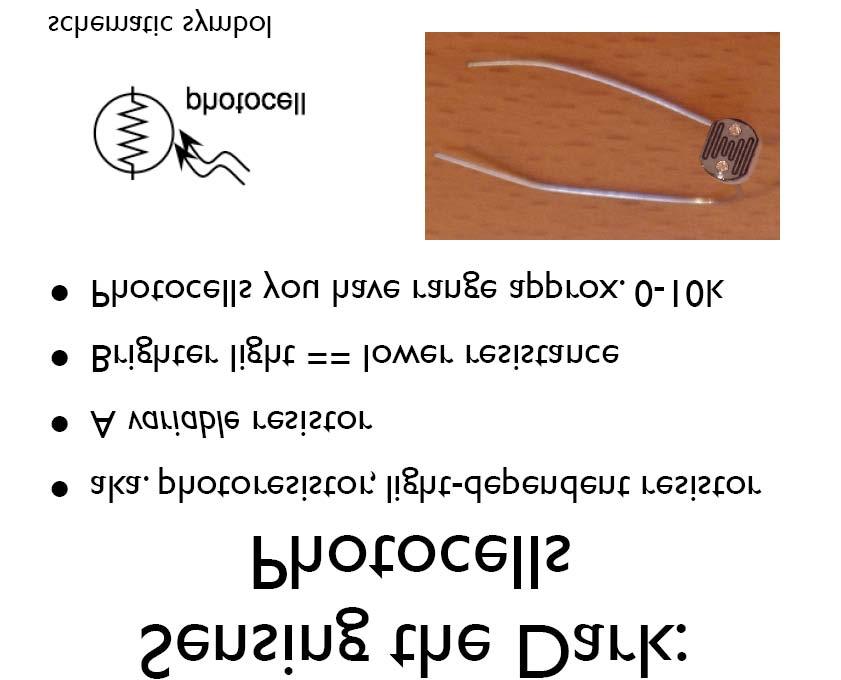
15 Moving on! Connect a photocell instead of a pot to your fading circuit! Do you get the same range of fade as with the pot?! Why or why not? 15
16 16
17 17
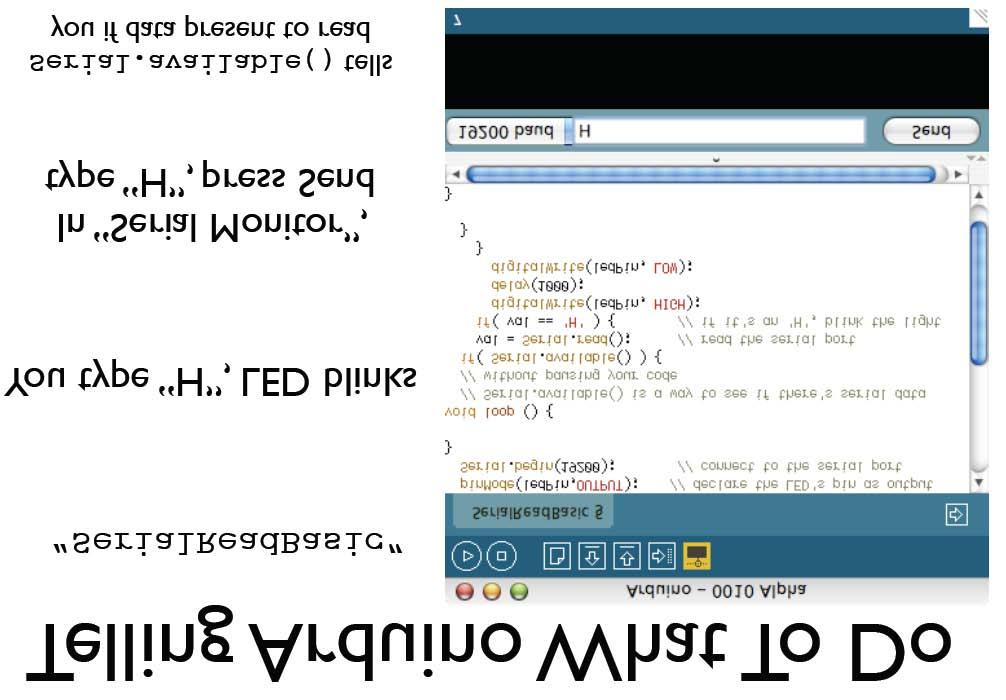
18 Serial from Arduino to PC! Serial.begin(baud-rate);! baud-rate is 300, 1200, 2400, 4800, 9600, 14400,19200, 28800, 57600, or ! Sets serial bit rate! Serial.print(arg);! sends arg to the serial output can be number or string! Serial.print(arg,format); // formats the arg! format can be BYTE, BIN, OCT, DEC, HEX! Serial.println(arg);! Same, but also prints a newline to the output Send data to PC void setup() { Serial.begin(9600); // init the serial port } void loop() { Serial.println("Hello World!"); // print to the screen! delay(500); // Wait so you don t print too fast } 18
19 Checking on Analog Inputs int sensorpin = 0; // select the input pin for the potentiometer int ledpin = 13; // select the pin for the LED int sensorvalue = 0; // variable to store the value coming from the sensor void setup() { pinmode(ledpin, OUTPUT); // declare the ledpin as an OUTPUT: Serial.begin(9600); // Init serial communication at 9600 baud } void loop() { sensorvalue = analogread(sensorpin); // read the value from the sensor: Serial.print( Sensor value is: ); // print a message Serial.println(sensorValue, DEC); // print the value you got delay(500); // wait so you don t print too much! } // VERY useful for getting a feel for the range of values coming in // map(value, inlow, inhigh, outlow, outhigh); Serial From PC to Arduino! Serial.available();! returns an int that tells you how many bytes remain in the input buffer! Serial.read();! returns the next byte waiting in the input buffer! Serial.flush();! clear the input buffer of any remaining bytes 19
; // opens serial port, sets data rate to 9600 bps } void loop() { // send data only when you receive data: if (Serial.")
20 Serial Read Example int incomingbyte = 0; // for incoming serial data void setup() { Serial.begin(9600); // opens serial port, sets data rate to 9600 bps } void loop() { // send data only when you receive data: if (Serial.available() > 0) { // read the incoming byte: incomingbyte = Serial.read(); } // say what you got: Serial.print("I received: "); Serial.println(incomingByte, DEC); } 20
21 21
22 22

23 23
24 24
25 25

26 ASCII codes Standard byte codes for characters Mysterious val = val 0 ; statement converts the byte that represents the character to a byte of that number For example, if the character is 3, the ASCII code is 51 The ASCII code for 0 is 48 So, = 3 This converts the character 3 into the number 3 26
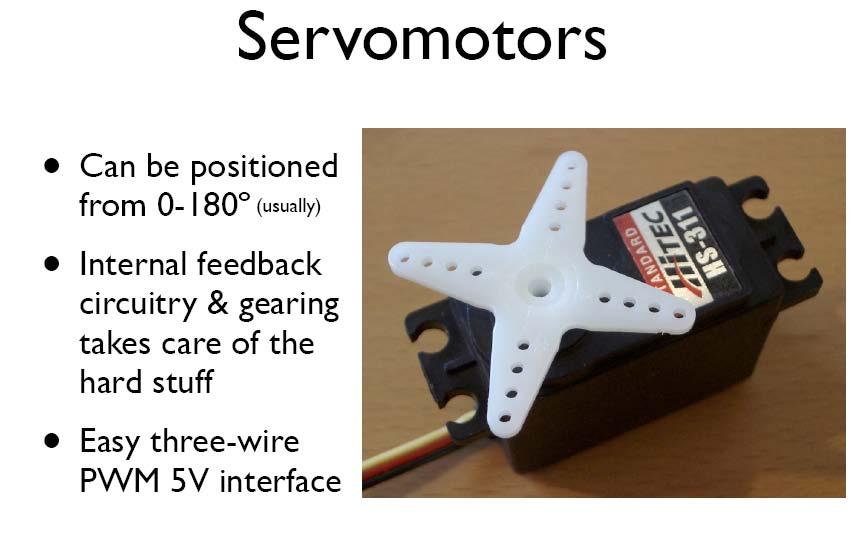
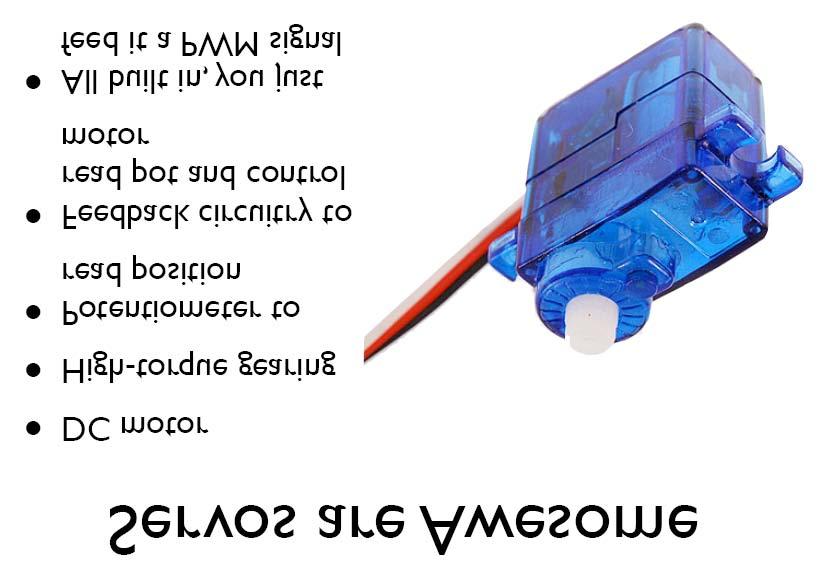
27 Moving on Servos! Servo motors are small DC motors that have a range of motion of 0-180º! Internal feedback and gearing to make it work! easy three-wire interface! position is controlled by PWM signals 27
28 28
29 29
30 Our servos are: weight: 9g, speed 0.12s/60deg at 4.8v, torque 17.5oz/in (1kg/cm) voltage range: v 30
31 31

32 32
33 Servo Example Program #include <Servo.h> // include the built-in servo library Servo myservo; // create a servo object to control the servo (one per servo) int pos = 0; // variable to store the servo position void setup() { myservo.attach(9); // attach servo control to pin 9 } void loop() { for (pos = 0; pos < 180; pos++) { // go from 0 to 180 degrees myservo.write(pos); // move the servo } delay(15);l // give it time to get there for (pos = 180; pos>=1; pos--) { // wave backwards myservo.write(pos); delay(15); } }! Servo is a class Servo Functions! Servo myservo; // creates an instance of that class! myservo.attach(pin);! attach to an output pin (doesn t need to be PWM pin!)! Servo library can control up to 12 servos on our boards! but a side effect is that it disables the PWM on pins 9 and 10! myservo.write(pos);! moves servo pos ranges from 0-180! myservo.read();! returns the current position of the servo (0-180) 33
34 Moving on! Write a program to control the position of the servo from a pot, or from a photocell! remember pot analogread(); values are from ! measure the range of values coming out of the photocell first?! use Serial.print(val); for example! use map(val, in1, in2, 0, 180); to map in1-in2 values to 0-180! Can also use constrain(val, 0, 180); Side Note - Power! Servos can consume a bit of power! We need to make sure that we don t draw so much power out of the Arduino that it fizzles! If you drive more than a couple servos, you probably should put the servo power pins on a separate power supply from the Arduino! Use a wall-wart 5v DC supply, for example 34


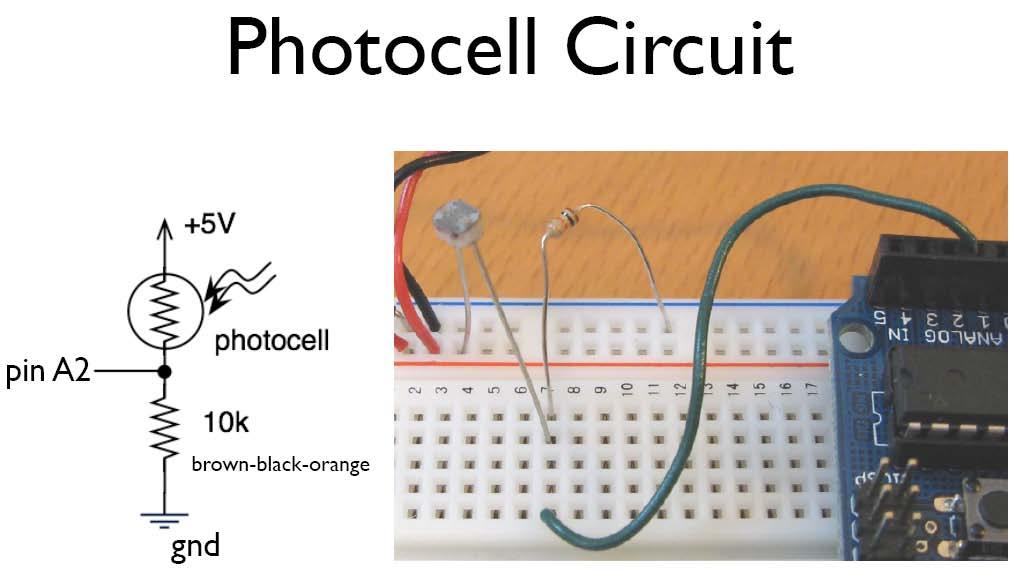
35 Servo/Light Assignment! Use a photocell on the input! put in series with 10k ohm resistor! use a servo on the output! connect to a PWM pin! make the servo do something in response to the amount of light falling on the photocell 35
36 Summary Whew!! LEDs use current limiting resistors (remember color code!)! drive from digitalwrite(pin,val); for on/off! drive from analogwrite(pin,val); for PWM dimming (values from 0-255)! buttons current limiting resistors again! active-high or active low (pullup or pulldown)! read with digitalread(pin);! potentiometers (pots) voltage dividers with a knob! use with analogread(pin); for values from Summary Whew!! photocells variable resistors! use with current-limiting resistors (to make voltage divider)! Serial communications read a byte, or write a value! communicate to the Arduino enviroment, or your own program! Servos use Servo library to control motion! might need external power supply! range of motion 0-180º! Also setup( ) and loop( ) functions, and various C programming ideas 36
37 ! DC Motors More Later! use transistors as switches for larger current loads! Stepper motors! Sort of like servos, but with continuous range of motion! Can also be more powerful! I2C serial bus! Various LED driver chips! other serially-controlled devices! Piezo buzzers! make some noise!! But you can also use them as input devices to sense movement! IR motion sensors! simple motion and also distance sensors! Accelerometers! Wii nunchucks, for example! Others? 37
Arduino Digital Out_QUICK RECAP
 Arduino Digital Out_QUICK RECAP BLINK File> Examples>Digital>Blink int ledpin = 13; // LED connected to digital pin 13 // The setup() method runs once, when the sketch starts void setup() // initialize
Lecture 6. Interfacing Digital and Analog Devices to Arduino. Intro to Arduino
 Lecture 6 Interfacing Digital and Analog Devices to Arduino. Intro to Arduino PWR IN USB (to Computer) RESET SCL\SDA (I2C Bus) POWER 5V / 3.3V / GND Analog INPUTS Digital I\O PWM(3, 5, 6, 9, 10, 11) Components
.:Twisting:..:Potentiometers:.
 CIRC-08.:Twisting:..:Potentiometers:. WHAT WE RE DOING: Along with the digital pins, the also has 6 pins which can be used for analog input. These inputs take a voltage (from 0 to 5 volts) and convert
Yihao Qian Team A: Aware Teammates: Amit Agarwal Harry Golash Menghan Zhang Zihao (Theo) Zhang ILR01 Oct.14, 2016
 Zhang ILR01 Oct.14, 2016") Yihao Qian Team A: Aware Teammates: Amit Agarwal Harry Golash Menghan Zhang Zihao (Theo) Zhang ILR01 Oct.14, 2016 Individual Progress For sensors and motors lab, I was in charge of the servo and force
Yihao Qian Team A: Aware Teammates: Amit Agarwal Harry Golash Menghan Zhang Zihao (Theo) Zhang ILR01 Oct.14, 2016 Individual Progress For sensors and motors lab, I was in charge of the servo and force
100UF CAPACITOR POTENTIOMETER SERVO MOTOR MOTOR ARM. MALE HEADER PIN (3 pins) INGREDIENTS
 INGREDIENTS") 05 POTENTIOMETER SERVO MOTOR MOTOR ARM 100UF CAPACITOR MALE HEADER PIN (3 pins) INGREDIENTS 63 MOOD CUE USE A SERVO MOTOR TO MAKE A MECHANICAL GAUGE TO POINT OUT WHAT SORT OF MOOD YOU RE IN THAT DAY Discover:
05 POTENTIOMETER SERVO MOTOR MOTOR ARM 100UF CAPACITOR MALE HEADER PIN (3 pins) INGREDIENTS 63 MOOD CUE USE A SERVO MOTOR TO MAKE A MECHANICAL GAUGE TO POINT OUT WHAT SORT OF MOOD YOU RE IN THAT DAY Discover:
Introduction to. An Open-Source Prototyping Platform. Hans-Petter Halvorsen
 Introduction to An Open-Source Prototyping Platform Hans-Petter Halvorsen Contents 1.Overview 2.Installation 3.Arduino Starter Kit 4.Arduino TinkerKit 5.Arduino Examples 6.LabVIEW Interface for Arduino
HAW-Arduino. Sensors and Arduino F. Schubert HAW - Arduino 1
 HAW-Arduino Sensors and Arduino 14.10.2010 F. Schubert HAW - Arduino 1 Content of the USB-Stick PDF-File of this script Arduino-software Source-codes Helpful links 14.10.2010 HAW - Arduino 2 Report for
Analog Feedback Servos
 Analog Feedback Servos Created by Bill Earl Last updated on 2018-01-21 07:07:32 PM UTC Guide Contents Guide Contents About Servos and Feedback What is a Servo? Open and Closed Loops Using Feedback Reading
1. Introduction to Analog I/O
 EduCake Analog I/O Intro 1. Introduction to Analog I/O In previous chapter, we introduced the 86Duino EduCake, talked about EduCake s I/O features and specification, the development IDE and multiple examples
Assignments from last week
 Assignments from last week Review LED flasher kits Review protoshields Need more soldering practice (see below)? http://www.allelectronics.com/make-a-store/category/305/kits/1.html http://www.mpja.com/departments.asp?dept=61
Coding with Arduino to operate the prosthetic arm
 Setup Board Install FTDI Drivers This is so that your RedBoard will be able to communicate with your computer. If you have Windows 8 or above you might already have the drivers. 1. Download the FTDI driver
Arduino. AS220 Workshop. Part II Interactive Design with advanced Transducers Lutz Hamel
 AS220 Workshop Part II Interactive Design with advanced Transducers Lutz Hamel hamel@cs.uri.edu www.cs.uri.edu/~hamel/as220 How we see the computer Image source: Considering the Body, Kate Hartman, 2008.
Computational Crafting with Arduino. Christopher Michaud Marist School ECEP Programs, Georgia Tech
 Computational Crafting with Arduino Christopher Michaud Marist School ECEP Programs, Georgia Tech Introduction What do you want to learn and do today? Goals with Arduino / Computational Crafting Purpose
Learning Objectives. References 10/26/11. Using servos with an Arduino. EAS 199A Fall 2011
 Using servos with an Arduino EAS 199A Fall 2011 Learning Objectives Be able to identify characteristics that distinguish a servo and a DC motor Be able to describe the difference a conventional servo and
ABCs of Arduino. Kurt Turchan -
 ABCs of Arduino Kurt Turchan - kurt@trailpeak.com Bio: Kurt is a web designer (java/php/ui-jquery), project manager, instructor (PHP/HTML/...), and arduino enthusiast, Kurt is founder of www.trailpeak.com
TWEAK THE ARDUINO LOGO
 TWEAK THE ARDUINO LOGO Using serial communication, you'll use your Arduino to control a program on your computer Discover : serial communication with a computer program, Processing Time : 45 minutes Level
Using Servos with an Arduino
 Using Servos with an Arduino ME 120 Mechanical and Materials Engineering Portland State University http://web.cecs.pdx.edu/~me120 Learning Objectives Be able to identify characteristics that distinguish
Arduino: Sensors for Fun and Non Profit
 Arduino: Sensors for Fun and Non Profit Slides and Programs: http://pamplin.com/dms/ Nicholas Webb DMS: @NickWebb 1 Arduino: Sensors for Fun and Non Profit Slides and Programs: http://pamplin.com/dms/
J. La Favre Using Arduino with Raspberry Pi February 7, 2018
 As you have already discovered, the Raspberry Pi is a very capable digital device. Nevertheless, it does have some weaknesses. For example, it does not produce a clean pulse width modulation output (unless
Mechatronics Engineering and Automation Faculty of Engineering, Ain Shams University MCT-151, Spring 2015 Lab-4: Electric Actuators
 Mechatronics Engineering and Automation Faculty of Engineering, Ain Shams University MCT-151, Spring 2015 Lab-4: Electric Actuators Ahmed Okasha, Assistant Lecturer okasha1st@gmail.com Objective Have a
Arduino Sensor Beginners Guide
 Arduino Sensor Beginners Guide So you want to learn arduino. Good for you. Arduino is an easy to use, cheap, versatile and powerful tool that can be used to make some very effective sensors. This guide
You'll create a lamp that turns a light on and off when you touch a piece of conductive material
 TOUCHY-FEELY LAMP You'll create a lamp that turns a light on and off when you touch a piece of conductive material Discover : installing third party libraries, creating a touch sensor Time : 5 minutes
LED + Servo 2 devices, 1 Arduino
 LED + Servo 2 devices, 1 Arduino Learn to connect and write code to control both a Servo and an LED at the same time. Many students who come through the lab ask if they can use both an LED and a Servo
RESET SIK GUIDE SCL SCA AREF GND ~11 ~10 13 RX TX ~9 8 7 ~6 ~5 4 ~3 DIGITAL (PWM~) 7-15V ON
 7-15V ON") .V V IOREF -V A POWER ANALOG IN A A A A A VIN ~ ~ SCL SDA AREF ISP ~ ON DIGITAL (PWM~) ~ ~ ~ SIK GUIDE SCL SCA AREF ~ ~ Your guide to the SparkFun Inventor s Kit for the SparkFun RedBoard ~ ~ ~ ~ DIGITAL
.V V IOREF -V A POWER ANALOG IN A A A A A VIN ~ ~ SCL SDA AREF ISP ~ ON DIGITAL (PWM~) ~ ~ ~ SIK GUIDE SCL SCA AREF ~ ~ Your guide to the SparkFun Inventor s Kit for the SparkFun RedBoard ~ ~ ~ ~ DIGITAL
Design with Microprocessors Year III Computer Science 1-st Semester
 Design with Microprocessors Year III Computer Science 1-st Semester Lecture 9: Microcontroller based applications: usage of sensors and actuators (motors) DC motor control Diligent MT motor/gearbox 1/19
Introduction to Mechatronics Programming a robot
 Introduction to Mechatronics Programming a robot Lecturer Filippo Sanfilippo Faculty of Aalesund University College, Norway @fisa Filippo Sanfilippo 1 Filippo Sanfilippo 2 Content of today s lecture! Programming
Lab 06: Ohm s Law and Servo Motor Control
 CS281: Computer Systems Lab 06: Ohm s Law and Servo Motor Control The main purpose of this lab is to build a servo motor control circuit. As with prior labs, there will be some exploratory sections designed
Basics before Migtrating to Arduino
 Basics before Migtrating to Arduino Who is this for? Written by Storming Robots Last update: Oct 11 th, 2013 This document is meant for preparing students who have already good amount of programming knowledge,
MICROCONTROLLERS BASIC INPUTS and OUTPUTS (I/O)
") PH-315 Portland State University MICROCONTROLLERS BASIC INPUTS and OUTPUTS (I/O) ABSTRACT A microcontroller is an integrated circuit containing a processor and programmable read-only memory, 1 which is
PH-315 Portland State University MICROCONTROLLERS BASIC INPUTS and OUTPUTS (I/O) ABSTRACT A microcontroller is an integrated circuit containing a processor and programmable read-only memory, 1 which is
INTRODUCTION to MICRO-CONTROLLERS
 PH-315 Portland State University INTRODUCTION to MICRO-CONTROLLERS Bret Comnes and A. La Rosa 1. ABSTRACT This laboratory session pursues getting familiar with the operation of microcontrollers, namely
PWM CONTROL USING ARDUINO. Learn to Control DC Motor Speed and LED Brightness
 PWM CONTROL USING ARDUINO Learn to Control DC Motor Speed and LED Brightness In this article we explain how to do PWM (Pulse Width Modulation) control using arduino. If you are new to electronics, we have
CONSTRUCTION GUIDE Capacitor, Transistor & Motorbike. Robobox. Level VII
 CONSTRUCTION GUIDE Capacitor, Transistor & Motorbike Robobox Level VII Capacitor, Transistor & Motorbike In this box, we will understand in more detail the operation of DC motors, transistors and capacitor.
Servo Sweep. Learn to make a regular Servo move in a sweeping motion.
 Servo Sweep Learn to make a regular Servo move in a sweeping motion. We have seen how to control a Servo and also how to make an LED Fade on and off. This activity will teach you how to make a regular
CPSC 226 Lab Four Spring 2018
 CPSC 226 Lab Four Spring 2018 Directions. This lab is a quick introduction to programming your Arduino to do some basic internal operations and arithmetic, perform character IO, read analog voltages, drive
Community College of Allegheny County Unit 7 Page #1. Analog to Digital
 Community College of Allegheny County Unit 7 Page #1 Analog to Digital "Engineers can't focus just on technology; they need to develop their professional skills-things like presenting yourself, speaking
INTRODUCTION to MICRO-CONTROLLERS
 PH-315 Portland State University INTRODUCTION to MICRO-CONTROLLERS Bret Comnes, Dan Lankow, and Andres La Rosa 1. ABSTRACT A microcontroller is an integrated circuit containing a processor and programmable
6Circuit Worksheets SIK BINDER //93
 6Circuit Worksheets SIK BINDER //93 Tier 1 Difficulty Circuit #1 Blink LED Ohm s Law: V = I * R I = V / R R = V / I How is this circuit, or a circuit like it, used in everyday life? Provide at least three
Rodni What will yours be?
 Rodni What will yours be? version 4 Welcome to Rodni, a modular animatronic animal of your own creation for learning how easy it is to enter the world of software programming and micro controllers. During
Experiment 1 Identification of Components and Breadboard Realization
 Experiment 1 Identification of Components and Breadboard Realization Aim: Introduction to the lab and identification of various components and realization using bread board. Hardware/Software Required:
Sidekick Basic Kit for Arduino V2 Introduction
 Sidekick Basic Kit for Arduino V2 Introduction The Arduino Sidekick Basic Kit is designed to be used with your Arduino / Seeeduino / Seeeduino ADK / Maple Lilypad or any MCU board. It contains everything
MICROCONTROLLERS BASIC INPUTS and OUTPUTS (I/O)
") PH-315 Portland State University MICROCONTROLLERS BASIC INPUTS and OUTPUTS (I/O) ABSTRACT A microcontroller is an integrated circuit containing a processor and programmable read-only memory, 1 which is
PH-315 Portland State University MICROCONTROLLERS BASIC INPUTS and OUTPUTS (I/O) ABSTRACT A microcontroller is an integrated circuit containing a processor and programmable read-only memory, 1 which is
Lab 5: Arduino Uno Microcontroller Innovation Fellows Program Bootcamp Prof. Steven S. Saliterman
 Lab 5: Arduino Uno Microcontroller Innovation Fellows Program Bootcamp Prof. Steven S. Saliterman Exercise 5-1: Familiarization with Lab Box Contents Objective: To review the items required for working
Arduino Advanced Projects
 Arduino Advanced Projects Created as a companion manual to the Toronto Public Library Arduino Kits. Arduino Advanced Projects Copyright 2017 Toronto Public Library. All rights reserved. Published by the
Programming a Servo. Servo. Red Wire. Black Wire. White Wire
 Programming a Servo Learn to connect wires and write code to program a Servo motor. If you have gone through the LED Circuit and LED Blink exercises, you are ready to move on to programming a Servo. A
Figure 1. Digilent DC Motor
 Laboratory 9 - Usage of DC- and servo-motors The current laboratory describes the usage of DC and servomotors 1. DC motors Figure 1. Digilent DC Motor Classical DC motors are converting electrical energy
Lecture 4: Basic Electronics. Lecture 4 Brief Introduction to Electronics and the Arduino
 Lecture 4: Basic Electronics Lecture 4 Page: 1 Brief Introduction to Electronics and the Arduino colintan@nus.edu.sg Lecture 4: Basic Electronics Page: 2 Objectives of this Lecture By the end of today
INTRODUCTION to MICRO-CONTROLLERS
 PH-315 Portland State University INTRODUCTION to MICRO-CONTROLLERS Bret Comnes, Dan Lankow, and Andres La Rosa 1. ABSTRACT A microcontroller is an integrated circuit containing a processor and programmable
URM37 Ultrasonik Mesafe Sensörü - Arduino - Raspberry Pi - LattePanda Uyumlu - DFRobot
 URM37 Ultrasonik Mesafe Sensörü - Arduino - Raspberry Pi - LattePanda Uyumlu - DFRobot URM37 V4.0 Ultrasonic Sensor Contents [ hide ] 1 Introduction 2 Specification 3 PinOut 4 Tutorial 4.1 Button for RS232/TTL
CONSTRUCTION GUIDE IR Alarm. Robobox. Level I
 CONSTRUCTION GUIDE Robobox Level I This month s montage is an that will allow you to detect any intruder. When a movement is detected, the alarm will turn its LEDs on and buzz to a personalized tune. 1X
Preface. If you have any problems for learning, please contact us at We will do our best to help you solve the problem.
 Preface Adeept is a technical service team of open source software and hardware. Dedicated to applying the Internet and the latest industrial technology in open source area, we strive to provide best hardware
Arduino Application: Speed control of small DC Motors
 Arduino Application: Speed control of small DC Motors ME 120 Mechanical and Materials Engineering Portland State University http://web.cecs.pdx.edu/~me120 Learning Objectives Be able to describe the use
Arduino Programming Part 3
 Arduino Programming Part 3 EAS 199A Fall 2011 Overview Part I Circuits and code to control the speed of a small DC motor. Use potentiometer for dynamic user input. Use PWM output from Arduino to control
INA169 Breakout Board Hookup Guide
 Page 1 of 10 INA169 Breakout Board Hookup Guide CONTRIBUTORS: SHAWNHYMEL Introduction Have a project where you want to measure the current draw? Need to carefully monitor low current through an LED? The
THE INPUTS ON THE ARDUINO READ VOLTAGE. ALL INPUTS NEED TO BE THOUGHT OF IN TERMS OF VOLTAGE DIFFERENTIALS.
 INPUT THE INPUTS ON THE ARDUINO READ VOLTAGE. ALL INPUTS NEED TO BE THOUGHT OF IN TERMS OF VOLTAGE DIFFERENTIALS. THE ANALOG INPUTS CONVERT VOLTAGE LEVELS TO A NUMERICAL VALUE. PULL-UP (OR DOWN) RESISTOR
.:Getting Started:..:(Blinking LED):.
:.") CIRC-01.:Getting Started:..:(Blinking LED):. WHAT WE RE DOING: LEDs (light emitting diodes) are used in all sorts of clever things which is why we have included them in this kit. We will start off with
CIRC-01.:Getting Started:..:(Blinking LED):. WHAT WE RE DOING: LEDs (light emitting diodes) are used in all sorts of clever things which is why we have included them in this kit. We will start off with
Attribution Thank you to Arduino and SparkFun for open source access to reference materials.
 Attribution Thank you to Arduino and SparkFun for open source access to reference materials. Contents Parts Reference... 1 Installing Arduino... 7 Unit 1: LEDs, Resistors, & Buttons... 7 1.1 Blink (Hello
Training Schedule. Robotic System Design using Arduino Platform
 Training Schedule Robotic System Design using Arduino Platform Session - 1 Embedded System Design Basics : Scope : To introduce Embedded Systems hardware design fundamentals to students. Processor Selection
Experiment 1: Robot Moves in 3ft squared makes sound and
 Experiment 1: Robot Moves in 3ft squared makes sound and turns on an LED at each turn then stop where it started. Edited: 9-7-2015 Purpose: Press a button, make a sound and wait 3 seconds before starting
Arduino and Servo Motor
 Arduino and Servo Motor 1. Basics of the Arduino Board and Arduino a. Arduino is a mini computer that can input and output data using the digital and analog pins b. Arduino Shield: mounts on top of Arduino
Setup Download the Arduino library (link) for Processing and the Lab 12 sketches (link).
 for Processing and the Lab 12 sketches (link).") Lab 12 Connecting Processing and Arduino Overview In the previous lab we have examined how to connect various sensors to the Arduino using Scratch. While Scratch enables us to make simple Arduino programs,
Lab 12 Connecting Processing and Arduino Overview In the previous lab we have examined how to connect various sensors to the Arduino using Scratch. While Scratch enables us to make simple Arduino programs,
Arduino Control of Tetrix Prizm Robotics. Motors and Servos Introduction to Robotics and Engineering Marist School
 Arduino Control of Tetrix Prizm Robotics Motors and Servos Introduction to Robotics and Engineering Marist School Motor or Servo? Motor Faster revolution but less Power Tetrix 12 Volt DC motors have a
CURIE Academy, Summer 2014 Lab 2: Computer Engineering Software Perspective Sign-Off Sheet
 Lab : Computer Engineering Software Perspective Sign-Off Sheet NAME: NAME: DATE: Sign-Off Milestone TA Initials Part 1.A Part 1.B Part.A Part.B Part.C Part 3.A Part 3.B Part 3.C Test Simple Addition Program
DFRduino Romeo All in one Controller V1.1(SKU:DFR0004)
") DFRduino Romeo All in one Controller V1.1(SKU:DFR0004) DFRduino RoMeo V1.1 Contents 1 Introduction 2 Specification 3 DFRduino RoMeo Pinout 4 Before you start 4.1 Applying Power 4.2 Software 5 Romeo Configuration
DFRduino Romeo All in one Controller V1.1(SKU:DFR0004) DFRduino RoMeo V1.1 Contents 1 Introduction 2 Specification 3 DFRduino RoMeo Pinout 4 Before you start 4.1 Applying Power 4.2 Software 5 Romeo Configuration
The µbotino Microcontroller Board
 The µbotino Microcontroller Board by Ro-Bot-X Designs Introduction. The µbotino Microcontroller Board is an Arduino compatible board for small robots. The 5x5cm (2x2 ) size and the built in 3 pin connectors
LEDs and Sensors Part 2: Analog to Digital
 LEDs and Sensors Part 2: Analog to Digital In the last lesson, we used switches to create input for the Arduino, and, via the microcontroller, the inputs controlled our LEDs when playing Simon. In this
arduino experimentation kit Arduino Experimenter s Kit SketchBoard Edition
 ARDX arduino experimentation kit Arduino Experimenter s Kit SketchBoard Edition ARDX Open-Source Arduino Instruction Guide Document Revision: Nov 18 2015 A Few Words ABOUT THIS KIT The overall goal of
Sten-Bot Robot Kit Stensat Group LLC, Copyright 2013
 Sten-Bot Robot Kit Stensat Group LLC, Copyright 2013 Legal Stuff Stensat Group LLC assumes no responsibility and/or liability for the use of the kit and documentation. There is a 90 day warranty for the
Photo Resistor PARTS: Wire Resistor. Photo Resistor LED. Resistor
 .V V CIRCUIT Circuit # Photo Resistor PIN LED (Light-Emitting Diode) Resistor ( ohm) (Orange-Orange-Brown) volt Photocell (Light Sensitive Resistor) PIN A RedBoard Resistor (K ohm) (Brown-Black-Orange)
02 Digital Input and Output
 week 02 Digital Input and Output RGB LEDs fade with PWM 1 Microcontrollers utput ransducers actuators (e.g., motors, buzzers) Arduino nput ransducers sensors (e.g., switches, levers, sliders, etc.) Illustration
Experimenter s Guide for Arduino
 ARDX experimentation kit for arduino Experimenter s Guide for Arduino (ARDX) A Few Words ABOUT THIS KIT The overall goal of this kit is fun. Beyond this, the aim is to get you comfortable using a wide
Application Note. Communication between arduino and IMU Software capturing the data
 Application Note Communication between arduino and IMU Software capturing the data ECE 480 Team 8 Chenli Yuan Presentation Prep Date: April 8, 2013 Executive Summary In summary, this application note is
Motors and Servos Part 2: DC Motors
 Motors and Servos Part 2: DC Motors Back to Motors After a brief excursion into serial communication last week, we are returning to DC motors this week. As you recall, we have already worked with servos
INTRODUCTION TO THE ARDUINO MICROCONTROLLER
 INTRODUCTION TO THE ARDUINO MICROCONTROLLER Hands-on Research in Complex Systems Shanghai Jiao Tong University June 17 29, 2012 Instructor: Thomas E. Murphy (University of Maryland) Assisted by: Hien Dao
Parts List. Robotic Arm segments ¼ inch screws Cable XBEE module or Wifi module
 Robotic Arm 1 Legal Stuff Stensat Group LLC assumes no responsibility and/or liability for the use of the kit and documentation. There is a 90 day warranty for the Sten-Bot kit against component defects.
CONSTRUCTION GUIDE Robotic Arm. Robobox. Level II
 CONSTRUCTION GUIDE Robotic Arm Robobox Level II Robotic Arm This month s robot is a robotic arm with two degrees of freedom that will teach you how to use motors. You will then be able to move the arm
FABO ACADEMY X ELECTRONIC DESIGN
 ELECTRONIC DESIGN MAKE A DEVICE WITH INPUT & OUTPUT The Shanghaino can be programmed to use many input and output devices (a motor, a light sensor, etc) uploading an instruction code (a program) to it
Spooky Projects. Class 3. Introduction to Microcontrollers with Arduino. 21 Oct machineproject - Tod E. Kurt
 Spooky Projects Introduction to Microcontrollers with Arduino Class 3 21 Oct 2006 - machineproject - Tod E. Kurt What s For Today Controlling Arduino from a computer Controlling a computer from Arduino
Operating Mode: Serial; (PWM) passive control mode; Autonomous Mode; On/OFF Mode
 passive control mode; Autonomous Mode; On/OFF Mode") RB-Dfr-11 DFRobot URM V3.2 Ultrasonic Sensor URM37 V3.2 Ultrasonic Sensor uses an industrial level AVR processor as the main processing unit. It comes with a temperature correction which is very unique
RB-Dfr-11 DFRobot URM V3.2 Ultrasonic Sensor URM37 V3.2 Ultrasonic Sensor uses an industrial level AVR processor as the main processing unit. It comes with a temperature correction which is very unique
HC-SR501 Passive Infrared (PIR) Motion Sensor
 Motion Sensor") Handson Technology User Guide HC-SR501 Passive Infrared (PIR) Motion Sensor This motion sensor module uses the LHI778 Passive Infrared Sensor and the BISS0001 IC to control how motion is detected. The
Handson Technology User Guide HC-SR501 Passive Infrared (PIR) Motion Sensor This motion sensor module uses the LHI778 Passive Infrared Sensor and the BISS0001 IC to control how motion is detected. The
Arduino Microcontroller Processing for Everyone!: Third Edition / Steven F. Barrett
 Arduino Microcontroller Processing for Everyone!: Third Edition / Steven F. Barrett Anatomy of a Program Programs written for a microcontroller have a fairly repeatable format. Slight variations exist
EE-110 Introduction to Engineering & Laboratory Experience Saeid Rahimi, Ph.D. Labs Introduction to Arduino
 EE-110 Introduction to Engineering & Laboratory Experience Saeid Rahimi, Ph.D. Labs 10-11 Introduction to Arduino In this lab we will introduce the idea of using a microcontroller as a tool for controlling
Industrial Automation Training Academy. Arduino, LabVIEW & PLC Training Programs Duration: 6 Months (180 ~ 240 Hours)
") nfi Industrial Automation Training Academy Presents Arduino, LabVIEW & PLC Training Programs Duration: 6 Months (180 ~ 240 Hours) For: Electronics & Communication Engineering Electrical Engineering Instrumentation
nfi Industrial Automation Training Academy Presents Arduino, LabVIEW & PLC Training Programs Duration: 6 Months (180 ~ 240 Hours) For: Electronics & Communication Engineering Electrical Engineering Instrumentation
URM37 V3.2 Ultrasonic Sensor (SKU:SEN0001)
") URM37 V3.2 Ultrasonic Sensor (SKU:SEN0001) From Robot Wiki Contents 1 Introduction 2 Specification 2.1 Compare with other ultrasonic sensor 3 Hardware requierments 4 Tools used 5 Software 6 Working Mode
URM37 V3.2 Ultrasonic Sensor (SKU:SEN0001) From Robot Wiki Contents 1 Introduction 2 Specification 2.1 Compare with other ultrasonic sensor 3 Hardware requierments 4 Tools used 5 Software 6 Working Mode
Robotic Arm Assembly Instructions
 Robotic Arm Assembly Instructions Last Revised: 11 January 2017 Part A: First follow the instructions: http://www.robotshop.com/media/files/zip2/rbmea-02_-_documentation_1.zip While assembling the servos:
Using Transistors and Driving Motors
 Chapter 4 Using Transistors and Driving Motors Parts You ll Need for This Chapter: Arduino Uno USB cable 9V battery 9V battery clip 5V L4940V5 linear regulator 22uF electrolytic capacitor.1uf electrolytic
SCHOOL OF TECHNOLOGY AND PUBLIC MANAGEMENT ENGINEERING TECHNOLOGY DEPARTMENT
 SCHOOL OF TECHNOLOGY AND PUBLIC MANAGEMENT ENGINEERING TECHNOLOGY DEPARTMENT Course ENGT 3260 Microcontrollers Summer III 2015 Instructor: Dr. Maged Mikhail Project Report Submitted By: Nicole Kirch 7/10/2015
ZIO Python API. Tutorial. 1.1, May 2009
 ZIO Python API Tutorial 1.1, May 2009 This work is licensed under the Creative Commons Attribution-Share Alike 2.5 India License. To view a copy of this license, visit http://creativecommons.org/licenses/by-sa/2.5/in/
Project 27 Joystick Servo Control
 Project 27 Joystick Servo Control For another simple project, let s use a joystick to control the two servos. You ll arrange the servos in such a way that you get a pan-tilt head, such as is used for CCTV
2.017 DESIGN OF ELECTROMECHANICAL ROBOTIC SYSTEMS Fall 2009 Lab 4: Motor Control. October 5, 2009 Dr. Harrison H. Chin
 2.017 DESIGN OF ELECTROMECHANICAL ROBOTIC SYSTEMS Fall 2009 Lab 4: Motor Control October 5, 2009 Dr. Harrison H. Chin Formal Labs 1. Microcontrollers Introduction to microcontrollers Arduino microcontroller
1. Controlling the DC Motors
 E11: Autonomous Vehicles Lab 5: Motors and Sensors By this point, you should have an assembled robot and Mudduino to power it. Let s get things moving! In this lab, you will write code to test your motors
Interfacing with Other Programming Environments _Processing, _MAXMSP, _PureData,
 + + + Interfacing with Other Programming Environments _Processing, http://processing.org/ _MAXMSP, http://cycling74.com/ _PureData, http://puredata.info/ Using the Firmata Library Firmata a generic protocol
Follow this and additional works at: Part of the Engineering Commons
 Trinity University Digital Commons @ Trinity Mechatronics Final Projects Engineering Science Department 5-2016 Heart Beat Monitor Ivan Mireles Trinity University, imireles@trinity.edu Sneha Pottian Trinity
Programming 2 Servos. Learn to connect and write code to control two servos.
 Programming 2 Servos Learn to connect and write code to control two servos. Many students who visit the lab and learn how to use a Servo want to use 2 Servos in their project rather than just 1. This lesson
Intelligent Systems Design in a Non Engineering Curriculum. Embedded Systems Without Major Hardware Engineering
 Intelligent Systems Design in a Non Engineering Curriculum Embedded Systems Without Major Hardware Engineering Emily A. Brand Dept. of Computer Science Loyola University Chicago eabrand@gmail.com William
4WD Mobile Platform SKU:ROB0022
 4WD Mobile Platform SKU:ROB0022 Contents [hide] 1 Function Introduction 1.1 STEP1: Assemble Robot 1.2 STEP2: Debug Motor 1.3 STEP3:Install Upper Plate 1.4 STEP4: Debug Ultrasonic Sensor and Servo 1.5 STEP5:
Drawbot DC Motor Servo Motor Creative Design 03 Interactive Digital Prototyping Junior Software Academy. 10 Drowbot 121 MIC
 + - + - 3.3v Gnd scl L293D MIC 1n4 03 10. 11. 12. 13. 14. Drawbot DC Motor Servo Motor Creative Design 03 Interactive Digital Prototyping 120 Junior Software Academy 10 Drowbot 121 WEEK 10 Drawbot LESSON
For this exercise, you will need a partner, an Arduino kit (in the plastic tub), and a laptop with the Arduino programming environment.
, and a laptop with the Arduino programming environment.") Physics 222 Name: Exercise 6: Mr. Blinky This exercise is designed to help you wire a simple circuit based on the Arduino microprocessor, which is a particular brand of microprocessor that also includes
Physics 222 Name: Exercise 6: Mr. Blinky This exercise is designed to help you wire a simple circuit based on the Arduino microprocessor, which is a particular brand of microprocessor that also includes
The Motor sketch. One Direction ON-OFF DC Motor
 One Direction ON-OFF DC Motor The DC motor in your Arduino kit is the most basic of electric motors and is used in all types of hobby electronics. When current is passed through, it spins continuously
Let's Code Blacksburg's Arduino Cookbook
 Let's Code Blacksburg's Arduino Cookbook Version 2016-07-11 By Monta Elkins, Eddie Sheffield and Thomas Weeks Let's Code Blacksburg 2016 Online PDF: https://github.com/letscodeblacksburg/arduino-recipes/blob/master/2016-07-11_lcbb_arduino_cookbook.pdf
NAMASKAR ROBOT-WHICH PROVIDES SERVICE
 Int. J. Elec&Electr.Eng&Telecoms. 2014 V Sai Krishna and R Sunitha, 2014 Research Paper ISSN 2319 2518 www.ijeetc.com Vol. 3, No. 1, January 2014 2014 IJEETC. All Rights Reserved NAMASKAR ROBOT-WHICH PROVIDES