Workshops Elisava Introduction to programming and electronics (Scratch & Arduino)
|
|
|
- Rafe Wells
- 5 years ago
- Views:
Transcription
1 Workshops Elisava 2011 Introduction to programming and electronics (Scratch & Arduino)

2 What is programming? Make an algorithm to do something in a specific language programming. Algorithm: a procedure or formula for solving a problem. Programming language: artificial language designed to communicate instructions to a machine. It also involves the process of designing, writing, testing, debugging, and maintaining the source code of a computer program.
3 What is Arduino? (I) It's an open source electronics prototyping platform: Open source: resources that can be used, redistributed or rewritten free of charge, often software or hardware. Electronics: technology which makes use of the controlled motion of electrons through different media. Prototyping: an original form that can serve as a basis or standard for other things. Platform: hardware architecture with software framework on which other software can run.
4 What is Arduino? (II) The Arduino board is like a small computer that can be programmed as many times as needed. As a computer, it provides I/O interaction, through digital (input and output) and analog input pins. Digital: discrete and finit, described in two states: 1/0, ON/OFF. Analog: continuous, can have infinite number of values. The sketch made with the Arduino IDE is loaded to the board and stored in the microcontroller. More info at:

5 Parts of Arduino board

6 What is Scratch? It's an open source and educational software focused mainly for children, designed by the Lifelong Kindergarten group at MIT, and implemented in Smalltalk (Squeak). The programming instructions are pieces that have to be stick each other in an order to form blocks and make a coherent program, just like a puzzle. More info and downloads at:
 has to be loaded to the board to work properly with S4A.")
7 What is S4A? Scratch for Arduino (S4A) is a modified version of Scratch ready for communication with Arduino boards. An Arduino sketch (S4AFirmware) has to be loaded to the board to work properly with S4A. Both the installer and firmware can be downloaded from our website:
8 Pin mapping in S4A: Digital read: digital pins 2 and 3. Digital write: digital pins 10, 11 and 13. Analog read: analog pins 0-5. Analog write: digital pins 5, 6 and 9. Servo control: digital pins 4, 7 (continuous rotation). 8 and 12 (standard).
: is the amount of flow through a conductive material, measured in Amperes or Amps (A).")
9 Basic electronics: Ohm's Law Electricity if the flow of energy (electrons) through a conductive material. Voltage (V): is the measure of electrical potential, measured in Volts (V). Current (I): is the amount of flow through a conductive material, measured in Amperes or Amps (A). Resistance (R): is the material's opposition to the flow of electric current, measured in Ohms (Ω).


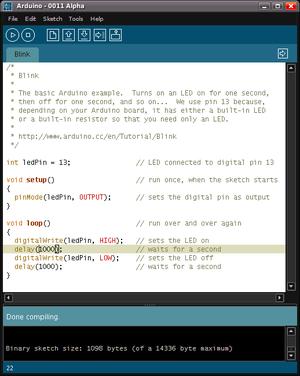
10 Sample program: Blink Comparison of a simple program that blinks a LED connected to pin 13 on Arduino and in S4A. We can appreciate the differences between the form and syntax of programming languages in both cases: Arduino S4A
11 Uploading a sketch (I) Download the Arduino IDE at: cc/en/main/software and extract it. Open an example: File > Examples > Basics > Blink. Select the board version at: Tools > Board and serial port where the board is connected on: Tools > Serial port. Click on upload button. Done!

12 Uploading a sketch (II)

13 Ex. 1: Button + LED In this exercise we will mount a LED controlled by a button. The objective is turn on the LED on whenever the button is pressed, and turn it off when not pressed. What we need: 1 x Arduino 1 x Protoboard 1 x Button 1 x LED 1 x 10 kω resistor
14 Ex. 1: Circuit scheme
15 Ex. 1: Why do we need a resistor? A pull-down resistor is needed because, without it, we can induce a dead short when the button is pushed down.

16 Ex. 2: LDR + LED Now we will replace the button by a LDR (Light Dependent Resistor). The objective is turn on the LED when the LDR is covered. What we need: 1 x Arduino 1 x Protoboard 1 x LDR 1 x LED 1 x 10 kω resistor

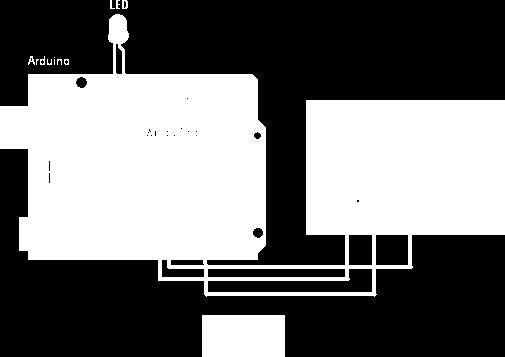
17 Ex. 2: Circuit scheme
 instead of the pin 13: What we need: 1 x Arduino 1 x Protoboard 1 x Potentiometer 1 x LED 1 x 220 Ω")
18 Ex. 3: Potentiometer + LED Now we're going to use a potentiometer instead of fotoresistor, with which we'll control the light of the LED gradually. This means that we need to use a PWM pin (for example 5) instead of the pin 13: What we need: 1 x Arduino 1 x Protoboard 1 x Potentiometer 1 x LED 1 x 220 Ω resistor

19 Ex. 3: What's a potentiometer? A potentiometer is a variable impedance device that provides an analog value. In our case, using an Arduino board, the range will be between 0 and Its resistance is controlled by turning its axis, as shown in the picture: NOTE: The value of the resistance rise or drop in one direction or the other depending on how you connect the power pins.
 is a technique used to simulate an analog output with a digital one, creating a square wave that constantly switches")
20 Ex. 3: What does PWM mean? The pulse width modulation (PWM) is a technique used to simulate an analog output with a digital one, creating a square wave that constantly switches between on and off. The time when the wave is 5V (ON) is called pulse width, which is modified to change the analogue value.

21 Ex. 3: Circuit scheme

22 Ex. 4: Semaphore In this exercise we'll try to simulate the operation of a traffic light, those which have a button to facilitate the passage of pedestrians. The goal is to simulate the behavior of these lights with a simple program. What we need: 1 x Arduino 1 x Protoboard 1 x Switch 2 x LEDs (red and green) 1 x LED RGB 4 x 220 Ω resistors 1 x 10k Ω resistor
23 Ex. 4: RGB LED The RGB LEDs provide a full spectrum of color (in contrast to normal ones, which give only one color), resulting in a light composed of three primary colors. Depending on the intensity of each color, we can get a lot of different shades. It is very important to know wich color controls each LED leg: Remember that we must use PWM outputs (5, 6 and 9) instead of digital (as in the previous exercise).

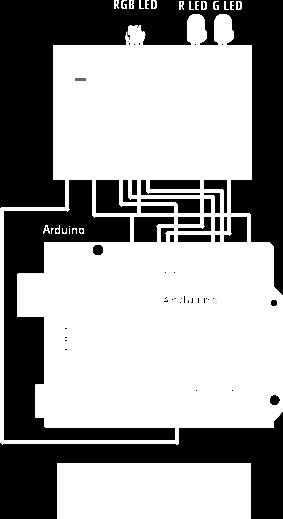
24 Ex. 4: Circuit scheme

25 Ex. 4: Video demonstration Here we can see a video demonstration of this exercise:
26 Ex. 5: RGB LED + Infrared sensor The goal of this exercise will be the interaction between objects, using messages or variable changes. We'll also see and use the lists for the first time, and the elements in programming as flags. To do so entertaining we will create a "virtual musical instrument." This will be the first time we program more than one object. The goal is to split the program into different objects and that each has a different function.

27 Ex. 5: Circuit scheme

28 Ex. 6: Pong with sensors Now we'll try to remake one of the first video game in history, the PONG: The goal is to use two sensors on the same board, and assign one to each player. In addition, we can incorporate a button to start the game, LEDs that light every time the players score a point, and so on...

29 Ex. 6: Circuit scheme
.")
30 Ex. 7: Robot with CR servos In this session we'll use servos for the first time. The first part of the exercise is to create a robot controlled by the computer keyboard (with the direction arrows, for example). The second is to make this robot autonomous, and capable to go alone and avoid objects with the help of sensors. What we need: 1 x Arduino 1 x Protoboard 2 x CR Servomotors (Futaba) 2 x Infrared sensors 1 x Chassis, wheels and ball 1 x LED (optional)
.")
31 Ex. 7: Circuit scheme 1 As shown in the diagram, each servo has 3 wires: one red (5V), one black (GND) and one yellow, which will be connected to the pin we want to use to send the order to the servomotor. For this we have pins 4 and 7. As you can see the assembly is quite simple, just need a common point on the board to connect the power of each servo (red and black wires). The diagram in next page includes a pair of infrared sensors and an LED to make it autonomous.

32 Ex. 7: Circuit scheme 2
FABO ACADEMY X ELECTRONIC DESIGN
 ELECTRONIC DESIGN MAKE A DEVICE WITH INPUT & OUTPUT The Shanghaino can be programmed to use many input and output devices (a motor, a light sensor, etc) uploading an instruction code (a program) to it
EE-110 Introduction to Engineering & Laboratory Experience Saeid Rahimi, Ph.D. Labs Introduction to Arduino
 EE-110 Introduction to Engineering & Laboratory Experience Saeid Rahimi, Ph.D. Labs 10-11 Introduction to Arduino In this lab we will introduce the idea of using a microcontroller as a tool for controlling
Attribution Thank you to Arduino and SparkFun for open source access to reference materials.
 Attribution Thank you to Arduino and SparkFun for open source access to reference materials. Contents Parts Reference... 1 Installing Arduino... 7 Unit 1: LEDs, Resistors, & Buttons... 7 1.1 Blink (Hello
Understanding the Arduino to LabVIEW Interface
 E-122 Design II Understanding the Arduino to LabVIEW Interface Overview The Arduino microcontroller introduced in Design I will be used as a LabVIEW data acquisition (DAQ) device/controller for Experiments
Objectives: Learn what an Arduino is and what it can do Learn what an LED is and how to use it Be able to wire and program an LED to blink
 Objectives: Learn what an Arduino is and what it can do Learn what an LED is and how to use it Be able to wire and program an LED to blink By the end of this session: You will know how to use an Arduino
Robotics & Embedded Systems (Summer Training Program) 4 Weeks/30 Days
 4 Weeks/30 Days") (Summer Training Program) 4 Weeks/30 Days PRESENTED BY RoboSpecies Technologies Pvt. Ltd. Office: D-66, First Floor, Sector- 07, Noida, UP Contact us: Email: stp@robospecies.com Website: www.robospecies.com
(Summer Training Program) 4 Weeks/30 Days PRESENTED BY RoboSpecies Technologies Pvt. Ltd. Office: D-66, First Floor, Sector- 07, Noida, UP Contact us: Email: stp@robospecies.com Website: www.robospecies.com
Embedded Systems & Robotics (Winter Training Program) 6 Weeks/45 Days
 6 Weeks/45 Days") Embedded Systems & Robotics (Winter Training Program) 6 Weeks/45 Days PRESENTED BY RoboSpecies Technologies Pvt. Ltd. Office: W-53G, Sector-11, Noida-201301, U.P. Contact us: Email: stp@robospecies.com
Embedded Systems & Robotics (Winter Training Program) 6 Weeks/45 Days PRESENTED BY RoboSpecies Technologies Pvt. Ltd. Office: W-53G, Sector-11, Noida-201301, U.P. Contact us: Email: stp@robospecies.com
introduction to Digital Electronics Install the Arduino IDE on your laptop if you haven t already!
 introduction to Digital Electronics Install the Arduino IDE 1.8.5 on your laptop if you haven t already! Electronics can add interactivity! Any sufficiently advanced technology is indistinguishable from
Computational Crafting with Arduino. Christopher Michaud Marist School ECEP Programs, Georgia Tech
 Computational Crafting with Arduino Christopher Michaud Marist School ECEP Programs, Georgia Tech Introduction What do you want to learn and do today? Goals with Arduino / Computational Crafting Purpose
Training Schedule. Robotic System Design using Arduino Platform
 Training Schedule Robotic System Design using Arduino Platform Session - 1 Embedded System Design Basics : Scope : To introduce Embedded Systems hardware design fundamentals to students. Processor Selection
HAW-Arduino. Sensors and Arduino F. Schubert HAW - Arduino 1
 HAW-Arduino Sensors and Arduino 14.10.2010 F. Schubert HAW - Arduino 1 Content of the USB-Stick PDF-File of this script Arduino-software Source-codes Helpful links 14.10.2010 HAW - Arduino 2 Report for
MAKEVMA502 BASIC DIY KIT WITH ATMEGA2560 FOR ARDUINO USER MANUAL
 BASIC DIY KIT WITH ATMEGA2560 FOR ARDUINO USER MANUAL USER MANUAL 1. Introduction To all residents of the European Union Important environmental information about this product This symbol on the device
Two Hour Robot. Lets build a Robot.
 Lets build a Robot. Our robot will use an ultrasonic sensor and servos to navigate it s way around a maze. We will be making 2 voltage circuits : A 5 Volt for our ultrasonic sensor, sound and lights powered
Lab 2: Blinkie Lab. Objectives. Materials. Theory
 Lab 2: Blinkie Lab Objectives This lab introduces the Arduino Uno as students will need to use the Arduino to control their final robot. Students will build a basic circuit on their prototyping board and
Setup Download the Arduino library (link) for Processing and the Lab 12 sketches (link).
 for Processing and the Lab 12 sketches (link).") Lab 12 Connecting Processing and Arduino Overview In the previous lab we have examined how to connect various sensors to the Arduino using Scratch. While Scratch enables us to make simple Arduino programs,
Lab 12 Connecting Processing and Arduino Overview In the previous lab we have examined how to connect various sensors to the Arduino using Scratch. While Scratch enables us to make simple Arduino programs,
ARDUINO / GENUINO. start as professional
 ARDUINO / GENUINO start as professional . ARDUINO / GENUINO start as professional short course in a book MOHAMMED HAYYAN ALSIBAI SULASTRI ABDUL MANAP Publisher Universiti Malaysia Pahang Kuantan 2017 Copyright
Arduino Workshop 01. AD32600 Physical Computing Prof. Fabian Winkler Fall 2014
 AD32600 Physical Computing Prof. Fabian Winkler Fall 2014 Arduino Workshop 01 This workshop provides an introductory overview of the Arduino board, basic electronic components and closes with a few basic
PCB & Circuit Designing (Summer Training Program) 6 Weeks/ 45 Days PRESENTED BY
 6 Weeks/ 45 Days PRESENTED BY") PCB & Circuit Designing (Summer Training Program) 6 Weeks/ 45 Days PRESENTED BY RoboSpecies Technologies Pvt. Ltd. Office: D-66, First Floor, Sector- 07, Noida, UP Contact us: Email: stp@robospecies.com
PCB & Circuit Designing (Summer Training Program) 6 Weeks/ 45 Days PRESENTED BY RoboSpecies Technologies Pvt. Ltd. Office: D-66, First Floor, Sector- 07, Noida, UP Contact us: Email: stp@robospecies.com
Programming a Servo. Servo. Red Wire. Black Wire. White Wire
 Programming a Servo Learn to connect wires and write code to program a Servo motor. If you have gone through the LED Circuit and LED Blink exercises, you are ready to move on to programming a Servo. A
Monitoring Temperature using LM35 and Arduino UNO
 Sharif University of Technology Microprocessor Arduino UNO Project Monitoring Temperature using LM35 and Arduino UNO Authors: Sadegh Saberian 92106226 Armin Vakil 92110419 Ainaz Hajimoradlou 92106142 Supervisor:
Coding with Arduino to operate the prosthetic arm
 Setup Board Install FTDI Drivers This is so that your RedBoard will be able to communicate with your computer. If you have Windows 8 or above you might already have the drivers. 1. Download the FTDI driver
OCR Electronics for A2 MOSFETs Variable resistors
 Resistance characteristic You are going to find out how the drain-source resistance R d of a MOSFET depends on its gate-source voltage V gs when the drain-source voltage V ds is very small. 1 Assemble
ARDUINO / GENUINO. start as professional. short course in a book. faculty of engineering technology
 ARDUINO / GENUINO start as professional short course in a book faculty of engineering technology Publisher Universiti Malaysia Pahang Kuantan 2017 Copyright Universiti Malaysia Pahang, 2017 First Published,
Arduino Setup & Flexing the ExBow
 Arduino Setup & Flexing the ExBow What is Arduino? Before we begin, We must first download the Arduino and Ardublock software. For our Set-up we will be using Arduino. Arduino is an electronics platform.
Saturday Academy Program
 Lesson Plans High School Courses Donald L. McCoy K-to-College STEM Education Consultant thempitman@gmail.com Last Update: October 17, 2018 Virtual Reality Coding using PlayCanvas RobotC Coding Applications
J. La Favre Using Arduino with Raspberry Pi February 7, 2018
 As you have already discovered, the Raspberry Pi is a very capable digital device. Nevertheless, it does have some weaknesses. For example, it does not produce a clean pulse width modulation output (unless
PCB & Circuit Designing
 (Summer Training Program) 4 Weeks/30 Days PRESENTED BY RoboSpecies Technologies Pvt. Ltd. Office: W-53G, Sector-11, Noida-201301, U.P. Contact us: Email: stp@robospecies.com Website: www.robospecies.com
CONSTRUCTION GUIDE Robotic Arm. Robobox. Level II
 CONSTRUCTION GUIDE Robotic Arm Robobox Level II Robotic Arm This month s robot is a robotic arm with two degrees of freedom that will teach you how to use motors. You will then be able to move the arm
UTILIZATION OF ROBOTICS AS CONTEMPORARY TECHNOLOGY AND AN EFFECTIVE TOOL IN TEACHING COMPUTER PROGRAMMING
 UTILIZATION OF ROBOTICS AS CONTEMPORARY TECHNOLOGY AND AN EFFECTIVE TOOL IN TEACHING COMPUTER PROGRAMMING Aaron R. Rababaah* 1, Ahmad A. Rabaa i 2 1 arababaah@auk.edu.kw 2 arabaai@auk.edu.kw Abstract Traditional
PCB & Circuit Designing (Summer Training Program 2014)
") (Summer Training Program 2014) PRESENTED BY In association with RoboSpecies Technologies Pvt. Ltd. Office: A-90, Lower Ground Floor, Sec- 4, Noida, UP Contact us: Email: stp@robospecies.com Website: www.robospecies.com
(Summer Training Program 2014) PRESENTED BY In association with RoboSpecies Technologies Pvt. Ltd. Office: A-90, Lower Ground Floor, Sec- 4, Noida, UP Contact us: Email: stp@robospecies.com Website: www.robospecies.com
Mechatronics Engineering and Automation Faculty of Engineering, Ain Shams University MCT-151, Spring 2015 Lab-4: Electric Actuators
 Mechatronics Engineering and Automation Faculty of Engineering, Ain Shams University MCT-151, Spring 2015 Lab-4: Electric Actuators Ahmed Okasha, Assistant Lecturer okasha1st@gmail.com Objective Have a
CURIE Academy, Summer 2014 Lab 2: Computer Engineering Software Perspective Sign-Off Sheet
 Lab : Computer Engineering Software Perspective Sign-Off Sheet NAME: NAME: DATE: Sign-Off Milestone TA Initials Part 1.A Part 1.B Part.A Part.B Part.C Part 3.A Part 3.B Part 3.C Test Simple Addition Program
Workshop 9: First steps in electronics
 King s Maths School Robotics Club Workshop 9: First steps in electronics 1 Getting Started Make sure you have everything you need to complete this lab: Arduino for power supply breadboard black, red and
Jaguar Motor Controller (Stellaris Brushed DC Motor Control Module with CAN)
") Jaguar Motor Controller (Stellaris Brushed DC Motor Control Module with CAN) 217-3367 Ordering Information Product Number Description 217-3367 Stellaris Brushed DC Motor Control Module with CAN (217-3367)
Jaguar Motor Controller (Stellaris Brushed DC Motor Control Module with CAN) 217-3367 Ordering Information Product Number Description 217-3367 Stellaris Brushed DC Motor Control Module with CAN (217-3367)
THE INPUTS ON THE ARDUINO READ VOLTAGE. ALL INPUTS NEED TO BE THOUGHT OF IN TERMS OF VOLTAGE DIFFERENTIALS.
 INPUT THE INPUTS ON THE ARDUINO READ VOLTAGE. ALL INPUTS NEED TO BE THOUGHT OF IN TERMS OF VOLTAGE DIFFERENTIALS. THE ANALOG INPUTS CONVERT VOLTAGE LEVELS TO A NUMERICAL VALUE. PULL-UP (OR DOWN) RESISTOR
Rodni What will yours be?
 Rodni What will yours be? version 4 Welcome to Rodni, a modular animatronic animal of your own creation for learning how easy it is to enter the world of software programming and micro controllers. During
Arduino Platform Capabilities in Multitasking. environment.
 7 th International Scientific Conference Technics and Informatics in Education Faculty of Technical Sciences, Čačak, Serbia, 25-27 th May 2018 Session 3: Engineering Education and Practice UDC: 004.42
Sensors and Sensing Motors, Encoders and Motor Control
 Sensors and Sensing Motors, Encoders and Motor Control Todor Stoyanov Mobile Robotics and Olfaction Lab Center for Applied Autonomous Sensor Systems Örebro University, Sweden todor.stoyanov@oru.se 13.11.2014
Veyron Servo Driver (24 Channel) (SKU:DRI0029)
 (SKU:DRI0029)") Veyron Servo Driver (24 Channel) (SKU:DRI0029) From Robot Wiki Contents 1 Introduction 2 Specifications 3 Pin Definitions 4 Install Driver o 4.1 Windows OS Driver 5 Relationship between Steering Angle
Veyron Servo Driver (24 Channel) (SKU:DRI0029) From Robot Wiki Contents 1 Introduction 2 Specifications 3 Pin Definitions 4 Install Driver o 4.1 Windows OS Driver 5 Relationship between Steering Angle
Quantizer step: volts Input Voltage [V]
![Quantizer step: volts Input Voltage [V]](/thumbs/96/126541381.jpg "Quantizer step: volts Input Voltage [V]") EE 101 Fall 2008 Date: Lab Section # Lab #8 Name: A/D Converter and ECEbot Power Abstract Partner: Autonomous robots need to have a means to sense the world around them. For example, the bumper switches
EE 101 Fall 2008 Date: Lab Section # Lab #8 Name: A/D Converter and ECEbot Power Abstract Partner: Autonomous robots need to have a means to sense the world around them. For example, the bumper switches
InnobotTM User s Manual
 InnobotTM User s Manual Document Rev. 2.0 Apr. 15, 2014 Trademark Innovati,, and BASIC Commander are registered trademarks of Innovati, Inc. InnoBASIC, cmdbus, Innobot and Explore Board are trademarks
Class #3: Experiment Signals, Instrumentation, and Basic Circuits
 Class #3: Experiment Signals, Instrumentation, and Basic Circuits Purpose: The objectives of this experiment are to gain some experience with the tools we use (i.e. the electronic test and measuring equipment
Exercise 5: PWM and Control Theory
 Exercise 5: PWM and Control Theory Overview In the previous sessions, we have seen how to use the input capture functionality of a microcontroller to capture external events. This functionality can also
DESCRIPTION DOCUMENT FOR WIFI SINGLE DIMMER ONE AMPERE BOARD HARDWARE REVISION 0.3
 DOCUMENT NAME: DESIGN DESCRIPTION, WIFI SINGLE DIMMER BOARD DESCRIPTION DOCUMENT FOR WIFI SINGLE DIMMER ONE AMPERE BOARD HARDWARE REVISION 0.3 Department Name Signature Date Author Reviewer Approver Revision
Building an autonomous light finder robot
 LinuxFocus article number 297 http://linuxfocus.org Building an autonomous light finder robot by Katja and Guido Socher About the authors: Katja is the
Programming 2 Servos. Learn to connect and write code to control two servos.
 Programming 2 Servos Learn to connect and write code to control two servos. Many students who visit the lab and learn how to use a Servo want to use 2 Servos in their project rather than just 1. This lesson
ZX Distance and Gesture Sensor Hookup Guide
 Page 1 of 13 ZX Distance and Gesture Sensor Hookup Guide Introduction The ZX Distance and Gesture Sensor is a collaboration product with XYZ Interactive. The very smart people at XYZ Interactive have created
PS2-SMC-06 Servo Motor Controller Interface
 PS2-SMC-06 Servo Motor Controller Interface PS2-SMC-06 Full Board Version PS2 (Playstation 2 Controller/ Dual Shock 2) Servo Motor Controller handles 6 servos. Connect 1 to 6 Servos to Servo Ports and
LED + Servo 2 devices, 1 Arduino
 LED + Servo 2 devices, 1 Arduino Learn to connect and write code to control both a Servo and an LED at the same time. Many students who come through the lab ask if they can use both an LED and a Servo
THE IMPORTANCE OF PLANNING AND DRAWING IN DESIGN
 PROGRAM OF STUDY ENGR.ROB Standard 1 Essential UNDERSTAND THE IMPORTANCE OF PLANNING AND DRAWING IN DESIGN The student will understand and implement the use of hand sketches and computer-aided drawing
Brushed DC Motor Control. Module with CAN (MDL-BDC24)
") Stellaris Brushed DC Motor Control Module with CAN (MDL-BDC24) Ordering Information Product No. MDL-BDC24 RDK-BDC24 Description Stellaris Brushed DC Motor Control Module with CAN (MDL-BDC24) for Single-Unit
Stellaris Brushed DC Motor Control Module with CAN (MDL-BDC24) Ordering Information Product No. MDL-BDC24 RDK-BDC24 Description Stellaris Brushed DC Motor Control Module with CAN (MDL-BDC24) for Single-Unit
MAE106 Laboratory Exercises Lab # 1 - Laboratory tools
 MAE106 Laboratory Exercises Lab # 1 - Laboratory tools University of California, Irvine Department of Mechanical and Aerospace Engineering Goals To learn how to use the oscilloscope, function generator,
Mechatronics Project Report
 Mechatronics Project Report Introduction Robotic fish are utilized in the Dynamic Systems Laboratory in order to study and model schooling in fish populations, with the goal of being able to manage aquatic
Objective of the lesson
 Arduino Lesson 5 1 Objective of the lesson Learn how to program an Arduino in S4A All of you will: Add an LED to an Arduino and get it to come on and blink Most of you will: Add an LED to an Arduino and
Programming PIC Microchips
 Programming PIC Microchips Fís Foghlaim Forbairt Programming the PIC microcontroller using Genie Programming Editor Workshop provided & facilitated by the PDST www.t4.ie Page 1 DC motor control: DC motors
Arduino An Introduction
 Arduino An Introduction Hardware and Programming Presented by Madu Suthanan, P. Eng., FEC. Volunteer, Former Chair (2013-14) PEO Scarborough Chapter 2 Arduino for Mechatronics 2017 This note is for those
Advanced Mechatronics 1 st Mini Project. Remote Control Car. Jose Antonio De Gracia Gómez, Amartya Barua March, 25 th 2014
 Advanced Mechatronics 1 st Mini Project Remote Control Car Jose Antonio De Gracia Gómez, Amartya Barua March, 25 th 2014 Remote Control Car Manual Control with the remote and direction buttons Automatic
02 Digital Input and Output
 week 02 Digital Input and Output RGB LEDs fade with PWM 1 Microcontrollers utput ransducers actuators (e.g., motors, buzzers) Arduino nput ransducers sensors (e.g., switches, levers, sliders, etc.) Illustration
For this exercise, you will need a partner, an Arduino kit (in the plastic tub), and a laptop with the Arduino programming environment.
, and a laptop with the Arduino programming environment.") Physics 222 Name: Exercise 6: Mr. Blinky This exercise is designed to help you wire a simple circuit based on the Arduino microprocessor, which is a particular brand of microprocessor that also includes
Physics 222 Name: Exercise 6: Mr. Blinky This exercise is designed to help you wire a simple circuit based on the Arduino microprocessor, which is a particular brand of microprocessor that also includes
DESCRIPTION DOCUMENT FOR WIFI / BT HEAVY DUTY RELAY BOARD HARDWARE REVISION 0.1
 DESCRIPTION DOCUMENT FOR WIFI / BT HEAVY DUTY RELAY BOARD HARDWARE REVISION 0.1 Department Name Signature Date Author Reviewer Approver Revision History Rev Description of Change A Initial Release Effective
Internet of Things Student STEM Project Jackson High School. Lesson 3: Arduino Solar Tracker
 Internet of Things Student STEM Project Jackson High School Lesson 3: Arduino Solar Tracker Lesson 3 Arduino Solar Tracker Time to complete Lesson 60-minute class period Learning objectives Students learn
LESSONS Lesson 1. Microcontrollers and SBCs. The Big Idea: Lesson 1: Microcontrollers and SBCs. Background: What, precisely, is computer science?
 LESSONS Lesson Lesson : Microcontrollers and SBCs Microcontrollers and SBCs The Big Idea: This book is about computer science. It is not about the Arduino, the C programming language, electronic components,
Microcontrollers and Interfacing
 Microcontrollers and Interfacing Week 07 digital input, debouncing, interrupts and concurrency College of Information Science and Engineering Ritsumeikan University 1 this week digital input push-button
Sensors and Sensing Motors, Encoders and Motor Control
 Sensors and Sensing Motors, Encoders and Motor Control Todor Stoyanov Mobile Robotics and Olfaction Lab Center for Applied Autonomous Sensor Systems Örebro University, Sweden todor.stoyanov@oru.se 05.11.2015
Internet of Things (Winter Training Program) 6 Weeks/45 Days
 6 Weeks/45 Days") (Winter Training Program) 6 Weeks/45 Days PRESENTED BY RoboSpecies Technologies Pvt. Ltd. Office: W-53g, Sec- 11, Noida, UP Contact us: Email: stp@robospecies.com Website: www.robospecies.com Office: +91-120-4245860
(Winter Training Program) 6 Weeks/45 Days PRESENTED BY RoboSpecies Technologies Pvt. Ltd. Office: W-53g, Sec- 11, Noida, UP Contact us: Email: stp@robospecies.com Website: www.robospecies.com Office: +91-120-4245860
User Interface Engineering FS 2013
 User Interface Engineering FS 2013 Input Fundamentals 23.09.2013 1 Last Week Brief Overview of HCI as a discipline History of the UI Product perspective Research perspective Overview of own research as
PLAN DE FORMACIÓN EN LENGUAS EXTRANJERAS IN-57 Technology for ESO: Contents and Strategies
 Lesson Plan: Traffic light with Arduino using code, S4A and Ardublock Course 3rd ESO Technology, Programming and Robotic David Lobo Martínez David Lobo Martínez 1 1. TOPIC Arduino is an open source hardware
Programmable Control Introduction
 Programmable Control Introduction By the end of this unit you should be able to: Give examples of where microcontrollers are used Recognise the symbols for different processes in a flowchart Construct
A servo is an electric motor that takes in a pulse width modulated signal that controls direction and speed. A servo has three leads:
 Project 4: Arduino Servos Part 1 Description: A servo is an electric motor that takes in a pulse width modulated signal that controls direction and speed. A servo has three leads: a. Red: Current b. Black:
1Getting Started SIK BINDER //3
 SIK BINDER //1 SIK BINDER //2 1Getting Started SIK BINDER //3 Sparkfun Inventor s Kit Teacher s Helper These worksheets and handouts are supplemental material intended to make the educator s job a little
Arduino STEAM Academy Arduino STEM Academy Art without Engineering is dreaming. Engineering without Art is calculating. - Steven K.
 Arduino STEAM Academy Arduino STEM Academy Art without Engineering is dreaming. Engineering without Art is calculating. - Steven K. Roberts Page 1 See Appendix A, for Licensing Attribution information
Inspiring Creative Fun Ysbrydoledig Creadigol Hwyl. S4A - Scratch for Arduino Workbook
 Inspiring Creative Fun Ysbrydoledig Creadigol Hwyl S4A - Scratch for Arduino Workbook 1) Robotics Draw a robot. Consider the following and annotate: What will it look like? What will it do? How will you
Industrial Automation Training Academy. Arduino, LabVIEW & PLC Training Programs Duration: 6 Months (180 ~ 240 Hours)
") nfi Industrial Automation Training Academy Presents Arduino, LabVIEW & PLC Training Programs Duration: 6 Months (180 ~ 240 Hours) For: Electronics & Communication Engineering Electrical Engineering Instrumentation
nfi Industrial Automation Training Academy Presents Arduino, LabVIEW & PLC Training Programs Duration: 6 Months (180 ~ 240 Hours) For: Electronics & Communication Engineering Electrical Engineering Instrumentation
FIRST Robotics Control System
 2018/2019 FIRST Robotics Control System Team 236 1 (click on a component to go to its slide) 2 The Robot Powered solely by 12V battery RoboRIO- is the computer on the robot Controlled by Java code on the
Built-in soft-start feature. Up-Slope and Down-Slope. Power-Up safe start feature. Motor will only start if pulse of 1.5ms is detected.
 Thank You for purchasing our TRI-Mode programmable DC Motor Controller. Our DC Motor Controller is the most flexible controller you will find. It is user-programmable and covers most applications. This
University of Florida Department of Electrical and Computer Engineering EEL 5666 Intelligent Machines Design Laboratory GetMAD Final Report
 Date: 12/8/2009 Student Name: Sarfaraz Suleman TA s: Thomas Vermeer Mike Pridgen Instuctors: Dr. A. Antonio Arroyo Dr. Eric M. Schwartz University of Florida Department of Electrical and Computer Engineering
Welcome to Arduino Day 2016
 Welcome to Arduino Day 2016 An Intro to Arduino From Zero to Hero in an Hour! Paul Court (aka @Courty) Welcome to the SLMS Arduino Day 2016 Arduino / Genuino?! What?? Part 1 Intro Quick Look at the Uno
Name: Resistors and Basic Resistive Circuits. Objective: To gain experience with data acquisition proto-boards physical resistors. Table of Contents:
 Objective: To gain experience with data acquisition proto-boards physical resistors Table of Contents: Name: Resistors and Basic Resistive Circuits Pre-Lab Assignment 1 Background 2 National Instruments
FINAL DESIGN REPORT. Dodge This! DODGERS: Cristobal Rivero Derek Fairbanks 4/21/2009
 FINAL DESIGN REPORT Dodge This! DODGERS: Cristobal Rivero Derek Fairbanks 4/21/2009 Abstract: Our project is to develop an automatic dodge ball game. It consists of an infrared video camera, computer,
Voltage Dividers a learn.sparkfun.com tutorial
 Voltage Dividers a learn.sparkfun.com tutorial Available online at: http://sfe.io/t44 Contents Introduction Ideal Voltage Divider Applications Extra Credit: Proof Resources and Going Further Introduction
Lesson 3: Arduino. Goals
 Introduction: This project introduces you to the wonderful world of Arduino and how to program physical devices. In this lesson you will learn how to write code and make an LED flash. Goals 1 - Get to
Introduction to Electronics and Breadboarding Circuits
 Introduction to Electronics and Breadboarding Circuits What we're going to learn today: What is an electronic circuit? What kind of power is needed for these projects? What are the fundamental principles
Total Hours Registration through Website or for further details please visit (Refer Upcoming Events Section)
") Total Hours 110-150 Registration Q R Code Registration through Website or for further details please visit http://www.rknec.edu/ (Refer Upcoming Events Section) Module 1: Basics of Microprocessor & Microcontroller
Total Hours 110-150 Registration Q R Code Registration through Website or for further details please visit http://www.rknec.edu/ (Refer Upcoming Events Section) Module 1: Basics of Microprocessor & Microcontroller
LDOR: Laser Directed Object Retrieving Robot. Final Report
 University of Florida Department of Electrical and Computer Engineering EEL 5666 Intelligent Machines Design Laboratory LDOR: Laser Directed Object Retrieving Robot Final Report 4/22/08 Mike Arms TA: Mike
TWEAK THE ARDUINO LOGO
 TWEAK THE ARDUINO LOGO Using serial communication, you'll use your Arduino to control a program on your computer Discover : serial communication with a computer program, Processing Time : 45 minutes Level
RC-WIFI CONTROLLER USER MANUAL
 RC-WIFI CONTROLLER USER MANUAL In the rapidly growing Internet of Things (IoT), applications from personal electronics to industrial machines and sensors are getting wirelessly connected to the Internet.
MICROCONTROLLERS BASIC INPUTS and OUTPUTS (I/O)
") PH-315 Portland State University MICROCONTROLLERS BASIC INPUTS and OUTPUTS (I/O) ABSTRACT A microcontroller is an integrated circuit containing a processor and programmable read-only memory, 1 which is
PH-315 Portland State University MICROCONTROLLERS BASIC INPUTS and OUTPUTS (I/O) ABSTRACT A microcontroller is an integrated circuit containing a processor and programmable read-only memory, 1 which is
DE1.3 Electronics 1. Tips on Team Projects
 DE1.3 Electronics 1 Tips on Team Projects To help you progress with the team project, I have prepared this documents to provide extra instructions that you should find helpful. 1. How can I drive TWO motors
LAB 1 AN EXAMPLE MECHATRONIC SYSTEM: THE FURBY
 LAB 1 AN EXAMPLE MECHATRONIC SYSTEM: THE FURBY Objectives Preparation Tools To see the inner workings of a commercial mechatronic system and to construct a simple manual motor speed controller and current
Lecture 4: Basic Electronics. Lecture 4 Brief Introduction to Electronics and the Arduino
 Lecture 4: Basic Electronics Lecture 4 Page: 1 Brief Introduction to Electronics and the Arduino colintan@nus.edu.sg Lecture 4: Basic Electronics Page: 2 Objectives of this Lecture By the end of today
UNIT 4 VOCABULARY SKILLS WORK FUNCTIONS QUIZ. A detailed explanation about Arduino. What is Arduino? Listening
 UNIT 4 VOCABULARY SKILLS WORK FUNCTIONS QUIZ 4.1 Lead-in activity Find the missing letters Reading A detailed explanation about Arduino. What is Arduino? Listening To acquire a basic knowledge about Arduino
Light Emitting Diode IV Characterization
 Light Emitting Diode IV Characterization In this lab you will build a basic current-voltage characterization tool and determine the IV response of a set of light emitting diodes (LEDs) of various wavelengths.
DC motor control using arduino
 DC motor control using arduino 1) Introduction: First we need to differentiate between DC motor and DC generator and where we can use it in this experiment. What is the main different between the DC-motor,
Piezo Kalimba. The initial objective of this project was to design and build an expressive handheld
 Brian M c Laughlin EMID Project 2 Report 7 May 2014 Piezo Kalimba Design Goals The initial objective of this project was to design and build an expressive handheld electronic instrument that is modelled
Electronics Design Laboratory Lecture #10. ECEN 2270 Electronics Design Laboratory
 Electronics Design Laboratory Lecture #10 Electronics Design Laboratory 1 Lessons from Experiment 4 Code debugging: use print statements and serial monitor window Circuit debugging: Re check operation
Prelab: Introduction and Greenhouse Construction
 Prelab: Introduction and Greenhouse Construction In this lab, you will create a PID control system that will regulate temperature and humidity of a greenhouse-like enclosure. You will learn the concepts
IMPLEMENTATION AND DESIGN OF TEMPERATURE CONTROLLER UTILIZING PC BASED DATA ACQUISITION SYSTEM
 www.elkjournals.com IMPLEMENTATION AND DESIGN OF TEMPERATURE CONTROLLER UTILIZING PC BASED DATA ACQUISITION SYSTEM Ravindra Mishra ABSTRACT Closed loop or Feedback control is a popular way to regulate
MOBILE ROBOT LOCALIZATION with POSITION CONTROL
 T.C. DOKUZ EYLÜL UNIVERSITY ENGINEERING FACULTY ELECTRICAL & ELECTRONICS ENGINEERING DEPARTMENT MOBILE ROBOT LOCALIZATION with POSITION CONTROL Project Report by Ayhan ŞAVKLIYILDIZ - 2011502093 Burcu YELİS
LEDs and Sensors Part 2: Analog to Digital
 LEDs and Sensors Part 2: Analog to Digital In the last lesson, we used switches to create input for the Arduino, and, via the microcontroller, the inputs controlled our LEDs when playing Simon. In this
Blue Point Engineering
 Blue Point Engineering Instruction I www.bpesolutions.com Pointing the Way to Solutions! Puppet - II+ Controller (BPE No. PCA-0001) Servo Position Adjustment EEPROM Digital Button Power 5 Vdc Playback