TM TM DOG HOUSE Age 9+
|
|
|
- Hubert Crawford
- 6 years ago
- Views:
Transcription


1 TM TM DOG HOUSE Age 9+
2 Safety First! Use eye protection, always! Use ear protection with loud power tools Stay with kids while they work! Follow tool manufacturers safety guidelines This project is recommended for ages 9+ Page 1
3 TOOLS Tape measure Pencil Speed square or rafter square Clamps Japanese-style handsaw Pencil Drill and bits Countersink bit Jig saw Straight edge Sander Miter box Sanding sponges Exterior wood glue Putty knife Paint cans (for weights) Paint rollers Paint trays Permanent marker Page 2
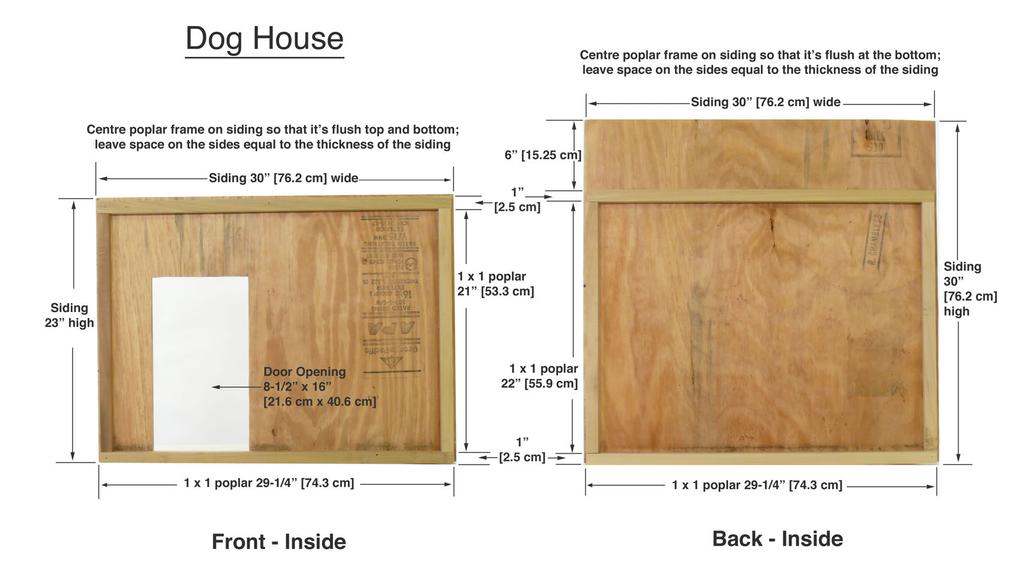
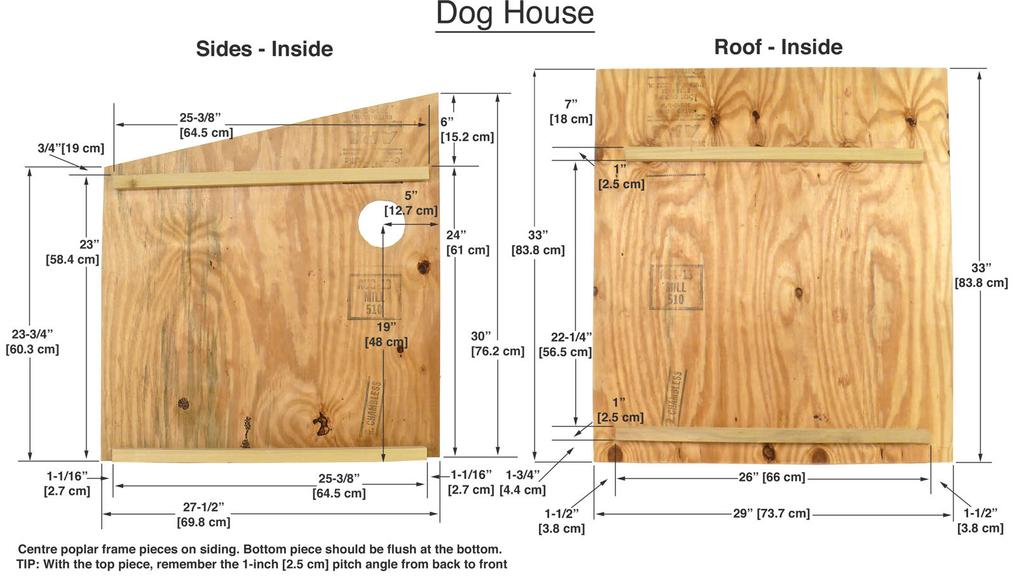
4 SUPPLIES Wood Siding Plytanium (T1-11) siding - two 11/32 thick x 4' wide x 8' long [.8 thick x 121 cm wide x 243 cm long] sheets of siding Cut list: Cut all siding so that the pattern of lines runs vertically Back: 30 wide x 30 high [76.2 cm x 76.2 cm] Front: 30 wide x 23 high [76.2 cm x 58.4 cm] Side pieces: (see shape detail on Pages 6 and 7) Be sure to lay out and cut left and right side pieces (so one isn t inside out!) Height at front edge is 23-¾ [60.3 cm] Height at back edge is 30 [76.2 cm] Length of side is 27-½ [69.8] If you want to add corner trim, you can cut spare pieces of siding into 1-½ [2.5 cm] strips. Use a short length of door trim to trim out the opening or use 2-½ [6.35 cm] wide strips of siding instead. Recommended Cedar Deck for the Dog House 2x4 [3.8 x 8.9 cm] cedar lumber (one 10-foot [304.8 cm] long board) 5/8 x5-¼ [1.6 x 13.3 cm] cedar fencing (seven 5-foot [152.4 cm] long boards Forty-two 1-¼ [3.2 cm] deck screws 1x1 Poplar for framing 1 x1 [2.5 cm x 2.5 cm] poplar - fourteen 3-foot [121 cm] boards Cut list: Back: Cut two pieces at 29-¼ [74.3 cm] Cut two pieces at 22 [55.9 cm] Front Cut two pieces at 21 [53.3 cm] Side pieces Cut four pieces at 25-3/8 [64.5 cm] Roof Cut two pieces 26 [66 cm] Screws Package of one-hundred 1-1/4 [3.2 cm] deck screws NOTE: We recommend Duel Drive PoziSquare Deck screws, which work well with either a Phillips or square-head driver bit, or the PoziSquare bit that s included in each package of PoziSquare screws. Other Materials Paint Brushes and small rollers Drop cloth Round decorative gate hardware Page 3

5 DOG HOUSE Page 4
6 Page 5
7 Page 6

8 Page 7


9 Overview: Elizabeth's dog house is constructed in a shed style that fits most medium-size dogs. It includes decorative ventilation and an optional deck. The roof is a sun deck and it s removable for cleaning, too! 1. Measure Start your doghouse by measuring and cutting the 1x1 poplar framing. You'll find our full cut list on Page 3 of these instructions. 2. Saw Cut the framing lumber using a Japanese style hand saw, which cuts on the pull stroke so it's really easy to use. A two-handed grip keeps fingers safe. 3. Clamp Clamp two boards to a flat table and use the speed square to square the corner first corner. Page 8


10 4. Mark Then mark where the screws will go. Stagger them slightly. 5. Drill Drill pilot holes remembering to pull the bit back out occasionally to allow it to shed sawdust that builds up in the flutes of the bit. 6. Countersink Use a countersink bit to carve a shallow hole for the head of each screw. This will prevent the wood from splitting when you drive the screw. 7. Fasten Drive 2-inch [5 cm] screws into the pilot holes using short pulses to help control the drill better. Page 9


11 8. Continue framing Keep drilling and screwing till you've completed the front and back frames. 9. Cut Next, use a jigsaw to cut sheets of exterior siding that will make the walls of the dog house. (Measurements on Page 3) TIP: Clamp a straight edge in position to help guide the jigsaw. 10. Keep cutting Continue cutting the rest of the siding. Once you get comfortable with using the jigsaw you'll be able to follow the line without using a straight-edge. Page 10


12 11. Sand Smooth the siding and remove slivers from the freshly cut edges using an electric sander. 12. Design Draw a door opening on the front wall that is approximately as tall as your dog's shoulders and as wide as your dog's chest. 13. Cut Cut the two vertical sides of the door with the jigsaw. TIP: To make the cut across the top of the door, drill a generous sized hole at the corner. This will allow you to insert the jigsaw blade to start the cut. Page 11


13 14. Saw Use a mitre box to cut the door trim with 45-degree angles at the corners. 15. Sand Use sandpaper or a sanding sponge to remove slivers from the freshly cut trim pieces. 16. Apply glue Squeeze a bead of exterior wood glue around the edge of the door opening and on the backs of the trim pieces. TIP: Use a putty knife to spread the glue evenly before putting the trim pieces in place. Page 12
 to help the trim pieces adhere properly.")

 19.")

14 17. Add weight After you press each trim piece into position, place some heavy objects (paint cans or books work well) to help the trim pieces adhere properly. Allow the glue to set for 20 minutes. 18. Trace To give the dog house extra ventilation, add decorative fence hardware from Lowe s. Start by tracing the provided template onto one of the side walls of the dog house. (See page 6) 19. Drill Drill a generous-sized hole anywhere on the circle to give you an place to insert the jig saw blade. 20. Cut Insert the jigsaw blade in the drilled hole and proceed to cut out the circle. Go really slowly and keep pivoting the blade to stay on the marked line. Repeat on opposite side panel for a second vent. Page 13

![fastening the siding to the poplar frame with 1-1/4-inch [3 cm] screws. 22.](/docs-images/75/72170685/images/15-1.jpg "Inspect After completing the back wall according to the diagrams on page 5 &")


15 21. Fasten Time to attach the doghouse walls to the frame. Lay the back wall down on its frame and drill countersunk pilot holes before fastening the siding to the poplar frame with 1-1/4-inch [3 cm] screws. 22. Inspect After completing the back wall according to the diagrams on page 5 & 7, move on to assembling the front wall. 23. Fasten Just like the back wall, use short screws to fasten the front wall, side walls and roof to their frames. (see pages 5, 6 & 7). 24. Paint Roll on a nice coat of exterior-grade paint to fancy up your dog house. Be sure to cover the edges and the inside too if desired. Page 14


16 25. Assemble Now it's time to start final assembly! 26. Fasten Pre-drill, counter sink and fasten 1-¼ [3 cm] screws along the sides on each corner of the dog house. The side walls are designed to fit inside the front and back walls. Follow the guidelines on page Install Install the decorative gate hardware in the side vent holes on both sides. (Simply screw the interlocking plates together.) 28. Add optional trim If you want to trim out the dog house, cut some additional strips of siding 1-½ [3.8 cm] wide and fasten them, making sure to drive the screws through the siding and the poplar framing behind the siding. Page 15


17 29. Install Install the removable roof. 30. ADD DOG! 31. Optional Recommended Extra: Dog Deck To keep cold and damp away from your dog, we recommend building a simple deck for the dog house to sit on. 32. Saw Start by cutting three pieces of 2x4 lumber to 37-inches [94 cm]. Page 16

18 DECK FOR DOG HOUSE Page 17


19 33. Layout Position the fencing boards on top of the three evenly-spaced 2x4s. Leave a small space between the boards for drainage. 34. Mark Place a spare board across the deck over each of the three 2x4s in turn, adding dots for where you'll drive screws to secure the boards. 35. Drill Drill pilot holes on each of the marks. Don't forget to make countersink holes to hold the heads of the screws (this will help prevent the wood from splitting in the future). 36. Fasten Now drive short (1-1/4-inch [3 cm]) screws into the pilot holes. Page 18


20 37. Trim Trim the ends of the boards even and sand the corners on the fresh cut. Now add DOG HOUSE and DOG! Page 19
21 Page 20
 have made every effort to be complete and accurate in the instructions and other content contained in this publication.")
22 DISCLAIMER Almost any do-it-yourself project involves risk of some sort. Your tools, materials, and skill will vary, as will the conditions of your project site. Lowe s Companies Inc., and its subsidiaries ("Lowe s") have made every effort to be complete and accurate in the instructions and other content contained in this publication. However, neither Lowe s nor the publisher will assume any responsibility or liability for damages or losses sustained or incurred in the course of your home improvement or repair project or in the course of your use of the item you create or repair. Always follow the manufacturer s operating instructions in the use of tools, check and follow your local building codes, and observe all standard safety precautions. Prices and supply may vary, so check the cost of materials and labour in your area before beginning any home improvement project. We strive to be accurate, but unintentional errors may occur and we reserve the right to correct any error. See a Lowe s store for information regarding product warranties and any available protection plans. All prices, products and promotions are limited to Canada locations only. This Family Fun video is for informational purposes only. Lowe s assumes no responsibility for the accuracy of the information contained herein and disclaims any liability for omissions, errors or the outcome of any project. Lowe s assumes no responsibility or liability for damages, losses, or injuries sustained in the course of your project or in the course of your use of any item you repair or create. Always follow the manufacturer s operating instructions in the use of tools, and take proper safety precautions when taking on any project. It is your responsibility to ensure that participants engage in age-appropriate activities and that children are appropriately supervised. If there is any question or doubt with regard to any element of a project, please consult with a licensed professional. No part of this video may be reproduced in any form or by any means without prior written permission of Lowe s. Lowe s, the gable design, and Lowe s Family Fun Projects and Learning Through Building are trademarks of LF, LLC. All rights reserved. Page 21
Safety First! Use eye protection, always! Use ear protection with loud power tools. Stay with children while they work!
 TM BIRD FEEDER TM Safety First! Use eye protection, always! Use ear protection with loud power tools Stay with children while they work! Follow tool manufacturers safety guidelines Page 1 TOOLS Safety
TM TM TM TM BOOK SLING
 TM TM TM TM BOOK SLING BOOK SLING Page 1 Safety First! Use eye protection, always! Use ear protection with loud power tools Stay with children while they work! Follow tool manufacturers safety guidelines
Safety First! Use eye protection, always! Use ear protection with loud power tools. Stay with children while they work!
 TM TM WORK BENCH Safety First! Use eye protection, always! Use ear protection with loud power tools Stay with children while they work! Follow tool manufacturers safety guidelines Page 1 TOOLS Handsaw
Safety First! Use eye protection, always! Use ear protection with loud power tools. Stay with children while they work!
 TM TM ART TABLE Safety First! Use eye protection, always! Use ear protection with loud power tools Stay with children while they work! Follow tool manufacturers safety guidelines Page 1 ART TABLE Page
TM TM MESSAGE CENTRE
 TM TM MESSAGE CENTRE Safety First! Use eye protection, always! Use ear protection with loud power tools Stay with children while they work! Follow tool manufacturers safety guidelines Page 1 TOOLS Drill
GROWTH CHART. Page 2
 TM TM GROWTH CHART GROWTH CHART Page 2 Safety First! Use eye protection, always! Use ear protection with loud power tools Stay with children while they work! Follow tool manufacturers safety guidelines
Safety First! Use eye protection, always! Use ear protection with loud power tools. Stay with children while they work!
 TM TM CAMP STOOLS Safety First! Use eye protection, always! Use ear protection with loud power tools Stay with children while they work! Follow tool manufacturers safety guidelines Page 1 TOOLS Handsaw
Copyright 2010 Springbok Publishing All Rights Reserved- Page 1
 Copyright 2010 Springbok Publishing All Rights Reserved- www.woodensaddlerackplans.com Page 1 Legal Information All contents copyright 2010 by Springbok Publishing. All rights reserved. No part of this
PROJECT PLANS WOODEN GIFT BOX
 PROJECT PLANS WOODEN GIFT BOX Make the gifts you give even more special by presenting them in this one-of-a-kind gift box. In fact, the box may be valued more than whatever it contains. The box is sized
Free Doghouse Plans Page 1 of 2
 Free Doghouse Plans Page 1 of 2 This doghouse is designed with the beginner in mind. It might even be a good project to involve the kids. The entire project requires only one sheet of plywood, two 2"x4"s
woodworkersjournal.com MATERIAL LIST
 MATERIAL LIST T x W x L 1 Legs (2) 1 1 2" x 3 1 2" x 36 7 16" 2 End Uprights (2) 1 1 2" x 3 1 2" x 32 1 2" 3 Stringers (4) 1 1 2" x 3 1 2" x 42" 4 Top Cladding, Long (2) 3/4" x 7 1 4" x 65 3 4" 5 Side
Good In Shed. So Hutch for So Little! A perky shed to conceal homely garbage cans and frustrate furry scavengers.
 Good In Shed So Hutch for So Little! A perky shed to conceal homely garbage cans and frustrate furry scavengers. Materials: Tools 2x4 pressure treated or cedar 5-8' pieces 1/2" Exterior grade plywood 1-4x8
Tools: Drill/Driver Kreg Jig Miter Saw Jigsaw Circular Saw Adjustable Square Tape Measure Veneer Trimmer Sandpaper and Sander
 R PROJECT PLANS DROP-FRONT DESK Create a workspace almost anywhere with this drop-front desk. Mounted to a wall, it doesn t take up any floor space, which means you can hang it wherever you need to work.
PROJECT PLANS PATIO PLANTER BOX
 PROJECT PLNS PTIO PLNTER BOX This great-looking planter makes the perfect place for your favorite plants and flowers. It s sized to hold an 18" round plastic pot, which you can pick up in any garden center.
How-to-Install. Laminate Countertops and Sheet Laminate. FREE brochure Reverso en español
 FREE brochure Reverso en español How-to-Install Laminate Countertops and Easy to install instructions provided inside Multiple colors available for unique design options Durable and easy to care for Accessory
Balustrade Systems / Installation Instructions
 A. PARTS AND SUPPLIES NEEDED FOR INSTALLATION Hardware included for each 10 section of rail: 2 3 x 1-1/2 L-brackets 4 1-3/4 x 3/16 Blue hex-head screws for anchoring the L-brackets to the newel cap, column
176 S. New Holland Road Gordonville, PA Tel: Fax: Playhouse Loft
 176 S. New Holland Road Gordonville, PA 17529 Tel: 717-768-0066 Fax: 717-768-8569 A S S E M B LY M A N U A L Playhouse Loft Playhouse Loft revised 9/6/05 Assembly Manual Dear Customer, Thank you for your
DeckRail A Product of DeckRite LLC 3912 East Progress North Little Rock, AR Phone: (501) Fax: (501)
 Fax: (501)") Disclaimer: Deck Rail Glass Railing Installation Guide This guide is not intended to replace a trained professional installer. The drawings and instructions contained within are for demonstration purposes
Disclaimer: Deck Rail Glass Railing Installation Guide This guide is not intended to replace a trained professional installer. The drawings and instructions contained within are for demonstration purposes
MAGNUM BOARD INTERIOR INSTALLATION GUIDELINES
 TECHNICAL BULLETIN No.: 090509-1405 Subject: Issue Date: September 4, 2009 Issue No.: II MAGNUM BOARD INTERIOR INSTALLATION GUIDELINES 1. CUTTING MAGNUM BOARD You can easily cut Magnum Board with carbide
Project Plans Kreg Tool Company / BuildSomething. All Rights Reserved.
 BY Project Plans HARDWARE ORGANIZER How easy is it top keep screws, hardware, and other small items organized instead of in the way? Just cut six identically sized pieces of plywood, add a 1x2 cleat, and
MyOutdoorPlans.com. By Julian King [2X4 GARDEN BENCH]
![MyOutdoorPlans.com. By Julian King [2X4 GARDEN BENCH]](/thumbs/75/72876801.jpg "MyOutdoorPlans.com. By Julian King [2X4 GARDEN BENCH]") MyOutdoorPlans.com By Julian King [2X4 GARDEN BENCH] CUT LIST A 2 pieces of 2 4 lumber 24 long, 2 pieces 32 1/2 long LEGS B 2 pieces of 2 4 lumber 45 long, 2 pieces 15 1/2 long, 1 piece 12 1/2 long SEAT
MyOutdoorPlans.com By Julian King [2X4 GARDEN BENCH] CUT LIST A 2 pieces of 2 4 lumber 24 long, 2 pieces 32 1/2 long LEGS B 2 pieces of 2 4 lumber 45 long, 2 pieces 15 1/2 long, 1 piece 12 1/2 long SEAT
U. M. ARMY Texas Conference. Wheel Chair Ramp Manual
 U. M. ARMY Texas Conference Wheel Chair Ramp Manual June 2014 U. M. ARMY Texas Conference Building & Repair Tips Wheelchair Ramps Complete a site survey to determine the design and layout of the ramp.
How to Mitre Mouldings
 How to Mitre Mouldings About Window and Door Mouldings Mitre cuts are a basic operation in most moulding installation. Mitre cuts are typically 45 degree angles, however many installations require minor
PROJECT PLANS ROLLING LAUNDRY SORTER
 R PROJECT PLANS ROLLING LAUNDRY SORTER Sorting laundry certainly doesn t rank high on anyone s list. So, anything that makes this task easier is welcome. If that functionality can be mixed with a bit of
1 ¼-inch Pocket Screws Brad Nailer or Hammer 1 ¼-inch Brad Nails Clamps
 MATERIALS: TOOLS: (4) 2 x 6 x 8 Ft. Boards Tape Measure (2) 2 x 4 x 8 Ft. Boards Carpenter s Square (7) 1 x 4 x 8 Ft. Boards Pencil (2) 1 x 3 x 8 Ft. Boards Drill (1) Half Sheet of ¾-inch Thick Plywood
DIY CHILD S STOOL. Instructions
 DIY CHILD S STOOL Children have their own special world. And having the right furniture is part of that world. We have designed an easy-to-assemble child's stool that you can paint in a selection of bright
Project Plans Kreg Tool Company/BuildSomething. All Rights Reserved.
 BY Project Plans ONE-OF-A-KIND CUTTING BOARD This solid-maple cutting board offers ample space for cutting and a comfortable handle, but the most-unique feature lies underneath. A cutout in the lower layer
ARTS AND CRAFTS CHAIR
 ARTS AND CRAFTS CHAIR 491 MATERIALS LIST--DINING CHAIR Key No. Size and description (use) A 2 1-3/4 x 1-3/4 x 16-1/4'' oak (front leg) B 2 1-3/4 x 3-3/4 x 40-1/2'' oak (rear leg) C 1 1-3/4 x 3-3/16 x 15''
PROJECT PLANS HOBBY BENCH
 PROJECT PLANS HOBBY BENCH This great-looking bench provides the perfect place to pursue a variety of hobbies. It offers a large bench top with built-in trays for small items, plus shelves up above to hold
Corner Entertainment Center Plans
 Table of Contents Introduction... 3 Let s discuss the tools needed... 3 Let s discuss the materials needed... 4 Let s build it... 4 Attaching the 2x2's... 7 Determine the shelf spacing... 9 Scribing the
After the canopy hinge is square with the firewall and the nut plates are installed you can set up the hinge mounts. Start by clamping a 1/16 tongue
 Written by: Sean Cole September 19, 2008 When fitting the stiffener use 3/32 clecos to hold it in place, it makes a smaller hole and is easier to work with. Only use the amount needed to hold the stiffener
Installing your new Bevella Top. L Shaped Countertop with Joints No Finished Ends (Fits Between Four Walls)
") Installing your new Bevella Top L Shaped Countertop with Joints No Finished Ends (Fits Between Four Walls) Bevella RTI Countertops are engineered and manufactured to the highest quality standards, built
Installing your new Bevella Top L Shaped Countertop with Joints No Finished Ends (Fits Between Four Walls) Bevella RTI Countertops are engineered and manufactured to the highest quality standards, built
Canadian Installation Guide
 Canadian Installation Guide Revised October 22, 2014 GenStone products are designed to provide a realistic look of stone or rock. Although installation of GenStone is much easier than traditional masonry
PROJECT PLANS EXPANDABLE CRAFT CENTER
 R PROJECT PLANS EXPANDABLE CRAFT CENTER Whether you re working on craft projects, sewing, or pursuing another hobby, this craft center offers a great place to work. It features a large work surface that
DIRK HOFER S ONE SHEET OF PLYWOOD DOGHOUSE PLAN LAKES ANIMAL FRIENDSHIP SOCIETY
 DIRK HOFER S ONE SHEET OF PLYWOOD DOGHOUSE PLAN LAKES ANIMAL FRIENDSHIP SOCIETY WWW.LAKESANIMALFRIENDSHIP.CA Lakes Animal Friendship Society, in cooperation with the Lakes District Secondary School (LDSS)
Chapter 17 - Porch Trim
 Chapter 17 - Porch Trim Contents Chapter 17 - Porch Trim... 17-1 Timing & Prerequisites... 17-2 Trim on Porch Beams (Volunteer)... 17-4 Smart Trim on the Bottom of the Beam... 17-4 Smart Trim on the Inside
Retrofit Apron Front Farm Sink With Dual Mount Capability Installation Instructions
 For Under-Mount Installation please refer to page 14 FOR EXPERIENCED AND PROFESSIONAL INSTALLATION ONLY This installation project is designed for an advanced skill level. Disclaimer: Undermount Application
Bird Feeder. Tool Requirements
 Bird Feeder Written and constructed by Craig Tilley This wooden bird feeder will be an attractive addition to your garden. Its wide trays allow plenty of room for birds to come and have a snack, and the
Hinge Mortising Jig. One of the make it or break it parts of building a. 6 ShopNotes No. 74
 Hinge Mortising Jig A Mortise for a Hinge. Quick, clean, and accurate that s the only way to describe the mortise you get with a trim router and this hinge mortising jig. One of the make it or break it
MATERIALS: TOOLS: CUT LIST:
 MATERIALS: (3) 4x4x8 Ft. Boards (8) 2x4x8 Ft. Boards 2 ½-inch Pocket Screws 2 ½-inch Wood Screws 1-inch Wood Screws (16) Figure 8 Tabletop Fasteners Wood Glue Wood Filler TOOLS: Tape Measure Pencil Carpenter
Building the Gothic Church
 Building the Gothic Church Mold #54 does not contain all of the blocks to build this church. You will need extra regular blocks (1/2" x 1/2" x 1") and square blocks (1/2" x 1/2" x 1/2"). These blocks can
Installation Guide. Pionite Decorative Surfaces One Pionite Road, Auburn, Maine PIONITE ( )
") Installation Guide A Subsidiary of Panolam Surface Systems SMPBRO00-012 6/14 Pionite decorative laminates are designed for finished interior surfaces which require high impact, wear and stain resistance
Installation Guide A Subsidiary of Panolam Surface Systems SMPBRO00-012 6/14 Pionite decorative laminates are designed for finished interior surfaces which require high impact, wear and stain resistance
T he Double-Hung Replacement System replaces the sash and balance system of an older double-hung window. The
 Double-Hung Replacement System Installation The Pozzi Collection PID001 (12/03) T he Double-Hung Replacement System replaces the sash and balance system of an older double-hung window. The frame of the
Building Instructions
 Building Instructions Tools Required Tape measure Straight edge Pencil/pen Jigsaw Table Saw Circular Saw Electric drill 1 Hole saw bit Saw horses/table Protractor Staple gun Caulk gun Paint brush Wrenches
Project Skill Level: INTERMEDIATE Plywood Used: CANPLY EXTERIOR Good Two Sides (G2S) or precision sanded Aspen
 or precision sanded Aspen") Project Skill Level: INTERMEDIATE Plywood Used: CANPLY EXTERIOR Good Two Sides (G2S) or precision sanded Aspen MATERIALS LIST: (1) ¾" x 4 ft x 8 ft plywood panel (20) #8 x 2" Robertson or Phillips wood
Project Skill Level: INTERMEDIATE Plywood Used: CANPLY EXTERIOR Good Two Sides (G2S) or precision sanded Aspen MATERIALS LIST: (1) ¾" x 4 ft x 8 ft plywood panel (20) #8 x 2" Robertson or Phillips wood
Stair Parts Installation. Tricks
 Stair Parts Installation Tips & Tricks Introduction Your DIY staircase guide Welcome to the Stairpart home installation guide. Your stairway is both a functional and focal point in your home, so keeping
Robert Bosch GmbH. Wall organiser
 Wall organiser The organisational talent Wall organiser Say goodbye to messiness! The wall organiser is the ideal place to store everything that tends to lie around. 1 Introduction Wardrobes, drawers and
Nanton Grain Mill Assembly
 ( 1 ) Nanton Grain Mill Assembly Locate package for assembling storage building. These are cut from 1/8 masonite. Inspect and lightly sand edges where it will be bonded. Use white glue or CA glue to bond.
Installation Guide. Tools Recommended:
 Installation Guide GenStone products are designed to provide a realistic look of stone or rock at a fraction of the installed cost. To achieve this, we have engineered the time and hassle out of installation
Tools and materials. Order of work. Prepare a flat pack as follows:
 DIY Badge Activity Pack What s included in this How To s pack: Making a mug tree...2 Making a magazine storage box... Making a key holder...4 Making a bird apple feeder...5 Making a set of dominoes...6
Chapter 22 - Cabinets & Vanities
 Chapter 22 - Cabinets & Vanities Contents Chapter 22 - Cabinets & Vanities... 22-1 Timing & Prerequisites... 22-2 Cabinets... 22-3 Cabinet Layout... 22-3 Wall Cabinets... 22-4 Assemble the Wall Units...
Building the Cathedral
 Building the Cathedral Please note that the cathedral is a fairly difficult and time consuming project. I strongly suggest building one or two easier models before tackling this one! Four molds are needed
PROJECT PLANS OUTDOOR SERVING CART
 R PROJECT PLANS OUTDOOR SERVING CART Make outdoor entertaining easy with this serving cart. It offers lots of space for storing food, tableware, and outdoor supplies, plus it cradles bottles where they
DIY PROJECT KIT PLANS
 IY PROJET KIT PLNS MOULR LOSET ORGNIZER This organizer makes it easy to turn a cluttered, chaotic closet into a clean, organized space. It s modular, which means it s made up of just a few boxes that you
Al Keller s Inexpensive Backyard Greenhouse Plans
 Al Keller s Inexpensive Backyard Greenhouse Plans There are many ways to construct low cost greenhouses for your property. This is just one man s design, using easily obtainable and fairly inexpensive
176 S. New Holland Road Gordonville, PA Tel: Fax: Summit Tower
 176 S. New Holland Road Gordonville, PA 17529 Tel: 717-768-0066 Fax: 717-768-8569 A S S E M B LY M A N U A L Summit Tower Summit Tower Assembly Manual revised 9/07/05 Dear Customer, Thank you for your
Tools and Tips: ( 1 )
") Tools and Tips: As you build instructions will show in my many picture manual how to assemble. You can use your own methods as you desire, my results are very good. A smooth, flat work surface is very
Tools and Tips: As you build instructions will show in my many picture manual how to assemble. You can use your own methods as you desire, my results are very good. A smooth, flat work surface is very
DIY X Panel Side Table
 DIY X Panel Side Table *Before beginning this project, please read through all of the plans as well as the blog post associated with this project. Always use safety precautions whenever using power tools
ADULT. Adirondack / Muskoka Chair Plans
 ADULT Adirondack / Muskoka Chair Plans Materials List 3/4" x 9 1/2" (1.9cm x 24.1cm) redwood, cedar or pine boards. Six, 8' (2.44m) boards should make one chair depending on knots and layout. You can also
How to Build a Raised Bed Cold Frame
 How to Build a Raised Bed Cold Frame Protect your plants from frost with a cold frame that sits right on top of your existing 4' x 4' raised bed. The lid is held open with screen door closers, and the
Small 45 Roof Houses 1 or 2 Story 1 /24 th Scale Patterns
 BA GARDEN TOWNS 45 Roof Houses 10" x 10" 1 or Story Scaled and easy to read patterns and instructions for wood houses. Yard and Garden Buildings Compatible with Garden Railroads or a delight for any child's
Instructables Butcher Block Top
 Instructables Butcher Block Top Project Overview: This project requires basic woodworking skills and access to woodworking machines. Woodworking machines have sharp cutting edges and are NOT forgiving.
EASY BREAD/ CUTTING BOARDS
 PLANS BY DEEPLY SOUTHERN HOME EASY BREAD/ CUTTING BOARDS DIFFICULTY LEVEL: EASY TOOLS REQUIRED 18V ONE+ RANDOM ORBIT SANDER 18V ONE+ CORNER CAT FINISH SANDER 18V ONE+ LITHIUM-ION DRILL KIT 18V ONE+ ORBITAL
Tools and Tips: ( 1 )
") Tools and Tips: As you build instructions will show in my many picture manual how to assemble. You can use your own methods as you desire, my results are very good. A smooth, flat work surface is very
Tools and Tips: As you build instructions will show in my many picture manual how to assemble. You can use your own methods as you desire, my results are very good. A smooth, flat work surface is very
HOW TO INSTALL ELITE PANELED WAINSCOTING Using X-Rails with Either Raised, Flat or Beaded Panels
 HOW TO INSTALL ELITE PANELED WAINSCOTING Using X-Rails with Either Raised, Flat or Beaded Panels 1. First, remove the cover plates from all electrical outlets. All baseboards should also be removed; the
DIY Outdoor Console Table Addicted2DIY.com
 DIY Outdoor Console Table Addicted2DIY.com *Before beginning this project, please read through all of the plans. Always use safety precautions whenever using power tools and follow the manufacturer s suggested
KIT ASSEMBLY INSTRUCTIONS
 KIT ASSEMBLY INSTRUCTIONS We have designed these instructions as a stepby step procedure to simplify the assembly process. Nevertheless, we do recommend including someone with carpentry expertise on your
Chief s Shop: Simple Woodworking Bench
 Chief s Shop: Simple Woodworking Bench Be sure to read the instructions and review the illustrations and accompanying video for this project BEFORE you start. Follow ALL SAFETY GUIDELINES AND RECOMMENDATIONS
Kentucky 4H Wood Science Plans Notebook. Plans Level 2
 Kentucky 4H Wood Science Plans Notebook Plans Level 2 MATERIALS NEEDED: JEWELRY BOX WS201 1 piece wood 1/4" x 4 x 4 1/2" (bottom) 1 piece wood 1/4" x 4 1/2" x 5 (top) 2 pieces wood 1/4" x 2 x 5 (front
OUTDOOR STOOL. ProWood Project Plan
 ProWood Project Plan OUTDOOR STOOL With ProWood Professional Grade pressure-treated wood, you can easily build this sturdy stool and complement your outdoor deck, patio or yard furniture and expand your
129 KITCHEN BASE CABINET 480
 129 KITCHEN BASE CABINET 480 There are two sorts of kitchen cabinets: base cabinets, which sit on the floor, and wall cabinets. Base cabinets provide both storage space and work surfaces. They often house
DIY Wine Storage Cabinet
 DIY Wine Storage Cabinet ADDICTED2DIY.COM *Before beginning this project, please read through all of the plans and the blog post. When building this project, be sure to measure your wood and cut to fit.
Garden Bridge. c D E. All dimensions are in mm- Arch Tread Handrail' Post Reinforcement brace. Written & designed by David Watkins.
 Garden Bridge Written & designed by David Watkins Slmple by design yet decorative by nature. This ornate Garden Bridge will rest proudly amongst most garden backdrops. The fiddliest step in this project
Kitchen Upper Cabinet: Double Doors Cabinets from Scratch
 Kitchen Upper Cabinet: Double Doors by Cabinets from Scratch Our Home from Scratch LLC Page 1 Disclaimer Our Home from Scratch LLC and its legal owners cannot be held responsible for any loss, damage,
Cabinet is 90% assembled, all you need to do is to attach the legs, lay the glass top on the cabinet, connect the faucet, drains & ptrap.
 Things you might need for the installation: vessel sink, plumber's putty(home depot), liquid nails(home depot), Bucket silicone caulk(home depot), Putty knife Plumber's putty Pipe wrench Channel-lock pliers
 America s leading woodworking authority To download these plans, you will need Adobe Reader installed on your computer. If you want to get a free copy, visit: http://adobe.com/ reader. Having trouble downloading
PRIVACY INSTALLATION FOR: Standard 6 H x 8 W Privacy Fence 4 x 4 Post Sleeve & Brackets Dog Ear or Straight-Edge Pickets 1.75 x 3.
 PRIVACY INSTALLATION FOR: Standard 6 H x 8 W Privacy Fence 4 x 4 Post Sleeve & Brackets Dog Ear or Straight-Edge Pickets 1.75 x 3.5 Rail Storage and Handling Fence Preparation and Layout Locate and Set
Balustrade System Installation - Cambridge & Huntington
 A. PARTS AND SUPPLIES NEEDED FOR INSTALLATION Hardware included for each 10 section of rail: 2 3 x 1-1/2 L-brackets 4 1-3/4 x 3/16 Blue hex-head screws for anchoring the L-brackets to the newel cap, column
A candle stick addresses transferring and reproducing dimensions from a plan and breaking the project into steps.
 Activities Discussion These projects allow more skill development including making items to match a drawing, sizing projects to specific dimensions, and just trying fun stuff for the first time! A candle
This indicates a diagram detailing the dimensions of a project part and/or the placement for pocket holes, screws, nails, etc.
 S i m p le Woodworking: What You'll Need v lumber 2-1 x 12 x 6 hardware/supplies (availability will vary) 1 1/4" pocket hole screws #18 x 1 1/2 brads or pocket hole plugs 12-inch continuous hinge magnetic
176 S. New Holland Road Gordonville, PA Tel: Fax: Eagles Nest
 176 S. New Holland Road Gordonville, PA 17529 Tel: 717-768-0066 Fax: 717-768-8569 A S S E M B LY M A N U A L Eagles Nest Eagles Nest Assembly Manual revised 9/2/05 Dear Customer, Thank you for your purchase
Shop Style Miter Saw Stand Kit
 Quality Power Tool Accessories OWNER S MANUAL Assembled Unit Shown Without Shelves & Wings Assembled With Shelves & Wings Shop Style Miter Saw Stand Kit Model 2850 IMPORTANT Read and understand all safety
Greene & Greene. Mailbox. by Seth Keller. Signature details create an elegant box. 2 AmericanWoodworker.com
 Greene & Greene Mailbox by Seth Keller Signature details create an elegant box. 2 AmericanWoodworker.com We needed a new mailbox, but I couldn t find an off-the-shelf version that I liked. So I decided
CCC Project Manual BUILDING MATERIALS
 CCC Project Manual BUILDING MATERIALS Units of Measure and Conversions In this manual, you may see some shorthand notations for units of measure... 12 means 12 inches 10 means 10 feet 12 inches equals
INCEPTIV INSTALLATION GUIDELINES
 3D WOOD WALL PANELS INCEPTIV INSTALLATION GUIDELINES We recommend you hire an experienced finish carpenter or floor installer to achieve quality results with all Duchateau Wall Coverings. The right tools
How to build a Ram for Challenge E: Twist-O-Rama
 How to build a Ram for Challenge E: Twist-O-Rama Notes The Ram is like the Structure Tester it is not Interference for a Team Manager or other non-team members to build it. Construction time is approximately
Close Encounters of the Bird Kind
 Close Encounters of the Bird Kind Building some bird housing will improve your libido as the natural forces of Spring work their magic. Materials: ¾", 2" and 3" exterior screws 1" x 8" pine or spruce 1"
This indicates a diagram detailing the dimensions of a project part and/or the placement for pocket holes, screws, nails, etc.
 S i m p le Woodworking: What You'll Need v lumber 2-1 x 12 x 8 1-1 x 12 x 10 1-2x4x8 hardware/supplies (availability will vary) 1 1/4" deck screws (optional) timber oil/sealer tools table saw w/dado set
Sunhouse. Assembly Manual
 Sunhouse Assembly Manual Thank you for your purchase of this sunhouse. Sunhouse Assembly Manual This manual is designed to simplify the assembly process, however we recommend having an experienced carpenter
Plans. Easy-to-Build Full-size Deluxe Murphy Bed Plan. For more plans, tools and hardware visit rockler.com
 Easy-to-Build Full-size Deluxe Murphy Bed Plan Build a full-size Deluxe Murphy Bed complete with decorative molding and matching side cabinets! Plans For more plans, tools and hardware visit rockler.com
Frameless Inline Door With Return QCI5263
 INSTALLATION INSTRUCTIONS Frameless Inline Door With Return QCI5263 WALL MOUNT HINGES FRAMELESS DOOR / PANEL / RETURN PANEL QCI5263 REV. 0 Page 1 Certified 06/17/2016 Parts List with wall mount hinges
Patrol Box Plans by David J. Yarusso Troop 609
 Patrol Box Plans by David J. Yarusso Troop 609 Materials List: 1. One 4 x8 sheet of ½ thick cabinet grade (birch or oak) or AC plywood. If using AC grade, use the A grade surface on the outside for a clean
CUSTOM SHUTTERS IN-A-BOX
 CUSTOM SHUTTERS IN-A-BOX SHUTTER ASSEMBLE INSTRUCTIONS & INSTALLATION INSTRUCTIONS 1. Inspect the contents of your package. Do not discard the shutter packaging box until you have started painting your
SINKS AND LAVATORIES. Steps to completion: These items are essential for installing all sinks:
 DUPONT CORIAN SOLID SURFACE FABRICATION/INSTALLATION FUNDAMENTALS NA/ENGLISH SINKS AND LAVATORIES INTRODUCTION This bulletin discusses installing DuPont Corian solid surface sinks and lavatories. OVERVIEW
Kentucky 4H Wood Science Plans Notebook. Plans Level 1
 Kentucky 4H Wood Science Plans Notebook Plans Level 1 MATERIALS NEEDED: 1 piece wood 3/4" x 2 x 2 1 piece wood 3/4" x 3 x 3 1/2" 1 wooden spring-type clothespin 2-1 1/2" nails 1-1/2 woodscrew Wood Glue
Radon 07 Installation Instructions & Parts List
 Radon 07 Installation Instructions & Parts List Illustration Radon 07, H1 Handle Right Hand: Open Out 14/06/2016 Revision 1.1 Page 1 of 21 IMPORTANT This shower screen / enclosure must be installed by
Beds may be put up or taken down quickly by use of a simple bolted connection at rails and uprights. MATERIALS LIST
 CANPLY This design has been made both functional and attractive by use of pattern cut-outs in head and foot uprights, which serve as ladders. Since most children love to climb, getting them to bed will
176 S. New Holland Road Gordonville, PA Tel: Fax: Castle Loft
 176 S. New Holland Road Gordonville, PA 17529 Tel: 717-768-0066 Fax: 717-768-8569 A S S E M B LY M A N U A L Castle Loft Castle Loft Assembly Manual revised 08/31/05 Dear Customer, Thank you for your purchase
MATERIALS PREPARATION SETTING FENCE POSTS 01 TIP
 Skill Level: INTERMEDIATE Give these projects a try if you're a confident DIYer with a good working knowledge of a variety of tools. They can take a day or more to complete. If you can build a birdhouse
Kreg Tool Co. All Rights Reserved.
 Version 1 p. 1 Materials: Lumber: Qty: Board 2 2x2s 3 ft. long 2 1x2s 8 ft. long 2 1x3s 8 ft. long 6 1x6s 10 ft. long INSTRUCTIONS: Supplies: 1 1 / 4" Kreg Screws (coarse thread for softwoods, fine thread