TM TM TM TM BOOK SLING
|
|
|
- Lee Miles
- 6 years ago
- Views:
Transcription


1 TM TM TM TM BOOK SLING

2 BOOK SLING Page 1
3 Safety First! Use eye protection, always! Use ear protection with loud power tools Stay with children while they work! Follow tool manufacturers safety guidelines Page 2
4 TOOLS Handsaw Sewing Machine Drill Scissors Drill and Driver Bits 1/8 inch [3.175 mm] drill bit for pilot holes 23/64 inch [9.128 mm] drill bit for decorative caps ¾ spade bit [19.05 mm] for dowel holes driver bit to fit screws Foam paint brush Pencil Tape measure Clamp Jobs for kids and adults together Adult-only jobs Page 3
5 SUPPLIES Canvas Cut one piece measuring 32 x 20 [81.28 cm x 50.8 cm] Weldbond glue Vinyl shelf liner 1x4 poplar - one 48-inch [121.92cm] board Two 36-inch, ¾-inch diameter hardwood dowels [91.44 cm x cm diameter] Screws Four 2-inch [5.08cm] #8 wood screws Four 3/8-inch [9.525 mm] hardwood screw caps Paint 18-inch [45.72 cm] interlocking picturehanging hardware Page 4
![1. Cut Cut a piece of canvas 32" x 20" [81.28 cm x 50.8 cm].](/docs-images/72/66375065/images/6-0.jpg "We used a rubberized drop cloth for a really tough book sling.")


6 1. Cut Cut a piece of canvas 32" x 20" [81.28 cm x 50.8 cm]. We used a rubberized drop cloth for a really tough book sling. 2. Hem short edges Put a half-inch [1.27 cm] hem on each of the short edges using a zig-zag stitch. 3. Hem long edges Fold and sew a 2-inch [5.08 cm] hem on both long edges to create pockets that will hold the wooden rods. 4. Make stamp designs Draw shapes onto vinyl shelf liner, which is thick, tough, flexible and works perfectly for do-it-yourself stamps. Page 5


7 5. Cut Cut out the shapes using pointy scissors. 6. Glue Apply glue to a block of scrap lumber. 7. Spread Use a paintbrush to spread the glue in a thin layer over the surface of the block. 8. Fasten Press the vinyl cut-out into the glue, making sure to press down all of the edges. Page 6


8 9. Apply paint When the glue has had at least 20 minutes to dry, brush a thin layer of paint onto the vinyl shape. 10. Stamp Start printing the fabric with your stamps! 11. Experiment Mix other colours and dab them onto your stamps in stripes and spots. 12. Fill up the whole surface Keep stamping till you've filled up the surface of the fabric. Page 7


9 13. Embellish You can add 'art marks' to add even more texture to your design. 14. Dry Set aside the stamped fabric so it can dry. 15. Cut Secure a poplar board in a clamp and use a Japanese-style hand saw to cut the pieces listed in the cut list. This style of saw cuts on the pull stroke so it's really fast and easy. 16. Clamp Stack and clamp the two short end pieces to your work surface, using a third piece of scrap lumber on the bottom to reduce tearout and slivers. Page 8

![You'll need two holes, one for each rod, spaced about 2 inches [5.08 cm] apart.](/docs-images/72/66375065/images/10-2.jpg "18. Drill Use a ¾-inch [1.905 cm] spade bit to drill two dowel holes.")


10 17. Trace Place a dowel on top of the stacked wood pieces and trace it so you'll know where to drill. You'll need two holes, one for each rod, spaced about 2 inches [5.08 cm] apart. 18. Drill Use a ¾-inch [1.905 cm] spade bit to drill two dowel holes. TIP As long as the boards are stacked and firmly clamped, you can drill the two dowel holes in any position. We staggered them so the front rod will hang below the back rod. 19. Mark Next, use a pencil to mark two pilot holes where you will drive screws to fasten the side pieces to the long board. Centre of hole is 3/8 [0.925 cm] up from the bottom edge and an inch [2.54 cm] in from each side. Page 9


![heads. Use a 23/64 [9.128 mm] drill bit to drill down 1/4-inch [6.](/docs-images/72/66375065/images/11-3.jpg "35 mm] deep right on top of the pilot holes. 22.")

11 20. Drill Using a 1/8-inch [3.175 mm] bit, drill pilot holes through the end pieces. 21. Drill for caps Now we'll enlarge the top of those freshly-drilled pilot holes to hold the decorative hardwood caps that will cover the screw heads. Use a 23/64 [9.128 mm] drill bit to drill down 1/4-inch [6.35 mm] deep right on top of the pilot holes. 22. Drill some more Next we'll drill 1/8 [3.175 mm] pilot holes that pass through the already-drilled end pieces and into the long board that forms the back of the book sling. 23. Fasten Drive #8, 2-inch [ cm] screws into the pilot holes. Page 10


12 24. Tap Use a small hammer to tap the decorative caps into place to cover the screw heads. 25. Assemble Feed the dowels through the end-pieces and into the pockets of the book sling. 26. Lock To ensure that the dowels never slip out of place, drill a small hole at each end of both dowels and insert cotter pins. 27. Install hanging hardware Centre and fasten your interlocking hanging hardware in position on the back of the book sling. Page 11

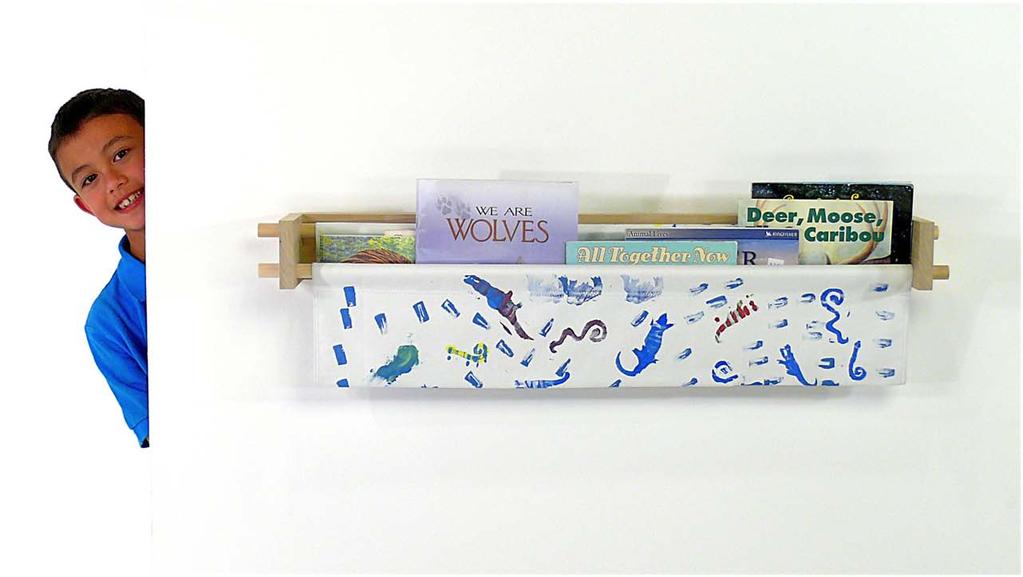
13 Mount your book sling and load it up with your favourite reading! Page 12

14 Page 13
 have made every effort to be complete and accurate in the instructions and other content contained in this publication.")

15 DISCLAIMER Almost any do-it-yourself project involves risk of some sort. Your tools, materials, and skill will vary, as will the conditions of your project site. Lowe s Companies Inc., and its subsidiaries ("Lowe s") have made every effort to be complete and accurate in the instructions and other content contained in this publication. However, neither Lowe s nor the publisher will assume any responsibility or liability for damages or losses sustained or incurred in the course of your home improvement or repair project or in the course of your use of the item you create or repair. Always follow the manufacturer s operating instructions in the use of tools, check and follow your local building codes, and observe all standard safety precautions. Prices and supply may vary, so check the cost of materials and labour in your area before beginning any home improvement project. We strive to be accurate, but unintentional errors may occur and we reserve the right to correct any error. See a Lowe s store for information regarding product warranties and any available protection plans. All prices, products and promotions are limited to Canada locations only. This Family Fun video is for informational purposes only. Lowe s assumes no responsibility for the accuracy of the information contained herein and disclaims any liability for omissions, errors or the outcome of any project. Lowe s assumes no responsibility or liability for damages, losses, or injuries sustained in the course of your project or in the course of your use of any item you repair or create. Always follow the manufacturer s operating instructions in the use of tools, and take proper safety precautions when taking on any project. It is your responsibility to ensure that participants engage in age-appropriate activities and that children are appropriately supervised. If there is any question or doubt with regard to any element of a project, please consult with a licensed professional. No part of this video may be reproduced in any form or by any means without prior written permission of Lowe s. Lowe s, the gable design, and Lowe s Family Fun Projects and Learning Through Building are trademarks of LF, LLC. All rights reserved. Page 14
Safety First! Use eye protection, always! Use ear protection with loud power tools. Stay with children while they work!
 TM TM ART TABLE Safety First! Use eye protection, always! Use ear protection with loud power tools Stay with children while they work! Follow tool manufacturers safety guidelines Page 1 ART TABLE Page
Safety First! Use eye protection, always! Use ear protection with loud power tools. Stay with children while they work!
 TM TM WORK BENCH Safety First! Use eye protection, always! Use ear protection with loud power tools Stay with children while they work! Follow tool manufacturers safety guidelines Page 1 TOOLS Handsaw
Safety First! Use eye protection, always! Use ear protection with loud power tools. Stay with children while they work!
 TM TM CAMP STOOLS Safety First! Use eye protection, always! Use ear protection with loud power tools Stay with children while they work! Follow tool manufacturers safety guidelines Page 1 TOOLS Handsaw
TM TM DOG HOUSE Age 9+
 TM TM DOG HOUSE Age 9+ Safety First! Use eye protection, always! Use ear protection with loud power tools Stay with kids while they work! Follow tool manufacturers safety guidelines This project is recommended
GROWTH CHART. Page 2
 TM TM GROWTH CHART GROWTH CHART Page 2 Safety First! Use eye protection, always! Use ear protection with loud power tools Stay with children while they work! Follow tool manufacturers safety guidelines
TM TM MESSAGE CENTRE
 TM TM MESSAGE CENTRE Safety First! Use eye protection, always! Use ear protection with loud power tools Stay with children while they work! Follow tool manufacturers safety guidelines Page 1 TOOLS Drill
Safety First! Use eye protection, always! Use ear protection with loud power tools. Stay with children while they work!
 TM BIRD FEEDER TM Safety First! Use eye protection, always! Use ear protection with loud power tools Stay with children while they work! Follow tool manufacturers safety guidelines Page 1 TOOLS Safety
PROJECT PLANS WOODEN GIFT BOX
 PROJECT PLANS WOODEN GIFT BOX Make the gifts you give even more special by presenting them in this one-of-a-kind gift box. In fact, the box may be valued more than whatever it contains. The box is sized
Wanderlust Suitcase Vanity
 Wanderlust Suitcase Vanity If you re like me, you re always up for an adventure. When I saw some examples of DIY reclaimed suitcases, paired with the exciting new Wanderlust embroidery design collection,
PROJECT PLANS ROLLING LAUNDRY SORTER
 R PROJECT PLANS ROLLING LAUNDRY SORTER Sorting laundry certainly doesn t rank high on anyone s list. So, anything that makes this task easier is welcome. If that functionality can be mixed with a bit of
How-to-Install. Laminate Countertops and Sheet Laminate. FREE brochure Reverso en español
 FREE brochure Reverso en español How-to-Install Laminate Countertops and Easy to install instructions provided inside Multiple colors available for unique design options Durable and easy to care for Accessory
this clip Sure it looks fab, but this frameon-frame
 There s more than meets the eye with these darling frames. Everyday enough for favorite photos, yet versatile enough to create clever projects like these handy organizers & many more! {CREATIVE INSPIRATIONS
THE GREEN CLUB PROJECT
 tennis ball end cap finishing tape THE GREEN CLUB PROJECT duct tape How to make the ultimate recycled juggling club at home. BY JONATHAN POPPELE 16 or 20 oz bottle club body hardwood dowel collar finishing
Project Plans Kreg Tool Company / BuildSomething. All Rights Reserved.
 BY Project Plans HARDWARE ORGANIZER How easy is it top keep screws, hardware, and other small items organized instead of in the way? Just cut six identically sized pieces of plywood, add a 1x2 cleat, and
Denise M. DeRose Handled Clamshell Handbag
 Denise M. DeRose Handled Clamshell Handbag Materials: Wood 2 discs between 6 and 9 in diameter -- 4/4, 6/4 or 8/4 1 piece of thin hardwood ¼ inch thick and 4 x 10 Wood for waste blocks Supplies Small piece
PROJECT PLANS EXPANDABLE CRAFT CENTER
 R PROJECT PLANS EXPANDABLE CRAFT CENTER Whether you re working on craft projects, sewing, or pursuing another hobby, this craft center offers a great place to work. It features a large work surface that
Wall-mounted folding desk.
 Wall-mounted folding desk. Step-by-step project The wall-mounted folding desk: ideal for small rooms. Are big desks not doing it for you? We feel the same way. They take up a lot of space, especially in
Making Simple Bookbinding Equipment
 Tony Firman 20 1 2 19 Notes Tony Firman Tony Firman Bookbinding 18 3 : 2012 Tony Firman Bookbinding P.O. Box 507 Haslet, TX 76052 www.tonyfirmanbookbinding.com 4. When all the tapes have been pinned in
Chief s Shop: Simple Woodworking Bench
 Chief s Shop: Simple Woodworking Bench Be sure to read the instructions and review the illustrations and accompanying video for this project BEFORE you start. Follow ALL SAFETY GUIDELINES AND RECOMMENDATIONS
Laminate Cabinet Installation Instructions
 Laminate Cabinet Installation Instructions www.easygaragestorage.com/installation How To Use These Instructions Thank you for your purchase! Please read each step of this manual thoroughly to ensure proper
Coat Rack. Materials: Directions:
 Coat Rack 2x2 wooden poplar (foundation of the rack) 3/4 inch diameter wood dowels (5-8 depending on how many arms you want) 1/4 inch dowel screw 1/4 inch drill bit Power drill Ruler Pencil Paint/spray
Take advantage of some fun games and activities to teach the girls the importance of recycling and protecting our limited resources on this planet.
 BRITISH COLUMBIA COUNCIL RECYCLING BADGE A N I N S T A N T M E E T I N G F O R G U I D E S F R O M T H E B C P R O G R A M C O M M I T T E E Take advantage of some fun games and activities to teach the
Ranch Rail Vinyl Fence
 Ranch Rail Vinyl Fence INSTALLATION INSTRUCTIONS These instructions are to be used as general guidelines for the installation of your vinyl fence under normal installation conditions. Local conditions
Rustic Console Table
 Copyright 2016 Shanty-2-Chic.com T Rustic Console Table he perfect compliment to the Bookcase Tower, this entryway table will WOW your visitors and yourself with it's ease of construction yet high-style
JELD-WEN DesignGlide Barn Door Hardware System Installation (JII-90003)
") JELD-WEN DesignGlide Barn Door Hardware System Installation IMPORTANT INFORMATION CONTACT US For questions, feel free to contact us by phone or email: Phone: 1-(800)-JELD-WEN/1-(800)-535-3936 Email: customerserviceagents@jeldwen.com
JELD-WEN DesignGlide Barn Door Hardware System Installation IMPORTANT INFORMATION CONTACT US For questions, feel free to contact us by phone or email: Phone: 1-(800)-JELD-WEN/1-(800)-535-3936 Email: customerserviceagents@jeldwen.com
HOW TO HOME IMPROVEMENT INSTRUCTIONS (Steps to make changes and before and after photos) Entrance to Front and Back of House
 Entrance to Front and Back of House") HOW TO HOME IMPROVEMENT INSTRUCTIONS (Steps to make changes and before and after photos) Entrance to Front and Back of House 1. Outdoor Grab Bar To install a weatherproof grab bar into a brick wall: 1.
HOW TO HOME IMPROVEMENT INSTRUCTIONS (Steps to make changes and before and after photos) Entrance to Front and Back of House 1. Outdoor Grab Bar To install a weatherproof grab bar into a brick wall: 1.
DIY PROJECT KIT PLANS
 IY PROJET KIT PLNS MOULR LOSET ORGNIZER This organizer makes it easy to turn a cluttered, chaotic closet into a clean, organized space. It s modular, which means it s made up of just a few boxes that you
Kentucky 4H Wood Science Plans Notebook. Plans Level 2
 Kentucky 4H Wood Science Plans Notebook Plans Level 2 MATERIALS NEEDED: JEWELRY BOX WS201 1 piece wood 1/4" x 4 x 4 1/2" (bottom) 1 piece wood 1/4" x 4 1/2" x 5 (top) 2 pieces wood 1/4" x 2 x 5 (front
Tools: Drill/Driver Kreg Jig Miter Saw Jigsaw Circular Saw Adjustable Square Tape Measure Veneer Trimmer Sandpaper and Sander
 R PROJECT PLANS DROP-FRONT DESK Create a workspace almost anywhere with this drop-front desk. Mounted to a wall, it doesn t take up any floor space, which means you can hang it wherever you need to work.
Do-It-Yourself Bleeding Control Prop for Tourniquet Practice
 Do-It-Yourself Bleeding Control Prop for Tourniquet Practice Introduction Hands-on skill practice is necessary to developing competence in using commercial or improvised tourniquets. Learners can practice
ARTS AND CRAFTS Take us to the World Centres. Cow Refrigerator Magnet. Recycled Pop Can Cow
 Cow Refrigerator Magnet For instructions, please visit http://www.aokcorral.com/projects/how2apr2006.htm Recycled Pop Can Cow For instructions, please visit http://www.favecrafts.com/green-crafting/smashed-soda-can-animals
From "American Woodturner" the Journal of the American Association of Woodturners, April 2015, vol 30, no 2 - CUSTOM - TOOL HANDLES
 From "American Woodturner" the Journal of the American Association of Woodturners, April 2015, vol 30, no 2 - CUSTOM - TOOL HANDLES Carl Ford I have found most commercially available tool handles uncomfortable
Bleeding Control Prop for Tourniquet Practice Advanced Bleeding Control
 Do It Yourself Bleeding Control Prop for Tourniquet Practice Advanced Bleeding Control Introduction Hands-on skill practice is necessary to developing competence in using commercial or improvised tourniquets.
This indicates a diagram detailing the dimensions of a project part and/or the placement for pocket holes, screws, nails, etc.
 S i m p le Woodworking: What You'll Need v lumber 2-1 x 12 x 6 hardware/supplies (availability will vary) 1 1/4" pocket hole screws #18 x 1 1/2 brads or pocket hole plugs 12-inch continuous hinge magnetic
Important Note: Why this guidebook is FREE?
 Easy DIY Murphy Bed Construction Guide 1 Important Note: This guide is a FREE SAMPLE of our Complete Construction Guidebook. With the help of this guide you will get familiar with the construction steps
Boxtrot. Tools. Materials:
 Boxtrot Sneak downstairs with a little nog and chisel yourself a nice box to hold your New Year's resolutions. Materials: Cut List: 3/8" plywood - preferably high grade, seven-ply, cabinetmakers plywood
Project: Trebuchet Overview: This medieval launcher would reek. Materials: 3/4 plywood, 2 of 5/8 threaded. Minimum Cutting Area: 2 sheets of plywood
 Project: Trebuchet Overview: This medieval launcher would reek havoc on enemies castles. However, the modern day conversion using 20lbs of weight will easily through a tennis ball the length of a gymnasium.
Kitchen Upper Cabinet: Double Doors Cabinets from Scratch
 Kitchen Upper Cabinet: Double Doors by Cabinets from Scratch Our Home from Scratch LLC Page 1 Disclaimer Our Home from Scratch LLC and its legal owners cannot be held responsible for any loss, damage,
INSTRUCTION FOR WALL-FIXING OF VANITY UNIT GAYA
 INSTRUCTION FOR WALL-FIXING OF VANITY UNIT GAYA Vanity unit Gaya with 2 drawers L.(cm. 60-23 5/8) (cm.70-27 9/) (cm.90-35 7/) Suggested dimensions for wall-fixing of Gaya Vanity units 850-33 15 350-13
PROTECT-A-POOL INGROUND REMOVABLE SAFETY FENCE
 PROTECT-A-POOL INGROUND REMOVABLE SAFETY FENCE I N S T A L L A T I O N I N S T R U C T I O N S INSTALLATION TOOLS The following tools are required for installation. Chalk Pencil Utility Knife Tape Measure
Assembly Instructions Music Library System
 Assembly Instructions Music Library System 7-Shelf Unit is shown. 6-Shelf Unit assembly is the same except where noted. Contents Important User Information...........................2 General...2 Manufacturer...2
Kentucky 4H Wood Science Plans Notebook. Plans Level 1
 Kentucky 4H Wood Science Plans Notebook Plans Level 1 MATERIALS NEEDED: 1 piece wood 3/4" x 2 x 2 1 piece wood 3/4" x 3 x 3 1/2" 1 wooden spring-type clothespin 2-1 1/2" nails 1-1/2 woodscrew Wood Glue
Kitchen Upper Cabinet: Single Door Cabinets from Scratch
 Kitchen Upper Cabinet: Single Door by Cabinets from Scratch Our Home from Scratch LLC Page 1 Disclaimer Our Home from Scratch LLC and its legal owners cannot be held responsible for any loss, damage, disappointment,
Pressed Flowers. Materials: Directions: Pressed flowers Heavyweight paper Picture frame Craft glue Small paint brush Tweezers
 Pressed Flowers Pressed flowers Heavyweight paper Picture frame Craft glue Small paint brush Tweezers 1. Pressed flowers can be purchased online or you can easily press them yourself. Begin by folding
(28) 2 x 4 x 8 Ft. Boards Tape Measure (9) 2 x 6 x 8 Ft. Boards Pencil (6) 2 x 2 x 8 Ft. Boards Carpenter s Square (9) 1 x 3 x 8 Ft.
 2 x 4 x 8 Ft. Boards Tape Measure (9) 2 x 6 x 8 Ft. Boards Pencil (6) 2 x 2 x 8 Ft. Boards Carpenter s Square (9) 1 x 3 x 8 Ft.") MATERIALS: TOOLS: (28) 2 x 4 x 8 Ft. Boards Tape Measure (9) 2 x 6 x 8 Ft. Boards Pencil (6) 2 x 2 x 8 Ft. Boards Carpenter s Square (9) 1 x 3 x 8 Ft. Boards Drill 2 ½-inch Pocket Screws Circular Saw 2
MATERIALS: TOOLS: (28) 2 x 4 x 8 Ft. Boards Tape Measure (9) 2 x 6 x 8 Ft. Boards Pencil (6) 2 x 2 x 8 Ft. Boards Carpenter s Square (9) 1 x 3 x 8 Ft. Boards Drill 2 ½-inch Pocket Screws Circular Saw 2
15 Dovetail Jig. Instruction Manual. Part # 3452
 15 Dovetail Jig Instruction Manual Part # 3452 CAUTION: Please read, understand, and follow all manufacturers instructions, guidelines and owners manuals that come with your power tools. Peachtree Woodworking
woodworkersjournal.com MATERIAL LIST
 MATERIAL LIST T x W x L 1 Legs (2) 1 1 2" x 3 1 2" x 36 7 16" 2 End Uprights (2) 1 1 2" x 3 1 2" x 32 1 2" 3 Stringers (4) 1 1 2" x 3 1 2" x 42" 4 Top Cladding, Long (2) 3/4" x 7 1 4" x 65 3 4" 5 Side
T A P N T W I S T INSTALLATION GUIDE
 T A P N T W I S T a dynamite way to install balusters INSTALLATION GUIDE T A P N T W I S T a dynamite way to install balusters Your Beautiful New Staircase is Just Steps Away! Tools You Need: Tape Measure
WOODWORKING GUIDE: BASIC JOINERY
 WOODWORKING GUIDE: BASIC JOINERY Close isn't really good enough. A perfect fit is what counts. When building furniture, there are many ways to construct joints. The simplest are those that use mechanical
Sewing Roll. Base Fabric. Base Fabric. Third Fabric. Second Fabric (Bottom Pockets) Pockets)
 Pockets)") You will need Brother Creative Sewing Pack (Free Motion Foot, Braiding Foot, Narrow Hem Foot, Piping Foot and Concealed Zipper Foot) Base fabric 1 x fat ¼ (50cm square) cut in half Second fabric 50cm x
You will need Brother Creative Sewing Pack (Free Motion Foot, Braiding Foot, Narrow Hem Foot, Piping Foot and Concealed Zipper Foot) Base fabric 1 x fat ¼ (50cm square) cut in half Second fabric 50cm x
DIY Rustic Dresser Addicted2DIY.com
 DIY Rustic Dresser Addicted2DIY.com *Before beginning this project, please read through all of the plans as well as the blog post associated with this project. Always use safety precautions whenever using
A MULTI-PURPOSE LOFT THAT CAN BE USED FOR SLEEPING, STORAGE, AND FREEING UP SPACE (Supports 200 lbs max) DIFFICULTY: 6/10
 DIFFICULTY: 6/10") A MULTI-PURPOSE LOFT THAT CAN BE USED FOR SLEEPING, STORAGE, AND FREEING UP SPACE (Supports 200 lbs max) DIFFICULTY: 6/10 CAUTION The instructions are only a guide, and should be followed by individuals
A MULTI-PURPOSE LOFT THAT CAN BE USED FOR SLEEPING, STORAGE, AND FREEING UP SPACE (Supports 200 lbs max) DIFFICULTY: 6/10 CAUTION The instructions are only a guide, and should be followed by individuals
Why are we giving this guidebook as a FREE download?
 Construction Guide Queen, Double & Twin Vertical 1 Note: This guide covers the construction steps for all 3 sizes of the vertical wall mount Easy DIY Murphy beds, Queen, Double and Twin. The construction
SINGER Embellished Curtain Panel
 SINGER Embellished Curtain Panel This curtain panel has an accent border, embellished with rows of decorative stitches. Experiment with various thread colors and stitch patterns to find the just the right
on trend &on budget frame of mind free
 on trend &on budget Redress your favorite space with a scattering of these delightful designer frames. Simply mix and match shapes and sizes (even paint them!) to transform your space from plain Jane to
PROJECT PLANS COMPACT COAT RACK
 PROJT PLNS OMPT OT RK Not everyone has space for a mudroom, but everyone does need a place to hang coats and hats when they come in the door. With this coat rack, you ll get that hanging space without
TAMBOUR DOOR SYSTEMS. Construction Automotive Industry
 TAMBOUR DOOR SYSTEMS C3 Installation instructions www.rehau.com Construction Automotive Industry C3 Parts Overview 8 1 Slats 2 Handle 6 7 3 Handle gliders 4 Track cover 5 1 9 5 Track base 6 End caps 4
Cabinet is 90% assembled, all you need to do is to attach the legs, lay the glass top on the cabinet, connect the faucet, drains & ptrap.
 Things you might need for the installation: vessel sink, plumber's putty(home depot), liquid nails(home depot), Bucket silicone caulk(home depot), Putty knife Plumber's putty Pipe wrench Channel-lock pliers
Free Doghouse Plans Page 1 of 2
 Free Doghouse Plans Page 1 of 2 This doghouse is designed with the beginner in mind. It might even be a good project to involve the kids. The entire project requires only one sheet of plywood, two 2"x4"s
PROJECT PLANS HOBBY BENCH
 PROJECT PLANS HOBBY BENCH This great-looking bench provides the perfect place to pursue a variety of hobbies. It offers a large bench top with built-in trays for small items, plus shelves up above to hold
DIY Outdoor Console Table Addicted2DIY.com
 DIY Outdoor Console Table Addicted2DIY.com *Before beginning this project, please read through all of the plans. Always use safety precautions whenever using power tools and follow the manufacturer s suggested
Designer Shower Curtain with Snap-on Grommets
 Published on Sew4Home Designer Shower Curtain with Snap-on Grommets Editor: Liz Johnson Friday, 26 February 2010 9:00 A shower curtain is an easy item to sew; it's just big! You can make one in just a
Stair Parts Installation. Tricks
 Stair Parts Installation Tips & Tricks Introduction Your DIY staircase guide Welcome to the Stairpart home installation guide. Your stairway is both a functional and focal point in your home, so keeping
The frame sections of the china hutch are assembled with the aid of glue and spiral dowels. Dowel centers are recommended to
 60 CHINA HUNT 282 ARE YOU LOOKING for a showpiece china hutch to display your elegant chinaware, antique vase, or collectibles? Here's the perfect cabinet for you, with lots of transparent glass to show
136 PLYWOOD DESK 522
 136 PLYWOOD DESK 522 Simple in design and inexpensive, this plywood desk is made from a single 4- x 8-foot panel. Plywood is available with many hardwood veneers; it can also be covered with plastic laminate,
Project Plans Kreg Tool Company/BuildSomething. All Rights Reserved.
 BY Project Plans ONE-OF-A-KIND CUTTING BOARD This solid-maple cutting board offers ample space for cutting and a comfortable handle, but the most-unique feature lies underneath. A cutout in the lower layer
PROJECT PLANS OUTDOOR SERVING CART
 R PROJECT PLANS OUTDOOR SERVING CART Make outdoor entertaining easy with this serving cart. It offers lots of space for storing food, tableware, and outdoor supplies, plus it cradles bottles where they
Robert Bosch GmbH. Minimalist washstand
 Minimalist washstand Neat and tidy Minimalist washstand Minimalist design in the bathroom is in fashion. And rightly so, as this washstand proves: because less is more! 1 Introduction Here s an idea to
Motorized or Crank Operated Fortress Zipper Track Shade with Housing and Side Track Installation Instructions
 Motorized or Crank Operated Fortress Zipper Track Shade with Housing and Side Track Installation Instructions Tools Needed Drill 3/8 Metal Drill Bit ¼ Masonry Drill Bit Measuring Tape Pencil 4 Level Phillips
This photo more clearly shows how locating pins are used to transfer the dowel holes from the edge to front of frame. Use bar clamps till glue dries.
 CHINA HUTCH 266 The frame sections of the china hutch are assembled with the aid of glue and spiral dowels. Dowel centers are recommended to ease matching of dowel holes. gant chinaware, antique vase,
Installation Instructions Split Shake, Staggered Shake, Shingle, Perfection Shingle, and Shapes
 Installation Instructions Split Shake, Staggered Shake, Shingle, Perfection Shingle, and Shapes General Guidelines These instructions show one type of installation and are intended for the professional
Murphy Door DIY Hardware Installation Manual
 Murphy Door DIY Hardware Installation Manual The Murphy Door Bi-Folding Bookshelf was designed to install IN FRONT of existing door ways, replacing the door or doors while concealing the door way. In MOST
Robert Bosch GmbH. Wall organiser
 Wall organiser The organisational talent Wall organiser Say goodbye to messiness! The wall organiser is the ideal place to store everything that tends to lie around. 1 Introduction Wardrobes, drawers and
QLF215 INSTRUCTION MANUAL
 QLF215 INSTRUCTION MANUAL We ll Make It Stress-Free If you have any questions along the way, just give us a call. 1-800-359-5520. We re ready to help! 1 2 3 IMPORTANT SAFETY INSTRUCTIONS SAVE THESE INSTRUCTIONS
VEUE PIVOT ARM INSTALLATION MANUAL. February 2017
 VEUE PIVOT ARM INSTALLATION MANUAL February 2017 CONTENTS February 2017 This manual is to be read in conjunction with the Product Specifications & Assembly manual SECTION NO. DESCRIPTION PAGE NO. SECTION
Please observe the maximum weight loads specified in our sales documentation. Tools required for installation are not supplied.
 Trax H H6L profile WARNING Before installing this product, read and follow all warning notices and instructions accompanying this product. Failure to adequately install this product can result in severe
 America s leading woodworking authority To download these plans, you will need Adobe Reader installed on your computer. If you want to get a free copy, visit: http://adobe.com/ reader. Having trouble downloading
Copyright 1998 KDE Technologies
 Modular Computer Corner Desk Unit Copyright 1998 KDE Technologies http://members.tripod.com/~kdetech/ 1. Introduction 2. Plans Sheet one - Isometric Sheet two - Top Detail / Corner Unit Sheet three - Leg
Vinyl Windows and Doors
 Vinyl Windows and Doors Part Number: V983571 2011 Pella Corporation INSTALLATION INSTRUCTION - INSTRUCCIONES DE INSTALACION 350 SERIES WINDOW INTO EXISTING WOOD FRAME WINDOW Lea las instrucciones en español
Front Vise 70G G08.02
 Front Vise 70G08.01 70G08.02 The following instructions guide you through the installation of either the Regular Front Vise (70G08.01) or the Large Front Vise (70G08.02). The first step is to determine
How to build a Ram for Challenge E: Twist-O-Rama
 How to build a Ram for Challenge E: Twist-O-Rama Notes The Ram is like the Structure Tester it is not Interference for a Team Manager or other non-team members to build it. Construction time is approximately
Kitchen Base Cabinet: Multiple Drawers Cabinets from Scratch
 Kitchen Base Cabinet: Multiple Drawers by Cabinets from Scratch Our Home from Scratch LLC Page 1 Disclaimer Our Home from Scratch LLC and its legal owners cannot be held responsible for any loss, damage,
Worktop. Weight Capacity. 100 lbs. 21 Corner Worktop. 48 Worktop. Fits over 2 Cabinets. 72 Worktop. Fits over 3 Cabinets. 200 lbs. 150 lbs.
 Bold.0 Warning: Excessive weight hazard! Use two or more people to move, assemble or install cabinets and locker to avoid back injury. Do not leave children unattended near cabinets. High risk of tipping
Designed for Vectric by Michael Tyler
 Project Tutorial Compatible with: (or greater) and (or greater) Sample Carved with: ShopBot Buddy PRSalpha BT48 www.shopbottools.com Featuring compatibility with nearly all CNC Machines Nesting birds never
#P2-21 Victorian Wall Pocket Organize and decorate all at the same time with this handy wall pocket. 12 tall.
 Victorian Wall Pocket Organize and decorate all at the same time with this handy wall pocket. 12 tall. Cut on dashed line for Back Cut on solid line for Frame only. Stock: 1/8-1/4, cut 1 each Left pattern
Mount to the Wall INSTALLATION MANUAL
 Mount to the Wall 15 Locate the Wooden Studs This step applies to wooden stud wall installation only. Determine and mark the exact locations of two stud centers on the wall. Wooden studs should be spaced
T he Double-Hung Replacement System replaces the sash and balance system of an older double-hung window. The
 Double-Hung Replacement System Installation The Pozzi Collection PID001 (12/03) T he Double-Hung Replacement System replaces the sash and balance system of an older double-hung window. The frame of the
Kitchen Base Cabinet: Single Drawer with Double Doors Cabinets from Scratch
 Kitchen Base Cabinet: Single Drawer with Double Doors by Cabinets from Scratch Our Home from Scratch LLC Page 1 Disclaimer Our Home from Scratch LLC and its legal owners cannot be held responsible for
PRESSING LINING IDEAS FOR FINISHING TOUCHES. You've finished your masterpiece! Here are ideas on how to prepare it for use as a wall hanging.
 You've finished your masterpiece! Here are ideas on how to prepare it for use as a wall hanging. PRESSING Press as instructed for the craft you have done. Be careful not to flatten threads or yarns. If
Treviso POCKET BILLIARD TABLE INSTALLATION MANUAL. SERVICE DEPARTMENT P.O. BOX 68 BRISTOL, WI 53104
 Treviso TM POCKET BILLIARD TABLE INSTALLATION MANUAL www.brunswickbilliards.com SERVICE DEPARTMENT P.O. BOX 68 BRISTOL, WI 53104 51-905881-000 NOVEMBER 2008 NOTE: Please use the instructions in this manual
(2) 4 x 8 Ft. Sheets of ¾-inch Purebond Plywood Tape Measure (2) 4 x 8 Ft. Sheets of ¼-inch Purebond Plywood Pencil (1) 1 x 8 x 8 Ft.
 4 x 8 Ft. Sheets of ¾-inch Purebond Plywood Tape Measure (2) 4 x 8 Ft. Sheets of ¼-inch Purebond Plywood Pencil (1) 1 x 8 x 8 Ft.") MATERIALS: TOOLS: (2) 4 x 8 Ft. Sheets of ¾-inch Purebond Plywood Tape Measure (2) 4 x 8 Ft. Sheets of ¼-inch Purebond Plywood Pencil (1) 1 x 8 x 8 Ft. Board Carpenter s Square (1) 1 x 6 x 8 Ft. Board
MATERIALS: TOOLS: (2) 4 x 8 Ft. Sheets of ¾-inch Purebond Plywood Tape Measure (2) 4 x 8 Ft. Sheets of ¼-inch Purebond Plywood Pencil (1) 1 x 8 x 8 Ft. Board Carpenter s Square (1) 1 x 6 x 8 Ft. Board
ASSEMBLY INSTRUCTIONS
 LEGAL DISCLAIMER: MameRoom Designs LLC will not be held liable for any incidental or consequential damages for breach of any expressed or implied warranty of the Ultimate Arcade cabinet, nor an incidental
Clearview Railing System Installation Instructions
 Clearview Railing System Installation Instructions Disclaimer: AGS Stainless, Inc. has its Clearview Railing Systems designed by a professional engineer to meet the requirements of the latest national
INSTALL INSTRUCTIONS WELCOME TO THE NEWAGE PERFORMANCE CABINETRY SERIES NEWAGE STEEL WELDED CABINETRY
 NEWAGE STEEL WELDED CABINETRY WELCOME TO THE NEWAGE PERFORMANCE CABINETRY SERIES ALL CABINETS MUST BE MOUNTED TO STUDS ON A SECURE WALL, AS PER THESE INSTRUCTIONS. FAILURE TO DO SO MAY RESULT IN SERIOUS
Pro-Doweling Kit USER S MANUAL #840. Visit us at
 Pro-Doweling Kit USER S MANUAL #840 99 Washington Street Melrose, MA 02176 Phone 781-665-1400 Toll Free 1-800-517-8431 Visit us at www.testequipmentdepot.com Please read this manual carefully and thoroughly
Jimmy Owl Pin Cushion
 Jimmy Owl Pin Cushion Designed by Christine Mitchell Read instructions carefully before starting the project. Note: I almost never wash fabric before using, I use good quality fabrics and rarely have trouble.
MAKO TM CASH DISPENSER
 MAKO TM CASH DISPENSER PEDESTAL INSTALLATION GUIDE VERSION 2.0 TDN 0702-000 2/99 CORPORATE HEADQUARTERS: RMA (RETURN MATERIAL AUTHORIZATION) RETURN ADDRESS: 522 E. Railroad Street 2405 B Street Long Beach,
PLANS BY TOM BURY MURPHY WORKTABLE TOTAL DIMENSIONS: FOLDED UP 30 X 48 X 0 FOLDED DOWN 30 X 58 X 84
 MURPHY WORKTABLE TOTAL DIMENSIONS: FOLDED UP 30 X 48 X 0 FOLDED DOWN 30 X 58 X 84 MATERIALS LIST: (2) 2 x8 x8 (3) 2 x4 x8 (1) 1 x2 x8 (1) 48 x96 3/4 plywood (2) 1-1/2 x30 continuous hinge (1) Left-side
MATERIALS PREPARATION SETTING FENCE POSTS 01 TIP
 Skill Level: INTERMEDIATE Give these projects a try if you're a confident DIYer with a good working knowledge of a variety of tools. They can take a day or more to complete. If you can build a birdhouse
BABY WOLF LOOM. Assembly Instructions for Knocked-Down Looms
 BABY WOLF LOOM Assembly Instructions for Knocked-Down Looms BEFORE YOU BEGIN Please read through the directions before beginning to assemble your loom. Unpack the loom parts carefully. Do not throw away