DIY Peddle Tractor. Introduc on
|
|
|
- Jeffrey Nichols
- 6 years ago
- Views:
Transcription

1 DIY Peddle Tractor Introduc on I myself have worked on numerous projects, but like most of you here, I did it for my own pleasure and for the people I was doing the work for. But unlike some others, I never really documented my projects - or so I thought. When I saw this contest this past week, I thought I s share one of my plywood projects. Because like a lot of projects I did, documenta on can be rather sparse so I worked on these a bit, to make it all more presentable here. I'll lay out the situa on. This happened a while back. Being single with a good job, good wages, and lots of nephews and nieces, some of them who I was sponsor (godfather) for, I always bought the kids something extra or special for Christmas. But it seemed that Christmas had become too commercialized. The kids open their presents, put the ba eries in, press a bu on, and call it play - for that day and that's it. They probably got very li le use out of it a er. So I looked back and thought, "What did I have fun with?" As it turned out, it wasn't even a gi I received but one that was passed down from my oldest brother. An Allis Chalmers WD Peddle Tractor (made from cast aluminum), just like my Dad's AC WD-45. But now they were made from plas c, and you could only get John Deere. Those were not the type of tractors my Dad had. I decided to make a tractor from plywood. My Dad thought it was a good gesture, but he didn't think the kids would play with it since it wasn't store-bought. I talked to my brother and he said that he would like one for his son. I thought, "What the heck. I'll make three." At the me, I had access to a CNC router to cut this, but since I had to adjust the design to make this out of hand tools in stead of CNC equipment I d design it that way. At the me, I had a me of it obtaining parts, but now they re easily accessible on a web search. When it came me to assemble I had injuryed myself, fortunately my brother pick up and he did have a me because of an issue I had with the console and steering mechanism, he had the hard part. I since corrected it. Here's the CAD model I made so at least you have a li le more to go by, considering I didn't document my work much with pictures. Fortunately though there were pictures taken.
2 Tools Required Tool Size Acetylene Torch Allen Wrench 9/64" Angle Grinder Bandsaw Coping Saw or Jig Saw Cresent Wrench Drill Bit (Spade or Forestner) 9/32", 1/2", 9/16, 3/4" Drill Bits No. 24 (0.1520"), No. 38 (.1015"), 5/32" Drill Motor Flat Head Screw Driver Hammer Hole Saw 1", 1-1/4", 1-1/2", 1-3/4" 2" Dia. MIG or Stick Welder Needle Nose Pliers Open/Box End Wrench 7/16" Plunger Router/Shaper Table Saw Wood Chisel As Needed Wood Rasp/File

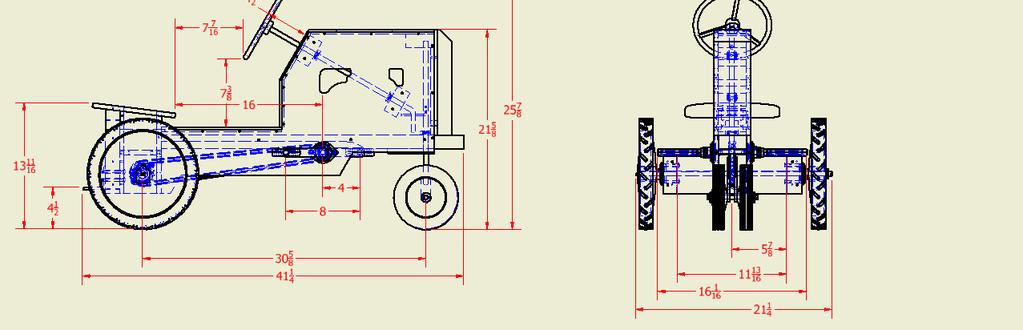
3 Over All Dimensional View
 The most difficult can fi ng together the steering mechanism. The best is a er the parts are cut, assemble the parts, removing one side, seat and rear axle top as shown in the picture 3.")
4 Procedures Notes: 1.) If purchasing parts, such as the pedal crank or steering mechanism as an example, wait ll the parts arrive to verify dimensions if you have to make adjustments 2.) The most difficult can fi ng together the steering mechanism. The best is a er the parts are cut, assemble the parts, removing one side, seat and rear axle top as shown in the picture 3.) most parts can be obtained at your local hardware store or online catalog. Procedures: 1.) cut out the parts from the drawing (even though the plywood is sanded on both sides, it best to sand it again with finer sand paper for a be er finish)
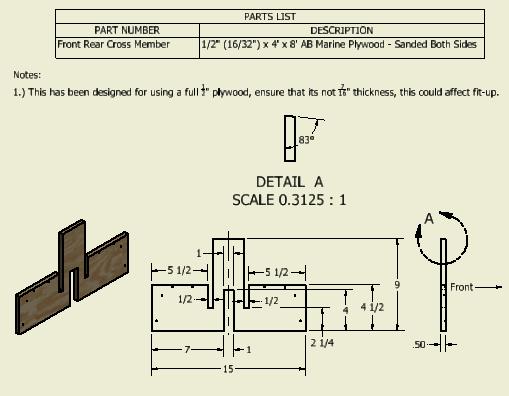


5 Dimensional Drawings of Cross members Hood Top and Console
 cut metal parts and fabricate as")
 when assembling the steering")

6 Metal Fabrica on 2.) cut metal parts and fabricate as to drawing 3.) when assembling the steering column, you have to assemble the parts prior to final welding (mid frame and lower steering shroud Rear Axle Steering Column
 assemble the outer edge, use minimal drywall fasteners, because these will be removed a er a flip. 6.) lay in the internal steering alignment blocks, use the sha ing as alignment jigs and leave in.")
7 Cut-Away View 4.) layout the right side on a table (outside facing down with the rear hanging off the table (this is using the right side as a template) 5.) assemble the outer edge, use minimal drywall fasteners, because these will be removed a er a flip. 6.) lay in the internal steering alignment blocks, use the sha ing as alignment jigs and leave in. 7.) test the steering mechanism by turning the column. 8.) a er your sa sfied with the mechanism ghten the locking collar on the column and post 9.) align the le side onto the outside border and complete fastening with screws periodically tes ng the steering to ensure the blocking did not move or shi.
8 10.) install the rear bearings on the le side 11.) install the pedal bearings on the le side 12.) flip the body on its le side and remove the right side 21.) install seat, steering wheel, rear and front wheel, keep in mind that only one rear wheel actually drives. 22.) break all sharp corner with a wood file or rasp. 23.) paint you favorite color 13.) install rear backer plate and hitch and fasten. 24.) model s ckers are available from an Internet search 14.) install rear axle and 15 tooth sprocket, center rear axle and the sprocket onto the axle and ghten 15.) install the pedal axle and 9 tooth sprocket. Center the pedal axle and the sprocket on to the pedal axle and ghten 16.) rea ach the right side and test the steering mechanism as you fasten it. 17.) install the rear bearings 18.) install pedal bearings 19.) install #40 roller chain 20.) install pedal arms and pedals
 Best to assemble with one side and seat removed for easier")
9 Call Out Note: 1.) Best to assemble with one side and seat removed for easier fit up. 2.) Remove all sharp corners with file.

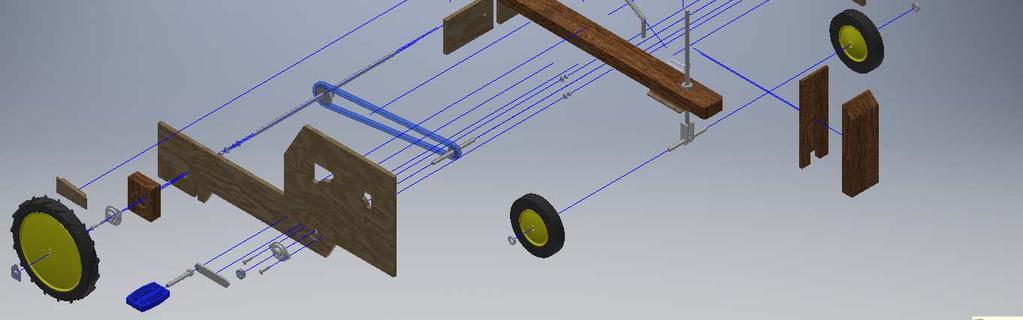
10 Exploded View


11 Presenta on When Christmas day came, the presents were too big to wrap, so we had them go into another room, and we set them up in the middle of the Kitchen. And then we had them come out. It was a race. This was one of the most enjoyable Christmas s we had. I stopped in a few months later, And I no ced, ;lug marks on the kitchen cabinets, I asked mom about that she just laughed. One more thing, you may wonder, Why the silver horse paint scheme.., and not Green, Red or Blue, Well.

12 That s Grampa s colors of course.
INSTALL INSTRUCTIONS
 Jeep JK Rear Stealth Bumper Product : 508R0B, 508R0B TC Applica on : 2007+ Jeep Wrangler JK ( 2 Door and 4 Door ) Page ( 1 of 5 ) I WARNING Read the instruc ons completely before beginning installa on.
N. 15th Street, Middlesboro, KY FLIP TARP DUMP BODY INSTALLATION INSTRUCTIONS
 1-800-248-7717 1002 N. 15th Street, Middlesboro, KY 40965 FLIP TARP DUMP BODY INSTALLATION INSTRUCTIONS Congratulations on your purchase of a Mountain Flip Tarp Dump Body tarping system. With tarping systems
Shay Tender Frame Fabrication
 Shay Tender Frame Fabrication Nelson Riedel Nelson@NelsonsLocomotive.com Initial:3/15/03 Last Revised: 06/05/2004 This page shows additional detail on the tender frame members and some of the processes
FLIP TARP SINGLE & DOUBLE UNDERBODY TRAILERS
 1-800-248-7717 1002 N. 15th Street, Middlesboro, KY 40965 FLIP TARP SINGLE & DOUBLE UNDERBODY TRAILERS INSTALLATION INSTRUCTIONS Congratulations on your purchase of a Mountain Flip Tarp Trailer system.
A Portable, Human-Powered Lathe Designed and Built by Scott Lewis Illustrations by David Heim
 Tailstock Toolrest and banjo Drive belt guard Headstock post Headstock spindle Page 1 Metric dimensions Tailstock post Drive belt tensioner Drive belt and flywheel Chair Bicycle pedals, sprockets, and
k 5356 PINE AVE FRESNO, CA USA TOLL FREE: 877.4X4.TOYS WORLDWIDE:
 tacoma front shackle kit 110821-1-k kit contents 5356 PINE AVE FRESNO, CA 93727 USA TOLL FREE: 877.4X4.TOYS WORLDWIDE: 559.252.4950 WWW.TRAIL-GEAR.COM recommended tools Loctite Cutoff Wheel Welder Grinder
Tools: Sharpie, Square, Vise, Hack saw, Ruler, Punch, Hammer, File. 2. Cut the stock Place stock in vise and cut with hack saw
 Purpose: MAKE CATAPULT ARM Step 1 Tools: Sharpie, Square, Vise, Hack saw, Ruler, Punch, Hammer, File Materials: Flat aluminum ½ inch stock (see picture below) Gloves required 1. Pick up the aluminum ½
CHEVY 4100/4400 SUPERRAIL MOUNTING KIT WITH ADAPTER FOR B&W GOOSENECK PART #4434
 CHEVY 4100/4400 SUPERRAIL MOUNTING KIT WITH ADAPTER FOR B&W GOOSENECK PART #4434 Installation Instructions SPECIFICATIONS Fits 1999-2010 Chevy 2500 & 3500 Short Bed Mounts to B&W gooseneck part #1067 Hitch
TRAILMATE METEOR ASSEMBLY MANUAL
 TRAILMATE METEOR ASSEMBLY MANUAL The Trailmate Meteor recumbent has been designed for easy assembly. This means more time to enjoy the smooth ride with single speed, 3 speed coaster brake and 21 speed
RC4WD Diablo V2 Instruction Manual
 Version 1.1 RC4WD Diablo V2 Instruction Manual Thank you for your purchase. Welcome to the RC4WD family. This kit is a combination of many specially engineered and manufactured parts. Enjoy your build.
Clock 35 - Toyland. Construction instructions for Clock 35
 This clock has been designed for children, it is a stand-alone unit and can be positioned on a shelf or cabinet out of the reach of very young hands who may be tempted to touch. The clock is shown in two
Jenny Legs Assembly Instructions
 Jenny Legs Assembly Instructions R EXTENDED PHILLIPS BIT MM ALLEN WRENCH 6MM HEX DRIVE /" 007 Steelcase Inc. Grand Rapids, MI 90 U.S.A. Printed in U.S.A. Page of 6 88000 Rev F Jenny Club Instructions:
CHEVY 4100/4400 SUPERRAIL MOUNTING KIT WITH ADAPTER FOR B&W GOOSENECK PART #4432
 CHEVY 4100/4400 SUPERRAIL MOUNTING KIT WITH ADAPTER FOR B&W GOOSENECK PART #4432 Installation Instructions SPECIFICATIONS Fits 2011-2018 Chevy 2500 & 3500 Short Bed Mounts to B&W gooseneck part #1011 Hitch
FORD 4100/4400 SUPERRAIL MOUNTING KIT WITH ADAPTER FOR B&W GOOSENECK PART #4431
 FORD 4100/4400 SUPERRAIL MOUNTING KIT WITH ADAPTER FOR B&W GOOSENECK PART #4431 Installation Instructions SPECIFICATIONS Fits 1999 2016 Ford F250 & F350 Short Bed Mounts to B&W gooseneck part #1108 & 1111
For additional assistance call
 The following pages will help guide you through the process of assembling your new 48 custom prize wheel. Choose an assembly area with plenty of room to lay your pieces on the floor and also a bench or
Rebuilding the Original Ford 8N Front Bumper
 Rebuilding the Original Ford 8N Front Bumper by John Korschot - www.johnsoldiron.com February 2010 Almost everyone recognizes the original Ford front bumper. It's easy to spot as it drops towards the front
Mount to the Wall INSTALLATION MANUAL
 Mount to the Wall 15 Locate the Wooden Studs This step applies to wooden stud wall installation only. Determine and mark the exact locations of two stud centers on the wall. Wooden studs should be spaced
Big Sweep Lathe Dust Catcher System
 Big Sweep Lathe Dust Catcher System Version.0 Disconnect saw from power source before fitting or removing insert. Ear Protection proper ear protection when working with machinery. Use caution when handling
Ziroli D-17 Beech Staggerwing
 Ziroli D-17 Beech Staggerwing Parts List Vacuform Parts: Miscellanous Pieces 1 Four Side Panels 1 3/16" Tube, 2" Long 2 Lower Dash - Back Dash 2 Felt, 12x24 3 Dash 3 Cordury 12x24 4 Dash Hood 4 Aluminum
Post-Paint>Fuselage>Interior>Controls>Fit rudder pedals
 Post-Paint>Fuselage>Interior>Controls>Fit rudder pedals Objectives of this task: To fit the rudder pedals and steering links to the aircraft, and fit the rudder cable to the rudder pedals and set the deflection
VERSION 1.0 JANUARY 5, 2013 R2-ATL MOTOR MOUNT KIT ASSEMBLY GUIDE ASTROMECH DRIVE SYSTEM
 VERSION 1.0 JANUARY 5, 2013 R2-ATL MOTOR MOUNT KIT ASSEMBLY GUIDE ASTROMECH DRIVE SYSTEM R2-ATL MOTOR MOUNT KIT PURPOSE The R2-ATL motor mount is designed for use in Astromech s Droids up to 300 pounds.
TOOLS 2 ½ hole saw (a good sharp one. You re going to make 36 holes.) Sharp pencil Yard stick Compass Protractor Sandpaper Rasp Drill Motor Jig Saw
 Sharp pencil Yard stick Compass Protractor Sandpaper Rasp Drill Motor Jig Saw") My version of this upright rifle rack does not have a turntable or lazy Suzan on it. I need to be able to move my rifles around so I opted to put casters on the bottom of the rack. With four casters, it
My version of this upright rifle rack does not have a turntable or lazy Suzan on it. I need to be able to move my rifles around so I opted to put casters on the bottom of the rack. With four casters, it
Tortoise Switch Machines, Mounted Horizontally
 Tortoise Switch Machines, Mounted Horizontally by David King Have you ever used the Tortoise Switch Machines manufactured by Circuitron. These are a wonderful stall motor slow motion switch machine that
Murphy Door DIY Hardware Installation Manual
 Murphy Door DIY Hardware Installation Manual The Murphy Door Bi-Folding Bookshelf was designed to install IN FRONT of existing door ways, replacing the door or doors while concealing the door way. In MOST
Classic Kitchen Island
 America s leading woodworking authority Step by Step construction instruction. A complete bill of materials. Classic Kitchen Island Exploded view and elevation drawings. How-to photos with instructive
Installation Instructions for Vista Air Vertically Folding Walls
 Installation Instructions for Vista Air Vertically Folding Walls Use these instructions in conjunction with your shop drawings to see the specifics that are particular to the model you are installing.
Contour. Wall Style Adjustable Z Revised 01/30/2017
 Wall Style Adjustable Z000000201 Revised 01/30/2017 Page 2 of 9 Unpacking Your Shipment Unpack and iden fy each component in each box that you received. If your shipment is missing parts, or too many parts
2 1 2" Louver Shutter Instructions
 " Shutter Instructions Congratulations on your purchase of the Template Set! These instructions will guide you through the process of building a Plantation Shutter. Familiarity with the instructions will
Installing flat panels on the MPL15 wall mount
 Installing flat panels on the MPL15 wall mount The MPL15 (DS-VW775) is a full-service video wall mount that can accommodate tiled LCD panels with up to a 400 x 400 mm VESA pattern in portrait and landscape
Motorized or Crank Operated Fortress Zipper Track Shade with Housing and Side Track Installation Instructions
 Motorized or Crank Operated Fortress Zipper Track Shade with Housing and Side Track Installation Instructions Tools Needed Drill 3/8 Metal Drill Bit ¼ Masonry Drill Bit Measuring Tape Pencil 4 Level Phillips
GMC Cut-Out Fender Flares Set of 4
 GMC Cut-Out Fender Flares Set of 4 STEP 1 PRIOR TO INSTALLATION A) Bushwacker only approves installing the fl ares according to these written instructions with the hardware provided. WARNING: Failure to
Under Seat Storage Drawer Installation Instructions
 Under Seat Storage Drawer Installation Instructions Parts List: 1) Drawer Assembly 8) Self Tapping Screws 1) Instructions 1) Template Tools Needed: Drill and/or Bit Driver Tape Measure Jigsaw or metal
INSTALL INSTRUCTIONS
 Jeep JK Rear Corner Skins Product : JK200,JK201,JK202,JK203 Applica on : 2007+ Jeep Wrangler JK ( 2 Door and 4 Door ) Page ( 1 of 6 ) I WARNING Read the instruc ons completely before beginning installa
Installation Instructions
 DODGE 4100/4400 SUPERRAIL MOUNTING KIT WITH ADAPTER FOR B&W GOOSENECK PART #4433 Installation Instructions SPECIFICATIONS Fits 2003 2012 Dodge 2500 & 3500 Short Bed Mounts to B&W gooseneck part #1307 &
Davis Graveyard. Hauntcon Creating a 3-Axis Bucky Skull
 Davis Graveyard Hauntcon 2009 Creating a 3-Axis Bucky Skull 3 - Rare Earth Magnet - Cube - 0.500 x 0.500 x 0.500 $9.99 pk 4 3 - Rare Earth Magnet - Block - 0.500 x 0.500 x 0.125 $8.99 pk 10 How to Make
Router Table Floor Stand
 Router Table Floor Stand Owner s Manual 05J20.40 Introduction The Veritas Router Table Floor Stand has been designed as a free-standing router table workstation to work with the existing Veritas Router
RC4WD (R2D) R2 Disconnect Transmission Sideway Servo Mount Installation
 R2 Disconnect Transmission Sideway Servo Mount Installation") RC4WD (R2D) R2 Disconnect Transmission Sideway Servo Mount Installation In this manual you will find out how to install the R2D Sideway servo mount. The disconnect tranny is used to help in competition
RC4WD (R2D) R2 Disconnect Transmission Sideway Servo Mount Installation In this manual you will find out how to install the R2D Sideway servo mount. The disconnect tranny is used to help in competition
Norman's Grizzly G0602 Reverse Tumbler Plans
 Norman's Grizzly G0602 Reverse Tumbler Plans Pictures taken by Norman Author Norman here is the photos of the change gears for the G0602 lathe. reverse turning to the right or for left hand threads netural
PLANS BY TOM BURY MURPHY WORKTABLE TOTAL DIMENSIONS: FOLDED UP 30 X 48 X 0 FOLDED DOWN 30 X 58 X 84
 MURPHY WORKTABLE TOTAL DIMENSIONS: FOLDED UP 30 X 48 X 0 FOLDED DOWN 30 X 58 X 84 MATERIALS LIST: (2) 2 x8 x8 (3) 2 x4 x8 (1) 1 x2 x8 (1) 48 x96 3/4 plywood (2) 1-1/2 x30 continuous hinge (1) Left-side
Parts Included: T-Feet Assembly
 Parts Included: T-Feet Assembly Foot Kit: J-Rail Kit: Column Kit: 2 Feet 2 T-Top Supports 2 J-Rails Hex Rod to be Included on a Crank Assembly only. 2 Electric or Crank Columns 3 rd Leg option for 3 leg
PILOT SEAT AND HARNESS
 1. Locate the following parts PILOT SEAT AND HARNESS #84 threading needle, 1 each #88 lacing cord, 1 each #119 aluminum seat, 1 each #120 plywood, pilot seat bottom, 1 each #121 wood screw, 3 each #293
Motorcycle Lift Assembly Instructions
 Motorcycle Lift Assembly Instructions Copyright JCS 2009 Rev1M Page 1 Lift Table Assembly Instructions The following pages will assist you in the construction of your Motorcycle Lift Table. You will find
Hinge Mortising Jig. One of the make it or break it parts of building a. 6 ShopNotes No. 74
 Hinge Mortising Jig A Mortise for a Hinge. Quick, clean, and accurate that s the only way to describe the mortise you get with a trim router and this hinge mortising jig. One of the make it or break it
ADULT ASSEMBLY REQUIRED DUE TO THE PRESENCE OF SMALL PARTS, SHARP POINTS, SHARP EDGES
 ADULT ASSEMBLY REQUIRED DUE TO THE PRESENCE OF SMALL PARTS, SHARP POINTS, SHARP EDGES If you have any questions regarding assembly or if you are missing parts, do not return this item to the Sam s Wholesale
MATERIALS: TOOLS: CUT LIST:
 MATERIALS: (3) 4x4x8 Ft. Boards (8) 2x4x8 Ft. Boards 2 ½-inch Pocket Screws 2 ½-inch Wood Screws 1-inch Wood Screws (16) Figure 8 Tabletop Fasteners Wood Glue Wood Filler TOOLS: Tape Measure Pencil Carpenter
How to Make a Wedding Band 52 to 66 K, XL & XLH By the OSKRG vs.2
 How to Make a Wedding Band 52 to 66 K, XL & XLH By the OSKRG vs.2 Tools Needed: Large Vise Torch Welder Large Channel locks Drill Motor For a 52 through 55 K Model: o A 5/16 x 24 Tap & 17/64 bit For a
This manual will aid in the assembly of the FireBall V90 and FireBall X90. The assembly of both machines will be identical, unless specified.
 This manual will aid in the assembly of the FireBall V90 and FireBall X90. The assembly of both machines will be identical, unless specified. Step #1 Lay all parts out to verify quantities. (2) 2 x 25-1/4
Lumber Smith. Assembly Manual. If you are having problems assembling the saw and need assistance, please contact us at:
 Lumber Smith Assembly Manual If you are having problems assembling the saw and need assistance, please contact us at: 804-577-7398 info@lumbersmith.com 1 Step 1 Safety Carefully read the Owners Manual.
Metal Shapers Forums and Tech Rodding Roundtable Home Forums Events Members Webring Tech Merchandise Contact Chat Services Links Want Ads Advertising
 Metal Shapers Forums and Tech Home Forums Members Webring Tech Contact Chat Services On the following pages your will find detailed instructions on the parts needed and assembly instructions for a 12"
FORWARD FUSELAGE SIDES & REAR TOP SKINS
 FORWARD FUSELAGE SIDES & REAR TOP SKINS WORK REPORT Step No. Check Parts / Tools Qty Preparations. 1 [ ] 6F5-3 Upper Front Longerons 2 2 [ ] 6F5-5 Heel Support 1 3 [ ] 6F5-2 Front Floor Skin 1 3 [ ] Firewall
Turning Pendants with the Richard Joyner Eccentric Backer Plate
 Turning Pendants with the Richard Joyner Eccentric Backer Plate Vaughn McMillan August 2010 As the result of a great tool sharing effort by my friend Jonathan Shively at http://familywoodworking.org, I
Metallaire Installation Instructions
 CEILING INSTALLATION INSTRUCTIONS NAIL-UP INSTALLATION CAUTION: The edges of the metal panels are sharp! Wear heavy protective gloves when handling the metal panels. Metallaire panels are steel and designed
Installation Instructions
 FORD 20K Industry Standard Rail Custom Mounting Kit #2738 Gross Trailer Weight (Maximum)...20,000 lbs. Vertical Load Weight (Max. Pin Weight)...5,000 lbs. SYSTEM TOW CAPACITY Please note, in order to determine
RLP Mini Low Profile V Track Hardware sliding door hardware/ barn door track
 Page 1 of 9 Installation Suggestions for: RLP Mini Low Profile V Track Hardware sliding door hardware/ barn door track Read these instructions to end before starting installation or ordering hardware.
Installation Instructions
 CHEVY / GMC 20K Industry Standard Rail Custom Mounting Kit #2724 Gross Trailer Weight (Maximum)...20,000 lbs. Vertical Load Weight (Max. Pin Weight)...5,000 lbs. SYSTEM TOW CAPACITY Please note, in order
Ford Pick Up Rear leaf Spring Kit Installation Instructions
 1948-1956 Ford Pick Up Rear leaf Spring Kit Installation Instructions 1-800-984-6259 www.totalcostinvolved.com Parts 48 inch leaf (2) springs (4) U-bolts 3/8-24 x l 1/4bolts (16) & nuts (2) 1/2-20 x 4
Miter Saw Super Stand
 Quality Power Tool Accessories OWNER S MANUAL Miter Saw Super Stand Models 2875/2875XL IMPORTANT Read and understand all safety guidelines and instructions carefully before operating. GENERAL INFORMATION
OX CNC. Mechanical Assembly Instructions. S.A. Brown & Maker Store
 OX CNC Mechanical Assembly Instructions S.A. Brown & Maker Store v1.2 07 2017 Contents About The Maker Store Ox CNC Kit... 2 Unpack and Check All Components... 2 Tools Required... 2 Pre-Assembly Notes...
RACER TECH COMMANDER HD TIE ROD INSTALLATION
 RACER TECH COMMANDER HD TIE ROD INSTALLATION NOTE: These instructions are a universal explanation of how to install our HD Tie Rods. All kits are identical for all inner joints and nearly identical for
Hand Tool Identification Worksheet. Name: Screw driver. Purpose: To turn the screws. Name: chisels. Purpose: To remove/chip away materials
 Hand Tool Identification Worksheet Name: Screw driver Purpose: To turn the screws Safety Facts: Don t use for prying or as a chisel Name: chisels Purpose: To remove/chip away materials Safety Facts: Always
Assembly Instructions
 page 1 Serious personal-injury to the operator or bystanders, as well as damage to equipment or property, can occur, if all safety and assembly instructions, provided with this product, are not followed.
MATERIALS: TOOLS: CUT LIST:
 MATERIALS: TOOLS: (2) 2x2x8 Ft. Boards Tape Measure (2) 1x4x8 Ft. Boards Pencil (4) 1x2x8 Ft. Boards Carpenter s Square (1) 4x4 Ft. Sheet of ¾-Inch Plywood Drill with 5/16-inch Drill Bit (1) 1 ½-inch Thick
Free Standing Frame and Canopy
 Patriot Docks Free Standing Frame and Canopy Required Tools: Cordless Drill, 3/8 drill bit, 17mm wrench, 18mm wrench, 6mm hex key (included), 8mm hex key (included) Helpful Tips: Assembling and installing
BABY WOLF LOOM. Assembly Instructions for Knocked-Down Looms
 BABY WOLF LOOM Assembly Instructions for Knocked-Down Looms BEFORE YOU BEGIN Please read through the directions before beginning to assemble your loom. Unpack the loom parts carefully. Do not throw away
Bearing Overhaul Instructions for: Tallboy (.1) 2009
 2009") Bearing Overhaul Instructions for: Tallboy (.1) 2009 Tools Needed: 7900 Removal Tool 7902 Removal Tool 7900/7902/6902 Press Tool Grease Gun (included with frame) (2) ll/16" or adjustable wrenches 9/16"
Bearing Overhaul Instructions for: Tallboy (.1) 2009 Tools Needed: 7900 Removal Tool 7902 Removal Tool 7900/7902/6902 Press Tool Grease Gun (included with frame) (2) ll/16" or adjustable wrenches 9/16"
INSTRUCTION SHEET U19
 U19 All Refrigerator and All Freezer Trim Kit Installation Product Line: U19 All Refrigerator and All Freezer Models Parts Included in Kit TRIMKITEZ1 (Part# 297333500): Single Trim Kit Components Single
Silverware Chest Plan
 Silverware Chest Plan 05L14.01 Introduction 1. Measure the space required for your cutlery before beginning this project to be sure that it will fit in the drawers and top compartment. The best way to
AUTOMATIC ADVANCE MANUAL
 AUTOMATIC ADVANCE MANUAL AVL Looms, Inc. 3851 Morrow Lane, Suite #9 Chico, CA 95928-8305 530 893-4915 530 893-1372 fax # info@avlusa.com www.avlusa.com Copyright 2009 TABLE OF CONTENTS Page # I. Parts.........................
FIRST TEAM SPORTS, INC.
 FIRST TEAM SPORTS, INC. INVADER EZ-CRANK PORTABLE BASKETBALL GOAL ASSEMBLY INSTRUCTIONS Revised - 08/04/10 BILL OF MATERIALS (1) BASE TANK (1) BACKBOARD MOUNT (2) 5/16 X ¾ HEX BOLT (1) LOWER POST (2) SPRING
Make a Safe. Description. Lesson Objectives. Assumptions. Terminology
 Youth Explore Trades Skills Make a Safe Description Welding is a vast area in the metalworking field and a widely used joining process for metal. In this activity plan students will learn how to MIG weld
Page 1 C & C 30 MK II. Building the bulkhead Liquor Cabinet. 1. This package contains pages of instructions and sketches.
 Page 1 C & C 30 MK II Building the bulkhead Liquor Cabinet 1. This package contains pages of instructions and sketches. 2. Woodworking skills and equipment are essential to make the 33 pieces and assemble
INSTALLATION INSTRUCTIONS DODGE RAM 2 & 4WD 1500 PART # P5058
 INSTALLATION INSTRUCTIONS 2009-13 DODGE RAM 2 & 4WD 1500 PART # P5058 PARTS LIST: Qty Description Qty Description 1 Grille Guard 12 12-1.75mm Hex Nuts 2 Upper Frame Mounting s (for trucks without tow hooks
INSTALLATION INSTRUCTIONS
 INSTALLATION INSTRUCTIONS R5 STEP BOARD APPLICATION: 2009-2017 Dodge Ram 1500 Quad / Crew Cab 2010-2017 Dodge Ram 2500/3500 Crew Cab PART NUMBER: 28-51040, 28-51045, 28-51050, 28-51055 ITEM QUANTITY DESCRIPTION
A Quick-Change Gearbox For The 7x Minilathe
 A Quick-Change Gearbox For The 7x Minilathe Richard Hagenbuch 10 August 2002 This article describes how to a build a quick-change gearbox for your 7X minilathe. I'll describe one that I built as a prototype
Shoe Organizer Plans Our Home from Scratch
 Shoe Organizer Plans by Our Home from Scratch Our Home from Scratch LLC Page 1 Disclaimer Our Home from Scratch LLC and its legal owners cannot be held responsible for any loss, damage, injury or death
1949 to 1954 Chevrolet Dual Master Cylinder Conversion
 1949 to 1954 Chevrolet Dual Master Cylinder Conversion This document is a one stop shop to getting your brake system updated on your old Chevy. Whether you re going with a disc conversion or just sticking
20011, F100 - F150 - F250 - F350 P.U. & BRONCO Tools Needed for Installation:
 Rev-4 05-24-12 CUT OUT FLARES INSTALLATION INSTRUCTIONS FOR 20011, 20012 F100 - F150 - F250 - F350 P.U. & BRONCO Tools Needed for Installation: Step 1: Painting (A) 3/8 Drill (B) 3/16 Drill Bit (C) 5/16
Ford F150 Front Bumper
 2009-2011 Ford F150 Front Bumper Warning! Read the instructions completely before beginning the installation. Before tightening bolts, drilling or cutting where required, check to make sure that there
WOOD TOY NEWS. July 23, 2013 Tuesday
 WOOD TOY NEWS Make your own perfect turntable for spray painting toys with these useful tips. And it s fast, fun and easy to build! by Imants Udris Watch the video on our website at : http://www.toymakingplans.com/website/how-to/
CRP700 Benchtop Basic CNC Machine Assembly Instructions. Updated 9/11/2014 SHEET 1 of 25
 CRP700 Benchtop Basic CNC Machine Assembly Instructions Updated 9//0 SHEET of NOTE: This piece of extrusion is mounted wide side up Quick Tip: Lay extrusion on table as shown for easy assembly BASE ASSEMBLY:.
Deck Mount Installation with Bench
 Deck Mount Installation with Bench 1. Mark track with square. 2. Cut tracks with saw. 3. Drill ¼ hole (if needed.) 4. Countersink track. 5. Countersink all track 6. File all track ends. ends. 7. Lay out
Installation Instructions
 FORD 20K Industry Standard Rail Custom Mounting Kit #2760 Gross Trailer Weight (Maximum)...20,000 lbs. Vertical Load Weight (Max. Pin Weight)...5,000 lbs. SYSTEM TOW CAPACITY Please note, in order to determine
INSTALLATION TORSION SPRING FRONT OR REAR MOUNT LOW HEADROOM. 1 Cutting Vertical Track. 2 Fully Adjustable Jamb Brackets
 TORSION SPRING FRONT OR REAR MOUNT LOW HEADROOM Wayne Dalton, a division of Overhead Door Corporation P.O. Box 67, Mt. Hope, OH., 44660 Supplemental insert Copyright 2015 Wayne Dalton, a division of Part
Zodiac CH 601 XL drawing revision log, updates included in 4 th Edition, January 1, 2008.
 Zodiac CH 601 XL drawing revision log, updates included in 4 th Edition, January 1, 2008. 6-X-0 6-X-1 6-T-0 6-T-1 6-T-2 6-T-3 6-T-4 6-T-5 6-T-6 6-W-0 6-W-00 6-W-1 6-W-2 6-W-3 6-W-4 6-W-5 6-W-6 01/08 DRAWING
Technical Procedure. HIITMill (X) Push/Pull Brake Cable Install
 Push/Pull Brake Cable Install") HIITMill (X) Push/Pull Brake Cable Install Applies to: HIITMill and HIITMill X Required Tools: 2.5mm Allen Key 3mm Allen Key 4mm Allen Key 5mm Allen Key 6mm Allen Key 10mm Wrench 10mm Socket Ratchet Needle
HIITMill (X) Push/Pull Brake Cable Install Applies to: HIITMill and HIITMill X Required Tools: 2.5mm Allen Key 3mm Allen Key 4mm Allen Key 5mm Allen Key 6mm Allen Key 10mm Wrench 10mm Socket Ratchet Needle
Don't Be A Cart-Aleck
 Don't Be A Cart-Aleck Indulge your resourcefulness by building a classic gocart! (If you have a favourite youngster, you should probably know how to build a go-cart.) Materials: Tools Four wheels with
ADULT. Adirondack / Muskoka Chair Plans
 ADULT Adirondack / Muskoka Chair Plans Materials List 3/4" x 9 1/2" (1.9cm x 24.1cm) redwood, cedar or pine boards. Six, 8' (2.44m) boards should make one chair depending on knots and layout. You can also
Installation Instructions
 CHEVY / GMC 24K Industry Standard Rail Heavy Duty Custom Mounting Kit #2226 Gross Trailer Weight (Maximum)...24,000 lbs. Vertical Load Weight (Max. Pin Weight)...6,000 lbs. SYSTEM TOW CAPACITY Please note,
8030 Synergy Jeep JK Rear Long Arm Frame Brackets
 General Notes: SYNERGY MFG. 870 INDUSTRIAL WAY, SAN LUIS OBISPO, CA (805) 242-0397 8030 Synergy Jeep JK Rear Long Arm Frame Brackets These instructions are also available on our website; www.synergymfg.com.
Make a cupboard as a BCATS
 National Certificate in Building, Construction, and Allied Trades Skills (BCATS) Make a cupboard as a BCATS project Unit Standard 25921 Level 2, Credit 6 Name: Contents Reference Page What you need to
Anti-Chattering Retrofit Assembly
 Anti-Chattering Retrofit Assembly Please follow through these instructions carefully and thoroughly. If you have questions, feel free to contact a Bend-Tech service representative at our office 651-257-8715
Rugged Ridge Engine Transmission Skid Plate JK
 Installation Time: 1-2 Hours Tools Required: Rugged Ridge Engine Transmission Skid Plate 2012-2017 JK Sockets: 16mm, 17mm, 18mm deep well Socket Wrench Wrenches: 16mm, 18mm Torque Wrench Drill ½ Drill
GMC Cut-Out Fender Flares Set of 4
 GMC Cut-Out Fender Flares Set of 4 STEP 1 PRIOR TO INSTALLATION A) Bushwacker only approves installing the fl ares according to these written instructions with the hardware provided. WARNING: Failure to
BPF Toyota Tundra Mesh Installation Guide
 BPF 2007-2009 Toyota Tundra Mesh Installation Guide www.bpfabricating.com Tools Required Philips Screw Driver Flat Head Screw Driver Dremel or Rotary Tool Hand Saw or Multi Max Adjustable Square Tape Measure
Rebuilding Worn 9N/2N Shift Covers by John Korschot - (March 2010)
") Rebuilding Worn 9N/2N Shift Covers by John Korschot - www.johnsoldiron.com (March 2010) If you have a 9N, chances are that your shift cover looks like this. This particular shift cover is an aluminum one
Rebuilding Worn 9N/2N Shift Covers by John Korschot - www.johnsoldiron.com (March 2010) If you have a 9N, chances are that your shift cover looks like this. This particular shift cover is an aluminum one
Sentinel Electronic Safe Installation Guide
 Sentinel Electronic Safe Installation Guide by Rev 07/12/2004 P/N 100020 Table of Contents 1. OVERVIEW...3 2. SAFE INSTALLATION...3 2.1. TOOLS REQUIRED...3 2.2. SELECTING THE MOUNTING LOCATION...3 2.3.
Package contains. Required tools and consumables:
 Thank you for purchasing the TriTrix MTM Transmission Line cabinet kit. This cabinet kit was precision cut using CNC machinery for the best possible fit and finish. With a little time and patience, your
INSTALLATION GUIDE KPC SNBO-C31
 INSTALLATION GUIDE KPC SNBO-C31 Bolt-On Frame Step Notch 1963-1972 Chevrolet and GMC C10 Pickup Description: Bolt-on, frame step notch for 1963-1972 Chevrolet and GMC C10 pickup to provide additional suspension
Melamine Plastic Laminate. Toilet Partition Installation Manual
 Melamine Plastic Laminate Toilet Partition Installation Manual PHONE: FAX: 1-866-317-2786 ATTENTION DO NOT MIX FASTENER PACKS EACH FASTENER PACK HAS THE NECESSARY BOLTS, BARRELS AND SCREWS TO INSTALL THE
CHEVY/GMC SuperRail Mounting Kit #3117
 CHEVY/GMC SuperRail Mounting Kit #3117 #3100 SuperGlide (12K) Gross Trailer Weight (Maximum) Vertical Load Weight (Max. Pin Weight) 12,000 lbs. 3,000 lbs. Installation Instructions SPECIFICATIONS Fits