GHOST 400, GHOST 350, BUCK COMMANDER, PENETRATOR, QUAD 400, WILDCAT C5 & PANZER V CRANK COCKING DEVICE INSTRUCTION MANUAL
|
|
|
- Mervin Matthews
- 6 years ago
- Views:
Transcription

1 GHOST 400, GHOST 350, BUCK COMMANDER, PENETRATOR, QUAD 400, WILDCAT C5 & PANZER V CRANK COCKING DEVICE INSTRUCTION MANUAL CROSSBOW MODEL SHOWN IS OUR QUAD 400 BARNETT CROSSBOWS 955 LIVE OAK ST. TARPON SPRINGS, FL 34689
2 CRANK ASSEMBLY STEP 1 NOTE: ANCHORS WILL GO OVER STRING FROM SPOOLS TO CONTAIN THEM IN THE GROOVE. 2. right-side string spool 4. 1/4-20 socket-head cap screw 3. thumbscrew 6. crank handle assembly 5. 1/8 pins (4) 1. left-side string spool Insert 1/8 pins (5.) into right-side string spool (2.), then insert rightside string spool into middle stock hole. (Note: You may apply a white lithium grease into the spool bushing to reduce friction.) Insert left- side string spool (1.) into the middle stock hole. Important: Keep the string spools position the same way on both sides to allow even take-up of string during use (see note below). Once spools are connected, insert ¼-20 x 5/8 socket-head cap screw (4.) into right-side string spool (2.) and thread into left-side string spool (1.). To tighten, align crank handle (6.) with left-side string spool (1.) and thread in thumbscrew (3.). Using supplied Allen wrench, tighten ¼-20 x 5/8 socket-head cap screw (4.). NOTE: BE SURE THE STRING IS AT EQUAL LENGTHS ON BOTH THE RIGHT- AND LEFT-HAND SIDES OF THE SPOOL AND THAT THE KNOT HOLES ARE IN LINE WITH EACH OTHER ON BOTH SIDES BEFORE CONNECTING THEM TOGETHER (#1 & #2).
3 CRANK ASSEMBLY STEP 2 string string 7. right-side string anchor 9. finish cap (right side) 8. left-side string anchor 10. finish cap (left side) 11. #10-24 x 1 sockethead cap screw Insert right-side string anchor (7.) into front right stock hole. Insert left-side string anchor (8.) into front left stock hole. Insert #10-24 x 1 socket-head cap screw (11.) into left string anchor and tighten. Press right finish cap (9.) into right anchor hole and left finish cap (10.) into left anchor hole.
4 CRANK ASSEMBLY STEP catch cover 14. socket-head cap screws 12. spool catch 13. catch plate Insert spool catch (12.) into the right-side back hole. Insert catch plate (13.) into left-side back hole. Insert #4-40 socket-head cap crews (14.) through catch plate and thread into spool catch. Press catch cover (15.) into hole when completed.
5 IMPORTANT QUAD 400 CRANK COCKING DEVICE string goes over string anchor BUCK COMMANDER, GHOST 350, GHOST 400, PENETRATOR, WILDCAT C5 and PANZER V CRANK COCKING DEVICE string goes under string anchor

 2 3 8-16 x 1 thread")

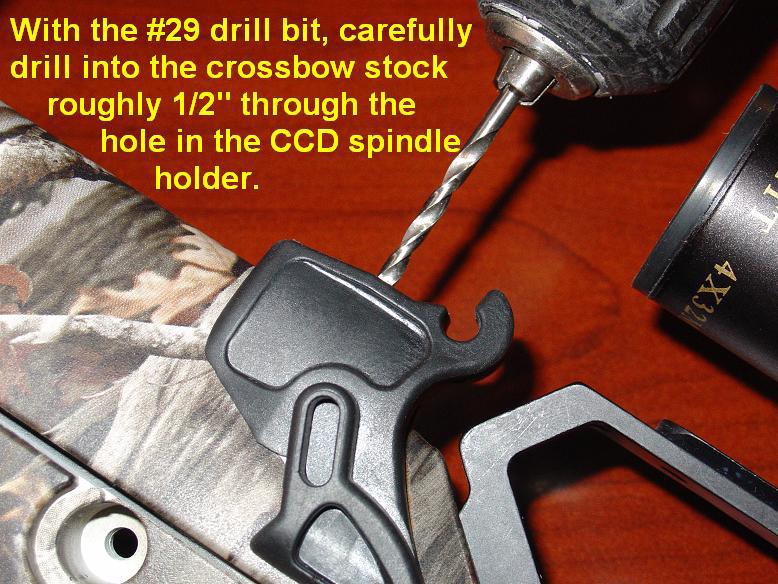
6 Buck Commander, Ghost 400, Ghost 350, Penetrator, Wildcat C5 Hook Spindle Bracket Installation Instructions Materials (Shown in Figure 1): Qty: 1 CCD Hook Spindle Mount 1 2 Double-side adhesive pad (1 spare) x 1 thread forming screw 1 4 #29 drill bit Not included 5 Phillips-head screwdriver Not included Not Pictured- Drill Not included Figure 1 Step 1. Step 2.

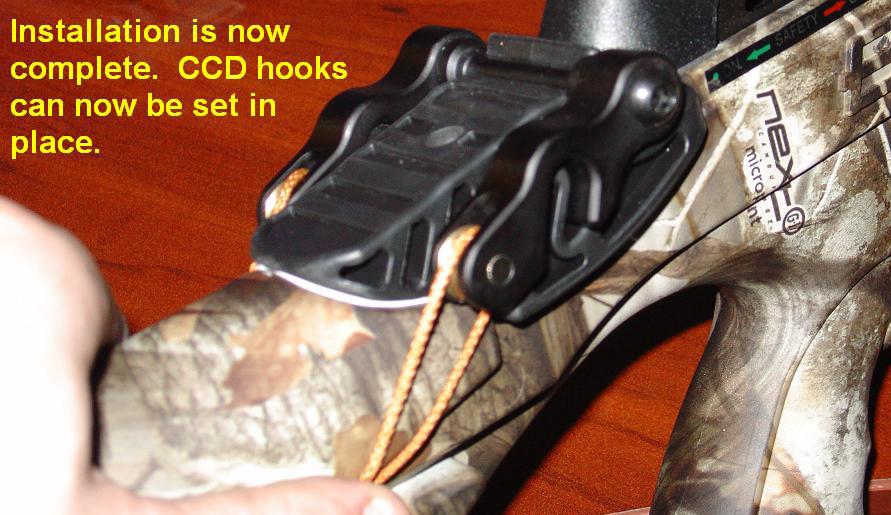

7 Step 3. (OPTIONAL) Step 4. (OPTIONAL) Step 5.
: Qty: 1 Quad CCD Hook Spindle Mount 1 2 Double-side adhesive pad (1")

8 Quad 400 Hook Spindle Bracket Installation Instructions Materials (Shown in Figure 1): Qty: 1 Quad CCD Hook Spindle Mount 1 2 Double-side adhesive pad (1 spare) x 1 thread forming screw 1 4 #29 drill bit Not included 5 Phillips-head screwdriver Not included Not Pictured- Drill Not included Figure 1 Step 1. Step 2.


9 Step 3. (OPTIONAL) Step 4. (OPTIONAL) Step 5.
10 WARNING: NEVER USE YOUR CRANK DEVICE TO UNCOCK / UNLOAD STRING FROM THE TRIGGER note: to disengage the ratchet feature, place toggle switch into the back and down position. this will allow crank handle to rotate in two directions. note: when cranking the string back, place the toggle switch in the forward position to activate the ratcheting feature. this will allow crank handle to rotate in one direction. With Crank Cocking Device (CCD) installed you are ready to use. 1. Place the Toggle Switch in the back and down position. 2. Attach String Puller Assembly to string by inserting crossbow string into hooks. 3. Install the Crank Handle to either right or left side (depending on your dominate hand) and tighten Thumbscrew. 4. Place Toggle Switch in the forward position to engage Right-Side String Spool and turn Crank Handle clockwise. Note: You should hear a ratcheting sound and the Crank Handle should not turn counterclockwise. 5. Turn the Crank Handle until the crossbow string engages the trigger and safety assembly. 6. While holding the Crank Handle securely, place the Toggle Switch into the back and down position. Turn Crank Handle slowly counterclockwise until the trigger assembly stops the crossbow string. 7. Place String Puller Assembly on the backside of scope mount or on the saddle bracket (see instructions pages 6-9).
11 SAFETY GUIDELINES DO NOT TURN HANDLE BACKWARDS WHILE COCKING THE BOW!! Doing this will damage the rope on the cranking device. The latch mechanism should always be engaged when cocking the crossbow. An audible clicking sound should be present while turning the handle in a forward rotation. If this clicking sound is not present, place the safety in the engaging position. UNCOCKING THE CROSSBOW: DO NOT UNCOCK THE CROSSBOW BY USING THE CRANK COCKING DEVICE. Doing so could cause bodily injury or damage your crossbow. The best way to unload your crossbow is to shoot an arrow into the ground. You may want to keep an old arrow with you for this purpose. DO NOT FIRE YOUR CROSSBOW WITH THE CRANK COCKING DEVICE HOOKS STILL FIXED ON THE STRING. Doing so may cause severe damage to your bow or cause personal injury. BARNETT OUTDOORS LIMITED WARRANTY The crank cocking device is guaranteed to the original purchaser to be free of manufacturer defects for a period of one year from the date of purchase. Our liability extends to parts, labor and return transportation to the customer. NOT COVERED: Ropes; transportation of defective product to our Service Department; damage caused by misuse, modification or failure to perform normal maintenance; any other expense, consequential damages, incidental damages or incidental damages, including damage to property or person. HOW TO OBTAIN SERVICE: DO NOT return the unit to the dealer that you purchased it from. Dealers are not authorized to make exchanges or returns on our behalf. Please contact our Sales Department to obtain a Return Authorization number (RA#) at Product returned without an RA# will be refused. Write the RA# on the outside of the package and attach to the product your name, address, telephone number and letter describing the problem. Carefully package and return, transportation prepaid, to: Barnett Outdoors, LLC Attn: Service Department 955 Live Oak St. Tarpon Springs, FL 34689
12 BARNETT OUTDOORS, LLC 955 LIVE OAK ST. TARPON SPRINGS, FL PHONE: FAX: Warranty Registration card (below) must be mailed within 10 days of the purchase to validate the warranty. WARRANTY CARD Name Age Address City State Zip Date of Purchase Phone # Place of Purchase Price Paid Purchase Address City State Zip
AM500-U Installation Guide
 1321 S. State College Blvd., Fullerton, CA 92831 USA Included Components Maximum Flat Panel Weight: 500 lb. / 226.79 kg. Wall Mount Bracket (Qty 2) Cross Bar 5/16 Flat Washers (Qty 6) Universal Spacers
CROSSBOWS SAFETY INFORMATION. BLITZ ASSEMBLY INSTRUCTIONS and OWNERS MANUAL. Outdoors. Outdoors. Please keep for future reference
 SAFETY INFORMATION BLITZ ASSEMBLY INSTRUCTIONS and OWNERS MANUAL NOT A TOY. ADULT SUPERVISION REQUIRED l MISUSE OR CARELESS USE MAY CAUSE INJURY OR DEATH l THE RANGE OF THIS CROSSBOW COULD BE DANGEROUS
NOVA-EXT Versatile Projector Mount Model: NOVA-EXT
 INSTALLATION MANUAL NOVA-EXT Versatile Projector Mount Model: NOVA-EXT NORTH AMERICA 3130 East Miraloma Avenue Anaheim, CA 92806 USA USA and Canada Phone: 800-368-9700 Fax: 800-832-4888 Other Locations
CROSSBOWS SAFETY INFORMATION. BLITZ ASSEMBLY INSTRUCTIONS and OWNERS MANUAL. Outdoors. Outdoors. Please keep for future reference
 SAFETY INFORMATION BLITZ ASSEMBLY INSTRUCTIONS and OWNERS MANUAL NOT A TOY. ADULT SUPERVISION REQUIRED l MISUSE OR CARELESS USE MAY CAUSE INJURY OR DEATH l THE RANGE OF THIS CROSSBOW COULD BE DANGEROUS
CROSSBOWS SAFETY INFORMATION. FURY ASSEMBLY INSTRUCTIONS and OWNERS MANUAL. Outdoors. Outdoors. Please keep for future reference
 SAFETY INFORMATION FURY ASSEMBLY INSTRUCTIONS and OWNERS MANUAL NOT A TOY. ADULT SUPERVISION REQUIRED l MISUSE OR CARELESS USE MAY CAUSE INJURY OR DEATH l THE RANGE OF THIS CROSSBOW COULD BE DANGEROUS
USER'S MANUAL. Compound Crossbow. Raging River Outdoor Products. Tel:
 Raging River Outdoor Products Compound Crossbow USER'S MANUAL Raging River Outdoor Products Tel: 1-470-200-0499 Email: sales@ragingriveroutdoors.com www.ragingriveroutdoors.com Please call or email us
INSTALLATION INSTRUCTIONS
 INSTALLATION INSTRUCTIONS CTM-MS1 Flat Panel Display Mount (26 to 37 ) NORTH AMERICA 3130 East Miraloma Avenue Anaheim, CA 92806 USA USA and Canada Phone: 800-368-9700 Fax: 800-832-4888 Other Locations
P4263TP. Installation Guide. Low-Profile Tilting Portrait Mount for Flat-Panels
 Low-Profile Tilting Portrait Mount for Flat-Panels 1321 S. State College Blvd., Fullerton, CA 92831 USA Weight Limit Maximum Flat Panel Weight: 175 lbs. Warning Statements THE WALL STRUCTURE MUST BE CAPABLE
PRC-LA Installation Guide
 1321 S. State College Blvd., Fullerton, CA 92831 USA Weight Limit Maximum Flat Panel Weight: Warning Statements 50 lbs. THE WALL STRUCTURE MUST BE CAPABLE OF SUPPORTING AT LEAST FOUR TIMES THE WEIGHT OF
O-Sullivan King 4 Poster Bed O-Sullivan Queen 4 Poster Bed Parts and Hardware List
 Parts and Hardware List A. Left Headboard Post 1 pc B. Right Headboard Post 1 pc C. Left Footboard Post 1 pc D. Right Footboard Post 1 pc E. Headboard Panel 1 pc F. Footboard Rail 1 pc. Spindles 4 pcs
TABLE OF CONTENTS LIMITATIONS OF WARRANTY CONT. QUALITY
 THANK YOU Congratulations on your recent purchase! We at Stryker know that you have a choice when it comes to your archery equipment, and we want to thank you for choosing us as your hunting partner. Your
THANK YOU FOR PURCHASING OUR STUDIO RTA CREATION STATION
 THANK YOU FOR PURCHASING OUR STUDIO RTA MODEL# 20672 IF YOU REQUIRE ANY ASSISTANCE WITH ASSEMBLY, PARTS, OR INFORMATION ON OTHER PRODUCTS, PLEASE VISIT OUR WEBSITE: www.studiorta.com OR CALL OR WRITE THE
TABLE OF CONTENTS LIFETIME WARRANTY
 THANK YOU Congratulations on your recent purchase! We at Stryker know that you have a choice when it comes to your archery equipment, and we want to thank you for choosing us as your hunting partner. Your
Speaker Mount Center Channel Speaker Adapter (PAC-301)
") I N S T R U C T I O N M A N U A L Speaker Mount Center Channel Speaker Adapter () The Speaker Mount Center Channel Speaker Adapter () uses the same interface as the Side Speaker Adapter and can be used
I N S T R U C T I O N M A N U A L Speaker Mount Center Channel Speaker Adapter () The Speaker Mount Center Channel Speaker Adapter () uses the same interface as the Side Speaker Adapter and can be used
#27541 Mobile Laptop. Charging Station. Assembly Instructions
 1 #27541 Mobile Laptop Charging Station Assembly Instructions #27541 Mobile Laptop Charging Station Part Drawing Description Qty Part Drawing Description Qty Hardware List P-1 Left Leg Welded 1 EA A Phil
INSTALLATION INSTRUCTIONS
 CREATING POSITIVE CUSTOMER EXPERIENCES INSTALLATION INSTRUCTIONS Universal Low Profile Tilt Mount for 42 to 63 Flat Panels NORTH AMERICA 3130 East Miraloma Avenue Anaheim, CA 92806 USA USA and Canada Phone:
INSTALLATION INSTRUCTIONS
 INSTALLATION INSTRUCTIONS Universal Short Throw Projector Arm Model: UNI-STA/UNI-EXT NORTH AMERICA 3130 East Miraloma Avenue Anaheim, CA 92806 USA USA and Canada Phone: 1-800-368-9700 Fax: 1-800-832-4888
White Quail Auto Trap
 White Quail Auto Trap WARNING SAFETY, STORAGE & USE IF THE MAIN SPRING IS ATTACHED AND THE TRAP ARM IS IN THE 6 O CLOCK POSITION, THE TRAP IS ARMED AND EXTREME CAUTION IS REQUIRED. TO DISARM, TURN THE
AST-2446 INSTALLATION INSTRUCTIONS
 AST-2446 Suspension Adapter AST-2446 INSTALLATION INSTRUCTIONS Single Stud Installation Step 1. Secure the ceiling plate to the ceiling structure (see WARNING). Step 2. Use suitable hardware (commercially
#27541 Mobile Laptop Charging Station
 1 #27541 Mobile Laptop Charging Station Assembly Instructions #27541 Mobile Laptop Charging Station Part Drawing Description Qty Part Drawing Description Qty Hardware List P-1 Left Leg Welded 1 EA A Phil
INSTALLATION INSTRUCTIONS
 CREATING POSITIVE CUSTOMER EXPERIENCES INSTALLATION INSTRUCTIONS PDS-PLUS Universal Projector Mount Model: NORTH AMERICA 3130 East Miraloma Avenue Anaheim, CA 92806 USA USA and Canada Phone: 1.800.368.9700
ASSEMBLY INSTRUCTIONS & OWNERS MANUAL
 ASSEMBLY INSTRUCTIONS & OWNERS MANUAL Congratulations on your purchase of the Inferno Fury 175lb Recurve Crossbow Package! Thank you for purchasing our product, we hope you have many years of enjoyment
INSTALLATION INSTRUCTIONS
 INSTALLATION INSTRUCTIONS Premier Mounts Tilting Wall Mount Model: TWM-085 For use with Panasonic 85 Flat Panel NORTH AMERICA 3130 East Miraloma Avenue Anaheim, CA 92806 USA USA and Canada Phone: 1.800.368.9700
INSTALLATION INSTRUCTIONS Medium Flat Panel Model MSP-SI1
 INSTALLATION INSTRUCTIONS Medium Flat Panel Model MSP-SI1 IMPORTANT! : The MSP-S11 Mount is designed for use with Sharp 45" LCD displays that have a 200mm x 200mm mounting pattern. IMPORTANT! : The mount
INSTALLATION INSTRUCTIONS
 INSTALLATION INSTRUCTIONS AM2 / AM2-B Articulating Swingout Arm NORTH AMERICA 3130 East Miraloma Avenue Anaheim, CA 92806 USA USA and Canada Phone: 1.800.368.9700 Fax: 1.800.832.4888 Other Locations Phone:
INSTALLATION INSTRUCTIONS
 INSTALLATION INSTRUCTIONS P4263F Universal Low Profi le Flat Mount for 42 to 63 Flat Panels NORTH AMERICA 3130 East Miraloma Avenue Anaheim, CA 92806 USA USA and Canada Phone: 1.800.368.9700 Fax: 1.800.832.4888
Installation Instructions PP-FCMA
 Installation Instructions PP-FCMA Step 1 Carefully remove a 24 (610mm)x48 (1120mm) or two 24 (610mm)x24 (610mm) suspended ceiling tiles. Step 2 Install the four (4) each ¼ x3 eye bolts securely into the
INSTALLATION INSTRUCTIONS
 INSTALLATION INSTRUCTIONS Polaris Universal Projector Mount Model: NORTH AMERICA 1321 S. State College Blvd. Fullerton, CA 92831 USA USA and Canada Phone: 1.800.368.9700 Fax: 1.800.832.4888 Other Locations
Installation and Assembly: Articulating Swivel Arm for 37" - 60" Flat Panel Displays
 Installation and Assembly: Articulating Swivel Arm for 37" - 60" Flat Panel Displays Models: PLA60, PLA60-S, PLAV60, PLAV60-S Max UL Load Capacity: 175 lb (79 kg) 2300 White Oak Circle Aurora, Il 60502
Installation Guide. Model VLS-TM1540. Universal Tilt/Pivot Wall Mount for use with Flat Panel Displays
 Installation Guide www.revenaproducts.com 4915 SW Griffith Drive Suite 302 Beaverton, OR 97005 Model VLS-TM1540 Universal Tilt/Pivot Wall Mount for use with 15-40 Flat Panel Displays Installation Guide
Models 2030 and 2040
 Models 2030 and 2040 Overview... 2 Tools Needed... 2 Hardware... 2 Assembly... 3-8 Installation... 9 Operation... 9 Maintenance... 10 Accessories... 10 Limited Warranty... 10 Document # 101290 0607 Printed
Manual Carton Closing Staplers
 Operator s Manual Manual Carton Closing Staplers SHB00-A Item No. 6400 -/8" Crown Carton Closing Stapler 5/8" and /4" (5mm and 8mm) Ask for Genuine INTERCHANGE A58 and A4 Staples SHB50-C Item No. 640 -/4"
Models 2230 and 2240
 Models 2230 and 2240 Overview... 2 Tools Needed... 2 Hardware...3 Assembly... 4-13 Installation... 14 Drawer Removal... 15 Operation... 15 Maintenance... 15 Accessories... 16 Limited Warranty... 16 Perform
MODEL M1023 QUICK CHANGE COLLET ATTACHMENT INSTRUCTION MANUAL. Phone: On-Line Technical Support:
 MODEL M1023 QUICK CHANGE COLLET ATTACHMENT INSTRUCTION MANUAL Phone: 1-360-734-3482 On-Line Technical Support: tech-support@shopfox.biz #6727BL COPYRIGHT JANUARY, 2005 BY WOODSTOCK INTERNATIONAL, INC.
INSTALLATION INSTRUCTIONS
 INSTALLATION INSTRUCTIONS Universal Swingout Arm Model: AM300/AM300-B NORTH AMERICA 3130 East Miraloma Avenue Anaheim, CA 92806 USA USA and Canada Phone: 1.800.368.9700 Fax: 1.800.832.4888 Other Locations
Models 2130 and 2140
 Models 2130 and 2140 Overview... 2 Tools Needed... 2 Hardware... 2 Assembly... 3-10 Installation...11 Operation... 11 Maintenance... 12 Accessories...12 Limited Warranty... 12 Printed in USA 2007 Perform
Models 2130 and 2140
 Models 2130 and 2140 Overview... 2 Tools Needed... 2 Hardware... 2 Assembly... 3-10 Installation...11 Operation... 11 Maintenance... 12 Accessories...12 Limited Warranty... 12 Perform the following sequence
THANK YOU FOR PURCHASING OUR STUDIO RTA PROJECT STATION
 THANK YOU FOR PURCHASING OUR STUDIO RTA MODEL# 50040 BLACK/MAPLE, 50042 PEWTER/CHERRY IF YOU REQUIRE ANY ASSISTANCE WITH ASSEMBLY, PARTS, OR INFORMATION ON OTHER PRODUCTS, PLEASE VISIT OUR WEBSITE: www.studiorta.com
Parts list Instruction guide Warnings Please read carefully before assembling and using product.
 Parts list Instruction guide Warnings Please read carefully before assembling and using product. Jet Rail XL Part Number 27377 Tools required for assembly Hammer 9/16 Wrench 3/4 Wrench Ratchet 9/16 Socket
Display-Top Apothecary Cabinet. Assembly Instructions. Page 1
 Display-Top Apothecary Cabinet Assembly Instructions Page 1 Display-Top Apothecary Cabinet Parts List Please check packaging for all parts and hardware before discarding. Unpack and lay parts on clean,
B B B
 Winchester SXP Gauge Tactlite Six Position Adjustable Shotgun Stock with Scorpion Recoil System B..0.00 B..0.00 B..0.00 Removable/Adjustable Tactical Cheekrests X Scorpion Recoil Pad Dual Sided QD Attachment
GB-AVSTOR5 Ceiling Equipment Storage Box with Pipe Coupler
 Ceiling Equipment Storage Box with Pipe Coupler INSTALLATION INSTRUCTIONS CREATING POSITIVE CUSTOMER EXPERIENCES 9534-500-021-00 Contents Weight Limit... 2 Warning Statements... 2 Installation Tools...
RULTRACT RETRACTOR CABLE REPLACEMENT INSTRUCTIONS. Rultract, Inc. is the ONLY authorized service center in the U.S.A.
 RULTRACT RETRACTOR CABLE REPLACEMENT INSTRUCTIONS Rultract, Inc. is the ONLY authorized service center in the U.S.A. When your Rultract instrument needs repair or service, contact Rultract Inc. or Rultract
31082 INSTALLATION INSTRUCTIONS
 08 INSTALLATION INSTRUCTIONS Safety glasses should be worn at all times while installing this product. YEARS: 07-CURRENT MAKE: HONDA MODEL: RIDGELINE STYLE: TRUCK WARNING: NEVER EXCEED YOUR VEHICLE MANUFACTURER'S
REPLACEMENT TARP for SRT-2 SPOOL ROLL TARP
 REPLACEMENT TARP for SRT-2 SPOOL ROLL TARP NOTICE TO INSTALLER: Even if familiar with product, read instructions prior to installation as improvements may be made without notice. Always handle components
REPAIR INSTRUCTIONS: CABLE
 The repair instructions describe replacing the Cable in the Easy Sun PARASOL Sunshade. These repair instructions are intended only for persons with experience of using the tools required. Please read the
Please read and understand the OnBoard Timpani Cart Owner s Manual before using the Timpani Cart.
 Assembly and Owner s Manual OnBoard Timpani Cart Performance Position Towing Position CONTENTS Important User Information...........................2 General......................................2 Manufacturer.................................2
E-PLEX 3X00 SERIES NARROW STILE LOCK INSTALLATION INSTRUCTIONS
 E-PLEX 3X00 SERIES NARROW STILE LOCK INSTALLATION INSTRUCTIONS TABLE OF CONTENTS Tools Required.................................................................3 A. Door Preparation - Remove Existing Outside
OWNER S MANUAL C 1O C K L O A D S Q U E E Z E G A M E O V E R >> >> >>
 OWNER S MANUAL C 1O C K >> L O A D >> S Q U E E Z E >> G A M E O V E R THANK YOU Congratulations on being the proud new owner of the Stryker Crossbow. The Stryker Crossbow is designed to be a safe and
INSTALLATION INSTRUCTIONS
 INSTALLATION INSTRUCTIONS PP-FCTA Suspended Ceiling Adapter NORTH AMERICA 3130 East Miraloma Avenue Anaheim, CA 92806 USA USA and Canada Phone: 1.800.368.9700 Fax: 1.800.832.4888 Other Locations Phone:
Installation and Assembly: Recessed Cable Management and Power Storage Accessory Box
 Installation and Assembly: Recessed Cable Management and Power Storage Accessory Box Models: IBA3, IBA3-W 2300 White Oak Circle Aurora, Il 60502 (800) 865-2112 Fax: (800) 359-6500 www.peerlessmounts.com
STRINGING MACHINE OWNER'S MANUAL. Copyright 1998 GAMMA Sports - All Rights Reserved
 6002 STRINGING MACHINE OWNER'S MANUAL Issue 3 - June 20, 1998 Copyright 1998 GAMMA Sports - All Rights Reserved 6002 OWNER'S MANUAL TABLE OF CONTENTS PAGE 1... WARRANTY PAGE 2... FEATURES PAGE 3... ASSEMBLY
Security Products & Services...That Never Sleep. Sur-Lock. I/O 2000L Family of Exit Control Alarm Locks. Installation Instructions
 Security Products & Services...That Never Sleep Sur-Lock I/O 2000L Family of Exit Control Alarm Locks Installation Instructions IMPORTANT It is important that you read and follow these instructions carefully.
AM95 Installation Guide
 1321 S. State College Blvd., Fullerton, CA 92831 USA Included Components: Maximum Flat Panel Weight: 95 lb. / 43.1 kg. M4 X 25mm M5 X 25mm M6 X 12mm (Qty 2) M6 X 25mm M8 X 25mm Allen Key Plastic Cover
INSTRUCTION BOOK FOR. UTB Contour
 INSTRUCTION BOOK FOR UTB Contour Included Hardware Tools Required for Installation Large (47 ) (1) Screens under 104" in viewing width (2) Screens 104" and over in viewing width Phillips Screwdriver Pencil
A A A
 Hatsan Escort GA Akita Adjustable A..0.03 A..0.03 A..30.03 3 Four Position Adjustable Scorpion Recoil Pad Adjustable Soft Touch Padded Cheekrest 3 70.0795.0 Hatsan Escort GA Akita Adjustable [] M8 x.5
RZ 200 Parts Diagram. To avoid confusion during installation remove this page and router being installed pages, return others to box.
 Collar Page 1 To avoid confusion during installation remove this page and router being installed pages, return others to box. Caution: Before and during installation of Router Raizer make sure power switch
INSTALLATION INSTRUCTIONS
 INSTALLATION INSTRUCTIONS Universal Swingout Arm for 37 to 47 Flat Panels Model: AM80 NORTH AMERICA 3130 East Miraloma Avenue Anaheim, CA 92806 USA USA and Canada Phone: 1-800-368-9700 Fax: 1-800-832-4888
Installation Operation Care
 Installation Operation Care Designer Roller and Designer Screen Shades Standard and Cassette Cordless Lifting System CONTENTS Getting Started: Product Views... 1 Tools and Fasteners Needed... 3 Installation
K ARICA ROUND SHOWER ENCLOSURE
 K-7050 ARICA ROUND SHOWER ENCLOSURE 1. BEFORE YOU BEGIN HOW TO USE THESE INSTRUCTIONS Please read these instructions carefully to familiarize yourself with the required tools, materials, and installation
HOME BAR SERIES 3 DRAWER BASE
 HOME BAR SERIES 3 DRAWER BASE Warning: Excessive weight hazard! Use two or more people to move, assemble or install wine cabinets to avoid back injury. Do not leave children unattended near cabinets. High
Tablet Arm for Wenger Playright Chairs
 Assembly Instructions Tablet Arm for Wenger Playright Chairs CONTeNTs Before You Begin..........................................................2 Warranty.................................................................2
INSTALLATION QUICK ADJUST RELOCATOR FOR TOUR-PAK 8973
 FOR TOUR-PAK 8973 PARTS INCLUDED 1 Base Plate Assembly 1 Right Side Extruded Slider Assembly 1 Left Side Extruded Slider Assembly 1 Filler Panel 1 Hardware Kit 1 Stop Block 2 1/4-20 x 1/2" Hex Head Cap
HOME BAR SERIES 3 DRAWER BASE STOP. Warning: Excessive weight hazard! ATTENTION: Is your cabinet damaged?
 HOME BAR SERIES 3 DRAWER BASE Warning: Excessive weight hazard! Use two or more people to move, assemble, or install cabinets and locker to avoid back injury. Do not leave children unattended near cabinets.
Gared Pro-S Portable Backstop
 Models: 9616 & 9618 Installation, Operation and Maintenance Instructions Please read all instructions before attempting installation or operation of these units SAVE THESE INSTRUCTIONS FOR FUTURE USE PUBLICATION
MERCENARY WHISPER 390 Compound Crossbow OWNER S MANUAL
 MERCENARY WHISPER 390 Compound Crossbow OWNER S MANUAL READ ALL INSTRUCTIONS AND WARNINGS BEFORE USING If you have any questions about this product or need some help, do not return the product to the store
SM-RAZOR-T-M/L/XL. Strong Low Profile Tilt Mount for Ultra-Thin Flat-Panel TVs INSTRUCTION MANUAL
 SM-RAZOR-T-M/L/XL Strong Low Profile Tilt Mount for Ultra-Thin Flat-Panel TVs INSTRUCTION MANUAL WARNINGS: Installation of this product should be done by a qualified professional. Do not begin installation
ASSEMBLY AND ADJUSTMENT
 EPPA MONITOR ARM EPPA Rev A 10/17 Model EPPA-XXX ASSEMBLY AND ADJUSTMENT EPPA MONITOR ARM PARTS AND TOOLS PLEASE REVIEW these instructions before beginning the assembly and adjustment procedures. Check
Installation Instructions BestRail Ladder Rack Must be used with BestRail Accessories: Overhead Rack
 Installation Instructions BestRail Ladder Rack Must be used with Accessories: 42791 Can be used with Accessories: 42793 Tie Down 42794 Retractable Tie Down The channels in the Ladder Rack are the same
SM-RAZOR-F-M/L/XL. Strong Low Profile Fixed Mount for Ultra-Thin Flat-Panel TVs INSTALLATION MANUAL
 SM-RAZOR-F-M/L/XL Strong Low Profile Fixed Mount for Ultra-Thin Flat-Panel TVs INSTALLATION MANUAL WARNINGS: Installation of this product should be done by a qualified professional. Do not begin installation
PART #MSP-DCCST Flat Panel Tilt Mount
 INSTALLATION INSTRUCTIONS PART # Flat Panel Tilt Mount The Flat Panel Tilt Mount is a quick disconnect mounting solution for flat panel displays. The mount features adjustability between 0 and 15 degrees
GEARGRID Seattle / SCUBA Storage System
 GEARGRID Seattle / SCUBA Storage System Assembly Instructions & Owners Manual Thank you for choosing the Geargrid Seattle / SCUBA Storage System. Geargrid is committed to high-quality products and your
CROSSBOW OWNER S MANUAL
 CROSSBOW OWNER S MANUAL TABLE OF CONTENTS GENERAL USE 2 Introduction... 2 General Use & Operation Warnings... 2 General Use & Operation Safety Guidelines... 5 Crossbow Type Overview...7 Quiver Overview...
INSTALLATION INSTRUCTIONS
 INSTALLATION INSTRUCTIONS Ultra Short-Throw Projector Wall Mount Model: UNIU NORTH AMERICA 3130 East Miraloma Avenue Anaheim, CA 92806 USA USA and Canada Phone: 1-800-368-9700 Fax: 1-800-832-4888 Other
Crestline Dampening System. Installation Instructions. Hamada RS34 & VS34 Parent Unit DU34 Upper Unit. For Presses Originally Equipped With
 Crestline Dampening System Installation Instructions Hamada RS34 & VS34 Parent Unit DU34 Upper Unit For Presses Originally Equipped With Molleton Dampeners X88-78 01/2001 Rev-A GENERAL INFORMATION ATTENTION
Adjustable Performance Trim Tab Kit PART# - RS27110-APT
 Adjustable Performance Trim Tab Kit PART# - RS27110-APT APPLICATION(S): Sea Doo RXP-X 260 We strongly recommend the use of a service manual to familiarize yourself with the various components and procedures
BASIC TOOLS AND MATERIALS NEEDED. Introduction HOW TO CARE FOR YOUR DOOR
 DO IT RIGHT! Use a Kohler Certified Installer, (KCI), for the installation of your Kohler Shower Door. Contact your Kohler Distributor/Showroom or call Kohler at 1-800-4-KOHLER for the KCI nearest you.
FM125 & FM126 Service Guide
 FM125 & FM126 Service Guide FM125-0022 & FM125-0024 Repair Kit 1 2 3 4 #1-1 Pc. FM125-5012 Ball Carrier Installation Tool (FM125-0022 Only) #2-2 Pcs. P5-287-R0 O-Ring #3-2 Pcs. P5-067-R2 O-Ring #4-1 Pc.
User Manual. Where Imagination Meets Innovation. FRESH AERO Easy Seat Tool For Grumman AA1 & AA5 Series Aircraft
 FRESH AERO Easy Seat Tool For Grumman AA1 & AA5 Series Aircraft Alpha Model For Grumman AA-1 & AA-5 Series Aircraft with Access Holes in Front Seat Buckets User Manual The Steelebrook Group Where Imagination
Cam Handle Service Guide
 Cam Handle Service Guide Page 2. Introduction Page 3. Troubleshooting guide Page 4-5. Adjusting the clamp force Page 6-7. Disassembling, greasing and replacing components Page 8-9. Replacing the post bearings
Installation and Assembly: Recessed Cable Management and Power Storage Accessory Box
 Installation and Assembly: Recessed Cable Management and Power Storage Accessory Box Models: IBA2AC, IBA2AC-W 2300 White Oak Circle Aurora, Il 60502 (800) 865-2112 Fax: (800) 359-6500 www.peerlessmounts.com
AUC Cell Assembly Torque Stand. User Manual
 AUC Cell Assembly Torque Stand User Manual WARRANTY Spin Analytical Inc., warrants this product to be defect free in both material and workmanship for 90 days from the date of shipment. Labor services
Models: PLAV70-UNL, PLAV70-UNLP. Installation and Assembly - Universal Articulating Swivel Double-Arm for 42" - 95" Plasma Screens
 Installation and Assembly - Universal Articulating Swivel Double-Arm for 42" - 95" Plasma Screens Models: PLAV70-UNL, PLAV70-UNLP Max UL Load Capacity: 200 lb (91 kg) 2300 White Oak Circle Aurora, Il 60502
INSTALLATION INSTRUCTIONS
 INSTALLATION INSTRUCTIONS Compact Power Amplifier NORTH AMERICA 3130 East Miraloma Avenue Anaheim, CA 92806 USA USA and Canada Phone: 1.800.368.9700 Fax: 1.800.832.4888 Other Locations Phone: (001).714.632.7100
OPERATORS MANUAL WEEKENDER STEEL LADDER RACK
 OPERATORS MANUAL WEEKENDER STEEL LADDER RACK WWW.WEATHERGUARD.COM MODELS 1450 & 1475 1475 Shown INSTALLATION TIME Approximate installation time: 60 minutes (depending on truck equipment installation experience
Modular Video Wall System with Push-to-Pop-out and Anti-Theft Features VW401P. User s Manual
 Modular Video Wall System with Push-to-Pop-out and Anti-Theft Features Contents Weight Limit.... 2 Warning Statements.... 2 Installation Tools.... 3 Parts List... 4 Features.... 5 Installing the Mount....
Tilting, Swiveling & Rotating Flat Panel Wall Mount
 Tilting, Swiveling & Rotating Flat Panel Wall Mount Model: VXA980TC +5 to -5 +5 to -5 Supports most 0-80 Flat Panel TVs Maximum Weight Capacity: 32 lbs. Supports VESA Sizes up to 600x500 For technical
Electric Skein Winder
 Electric Skein Winder Assembly and Use Package Contents 1 - Triangular Body (w/ motor) 1 - Cross Arm 1 - Left Foot (w/ yarn guide) 1 - Right Foot 1 - Adjustable Finger (w/ yarn clip) 3 - Adjustable Fingers
CROSSBOWS AXCT185. Compound Crossbow OWNER S MANUAL
 CROSSBOWS AXCT185 Compound Crossbow OWNER S MANUAL READ ALL INSTRUCTIONS AND WARNINGS BEFORE USING If you have any questions about this product or need some help, do not return the product to the store
Assembly Instructions and Parts Manual JPSF-1 Fence and JPSR Rail Set
 Assembly Instructions and Parts Manual JPSF-1 Fence and JPSR Rail Set WALTER MEIER (Manufacturing) Inc. 427 New Sanford Road LaVergne, Tennessee 37086 Part No. M-708482 Ph.: 800-274-6848 Revision C2 02/2013
Installation Instructions Factory Style Bow Kit
 INSTALLATION TIME Installation Instructions Factory Style Bow Kit SKILL LEVEL Vehicle Application: Jeep Wrangler JK 2 Door 2007 Current Part Number: 55000 Compatible with original equipment soft tops,
25-A Shawnee Way Bozeman, MT Fed ID PH FAX
 25-A Shawnee Way Bozeman, MT 59715 Fed ID 81-0414516 PH 406-586-9393 FAX 406-585-7378 SkyBar Mount for UTV with 1 ¾ 2 Roll Bar Standard Mount (optional mount on page 3) This gun rack is supplied with brackets
Rhino Packing Gland Tool
 Instruction Sheet P/N Rhino Packing Gland Tool 1. Description See Figure 1. The Rhino packing gland tool is used to remove the packing gland from Rhino bulk unloader pumps. The tool consists of two components,
INSTALLATION INSTRUCTIONS Small Flat Panel Height-Adjustable, Extended Pitch Swing Arm Wall Mount Model KWE-110
 INSTALLATION INSTRUCTIONS Small Flat Panel Height-Adjustable, Extended Pitch Swing Arm Wall Mount Model KWE-110 The KWE dual swing arm wall mount is designed to provide a broad range of viewing for Small
Installation Instructions
 Installation Instructions To ensure that your installation proceeds smoothly--please read these instructions carefully before you begin. P r o d u c t s Luxury Faucets and Accessories Jean Nouvel Product
RESIDENTIAL MOTORIZED STORAGE UNIT
 BY V-BRO PRODUCTS RESIDENTIAL MOTORIZED STORAGE UNIT Model: GGR220 INSTALLATION AND OPERATING INSTRUCTIONS Distributed Exclusively by V-BRO PRODUCTS For technical questions and replacement parts, please
INSTALLATION INSTRUCTIONS
 INSTALLATION INSTRUCTIONS R5 STEP BOARD APPLICATION: 2009-2017 Dodge Ram 1500 Quad / Crew Cab 2010-2017 Dodge Ram 2500/3500 Crew Cab PART NUMBER: 28-51040, 28-51045, 28-51050, 28-51055 ITEM QUANTITY DESCRIPTION
INSTALLATION INSTRUCTIONS
 INSTALLATION INSTRUCTIONS Universal Short Throw Projector Wall Mount Model: UNI/UNIE NORTH AMERICA 3130 East Miraloma Avenue Anaheim, CA 92806 USA USA and Canada Phone: 1-800-368-9700 Fax: 1-800-832-4888
Installation Procedures Dodge Charger R/T Scat Pak, SRT/Hellcat. SNS 66a
 Installation Procedures 2015-2017 Dodge Charger R/T Scat Pak, SRT/Hellcat SNS 66a Warning: Please read directions completely before starting. If you have any questions please contact BMPP before beginning
Model Assembly & Operating Instructions
 30 SHEAR BRAKE ROLL Model 05907 Assembly & Operating Instructions Diagrams within this manual may not be drawn proportionally. Due to continuing improvements, actual product may differ slightly from the