Enlighten. Enlighten. exponorm. Legend. Legend. (1) Left Mitre Edge Extrusion with pre-installed threads for baseplate attachment
|
|
|
- Jonathan Cross
- 5 years ago
- Views:
Transcription


 Right")

 Left")


 Top Left")

 Vertical")
 LED Cord")
 Small Thumb")


1 exponorm. LED BackWall Montage - Anleitung Legend (8) Cross Seam Stabilizer (CSS) (2) Crescent Baseplate (1) Right Mitre Edge Extrusion with pre-installed threads for baseplate attachment (1) Left Mitre Edge Extrusion with pre-installed threads for baseplate attachment (1) Bottom Left Extusion with pre-installed L-Bracket and foot (1) Bottom Middle Extrusion with pre-installed foot (1) Bottom Right Extrusion with pre-installed L-Bracket and foot (1) Top Right Mitre Edge Extrusion (1) Top Left Extusion with pre-installed L-Bracket (1) Top Middle Extrusion (1) Top Right Extrusion with pre-installed L-Bracket (1) Top Left Mitre Edge Extrusion Legend (2) Flat End Middle Side Extrusion (1) Middle Vertical Support (2) Vertical Support End (2) LED Driver (1) LED Cord Extension (4) Thumb Screws (2) Small Thumb Screws Messebau. Ausstellungssysteme. Präsentationsmedien. Showroom St.Gallen Expo Norm AG Schachenstrasse St.Gallen T info@exponorm.ch


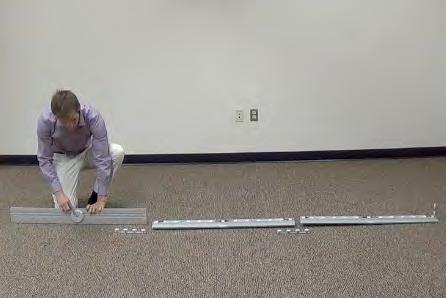

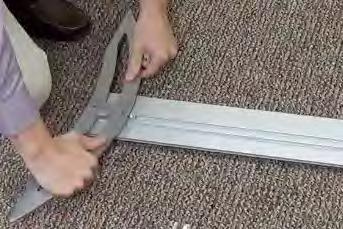


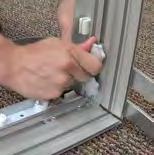


2 LED BackWall Montage - Anleitung Lay out all hardware and parts. Lay out 3 extrusions with pre-installed foot at the bottom. Insert Cross Seam Stabilizer (CSS) halfway into bottom left extrusion and tighten 2 Bottom left and right extrusions have pre-installed L- Brackets. Connect middle extrusion and tighten 2 Remove LED connection from the clips. Connect the two ends and stow back into the clips. Insert CSS halfway into middle extrusion and tighten 2 Connect extrusion with pre-installed L- Bracket and tighten 2 Attach baseplate to extrusion with mitre edge and pre-installed threads. Secure with Connect extrusion assembly onto L-Bracket and tighten *Important* See that all LED connections are stowed in clips to prevent damage from mitre edges. Repeat for other side. Attach baseplate to the other extrusion with mitre edge and pre-installed threads. Slide extrusion assembly onto L-Bracket and tighten 2 Insert CSS halfway into middle left Connect middle left extrusion and tighten 2 Insert CSS halfway into middle right Connect middle right extrusion and tighten 2 Insert CSS halfway into upper left Mitre edge will be on top. Connect upper left extrusion and tighten 2 Insert CSS halfway into upper right Mitre edge will be on top. Connect upper right extrusion and tighten 2 Lay out three part vertical support. Connect the end of the middle bar and connect one end of the vertical support. Secure with thumb screw. Connect the other end of the vertical support to the middle bar. Secure with thumb screw.


3 Upon assembly, each end will have a knob connector. Insert vertical support into the back channel of the frame closest to the LED lights. Tighten the thumb screw to lock in place. Insert CSS halfway into top left extrusion with pre-installed L-Bracket and tighten 2 Connect top middle extrusion and tighten 2 Remove LED connection from clips. Connect and stow back into clips. Insert L-Bracket into mitre edge of upper left extrusion. Place vertical support into the back channel of the top middle extrusion. Tighten thumb screw to lock in place. Tighten 2 Recess CSS into top right extrusion and tighten thumb screw to hold in place. Insert L-Bracket into mitre edge of extrusion. Loosen thumb screw and slide CSS halfway into extrusion. Tighten all four Remove LED connection from the clips. Connect and stow back into the clips. Tighten 2 Your frame assembly is complete.


4 Graphic Setup Instructions Insert Silicone Edge Graphic (SEG) into top left corner of the frame. Insert SEG into top right corner. Insert SEG into bottom right corner. Insert SEG into bottom left corner. Insert SEG into top center channel. Insert SEG into bottom center channel. Insert SEG into right middle channel. Insert SEG into left middle channel. Press the remaining SEG into the channel along the left side. Press the remaining SEG along the bottom. Press the remaining SEG along the right side. Insert the remaining SEG along the top. LED Light Setup Instructions Remove both LED drivers and one cord Connect top LED connector to the cord Stow connection back into clip. Thread cord down the inside channel onto clips. Disconnect cord extension from driver. Attach backlit liner to the Velcro on the top left corner of the frame. Continue to attach Velcro along the top of the frame. Velcro the right side and the left side. Attach with some tension on the bottom. Peel back the bottom left corner of the backer. Remove LED connector from clip. Insert LED connector and cord extension through the hole in the backlit liner. Reattach the corner of the backlit liner to the frame. Connect the LED driver to the LED connector for the bottom row of lights and connect the other LED driver to the cord extension for the top row of lights. Plug into power strip and turn on.


5 LED Light Setup Instructions Remove both LED drivers and one cord Connect top LED connector to the cord Stow connection back into clip. Thread cord down the inside channel onto clips. Disconnect cord extension from driver. Attach backlit liner to the Velcro on the top left corner of the frame. Continue to attach Velcro along the top of the frame. Velcro the right side and the left side. Attach with some tension on the bottom. Peel back the bottom left corner of the backer. Remove LED connector from clip. Insert LED connector and cord extension through the hole in the backlit liner. Reattach the corner of the backlit liner to the frame. Connect the LED driver to the LED connector for the bottom row of lights and connect the other LED driver to the cord extension for the top row of lights. Plug into power strip and turn on. RollOne Packing Instructions RollOne Case and Extrusion Box. Insert extrusions. Insert counter conversion counter top. Insert LED driver box. Insert baseplate box. Insert graphics and care kit.
Vector Frame Monitor Kiosk 01
 Vector Frame Monitor Kiosk 01 VF-MK-01-DS Vector Frame TM monitor kiosks are a sleek, stylish way to display media at any trade show, event, in a retain or corporate space. These new kiosks feature push-fit
1 Intro Folding Panel System 12 Panel Display Backwall Set-up Instructions 1. 2.
 1 Intro Folding Panel System 12 Panel Display Backwall Set-up Instructions Right Stack top panels on bottom panels Unfold display wall Set in desired configuration Wrong Pull from here Remove each folded
WHEN DISASSEMBLING ALUMINUM EXTRUSION, TIGHTEN ALL SETSCREWS AND LOCKS TO PREVENT LOSS DURING SHIPPING
 Order #XXXXX - VK-2921 - General Layout Step 1 10 20 Plan View Page 1 of 6 Order #XXXXX - General Information Step 2 Using Your Setup Instructions The Visionary Designs Setup Instructions are created specifically
Hybrid Pro Counter 01
 Hybrid Pro Counter 01 HPC-01 All Hybrid Pro Modular counters feature accessible storage and locking doors. Purchased magnet applied graphic panel allows for your messaging and branding. features and benefits:
PM4S3 Monitor Kiosk. features and benefits: dimensions: additional information:
 PM4S3 Monitor Kiosk PM4S3-MK-M PM4S3-MK-L Kiosk displays are portable and easy to assemble. The aluminum extrusion frame features cam locks, tension glide connections and medium or large monitor mounts.
ASSEMBLY INSTRUCTIONS MANUAL
 PAGE 1 OF 9 RECOMMENDED TOOLS FOR ASSEMBLY: ALLEN WRENCH (INCLUDED) BOX WRENCH (INCLUDED) PHILLIPS SCREW DRIVER (NOT INCLUDED) PARTS IN CARTON: ALLEN WRENCH SCREWS (20 EACH) ROUND HEAD SCREWS (8 EACH)
TOYOTA TUNDRA CARGO DIVIDER Preparation. Part Number: PT
 Preparation Part Number: PT767-34070 Kit Contents 1 1 Divider Screen 2 1 LH Bracket with Warning Label 3 1 RH Bracket without Warning Label NOTE: Part number of this accessory may not be the same as the
Vector Frame Monitor Kiosk 01
 Vector Frame Monitor Kiosk 01 VF-MK-01-SS VF-MK-01-DS Vector Frame TM monitor kiosks are a sleek, stylish way to display media at any trade show, event, in a retain or corporate space. These new kiosks
Vector Frame Monitor Kiosk 01
 Vector Frame Monitor Kiosk 01 VF-MK-01-SS VF-MK-01-DS Vector Frame TM monitor kiosks are a sleek, stylish way to display media at any trade show, event, in a retain or corporate space. These new kiosks
User Instructions Multiline Otter Scoreboard Caddy Assembly
 List of parts: User Instructions Multiline Otter Scoreboard Caddy Assembly Single Caddy Double Caddy 1 1 Base assembly with attached wheels 2 4 1 1 2 4 4 8 10 20 12 Uprights (60 or 74 aluminum extrusion)
Formulate Designer Series 20 Backwall - Kit 07
 Formulate Designer Series 20 Backwall - Kit 07 FMLT-DS-20-07 Formulate Designer Series 20ft displays have unique stylistic features and shapes, are portable and easy to assemble. The aluminum tube frame
Formulate Designer Series 10 Backwall - Kit 09
 Formulate Designer Series 10 Backwall - Kit 09 FMLT-DS-10-09 Formulate Designer Series 10ft displays have unique stylistic features and shapes, are portable and easy to assemble. The aluminum tube frame
Therma-Tru Door Gallery Setup Instructions Swing Unit with Hardware Kit - Hardware Part # MADGSWU15 (Swing Unit) Part # MADGHKSU10 (Hardware Kit)
 Part # MADGHKSU10 (Hardware Kit)") Swing Unit with Hardware Kit - Hardware Tools Included: 4mm Allen Wrench, 6mm Allen Wrench, 8mm T-Handle Allen Wrench (1) 3/4" Drill Bit, (1) 7/32" Drill Bit and Hole Template Guide Tools Required: Phillips
Swing Unit with Hardware Kit - Hardware Tools Included: 4mm Allen Wrench, 6mm Allen Wrench, 8mm T-Handle Allen Wrench (1) 3/4" Drill Bit, (1) 7/32" Drill Bit and Hole Template Guide Tools Required: Phillips
WHEN DISASSEMBLING ALUMINUM EXTRUSION, TIGHTEN ALL SETSCREWS AND LOCKS TO PREVENT LOSS DURING SHIPPING
 Order #xxxxx - Sacagawea - VK-23 - General Layout Step 0 Plan View 0 202 Page of 4 Order #xxxxx - Sacagawea - General Information Step 2 Using You Set-up Instructions: The Visionary Designs Set-up Instructions
lilitab Counter 1.5 Packing List and Assembly Instructions
 lilitab Counter 1.5 Packing List and Assembly Instructions 2339 3rd Street, Suite 59 support@lilitab.com San Francisco, CA 94107 t: 888.705.0190 www.lilitab.com v.1.0 TABLE OF CONTENTS LILITAB COUNTER
Formulate Designer Series 10 Backwall - Kit 11
 Formulate Designer Series 10 Backwall - Kit 11 FMLT-DS-10-11 Formulate Designer Series 10ft displays have unique stylistic features and shapes, are portable and easy to assemble. The aluminum tube frame
Vector Frame Counter 06
 Vector Frame Counter 06 VFC-06 Vector Frame counters compliment the Vector Frame series of exhibit kits, but are also ideal for any stand-alone event or display. Vector Frame counters couple simple extrusion-based
SETUP INSTRUCTIONS If you would like to tell us about your experience with your setup instructions please us at
 207 VK-964 General Layout 0 0 Plan View www.classicexhibits.com SETUP INSTRUCTIONS If you would like to tell us about your experience with your setup instructions please email us at info@classicexhibits.com
Formulate Designer Series 20 Backwall - Kit 06
 Formulate Designer Series 20 Backwall - Kit 06 FMLT-DS-20-06 Formulate Designer Series 20ft displays have unique stylistic features and shapes, are portable and easy to assemble. The aluminum tube frame
Formulate Designer Series 10 Backwall - Kit 10
 Formulate Designer Series 10 Backwall - Kit 10 FMLT-DS-10-10 Formulate Designer Series 10ft displays have unique stylistic features and shapes, are portable and easy to assemble. The aluminum tube frame
Charisma SEG Slim Profile Light Box - XSL Series
 Page - Assemble the Frame First start by assembling corners. There are three (3) brackets per corner. All extrusion sections are numbered to identify which pieces go together, with, 2 with 2, etc. Insert
PACLEASE Hybrid Sacagawea VK-1222 Display Instructions / PAGE 1 - General Layout
 PACLEASE Hybrid Sacagawea VK-222 Display Instructions / PAGE - General Layout 800-676-3976 425-556-95 4054 48th Ave. NE Redmond, WA 98052 0 0 Plan View PACLEASE Hybrid Sacagawea VK-222 Display Instructions
features and benefits: dimensions: Approximate weight with cases: 122 lbs / 28 kgs Shipping Packing case(s): 1 OCE 1 OCH
: 1 OCE 1 OCH") Formulate Kiosk - 01 FMLT-KIOSK-01 Formulate Kiosks combine lightweight aluminum tube frames with state-of-the-art printed stretch zipper pillowcase fabric graphics to create funky and functional multimedia
Formulate Kiosk - 01 FMLT-KIOSK-01 Formulate Kiosks combine lightweight aluminum tube frames with state-of-the-art printed stretch zipper pillowcase fabric graphics to create funky and functional multimedia
POP PLUS / SPIDER SET-UP INSTRUCTIONS
 POP PLUS / SPIDER SET-UP INSTRUCTIONS 1 Place system frame on floor with screws indicating top. Expand upwards & outwards and secure frame connectors. Pop-Up display systems are made to be set-up and taken
Formulate Accent Ladder 10
 Formulate Accent Ladder 10 FMLT-WL10 Formulate Master Accents enhance the functionality of many Formulate Master 10 and 20 backwalls and add more real estate for messaging too! With monitor supports, literature
FabLite Designer Series 10' Kit 06 - FL10-DS06
 FabLite Designer Series 10' Kit 06 - FL10-DS06 FL10-DS06 FabLite Designer Series 10ft displays have unique stylistic features and shapes, are portable and easy to assemble. The aluminum tube frame features
Series 4 HV Single Monitor Lift Assembly Instructions
 6703 Zinser Street Schofield, WI 54476 6/13/17 Series 4 HV Single Monitor Lift Assembly Instructions Read all the instructions before beginning. Hardware Pack # 53368 Page1 OF 6 Tools Required for Assembly:
WHEN DISASSEMBLING ALUMINUM EXTRUSION, TIGHTEN ALL SETSCREWS AND LOCKS TO PREVENT LOSS DURING SHIPPING
 VK-044 - Order #xxxxx - General Layout Step 8.5.00 0 Plan View 0 Page of VK-044 - Order #xxxxx - General Information Step 8.5.00 Using Your Setup Instructions The Visionary Designs Setup Instructions are
Linear Pro Kit 27. features and benefits: dimensions: additional information:
 Linear Pro Kit 27 LN-K-3P-27 Linear Pro Kits provide a modern, slick and stylish appearance. The extrusion based exhibits feature a Velcro-applied fabric center graphic, UV printed or frosted plex headers
7878 K940. Checkpoint Antenna. Kit Instructions. Issue B
 7878 K940 Checkpoint Antenna Kit Instructions Issue B Revision Record Issue Date Remarks A July 7, 2009 First issue B Nov2013 Revised the Checkpoint installation procedures for 7878 and 7874 scanners Added
MyStudio VS53 Versa Sweep Setup Instructions
 MyStudio VS53 Versa Sweep Setup Instructions MISSION STATEMENT Pro Cyc, Inc. is the world leader in design and sales of modular infinity backgrounds. Our studio systems are recommended by every major company
SETUP INSTRUCTIONS If you would like to tell us about your experience with your setup instructions please us at
 208 VK-233 General Layout 0 0 Plan View SETUP INSTRUCTIONS If you would like to tell us about your experience with your setup instructions please email us at info@classicexhibits.com 208 General Information
PRS X-Axis E-Chain Installation For Tools with a 12 Z-Axis
 888-680-4466 ShopBotTools.com PRS X-Axis E-Chain Installation For Tools with a 12 Z-Axis This kit is compatible with PRS Shopbots that have an X-axis cutting area of 96 to 144. It is not immediately compatible
Vibe Monitor Stand. features and benefits: dimensions: additional information:
 Vibe Monitor Stand VB-MK-01 The vibe monitor stand is an excellent addition to a variety of backwall displays and exhibits. Use this sturdy, stand alone kiosk in a variety of situations to display your
Progeny Integrated Mobile Unit Unpacking/Assembly Guide
 Summary: The following instruction will guide you through the unpacking and installation of the Progeny Mobile Unit. Any question or concerns or suggestions should be directed to Progeny Technical Support
BLUEMOTION UXP, CDP, SD
 Feed and Support Kit Contents FEED KIT CONTENTS: - One () 7 Feed Cord - One () 4 Canopy - One () Grommet - One () Threaded Barrel - One () 7 Swedged Suspension Cable - One () Y-Cable Assembly with Cable
Linear Pro Kit 22. features and benefits: dimensions: additional information:
 Linear Pro Kit 22 LN-K-3P-22 Linear Pro Kits provide a modern, slick and stylish appearance. The extrusion based exhibits feature a Velcro-applied fabric center graphic, UV printed or frosted plex headers
Fan, Eden/Northfield, GS Installation Instructions (SKU ) Packing List
 Packing List") Packing List Blower Assembly Wiring Harness Rheostat with Nut and Knob Snap Disc Mounting Hardware (4) rubber grommets with brass inserts, (4) nuts, (4) washers. Cover Assembly Installation Warning: Make
Packing List Blower Assembly Wiring Harness Rheostat with Nut and Knob Snap Disc Mounting Hardware (4) rubber grommets with brass inserts, (4) nuts, (4) washers. Cover Assembly Installation Warning: Make
Bi-Pass And Bi-Fold Sliders
 Bi-Passs and Bi-Fold Sliders Installation Guide Bi-Pass And Bi-Fold Sliders Tools required: Hand Drill Counter Sink Drill BitSet #8 Philips Screw Driver Measuring Tape Level What s Included: Panels with
Y1160A EIA Rack Sliding Shelf Installation Note
 Y1160A EIA Rack Sliding Shelf Installation Note This installation note contains procedures for mounting L4400 Series LXI instruments in EIA rack cabinets using the Y1160A sliding shelf rack mount kit.
Installation Instructions
 Installation Instructions Optima LED 8 Double-Sided StretchLite Perimeter Lit Graphic Display Line Voltage Connector Optima LED DS5 (Double-sided StretchLite Graphic Display) with Graphics Corner Bracket
Tradewinds Amplify Display System Instructions
 Table of Contents Packing & Unpacking... Standard Kits... Component Identification... Primary Components Vertical Pole Top... Vertical Pole Bottom... Horizontal... Cross/Hanging Bar... Amplify Shelf Package
Thor Audi A4/S4 Skid Plate Installation Instructions
 Thor Audi A4/S4 Skid Plate Installation Instructions Parts List: 1 Aluminum Skid Plate 2 Aluminum Side Wings 10 10mm Flat Washers 3 8mm Flat Washers 3 8mm Speed Clips 2 10x40mm Bolts 3 8x35mm Bolts 2 Rivet-nuts
M10 x 75mm Sockethead Cap Screws. 5mm Fender Washer (12) Included - (8) Required. #10 x 2.5" PH Wood Screws. (30) Included - (24) Required
 Included - (8) Required. #10 x 2.5 PH Wood Screws. (30) Included - (24) Required") Door System Unit - Hardware Tools Included: (2) 2mm Allen Wrenches, (2) 3mm Allen Wrenches, (2) 4mm Allen Wrenches, (2) 6mm Allen Wrenches, and (1) 8mm T-Handle Allen Wrench Tools Required: Phillips Screwdriver,
Door System Unit - Hardware Tools Included: (2) 2mm Allen Wrenches, (2) 3mm Allen Wrenches, (2) 4mm Allen Wrenches, (2) 6mm Allen Wrenches, and (1) 8mm T-Handle Allen Wrench Tools Required: Phillips Screwdriver,
Depending on the size you ordered you will have either 5 Foot sections which will build the 10 Foot frame or 6 Foot sections which will build the 12
 XL Quilting Frame 1 Depending on the size you ordered you will have either 5 Foot sections which will build the 10 Foot frame or 6 Foot sections which will build the 12 Foot frame Printed 2 June 2014 Updated
The Phoenix. Professional Quilting Frame. Copyright January 1, 2016 Jim M. Bagley, GraceWood, Inc (Reproduction Prohibited) Version 2.
 Version 2.") The Phoenix Professional Quilting Frame Copyright January 1, 2016 Jim M. Bagley, GraceWood, Inc (Reproduction Prohibited) Version 2.1 1 The Phoenix Professional Quilting Frame Parts List Box 1...3 Box
The Phoenix Professional Quilting Frame Copyright January 1, 2016 Jim M. Bagley, GraceWood, Inc (Reproduction Prohibited) Version 2.1 1 The Phoenix Professional Quilting Frame Parts List Box 1...3 Box
INVENT3D Printer Kit Disassembly Instructions
 INVENT3D Printer Kit Disassembly Instructions Version 6 AST2 10/26/16 1 I. General Disassembly Instructions Use the case layer drawings to ensure that components are stored in the appropriate location
Continuum Frame Assembly Instructions
 Continuum Frame Assembly Instructions Copyright January 1, 2017 Jim M. Bagley, GraceWood, Inc (Reproduction Prohibited) Version 2.2 Table of Contents Continuum Frame Table of Contents... i Warranty...ii
9 X 9 REMOVABLE TYPE ALUMINUM WINDOW BARS INSTALLATION INSTRUCTIONS Import Note : 9 X 9 Spacing Removable Type Installation is covered in this
 Import Note : 9 X 9 Spacing Removable Type Installation is covered in this Instruction. Removable Bars Only Mount in Recess Position ( Between Window Jamb/ Frame ) The spacing between horizontal bars is
Assembly Instructions
 Selling Station Assembly Instructions View from above without top A B C D Rounded finished corners on A & D Square unfinished 3-sides on B & C Selling Station Components (2) 2' x 6' Side s Have a channel
GRANDIO G R E E N H O U S E S GRANDIO ASCENT ADDITIONAL ROOF VENT KIT FOR NEW AND EXISTING GREENHOUSE CUSTOMERS
 GRANDIO G R E E N H O U S E S GRANDIO ASCENT ADDITIONAL ROOF VENT KIT FOR NEW AND EXISTING GREENHOUSE CUSTOMERS (GRA-ASC-VENT) ASCENT ROOF VENT PACKING LIST GRAPHIC PART NAME SIZE/LOCATION QUANTITY GRAPHIC
HQ Pole Upgrade Kit for HQ Adjustable Table and HQ QuilTable Assembly Instructions 1
 HQ Pole Upgrade Kit for HQ Adjustable Table and HQ QuilTable Assembly Instructions QF09775 The pole upgrade kit can be used with or without the QF09700 HQ Precison-Glide track upgrade kit. What s Included
WHEN DISASSEMBLING ALUMINUM EXTRUSION, TIGHTEN ALL SETSCREWS AND LOCKS TO PREVENT LOSS DURING SHIPPING
 Order #xxxxx - General Layout Step 866.65.00 0 Plan View 0 Page of 6 Order #xxxxx - General Information Step 866.65.00 Using Your Setup Instructions The Visionary Designs Setup Instructions are created
OWNER S MANUAL. Safety. Please read this owner s manual before use and keep it at hand for reference. Warranty
 Please read this owner s manual before use and keep it at hand for reference. OWNER S MANUAL Safety Important safety instructions for using the INCRA Miter5000 Before using the INCRA Miter5000, read and
110 and 555 Markerboard, Chalkboard and Tackboard Mounting
 0 and 555, Chalkboard and Tackboard Mounting 0 # BIT 0 Splined 0 and 555 Tackboard POWER GRIPS 555 If you have a problem, question, or request, call your local dealer, or Steelcase Line at 888.STEELCASE
Legacy Woodworking Machinery a division of Phantom Engineering. The Legacy CNC. Assembly Manual
 Legacy Woodworking Machinery a division of Phantom Engineering The Legacy CNC Assembly Manual New Orientation of the Legacy Step one: Re-orientation of the machine Remove the X-axis screw and supports.
Perfect Fit blinds. Preparation. Measuring Instructions. Step 1 - Measure glass size. Step 2 - Measure window depth
 Preparation Before you begin, ensure there is a 6mm clearance all around the outside of your window beading to allow enough room for the Perfect Fit framework. Also check that the seals of your window
INTRODUCTION. Abex Display Systems Design & Development Team
 INTRODUCTION Thank you for your recent purchase of an Abex 600 MultiConnect display, manufactured by Abex Display Systems, Inc. An Abex 600 MultiConnect display communicates a message about you: polished,
Mounting a BalanceBox 400 to a brick wall
 Unpack the BalanceBox 400 and remove the Wall frame cover and its bag of screws. Slide the cover out at the top. NOTE: the cover is NOT included with the BalanceBox 400H LOCK SCREW HOLE MOBILE STAND MOUNTING
EmagiKit. Privacy Pod Plus. Quiet. Easy. Affordable. INSTRUCTIONS ASSEMBLY
 EmagiKit Privacy Pod Plus Quiet. Easy. Affordable. INSTRUCTIONS ASSEMBLY DIMENSIONS AND COMPONENTS 47 47 Ceiling Unit 2-B 2-L 2-R Glass Door Corner Trim Door Handle 90 Adjustable Height Work Surface 1-B
INSTRUCTION BOOKLET #C20
 INSTRUCTION BOOKLET #C0 WARNING! ALL MURPHY/WALLBED SYSTEMS CONTAIN STORED ENERGY. FAILURE TO USE AND FOLLOW THESE INSTRUCTIONS DURING THE INSTALLATION PROCESS COULD RESULT IN SEVERE PERSONAL INJURY TO
KINEX benching Installation Guide
 KINEX benching Installation Guide Index KINEX Installation Guide SINGLE RUN SINGLE RUN Assembly Components... Assembly Outline...5 DOUBLE RUN Assembly Components...8 Assembly Outline...9 Assembly Instructions
western window systems westernwindowsystems.com installation instructions non-pocket 2-1/4 panels
 series 2600 multi-slide non-pocket 2-1/4 panels windowsystems.com windowsystems.com movement, which can cause warping and other problems. Frame kit components: Each door will have a head assembly, a threshold
To adjust the length of the track
 DELUXE ROTARY CHAIN ROMAN BLIND KITS The standard kit has a 1:1 chain drive suitable for blinds up to 3kgs in weight. For heavier blinds up to 6Kg use a 1:4 chain drive, see instructions on page 2. There
Germ City Storage Box Inventory
 Germ City Storage Box Inventory 4 Wide connector bars 11 Thin connector bars (4 with Velcro on one side) 12 Channel parts (6 with extensions) 1 Black fabric exhibit cover 2 Black decorated burlap panels
Sentinel Series Cigar Humidor End Tables
 Sentinel Series Cigar Humidor End Tables Assembly Instructions Models: Sentinel 500, 1000 and 1500 Style: Traditional SENTINEL ASSEMBLY INSTRUCTIONS Congratulations! You have purchased a superior cigar
installation guide Footer & Base Plate Assembly KINEX Installation Guide SINGLE RUN
 Phase Footer & Base Plate Assembly KINEX Installation Guide SINGLE RUN KINEXbenching installation guide Please contact cc@amqsolutions.com if you are missing any parts, have difficulty with assembly, or
Shapeoko XXL Assembly Guide
 Shapeoko XXL Assembly Guide 04/27/2016 XXL Packing LIst Item Qty Description Y-Carriage (left) 1 Y-Carriage (right) 1 X/Z Assembly 1 40 Rail 3 1 rail has mounting holes for controller Wasteboard Half 2
1 Removing The Screen Track, Screen and Screen Rollers Note: The screen remains in the track while the track is removed and/or installed.
 Sliding Door Screen and Screen Track Replacement Service Instruction These instructions apply to: Architect Series 12/2004-Current Designer Series 3/2005-Current Tools Required: #2 Phillips head screwdriver
Hatch Whiteboard: Portable Stand Installation Instructions
 Hatch Whiteboard: Portable Stand Installation Instructions Remove Projector Wall Plate 1. Open the wall mount for the projector. 2. Remove the shipping screw from the front center of the mount arm. 1 P
Diva Acoustical Ceiling
 Installation Instructions Diva Acoustical Ceiling CONTENTS Important User Information...........................2 Safety Precautions.................................3 Required Tools....................................3
HQ Electromagnetic Channel Locks
 HQ Electromagnetic Channel Locks Table of Contents Overview... 2 Kit Contents... 2 Tools Required... 5 Installation... 5 Using the HQ Electromagnetic Channel Locks... 10 Troubleshooting... 11 Overview
Q-Zone Hoop-Frame. Assembly Instructions. Copyright July 11, 2018 Grace Company (Reproduction Prohibited) Version 1.8
 Version 1.8") Q-Zone Hoop-Frame Assembly Instructions Copyright July 11, 2018 Grace Company (Reproduction Prohibited) Version 1.8 Table of Contents Table of Contents... i Warranty... ii Parts List Box 1...iii Box 2...
Q-Zone Hoop-Frame Assembly Instructions Copyright July 11, 2018 Grace Company (Reproduction Prohibited) Version 1.8 Table of Contents Table of Contents... i Warranty... ii Parts List Box 1...iii Box 2...
IDR assembly instructions:
 IDR assembly instructions: Required Tools: 2 X 12mm Open End Wrench 14mm open end wrench #2 Phillips Head Screw Driver (Drill with adjustable torque clutch recommended) 8mm nut driver (Supplied in IDR-AK)
Yes 20 Charging Wall Cabinet for Tablets
 Built with Anthro-DNA Owner's Manual for Yes 20 Charging Wall Cabinet for Tablets Part # YESCABGMPW Components at a Glance 1 2 4 5 8 7 10 3 6 9 Front of Cabinet (closed) 1. Locking front door to User area.
Item # Thanks for shopping with Improvements!
 Thanks for shopping with Improvements! Hampshire -Door Cabinet Item #5505 To order, call -800-64- West Chester, OH 45069 Made in China PR-6 If you have questions regarding this product, call -800-64- Mon.-Fri.
Tuff Tread. 502 W. Montgomery STE 120 Willis, TX PH: (800) FAX: (888)
 FAX: (888)") Motor Brush Holder Assembly Installation Instructions Never use a sanding stone or comm stone on the commutator of a Noramco Fitness Treadmill motor. The commutator of a motor that has been properly broken
Motor Brush Holder Assembly Installation Instructions Never use a sanding stone or comm stone on the commutator of a Noramco Fitness Treadmill motor. The commutator of a motor that has been properly broken
Orbital Truss Kiosk 02
 Orbital Truss Kiosk 02 OR-KIOSK-02 Orbital Express Truss Kiosks are the perfect way to display media and/or literature at any trade show, event, retail or corporate space. Kiosks complement the Orbital
a.k.a. casegoods instructions
 a.k.a. casegoods instructions a a.k.a. workwall installation IMPORTANT NOTES Failure to install product according to installation instruction will result in loss of warranty. Tools required for assembly
INSTALLATION INSTRUCTIONS
 INSTALLATION INSTRUCTIONS PARTS REQUIRED Single QuickStand Lite Parts A (1) Lower Arm A B C D B (1) Upper Arm C (1) Base D (1) Base Plate E (1) M8 Dynamic Arm Long F (1) Clamp Bracket G H (1) VESA Plate
Hawko Zhaga Systems Installation Instructions
 Hawko Zhaga Systems Installation Instructions Contents Wire Suspension Installation 4 Recessed Brackets 6 Fixed Suspension Rods 8 Swivel Suspension Rods 10 Surface Mount Ceiling 12 Surface Mount Wall
POWER PET. Low-E Automatic Patio Pet Door Installation and Operating Instructions
 POWER PET Low-E Automatic Patio Pet Door Installation and Operating Instructions Power Pet, Regular Height, Patio Door Assembly Steps Estimated assembly time: Under 1 hour STEP 1: Assemble the tools you
SAVE THESE INSTRUCTIONS
 SAVE THESE INSTRUCTIONS SONOMA 10.5 FT CANTILEVER UMBRELLA ASSEMBLY INSTRUCTIONS ASSEMBLE ON A FLAT, PROTECTED SURFACE. PART LIST FIGURE QUANTITY DESCRIPTION A LOWER BRACKET B UPPER BRACKET C BASE POLE
JK FRONT FENDER FLARE INSTALLATION INSTRUCTIONS
 JK FRONT FENDER FLARE INSTALLATION INSTRUCTIONS TOOLS NEEDED 3/16 Allen Wrench 1/2 Socket or wrench 10mm Socket Flat head screwdriver HARDWARE 5/16 x 3/4 button heads (14) 5/16 x 1 button heads (8) 5/16
INSTALLATION INSTRUCTIONS
 INSTALLATION INSTRUCTIONS For Wallbed models: Do-It-Yourself BOOKLET #C90 WARNING! ALL MURPY/WALLBED SYSTEMS CONTAIN STORED ENERGY. FAILURE TO USE AND FOLLOW THESE INSTRUCTIONS DURING THE INSTALLATION
Droplit v2 Frame Assembly
 SeeMeCNC Guides Droplit v2 Frame Assembly Droplit v2 Frame Assembly Written By: JJ Johnson 2017 seemecnc.dozuki.com Page 1 of 22 Step 1 Droplit v2 Frame Assembly Locate the Projector Plate, Projector Joining
L.L.Bean. Wooden Slat Bed
 L.L.Bean Wooden Slat Bed Thank you for purchasing our Slat Bed. Assembly of this product requires A Phillips head screwdriver. We have found it helpful to have a second person present in at least one step
FlexFrame - Storage Components and Skins
 FlexFrame - Storage Components and Skins 1/4 Square Drive Ball-Point Hex-Bit Socket 1/8 Short Hex, 1-1/2 Overall Length McMaster Part # 54075A44 Table of Contents Topic Page Storage Components 2 General
Big Sweep Lathe Dust Catcher System
 Big Sweep Lathe Dust Catcher System Version.0 Disconnect saw from power source before fitting or removing insert. Ear Protection proper ear protection when working with machinery. Use caution when handling
LED Thin Frame Fixed Frame Screen User Guide
 LED Thin Frame Fixed Frame Screen User Guide INTRODUCTION INTRODUCTION WARNING - Sharp Edges This product may contain sharp edges, please handle with care. Protective gloves are recommended. WARNING -
INSTALLATION GUIDE NS Double Clamp Ladder Rack NV200 / City Express ( Aluminum )
") INSTALLATION GUIDE 1530-NS Double Clamp Ladder Rack NV200 / City Express ( Aluminum ) QUICK START GUIDE Phase 1 - Assembly q 1.1 Setup... q 1.2 Ladder Rack Assembly... 3-5 5-13 Phase 2 - Installation q
INSTALLATION GUIDE 1530-NS Double Clamp Ladder Rack NV200 / City Express ( Aluminum ) QUICK START GUIDE Phase 1 - Assembly q 1.1 Setup... q 1.2 Ladder Rack Assembly... 3-5 5-13 Phase 2 - Installation q
COACT MEDIA UNIT ASSEMBLY WITH X9 OPEN SHELF STORAGE OPTION PART # INSTALLATION INSTRUCTIONS
 PART # 1609103 MEDIA UNIT ASSEMBLY WITH X9 OPEN SHELF STORAGE OPTION 1. Begin by placing the back panel on a flat non-marring surface, making sure the pre-drilled holes are facing up. Next, position the
WHEN DISASSEMBLING TIGHTEN ALL BLACK KNOBS TO PREVENT LOSS DURING SHIPPING
 Order #xxxxx - P20 - Ben Jamin - General Layout Step Page of 8 Order #xxxxx - P20 - Ben Jamin - Backwall Assembly Step Part Number 1 2 3A 3 4 Description Left w/ A10 Clamps Attached Middle Upper Curved
Please read BOTH these Installation Instructions and the General Towing Instructions before attempting to install or operate this equipment.
 2005-08 Pontiac G6 GT Please read BOTH these and the General Towing Instructions before attempting to install or operate this equipment. 1. Blue Ox towing products and accessories are intended to be installed
Linear Kiosk 05. features and benefits: dimensions: additional information:
 Linear Kiosk 05 LN-K-05 Dress up and add wow to your space with state-of-the-art multimedia kiosks. features and benefits: - Custom appearance - Easy to assemble - Bases & tops available in four color
Melamine Plastic Laminate. Toilet Partition Installation Manual
 Melamine Plastic Laminate Toilet Partition Installation Manual PHONE: FAX: 1-866-317-2786 ATTENTION DO NOT MIX FASTENER PACKS EACH FASTENER PACK HAS THE NECESSARY BOLTS, BARRELS AND SCREWS TO INSTALL THE
This instruction manual is an in-depth look and explanation of how to assemble and install the Murphy Bed properly and efficiently.
 This instruction manual is an in-depth look and explanation of how to assemble and install the Murphy Bed properly and efficiently. Don t be put off by the size of the instruction manual as the large diagrams
6000 Horizontal Router Table Owners Manual Please Read Carefully!
 6 Horizontal Router Table Owners Manual Please Read Carefully! Parts List Please identify and verify that you have all of the hardware & parts shown prior to assembly. The parts described in this box are
9 X 12 FIXED TYPE ALUMINUM WINDOW BARS INSTALLATION INSTRUCTIONS Import Note : 9 X 12 Spacing Fixed Type Installation is covered in this Instruction.
 Import Note : 9 X 12 Spacing Fixed Type Installation is covered in this Instruction. Fixed Bars can be Mount in Recess Position ( Between Window Jamb/ Frame )or Surface Mount (Face Of Wall) This Fixed
Stair Mounting Kit. Installing safety gates in modern homes can be very challenging, especially for stairs.
 Stair Mounting Kit Installation Guide Installing safety gates in modern homes can be very challenging, especially for stairs. The Stair Mounting Kit will allow you to mount gates to most square and round