The Important Thing. Everyday Life Album Instructions. Materials Needed. Gather photos (22 total) (P) = portrait (L) = landscape
|
|
|
- Clifton Cooper
- 5 years ago
- Views:
Transcription
1 Everyday Life Album Instructions The Important Thing Materials Needed D1772 My Acrylix Documented Scrapbooking Stamp Set E1032 My Acrylix Typography Alphabet Stamp Set BULK408 Chelsea Gardens Bulk Packet BULK406 Gimme Some Sugar Bulk Packet 1385 White Daisy cardstock (2 sheets) X5941 Bashful cardstock (2 sheets) X5979 Juniper cardstock (1 sheet) X5946 Linen cardstock (2 sheets) X5947 Mink cardstock (1 sheet) X5958 Peacock cardstock (1 sheet) Z2831 Charcoal Exclusive Inks Stamp Pad Z2865 Juniper Exclusive Inks Stamp Pad Z2896 Smoothie Exclusive Inks Stamp Pad Z4149 Picture My Life Cards Be-YOU-tiful Z3283 Picture My Life Overlays White Frames X7230C Chelsea Gardens Complements Z3089 Grey Gems Z1979 Marvy Uchida LePen Journaling Pen Z9996 Everyday Life Album Bashful Z3231 Flip Flaps Memory Protectors 4" 6" Z3230 Flip Flaps Memory Protectors 3" 4" Z3234 Flip Flaps Memory Protectors 3" 3" Z3252 Everyday Life Memory Protectors 6" 8" Z3192 Everyday Life Memory Protectors 4" 6" Z3191 Everyday Life Memory Protectors 3" 4" Z D Foam Tape Z2060 thin 3-D foam tape Z1836 Non-stick Micro-tip Scissors Y1000 1" 1" My Acrylix Block Y1002 1" 3½" My Acrylix Block Y1003 2" 2" My Acrylix Block Y1005 1" 6½" My Acrylix Block Y1009 2" 3½" My Acrylix Block Adhesive of choice trimmer Pencil Eraser Ruler Gather photos (22 total) (P) = portrait (L) = landscape 2 µ 2 3 µ 3 3 µ 4 (P) 3 µ 4 (L) 4 µ 6 (L) Today Layout Me Layout Home Layout Hobby Layout Layout Someone I Admire Layout Tradition Layout Lesson Learned Layout Back Cover Trim all zip strips and set aside Front Cover: 6½ µ ½ Lesson: 3 µ ½ 1
.")


2 Cut paper = first cut All paper measurements are width by height (w h). Today 6 µ 8 * 2 µ 2 * 2 µ 2 2 µ 2 Tradition V µ 6 Tradition ½ µ 6 Hobby 6 µ 8 Someone* ½ µ 2¼ 2 µ 2 Hobby 3 µ 4 Me 3 µ 3 Hobby V µ 5 Me 1¼ µ ½ Me 6 µ 4 cut orientation cut orientation front *back front *back Front Cover 4½ µ 5½ 6 µ 8 Back Cover 6 µ 8 Front Cover ½ µ 6¾ Someone 6 µ 4 ¾ µ 3¼ Linen cardstock Linen cardstock light *dark light *dark 2
3 Home 1¼ µ 5¾ Home 4 µ 6 Today 4¼ µ 6¼ Today 4 µ 3 Home* 4 µ 3 Mink cardstock Bashful cardstock light *dark light *dark Front Cover ¾ µ 7 Home* 1½ µ 6 Front Cover 6 µ 8 Lesson 6 µ 8 4 µ 6 Hobby 3¼ µ 4¼ Me ¼ µ 3 Me 3¼ µ 4 Someone* 3 µ 4 * 2 µ 2 (cut diagonal) 2 µ 2 Hobby* 3 µ 4 (cut diagonal) * 2 µ 2 Me* 3¼ µ 3¼ Hobby* ¼ µ 2½ Me* 1¼ µ 3¾ Bashful cardstock Peacock cardstock light *dark light *dark 3
4 Back Cover 3¼ µ 3¼ Tradition* ½ µ 6 6 µ 4 Front Cover 6 µ 2¼ Someone* 3 µ 4 Me 6 µ 4 Hobby 5 µ 7 Tradition 6 µ 4 Hobby, Lesson, Tradition 3¼ µ ¾ Juniper cardstock White Daisy cardstock light *dark Tradition 6 µ 4 Me 2¾ µ 2 Home ¾ µ 3¼ Lesson 6 µ 4 Someone ½ µ 6 Tradition 5 µ 3 Someone 3¼ µ ¾ White Daisy cardstock 1 µ 1 Back Cover 1 µ 2 4
5 The Important Things Front Cover Page 1 6" 8" Bashful cardstock 1 ½" 6¾" Linen cardstock 1 5½" 4½" Linen cardstock 1 6" 2¼" White Daisy cardstock 1 ¾" 7" Peacock cardstock 1 ½" 6½" Smoothie zip strip 1. Prepare 5½" 4½" Linen cardstock for stamping. Use ruler and pencil to lightly draw one vertical guideline at 2¾". Lightly draw three horizontal guidelines 1¾", 2¾" and 3¾" from top. 2. Using Charcoal ink, stamp Important with Typography alphabet along middle horizontal guideline. Start by stamping letter o to left of middle guideline, and letter r to right of middle guideline. Tip: Stamp each letter individually to ensure words will fit across cardstock. 3. Using Charcoal ink, stamp The along top horizontal guideline. To center word, start by stamping letter h centered on vertical guideline. 4. Using Charcoal ink, stamp Things along bottom horizontal guideline. Start by stamping letter n to right of vertical guideline, and then i to left of vertical guideline. 5. Erase guidelines after stamping is complete. 6. Using Charcoal ink, stamp buffalo check on 6" 2¼" White Daisy cardstock. 7. Attach stamped White Daisy cardstock along bottom of 6" 8" light Bashful cardstock. Using Charcoal ink, stamp dot border on Bashful cardstock, above White Daisy stamped piece. 8. Cut Glacier Complement border in half. Attach one half to top of ½" 6¾" Linen cardstock, and second half to bottom. 9. Dovetail one edge of ¾" 7" Peacock cardstock, ½" 6¾" Linen cardstock, and ½" 6½" Smoothie zip strip. 10. Attach light Peacock cardstock to light Bashful cardstock, ¾" from right. Attach ½" 6¾" Linen cardstock directly left of Peacock cardstock. Attach zip strip to Peacock cardstock, along left edge. 11. Attach The Important Things title to light Bashful cardstock. 12. Using Juniper ink, stamp ink splatters in top right corner of Linen cardstock. 13. Attach Charcoal scallop Complement along top edge of Linen cardstock. 14. Embellish with Complements and grey gems as shown. Use thin 3-D foam tape to attach Complements as desired The Important Thing About Today Layout 1 6" 8" Juniper dot paper 1 4¼" 6¼" Bashful cardstock 1 4" 3" Mink cardstock 1 Linen lined Picture My Life card 1 Smoothie diamond Picture My Life card 1 Bashful flowers Picture My Life card 1 white remember this overlay 1 white floral bough overlay 1. Stamp The Important Thing About above ninth journaling line from top of Linen lined Picture My Life card. Using Juniper ink, stamp THE V" from left edge, and stamp THING ABOUT V" from right edge. Using Charcoal ink, stamp important centered between THE and THING. 2. Using Charcoal ink, stamp scallop border along top edge of 4" 3" light Mink cardstock. 3. Attach Linen lined Picture My Life card to 4¼" 6¼" light Bashful cardstock. 4. Attach 4¼" 6¼" light Bashful cardstock centered on Juniper dots paper. 5. Attach TODAY Complement directly below stamped words and embellish with grey gems as desired. 6. Attach 3" 4" horizontal Flip Flap to 6" 8" Everyday Life Memory Protector, aligned with top edge of light Bashful cardstock. Insert remember this overlay over outer 3" 4" photo in Flip Flap. 7. Using Juniper ink, stamp documented centered along top edge of Bashful flowers Picture My Life card. Stamp second and third-generation documented below as shown. Add Charcoal heart Complements and gems as desired. 8. Attach watering can Complement to center of 3" 4" Smoothie diamond Picture My Life card. Insert floral bough overlay over pocket card in Memory Protector. Tip: Make sure to remove clear protectant from overlay card. 5
6 The Important Thing About Me Layout 1 6" 4" White Daisy cardstock 1 2¾" 2" White Daisy cardstock 1 6" 4" Glacier stripe paper 1 3" 3" Juniper dot paper 1 1¼" ½" Juniper dot paper 1 3¼" 4" Bashful cardstock 1 ¼" 3" Bashful cardstock 1 3¼" 3¼" Peacock cardstock 1 1¼" 3¾" Peacock cardstock 1 Be you tiful Picture My Life card 1 Smoothie diamond Picture My Life card (from previous layout) 1 white line border with heart overlay 1. Dovetail one end of 1¼" 3¾" Peacock cardstock. Attach to Smoothie diamond Picture My Life card centered from sides. 2. Attach ½" 1¼" Juniper dot paper on top of Peacock cardstock, along top edge. Attach large butterfly Complement. Using Charcoal ink, stamp ink splatters around butterfly. Embellish with white gems as shown. 3. Insert line border with heart overlay over Be you tiful Picture My Life card. Tip: Make sure to remove clear protectant from overlay card. 4. Using Charcoal ink, stamp THING ABOUT on 6" 4" White Daisy cardstock in top right corner. To left, use Smoothie ink to stamp important. Then use Charcoal ink to stamp THE. Using Juniper ink, stamp doodle heart below ABOUT. Using Charcoal ink, stamp me with Typography alphabet left of Juniper heart. Attach Charcoal arrow Complement as shown. 5. Using Charcoal ink, stamp journaling box on 2¾" 2" White Daisy cardstock. Stamp triple hearts in top left corner of journaling box and trim. 6. Using Charcoal ink, stamp good times on Charcoal banner Complement. 7. Using Smoothie ink, stamp dot border on left side of 3¼" 4" light Bashful cardstock. 8. Attach stamped journaling box to 3" 3" Juniper dot paper, ¼" from bottom and sides. Attach 3" ¼" light Bashful cardstock W" from top. Embellish with Charcoal butterfly Complement. 9. Attach 3¼" 4" stamped light Bashful cardstock to 6" 4" Glacier stripe paper V" from left. Keep Smoothie dot border on left. Attach 3¼" 3¼" Peacock cardstock, about ¼" from bottom, and ¼" from left of light Bashful cardstock. Attach stamped good times Complement. Using 3-D foam tape, attach large flower Complement. Embellish with white gems. 10. Attach 3" 3" Flip Flap to Memory Protector, aligned with 3" 3" photo on card. The Important Thing About Home Layout 1 6" 4" Mink cardstock 1 5¾" 1¼" Mink cardstock 1 3" 4" Mink cardstock 1 3¼" ¾" White Daisy cardstock 1 6" 1½" Peacock cardstock 1 date journaling Picture My Life card 1 Peacock gingham Picture My Life card 1 white dotted edge overlay 1 white dot border overlay 1. Attach 6" 1½" Peacock cardstock centered on 6" 4" light Mink cardstock. Attach Love Grows Here Complement to center. Insert dot border overlay over Mink cardstock in Memory Protector. 2. Dovetail left end of 5¾" 1¼" light Mink cardstock. Using Charcoal ink, stamp home with Typography alphabet in bottom right corner. Then stamp THE directly above h under top edge of cardstock. Next, use Juniper ink to stamp important. Below this, use Charcoal ink to stamp THING ABOUT. 3. Attach title to 4" 6" photo. Embellish with small heart Complement and dark grey gems on title as desired. 4. Using Charcoal ink, stamp arrow on ¾" 3¼" White Daisy cardstock and trim. Attach to Peacock gingham Picture My Life card, ¼" from top. Allow point of arrow to continue off card and trim. Embellish with grey butterfly Complement. 5. Insert dot border overlay over 3" 4" Mink cardstock in Memory Protector. 6
7 The Important Thing About My Hobby Layout 1 6" 8" Glacier stripe paper 1 5" 7" White Daisy cardstock 1 3¼" ¾" White Daisy cardstock 1 5" V" Juniper dot paper 1 3" 4" Juniper dot paper 1 3" 4" Peacock cardstock 1 3" 4" Mink cardstock (from previous layout) 1 2½" ¼" Peacock cardstock 1 4¼" 3¼" Peacock cardstock 1 enjoy THE LITTLE things Picture My Life card 1 striped edge Tangerine Picture My Life card 1 white best EVER overlay 1. Trim 3" 4" Peacock cardstock diagonally into two triangles. 2. Attach one Peacock triangle to light side of 3" 4" Mink cardstock used in previous layout. Insert best ever white overlay over cardstock in Memory Protector. 3. Attach 3" 3" photo centered on 3" 4" Juniper dot paper. Embellish with small flower Complement. 4. Prepare 5" 7" White Daisy cardstock for stamping. Lightly draw one vertical guideline at 2½". Lightly draw three horizontal guidelines X", 1W", and 2¼" from top. Then, draw one horizontal guideline 1" from bottom. 5. Using Charcoal ink, stamp important on top horizontal guideline, directly left of vertical guideline. Using Juniper ink, stamp THE left of important, and stamp THING ABOUT on right. Using Charcoal ink, stamp my on 1W" guideline with Typography alphabet. Then, stamp hobby on 2¼" guideline. Tip: Start by stamping middle letters to keep word centered on guideline. 6. Using Juniper ink, stamp dotted circles and circle outline to create scallop border on 5" 7" White Daisy cardstock. Stamp circle outline so half is below bottom guideline. 7. Erase guidelines after stamping is complete. 8. Using Juniper ink, stamp arrow on 3¼" ¾" White Daisy cardstock and trim. 9. Attach 5" 7" White Daisy cardstock to 6" 8" Glacier striped paper along bottom and right edges. Attach 5" V" Juniper dot paper directly above White Daisy cardstock. Layer and attach 2½" ¼" Peacock cardstock ¼" from right of edge. 10. Attach 4¼" 3¼" light Peacock cardstock 1" from bottom and centered on White Daisy cardstock. 11. Attach Remember tab, Charcoal leaves, and small Glacier flower Complements. Use 3-D foam tape to attach Complements as desired. 12. Embellish with dark grey gems as shown. The Important Thing About This Layout 1 6" 8" Linen cardstock 1 3¼" ¾" Linen cardstock 1 6" 4" White Daisy cardstock 1 1" 1" White Daisy cardstock 1 2" 2" Bashful cardstock 2 2" 2" Juniper dot paper 2 2" 2" floral paper 2 2" 2" Peacock cardstock 1 6" 4" Peacock cardstock 1 floral journaling Picture My Life card 1 white floral edge overlay 1. Trim 2" 2" Bashful cardstock diagonally into two triangles. 2. Arrange and attach 2" 2" paper and photos on 6" 8" light Linen cardstock. Then attach two Bashful cardstock triangles as shown. Tip: Light Linen squares on second and bottom rows are page base. 3. Using Charcoal ink, stamp dot border on light Linen cardstock square in second row to create journaling lines. 4. Using Charcoal ink, stamp & on 2" 2" light Peacock cardstock. 5. Attach 1" 1" White Daisy cardstock to 2" 2" floral paper in third row. Layer with Charcoal Complements as shown. 6. Using Charcoal ink, stamp arrow on 3¼" ¾" light Linen cardstock and trim. 7. Prepare 6" 4" light Peacock cardstock for stamping. Lightly draw one vertical guideline at 3". Then draw horizontal guidelines ½", 1¾", and 2½" from top. 8. Using Charcoal ink, stamp THE, important, and THING ABOUT along top guideline starting 1¼" from left. Stamp this with Typography alphabet centered on middle line. Then stamp place centered on bottom line. 9. Erase guidelines when stamping is complete. 10. Using 3-D foam tape, attach stamped arrow to floral edge white overlay. Embellish with gems as shown and insert over title card in Memory Protector. Tip: Make sure to remove clear protectant from overlay card. 11. Attach 4" 6" vertical Flip Flap to Memory Protector. 7
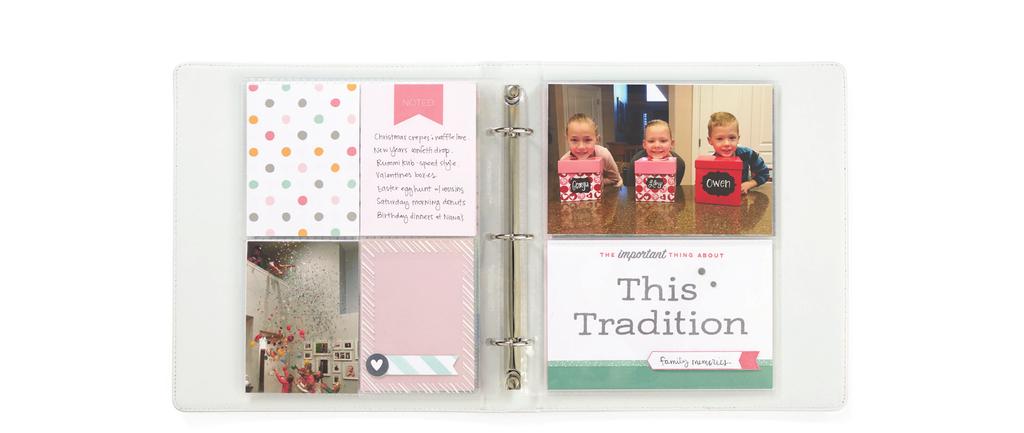
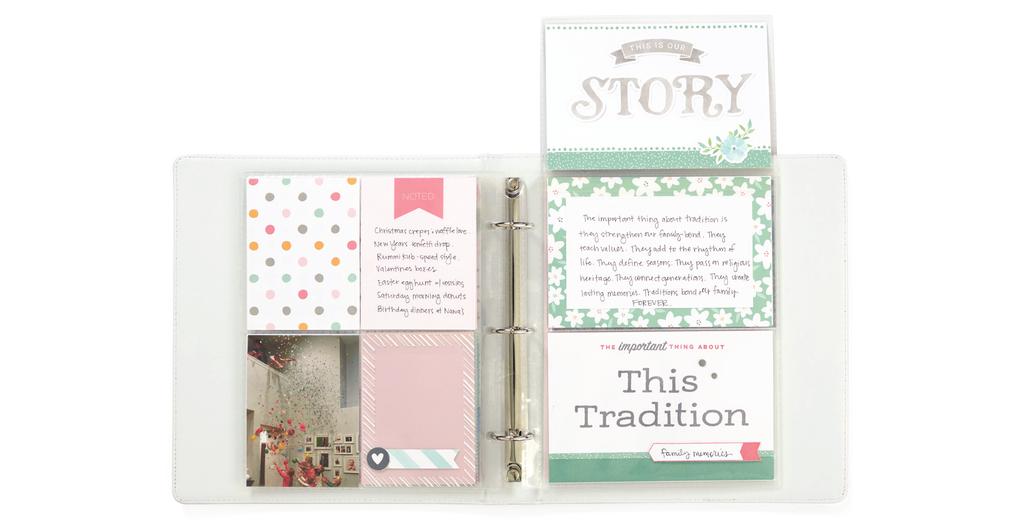
8 The Important Thing About Someone I Admire Layout 1 6" 4" Mink cardstock 1 6" ½" White Daisy cardstock 1 3¼" ¾" White Daisy cardstock 1 3" 4" Juniper cardstock 1 3" 4" Bashful cardstock 1 2¼" ½" floral paper 1 White Daisy wreath Picture My Life card 1 Bashful floral Picture My Life card 1 Linen stripe Picture My Life card 1 stripe border white overlay 1 hello white overlay 1. Using Smoothie ink, stamp grid lines and solid square to create plaid pattern on 6" ½" White Daisy cardstock. Tip: Use first and second-generation stamping technique with square stamp. 2. Prepare 6" 4" light Mink cardstock for stamping. Lightly draw one vertical guideline at 3". Lightly draw three horizontal guidelines ¾", 1¾", and 2¾" from top. 3. Using Charcoal ink, stamp Someone with Typography alphabet centered on middle guideline, and I Admire centered on bottom horizontal guideline. Tip: Start by stamping middle letters to keep word centered on guideline. 4. Using Juniper ink, stamp THE on top horizontal guideline 1¼" from left. Then using Charcoal ink, stamp important, and using Juniper ink, stamp THING ABOUT. 5. Erase guidelines when stamping is complete. 6. Attach stamped 6" ½" White Daisy cardstock along bottom of light Mink title. 7. Using Charcoal ink, stamp scallop border on light Mink cardstock, along top edge of stamped White Daisy piece 8. Using Juniper ink, stamp arrow on 3¼" ¾" White Daisy cardstock and trim. 9. Attach medium Glacier butterfly and Charcoal butterfly Complements to Linen Stripe Picture My Life card. Using Charcoal ink, stamp ink splatters and triple hearts around butterflies as shown. Using Juniper ink, stamp remember below hearts. 10. Dovetail left end of 2¼" ½" floral paper. Attach to bottom of 3" 4" stripe border overlay as shown. Attach Charcoal butterfly circle Complement to straight edge of floral paper. Overlay is window to next layout. Tip: Make sure to remove clear protectant from white overlay card. 11. Attach 3" 4" vertical Flip Flap to bottom right 3" 4" pocket on Memory Protector. 12. Embellish hello overlay with white gems as shown and insert over Juniper cardstock in Flip Flap. Tip: Make sure to remove clear protectant from white overlay card. The Important Thing About This Tradition Layout 2 6" 4" White Daisy cardstock 1 5" 3" White Daisy cardstock 1 3¼" ¾" White Daisy cardstock 1 6" ½" Juniper dot paper 1 6" V" Juniper dot paper 1 6" ½" Juniper cardstock 1 polka dot Picture My Life card 1 NOTED Picture My Life card 1 Juniper floral Picture My Life card 1 striped border white overlay (from previous layout) 1. Trim 4" 6" polka dot Picture My Life card to 3" 4". 2. Trim 4" 6" NOTED Picture My Life card to 3" 4". Keep vertical side of card facing up and trim ½" from each side. Then trim 2" from bottom of card. 3. Attach Charcoal circle heart Complement to striped border overlay on previous layout. Complement will cover back of circle used on front side of overlay window. 4. Attach 6" ½" Juniper dot paper to bottom of 6" 4" White Daisy cardstock. Using Juniper ink, stamp dot border above Juniper dot paper. Stamp again along top of White Daisy cardstock. 5. Attach THIS IS OUR STORY and small flower with leaves Complements to card. 6. Attach 5" 3" White Daisy cardstock to Juniper floral Picture My Life card for additional journaling space. 7. Prepare second 6" 4" White Daisy cardstock for stamping. Lightly draw one vertical guideline at 3". Then draw horizontal lines ½", 1X", and 2½" from top. 8. Using Smoothie ink, stamp THE on top line at 1½". Then using Charcoal ink, stamp important, and using Smoothie ink, stamp thing about. Using Charcoal Ink, stamp This with Typography alphabet on the middle line, and Tradition on the bottom line. 9. Erase guidelines when stamping is complete. 10. Attach 6" ½" Juniper cardstock to bottom of title pocket card. Attach 6" ¼" Juniper dot paper directly above Juniper cardstock. 11. Using Smoothie ink, stamp arrow on 3¼" ¾" White Daisy cardstock and trim. Using 3-D foam tape, attach on top of Juniper dot paper. 12. Embellish with gems as desired. 13. Attach 4" 6" horizontal Flip Flap to Memory Protector. 8
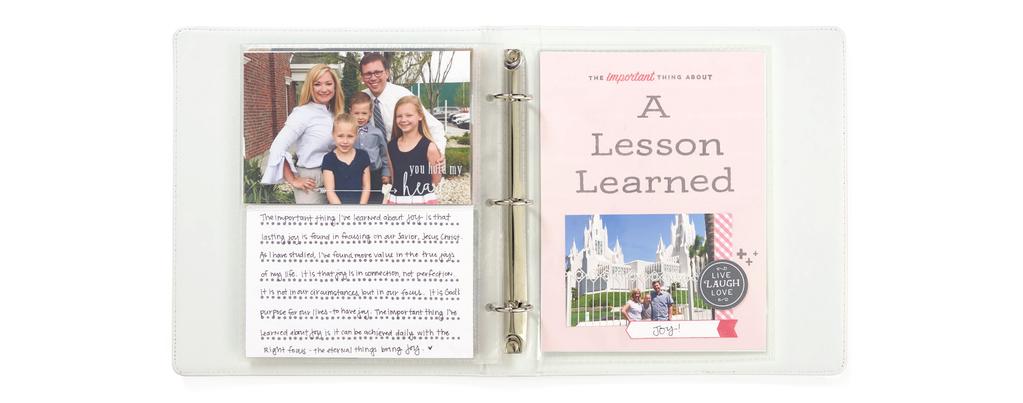
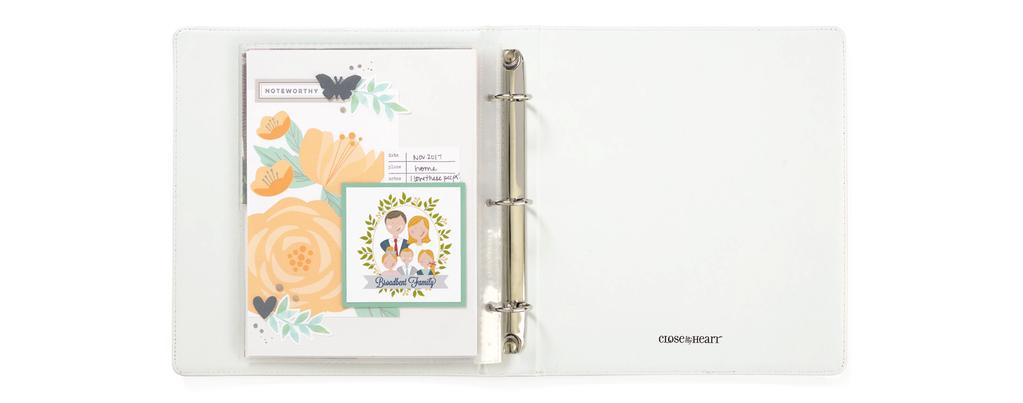
9 The Important Thing About A Lesson Learned 1 6" 8" Bashful cardstock 1 6" 4" White Daisy cardstock 1 3¼" ¾" White Daisy cardstock 1 ½" 3" Smoothie zip strip 1 white you hold my heart overlay 1. Prepare 6" 4" White Daisy cardstock for stamping. Lightly draw horizontal guidelines every ½" starting ½" from top. 2. Using Charcoal ink, stamp dot border along each horizontal guideline, leaving ¼" on both sides of border. Use for journaling. 3. Prepare 6" 8" Bashful cardstock for stamping. Lightly draw one vertical guideline at 3". Lightly draw one horizontal guideline ¾" from top. Draw three more horizontal guidelines 1¾", 2¾", and 3¾" from top. 4. Using Charcoal ink, stamp A Lesson Learned with Typography alphabet centered on three bottom guidelines. Tip: Start by stamping middle letters to keep word centered on guideline. 5. Using Charcoal ink, stamp THE on Bashful cardstock 1¼" from left on top guideline. Then using Smoothie ink, stamp important. The using Charcoal ink, stamp THING ABOUT. 6. Erase pencil lines when stamping is complete. 7. Attach 3" 4" photo X" from left and bottom edges of Bashful cardstock. 8. Attach ½" 3" Smoothie zip strip along right edge of 3" 4" photo. Using 3-D foam tape, attach LIVE LOVE LAUGH Complement over Smoothie zip strip. 9. Using Charcoal ink, stamp plus sign scatter as shown. 10. Using Smoothie ink, stamp arrow on ¾" 3¼" White Daisy cardstock and trim. 11. Attach stamped arrow, overlapping photo V" as shown. 12. Attach 4" 6" vertical Flip Flap to Memory Protector. Insert you hold my heart overlay over outer photo in Flip Flap. Back Cover Page 1 6" 8" Linen cardstock 1 3¼" 3¼" Juniper cardstock 1 1" 2" White Daisy cardstock 1 Tangerine floral Picture My Life card 1. Attach 4" 6" Tangerine floral pocket card to 6" 8" Linen cardstock, centered along left edge. 2. Using 3-D foam tape, attach 3¼" 3¼" light Juniper cardstock ¼" from right and 1¼" from bottom of Linen cardstock. 3. Using Charcoal ink, stamp date place notes on 1" 2" White Daisy cardstock. Attach as shown. 4. Attach grey rectangle Complement ¼" from left edge, along top edge of pocket card. Using Charcoal ink, stamp NOTEWORTHY on left side of Complement. 5. Attach butterfly, heart, and leaf Complements as shown. 6. Using Charcoal ink, stamp ink splatters as shown. 7. Embellish with grey gems as desired. 9

10 10
11 11
12 12
13 13
14 14

15 15
Hello Pumpkin. Deluxe Scrapbooking Workshop. 2 single pages, 2 layouts. Featured Technique: Using Mixed Media
 Deluxe Scrapbooking Workshop Hello Pumpkin 2 single pages, 2 layouts Featured Technique: Using Mixed Media Additional Materials Needed: D1784 Z2805 Z6502 Z2812 Z4181 Z1204 Z2060 Z2089 Z4214 My Acrylix
Made with Love Mini Album
 Workshop Made with Love Mini Album Additional Materials Needed: Exclusive Stamp Set: CC4192 My Acrylix For My Mother Stamp Set* Z2831 Charcoal Exclusive Inks Stamp Pad Z2844 Pixie Exclusive Inks Stamp
Grateful Heart. Scrapbooking Workshops Your Way. 3 layouts & 8 optional cards. (P) = portrait (L) = landscape. Gather photos (16 total) Project 1
 = portrait (L) = landscape. Gather photos (16 total) Project 1") Scrapbooking Workshops Your Way Grateful Heart 3 layouts & 8 optional cards (P) = portrait (L) = landscape Gather photos (16 total) 3µ3 3 µ 4 (P) 3 µ 4 (L) 4µ4 4 µ 6 (P) 4 µ 6 (L) 5 µ 7 (P) Project 1 4
Scrapbooking Workshops Your Way Grateful Heart 3 layouts & 8 optional cards (P) = portrait (L) = landscape Gather photos (16 total) 3µ3 3 µ 4 (P) 3 µ 4 (L) 4µ4 4 µ 6 (P) 4 µ 6 (L) 5 µ 7 (P) Project 1 4
I Heart Us. Scrapbooking Workshops Your Way. 3 layouts. (P) = portrait (L) = landscape. Gather photos (15 total) Project 1. Project 2 Project 3
 = portrait (L) = landscape. Gather photos (15 total) Project 1. Project 2 Project 3") Scrapbooking Workshops Your Way I Heart Us 3 layouts (P) = portrait (L) = landscape Gather photos (5 total) 3µ3 3 µ (P) µ µ 6 (L) 5 µ 7 (P) 5 µ 7 (L) Project Project 2 Project 3 3 2 Getting Started: Gather
Scrapbooking Workshops Your Way I Heart Us 3 layouts (P) = portrait (L) = landscape Gather photos (5 total) 3µ3 3 µ (P) µ µ 6 (L) 5 µ 7 (P) 5 µ 7 (L) Project Project 2 Project 3 3 2 Getting Started: Gather
Feels Like Home. Deluxe Scrapbooking Workshop. 2 layouts, 2 single pages. Featured Technique: Heat Embossing. Additional Materials Needed:
 Deluxe Scrapbooking Workshop Feels Like Home 2 layouts, 2 single pages Featured Technique: Heat Embossing Additional Materials Needed: D1821 My Acrylix Feels Like Home Scrapbooking Stamp Set* Z6500 Sugarplum
Hello Lovely. Scrapbooking Workshops Your Way
 Scrapbooking Workshops Your Way Hello Lovely 1. Gather photos (16 total); where applicable, photo orientation is noted as either portrait (P) or landscape (L) Project 1 1 4 µ 6 (L) 3 3 µ 3 Project 2 1
Here s to You 1 single page & 7 cards
 Workshop Here s to You 1 single page & 7 cards Additional Materials Needed: Z2841 Glacier Exclusive Inks Stamp Pad Z2895 Lagoon Exclusive Inks Stamp Pad Z2892 Pacifica Exclusive Inks Stamp Pad Y1006 3"
True North 2 layouts, 1 single page, 4 cards
 Workshop True North 2 layouts, 1 single page, 4 cards Additional Materials Needed: Z6509 Candy Apple Exclusive Inks Stamp Pad Z2829 Espresso Exclusive Inks Stamp Pad Z2851 Saffron Exclusive Inks Stamp
So Much Happy. Scrapbooking Workshops Your Way. 3 layouts. (P) = portrait (L) = landscape. Gather photos (17 total) Project 1. Project 2 Project 3
 = portrait (L) = landscape. Gather photos (17 total) Project 1. Project 2 Project 3") Scrapbooking Workshops Your Way So Much Happy 3 layouts (P) = portrait (L) = landscape Gather photos (7 total) µ 3µ3 3 µ 4 (P) 4 µ 6 (P) 5 µ 7 (L) 5 µ 7 (P) Project Project 4 Project 3 Getting Started:
Scrapbooking Workshops Your Way So Much Happy 3 layouts (P) = portrait (L) = landscape Gather photos (7 total) µ 3µ3 3 µ 4 (P) 4 µ 6 (P) 5 µ 7 (L) 5 µ 7 (P) Project Project 4 Project 3 Getting Started:
Happy Times Card Workshop
 This Happy Times Card Workshop makes 12 cards from 1/2 of a Paper Packet. The other half of the paper could be used to double the workshop to complete 24 cards, or it could be used for other types of paper
Jeepers Creepers. Scrapbooking Workshops Your Way
 Scrapbooking Workshops Your Way Jeepers Creepers. Gather photos (2 total); where applicable, photo orientation is noted as either portrait (P) or landscape (L) Project 5 µ 7 (P) 3 4 µ 6 (L) Project 2 4
Feels Like Home. Scrapbooking Workshops Your Way. 3 layouts. (P) = portrait (L) = landscape. Gather photos (12 total) Project 1. Project 2 Project 3
 = portrait (L) = landscape. Gather photos (12 total) Project 1. Project 2 Project 3") Scrapbooking Workshops Your Way Feels Like Home 3 layouts Gather photos ( total) (P) = portrait (L) = landscape 3µ3 3 µ 4 (P) 3 µ 4 (L) 4µ4 4 µ 6 (P) 4 µ 6 (L) Project Project Project 3 Getting Started:
Scrapbooking Workshops Your Way Feels Like Home 3 layouts Gather photos ( total) (P) = portrait (L) = landscape 3µ3 3 µ 4 (P) 3 µ 4 (L) 4µ4 4 µ 6 (P) 4 µ 6 (L) Project Project Project 3 Getting Started:
Whimsy Paper Fundamentals Album Project 10 Double Pages + Bonus Title Page
 Whimsy Paper Fundamentals Album Project 10 Double Pages + Bonus Title Page Materials needed: Z3127 Paper Fundamentals Whimsy 1385 White Daisy Cardstock Z3165 Fundamental Stickers Whimsy Pack X7202C Kaleidoscope
One Scoop at a Time. Cardmaking Workshops Your Way. 12 cards, 6 each of 2 designs
 Cardmaking Workshops Your Way One Scoop at a Time 12 cards, 6 each of 2 designs Featured Techniques: Second-generation Stamping and Rock & Roll Stamping Additional Materials Needed: Exclusive Stamp Set:
Happy Times 6-Page Scrapbooking Kit
 Happy Times 6-Page Scrapbooking Kit 1. Begin by attaching the Wood BTP to the outside edge of both base pages. These are your anchor pieces. 2. Next attach the two 1.5 x 6" strips of Ombre BTP to the top
Hostess Rewards Project Instructions Australia New Zealand
 Hostess Rewards Project Instructions Australia New Zealand Level 2 Hostess Rewards Artwork: Hostess Rewards Products Needed: A1195 My Acrylix Lovely Leaves M1150 My Acrylix Little Leaves 1388 Colonial
City Sidewalks Flip Flap Workshop Cu#ng Guide
 City Sidewalks Flip Flap Workshop Cu#ng Guide 11 ½ X 11 11 ½ X 11 3 ¾ X 4 1/2 ½ ½ 1 X 5 ¼ ½ X 5 ¼ ½ X 5 ¼ 1 X 3 3 X 5 ¼ 1 X 5 ¼ 4 X 5 ¼ 3 X 11 X X ½ X 2 ¾ 3 X 5 ¼ 1 2 1 2 10 X 1 ¾ ¾ X 5 ¼ 3 ¾ X 1 ¾ 1 X
2J 2G 3B 3A 3B 3A 3I 3J 3K 3J 3K 3B 3A3B 3A 3J 3K3J 3K TTING DIA GRAMS (1 of 3) 5C* 5C* 6B* 6B* 5C* 5C* 1A* 1A* 3B* 3B* & 3J* & 3J* 2B 2G 1D* 1D*
 5C* 5C* 6B* 6B* 5C* 5C* 1A* 1A* 3B* 3B* & 3J* & 3J* 2B 2G 1D* 1D*") Scrapbooking orkshops Your ay Jack 1. Gather photos (19 total); where applicable, photo orientation is noted as either portrait (P) or landscape Project 1 3 4 µ 6 3 µ 4 3 µ 3 Project 4 µ 6 (P) 1 4 µ 6
Scrapbooking orkshops Your ay Jack 1. Gather photos (19 total); where applicable, photo orientation is noted as either portrait (P) or landscape Project 1 3 4 µ 6 3 µ 4 3 µ 3 Project 4 µ 6 (P) 1 4 µ 6
Dreamin Big. Scrapbooking Workshops Your Way
 Scrapbooking Workshops Your Way Dreamin Big. Gather photos (6 total); where applicable, photo orientation is noted as either portrait (P) or landscape (L) Project 2 4 µ 6 (P) 4 µ 4 2 3 µ 4 (L) Project
Dad Is Rad 1 two-page layout, 1 single page, 4 cards
 Cardmaking Workshops Your Way Dad Is Rad two-page layout, single page, 4 cards Featured Technique: Rock & Roll Additional Materials Needed: Exclusive Stamp Set: Z2827 Almond Exclusive Inks Stamp Pad Z287
Some Kinda Wonderful. Scrapbooking Workshops Your Way
 Scrapbooking Workshops Your Way Some Kinda Wonderful. Gather photos (4 total); where applicable, photo orientation is noted as either portrait (P) or landscape (L) Project 2 4 µ 6 (L) 2 4 µ 6 (P) 3 µ 4
Hugs & Kisses Layout Workshop By Vicki Boutin
 Hugs & Kisses Layout Workshop By Vicki Boutin Kit: Hugs & Kisses Collection Pack, Hugs & Kisses- Devotion 12x12 paper 2 sheets, 24/7- Good Stuff 12x12 paper- one sheet, 24/7 Red Tweed/Calendar 12x12 paper,
Penelope. Workshops Your Way
 Workshops Your Way Penelope This workshop guide includes patterns, photos, tips, and cutting diagrams to walk you through creating all four Penelope Workshops Your Way layouts. At the end of this guide,
green at heart mini album
 national scrapbook day green at heart mini album featuring/ Green at Heart paper collection what i love about you by/ layle koncar kit supplies/ 1 Capital album in Milk Chocolate (brown) 1 Green at Heart
Annual Inspirations Index AU/NZ Page Item # Description AU NZ
 Annual Inspirations 2017-18 Index AU/NZ Page Item # Description AU NZ 3 New Consultant Kit $129 $145 14 9043 Make It from Your Heart Volume 3 $25.50 $29 15 9035 Make It from Your Heart Volume 1 $15 $18
PICNICS. & popsicles. Scrapbook Kit Projects from Kelly Goree. scrapbookandcards.com SCRAPBOOK KIT SUMMER 2018
 PICNICS & popsicles SCRAPBOOK KIT SUMMER 2018 Scrapbook Kit Projects from Kelly Goree QUARTERLY CRAFT KITS step-by-step instructions + + tips sketch LUCKY STARS (24x12) 1 Select Atlantic cardstock for
Holidays from the Heart Card Workshop
 Holidays from the Heart Card Workshop Consultant Holidays from the Heart Card Workshop Step 1: Determine how you will advertise this project. This card project can be advertised in two ways: 1. Consultant-Driven
The Great Outdoors Canada Bundle Workshop Supply List
 The Great Outdoors Canada Bundle Workshop Supply List This workshop includes: 2 two-page 12 x 12 layouts and 4 cards Supply List: CC101815 The Great Outdoors Workshop Kit Z3298 Cricut Artistry Collection
All Year Cheer Card Kit
 All Year Cheer Card Kit February, 2017 Designer, Wendi Robinson Finished size: 5 ½ x 4 ¼ Happy Birthday Photo Play Party Boy 1. Cut Slate Cardstock to 5 ½ x 8 ½ and fold in half to create card base 2.
Annual Inspirations Index CANADA Page Item # Description CA
 Annual Inspirations 2017-18 Index CANADA Page Item # Description CA 3 New Consultant Kit $95 14 9043 Make It from Your Heart Volume 3 $21.75 15 9035 Make It from Your Heart Volume 1 $12.75 15 9042 Make
Decorative Box with Easel Card Set & Side Waterfall Album
 Designed by ~ Annette Green Graphic 45 Supplies: 1 ea Botanical Tea Deluxe Collector's Edition (4501684) 1 ea Kraft 5 x 5 Mixed Media Box (4500984) 1 pk G45 Staples Metal Door Pulls (4500548 or 4500842)
CHASING. fireflies. Scrapbook Kit Projects from Lisa Dickinson SCRAPBOOK KIT SUMMER scrapbookandcards.com
 CHASING fireflies SCRAPBOOK KIT SUMMER 2017 Scrapbook Kit Projects from Lisa Dickinson Q U A R T E R LY C R A F T K I T S step-by-stepinstructions instructions++tips sketch step-by-step VACATION (24x12)
Garden Goddess Mixed Media Binder Album
 Designed by ~ Annette Green Graphic 45 Supplies: 1 each Garden Goddess 8 x 8 Paper Pad 1 pack Garden Goddess Chipboard 1 pack Garden Goddess Tags & Pockets 1 each Mixed Medium Album Kraft 1 pack G45 Staples
HOLIDAY EXPRESSIONS RECIPES SEPTEMBER DECEMBER 2017
 HOLIDAY EXPRESSIONS RECIPES SEPTEMBER DECEMBER 2017 This document was designed to work hand-in-hand with our beautiful new idea book to help you make the most of all the inspiring artwork inside. The idea
SEASONAL EXPRESSIONS RECIPES JANUARY APRIL 2018
 SEASONAL EXPRESSIONS RECIPES JANUARY APRIL 2018 This booklet was designed to work hand-in-hand with our beautiful new idea book to help you make the most of all the inspiring artwork inside. The idea book
lay it on me sketch layouts
 scrapbook s lay it on me sketch layouts featured products/ Chatterbox Happy Garden papers Scenic Route Loveland papers Crate Paper Sweet Branch papers BasicGrey painted brads Crate Paper brads and rub-ons
BLUE SKIES. & butterflies SCRAPBOOK KIT SPRING Scrapbook Kit Projects from Kelly Goree. scrapbookandcards.com
 BLUE SKIES & butterflies SCRAPBOOK KIT SPRING 2018 Scrapbook Kit Projects from Kelly Goree Q U A R T E R LY C R A F T K I T S step-by-stepinstructions instructions++tips sketch step-by-step SPRING FLING
How To Make A Simple Circuit & Switch
 How To Make A Simple Circuit & Switch Our video tutorial at www.artgonewild.com shows how to make a simple circuit & switch, which you can view at www.artgonewild.com. The sample card shown in the video
Calypso. Workshops Your Way. 3. Cut apart Picture My Life cards. Layout 3. Layout
 3 3 Workshops Your Way Calypso 0 3 Layout 3 3 () 6 µ 4 3H 3H Journaling 3 Journaling 3 4 3 4 3 Layout Layout 3 ()3 7 µ35 () 6 µ 4 (4) 3 µ 4 (4) 4 µ 3 *A* µ 4µ 4 3A* 4 µ 0 3A* 4 µ 0 * 4 µ * 4 µ µ 5 4. Cut
May 2008 Greetings to Go Body & Soul
 May 2008 Greetings to Go Body & Soul Materials: Body & Soul Greetings to Go Body & Soul CS Wood Mounted Stamp Set Body & Soul Unmounted Borders & Backgrounds and Fonts Body & Soul I Love Your Spirit Stamp
A Proper Gentleman's Board Book
 Designed by ~ Annette Green Graphic 45 Supplies: 1 pack A Proper Gentleman DCE 1 pack 12x12 Chipboard Sheets Black 1 pack G45 Staples Antique Metal Clock Keys 1 pack G45 Staples Regular Tags Black (4501806)
Annual Inspirations Index - US
 Annual Inspirations 2016-17 Index - US Page Item # Description USD 3 New Consultant Kit $75.00 10 Z5200 12" x 12" D-Ring Album Black $29.95 10 Z5201 12" x 12" D-Ring Album Grey $29.95 10 Z5202 12" x 12"
andy Cane Pop-Up Card
 andy Cane Pop-Up Card Project created by Jo-Ann Fabric and Craft Stores SUPPLIES & TOOLS: Cardstock: white, green, light red 12"x12" Paper, cream holly print Glitter alphabet stickers, black Self-adhesive
2019 Season Expressions (January - April) - AU/NZ Page Item # Description AU NZ
 - AU/NZ Page Item # Description AU NZ") 2019 Season Expressions (January - April) - AU/NZ Page Item # Description AU NZ 4 C1764 Hostess Rewards: Got Snow? $23.00 $25.00 5 E1044 Hostess Rewards: Illustrated Alphabet $49.50 $51.00 6 D1830 Hostess
2019 Season Expressions (January - April) - AU/NZ Page Item # Description AU NZ 4 C1764 Hostess Rewards: Got Snow? $23.00 $25.00 5 E1044 Hostess Rewards: Illustrated Alphabet $49.50 $51.00 6 D1830 Hostess
Annual Inspirations Index - AU NZ
 Annual Inspirations 2016-17 Index - AU NZ Page Item # Description AU NZ 3 New Consultant Kit $129.00 $145.00 10 Z5200 12" x 12" D-Ring Album Black $45.00 $51.00 10 Z5201 12" x 12" D-Ring Album Grey $45.00
Page of the Month Bonus Projects
 Page of the Month Bonus Projects Supply List: All leftover papers and embellishments from class All supplies listed on POTM supply list from class Black Soot Distress Ink Paper/Other: 1 x BG Candy Buttons
Make It from Your Heart
 Make It from Your Heart RECIPES Vol. 4 This document is designed to work hand-in-hand with Make It from Your Heart Volume 4 to help you make the most of all the inspiring artwork inside. Make It from Your
Master Template Unusual Minibooks 1
 Master Template Unusual Minibooks 1 Arrow 4-page 4 Minibook Cut out the 2 pages. Fold on the dotted lines. Place the inside pages inside the front page. Staple at the folded edge. Front page Back page
2019 Season Expressions (January - April) - US Page Item # Description USD
 - US Page Item # Description USD") 2019 Season Expressions (January - April) - US 4 C1764 Hostess Rewards: Got Snow? $14.95 5 E1044 Hostess Rewards: Illustrated Alphabet $31.95 6 D1830 Hostess Rewards: Let's Celebrate $18.95 7 B1666 Hostess
2019 Season Expressions (January - April) - US 4 C1764 Hostess Rewards: Got Snow? $14.95 5 E1044 Hostess Rewards: Illustrated Alphabet $31.95 6 D1830 Hostess Rewards: Let's Celebrate $18.95 7 B1666 Hostess
Scrapbook Kit Projects from Nicole Nowosad scrapbookandcards.com
 SCRAPBOOK KIT SPRING 2016 Scrapbook Kit Projects from Nicole Nowosad step-by-stepinstructions instructions++tips sketch step-by-step TODAY (24 x12 ) 1 Select Classic White cardstock as your layout base.
All Year Cheer Card Kit
 All Year Cheer Card Kit December, 2016 Designer, Wendi Robinson Finished size: 5 x 5 Hello There Pebbles Winter Wonderland 1. Cut Robin s Egg Cardstock to 5 x 10 and fold in half to create card base 2.
April 2016 Club Scrap Deluxe. Preparation: Trim the White and Pink Printed Cutaparts into sections as indicated by the artwork.
 Assembly Line Scrapbooking April 2016 Club Scrap Deluxe Dahlia Materials: Dahlia Deluxe Kit with Embellishment Option Tools and Supplies: 12 Paper Trimmer Adhesive Foam Adhesive Tape 3x14 CS Grid Ruler
Steampunk Debutante : Junk Journal
 Designed by ~ Maria Cole Graphic 45 Supplies: 1 pack Steampunk Debutante DCE 1 pack G45 Staples Large Tag Kraft 1 pack G45 Staples Large Tag Ivory 1 each Antique Brass Door Knocker 1 pad Decades Dye Ink
Scrapbook Kit Projects from Stacy Cohen scrapbookandcards.com
 SCRAPBOOK KIT SPRING 2016 Scrapbook Kit Projects from Stacy Cohen step-by-stepinstructions instructions+ +tips sketch step-by-step THE GREAT HUNT (24 x12 ) 1 Select Classic White cardstock as your layout
scarlet seasons scrapbook.com All I Want For Christmas BasicGrey supplies: Other supplies:
 BasicGrey supplies: Scarlet s Letter patterned papers, mini monogram letters, diecut tags and letter stickers; chipboard mini monograms; wholy cow rub-ons Other supplies: charcoal and brown chalk ink 2
euphoria collection kit
 scrapbook.com euphoria collection kit featuring/ Euphoria paper collection collection kit created by/ kelly goree designer note/ Use scraps first if at all possible. instructions/ kit supplies/ 1 Euphoria
Christmas Magic Merry Christmas Lantern
 Designed by ~ Annette Green Graphic 45 Supplies: 1 each Deep Rectangular Matchbook Box (4501520) 1 each Christmas Magic Collection Pack (4501735) 1 pack Christmas Magic Chipboard (4501737) 1 pack Metal
2018 Holiday Expressions AUSTRALIA/NEW ZEALAND Page Item # Description AU NZ
 2018 Holiday Expressions AUSTRALIA/NEW ZEALAND 4 D1807 Hostess Rewards: Junior Varsity Alphabet $29.50 $30.50 4 A1224 Hostess Rewards: Just the Way You Are $11.50 $12.00 5 C1734 Hostess Rewards: A Thousand
cards and Memories Judi watanabe Design by: 2007 Craft TV Weekly, Inc.
 cards and Memories Design by: Judi watanabe Cards and memories 1 Scrap your cards! Judi has an intriguing idea: use the same rubber stamp throughout the year to create beautiful cards for every occasion.
March 2008 Club Scrap Avant Garde
 March 2008 Club Scrap Avant Garde Materials: Avant Garde CS Kit Avant Garde Embellishment Pack Avant Garde Unmounted Borders & Backgrounds Avant Garde Wood Mounted Stamp Set Tools: 12 Paper Trimmer 13
August 2008 Greetings to Go Cruisin
 August 2008 Greetings to Go Cruisin Materials: Cruisin Greetings to Go Cruisin Unmounted Font and Borders & Backgrounds Cruisin Wood Mounted Stamp Set Cruisin Wood Mounted Happy Birthday Stamp Tools: Bone
July 2008 Club Scrap Matrix
 July 2008 Club Scrap Matrix Materials: Matrix CS Kit Matrix Embellishment Pack Matrix Wood Mounted Stamp Set Matrix Borders & Backgrounds Tools: 12 Paper Trimmer 13 CS Grid Ruler Adhesive Glue Lines Glue
Graphic 45 club august 2013
 Graphic 45 club august 2013 STUDENT SUPPLY LIST Paper Trimmer Adhesive (dry, liquid, glue dots, 1/8 sookwang tape) Foam Squares Pencil Ruler Scissors Craft Knife & Cutting Mat Vertical Photos: one 4 x
bittersweet six layout kit
 scrapbook.com bittersweet six layout kit featuring/ Bittersweet paper collection six layout kit created by/ kelly goree instructions/ layout 1/ She s Ours: 12"x12" single kit supplies/ 1 Bittersweet Collection
Scrapbook Kit Projects from Stacy Cohen scrapbookandcards.com
 SCRAPBOOK KIT SPRING 2017 Scrapbook Kit Projects from Stacy Cohen step-by-stepinstructions instructions++tips sketch step-by-step HELLO SPRING (24x12) 1 Select Pearl Gray cardstock as layout base. Trim
SEASONAL EXPRESSIONS RECIPES JANUARY APRIL 2017
 SEASONAL EXPRESSIONS RECIPES JANUARY APRIL 2017 This booklet was designed to work hand-in-hand with our beautiful new idea book to help you make the most of all the inspiring artwork inside. The idea book
Retreat 2007 Greetings to Go Hometown
 Retreat 2007 Greetings to Go Hometown Materials: Hometown Greetings to Go UM Borders and Backgrounds Embellishment Pack Don t Get Us Started Wood Mounted Stamp Welcome Home Alphabet Stickers White Glossy
SUN FUN INVITATION MATERIALS LIST:
 SUN FUN INVITATION Life s a Breeze stamp set Mark the Date stamp set Pumpkin Pie card stock Whisper White card stock Bashful Blue textured card stock Real Red textured card stock Whisper White textured
MINI TRAVEL ALBUM & SUITCASE COVER Designed By: Regina Andari July 2013
 MINI TRAVEL ALBUM & SUITCASE COVER Designed By: Regina Andari July 2013 A mini travel album is the perfect way to save photos and memorabilia from a special trip and to keep special notes and give a written
SEASONAL EXPRESSIONS RECIPES MAY AUGUST 2017
 SEASONAL EXPRESSIONS RECIPES MAY AUGUST 2017 This booklet was designed to work hand-in-hand with our beautiful new idea book to help you make the most of all the inspiring artwork inside. The idea book
Flutter Easel Calendar Box with Sliding Drawer
 Designed by ~ Maria Cole Graphic 45 Supplies: 1 each Flutter 12x12 Collection Pack Flutter Stickers *Included w/collection Pack 1 pack Flutter Ephemera Cards 1 pack G45 Staples Antique Metal Door Pulls
MonOgrams To Mail. Tricia Morris. Design by: 2007 Craft TV Weekly, Inc.
 MonOgrams To Mail Design by: Tricia Morris 1 Stamp and mail! Tricia is reviving two classic arts: monogramming and hand-written notes! She starts by making two clever folders to hold her projects. Then
eerie collection kit collection kit scrapbook.com designer note/ Use scraps first if possible. instructions/ created by/ kelly goree
 scrapbook.com eerie collection kit featuring/ Eerie paper collection collection kit created by/ kelly goree designer note/ Use scraps first if possible. instructions/ kit supplies/ 1 Eerie Collection Pack
HOLIDAY EXPRESSIONS RECIPES SEPTEMBER DECEMBER 2018
 HOLIDAY EXPRESSIONS RECIPES SEPTEMBER DECEMBER 2018 This booklet was designed to work hand-in-hand with our beautiful new idea book to help you make the most of all the inspiring artwork inside. The idea
acorn AVENUE SCRAPBOOK KIT AUTUMN 2017 Scrapbook Kit Projects from Stacy Cohen scrapbookandcards.com
 acorn AVENUE SCRAPBOOK KIT AUTUMN 2017 Scrapbook Kit Projects from Stacy Cohen step-by-stepinstructions instructions++tips sketch step-by-step PONY RIDE (24x12) 1 Select two sheets of white cardstock as
Twelve Days of Christmas Mixed Media Album
 Designed by ~ Kathy Clement Graphic 45 Supplies: 1 pack Twelve Days of Christmas DCE 1 each Mixed Media Album Red (4501741) (4501790) Additional Supplies: 1 piece 8½ x 11 Cardstock cream or ivory 36 May
August 2009 Club Scrap Apothecary
 August 2009 Club Scrap Apothecary Materials: Apothecary CS Kit Apothecary Embellishment Pack Apothecary Wood Mounted Stamp Apothecary Unmounted Borders & Backgrounds Tools: 12 Paper Trimmer 13 CS Grid
Scrapbook Kit Projects from Lisa Dickinson scrapbookandcards.com
 SCRAPBOOK KIT AUTUMN 2016 Scrapbook Kit Projects from Lisa Dickinson step-by-stepinstructions instructions++tips sketch step-by-step GO AUTUMN (24x12) 1 Select 06 paper (red plaid side) for the left half
December 2014 Club Scrap. Reunion
 Assembly Line Scrapbooking December 2014 Club Scrap Reunion Materials: Reunion Kit with Embellishment Option Reunion Unmounted (UM) Borders & Backgrounds Tools and Supplies: 12 Paper Trimmer Adhesive Tape
Great Outdoors. October 2007 Club Scrap. Materials: Club Scrap Great Outdoors Kit Embellishment Pack Wood Mounted Stamp Set UM Borders and Backgrounds
 October 2007 Club Scrap Great Outdoors Materials: Club Scrap Great Outdoors Kit Embellishment Pack Wood Mounted Stamp Set UM Borders and Backgrounds Tools: 12 Paper Trimmer Adhesive Tape Paper Piercing
WINTER. Scrapbook Kit Projects from Lisa Dickinson SCRAPBOOK KIT WINTER scrapbookandcards.com
 WINTER SCRAPBOOK KIT WINTER 2018 Scrapbook Kit Projects from Lisa Dickinson step-by-stepinstructions instructions++tips sketch step-by-step CHRISTMAS FUN (24x12) 1 Select Diamond cardstock for left side
Annual IB Index
 Annual IB 2015-16 Index September 2015- August 2016 Page Item # Description Price 2 New Consultant Kit $129.00 6 C1624 Hostess Rewards: Birthday Wish $8.00 7 B1490 Hostess Rewards: Happy Hooray $6.00 7
Summertime Squares. 50" x 63" quilt This pattern is intended for those who are familiar with needle-turn appliqué and basic piecing.
 Summertime Squares 50" x 63" quilt This pattern is intended for those who are familiar with needle-turn appliqué and basic piecing. Fabric: Summertime by Barbara Jones of QuiltSoup for Henry Glass & Co
SEASONAL EXPRESSIONS RECIPES MAY AUGUST 2016
 SEASONAL EXPRESSIONS RECIPES MAY AUGUST 2016 This booklet was designed to work hand-in-hand with our beautiful new idea book to help you make the most of all the inspiring artwork inside. The idea book
12 pages of. project inspiration
 12 pages of project inspiration YOU LOVE STICKS BY Kim Arnold Declaration Block Party Alphabet Stickers PROJECT INSTRUCTIONS: STEP 1: Use Block Party patterned paper for the base of the layout. STEP 2:
SEASONAL EXPRESSIONS RECIPES MAY AUGUST 2018
 SEASONAL EXPRESSIONS RECIPES MAY AUGUST 2018 This booklet was designed to work hand-in-hand with our beautiful new idea book to help you make the most of all the inspiring artwork inside. The idea book
INSTRUCTIONS. Vintage Scrapbook Page Layout #1 12 x 12 inches with photo mat and pull-out photo/journaling tag
 INSTRUCTIONS Vintage Scrapbook Page Layout #1 12 x 12 inches with photo mat and pull-out photo/journaling tag My Angel Policy You may use the instructions included with this tutorial to create and produce
Read all instructions before beginning. Instructions: 1. Prepare embroidery designs.
 Project Quilting Feathers and Frills Table Runner Detailed quilting gives breathtaking beauty to this whole cloth quilting inspired table runner. Only you will know how easy it was to make thanks to your
Design 2006 Shannon Lawrence Images Stampin Up! Design 2006 Shannon Lawrence Some images Stampin Up!
 Design and instructions 2006 Shannon Lawrence. All rights reserved. Printed images may be copyrighted by the manufacturer. You may share and reuse this document in full for personal use and nonprofit purposes
free more projects, tips & techniques at Joann.com
 SUPPLIES & TOOLS: Stonehill Collection quilting fabrics: 2 1 4 yds Main Floral Purple 3/4 yd Striped Multi 1/2 yd Paisley Peach 1/2 yd Flower Dot Peach 1 yd Dot Peach (includes binding) 1/2 yd Dot Purple
September 2011 Club Scrap Orient Express
 September 2011 Club Scrap Orient Express Materials: Orient Express CS Kit Orient Express Embellishment Pack Orient Express Unmounted FontArt and Borders & Backgrounds Orient Express Club Scrap Unmounted
September 2010 Greetings to Go Adobe
 September 2010 Greetings to Go Adobe Materials: Adobe Greetings to Go Adobe Wood Mounted Adobe Collage Stamp Adobe Art Nouveau Today is Yours Stamp Adobe Greeting Great Stamp Adobe and FontArt Adobe Beads
SEASONAL EXPRESSIONS RECIPES JANUARY APRIL 2019
 SEASONAL EXPRESSIONS RECIPES JANUARY APRIL 2019 This booklet was designed to work hand-in-hand with our beautiful new idea book to help you make the most of all the inspiring artwork inside. The idea book
HopeChest. 6 pages of. project inspiration
 HopeChest c o l l e c t i o n 6 pages of project inspiration BEAUTIFUL PRINCESS by Betsy Veldman COOL TIP use journal cards to create the perfect photo mat Pink Paislee Products: Hope Chest: Heirlooms
September 2008 Greetings to Go Cyprus
 September 2008 Greetings to Go Cyprus Materials: Cyprus Greetings to Go Cyprus Unmounted Font and Borders & Backgrounds Cyprus Wood Mounted Stamp Cyprus Wood Mounted Celebrate Everything Stamp Cyprus Wood
March 2009 Club Scrap Common Threads
 March 2009 Club Scrap Common Threads Materials: Common Threads CS Kit Common Threads Embellishment Pack Common Threads Unmounted Borders & Backgrounds Tools: 12 Paper Trimmer 13 CS Grid Ruler Adhesive
Designed by Maria Cole
 Designed by Maria Cole Graphic 45 Supplies: 1 sheet of Every Blooming Thing (4501472) 1 sheet of Plant Kingdom (4501474) 1 sheet of Seasonal Splendor (4501475) 1 sheet of Verdant Woodlands (4501479) 2
March 2014 Club Scrap Trees
 March 2014 Club Scrap Trees Materials: Trees CS Kit with Embellishment Pack Trees Greetings UM Trees Borders & Backgrounds UM Trees Art Nouveau UM Tools and Supplies: 12 Paper Trimmer Adhesive Tape 3x14
June 2017 Greetings to Go. Pattern Play
 Assembly Line Cardmaking June 2017 Greetings to Go Pattern Play Pattern Play Materials: Greetings to Go Tools and Supplies: Scor-Pal Adhesive Tape Bone Folder CS Foam Adhesive Circles Paper Trimmer 3x14
Garden Kneeling. Supplies. Visit bernina.com. Projects Webinars Promotions. Created by Kay Hickman
 Garden Kneeling Created by Kay Hickman Spring is just around the corner, a time for gardening and adding a bit of creativity to your landscape. Whether gardening is a joy or a chore, you can add a bit