Bozak Symphony sonic refresh, repair, binding post addition notes.
|
|
|
- Regina Bruce
- 5 years ago
- Views:
Transcription
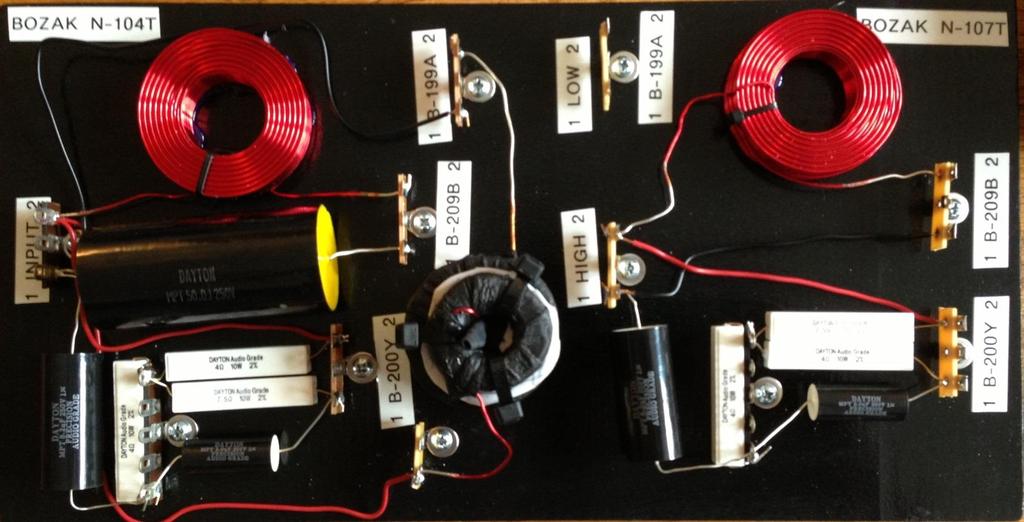
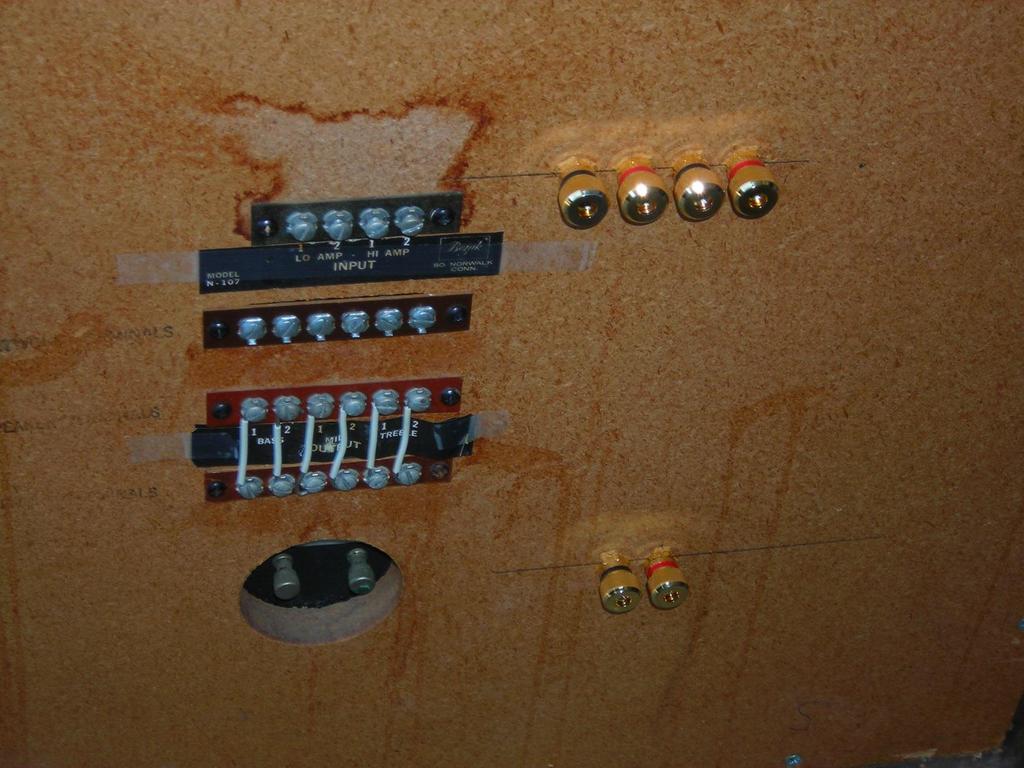
1 Bozak Symphony sonic refresh, repair, binding post addition notes. Documentation: Build Date: 724 (April 1972) Tweeters: B-200YC Midrange: B-209BC Woofer B-199AC Crossover Compliment: Bi-Amped at the factory- N-104 & N-107 Stock Crossovers - Included a Bozak Branded N-106B Active Crossover, stock - in great shape. [edit] Output caps leaking. Needed refresh. Phase 2 of my project is replacing just a few key electrolytic, audio grade capacitors inside of it. Overall shape of speakers: Broken 6 screw terminal strips in the back (ended up being 2 of them) Need to replace out of spec electronics. The speakers grill cloth: worn / stained. Metal lattice bent up, loose and disconnected in some areas. Woodwork: Needs touchup, some scratches. All parts are present with no rotting wood. Deal made to Jim Lopeman as far as the life of the speakers: Take care of them, upgrade as necessary. Don t sell them or parts of them. I decided to throw in: If modifications are made, keep original parts (except damaged ones) for the next owner. If I can t use them and take care of them as needed anymore, pass them along the same way that I received them Give them away for a charitable donation of their choice that I feel is fair. Plans: Basic Needs: Update capacitors in crossovers, fix terminal strips, replace grill fabric (separate file). But that is not how I roll Electronically I decided to: Completely build new crossovers out of new parts, 2 crossovers on single hardwood board, painted and documented Using optional Tobin modifications Add 5 way gold binding posts using 14 gauge stranded wire from the crossovers Rewire the wire from the crossovers to the exterior terminal strips using 16 gauge stranded wire Create new larger gauge jumper wires Cosmetically - simple - change the speaker cloth. (At least I thought that was simple) Planning - The Yahoo Bozak Group was a wealth of help and information. If I could not find a picture or diagram in the files / photos section of the group, people opened up the backs of their speakers to take pictures of their crossovers for me, others dug through their stash of Bozak parts to send pictures too. I kludged together a wealth of information, way more than I needed, then decided to take the plunge. I had built my own Klispch Crossovers rather recently, plus designed speakers and subs from the ground up in my younger years for home audio, band, concert and studio audio setups. I was ready to plan, order, build and install.
2 Crossovers - I ordered the parts from parts express. Pat Tobin has some spec suggestions that currently the parts are not available in those values, I needed to build my own N-104T B-199AC (Woofer) 3.15mH. Here is the parts list for the N-104T: (note - to build the N-107T, all don t need 50uF Cap and the 3 or 3.15mH inductor. ORDERED PART NUMBER DESCRIPTION DAYTON AUDIO DNR OHM 10W PRECISION AUDIO GRADE RESISTOR DAYTON AUDIO PMPC UF 250V PRECISION AUDIO CAPACITOR DAYTON AUDIO PMPC UF 250V PRECISION AUDIO CAPACITOR DAYTON AUDIO DMPC-50 50UF 250V POLYPROPYLENE CAPACITOR ERSE 1.1MH 18 AWG PERFECT LAYER INDUCTOR DAYTON AUDIO DNR OHM 10W PRECISION AUDIO GRADE RESISTOR JANTZEN 3.0MH 18 AWG AIR CORE INDUCTOR ERSE 0.15MH 18 AWG PERFECT LAYER INDUCTOR UNIT PRICE $1.38 $2.41 $5.99 $13.80 $10.39 $1.09 $15.60 $4.35 Tobin Schematics & Parts: N-104T v2 Tweeters
3 Midrange: Woofer:
4 Version #1 of the Tobin N-104T. As you see, he does have the smaller 1.1mH inductor for the midrange, but he has the 3.0mH inductor for the woofer. I found this site: Basic Stereo Speaker Crossover Inductor It shows that the 3.0mH inductor frequency will 424HZ. Using the calculator on the page, Pat s 3.15mH gets it down to HZ. That is pretty darn close. Also, coupling inductors in series adds them together; I read that the wire gauge should be the same. That is why I chose the 18g inductors on my parts list. I also read that the wire gauge in a circuit should be the same or less to the inductors, any larger starts to add inductance to the circuit. Tools for the job: I ve built my tech bench using the recommendations of the Dynaco Doctor here: I have a Weller analogue adjustable soldering iron with a stock of different size tips, most of the hand tools, a cordless drill with lots of bits and tips, cordless reciprocating saw, old hair drier for shrink wrap tubing. Generic X-Acto knife set that comes in handy. I attended a Tech School some 15 years ago; we received a good to better Volt Meter (Update : Picked up a new VM that can measure inductance after seeing Judy s), breadboard with wires and clips, Oscilloscope Leads and an electronic function calculator. I keep a copy of Ugly's electrical reference guide either on the bench or by my computer / home office. I bought a 1 pound spool of Kester 44 Rosin Core Solder 63/37 a year or so ago, I still have most of it left.
5 Bench Parts: I bought a bunch of the radio shack 5 pin solder lugs. But I find the hole too small on the bottom side. So I ordered some old style (NOS Phenolic) ones from EBay. I also got some Phenolic 6 Screw solder terminal strips (EBay). Also needed black friction electrical tape, 3 color 18 gauge hook up wire set (not bigger than the inductor size). All that, among other basic electrical bench stuff. Corrugated containerboard (OK Cardboard) Crossover Board: I mocked out the crossovers as separate units (N-107 & N-104) on Cardboard, all of them. After studying a couple of styles of the Tobin resistor / capacitor hookup, I chose to run the 4 ohm resistor across the top of the 5 point solder lug. I used my Miniature (6 ) Long Nose, Serrated pliers to make close bends on the components. I created a wax paper template (my wife has a full drafting setup at her office; I could not wait for tracing paper). It is easier to work with a 1x8 wood than the thin Masonite type material. I noticed that the stock crossovers are black, so I hustled on down to Home Depot, picked up a 4 1x8 hardwood plank. Measured the space inside the speaker (I did not want to remove any insolation), cut to length and painted it with many coats of Gloss Black. I used an ice pick / punch awl to mark where the solder lugs to, I then transferred 1 set of solder lugs to the wood. I predrilled the holes. I used screws and washers to fasten them down. After putting together all of the components, I checked and double-checked my work. It looked good so I wired it up. Labeling the connection points is a key step, as is keeping common (1) and positive (2). On my speakers, the Phenolic 6 Screw solder terminal strips slide in and out of the whole cut in the back panel. That is if you don t run solder down the wire into the insulation. So I soldered them up on the bench, same as the little tabs for the Gold 5 Way Binding Posts. Gold 5 Way Binding Posts: I am not a believer in $2K speaker cables; I build my own out of decent raw materials. For Bi-Amp cables on the same amp, I will use all 4 wires inside a single package. But as my set up will have 2 separate amplifiers sitting on different shelves, I ll be using 2 separate runs of speaker wire. I do like the convenience of banana plugs. So I install Gold 5 Way Binding Posts on all my speakers and vintage amps if at all possible. It s simple, on a speaker (wood), purchase a set of Dayton Audio BPA-38G HD Binding Posts, use a ¼ inch drill bit and tap them into the whole. Use ¾ spacing for use of the dual plugs. I used a T square to get a straight line, followed by using a dual set of Banana Plugs and a tape measure to get the spacing right. That s it. Replacing the grill cloth will be in a separate file in the building plans folder of the Yahoo group. I m planning on removing these terminal strips, installing a 3PDT Switch. I ll update the file is it is successful. Pictures Below
6
& ' (wire, inches) 16 black Tef-Flex 16 Black Lex 32 Red Lex 48 Blue Tef-Flex 32 White Tef-Flex
 16 black Tef-Flex 16 Black Lex 32 Red Lex 48 Blue Tef-Flex 32 White Tef-Flex") ! " # $! " % Qty Part (woofer) 1 4.40mH 16 AWG inductor 1 10.0uF Yellow film capacitor 1 5.62 Ohm NORTH resistor (tweeter) 1 8uF Yellow film capacitor 1 0.56mH 16 AWG inductor 1 3.32 Ohm NORTH resistor
! " # $! " % Qty Part (woofer) 1 4.40mH 16 AWG inductor 1 10.0uF Yellow film capacitor 1 5.62 Ohm NORTH resistor (tweeter) 1 8uF Yellow film capacitor 1 0.56mH 16 AWG inductor 1 3.32 Ohm NORTH resistor
C-Note Bookshelf Speaker Kit
 C-Note Bookshelf Speaker Kit Thank you for purchasing the C-Note bookshelf speaker kit. This speaker kit was precision cut using CNC machinery for the best possible fit and finish. With a little time and
Assembly Instructions for the 1.5 Watt Amplifier Kit
 Assembly Instructions for the 1.5 Watt Amplifier Kit 1.) All of the small parts are attached to a sheet of paper indicating both their value and id. 2.) Leave the parts affixed to the paper until you are
Building the Toothpick Audio CW Filter
 Building the Toothpick Audio CW Filter Introduction The toothpick is a simple variable bandpass audio filter designed to compliment the Splinter QRPp Trans-Receiver. The filter also contains an audio amplifier
Manual Version July 2007
 Manual Version 1.2 - July 2007 Page 1 Table of Contents Section1: M3 Phono Board Build...3 Phono Board Parts List...3 Preparation...4 Fitting the Valve Bases...6 Installing the Resistors...7 Starting the
Experiment 3 Ohm s Law
 Experiment 3 Ohm s Law The goals of Experiment 3 are: To identify resistors based upon their color code. To construct a two-resistor circuit using proper wiring techniques. To measure the DC voltages and
Bill of Materials: General Purpose Alarm, Pulsed PART NO
 General Purpose Alarm, Pulsed PART NO. 2190207 I hate alarms that sound continuously - unless they are smoke alarms. Smoke alarms should be annoying, but others should not. I wanted an alarm for a function
SoftRock v6.0 Builder s Notes. May 22, 2006
 SoftRock v6.0 Builder s Notes May 22, 2006 Be sure to use a grounded tip soldering iron in building the v6.0 SoftRock circuit board. The soldering iron needs to have a small tip, (0.05-0.1 inch diameter),
Jason Stull. Physics 498 (Physics of Music) Valve Junior Modification 5/13/2010
 Valve Junior Modification 5/13/2010") Jason Stull Physics 498 (Physics of Music) Valve Junior Modification 5/13/2010 1 Introduction My original idea for a class project was to build a tube guitar amplifier. I have wanted a tube amp for some
Jason Stull Physics 498 (Physics of Music) Valve Junior Modification 5/13/2010 1 Introduction My original idea for a class project was to build a tube guitar amplifier. I have wanted a tube amp for some
SoftRock v5.0 Builder s Notes. December 12, Building a QSD Kit
 SoftRock v5.0 Builder s Notes December 12, 2005 Building a QSD Kit Be sure to use a grounded tip soldering iron in building the QSD board. The soldering iron needs to have a small tip, (0.05-0.1 inch diameter),
PAT-4 POWER SUPPLY ASSEMBLY MANUAL Rev B Version
 PAT-4 POWER SUPPLY ASSEMBLY MANUAL Rev B Version 2013 AkitikA, LLC All rights reserved Revision Bp01 November 3, 2013 Page 1 of 16 Table of Contents Table of Contents... 2 Table of Figures... 2 Section
BX1956 Installation Instructions Chrysler PT Cruiser (Include Turbo)
") BX1956 Installation Instructions 2001-04 Chrysler PT Cruiser (Include Turbo) Serial No. The front fascia and metal bumper are removed for baseplate installation. Factory metal bumper will not be reinstalled.
BX1956 Installation Instructions 2001-04 Chrysler PT Cruiser (Include Turbo) Serial No. The front fascia and metal bumper are removed for baseplate installation. Factory metal bumper will not be reinstalled.
Assembly Instructions
 Assembly Instructions For the SSQ-2F 3.1 MHz Rife Controller Board Kit v1.41 Manual v1.00 2012 by Ralph Hartwell Spectrotek Services GENERAL ASSEMBLY INSTRUCTIONS Arrange for a clean work surface with
Assembly Instructions for the FRB FET FM 70 Watt Amp
 Assembly Instructions for the FRB FET FM 70 Watt Amp 1.) Orient the circuit board with the diagram 2.) Use a narrow chisel tip 25-30 watt soldering iron for assembly 3.) All the small parts are taped onto
Stereo 3.7W Class D Audio Amplifier
 Stereo 3.7W Class D Audio Amplifier Created by Bill Earl Last updated on 2014-10-28 10:45:16 AM EDT Guide Contents Guide Contents Overview Specifications: What is a Class D Amplifier? Other Audio amps
Atlas GenSet Tsunami Digital Sound Decoder Installation Notes
 Atlas GenSet Tsunami Digital Sound Decoder Installation Notes Overview This application note describes how to install a TSU-AT1000 digital sound decoder into an Atlas HO GenSet. Skill Level 2: The entire
BUILD YOUR OWN. Fuzz Face SUPER-FREQ.COM
 BUILD YOUR OWN Fuzz Face SUPER-FREQ.COM CHAPTER 1 The Fuzz Face By Mitchell Hudson of super-freq.com, in conjunction with Joe Gore of tonefiend.com. Build your own vintage Fuzz Face! Create a vintage-style
SoftRock v6.0 Builder s Notes. April 6, 2006
 SoftRock v6.0 Builder s Notes April 6, 006 Be sure to use a grounded tip soldering iron in building the v6.0 SoftRock circuit board. The soldering iron needs to have a small tip, (0.05-0. inch diameter),
THE ZEN TRIODE EXPIREMENTERS AMPLIFIER KIT MODEL SE84CDIYMONO
 THE ZEN TRIODE EXPIREMENTERS AMPLIFIER KIT MODEL SE84CDIYMONO ASSEMBLY INSTRUCTIONS 2008 The circuit board has been designed to be used in 2 ways; A) Mounted on stand-offs to a piece of wood and B) Mounted
Ford Super Duty 4x4 CB Antenna Installation 2004 F250 4x4 XLT Sport Back to 2004 F250 Main Page
 Ford Super Duty 4x4 CB Antenna Installation 2004 F250 4x4 XLT Sport Back to 2004 F250 Main Page I wanted to install a CB in my truck but I didn't particularly like any of the typical antenna installation
THE RING RESONATOR (K-975)
") THE RING RESONATOR (K-975) OUTPUT BOOST The Ring Resonator An Octave Up Fuzz Modkitsdiy.com 9 VDC CENTER (-) ADAPTER TO AMP IN FROM GUITAR OUT Unplug when not in use to save battery life. Use these instructions
THE RING RESONATOR (K-975) OUTPUT BOOST The Ring Resonator An Octave Up Fuzz Modkitsdiy.com 9 VDC CENTER (-) ADAPTER TO AMP IN FROM GUITAR OUT Unplug when not in use to save battery life. Use these instructions
UPDATING THE DYNACO STEREO 120 SOLID STATE POWER AMPLIFIER
 UPDATING THE DYNACO STEREO 120 SOLID STATE POWER AMPLIFIER 2013 AkitikA, LLC All rights reserved Revision 2.09 Page 1 of 31 Table of Figures... 3 Section 1: About this Manual... 4 Who Should Attempt this
Value Location Qty Transistors 2N5485 Q1, Q2, 4 Q3, Q4 2N5087 Q5 1. Trim Pots 250k VTRIM 1. Potentiometers C500k Speed 1. Toggle Switch On/On Vibe 1
 P-90 BUILD INSTRUCTIONS Thank you for your purchase of our P-90 kit! We have completely redesigned our entire line of kits to be the most user friendly, while still maintaining their same great sound!
Value Location Qty Potentiometers C1M Distortion 1 A10k Volume 1. Footswitch 3PDT SW1 1. Jacks 1/4 Mono 2 DC Power 1
 Distortion BUILD INSTRUCTIONS Thank you for your purchase of our Distortion+ kit! We have completely redesigned our entire line of kits to be the most user friendly, while still maintaining their same
2 Recommended Tools / Supplies
 Bias Scout TM Kit Assembly Manual Version 3.1 25 March 2015 1 Inventory of Parts 1 ea octal socket 1 ea octal base, brown (1 3/16" dia x 7/8" high) 1 ea 1.0 / 1W metal oxide, flame proof resistor 1 ea
Telecaster Wiring Kits Please Read All Instructions Before Beginning. Tools you will need: Soldering tips: Removing Current Wiring: Step 1. Step 2.
 Telecaster Wiring Kits Please Read All Instructions Before Beginning. Tools you will need: Soldering Iron (35 watt preferably) Solder Wet Sponge Wire Clippers Wire Strippers 3/8 Drill Bit 5/32 Drill Bit
Build Your Own Clone Chancellor Kit Instructions
 Build Your Own Clone Chancellor Kit Instructions Warranty: BYOC, Inc. guarantees that your kit will be complete and that all parts and components will arrive as described, functioning and free of defect.
Modification of USB Sound Card for Asterisk app_rpt Use
 Modification of USB Sound Card for Asterisk app_rpt Use First off a huge thank you to Steve for providing the original notes on how to modify a USB sound card. (http://images.qrvc.com/usbfob.pdf) These
Model 333 Single Channel USB Chromatography Data System Relay ( Contact Closure ) Installation
 Installation") Remove the four screws holding the Model 333 A/D board in the stand-alone box. If the 333 is installed in a GC or HPLC, remove the four hex head screws from the outside of the instrument which secure the
Remove the four screws holding the Model 333 A/D board in the stand-alone box. If the 333 is installed in a GC or HPLC, remove the four hex head screws from the outside of the instrument which secure the
Mono Amplifier. LM386 Headphone Amp
 Mono Amplifier LM386 Headphone Amp Layout On/Off Switch - cuts power to the circuit Mono Input Jack: use either L or R or solder together Schematic Step 1 - Parts List 1.) R1-10ohm Resistor - Brown Black
UPDATING THE DYNACO STEREO 120 SOLID STATE POWER AMPLIFIER REV B and REV C
 UPDATING THE DYNACO STEREO 120 SOLID STATE POWER AMPLIFIER REV B and REV C 2014-2016 AkitikA, LLC All rights reserved Revision 1.27 June 4, 2016 Page 1 of 32 Table of Contents Table of Contents... 2 Table
UPDATING THE DYNACO STEREO 120 SOLID STATE POWER AMPLIFIER (includes super heat sinks and replacement power supply capacitors)
") UPDATING THE DYNACO STEREO 120 SOLID STATE POWER AMPLIFIER (includes super heat sinks and replacement power supply capacitors) 2012 AkitikA, LLC All rights reserved Revision 1p1 Page 1 of 33 Table of Figures...
UPDATING THE DYNACO STEREO 120 SOLID STATE POWER AMPLIFIER (includes super heat sinks and replacement power supply capacitors) 2012 AkitikA, LLC All rights reserved Revision 1p1 Page 1 of 33 Table of Figures...
V6.2 SoftRock Lite Builder s Notes. November 17, 2006
 V6.2 SoftRock Lite Builder s Notes November 17, 2006 Be sure to use a grounded tip soldering iron in building the v6.2 SoftRock circuit board. The soldering iron needs to have a small tip, (0.05-0.1 inch
Pacific Antenna RF Probe assembly
 Pacific Antenna RF Probe assembly Parts In the Kit: 1 1/2 x 3 Blue PEX tube 2 5/8 O.D. vinyl caps 2 3/32 dia x 2 brass tube sections 2 Pogo spring contacts 1 4-40 x 7/16 pan head screw 1 4-40 x 1/4 pan
Line-Following Robot
 1 Line-Following Robot Printed Circuit Board Assembly Jeffrey La Favre October 5, 2014 After you have learned to solder, you are ready to start the assembly of your robot. The assembly will be divided
555 Morse Code Practice Oscillator Kit (draft 1.1)
") This kit was designed to be assembled in about 30 minutes and accomplish the following learning goals: 1. Learn to associate schematic symbols with actual electronic components; 2. Provide a little experience
This kit was designed to be assembled in about 30 minutes and accomplish the following learning goals: 1. Learn to associate schematic symbols with actual electronic components; 2. Provide a little experience
Pacific Antenna Code Practice Oscillator Kit
 Pacific Antenna Code Practice Oscillator Kit This kit is offered to initiate the first time builder in the various techniques of mechanical and electronic kit construction. At the end of the approximately
Basic Electronics for Model Railroaders By Gene Jameson NMRA Convention, Kansas City MO., August 5 12, 2018
 Basic Electronics for Model Railroaders By Gene Jameson NMRA Convention, Kansas City MO., August 5 12, 2018 Please turn off your cell phones. If it rings I will ask you to leave the room and I will NOT
BX1956 Installation Instructions Chrysler PT Cruiser (Include Turbo)
") BX1956 Installation Instructions 2001-04 Chrysler PT Cruiser (Include Turbo) Serial No. The front fascia and metal bumper are removed for baseplate installation. Factory metal bumper will not be reinstalled.
BX1956 Installation Instructions 2001-04 Chrysler PT Cruiser (Include Turbo) Serial No. The front fascia and metal bumper are removed for baseplate installation. Factory metal bumper will not be reinstalled.
For our first radio, we will need these parts: -A sturdy plastic bottle.
 For our first radio, we will need these parts: -A sturdy plastic bottle. I have used the plastic bottle that hydrogen peroxide comes in, or the bottles that used to contain contact lens cleaner. They are
Build Your Own Clone Classic Phaser Kit Instructions
 Build Your Own Clone Classic Phaser Kit Instructions Warranty: BYOC, Inc. guarantees that your kit will be complete and that all parts and components will arrive as described, functioning and free of defect.
THE AGGRESSOR (K-995)
") THE AGGRESSOR (K-99) TONE VOLUME DISTORTION MID-SHIFT SWITCH LED The Aggressor Distortion Pedal Modkitsdiy.com 9 VDC CENTER (-) ADAPTER TO AMP IN FROM GUITAR OUT Unplug when not in use to save battery
THE AGGRESSOR (K-99) TONE VOLUME DISTORTION MID-SHIFT SWITCH LED The Aggressor Distortion Pedal Modkitsdiy.com 9 VDC CENTER (-) ADAPTER TO AMP IN FROM GUITAR OUT Unplug when not in use to save battery
Bachmann GP7 Tsunami Digital Sound Decoder Installation Notes
 Bachmann GP7 Tsunami Digital Sound Decoder Installation Notes Overview This application note describes how to install a TSU-AT1000 digital sound decoder into a Bachmann HO GP7. Skill Level 3: One to three
Repairing your Porsche 928 Central Warning System (CWS) controller
 controller") Repairing your Porsche 928 Central Warning System (CWS) controller Disclaimer: This procedure is for a 1984 Porsche 928 S controller. Overview: Under the left foot pedal (dead pedal) of the Porsche 928
Repairing your Porsche 928 Central Warning System (CWS) controller Disclaimer: This procedure is for a 1984 Porsche 928 S controller. Overview: Under the left foot pedal (dead pedal) of the Porsche 928
Application Note. Bowser-Stewart VO-1000 Tsunami Digital Sound Decoder Installation Notes
 Application Note Overview This application note describes how to install a TSU-1000 Digital Sound Decoder into the Bowser-Stewart VO-1000 Locomotive. Skill Level 4: The entire installation can be completed
Modifying a USB sound fob to act as a repeater interface for app_rpt
 Modifying a USB sound fob to act as a repeater interface for app_rpt This document explains how to modify a USB sound fob to work as a repeater interface for app_rpt. The following materials and tools
Build Your Own Clone The Swede Kit Instructions
 Build Your Own Clone The Swede Kit Instructions Warranty: BYOC, Inc. guarantees that your kit will be complete and that all parts and components will arrive as described, functioning and free of defect.
Application Note. Athearn RTR AC4400CW Tsunami Digital Sound Decoder Installation Notes
 Application Note Overview This application note describes how to install a TSU-AT1000 Digital Sound Decoder into an HO Athearn Ready To Roll AC4400CW. Skill Level 2: The entire installation can be completed
BassAce - Midi Bass Synthesizer. BassAce Features
 Untitled Document BassAce - Midi Bass Synthesizer The BassAce is a small midi-synth based loosely on the TB303. It can be built many different ways. Depending on how it's configured it can be anything
EE43 43/100 Fall Final Project: 1: Audio Amplifier, Part Part II II. Part 2: Audio Amplifier. Lab Guide
 EE 3/00 EE FINAL PROJECT PROJECT:AN : AUDIO AUDIO AMPLIFIER AMPLIFIER Part : Audio Amplifier Lab Guide In this lab we re going to extend what you did last time. We re going to use your AC to DC converter
ELECRAFT Application Note
 ELECRAFT Application Note Front Panel Microphone Circuit Modification Revision A, November 12, 2008 Copyright 2008, Elecraft, Inc., All Rights Reserved Background Some K3 owners have noted distorted transmit
Laboratory 1 page 1 of 13
 Laboratory 1 page 1 of 13 Laboratory 1 Using the Meter, Breadboard, and Soldering Iron Introduction Welcome to the Bio Electronics Laboratory (BEL) located in B10 Benedum Hall. In this first lab assignment,
Building a Bitx20 Version 3
 Building a Bitx20 Version 3 The board can be broken into sections and then built and tested one section at a time. This will make troubleshooting easier as any problems will be confined to one small section.
Brief Installation Procedure: 1. Check the Parts 2. assembly each channel in brief and make sure the assembly is correct. 3. assembly the chassis in
 Brief Installation Procedure: 1. Check the Parts 2. assembly each channel in brief and make sure the assembly is correct. 3. assembly the chassis in brief, and make sure no small parts missed. 4. fixed
IR add-on module circuit board assembly - Jeffrey La Favre January 27, 2015
 IR add-on module circuit board assembly - Jeffrey La Favre January 27, 2015 1 2 For the main circuits of the line following robot you soldered electronic components on a printed circuit board (PCB). The
BRIDGE MODE FOR THE STEREO 120. Preface to Everything PLEASE READ THIS FIRST! YOU MAY SAVE YOURSELF A LOT OF TROUBLE!
 BRIDGE MODE FOR THE STEREO 120 Preface to Everything PLEASE READ THIS FIRST! YOU MAY SAVE YOURSELF A LOT OF TROUBLE! At some point I made 4 Ohm 1 khz output power tests of single channels of the updated
Driver level and the transformer
 AP12-XXX networks The AP12-xx series networks are designed to operate with the Klipsch K33 woofer which represents an impedance of 6 Ohms in series with 1 mhy voice coil inductance. The inductance becomes
Build Your Own Clone B.G. Fuzz Kit Instructions
 Build Your Own Clone B.G. Fuzz Kit Instructions Warranty: BYOC, Inc. guarantees that your kit will be complete and that all parts and components will arrive as described, functioning and free of defect.
Specimen Products Single Ended Stereo Amp Instruction Book
 Specimen Products Single Ended Stereo Amp Instruction Book Specimen tube amplifier designs are informed by decades of servicing and building musical instrument amps. As a result of being subjected to the
Build Your Own Clone Green Pony Kit Instructions
 Build Your Own Clone Green Pony Kit Instructions Warranty: BYOC, Inc. guarantees that your kit will be complete and that all parts and components will arrive as described, functioning and free of defect.
AUDIO PROBE EXPLAINED
 AUDIO PROBE EXPLAINED An Audio Probe is an essential tool for the DIY pedal builder. This along with a test box, are tools you should have at your disposal for easier debugging when things go wrong! They
Loudspeaker System. XCS1K Owner s Manual
 Loudspeaker System XCS1K Owner s Manual McIntosh Laboratory, Inc. 2 Chambers Street Binghamton, New York 13903-2699 Phone: 607-723-3512 FAX: 607-724-0549 WARNING - TO REDUCE RISK OF FIRE OR ELECTRICAL
S-Pixie QRP Kit. Student Manual. Revision V 1-0
 S-Pixie QRP Kit Student Manual Revision V 1-0 Introduction The Pixie 2 is a small, versatile radio transceiver that is very popular with QRP (low power) amateur radio operators the world over. It reflects
Assembly and Installation Instructions for White Oak Audio Design TM-1001 LED board
 Thank you for purchasing White Oak Audio Design s TM-1001 Upgrade LED Light Board. White Oak Audio Design products are meticulously engineered and tested to ensure a direct drop in fit with your tuner.
The Wave (K-MOD103) GUITAR DWELL REVERB REVERB SWITCH ON OUT OFF
 GUITAR DWELL REVERB REVERB SWITCH ON OUT OFF") The Wave (K-MOD103) OUT IN GUITAR IN DWELL REVERB REVERB SWITCH ON GUITAR OUT POWER ON OFF OFF Please note, there are no labels for this kit. The controls, switches and connectors have only been labeled
The Wave (K-MOD103) OUT IN GUITAR IN DWELL REVERB REVERB SWITCH ON GUITAR OUT POWER ON OFF OFF Please note, there are no labels for this kit. The controls, switches and connectors have only been labeled
Build Your Own Clone Analog Chorus Kit Instructions
 Build Your Own Clone Analog Chorus Kit Instructions Warranty: BYOC, Inc. guarantees that your kit will be complete and that all parts and components will arrive as described, functioning and free of defect.
Installing Your New Creature From The Black Lagoon Tail Light DMD Panel MOD
 Installing Your New Creature From The Black Lagoon Tail Light DMD Panel MOD A few things before we start: The wooden speaker panel provided in this MOD was manufactured using a Precision CNC machine and
PAT-4 UPGRADES ASSEMBLY MANUAL
 PAT-4 UPGRADES ASSEMBLY MANUAL Line amp distortion reducer Tone control switch 2013 AkitikA, LLC All rights reserved Revision 1p92 May 1, 2013 Page 1 of 20 Table of Contents Table of Contents... 2 Table
5W Mono Amplifier Kit
 5W Mono Amplifier Kit Kit Construction Before you start assembling your kit there are a couple of important things you must do. FIRST read through these instructions entirely before you start construction
THE STEP LADDER (K-978)
") THE STEP LADDER (K-978) Footswitch True-bypass = 0 db OUTPUT INPUT Ground shunt switching on the input jack keeps the amp quiet when unplugged from the Step Ladder. Attenuator Pot Full clockwise = 0 db
THE STEP LADDER (K-978) Footswitch True-bypass = 0 db OUTPUT INPUT Ground shunt switching on the input jack keeps the amp quiet when unplugged from the Step Ladder. Attenuator Pot Full clockwise = 0 db
Dynaco MK3 Electrolytic Cap Upgrade Assembly, Installation, and Adjustment Manual
 Page 1 PC-M3U Rev 1 I. Introduction Thanks for your purchase of our Mark 3 Quad Electrolytic Capacitor Replacement Board PC-M3U. It has been designed to replace the original Dynaco Quad (4 section) Aluminum
FILE // 4 GAUGE TERMINAL CONNECTORS DOCUMENT
 04 July, 2018 FILE // 4 GAUGE TERMINAL CONNECTORS DOCUMENT Document Filetype: PDF 293 KB 0 FILE // 4 GAUGE TERMINAL CONNECTORS DOCUMENT Alibaba.com offers 124 4 gauge wire connectors products. Unique Bargains
PM24 Installation Instructions
 Marchand Electronics Inc. PO Box 473, Webster, NY 14580 Tel:(716) 872-0980 Fax:(716) 872-1960 info@marchandelec.com http://www.marchandelec.com (c)1997 Marchand Electronics Inc. PM24 Installation Instructions
Assembly Manual V1R2B-Rev1.0D
 Assembly Manual V1R2B-Rev1.0D for 4 State QRP MagicBox - Solid State Transmit/Receive System Designed by: Jim Kortge, K8IQY Copyright 2009-2012 - All rights reserved This system is the result of some brainstorming
XRT30. Loudspeaker System
 Owner s Manual XRT30 Loudspeaker System XRT30 McIntosh Laboratory, Inc. 2 Chambers Street Binghamton, New York 13903-2699 Phone: 607-723-3512 FAX: 607-724-0549 WARNING - TO REDUCE RISK OF FIRE OR ELECTRICAL
The Tellun Corporation. TLN-861 Dunsel. User Guide, Rev Scott Juskiw The Tellun Corporation
 The Tellun Corporation TLN-861 Dunsel User Guide, Rev. 1.0 Scott Juskiw The Tellun Corporation scott@tellun.com TLN-861 User Guide Revision 1.0 August 31, 2006 1. Introduction The TLN-861 Dunsel is a collection
Installation Guide for 10 inch Davies Craig fan in SW20 Engine Lid.
 Installation Guide for 10 inch Davies Craig fan in SW20 Engine Lid. This manual is designed to guide you in installing a Davies Craig thermo fan in the lid of your MR2 to aid in reducing engine and intake
Instructions for Lighting an S Scale Caboose
 Instructions for Lighting an S Scale Caboose The S Scale Caboose lighting kit is adaptable for most caboose models of rolling stock including American Flyer (TM) and contains the same components as found
DIODE / TRANSISTOR TESTER KIT
 DIODE / TRANSISTOR TESTER KIT MODEL DT-100K 99 Washington Street Melrose, MA 02176 Phone 781-665-1400 Toll Free 1-800-517-8431 Visit us at www.testequipmentdepot.com Assembly and Instruction Manual Elenco
Please read BOTH these Installation Instructions and the General Instructions prior to installing or operating this equipment.
 Attachment Tab Height: 24-3/4 Attachment Tab Width: 21 Serial Number Please read BOTH these and the General Instructions prior to installing or operating this equipment. 1. Blue Ox towing products and
VOLUME AND TONE CONTROL - PREAMPLIFIER K8084
 VOLUME AND TONE CONTROL - PREAMPLIFIER K8084 When using one of our amplifiers (big or small), you always need a volume control and preferably also a tone control H8084IP-1 Features & specifications When
Application Note. Con-Cor Goose Tsunami Digital Sound Decoder Installation Notes
 Application Note Con-Cor Goose Tsunami Digital Sound Decoder Installation Notes Overview This application note describes how to install a TSU-750 Digital Sound Decoder into a Con-Cor HO Goose. Skill Level
Easy Transmitter. Support ETX_REV5_Manual V2.7 Revised
 Easy Transmitter Introduction The Easy Transmitter kit from qrpkits.com provides a basic, crystal controlled transmitter with VXO tuning to provide a small tuning range around the crystal frequency. It
Introduction Parts List
 Introduction There are many tutorials available on how to make your own LED spotlights. I ve looked at quite a few and the one I like best is found on HauntForum. The author is Niblique71 and I ve used
The Switched Longwire Tuner SLT
 The Switched Longwire Tuner SLT Thank you for purchasing the SLT kit from Hendricks QRP Kits. This kit is a very high quality kit that you will find easy to build, yet when you finish, you will have a
Explorer Wiring Kit (assembled)
") Explorer Wiring Kit (assembled) For Vintage, Firestorm & Standard Series Please Read All Instructions Before Beginning. Tools you will need: Soldering Iron (35 watt preferably) Solder Wet Sponge Wire Clippers
Explorer Wiring Kit (assembled) For Vintage, Firestorm & Standard Series Please Read All Instructions Before Beginning. Tools you will need: Soldering Iron (35 watt preferably) Solder Wet Sponge Wire Clippers
Guitarpedalkits.com Overdrive Pedal Build Instructions
 Page 1 Guitarpedalkits.com Overdrive Pedal Build Instructions Follow the instructions in this guide to build your very own DIY overdrive pedal from GuitarPedalKits.com. If you re a first time builder,
THE THUNDERDRIVE (K-950)
") THE THUNDERDRIVE (K-950) OUTPUT DISTORTION Unplug when not in use to save battery life. TO AMP IN The Thunderdrive Modkitsdiy.com FROM GUITAR OUT Use these instructions to learn: How to build an effects
THE THUNDERDRIVE (K-950) OUTPUT DISTORTION Unplug when not in use to save battery life. TO AMP IN The Thunderdrive Modkitsdiy.com FROM GUITAR OUT Use these instructions to learn: How to build an effects
Build Your Own Clone British Blues Overdrive Kit Instructions
 Build Your Own Clone British Blues Overdrive Kit Instructions Warranty: BYOC, LLC guarantees that your kit will be complete and that all parts and components will arrive as described, functioning and free
Electric Druid 4 second Digital Delay Project
 Electric Druid 4 second Digital Delay Project Overview! 2 Build Instructions! 2 Populate the PCB! 2 Resistors! 2 Cup of tea and soldering check! 3 Power protection diode! 4 Ground link wire! 4 IC sockets!
PM124 Installation Instructions. See important note about revisions of this board on the last page.
 Marchand Electronics Inc. PO Box 473, Webster, NY 14580 Tel:(716) 872-0980 Fax:(716) 872-1960 info@marchandelec.com http://www.marchandelec.com (c)1997 Marchand Electronics Inc. PM124 Installation Instructions
DIODE / TRANSISTOR TESTER KIT
 DIODE / TRANSISTOR TESTER KIT MODEL DT-100K Assembly and Instruction Manual Elenco Electronics, Inc. Copyright 1988 Elenco Electronics, Inc. Revised 2002 REV-K 753110 DT-100 PARTS LIST If you are a student,
Sound advice for Mapletree owners, customers, and DIYs Issue 7, March, Web:
 MPLETREE RNCHES Sound advice for Mapletree owners, customers, and DIYs Issue 7, March, 07 Web: www.mapletreeaudio.com email: info@mapletreeaudio.com Focus on customization of Mapletree products: signal
PLUTO-2.1 Construction
 1 von 11 19.12.2012 10:16 B u i l d y o u r l a s t l o u d s p e a k e r s y o u r s e l f o r l e t u s b u i l d t h e m f o r y o u Introduction Specifications Construction Electronics Supplies Photos
Build Your Own Clone Spring Reverb Kit Instructions
 Build Your Own Clone Spring Reverb Kit Instructions Warranty: BYOC, Inc. guarantees that your kit will be complete and that all parts and components will arrive as described, functioning and free of defect.
Chunky Cheese Build Guide Rev
 Chunky Cheese Build Guide Rev. 2008-08-04 The Chunky Cheese is a slightly-modified version of the discontinued Big Cheese fuzz pedal. Table of Contents Table of Contents... 1 PCB Layout... 2 Parts List...
Build Your Own Clone Silver Pony Kit Instructions
 Build Your Own Clone Silver Pony Kit Instructions Warranty: BYOC, Inc. guarantees that your kit will be complete and that all parts and components will arrive as described, functioning and free of defect.
Build Your Own Clone Mouse Kit Instructions
 Build Your Own Clone Mouse Kit Instructions Warranty: BYOC, Inc. guarantees that your kit will be complete and that all parts and components will arrive as described, functioning and free of defect. Soldering,
Build Your Own Clone Li l Echo Kit Instructions
 Build Your Own Clone Li l Echo Kit Instructions Warranty: BYOC, Inc. guarantees that your kit will be complete and that all parts and components will arrive as described, functioning and free of defect.
160- and 80-Meter Matching Networks for your 43-foot Vertical Phil Salas AD5X
 160- and 80-Meter Matching Networks for your 43-foot Vertical Phil Salas AD5X 43-foot verticals have become popular as they can be self supporting, are not too obtrusive, and have higher radiation resistance