Gloucester County Library System
|
|
|
- Erin Edwards
- 6 years ago
- Views:
Transcription
1 1 Gloucester County Library System
2 Gloucester County Library System 2 DIGITAL PHOTO ORGANIZING AND EDITING USING PICASA 3.9 FROM GOOGLE
3 To Download the FREE Picasa 3.9 Program from Google G O T O T H E W E B S I T E H T T P : / / P I C A S A. G O O G L E. C O M 3 C L I C K O N T H E B U T T O N F O R D O W N L O A D P I C A S A 3. W H E N G I V E N T H E C H O I C E O F R U N O R S A V E, C L I C K R U N, W H I C H W I L L I M M E D I A T E LY I N S T A L L P I C A S A 3 O N Y O U R C O M P U T E R. Y O U W I L L B E G I V E N T H E O P P O R T U N I T Y T O M A K E T H E P I C A S A P H O T O V I E W E R Y O U R D E F A U L T V I E W E R. C L I C K O N O K. I F Y O U F I N D T H A T D O N T L I K E I T, Y O U C A N A L W AY S T U R N I T O F F L A T E R B Y O P E N I N G P I C A S A 3 A N D C L I C K I N G O N T O O L S C O N F I G U R E P H O T O V I E W E R D O N T U S E

4 Go to the website 4 for Windows XP/Vista/7 For Mac OS X Requires Intel CPU Free photo editing software from Google, now with name tags.
5 Digital Photo Organizing and Editing 5 Click on the button for Download Picasa3. Download Picasa 3.9 for Windows XP/Vista/7
 In that case, click on click here to get it going.")
6 Thank you for downloading Picasa 3.9 (Your download should start automatically. If it doesn't, click here.) If you have a pop-up blocker on your computer, the download will not start automatically. (Note in the illustration above, there is a warning that Internet Explorer blocked this site from downloading. ) In that case, click on click here to get it going. You ll get the following dialog box: 6


7 Click on Run. After Picasa is downloaded to your computer, you ll see the following dialog box: Click on Run. The next step will be the License Agreement. You must click on I Agree to proceed. Your computer will then ask where you want to save the files (Choose Install Location). 7

8 Generally, the default (what you see already selected in the box in this case, C:\Program Files\Picasa2) is the best place, so you can go ahead and click on Install. You ll likely next get a Set-Up screen such as the one below: 8

9 You can select or de-select any of these options, depending upon your personal preferences. Once your selections are complete, click on Finish. 9

10 Assuming you left the checkbox for Run Picasa2 checked, Picasa will now open to this screen: 10
11 Finding Photos on Your Computer 11 W H E N Y O U I N S TA L L P I C A S A, J U S T C L I C K O N C O N T I N U E ( A S N O T E D O N T H E D I A G R A M A B O V E ), A N D I T I N S TA N T LY G O E S T O W O R K, O R G A N I Z I N G A L L T H E P I C T U R E S O N Y O U R H A R D D R I V E B Y D AT E I N T H E " F O L D E R S O N D I S K " C O L L E C T I O N. I F P I C A S A F I N D S F O L D E R S Y O U D O N ' T WA N T, G O I N T O T O O L S F O L D E R M A N A G E R T O T E L L I T W H I C H F O L D E R S T O S C A N O N C E, S C A N A LWAY S O R R E M O V E. T O R E M O V E I N D I V I D U A L P I C T U R E S F R O M Y O U R L I B R A RY, S I M P LY S E L E C T A P H O T O A N D R I G H T- C L I C K T O D E L E T E I T P E R M A N E N T LY F R O M Y O U R C O M P U T E R O R S I M P LY H I D E I T F R O M P I C A S A.
12 Digital Photo Organizing and Editing 12 Using Online Help The best way to start using Picasa3.9 is to first read the basic topics listed on the Picasa3.9 Help page. Open Picasa3.9, then click on Help Help Contents and Index (or simply press the F1 key at the top of your keyboard) and it will take you directly to the Picasa3 Help page.


13 Picasa Tabs 13

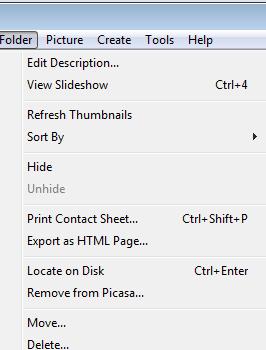
14 Picasa Tabs 14

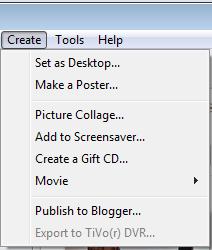
15 Picasa Tabs 15

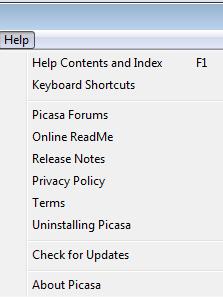
16 Picasa Tabs 16


17 Picasa Right click to see the tool bar. 17
18 Importing Basics: Add new photos You can use Picasa to import new photos and videos into a scanned folder - from a camera, CD/DVD, memory card, camera phone etc. - in a few simple steps. 18 Connect the camera (or memory card, CD/DVD, scanner, etc.) to your computer. In Picasa, click the Import button. Select the source of your new photos (e.g. your camera) from the 'Import from' drop-down menu at the top. Small thumbnail previews will display in the import tray, divided into groups based on the time in which they were taken. On your computer: Select the destination folder from the 'Import to' drop-down menu. Use the 'Folder title' drop down menu to automatically save in a new folder by date taken, today's date or a custom folder name. If you choose 'date taken,' your photos will be saved in separate folders by date. The 'Import to' section lets you choose where you'd like the photos to end up.
19 Picasa s Photo Tray 19 What is the Photo Tray (picture tray) and where is it? The Photo Tray is located at the bottom left of the Picasa screen. It displays the photo or photos you currently have selected. The Hold button allows a viewed photo to stick in the Photo Tray. This function is useful when selecting photos from multiple Folders or Albums. The Add To button allows you to add the selected photo or photos to an existing or new Album. The output options buttons (Web Album, , Print, Order Prints, Blog This, Collage, Export) perform their respective actions using the photos currently in the Photo Tray. The Clear button will remove your currently selection of photos from the Photo Tray. You will receive an "are you sure?" prompt before the Tray is cleared.


20 Picasa s Photo Tray Moving Photos 20
21 Moving and Renaming Photos 21 It s very easy to move photos from one folder to another using Picasa. Select a photo. With your mouse, drag and drop the photo to its new folder. To select more than one photo, hold down the Shift key on your keyboard as you select photos. If you move a photo into a different folder on disk, Picasa will remind you that you re about to move the actual file on your computer s hard drive. Click the OK button to move the photo to its new location. Note: Moving photos between folders in the Folders collection will affect their physical location on your hard drive.

22 Renaming Photos and Folders 22 To rename an individual photo : 1.Select the photo to be renamed. 2. Click "File." (Or access the rename option by pressing F2.) 3. Click "Rename. 4. Type in the new name for the photo. If you wish, you can add Date or Resolution data to the filename using the provided checkboxes. 5. Click "Rename." To rename a group of photos, do the following: 1.Select the photos you wish to rename. 2. Click "File." (Or access the rename option by pressing F2.) 3. Click "Rename. 4. Enter the common name you wish to use for this group of photos 5. Click "Rename." If you selected 12 photos from a family picnic and selected to rename them "picnic", the files will now be named 'picnic.jpg' through 'picnic-11.jpg'.
23 Using Tags to help find photos You can make it easy to find your photos by attaching Tags to identify the photo s subject matter. 23 Select one or more photos with a particular subject and then click on the Tag button (or press Ctrl T). You can then enter one or more subject names that you can later use to search for photos For example, Tag photos with the names of each person shown in the photo.


24 Basic Photo Editing Editing your photos is easy with Picasa! To begin editing a photo, find the photo on which you d like to work and double click to open it in the editing screen. 24
25 Editing Overview: Editing features 25 'Basic Fixes' tab: Make simple fixes to your photos. Fixes range from removing red-eye to cropping photos to one-click fixes for color and contrast. 'Tuning' tab: Use these advanced editing features to fix contrast and remove color cast. Adjust shadows and highlights to add some dimension to your photos or brighten up the foreground with fill light to salvage otherwise dark photos. 'Effects' tab: Choose from The effects range from simple filters such as black and white coloring and sharpening to more advanced photographic filters.
26 Photo Edits: 'Basic Fixes' features 26 Use Crop to better frame you photo or to cut out parts of a photo that you don't want to see. For example, you can crop your ex-girlfriend out of your holiday photos. Select a cropping dimension like 5x7, 8x10, or create and save your own custom crop dimension. Then drag and drop the cropping box directly over the photo. You can adjust your cropped area by clicking and dragging the corners of the box, all the while maintaining the same dimensions. You can also choose one of the three crop suggestions provided by Picasa. Click the Preview button to get a sneak peek at what your new shot will look like.
27 Photo Edits: 'Basic Fixes' features 27 Crop Use Crop to better frame you photo or to cut out parts of a photo that you don't want to see. For example, you can crop your exgirlfriend out of your holiday photos. Select a cropping dimension like 5x7, 8x10, or create and save your own custom crop dimension. Then drag and drop the cropping box directly over the photo. You can adjust your cropped area by clicking and dragging the corners of the box, all the while maintaining the same dimensions. You can also choose one of the three crop suggestions provided by Picasa. Click the Preview button to get a sneak peek at what your new shot will look like. Straighten You can straighten photos taken with an off-kilter camera. Use the slider to align the photo against the boxed grid and click Apply.
28 Photo Edits: 'Basic Fixes' features 28 Redeye The Redeye tool will automatically correct red eyes that it detects in your photos for any photo file type that Picasa supports. Click the Redeye button to have Picasa auto-correct your photo. Then click Apply to accept these changes. I'm feeling lucky This is the one-click fix. Picasa adjusts your photo's color and contrast to produce the ideal photo. You'll see a change only if your photo isn't already color-balanced. If you'd rather make the edit manually, please click the Reset button. Click, hold, and drag the mouse around each eye to select it; try to draw as small an area as possible for better results. Redeye will literally only remove the color red. Any eyes that appear yellow, white, or green due to flash issues will not be corrected.

29 Photo Edits: 'Basic Fixes' features 29 Auto Contrast Retouch Automatically set the brightness and contrast to optimal levels, while preserving a photo's color values. A great way to fix a flat photo Use the Retouch tool to remove unsightly blemishes and improve photo quality. It can also help you to restore old photos with marks, water stains, and scratches to excellent condition. Use the following steps: Auto Color Automatically remove color cast and restore the color balance, while preserving contrast and brightness values. Click the Retouch button. Click once to highlight the area you'd like to retouch. A few tips:
30 Photo Edits: 'Basic Fixes' features 30 Picnik Picnik was thrilled to announce they d joined the Google family Picnik is photo editing online, in your browser. It gives real people photo editing superpowers. It s fast, easy, and offers tons of powerful tools, artistic effects, stickers, frames, touch-ups, scrapbooking tools and more. And that s all for free.
31 Picnik Basic Edits 31

32 Picnik Effects 32

33 Picnik Decorate 33

34 Picnik Text 34
35 Text Quickly and easily add text on top of your pictures. Once you click the Text tool, just click anywhere on your photo and type your desired text. You can edit the style, size, and angle of the text, as well as drag it to your desired location. Click Apply to accept the edit. A few tips: Use the Copy Caption button to insert any previously existing caption as text on the photo. 35 After you've applied text to a single photo, you can bulk apply that text to multiple photos in a single folder or album by using the Copy Text and Paste Text options available under the Edit menu. Fill Light At times, photos with bright backgrounds can darken or compromise the subject detail. Use the slider to add light to the foreground of photos, making them more balanced. Also, try the Tuning tab for additional lighting options.
36 Photo Edits: Tuning' tab features Fill Light 36 Highlights At times, photos with bright backgrounds can darken or compromise important details in the photo. Add fill light to the foreground of photos, making them more balanced. Increase the highlights to amplify the bright spots of your photograph. It can help make the whites in your composition more vibrant.
37 Photo Edits: Tuning' tab features Shadows Darken the shadows in your photo to provide additional depth or contrast. Use this in conjunction with the 37 Highlights slider to add contrast to a flat-looking photo.
38 Photo Edits: Tuning' tab features Color Temperature 38 Neutral Color Picker Make your photos warmer by sliding the ticker to the right. This can make your colors more vivid and help bring to life the composition of your photograph. Tell Picasa which part of your photo it should treat as gray or white. Photo Lab will then use that selection to balance the colors in the photo.
39 Photo Edits: Tuning' tab features Auto Color Fix 39 Undo/Redo Click this magic wand to have Picasa automatically remove color cast and restore the color balance, while preserving contrast and brightness values. These two buttons, only active when there are unsaved edits on the photo, undo and redo your edits in the order they were applied.
40 Photo Edits: 'Effects' tab features Sharpen 40 Sepia Make the edges of objects in your photos crisper and less fuzzy. Use the slider to adjust the level of sharpness. Learn more about sharpening images. Give your image an 'oldfashioned' effect. Sepia toning began as a printing method in the 1880s, and you can use this tool to digitally reproduce its effect. Your image will be re-cast in a reddish brown tone.
41 Photo Edits: 'Effects' tab features Black and White 41 Warmify Give your image a historic or nostalgic effect. Turn any color photo into a black and white photo. The stark contrasts can enhance your subject matter. Warm up a cool photo, improving skin tones. For a more manual control, see the Color Temperature slider on the Tuning tab
42 Photo Edits: 'Effects' tab features Film Grain 42 Tint Add a 'grainy' film look to any photo. Digital photography doesn't naturally exhibit film grain, but this tool allows you to simulate it. The effect can be subtle, but it looks great when you print. Strip the color out of your photo and apply a colored tint over the top.
43 Photo Edits: 'Effects' tab features Saturation 43 Soft Focus Use the slider to adjust color saturation. Slide it all the way to the left to make the picture black and white. Slide it all the way to the right to make it appear 'radio-active.' Soften the focus around a center point that you select. Use the sliders to control the size of the focused area and also the amount of softness applied.
44 Photo Edits: 'Effects' tab features Glow Brightens the white areas of a photo, causing a dreamy effect. Use the sliders to control the intensity of the glow and also it's shining radius 44 Filtered Black and White Add the effect of shooting black and white film with a color filter. The filter blocks or enhances certain colors in the photo depending on the color filter you choose.


45 Photo Edits: 'Effects' tab features 45
46 Saving Edits: Saving photos 46 Saving Your Changes Picasa3 automatically keeps track of your photo edits even if you don t save your changes. Any unsaved changes, however, cannot be seen by any program other than Picasa3.9. So if you make a change to a photo in Picasa3.9 without saving it, and then open that photo in a different program to print, , or copy it, that other program will see only the original photo without the edits you made in Picasa3.9 For that reason, it is best to always save you changes. Just click on File Save after you make any changes in Picasa3.9 You can save individually after each photo you edit, or just let your changes accumulate until you have edited multiple photos in a folder, then select them all at one time using Edit Select All and click on File Save to save all of them at one time.
47 Exporting From Picasa: Exporting photos 47 Export If you'd like to easily create edited copies of a large number of pictures, you can export your photos to a location of your choice. When you export your photos, you can resize your photos and control the JPEG compression level when applying photo edits. Use the Export tool in Picasa to resize your photos or to otherwise create copies of your photos with all edits applied. When you export a photo in Picasa, you're creating a new copy of that photo with control over both the image resolution (the height and width of the image measured in pixels) and the image quality (JPEG compression). The original photo on your hard drive is never altered. Follow these steps to export copies of your photos:
48 Exporting From Picasa: Exporting photos 48 Select the photos you'd like to export. Click the Export button in the Photo Tray. In the 'Export to Folder' window, select your export settings: Choose an export location and enter a name for the exported folder. Customize your exported image size and quality: Image size options: You can choose between using the photo's original size or selecting a custom pixel size using the slider. The number of pixels you select with this slider determines the length or height of your photo (whichever is longer). The other dimension is determined automatically to maintain the aspect ratio of the photo.
49 Exporting From Picasa: Exporting photos Image quality: Select desired image quality for your photo using the Image Quality drop-down menu Automatic: Preserves the original image quality 49 You can choose to add a watermark to all of your exported photos. Click OK. Normal: Balances quality and size Maximum: Preserves fine detail for large file sizes Minimum: Yields some quality loss for small file sizes Your exported images are now saved on your hard drive in the location you specified. In Picasa, you can find these photos in the 'Exported Pictures' collection. Custom: Enables you to select your own value

50 Folders 50 Enter a description. You can also modify the folder s date, place taken, or description. Any descriptive information you add will be searchable in Picasa. Click the OK button. Changing the name of a folder in Picasa will change the name of the actual folder on your computer s hard drive. Double-click On the title of any folder to open the Folder Properties box Making an Album You can use albums to group and organize photos based on your own criteria and identified by a simple word or title. For example, you can create a album called Flowers to group all of your flower photos.
51 Create a new album There are several ways to do this. (1) Click on the Blue Create a New Album icon in the upper left, just above the Album listing. In the "Album Properties box, give your album a name; fill in the other information if you like. Click on OK. The album is ready for you to add photos. (2) Select one or more photos. Select File > New Album to create a new album in Picasa containing the selected photo(s). (3) You can do the same thing by choosing a photo, clicking the Add to button to the right of the Photo Tray, and selecting New Album on the popup list. 51 Add a photo to an existing album. The same photo can be assigned to many albums in Picasa. Select a photo, click the "Add to button to the right of the Photo Tray, and select an existing album from the popup list. Change an album description. Doubleclick on the title of any album to open the Album Properties box. Enter a new description for the album. You can also modify the album s date, place taken, or description. Any descriptive information you add will be searchable in Picasa. When you re done, click the OK button.
52 Create a new album Delete a photo from an album. Select a photo. Right-click with your mouse and select Remove from Album in the context menu or press the Delete key on your keyboard. Note: Deleting a photo from an album does not delete the original file from your computer s hard drive. Rearrange photos in an album or between albums. Click and drag a photo to change its order within a album or drag it into another album to add it to that album. This doesn t affect the order in which the original files are stored on your computer. Note: An album in Picasa is not the same as a Picasa Web Album. The Album collection does not show you the photos you may have uploaded to the web. 52 Viewing Photos in a slideshow You can easily view all the photos in a folder as a slide show on your computer. Select the desired folder or album. Click on Slideshow in the toolbar near the top.
53 Adding a Caption! 53 Start by adding a caption! At the bottom of the picture you ll see the words Make a caption! If you click on these words, they disappear and you can type in whatever caption you d like. When you re done, just click somewhere outside the caption area to set your caption. If you decide you don t like what you ve typed, click on your caption and try again. To the left of your caption, you ll see a small white box that allows you to toggle between showing or hiding your caption; to the right of the your caption, there is a small trash can: click on this to completely delete your caption quickly. When you create captions for your photos, they're saved along with the photos and stay with them, even when you upload them, export them, or send them by . However, your captions will only be displayed in Picasa, Picasa Web Albums, and other IPTC compatible programs.

54 Add name tags in Picasa Picasa's face-matching technology lets you organize your photos according to the people in them. Name tags are turned on by default, so the first time you open Picasa, it will scan your photos for new faces. This can take a while, but while it's running in the background you can start tagging them. Just follow these steps: 54 Make sure you're signed into your Google Account Click Sign in to Web Albums at the top right of Picasa. This lets you add name tags faster by accessing your Google contacts. Add name tags in bulk or a few photos at a time. In bulk: Click on the 'Unnamed People' album in the 'People' collection to see all unnamed faces from your photos in the one place. Faces are grouped by similarity, so adding a name will apply it to all the faces in that group.

55 Sharing Photos with Friends and Family ing Photos using Picasa3.9 You can use Picasa3.9 to photos using either the free Gmail program from Google, Or whatever is the default program on your computer. When ing photos, Picasa3.9 will automatically reduce the size of the photos 55 Automatically Resize Photos Even if you don t use Outlook Express or Gmail for , you can still use Picasa3.9 to automatically reduce the size of photos that you plan to . Just create a folder on your computer with a name such as Resized. Then in Picasa3 you can select the photos you want to and click on the Export button. This will open a window where you select the destination folder, which will be your Resized folder, and you can use the slider to determine what size the photos are to be reduced to. Once they have been exported, open your program and attach the photos from the Resized folder.
56 Printing at Home: Printing at home - the basics 56 When printing photos at home, it's possible to adjust layout, borders, captions, and printer settings, among other elements. Follow these steps to print your photos: Select the photos that you'd like to print. Click the Print button in your Photo Tray. On the next page, customize your printed photos: Select a print layout for your photos. For photos that are too big for the page, select whether you'd like to shrink them or automatically crop them to fit the page. Choose whether you'd like to add borders and captions to your printed pictures. Picasa uses your Windows printer settings. Click the Printer and Printer Setup buttons to adjust paper size, orientation, and print quality (Dots Per Inch - DPI). To print multiple copies of a photo on a page, use the - and + buttons for the 'Copies per Photo' setting. If you change your mind about printing a selected photo, click the Review button at the bottom of the screen. Select the photo you want to remove from the page you're printing, then click the Remove selected button. Click OK when you're done.
57 Printing at Home: Printing text and borders with photos When printing photos, you can choose to include borders, filenames, captions, and EXIF information. On the 'Print' screen, click the Border and Text Options button to access your settings. 57 Border Adjust the border width, color, and placement of your pictures. To activate all the border options, adjust the slider to provide some border width. Captions You have several options for printing captions: Choose to display the filename, caption, or EXIF information of the photo. Choose to display the caption on or below the image, or on the border you've set. Set the font, size, and color of the caption text. If your caption is too long, you can choose to 'Wrap text.' While you're editing the border and text settings, click Apply to preview how the font and format changes, and click OK to accept the changes.
58 Printing at Home: Multiple pictures per page When printing photos in Picasa, the size of the print you've selected determines how many prints you can fit on each page: Size Images per page 9 Wallet 3.5 x x x x 10 1 Full page 58 Cropping versus shrinking to fit When printing your photos, you have two options for how your photo appears within the selected print dimension: Crop to Fit: This option crops your photo to match the selected print dimension. If you've chosen 8 x 10 as your print size, your photo will be cropped to ensure that this entire space is filled. Shrink to Fit: This preserves the original dimension of your photos for printing. These photos won't necessarily conform to your chosen print layout size.
59 Ordering Prints and Products: Ordering prints Picasa provides convenient print ordering options from a variety of print vendors in the U.S. and abroad. If you would like to order prints through Picasa, please follow these steps: 59 Sign in using your username and password for that particular site. This is not the same as your Google Account for Picasa Web Albums. If you don't have an account with that vendor, click the 'Create an account' link in the window. Select the photos you'd like to print. Click the file button. Select your location from the drop-down menu on the left side of the screen. If your country isn't listed, we don't currently have any print partners in your location. Once you sign in, Picasa transfers your selected photos to the print processor's website. Follow the instructions located on the website to complete your order. Click the Choose button for the vendor that you wish to use.


60 Thank You! We hope this Class was helpful. Remember to run updates on all programs Gloucester County Library System Freeholder Director Robert M. Damminger 60 Freeholder Library Liaison Lyman Barnes
1/31/2010 Google's Picture Perfect Picasa
 The Picasa software lets you organize, edit, and upload your photos in quick, easy steps. Download Picasa at http://picasa.google.com You'll be prompted to accept the terms of agreement. Click I Agree.
Instructions: Editing a Photo Using Picasa 2. Allison Way and Charlie Windham ENG 313 February 27, 2008
 Instructions: Editing a Photo Using Picasa 2 Allison Way and Charlie Windham ENG 313 February 27, 2008 ABOUT THIS PICASA 2 MANUAL This manual tells you how to edit any photo using a free and downloadable
Buxton & District U3A Digital Photography Beginners Group Lesson 5: Simple Editing. 5 November 2013
 U3A Group Lesson 5: Simple Editing 5 November 2013 Programme Buxton & District 19 September Exploring your camera 1 October You ve taken some pictures now what? (Viewing pictures; filing on your computer)
ArcSoft PhotoImpression Table of Contents:
 ArcSoft PhotoImpression Table of Contents: 1. Welcome to PhotoImpression 2. Highlights of PhotoImpression 3. System Requirements 4. Installing PhotoImpression 5. Working with PhotoImpression Getting Started
Copyright Notice. Trademarks
 Copyright Notice All rights reserved. No part of this publication may be reproduced, stored in a retrieval system, or transmitted in any form or by any means, electronic, mechanical, photocopying, recording,
The Main Screen. Viewing Area - show the photos that were selected in the Source List.
 iphoto 11 The Main Screen Source List - This is where the Library, Events and Albums are identified. It is the place where photos can be organized and accessed. The Source List can also contain the slideshows,
Chris Guld. Show Me Video:.
 If you take a lot of digital photos, you will LOVE Picasa! We do. My husband and I live full-time in our motorhome and we travel all over the country. We ve taken over 30,000 photos of our travels so far!
PowerPoint 2016: Formatting Pictures. Introduction
 PowerPoint 2016: Formatting Pictures Introduction There are a variety of ways to format the pictures in your slide show. The picture tools in PowerPoint make it easy to personalize and modify the images
Contents Foreword 1 Feedback 2 Legal information 3 Getting started 4 Installing the correct Capture One version 4 Changing the version type 5 Getting
 Contents Foreword 1 Feedback 2 Legal information 3 Getting started 4 Installing the correct Capture One version 4 Changing the version type 5 Getting to know Capture One Pro 6 The Grand Overview 6 The
iphoto Getting Started Get to know iphoto and learn how to import and organize your photos, and create a photo slideshow and book.
 iphoto Getting Started Get to know iphoto and learn how to import and organize your photos, and create a photo slideshow and book. 1 Contents Chapter 1 3 Welcome to iphoto 3 What You ll Learn 4 Before
iphoto Objective Course Outline
 iphoto Objective In this class participants will learn how iphoto creates a photo center for photo organization by using rolls and albums. Participants will also learn the built-in editing tools. Participants
Go Daddy Online Photo Filer
 Getting Started and User Guide Discover an easier way to share, print and manage your photos online! Online Photo Filer gives you an online photo album site for sharing photos, as well as easy-to-use editing
MS Word Training Formatting Pictures
 Introduction MS Word Training Formatting Pictures There are many ways to format pictures in Word. For instance, you can change the size or shape of an image to better suit your document. You can also enhance
PosterArtist Quick Guide
 PosterArtist Quick Guide Create posters in four easy steps STEP STEP STEP STEP Use Auto Design to Create Posters Simply select a poster type and a design image to automatically create high-quality posters.
Introduction to Photoshop: Basic Editing & Prepare Images for the Web
 Introduction to Photoshop: Basic Editing & Prepare Images for the Web 1 LEARNING OBJECTIVES Basic tools in Photoshop & Use of Bridge Prepare images for print and web use TOPICS COVERED Photoshop Interface
Using Photoshop Elements
 Using Photoshop Elements Created By: Rick Williams August 2004 Table of Contents Photoshop Element Tools...Page 1 Tool Descriptions... Page 3 Starting Photoshop Elements... Page 7 Resizing an Image...
Photoshop Elements for Genealogists Part 1
 Photoshop Elements for Genealogists Part 1 By Barry J. Ewell Topics Covered Photoshop Elements Workspace Exploring the Tools Quick Fix Preview Photoshop Elements Workspace Workspace File Edit Image Enhance
Apple Photos Quick Start Guide
 Apple Photos Quick Start Guide Photos is Apple s replacement for iphoto. It is a photograph organizational tool that allows users to view and make basic changes to photos, create slideshows, albums, photo
Extreme Makeovers: Photoshop Retouching Techniques
 Extreme Makeovers: Table of Contents About the Workshop... 1 Workshop Objectives... 1 Getting Started... 1 Photoshop Workspace... 1 Retouching Tools... 2 General Steps... 2 Resolution and image size...
Recitation 2 Introduction to Photoshop
 Recitation 2 Introduction to Photoshop What is Adobe Photoshop? Adobe Photoshop is a tool for creating digital graphics either by starting with a scanned photograph or artwork or by creating the graphics
Photoshop CC: Essentials
 Photoshop CC: Essentials Summary Workspace Overview... 2 Exercise Files... 2 Selection Tools... 3 Select All, Deselect, And Reselect... 3 Adding, Subtracting, and Intersecting... 3 Working with Layers...
For customers in USA This device complies with Part 15 of the FCC rules. Operation is subject to the following two conditions:
 User manual For customers in North and South America For customers in USA This device complies with Part 15 of the FCC rules. Operation is subject to the following two conditions: (1) This device may not
Introduction. Basic Image Formatting. Word 2010 Formatting Pictures. To Crop an Image: Page 1
 Word 2010 Formatting Pictures Introduction Page 1 Once you've added pictures to your documents, you can format them in various ways. The picture tools in Word 2010 make it easy to incorporate images into
The Basics. Introducing PaintShop Pro X4 CHAPTER 1. What s Covered in this Chapter
 CHAPTER 1 The Basics Introducing PaintShop Pro X4 What s Covered in this Chapter This chapter explains what PaintShop Pro X4 can do and how it works. If you re new to the program, I d strongly recommend
Learning Photo Retouching techniques the simple way
 Learning Photo Retouching techniques the simple way Table of Contents About the Workshop... i Workshop Objectives... i Getting Started... 1 Photoshop Workspace... 1 Setting up the Preferences... 2 Retouching
Camera Raw software is included as a plug-in with Adobe Photoshop and also adds some functions to Adobe Bridge.
 Editing Images in Camera RAW Camera Raw software is included as a plug-in with Adobe Photoshop and also adds some functions to Adobe Bridge. Camera Raw gives each of these applications the ability to import
Lesson 4: Inserting and Modifying Clip Art and Photos
 CNET tech sites: Price comparisons Product reviews Tech news Downloads Site map Home Your Courses Your Profile Logout FAQ Contact Us About Lesson 4: Inserting and Modifying Clip Art and Photos PowerPoint
Color and More. Color basics
 Color and More In this lesson, you'll evaluate an image in terms of its overall tonal range (lightness, darkness, and contrast), its overall balance of color, and its overall appearance for areas that
Combine Black-and-White and Color
 Combine Black-and-White and Color Contributor: Seán Duggan n Specialty: Fine Art Primary Tool Used: Smart Objects Combining color and black-and-white in the same image is a technique that has been around
Adobe Photoshop PS2, Part 3
 Adobe Photoshop PS2, Part 3 Basic Photo Corrections This guide steps you through the process of acquiring, resizing, and retouching a photo intended for posting on the Web as well as for a print layout.
Mullingar Camera Club Basic introduction to Digital Printing using Photoshop CC.
 Mullingar Camera Club Basic introduction to Digital Printing using Photoshop CC. Table of Contents Course aims: 1 Course presentation notes: 1 Introducing Photoshop: 1 Adjusting the Brightness or Contrast
Using Adobe Photoshop
 Using Adobe Photoshop 6 One of the most useful features of applications like Photoshop is the ability to work with layers. allow you to have several pieces of images in the same file, which can be arranged
Adobe Photoshop. Levels
 How to correct color Once you ve opened an image in Photoshop, you may want to adjust color quality or light levels, convert it to black and white, or correct color or lens distortions. This can improve
Managing images with NewZapp
 Managing images with NewZapp This guide is for anyone using the NewZapp Fixed editor as opposed to the Drag and Drop editor. The Image Manager is where images are uploaded and stored in your NewZapp account
Photoshop CC Editing Images
 Photoshop CC Editing Images Rotate a Canvas A canvas can be rotated 90 degrees Clockwise, 90 degrees Counter Clockwise, or rotated 180 degrees. Navigate to the Image Menu, select Image Rotation and then
GETTING STARTED. 0 P a g e B a s i c s o f A d o b e P h o t o s h o p A g a P r i v a t e I n s t i t u t e f o r c o m p u t e r s c i e n c e
 GETTING STARTED 0 P a g e B a s i c s o f A d o b e P h o t o s h o p Adobe Photoshop: is a popular image editing software that provides a work environment consistent with Adobe Illustrator, Adobe InDesign,
From Camera to MLS. Class Outline: Transferring Photos to the Computer. Using a Card Reader
 From Camera to MLS Class Outline: Transferring Photos to the Computer Using a Card Reader Storing, Viewing, and Organizing Digital Photos on the Computer E-mailing and Printing Adding Photos in MLXchange
15 Photoshop Tips. Changing Photoshop rulers from inches to picas
 5 Photoshop Tips Changing Photoshop rulers from inches to picas What s the difference between inches and picas? a 6x inch RGB JPEG file is.9 MB a 6x pica RGB JPEG file is. MB a 6x inch RGB TIFF file is.
Paint Shop Pro Photo Xi: advanced features
 Paint ShoP Pro Photo Xi for PhotograPherS 11 Paint Shop Pro Photo Xi: advanced features tonal controls Most of the processes mentioned in the previous section deal with single-button operations that perform
Apple iphoto 4 ITS Technology & Learning Services Dr. Luanne Fose Revised April 29, 2004
 Apple iphoto 4 ITS Technology & Learning Services Dr. Luanne Fose Revised April 29, 2004 Table of Contents Introduction...1 Importing Photos From Your Digital Camera...1 Importing Photos From Other Sources...2
Adobe Photoshop CC 2018 Tutorial
 Adobe Photoshop CC 2018 Tutorial GETTING STARTED Adobe Photoshop CC 2018 is a popular image editing software that provides a work environment consistent with Adobe Illustrator, Adobe InDesign, Adobe Photoshop,
Introduction. Basic Image Formatting. PowerPoint 2010 Formatting Pictures. To Crop an Image: Page 1
 PowerPoint 2010 Formatting Pictures Introduction Page 1 Once you've added pictures to your presentations, you can format them in various ways. The picture tools in PowerPoint 2010 make it easy to incorporate
Photoshop CC 2018 Essential Skills
 Photoshop CC 2018 Essential Skills Adobe Photoshop Creative Cloud 2018 University Information Technology Services Learning Technology, Training, Audiovisual and Outreach Copyright 2018 KSU Division of
Kent Messamore 3/6/2010
 Post Processing Kent Messamore 3/6/2010 What we will cover Post Processing Photoshop, Lightroom, Elements, and others JPEG or RAW Photoshop Elements Workflow Organization, Create, share Photoshop Elements
Key Terms. Where is it Located Start > All Programs > Adobe Design Premium CS5> Adobe Photoshop CS5. Description
 Adobe Adobe Creative Suite (CS) is collection of video editing, graphic design, and web developing applications made by Adobe Systems. It includes Photoshop, InDesign, and Acrobat among other programs.
Images for PowerPoint Scanning, adjusting, & saving digital images
 Images for PowerPoint Scanning, adjusting, & saving digital images Susann Lusnia Digital Trends Seminar Tulane University April 17, 2008 Susann Lusnia email: slusnia@tulane.edu Classical Studies, Tulane
Photo Editing in Mac and ipad and iphone
 Page 1 Photo Editing in Mac and ipad and iphone Switching to Edit mode in Photos for Mac To edit a photo you ll first need to double-click its thumbnail to open it for viewing, and then click the Edit
For customers in Canada This Class B digital apparatus meets all requirements of the Canadian Interference-Causing Equipment Regulations.
 User manual For customers in North and South America For customers in USA This device complies with Part 15 of the FCC rules. Operation is subject to the following two conditions: (1) This device may not
By Washan Najat Nawi
 By Washan Najat Nawi how to get started how to use the interface how to modify images with basic editing skills Adobe Photoshop: is a popular image-editing software. Two general usage of Photoshop Creating
ADOBE PHOTOSHOP CS TUTORIAL
 ADOBE PHOTOSHOP CS TUTORIAL A D O B E P H O T O S H O P C S Adobe Photoshop CS is a popular image editing software that provides a work environment consistent with Adobe Illustrator, Adobe InDesign, Adobe
Windows INSTRUCTION MANUAL
 Windows E INSTRUCTION MANUAL Contents About This Manual... 3 Main Features and Structure... 4 Operation Flow... 5 System Requirements... 8 Supported Image Formats... 8 1 Installing the Software... 1-1
Adobe Lightroom CC Tutorial
 Adobe Lightroom CC Tutorial GETTING STARTED Adobe Lightroom CC is a photo editing program which can be used to manipulate and edit large quantities of photos at once. It has great exporting and metadata
2. Picture Window Tutorial
 2. Picture Window Tutorial Copyright (c) Ken Deitcher, 1999 Original image Final image To get you started using Picture Window we present two short tutorials. Basic Image Editing This tutorial covers basic
Photoshop: a Beginner s course. by: Charina Ong Centre for Development of Teaching and Learning National University of Singapore
 Photoshop: a Beginner s course by: Charina Ong Centre for Development of Teaching and Learning National University of Singapore Table of Contents About the Workshop... 1 Prerequisites... 1 Workshop Objectives...
Adobe Photoshop CS5 Tutorial
 Adobe Photoshop CS5 Tutorial GETTING STARTED Adobe Photoshop CS5 is a popular image editing software that provides a work environment consistent with Adobe Illustrator, Adobe InDesign, Adobe Photoshop
User Manual. Presented by The Knit Foundry: building better tools for knitters. Copyright 2005, 2006 The Knit Foundry
 Knit Visualizer 1.2 Manual Page 1 of 46 User Manual Presented by The Knit Foundry: building better tools for knitters Knit Visualizer 1.2 Manual Page 2 of 46 WHAT IS KNIT VISUALIZER? ----------------------------------------------------------------------------------------------
BOOK BUILDING. for beginners. Lightroom Tutorial by Mark Galer
 BOOK BUILDING for beginners Lightroom Tutorial by Mark Galer Contents Part One: Preparing the Book Part Two: Page Layout Design Ideas Create a Collection Choose your Images Sequence your Images Title your
Software Reference. FlexColor 4.0 for Camera Backs. by Hasselblad Imacon
 Software Reference FlexColor 4.0 for Camera Backs by Hasselblad Imacon 2 2004 Hasselblad A/S. All rights reserved., Part No 70030035 revision 1.0. The information in this manual is furnished for informational
1 ImageBrowser Software User Guide 5.1
 1 ImageBrowser Software User Guide 5.1 Table of Contents (1/2) Chapter 1 What is ImageBrowser? Chapter 2 What Can ImageBrowser Do?... 5 Guide to the ImageBrowser Windows... 6 Downloading and Printing Images
Using Adobe Photoshop to enhance the image quality. Assistant course web site:
 Using Adobe Photoshop to enhance the image quality Assistant course web site: http://www.arches.uga.edu/~skwang/edit6170/course.htm Content Introduction 2 Unit1: Scan images 3 Lesson 1-1: Preparations
Monaco ColorWorks User Guide
 Monaco ColorWorks User Guide Monaco ColorWorks User Guide Printed in the U.S.A. 2003 Monaco Systems, Inc. All rights reserved. This document contains proprietary information of Monaco Systems, Inc. No
inphoto ID PS Automatic ID photography With Canon PowerShot camera User Guide
 inphoto ID PS Automatic ID photography With Canon PowerShot camera User Guide 2018 Akond company Phone/fax: +7(812)384-6430 Cell: +7(921)757-8319 e-mail: info@akond.net akondsales@gmail.com http://www.akond.net
Getting Started. with Easy Blue Print
 Getting Started with Easy Blue Print User Interface Overview Easy Blue Print is a simple drawing program that will allow you to create professional-looking 2D floor plan drawings. This guide covers the
Challenge Image: Blur the Background
 Challenge Image: Blur the Background Challenge Image: Blur the Background In this lesson, we re going to work on a challenge image that was submitted by a Masters Academy member. The image features a little
OzE Field Modules. OzE School. Quick reference pages OzE Main Opening Screen OzE Process Data OzE Order Entry OzE Preview School Promotion Checklist
 1 OzE Field Modules OzE School Quick reference pages OzE Main Opening Screen OzE Process Data OzE Order Entry OzE Preview School Promotion Checklist OzESchool System Features Field unit for preparing all
The Camera Club. David Champion January 2011
 The Camera Club B&W Negative Proccesing After Scanning. David Champion January 2011 That s how to scan a negative, now I will explain how to process the image using Photoshop CS5. To achieve a good scan
SIMPLY TIFFANY STUDIOS SCRAPANEERS.COM
 Get Prepped Organize & Prepare The tips I want to share with you today will help you prepare tomorrow for Scanning Day and increase your scanning speed. Tip 1: Divide & Conquer Arrange your photos into
What s New in Capture NX
 What s New in Capture NX Thank you for downloading the latest version of Capture NX, with support for Picture Controls and other new features. Please note the following changes to the manual. En Camera
Adobe Photoshop CS 6 Level II. Topics: Selection Tools Layers Photo Correction
 Adobe Photoshop CS 6 Level II Topics: Selection Tools Layers Photo Correction Chapter 3 Quick Selection Tool The Quick Selection tool provides one of the easiest ways to make a selection. You simply paint
Cricut Design Space App for ipad User Manual
 Cricut Design Space App for ipad User Manual Cricut Explore design-and-cut system From inspiration to creation in just a few taps! Cricut Design Space App for ipad 1. ipad Setup A. Setting up the app B.
Introduction.
 Introduction At Photobooks Express, it s our aim to go that extra mile to deliver excellent service, products and quality. Our fresh, dynamic and flexible culture enables us to stand above the rest and
Add Rays Of Sunlight To A Photo With Photoshop
 Add Rays Of Sunlight To A Photo With Photoshop Written by Steve Patterson. In this photo effects tutorial, we'll learn how to easily add rays of sunlight to an image, a great way to make an already beautiful
Photoshop: Manipulating Photos
 Photoshop: Manipulating Photos All Labs must be uploaded to the University s web server and permissions set properly. In this lab we will be manipulating photos using a very small subset of all of Photoshop
Guidance on Using Scanning Software: Part 5. Epson Scan
 Guidance on Using Scanning Software: Part 5. Epson Scan Version of 4/29/2012 Epson Scan comes with Epson scanners and has simple manual adjustments, but requires vigilance to control the default settings
Photo Story Tutorial
 Photo Story Tutorial To create a new Photo Story Project: 1. Start 2. Programs 3. Photo Story 4. Begin a New Story 5. Next 6. Import Pictures 7. Click on your Flash Drive s name from the window on the
Introduction to: Microsoft Photo Story 3. for Windows. Brevard County, Florida
 Introduction to: Microsoft Photo Story 3 for Windows Brevard County, Florida 1 Table of Contents Introduction... 3 Downloading Photo Story 3... 4 Adding Pictures to Your PC... 7 Launching Photo Story 3...
Created by Eugene Stephens iphoto 11. To start iphoto: - Double-click Macintosh HD. Go to Applications > iphoto. Layout
 iphoto 11 To start iphoto: - Double-click Macintosh HD. Go to Applications > iphoto. Layout Library Viewing Area Search Zoom Toolbar - Library Library of imported photos & video clips, folders, albums,
Nikon View DX for Macintosh
 Contents Browser Software for Nikon D1 Digital Cameras Nikon View DX for Macintosh Reference Manual Overview Setting up the Camera as a Drive Mounting the Camera Camera Drive Settings Unmounting the Camera
Applying mathematics to digital image processing using a spreadsheet
 Jeff Waldock Applying mathematics to digital image processing using a spreadsheet Jeff Waldock Department of Engineering and Mathematics Sheffield Hallam University j.waldock@shu.ac.uk Introduction When
SCANNING IMAGES - USER S GUIDE. Scanning Images with Epson Smart Panel and PhotoShop [for Epson 1670 scanners]
![SCANNING IMAGES - USER S GUIDE. Scanning Images with Epson Smart Panel and PhotoShop [for Epson 1670 scanners]](/thumbs/89/98942649.jpg "SCANNING IMAGES - USER S GUIDE. Scanning Images with Epson Smart Panel and PhotoShop [for Epson 1670 scanners]") University of Arizona Information Commons Training 1 SCANNING IMAGES - USER S GUIDE Scanning Images with Epson Smart Panel and PhotoShop [for Epson 1670 scanners] p.2 Introduction and Overview Differences
University of Arizona Information Commons Training 1 SCANNING IMAGES - USER S GUIDE Scanning Images with Epson Smart Panel and PhotoShop [for Epson 1670 scanners] p.2 Introduction and Overview Differences
Introducing Digital Scrapbooking. Create beautiful books from your photos using Photoshop Elements
 Introducing Digital Scrapbooking Create beautiful books from your photos using Photoshop Elements 1 Contents Digital Scrapbooking with Photoshop Elements... 3 Using Photoshop Elements... 4 Saving your
It makes sense to read this section first if new to Silkypix... How to Handle SILKYPIX Perfectly Silkypix Pro PDF Contents Page Index
 It makes sense to read this section first if new to Silkypix... How to Handle SILKYPIX Perfectly...145 Silkypix Pro PDF Contents Page Index 0. 0.Overview and Introduction...9 0.1. Section Names...9 0.1.1.
Retouching Portraits in Photoshop
 Retouching Portraits in Photoshop I Removing Blemishes When removing blemishes, acne or other imperfections on the skin, our goal is to maintain as much of the original skin texture as possible. That way,
Photoshop Elements Hints by Steve Miller
 2015 Elements 13 A brief tutorial for basic photo file processing To begin, click on the Elements 13 icon, click on Photo Editor in the first box that appears. We will not be discussing the Organizer portion
Tutorial: Correcting images
 Welcome to Corel PHOTO-PAINT, a powerful tool for editing photos and creating bitmaps. In this tutorial, you'll learn how to perform basic image corrections to a scanned photo. This is what the image looks
System Requirements These are the minimum system requirements needed to run Movavi Photo Editor:
 System Requirements These are the minimum system requirements needed to run Movavi Photo Editor: Intel-based Mac computer Mac OS X 10.6, 10.7, 10.8 or 10.9 Display graphics minimum resolution of 1024x768;
Introduction to Photoshop Elements
 John W. Jacobs Technology Center 450 Exton Square Parkway Exton, PA 19341 610.280.2666 ccljtc@ccls.org www.ccls.org Facebook.com/ChesterCountyLibrary Introduction to Photoshop Elements Chester County Library
Movavi Photo Editor. User guide 2016
 Movavi Photo Editor User guide 2016 Activation When you first install a copy of Movavi Photo Editor, it will be running in trial mode, where you cannot save the edited images. To be able to use the program
Photo Effects & Corrections with PhotoFiltre
 Photo Effects & Corrections with PhotoFiltre P 330 / 1 Fix Colour Problems and Apply Stylish Effects to Your Photos in Seconds with This Free Software If you re keen on digital photography, you probably
Adobe Photoshop. How To Get Started With Adobe InDesign CC: 10 Things Beginners Want To Know How To Do TO START: 1) ZOOM, MOVE, RETOUCH (05:11)
 ZOOM, MOVE, RETOUCH (05:11)") Adobe Photoshop How To Get Started With Adobe InDesign CC: 10 Things Beginners Want To Know How To Do Video By Terry White Tutorial Sheet by Juliet Davis TO START: Open the tutorial in YouTube, download
Adobe Photoshop How To Get Started With Adobe InDesign CC: 10 Things Beginners Want To Know How To Do Video By Terry White Tutorial Sheet by Juliet Davis TO START: Open the tutorial in YouTube, download
Improve your photos and rescue old pictures
 PSPRO REVISTED Nov 5 2007 Page 1 of 7 Improve your photos and rescue old pictures This guide gives tips on how you can use Paint Shop5 and similar free graphic programmes to improve your photos. It doesn
Scanning Setup Guide for TWAIN Datasource
 Scanning Setup Guide for TWAIN Datasource Starting the Scan Validation Tool... 2 The Scan Validation Tool dialog box... 3 Using the TWAIN Datasource... 4 How do I begin?... 5 Selecting Image settings...
Resizing for ACCC Competition. Rev 1.0 9/12/2011
 Resizing for ACCC Competition Rev 1.0 9/12/2011 This document contains instructions for resizing your images to comply with the new Digital Image Competition Guidelines. In this document we have attempted
PASS4TEST. IT Certification Guaranteed, The Easy Way! We offer free update service for one year
 PASS4TEST IT Certification Guaranteed, The Easy Way! \ We offer free update service for one year Exam : 9A0-125 Title : Adobe Photoshop Lightroom 2 ACE Exam Vendors : Adobe Version : DEMO Get Latest &
Photoshop CS part 2. Workshop Objective. Getting Started Quit all open applications Single click Adobe Photoshop from the Dock
 pg. 1 Photoshop CS part 2 Photoshop is the premier digital photo editor application used for photo retouching, creating web images, film/video compositing, and other pixel/vector-based imagery. Workshop
INSTRUCTION MANUAL MM-A209
 E INSTRUCTION MANUAL 9222-7300-11 MM-A209 2 BEFORE YOU BEGIN Before installing the DiMAGE Viewer software, read the data-transfer section in the camera manual. This section details how to connect the camera
PhotoStory 3 Tutorial
 PhotoStory 3 Tutorial http://www.microsoft.com/windowsxp/using/digitalphotography/photostory/default.mspx Photostory is one of Microsoft's best kept secrets. This free software package is on your CD or,
photokaboom Learn Photography Home About Privacy, Etc. Ask Jim SarasotaPhotoLessons.com Menus Black-and-white Digital Photography
 1 of 12 3/28/2019, 5:53 PM photokaboom Learn Photography Home About Privacy, Etc. Ask Jim SarasotaPhotoLessons.com Menus 1 - Why Black-and-white? 2 - Is Color Present in a BW Photograph? 3 - Camera Set
Adobe Photoshop CS2 Workshop
 COMMUNITY TECHNICAL SUPPORT Adobe Photoshop CS2 Workshop Photoshop CS2 Help For more technical assistance, open Photoshop CS2 and press the F1 key, or go to Help > Photoshop Help. Selection Tools - The
Transforming Your Photographs with Photoshop
 Transforming Your Photographs with Photoshop Jesús Ramirez PhotoshopTrainingChannel.com Contents Introduction 2 About the Instructor 2 Lab Project Files 2 Lab Objectives 2 Lab Description 2 Removing Distracting