System Requirements These are the minimum system requirements needed to run Movavi Photo Editor:
|
|
|
- Kevin Williamson
- 6 years ago
- Views:
Transcription
1 System Requirements These are the minimum system requirements needed to run Movavi Photo Editor: Intel-based Mac computer Mac OS X 10.6, 10.7, 10.8 or 10.9 Display graphics minimum resolution of 1024x768; 32-bit color 128 MB RAM Minimum 150 MB of free hard disk space is needed for installation; 1 GB for proper operation Administrative permissions are required for installation While Movavi software may run on computers that do not meet these requirements, we cannot guarantee stable performance. If you are having hardware incompatibility problems, feel free to contact our support team.
2 Activation When you first install a copy of Movavi Software, it will be running in trial mode, where you cannot save the edited images. To be able to use the program to its fullest, you will need to activate it using an activation key that you can purchase from our official website or any of our partners. Please see the following sections on some of the frequently asked questions about activation: How do I get an activation key? How do I activate the program? I have a stable Internet connection. Can I activate the program if I don't have Internet access? If you have any other questions or you find that activation is not working correctly, please don't hesitate to contact our support team.
3 Getting an Activation Key 1. To purchase an activation key, open the Help menu in Movavi Photo Editor and select Buy Now or just use the button below. 2. Choose a personal or business license and click the corresponding Buy Now button. If you intend to use Movavi Photo Editor commercially, that is, to obtain profit of any kind or in a government organization, you need to select a business license. 3. Fill in your billing information and enter a valid address. This will be used to deliver your activation key, so make sure you have entered it correctly and that you have access to it. 4. After you've completed your payment and your request has been processed, you will receive a confirmation with your activation key, which you can use to activate Movavi Photo Editor. If you haven't received your activation key: Check the Spam folder of your mailbox Contact support
4 Online Activation This section explains how to activate Movavi Photo Editor using the quick online activation method if your computer is connected to the Internet. If your computer does not have a stable Internet connection, or you are having trouble with online activation, please see the Offline Activation section. Step 1: Open the Activation Dialog Box Launch Movavi Photo Editor Open the Movavi Photo Editor menu and select Activate Software. The following dialog box will appear: Step 2: Enter Your Activation Key 2.1. Enter or paste your activation key into the corresponding field Click Activate to complete the activation process. If you have entered the key correctly, you should see a message confirming successful activation. Click OK to complete the activation process and restart the program. If online activation fails, try the following: Check that the activation key is entered correctly and is intended for the program you are activating. Try offline activation. If you have any questions or problems while activating your Movavi software, please don't hesitate to contact our support team.

5 Offline Activation This topic explains how to activate Movavi Photo Editor if you do not have a stable Internet connection or if the online activation method did not work. You will be asked to send an automatically generated to our activation server and then enter its reply into the program you purchased. Although Internet access is required for sending s, you can complete this part of the activation process using any other computer that has an Internet connection. Step 1: Open the Activation Dialog Box Launch Movavi Photo Editor Open the Movavi Photo Editor menu and select Activate Software. The following dialog box will appear: Step 2: Enter Your Activation Key 2.1. Enter or paste your activation key into the corresponding field Select the Activate offline option Click Activate to proceed to the next step. Step 3: Send an with Your Activation Key You will see the following window:


6 The dialog box contains the activation key you entered and some some other information that is necessary for successful activation. To complete this step, you will need to send this information to our activation server via . You will receive an automatic response containing a registration key, which you will need to enter into to Activation Wizard's window. If your computer is not connected to the Internet, you can do this using any other computer as long as you have the message copied First, you will need to copy or save the information for later, when you send us the . Click Copy to copy the information to Clipboard. Save the text you copied as a text file that you can transfer to the computer you will be sending the from When you have Internet access, use your preferred mail client to compose an . Paste the information you copied from the Activation Wizard into the message body. Then, send the to reg@movavi.com. You should receive a reply within an hour.
7 To ensure a quick reply from our activation server, please do not alter the message subject or body Step 4: Enter Your Registration Key 4.1. Copy the registration key from the into the corresponding box of the activation dialog box Enter your registration name into the corresponding box Click Activate to complete the activation process. If you have entered all the information correctly, you should see a message confirming successful activation. Click Finish to complete the activation process and restart the program. If activation fails, try the following: Make sure you have entered the activation key and the registration key correctly and try again. Contact our support team.

8 Movavi Photo Editor Interface These are the main user interface elements of Movavi Photo Editor. Click on an element or its label to jump to its description. Work area The working area is where you can see your image file, and where you can perform some operations with the image, like drawing selections, cropping, or adding text. Tab selection The right-hand part of the window allows you to switch between tabs, which contain various related image editing tools: Adjust: contains Magic Enhance and other image adjustments Rotate: allows you to flip, rotate, and level out your image Crop: allows you to cut off the edges of the image if you don't need them Text: allows you to add text messages Resize: contains options for changing the image size Object Removal: here, you can select unnecessary objects in the image (such as power lines, blemishes, or stranges) and delete them from the image Background Removal: allows you to easily cut out an object from its background and set a new background. Tab contents When you click on a tab button on the left, the side panel will display the relevant buttons and options. Please note that you may be prompted to save your changes before leaving some tabs. Navigation bar The navigation bar allows you to zoom in and out and pan the image. Browse and delete files Use the arrows to browse files in the folder with the image you've opened. You can delete unwanted files with the 'trash can' button. Compare before and after Hold down the Compare button to view the original image or the last saved image state.
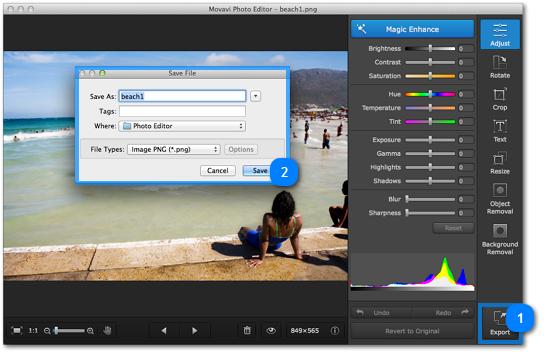
9 File information Click the File Information button to see basic information about the file, as well as Exif details from the camera. Revert all changes If you want to start over completely and revert all changes you've made to the image up until the last save, click the Revert All Changes button. Undo/Redo last operation Allows you to undo or repeat the last operation Save your image Click the Export button to save the edited image.

10 How to open an image: There are three simple ways to open an image for editing: 1. Drag and drop any image file from Finder or your desktop onto the Movavi Photo Editor window. 2. Click the Browse for Images button while on the start screen to browse for image files. 3. If you want to open the last file you've been working on, click Open last edited file on the startup screen of Movavi Photo Editor. How to save an image: 1. Click the Export button in the bottom right-hand corner or open the File menu and click Save to rewrite the previous image, or click Save As to save the image under a different name. 2. In the Save File dialog box, choose where you want to save your image. 3. If you want to save the image in a different format, open the File Types list and select the format you want. 4. Finally, click Save.
11

12 Zoom When you open an image in Movavi Photo Editor, it will be fitted to the window size. Use the zoom and navigation tools at the bottom of the window to set a comfortable view. Fit to screen adjusts the zoom level so that the entire image can fit in the window. Actual size sets the zoom level to 100%, displaying the image as it is. Hand tool to move an image around while zoomed in, click the hand icon and hold the left mouse button to move the image. Then, click the hand icon again to go back into editing mode. You can also move the image at any time by holding the right mouse button. To magnify an image, use the zoom slider at the bottom of the window. You can also zoom in and out using the mouse wheel. When you zoom in or out, the current zoom level will be displayed to the right of the navigation controls. Navigation Now you can sort through entire photo folders and edit their contents on the fly. Use the file navigation buttons at the bottom of the window: Go to the previous image in the folder Go to the next image in the folder Delete the current image If you have made changes to the file before switching to the previous or next file, you will be asked to save or discard the changes. Please note that switching to another file while working on a selection on the Object and Background Removal tabs will discard the selection.


13 Image Adjustments The Adjust tab allows you to manually adjust the photo's brightness, contrast, color, and other parameters. Click the Adjust button on the right to open the image adjustments. Magic Enhance For an instant fix, click the Magic Enhance button. Movavi Photo Editor will automatically adjust the brightness and contrast of your image. Histogram The histogram, located at the bottom of the Adjust tab, represents the distribution of colors and their shades in an image. When you view a histogram, it can give you information about how prominent a certain color is in the image, as well as about its brightness and contrast. The left edge of the histogram contains the dark areas, while the light areas are on the right. For example, if most of the colors are concentrated in the left-hand side, then the image is probably too dark, and vice versa. The height of a color's graph represents its amount in the image. This way, you can use the histogram to aid you in adjusting the image's colors. Histograms of normal, underexposed, and overexposed images.

14 Above the histogram, you will find several groups of sliders. Each slider allows you to change a certain parameter of the image, such as its brightness. Brightness Allows you to change the overall amount of light in the whole image, without changing any other parameters. When you increase or decrease brightness, note how the histogram moves left or right, but maintains its original shape. Contrast Allows you to change the difference between the lightest and darkest parts of the image. This can help you make the image more vivid, but too much contrast can cause unwanted posterization. Saturation Allows you to make the colors richer (positive values) or more subdued (negative values). Settings Saturation to -100 will make the image grayscale. Hue Allows you to change an image's overall color. Unlike tinting or color temperature (see below), changing an image's hue will not color the picture in shades of one color, rather, it will shift all the image's colors in a given direction. Temperature Allows you to make the image feel warmer or colder, by adding orange or blue color respectively. Tint Allows you to add a red or green tone to the image, either for color correction, or for an artistic feeling. Exposure In photography, exposure is the amount of light that is allowed to reach the camera's sensor, which is usually achieved using a combination of shutter speed, aperture, and lighting. If there is too much light on average, you may lose some details in the dark parts, while the light areas may become 'washed-out', and vice versa. This allows you to imitate a higher or lower exposure, as if you set it on your camera when taking the shot. Gamma Allows you to change how the middle tones appear on your image, without affecting the whites or blacks. Highlights and Shadows These two sliders allow you to make each component more prominent in the image, and thus make the image darker or brighter. Blur Allows you to slightly blur the image to reduce noise or smoothen out defects. Sharpness Allows you to sharpen the image to bring out more details. Please be aware that oversharpening an image can add noise. If you've changed a few values but want to cancel all the adjustments, click the Reset button underneath the sliders.


15 Rotating and Flipping Images The Rotate and Flip tab allows you to flip, rotate, and straighten out images with slanted horizon levels. Click the Rotate button on the right-hand side of the window to open orientation options. Rotating an image: Rotates your photo 90 anticlockwise Rotates your photo 90 clockwise Flipping an image: Flips your photo horizontally (upside down) Flips your photo vertically (left to right) Straighten A tilted horizon is a frequent problem for both beginner and experienced photographers when shooting from a handheld camera. This tool allows you to easily correct tilting in your photos, and you won't have to worry about horizon levels when taking your pictures. The Angle slider allows you to manually rotate the image up to 45 either way. Using the Level Tool: The Level Tool can help you automatically straighten out the image. 1. In your photo, find a straight horizontal or vertical line. This can be the horizon, the side of a building, or any other lines that are parallel or perpendicular to the horizon. 2. Now, click the Level Tool and trace that line on your image. Once you've traced the line, the image will be automatically rotated to make that line exactly horizontal or vertical.

16 Cropping Images Cropping an image allows you to save it with a different aspect ratio, remove unwanted parts from the edges, and zoom in on objects inside the image. We recommend that you save a backup copy of the image before cropping, in case you need the original image later. Click the Crop button on the right-hand side of the window to open the Crop tab. Select a preset from the drop-down box This allows you to crop the photo to a common aspect ratio, such as a square for uploading to Instagram, or 16:9 for a traditional desktop size. Lock aspect ratio Selecting this option will maintain the selected width to height proportions. This way, when you change one dimension of the cropping rectangle (whether by drawing the cropping area or by entering a number for width or height), the other dimension will change accordingly to keep the selected aspect ratio. Manually entering width and height If you need specific dimensions for your cropped image, you can manually enter the width and height into the corresponding fields of the Crop tab to change the crop area to these dimensions. The Invert Proportions button switches the width and height, rotating the cropping area by 90 Defining the cropping area Click and drag the mouse cursor across the image to outline the new image borders. The outside of the selected area will slightly darken: the darkened parts will later be cropped. If necessary, adjust the selected area: drag at the corners or sides of the selected area to change its size drag the middle of the selected area to move it inside the image. To crop the image to the outlined dimensions, click the Apply button in the Crop tab. If you want to cancel cropping, click the Reset button, or switch to any other tab.

17 Adding Text The Text tab allows you to add text to your images. Use text to create image postcards, but remember a picture is worth a thousand words! Click the Text button on the right-hand toolbar to switch to the Text tab. To add text: 1. In the Text tab, click Add Text. A new text box will appear in the center of your image. You can add as many text boxes as you like. 2. Double-click inside the text box and type the text you want. For multi-line text, you can simply press Enter to insert a line break, or use separate text boxes to customize each line's font and freely move each line around. 3. In the Text tab, choose a font you like and set up the color, outline, and other visuals. 4. With the text deselected, click and drag the text box to wherever you want in the image. To resize or rotate the frame, click and drag the rotation icon in the bottom right-hand corner of the text box, or use the respective Size and Text Rotation options in the Text tab. To delete text: To remove one text box, click the delete button in the upper left-hand corner of the text box. To clear all text boxes, click the Remove All Text button.

18 Resizing Images Resizing images allows you reduce an image's file size, prepare pictures for uploading to web albums, which often have a size limit, or prepare web-sized images for blogs and websites. Follow the instructions to learn how to resize images in Movavi Photo Editor. We recommend that you save a copy of the image before resizing in case you may need it later, especially if you plan on printing out the image. 1. On the right-hand panel of the window, click the Resize button to switch to the Resize tab. 2. Select or enter the necessary image size: The Fit into box allows you to select from the most common image sizes, as well as presets for printing and exporting images. To enter a custom image size, enter the dimensions into the width and height boxes. You can change the measurement unit in the box on the right. The default unit is pixels. To avoid visual distortions of the image after resizing, keep the Constrain proportions option enabled. 3. Finally, click Apply to resize the image to the specified size.

19 Erasing Objects The Object Removal tab can help you erase unwanted objects or people from your images. Movavi Photo Editor uses a special algorythm to reconstruct the background as if the deleted objects were never there. All you need to to is mark the objects you want to remove. 1. Select an object to remove: In this step, we will mark the parts of the image that we want removed using the tools from the toolbar on the right. Areas of the image selected for removing are marked red. Please note that if you switch to another tab with active selection, the selection will be lost. Use the Brush to freely paint the red selection area. Use the Size slider below to set the brush size. Use the Magic Wand tool to select adjacent areas of uniform color in a single click. Use the Lasso tool to outline an object. Click the arrow on the lasso icon to change the type of lasso: The standard Freehand Lasso allows you to freely draw the object's outline. The Polygonal Lasso allows you to outline the object with straight lines. below. Use the Eraser to deselect parts of the image. Just like with the brush, you can change eraser size with the slider Use the Clone Stamp Tool to select a part of the image to transfer onto another part of the image. You can use the Clone Stamp Tool to mask small blemishes or duplicate objects. Learn more about cloning objects If you need to make the selection larger or smaller on all sides, use the following keyboard shortcuts: Command+ OptionP to expand the selection Command+ OptionM to contract the selection If you want to remove multiple objects from the image, you can select them all at once or remove them one by one. If you want to deselect everything, click the Reset Selection button.

20 The people marked with red will be removed from the image. Hint: When selecting people and objects, don't forget about their shadows and reflections. 2. Set variation: When you remove an object, the program will replace that object with pixels from the rest of the image, so as to blend into the background. Variation affects how far away from the object the replacement pixels can be taken from. For lower variation values, the replacement pixels will be taken from the area only directly adjacent to the object, while at 100 they can be taken from any part of the image. Different variation values will provide different results depending on the size of the object, its background, and the overall uniformity of the image. Try out a few values to see which works best for your pictures. For example, in this image it would be best to select a lower variation so that the sea is not cloned onto the sand. 3. Start Erasing Click the Start Erasing button to begin processing. Please note that erasing objects with high variation values will take slightly longer. If you aren't satisfied with the result, you can click the Undo button and adjust your selection or choose a different variation value. Repeat steps 1-2 as many times as you need to remove all the unwanted objects. If you need to manually correct small blemishes, try using the Clone Stamp tool.

21 Clone Stamp Retouching To manually remove small blemishes or to clone (copy) objects on an image, you can use the clone stamp tool. 1. Select the Clone Stamp tool In the toolbar on the right-hand side of the Photo Editor window, click the stamp icon to select the Clone Stamp tool. 2. Set the stamp size and softness Use the Size slider beneath the tool icons to set the stamp's size. Increasing Softness will make the stamp's edges more transparent, which can help you blend the stamped parts with the rest of the image. 3. Pick a source Move your mouse pointer over to the area that you want to clone. Hold down the (Option/Alt) key and click on the image to define a source point. 4. Paint over the target Release the (Option/Alt) key. Then, move your mouse pointer to where you want the cloned fragment to appear and paint over the area you want to replace. As you move your cursor while painting with the stamp, the sampled area will also move relative to your cursor position.
, and choosing a new background. Step 1: Cutting out the Background 1.")
 to mark them as the foreground.")
22 Erasing Backgrounds Movavi Photo Editor can help you quickly and easily cut out people and objects from any background. You can use it to create product photos, funny collages and more. The workflow is divided into two basic steps: selecting your foreground object(s), and choosing a new background. Step 1: Cutting out the Background 1.1 Mark the foreground and background areas: Use the tools to specify which parts of the image belong to the object you want to keep, and which belong to the background and must be clipped away. The green Foreground Brush lets you select the object you want to keep. Paint a few strokes inside the object(s) to mark them as the foreground. There is no need to color the entire object, as Movavi Photo Editor uses a smart edge detection algorythm. The red Background Brush lets you mark the background, which needs to be erased. Swipe a few strokes of the red brush on the background around your object. Pay closer attention to parts of the background that have similar color or pattern to that of the foreground. The Eraser lets you erase both red and green selection in case you make a mistake. Now that you've marked the foreground and the background areas, a yellow border line will appear around your object. Sometimes, with complex shapes or background patterns, you may need to add a few more strokes of each brush to specify the border line. For higher precision, try zooming in on the image and using a smaller brush size.


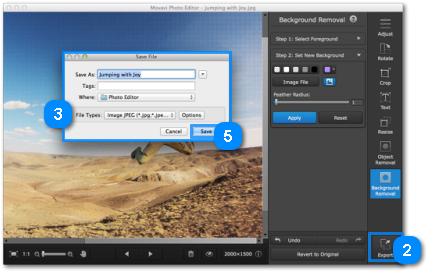
23 1.2 Set Boundary Smoothness: Sometimes, due to the complexity of the background or the object's shape itself, the yellow boundary may seem a little 'jagged' where it shouldn't be. To reduce this effect, you can set the Boundary Smoothness so that the borderline looks more natural. Likewise, if there are many small details on the edges of the object, select a low smoothness to preserve their shape. 1.3 Cut out the background When the yellow border completely encompasses the object you want, click Cut Out to clip away the background. The background will be removed, and you can proceed to the next step, where you can choose a new background. If you want to return to editing the selection, click Step 1: Select Foreground tab to show your selection and the selection tools. Once you've adjusted the selection, simply click the Cut Out button once again to proceed. Step 2: Set the New Background When you click Cut Out, you will be switched to Step 2, where you can select the image's new background: 2.1 Choosing a background color or image In this step, you can choose what you'd like to use as the new background for the object you've cut out.

24 Transparent: If you want to keep a transparent background, choose the 'transparency' icon to the left of the color palettes. Grayscale colors: To use a standard white, grey, or black background, choose one of the color icons. Custom color: To choose a different color, click the arrow on the rightmost color sample to open the palette. Click More in the palette to open the standard color selection dialog box where you can mix a custom color. Image: To open an image to use as the background, click the Image File button and select the file you want to use. It will then be added as the new background. If you switch to a color or transparent background, you can later return to using the image by clicking the image icon next to the Image File button. 2.2 Feather Radius If the object has uneven edges or color noise along the edges, you can use feathering to slightly blur the edges and make a smoother transition from the object to its new background. Drag the Feather Radius slider to set the necessary blurring level. 2.3 Move the object: Click and drag your object to move it anywhere you want in the image. If the object is much smaller than the original image size, you can later crop the image. 2.4 Finally, click Apply to accept the changes. Please note that if you switch to another tab while removing a background, your selection will be lost. Don't forget to save your changes!
25 Printing Images Follow these simple recommendations to print out high quality images from Movavi Photo Editor. 1. Make sure the image is large enough for printing on the selected paper size, and conversely, choose the right paper size for your images. If you print out small images on large paper, you may find that you can see individual pixels or that the image is not smooth enough on print. Before taking the photos you want to print, use a camera with a high megapixel count, make sure that it is set to the highest available quality (some cameras allow you to shoot smaller images than the camera's maximum size), and provide good lighting conditions to minimize noise. The larger the original photo, the larger a print size you can afford without losing crispness and quality. The standard for printing images is to have at least 300 pixels per inch of the photo paper. The following table shows the correlation between image size and its printed size when printed at 300 pixels per inch (~118 pixels/cm). You can use it to match paper size to your image size and vice versa. Camera Megapixels Image Size in Pixels Printed Size in Inches Printed Size in Centimeters x 1200 px 5" x 4" 13 cm x 10 cm x 1536 px 7" x 5" 17 cm x 13 cm x 1632 px 2560 x 1920 px 2816 x 2112 px 8.2" x 5.4" 8" x 6" 9" x 7" 21 cm x 14 cm 21 cm x 16 cm 24 cm x 18 cm x 2468 px 11" x 8" 28 cm x 21 cm x 2592 px 12.1" x 9.1" 33 cm x 22 cm x 3000 px 13" x 10" 34 cm x 25 cm If you didn't find the necessary size in the table, you can easily calculate the printed size in inches by dividing the width and height in pixels by 300. Likewise, to find out the minimum number of pixels for a certain print size, multiply the width and height in inches by 300 to get the image dimensions in pixels. 3. You do not need to downsize the image before printing: the software will automatically fit the image onto the selected paper size. Downsizing the image will only reduce quality. 4. If you need to crop unwanted parts of the image, make sure that the end result is not too small. If you have a very large image, you can use the crop function to zoom in on objects in the image, but keep in mind that the output image size must be large enough for printing. You can check the image size in pixels by clicking the File Information button on the bottom panel:. 5. Use a high quality printer for printing out your photos. These simple guidelines will help you choose a printer: Inkjet printers are much better at printing images than laser printers. Dye sublimation printers are considered the best for printing photos, however they are quite rare and can only be used for photo printing. Check the printer's dots per inch (DPI) resolution: the higher the DPI, the higher quality prints it will be able to produce. For photo printing, make sure that the printer has at least 300x300 DPI. Generally, a dedicated photo printer will produce better results than a general-purpose multifunction printer of the same price range. Some printers may produce colors different from the original because of the way they convert RGB color (the color scheme you see on your monitor) to CMYK color (used for printing). Be aware of your printer's maximum print size; many consumer printers only print photos up to 8 by 10 inches (20.32 x 25.4 cm). You should find this information on the packaging or in the printer's user manual. 6. Use high quality photo paper. There are different kinds of photo paper that may work differently depending on the content of your image. For example, glossy paper better reproduces bright colors, while matte paper is more suitable for portraits. Also, make sure that the paper matches your printer type (i.e. laser or inkjet). Also, please note that the colors you see in print may be slightly different than those you see on your display due to LCD monitor specifics. You can try to calibrate your display for better previewing: 1. Open the Apple menu and choose System Preferences. 2. In the Hardware section, click Displays. 3. In display settings, click the Color tab.
26 4. Click the Calibrate button to open the Display Calibration assistant and follow the onscreen instructions to calibrate your display. Finally, to print out an image from Movavi Photo Editor: 1. Open the File menu and choose Print. 2. Choose the printer you want to use for printing the photo. 3. Click Settings to open the settings for the selected printer. The settings will vary depending on your printer's software, but generally you can choose paper size, orientation and color options. 4. Choose the number of copies that you want to print. If this is your first time printing a photo, you may want to first print only one sample copy to make sure you have set up everything right. 5. Click Print to begin printing!
27 Changing Image Format Changing an image's format allows you to use your images in a wider variety of situations, compress the images to a smaller file size, and work with transparency. Many websites only allow a limited number of formats for uploading, so having a tool to easily change image format becomes a must. 1. Open the image you want. 2. Click Export in the bottom right-hand corner of the window. The Save File dialog box will open. 3. To choose an image format, open the Save as type box and select the format you need. If the format lists multiple file extensions, such as *.jpg, *.jpeg and others for JPEG, you can type the necessary file extension in the file name field. If your image contains transparent areas (for example, after removing a background), please note that not all formats support transparency. If you want to retain transparent areas after saving the image, choose one of the following formats: BMP, DPX, PNG, TGA. Advanced: Some formats also allow you to set image quality and compression method. For these formats, click the Options button in the Save File dialog box to open these options. JPEG Quality Drag the slider to the necessary quality level and click OK. Lower quality allows you to compress the image to a smaller file size, but will probably not look as good. TIFF Compression Select the preferred compression method and click OK. Uncompressed: no compression method will be used. The image will be much larger in size than its compressed copies, but uncompressed images with large resolutions may be processed faster by some software. PackBits: offers less compression than LZW, but is the most widely supported compression method, especially on Apple software. LZW: compresses the image to about half size. ZIP: best for working with 16-bit images and average for 8-bit images. 4. Choose where to save the new file and give your file a name. 5. Click Save. If you make any edits after saving the file in a different format, you will be working with the new file.
28

29 File Size and Image Quality Even though image files rarely take up more disk space than videos or other media files, a large photo collection can quickly fill up your hard drive if you save all photos at the maximum size and quality. In this section, you will learn how to manage image file size. Image file size is defined by the following properties: Image size in pixels: the larger the image, the more pixels it will be made up of, and the more data will need to be stored. The number of pixels also defines image resolution for printing, and affects the maximum level of detail you can achieve for a print of a certain size. To reduce file size, you can resize the image. However, this comes at a cost: the smaller copy will look just as good, but if you want to print out the image or use it as wallpaper, the smaller file will look considerably worse than its original. Let's see how much disk space you can save by resizing images. Below are the file sizes for one image (here, you see a scaled-down preview), and the difference is amazing, resizing a large image to a viewable 800x600 size makes the file size over a hundred times smaller. Dimensions File Size 7899x5924 px 27,6 MB 800x600 px 168 KB If you want to upload previews of your images to the web, or share photos in web albums, resizing the photos will most likely be a good idea: the upload times will be faster, and if you have a storage limit, it won't be filled up as fast as if you uploaded the images at their original size. Hint: Don't scale up small, low-quality images. An image with small dimensions does not have enough data in the file to allow any program to fully restructure the quality of a larger size image. If you size them up, you will only be wasting disk space without any improvement in quality. Read our resizing guide Image complexity: image complexity plays a large role in file size. Due to image compression specifics, images with different content but identical size and format will differ in file size because of the details that will need to be preserved. For example, if you save a large image of a purely blue background, some compression methods will only need to store which color fills the whole image, while for a picture of a flower, all the small details will be stored to avoid quality loss. Note the images below. They are of identical dimensions and are both saved in JPEG format. One image is a photo of a complex and colorful flower, while the other is a plain blue background. The second image's file size, having to encode less data, is 48 times smaller than the first! And while you can't simplify your photos to a single color, keep in mind that some images will naturally have larger file size than others. 425x282 pixels

30 144 KB 2,98 KB Format and compression method: A compression method can be seen as a shorthand writing system for image editing software, where it can write all the data of your image into less space, and then decipher the shorthand to recreate the image on your screen when you open the file. Most image compression methods do not store all of the image's data pixel by pixel, since it would take significantly more disk space. Instead, the image compression algorythm finds a way to pack this information by finding identical parts and only recording those same parts once, or by throwing away some data that it finds less important. Different formats have different compression methods, and choosing the best format largely depends on the type and purpose of the images. Lossless formats: some formats can store the image without losing any data, meaning that the quality of the image will not decrease when you save it. These formats can store the image either at its full size, or use a lossless compression method, that will pack the image into a smaller file, yet retain the original quality. No matter the compression level, these files are rather large, but offer the benefit of higher quality and sharper images, which is especially important for text images and logos. Common lossless formats: PNG, TIFF, BMP 'Lossy' formats: other formats allow you to save the images into smaller files, but they compress images at the expense of some quality. For large photos, the trade-off is usually justified, as the human eye will probably not notice the difference at low compression levels. However, when manually adjusting quality of 'lossy' formats, such as JPEG, it is important not to set the quality too low to enjoy the image. The most common 'lossy' format: JPEG When you change an image's format, note that saving it to a lossless format will not improve its quality, but only preserve the existing data. Likewise, if you change an image from a lossless format to a 'lossy' one, some data will inevitably be lost to compression. Saving files in a different format
31 Contacting Support If you have any questions or concerns regarding Movavi software, you are welcome to contact our support team. Please describe your problem in as much detail as possible; any screenshots or log files will allow us to help you faster. You can contact us using: guaranteed response in 3 business days Live Chat available 12 A.M. 6 P.M. GMT \ 4 P.M. 10 A.M. PST Monday through Friday. Our support team specialists may ask you for additional information that is required to solve your problem: these may include your license key, log files, and files you were working with, but never personal information. We value your privacy! Have you checked the FAQ section? Your question may have already been answered!
Movavi Photo Editor. User guide 2016
 Movavi Photo Editor User guide 2016 Activation When you first install a copy of Movavi Photo Editor, it will be running in trial mode, where you cannot save the edited images. To be able to use the program
Movavi Photo DeNoise User Manual. Start here: Quick start guide Remove trial restrictions Remove noise from photos
 Movavi Photo DeNoise User Manual Start here: Quick start guide Remove trial restrictions Remove noise from photos Quick start guide How to edit an image and remove color noise Step 1: Open image Open Movavi
Adobe Photoshop CC 2018 Tutorial
 Adobe Photoshop CC 2018 Tutorial GETTING STARTED Adobe Photoshop CC 2018 is a popular image editing software that provides a work environment consistent with Adobe Illustrator, Adobe InDesign, Adobe Photoshop,
Photoshop Elements Hints by Steve Miller
 2015 Elements 13 A brief tutorial for basic photo file processing To begin, click on the Elements 13 icon, click on Photo Editor in the first box that appears. We will not be discussing the Organizer portion
Adobe Photoshop CS5 Tutorial
 Adobe Photoshop CS5 Tutorial GETTING STARTED Adobe Photoshop CS5 is a popular image editing software that provides a work environment consistent with Adobe Illustrator, Adobe InDesign, Adobe Photoshop
By Washan Najat Nawi
 By Washan Najat Nawi how to get started how to use the interface how to modify images with basic editing skills Adobe Photoshop: is a popular image-editing software. Two general usage of Photoshop Creating
Introduction to Photoshop: Basic Editing & Prepare Images for the Web
 Introduction to Photoshop: Basic Editing & Prepare Images for the Web 1 LEARNING OBJECTIVES Basic tools in Photoshop & Use of Bridge Prepare images for print and web use TOPICS COVERED Photoshop Interface
Digital Imaging - Photoshop
 Digital Imaging - Photoshop A digital image is a computer representation of a photograph. It is composed of a grid of tiny squares called pixels (picture elements). Each pixel has a position on the grid
GETTING STARTED. 0 P a g e B a s i c s o f A d o b e P h o t o s h o p A g a P r i v a t e I n s t i t u t e f o r c o m p u t e r s c i e n c e
 GETTING STARTED 0 P a g e B a s i c s o f A d o b e P h o t o s h o p Adobe Photoshop: is a popular image editing software that provides a work environment consistent with Adobe Illustrator, Adobe InDesign,
ADOBE PHOTOSHOP CS TUTORIAL
 ADOBE PHOTOSHOP CS TUTORIAL A D O B E P H O T O S H O P C S Adobe Photoshop CS is a popular image editing software that provides a work environment consistent with Adobe Illustrator, Adobe InDesign, Adobe
Extreme Makeovers: Photoshop Retouching Techniques
 Extreme Makeovers: Table of Contents About the Workshop... 1 Workshop Objectives... 1 Getting Started... 1 Photoshop Workspace... 1 Retouching Tools... 2 General Steps... 2 Resolution and image size...
Photoshop CC Editing Images
 Photoshop CC Editing Images Rotate a Canvas A canvas can be rotated 90 degrees Clockwise, 90 degrees Counter Clockwise, or rotated 180 degrees. Navigate to the Image Menu, select Image Rotation and then
Using Photoshop Elements
 Using Photoshop Elements Created By: Rick Williams August 2004 Table of Contents Photoshop Element Tools...Page 1 Tool Descriptions... Page 3 Starting Photoshop Elements... Page 7 Resizing an Image...
ArcSoft PhotoImpression Table of Contents:
 ArcSoft PhotoImpression Table of Contents: 1. Welcome to PhotoImpression 2. Highlights of PhotoImpression 3. System Requirements 4. Installing PhotoImpression 5. Working with PhotoImpression Getting Started
For customers in USA This device complies with Part 15 of the FCC rules. Operation is subject to the following two conditions:
 User manual For customers in North and South America For customers in USA This device complies with Part 15 of the FCC rules. Operation is subject to the following two conditions: (1) This device may not
Adobe Photoshop PS2, Part 3
 Adobe Photoshop PS2, Part 3 Basic Photo Corrections This guide steps you through the process of acquiring, resizing, and retouching a photo intended for posting on the Web as well as for a print layout.
Adobe Photoshop CS2 Workshop
 COMMUNITY TECHNICAL SUPPORT Adobe Photoshop CS2 Workshop Photoshop CS2 Help For more technical assistance, open Photoshop CS2 and press the F1 key, or go to Help > Photoshop Help. Selection Tools - The
Introduction to Photoshop
 Introduction to Photoshop Instructional Services at KU Libraries A Division of Information Services www.lib.ku.edu/instruction Abstract: This course covers the basics of Photoshop, including common tools
Learning Photo Retouching techniques the simple way
 Learning Photo Retouching techniques the simple way Table of Contents About the Workshop... i Workshop Objectives... i Getting Started... 1 Photoshop Workspace... 1 Setting up the Preferences... 2 Retouching
Photoshop CC 2018 Essential Skills
 Photoshop CC 2018 Essential Skills Adobe Photoshop Creative Cloud 2018 University Information Technology Services Learning Technology, Training, Audiovisual and Outreach Copyright 2018 KSU Division of
Fireworks Bitmap Graphics Hands on practice notes. Basic Panels to note in Fireworks (Review)
") Fireworks Bitmap Graphics Hands on practice notes Topics of discussion 1. Saving files in Fireworks (PNG formats) - Review 2. Basic Panels Tool, Property, Layer & Optimize - Overview 3. Selection/Editing
Fireworks Bitmap Graphics Hands on practice notes Topics of discussion 1. Saving files in Fireworks (PNG formats) - Review 2. Basic Panels Tool, Property, Layer & Optimize - Overview 3. Selection/Editing
Mullingar Camera Club Basic introduction to Digital Printing using Photoshop CC.
 Mullingar Camera Club Basic introduction to Digital Printing using Photoshop CC. Table of Contents Course aims: 1 Course presentation notes: 1 Introducing Photoshop: 1 Adjusting the Brightness or Contrast
Photoshop: a Beginner s course. by: Charina Ong Centre for Development of Teaching and Learning National University of Singapore
 Photoshop: a Beginner s course by: Charina Ong Centre for Development of Teaching and Learning National University of Singapore Table of Contents About the Workshop... 1 Prerequisites... 1 Workshop Objectives...
Corel PHOTO-PAINT BERNINA Page 1 DL
 Corel PHOTO-PAINT 2018 BERNINA Page 1 Corel PHOTO-PAINT Corel PHOTO-PAINT is part of BERNINA Embroidery Software and gives users many tools for editing photos or bitmap artwork. Corel PHOTO- PAINT can
Unit 7 : Image Painting, Editing and Layers
 Unit 7 : Image Painting, Editing and Layers Introduction This Unit describes about various painting tools; such as selection, cropping and measuring tools, retouching, drawing and type tools, Navigation
PHOTO 11: INTRODUCTION TO DIGITAL IMAGING
 1 PHOTO 11: INTRODUCTION TO DIGITAL IMAGING Instructor: Sue Leith, sleith@csus.edu EXAM REVIEW Computer Components: Hardware - the term used to describe computer equipment -- hard drives, printers, scanners.
Using Adobe Photoshop
 Using Adobe Photoshop 4 Colour is important in most art forms. For example, a painter needs to know how to select and mix colours to produce the right tones in a picture. A Photographer needs to understand
Photoshop CC: Essentials
 Photoshop CC: Essentials Summary Workspace Overview... 2 Exercise Files... 2 Selection Tools... 3 Select All, Deselect, And Reselect... 3 Adding, Subtracting, and Intersecting... 3 Working with Layers...
Digital Photography 1
 Digital Photography 1 Photoshop Lesson 3 Resizing and transforming images Name Date Create a new image 1. Choose File > New. 2. In the New dialog box, type a name for the image. 3. Choose document size
A quick note: We hope that you will find something from the Tips and Tricks that will add a little pizazz to your yearbook pages!
 A quick note: The following pages are tips and tricks for Basic Photoshop users. You may notice that some instructions indicate that non-awpc fonts were used, and that some colors were created using the
PHOTOSHOP. pixel based image editing software (pixel=picture element) several small dots or pixels make up an image.
 several small dots or pixels make up an image.") Photoshop PHOTOSHOP pixel based image editing software (pixel=picture element) several small dots or pixels make up an image. RESOLUTION measurement of the total number of pixels displayed determines the
Photoshop PHOTOSHOP pixel based image editing software (pixel=picture element) several small dots or pixels make up an image. RESOLUTION measurement of the total number of pixels displayed determines the
Guidance on Using Scanning Software: Part 5. Epson Scan
 Guidance on Using Scanning Software: Part 5. Epson Scan Version of 4/29/2012 Epson Scan comes with Epson scanners and has simple manual adjustments, but requires vigilance to control the default settings
Adobe Photoshop CC Part 1: The Basics
 CALIFORNIA STATE UNIVERSITY, LOS ANGELES INFORMATION TECHNOLOGY SERVICES Adobe Photoshop CC Part 1: The Basics Summer 2015, Version 1.0 Table of Contents Introduction...2 New Features of Photoshop CC...2
Adobe Photoshop. Levels
 How to correct color Once you ve opened an image in Photoshop, you may want to adjust color quality or light levels, convert it to black and white, or correct color or lens distortions. This can improve
15 Photoshop Tips. Changing Photoshop rulers from inches to picas
 5 Photoshop Tips Changing Photoshop rulers from inches to picas What s the difference between inches and picas? a 6x inch RGB JPEG file is.9 MB a 6x pica RGB JPEG file is. MB a 6x inch RGB TIFF file is.
Photo Maker. User Manual
 Photo Maker User Manual PhotoMaker Mac Manual.indd 1 12/01/2011 4:46:14 PM Mac Manual.indd 2 12/01/2011 4:46:14 PM Contents 1. Precautions 2. Standard Accessories 3. Part Names 4. Installing the software
CATEGORY SKILL SET REF. TASK ITEM
 ECDL / ICDL Image Editing This module sets out essential concepts and skills relating to the ability to understand the main concepts underlying digital images and to use an image editing application to
Photo Editing in Mac and ipad and iphone
 Page 1 Photo Editing in Mac and ipad and iphone Switching to Edit mode in Photos for Mac To edit a photo you ll first need to double-click its thumbnail to open it for viewing, and then click the Edit
Overview of Photoshop Elements workspace
 Overview of Photoshop Elements workspace When you open Photoshop Elements, the Welcome screen offers you two options (Figure 1): The Organize button opens the Organizer. In the Organizer you organize and
Mask Integrator. Manual. Mask Integrator. Manual
 Mask Integrator Mask Integrator Tooltips If you let your mouse hover above a specific feature in our software, a tooltip about this feature will appear. Load Image Load the image with the standard lighting
Improve your photos and rescue old pictures
 PSPRO REVISTED Nov 5 2007 Page 1 of 7 Improve your photos and rescue old pictures This guide gives tips on how you can use Paint Shop5 and similar free graphic programmes to improve your photos. It doesn
Welcome to Photoshop CS
 Chapter 1 Welcome to Photoshop CS COPYRIGHTED MATERIAL Photoshop CS is the latest version of Photoshop, Adobe s powerful image-editing program. It s part of Adobe s Creative Suite, a package of design
2. Picture Window Tutorial
 2. Picture Window Tutorial Copyright (c) Ken Deitcher, 1999 Original image Final image To get you started using Picture Window we present two short tutorials. Basic Image Editing This tutorial covers basic
ScanGear CS-U 5.3 for CanoScan FB630U/FB636U Color Image Scanner User s Guide
 ScanGear CS-U 5.3 for CanoScan FB630U/FB636U Color Image Scanner User s Guide Copyright Notice 1999 Canon Inc. This manual is copyrighted with all rights reserved. Under the copyright laws, this manual
Working with Photoshop CS4
 http://www.larkin.net.au/ Page 1 Working with Photoshop CS4 Gather together your resources and backup your images Upload your digital still images from your digital camera to the computer. This action
All Creative Suite Design documents are saved in the same way. Click the Save or Save As (if saving for the first time) command on the File menu to
 command on the File menu to") 1 The Application bar is new in the CS4 applications. It combines the menu bar with control buttons that allow you to perform tasks such as arranging multiple documents or changing the workspace view.
1 The Application bar is new in the CS4 applications. It combines the menu bar with control buttons that allow you to perform tasks such as arranging multiple documents or changing the workspace view.
Apple Photos Quick Start Guide
 Apple Photos Quick Start Guide Photos is Apple s replacement for iphoto. It is a photograph organizational tool that allows users to view and make basic changes to photos, create slideshows, albums, photo
PhotoFiltre. Reverse foreground/background colors. Background & foreground colors. Set default foreground/background colors. Color choice palette
 PhotoFiltre BASIC TOOLS PALETTE Background & foreground colors Reverse foreground/background colors Set default foreground/background colors Color choice palette Toggle through color choice palettes Selection
INSTRUCTION MANUAL MM-A209
 E INSTRUCTION MANUAL 9222-7300-11 MM-A209 2 BEFORE YOU BEGIN Before installing the DiMAGE Viewer software, read the data-transfer section in the camera manual. This section details how to connect the camera
Downloaded From : Working with Photoshop 7.0
 Adobe Photoshop 1. Introduction What is Adobe Photoshop? Adobe Photoshop is a web designing software used for giving effects and filters to an image to make it more appealing and attractive. Brought out
CTE BASIC DIGITAL PHOTOGRAPHY STUDY GUIDE
 CTE BASIC DIGITAL PHOTOGRAPHY STUDY GUIDE VOCABULARY Histogram a graph of all tones in an image Image/adjust (hue/saturation, brightness/contrast) hue: color name (like green), saturation: how opaque (rich
Key Terms. Where is it Located Start > All Programs > Adobe Design Premium CS5> Adobe Photoshop CS5. Description
 Adobe Adobe Creative Suite (CS) is collection of video editing, graphic design, and web developing applications made by Adobe Systems. It includes Photoshop, InDesign, and Acrobat among other programs.
Rendering a perspective drawing using Adobe Photoshop
 Rendering a perspective drawing using Adobe Photoshop This hand-out will take you through the steps to render a perspective line drawing using Adobe Photoshop. The first important element in this process
Essential Post Processing
 Essential Post Processing By Ian Cran Preamble Getting to grips with Photoshop and Lightroom could be described in three stages. One is always learning and going through stages but there are three main
Tutorial: Correcting images
 Welcome to Corel PHOTO-PAINT, a powerful tool for editing photos and creating bitmaps. In this tutorial, you'll learn how to perform basic image corrections to a scanned photo. This is what the image looks
Contents. Introduction
 Contents Introduction 1. Overview 1-1. Glossary 8 1-2. Menus 11 File Menu 11 Edit Menu 15 Image Menu 19 Layer Menu 20 Select Menu 23 Filter Menu 25 View Menu 26 Window Menu 27 1-3. Tool Bar 28 Selection
For customers in Canada This Class B digital apparatus meets all requirements of the Canadian Interference-Causing Equipment Regulations.
 User manual For customers in North and South America For customers in USA This device complies with Part 15 of the FCC rules. Operation is subject to the following two conditions: (1) This device may not
Adobe PhotoShop Elements
 Adobe PhotoShop Elements North Lake College DCCCD 2006 1 When you open Adobe PhotoShop Elements, you will see this welcome screen. You can open any of the specialized areas. We will talk about 4 of them:
Digital Design and Communication Teaching (DiDACT) University of Sheffield Department of Landscape. Adobe Photoshop CS5 INTRODUCTION WORKSHOPS
 University of Sheffield Department of Landscape. Adobe Photoshop CS5 INTRODUCTION WORKSHOPS") Adobe INTRODUCTION WORKSHOPS WORKSHOP 1 - what is Photoshop + what does it do? Outcomes: What is Photoshop? Opening, importing and creating images. Basic knowledge of Photoshop tools. Examples of work.
Adobe INTRODUCTION WORKSHOPS WORKSHOP 1 - what is Photoshop + what does it do? Outcomes: What is Photoshop? Opening, importing and creating images. Basic knowledge of Photoshop tools. Examples of work.
Camera Raw software is included as a plug-in with Adobe Photoshop and also adds some functions to Adobe Bridge.
 Editing Images in Camera RAW Camera Raw software is included as a plug-in with Adobe Photoshop and also adds some functions to Adobe Bridge. Camera Raw gives each of these applications the ability to import
Copyright Notice. Trademarks
 Copyright Notice All rights reserved. No part of this publication may be reproduced, stored in a retrieval system, or transmitted in any form or by any means, electronic, mechanical, photocopying, recording,
GIMP (GNU Image Manipulation Program) MANUAL
 MANUAL") Selection Tools Icon Tool Name Function Select Rectangle Select Ellipse Select Hand-drawn area (lasso tool) Select Contiguous Region (magic wand) Selects a rectangular area, drawn from upper left (or lower
Selection Tools Icon Tool Name Function Select Rectangle Select Ellipse Select Hand-drawn area (lasso tool) Select Contiguous Region (magic wand) Selects a rectangular area, drawn from upper left (or lower
Introduction to Photoshop Elements
 John W. Jacobs Technology Center 450 Exton Square Parkway Exton, PA 19341 610.280.2666 ccljtc@ccls.org www.ccls.org Facebook.com/ChesterCountyLibrary Introduction to Photoshop Elements Chester County Library
GETTING STARTED MAKING A NEW DOCUMENT
 Accessed with permission from http://web.ics.purdue.edu/~agenad/help/photoshop.html GETTING STARTED MAKING A NEW DOCUMENT To get a new document started, simply choose new from the File menu. You'll get
Reference Guide. Color Image Scanner
 Color Image Scanner All rights reserved. No part of this publication may be reproduced, stored in a retrieval system, or transmitted in any form or by any means, electronic, mechanical, photocopying, recording,
Photoshop Filters. Applying Filters from the Filter Menu
 Photoshop Filters Filters are easy to learn and use, and yet are one of Photoshop s most powerful features. When used properly, they can recreate a number of photographic and artistic effects, can enhance
Retouching Portraits in Photoshop
 Retouching Portraits in Photoshop I Removing Blemishes When removing blemishes, acne or other imperfections on the skin, our goal is to maintain as much of the original skin texture as possible. That way,
Color and More. Color basics
 Color and More In this lesson, you'll evaluate an image in terms of its overall tonal range (lightness, darkness, and contrast), its overall balance of color, and its overall appearance for areas that
Adobe Lightroom CC Tutorial
 Adobe Lightroom CC Tutorial GETTING STARTED Adobe Lightroom CC is a photo editing program which can be used to manipulate and edit large quantities of photos at once. It has great exporting and metadata
What is real? What is art?
 HDCC208N Fall 2018 We ll fix it in post The Digital Darkroom What is real? What is art? We have been discussing this pair of questions at various points this semester, with drawings, paintings, the camera
Diploma in Photoshop
 Diploma in Photoshop Photoshop Selection Tools Selection Tools allow us to isolate areas of our image and apply adjustments to these selected areas only. A selection simply isolates one or more parts of
ScanPotter. Reference Manual
 ScanPotter Reference Manual Copyright 2014 by Microtek International, Inc. All rights reserved. Trademarks Microtek, ScanMaker, ArtixScan, ScanWizard, ScanPotter and ColoRescue are trademarks or registered
PackshotCreator 3D User guide
 PackshotCreator 3D User guide 2011 PackshotCreator - Sysnext All rights reserved. Table of contents 4 4 7 8 11 15 18 19 20 20 23 23 24 25 26 27 27 28 28 34 35 36 36 36 39 42 43 44 46 47 Chapter 1 : Getting
CS 547 Digital Imaging Lecture 2
 CS 547 Digital Imaging Lecture 2 Basic Photo Corrections & Retouching and Repairing Selection Tools Rectangular marquee tool Use to select rectangular images Elliptical Marque Tool Use to select elliptical
PHOTOSHOP: 3.3 CAMERA RAW
 1 PHOTOSHOP: 3.3 CAMERA RAW Raw image files are uncompressed images that contain all the information of the photo. Raw images give you flexibility in editing and allow you to achieve a better look because
Editing Using Photoshop CS5
 The Photoshop CS4 Editing Workspace - shown is the document (image) window, ToolBox, Info, Navigator, History, Adjustments and Layers Palettes, Windows Menus and Options Bar (on top). USING THE LAYERS
Windows INSTRUCTION MANUAL
 Windows E INSTRUCTION MANUAL Contents About This Manual... 3 Main Features and Structure... 4 Operation Flow... 5 System Requirements... 8 Supported Image Formats... 8 1 Installing the Software... 1-1
Using Adobe Photoshop to enhance the image quality. Assistant course web site:
 Using Adobe Photoshop to enhance the image quality Assistant course web site: http://www.arches.uga.edu/~skwang/edit6170/course.htm Content Introduction 2 Unit1: Scan images 3 Lesson 1-1: Preparations
The student will: download an image from the Internet; and use Photoshop to straighten, crop, enhance, and resize a digital image.
 Basic Photoshop Overview: Photoshop is one of the most common computer programs used to work with digital images. In this lesson, students use Photoshop to enhance a photo of Brevig Mission School, so
Adobe PhotoShop Elements 3.0 Quick Start Tutorial
 Adobe PhotoShop Elements 3.0 Quick Start Tutorial Introduction When you open Photoshop Elements, you are greeted by the welcome screen which offers you several choices: 1. Product Overview Provides a quick
ScanGear CS-U 6.0. for CanoScan D646U Color Scanner. User s Guide
 ScanGear CS-U 6.0 for CanoScan D646U Color Scanner User s Guide Copyright Notice Copyright 2000 Canon Inc. This manual is copyrighted with all rights reserved. Under the copyright laws, this manual may
CS 200 Assignment 3 Pixel Graphics Due Tuesday September 27th 2016, 9:00 am. Readings and Resources
 CS 200 Assignment 3 Pixel Graphics Due Tuesday September 27th 2016, 9:00 am Readings and Resources Texts: Suggested excerpts from Learning Web Design Files The required files are on Learn in the Week 3
How to use advanced color techniques
 How to use advanced color techniques In Adobe Photoshop, you can adjust an image s colors in a variety of ways. Using the techniques described in this guide, you can take the raw material of your image
Contents: Bibliography:
 ( 2 ) Contents: Sizing an Image...4 RAW File Conversion...4 Selection Tools...5 Colour Range...5 Quick Mask...6 Extract Tool...7 Adding a Layer Style...7 Adjustment Layer...8 Adding a gradient to an Adjustment
How to use advanced color techniques
 Adobe Photoshop CS5 Extended Project 6 guide How to use advanced color techniques In Adobe Photoshop CS5, you can adjust an image s colors in a variety of ways. Using the techniques described in this guide,
Recitation 2 Introduction to Photoshop
 Recitation 2 Introduction to Photoshop What is Adobe Photoshop? Adobe Photoshop is a tool for creating digital graphics either by starting with a scanned photograph or artwork or by creating the graphics
Photoshop CS2. Step by Step Instructions Using Layers. Adobe. About Layers:
 About Layers: Layers allow you to work on one element of an image without disturbing the others. Think of layers as sheets of acetate stacked one on top of the other. You can see through transparent areas
User Guide. Version 1.4. Copyright Favor Software. Revised:
 User Guide Version 1.4 Copyright 2009-2012 Favor Software Revised: 2012.02.06 Table of Contents Introduction... 4 Installation on Windows... 5 Installation on Macintosh... 6 Registering Intwined Pattern
PHOTOSHOP & ILLUSTRATOR BOOTCAMP
 FALL 2014 - ELIZABETH LIN PHOTOSHOP & ILLUSTRATOR BOOTCAMP ILLUSTRATOR ALIGNMENT To access the alignment panel, go to Window -> Align. You should see a panel like the one below. This panel allows you to
Photoshop 1. click Create.
 Photoshop 1 Step 1: Create a new file Open Adobe Photoshop. Create a new file: File->New On the right side, create a new file of size 600x600 pixels at a resolution of 300 pixels per inch. Name the file
Adobe Photoshop Notes. Adobe Photoshop CS3
 Adobe Photoshop Notes Adobe Photoshop CS3 Page 2 Introduction These notes have been put together for basic and advanced methods, features and language. I have also created notes on other Adobe products.
Chroma Mask. Manual. Chroma Mask. Manual
 Chroma Mask Chroma Mask Tooltips If you let your mouse hover above a specific feature in our software, a tooltip about this feature will appear. Load Image Here an image is loaded which has been shot in
Making Digital POSiTiVES & Negatives for Contact Printing Sandra C. Davis
 Making Digital POSiTiVES & Negatives for Contact Printing 2005-13 Sandra C. Davis Suggested reading: Making Digital Negatives for Contact Printing by Dan Burkholder, Twin Palms Press, and The Inkjet Negative
Gloucester County Library System
 1 Gloucester County Library System Gloucester County Library System 2 DIGITAL PHOTO ORGANIZING AND EDITING USING PICASA 3.9 FROM GOOGLE To Download the FREE Picasa 3.9 Program from Google G O T O T H E
Contents Foreword 1 Feedback 2 Legal information 3 Getting started 4 Installing the correct Capture One version 4 Changing the version type 5 Getting
 Contents Foreword 1 Feedback 2 Legal information 3 Getting started 4 Installing the correct Capture One version 4 Changing the version type 5 Getting to know Capture One Pro 6 The Grand Overview 6 The
ISCapture User Guide. advanced CCD imaging. Opticstar
 advanced CCD imaging Opticstar I We always check the accuracy of the information in our promotional material. However, due to the continuous process of product development and improvement it is possible
The Main Screen. Viewing Area - show the photos that were selected in the Source List.
 iphoto 11 The Main Screen Source List - This is where the Library, Events and Albums are identified. It is the place where photos can be organized and accessed. The Source List can also contain the slideshows,
Introduction. Basic Image Formatting. Word 2010 Formatting Pictures. To Crop an Image: Page 1
 Word 2010 Formatting Pictures Introduction Page 1 Once you've added pictures to your documents, you can format them in various ways. The picture tools in Word 2010 make it easy to incorporate images into
Table of Contents 1. Image processing Measurements System Tools...10
 Introduction Table of Contents 1 An Overview of ScopeImage Advanced...2 Features:...2 Function introduction...3 1. Image processing...3 1.1 Image Import and Export...3 1.1.1 Open image file...3 1.1.2 Import
Lightroom CC. Welcome to Joshua Tree Workshops. Astro & Landscape Lightroom Workflow w/presets
 Welcome to My approach to teaching is to offer small workshops which allow you to explore and discover our amazing planet, while learning photography and timelapse techniques. Astro & Landscape Lightroom