The Main Screen. Viewing Area - show the photos that were selected in the Source List.
|
|
|
- Evelyn Floyd
- 6 years ago
- Views:
Transcription
1 iphoto 11

2 The Main Screen Source List - This is where the Library, Events and Albums are identified. It is the place where photos can be organized and accessed. The Source List can also contain the slideshows, calendars and cards that were created. Viewing Area - show the photos that were selected in the Source List. 6

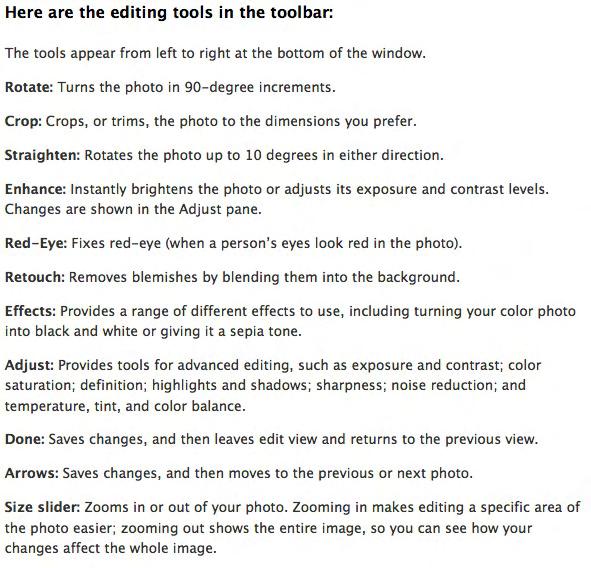
3 The Toolbar The toolbar contains the buttons and controls used to manage the photos. The plus sign is used to create something new, like an album, slideshow or project. The information gives the title, rating, keyword and file size. The Full Slide view switches the view to a black background. The Search tool looks up photos by title or keyword for example. Shows the status of the Source List selected, for example, if you click on an event, the number of photos will be displayed here. The Size Slider increases or decreases how large the photo appears in the viewing area. You will find these buttons on the right side. Create an Album, a Slideshow... Click this button to create a new Album or Slideshow, etc. Note: Select the pictures before clicking on this button. 7

4 Use Smart Albums to move pictures into folders automatically, based on the criteria you identify. For example, you can use keywords as criteria or picture ratings. Example: Put all photos in the Smart Album called Outdoor if the Keyword = Nature or the Keyword = Flower or the Keyword = Garden Use MobileMe to send pictures to your MobileMe Gallery and sync with other devices. MobileMe account required. Information Click this button to see the details for a photo such as file size and dimension. 8
5 Full Screen View Click this button to use Full-Screen View People tend to prefer the full-screen view for editing photos. When the Full View Screen is selected the background turns black, and the photo takes up most of the screen. Move your mouse to the top of the screen, the photos you see there are in the Photo Browser. Move your mouse to the bottom of the screen to find editing tools. The Info button shows the title, date, time, rating, format, and size of each photo. The Compare button will add the next photo to the photo already in full view screen for comparison of both photos. Clicking on this button will exit Full Screen view. How many Photos? Displays information about the number of photos in the selected source, i.e. a slideshow or an album. 9

6 Size Slider The size reduces or enlarges how large your photos appear in your photo library. Viewing Photos To view photos, click on Last Import from the Source list or click Library and view your photos by event. The Photos that appear in the Last Import will be from the last group of photos that were added together. The size slider bar located in the lowerright corner allows your images to be made smaller or larger in the photo viewing area. The photos can also be displayed with titles, keywords and ratings by selecting them from the View menu. 10

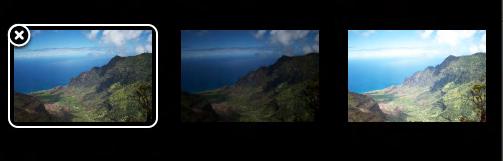
7 Events When you import photos into iphoto, it groups photos into Events by the day and time they were taken. For example, if you take a bunch of photos in the morning, then wait a few hours, and take more photos in the afternoon, the photos may be divided into two different events. The title of the event will appear as untitled. You can rename the event by clicking on the name and typing a name that best helps you identify this group of photos. Event Skimming When you look at the Events folder, each event group will be represented by a single image. If you run your cursor over the representative image, other images in that event group will appear one at a time. Albums You can select photos and drag them to an Album. Click the plus buton to create an album. You can put the same photo into as many albums as you like. Automatically Create an Album - You can select a range of photos, and then drag the range of photos into an empty space on the Source list and an album will be automatically created. To change the name of the album, double-click on the album icon and type in the desired album name. The order of the albums as they appear on the Source List can also be changed by dragging the icon up or down to the desired place on the Source List. 11
8 Photos can also be rearranged in an album. Drag the photo to the desired place in the album. Albums can be grouped in Folders. For example, you could have photos of different families within a larger family. You may want an album for each family and place it in a Folder under the family name. Editing Photos To edit a photo, simply double-click on the photo. (Or click on Full Screen View) The icons along the bottom are editing tools. Left and right arrows in the lower-right corner of the screen will move from photo to photo. Clicking on the done button will return to the last Event viewed. The Rotate button will rotate by 90-degree increments any selected photo. The Crop button removes the portion of the photo that you do not want. Using a size in the Constrain menu and clicking the Crop button will crop the dimensions of the photo. The Straighten tool helps you realign a photo horizontally or vertically. Enhance automatically adjust the color and contrast of the photo. When the Red-Eye button is clicked, the mouse becomes a crosshair pointer. A pop-up menu tells you to click with the cross in the center of the eye. If people in a photo have red-eye, this should reduce the red-eye look. 12


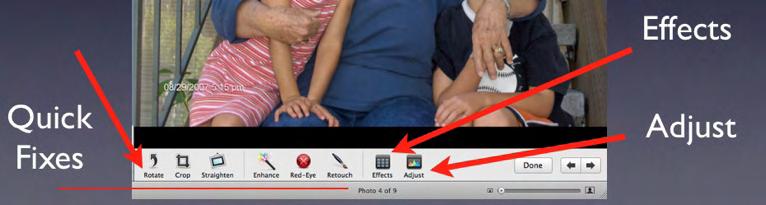
9 When the Retouch button is clicked the mouse becomes a crosshair pointer. With small strokes drag the crosshair pointer over blemishes and small marks that you want removed from the photo. When the Effects button is clicked, a menu will come up with different types of effects that can be used on the photo. Such effects as: black and white, Sepia, Antique, fade color, boost color, matte, Vignette and Edge Blur can be used. The Adjust button brings up advanced editing tools using levels to adjust for exposure, contrast, highlights, shadows, saturation, temperature, tint, sharpness, and noise reduction. To exit edit view, click the done button. The Arrow buttons moves to the next or previous photos. Flagged Photos Select a photo and click on the Flag button to flag a photo. Flagged photos are available in the Flagged folder in the source list. 13
10 Search Photos Use the search box at the bottom of the screen to search photos by keyword. Click the drop-down arrow by the magnifying glass for keyword. Create a Slideshow Slideshows are created from photos in your library, events, or Albums. Click the plus button to create a slideshow. You can drag and drop photos into the slideshow and put the same photo into as many slideshows as you like. Select the effects, music, slide transitions, and other settings for the slideshow. The pan and zoom effect was developed by Ken Burns and is known as the Ken Burns Effect. Click in the checkbox to turn on the Ken Burns Effect. Music provides the options to select music for the background of your slideshow. With one click, music will not be played in the background. Use the itunes playlist to use multiple songs in a slideshow! Merge Two Events Click and drag one event into another to merge two events Duplicate Photos Click on View, Duplicate to create a copy of a photo Restore Photos Click on View Revert to Original to go back to the original version of a photo you edited. 14


11 iphoto Preferences You can set preferences like text size and open iphoto when a digital camera is attached to the computer with preferences. 1. Click on iphoto 2. Select Preferences 3. Click on General You can set the action iphoto will take when you double-click on a photo: edit or magnify the picture. You can set the action your computer will take when you connect a camera to the computer: open iphoto. 4. Click on Appearance You can set the border on pictures, and how the photos are organized. At the bottom, you can select large text. 5. Click on Events You can set the action iphoto will take when you double-click on an event: show event photos or magnify the photos You can set how pictures are organized into events when they are imported into the iphoto library. 15
12 Key iphoto Terms Menu Bar The Menu Bar that appears at the very top of the Mac screen identifies the iphoto screen. The Menu Bar provides many options and menus that will help you work with your photos. Events Each time you import (add) photos to the iphoto library, the group of photos will be grouped into events. The default is to group photos by the date they were created. You can set the criteria by which photos are grouped into events using preferences. Import Bringing pictures into iphoto from another location such as a file on your computer, a digital camera, or from a storage device such as a USB drive. Export Send pictures from iphoto to a new location, such as idvd. Library The storage place for photos in iphoto Size slider Increases or decreases the size of the photos in the viewing window. Some times you have to adjust the size of the photos to do work, for example, you may have to make the size of the photos larger if you desire to add keywords to a photo. Toolbar The buttons that appear below the photo viewing window that perform actions such as edit, delete, and print. 16

13 Straighten Click on the Edit button to see the straighten tool. An advanced version of rotate, you can tilt a picture one direction or another. Full Screen View An alternative environment with a black background used to view and edit photos in the iphoto library. Keywords iphoto pictures can be tagged with keywords so that you can pull up a whole variety of photos at the same time, all sharing the same trait! Each photo can be given an unlimited number of keyword tags, and each tag can be applied to as many or as few photos as you wish. Click on View to turn on/off Keywords. In this example, three keywords have been added to the photo: flowers, garden, and outdoors 17
14 The Three Sets of Basic Editing Tools Quick Fixes Effects Window Adjust Window

15 The iphoto 11 Editing Interface
16 The Six iphoto Quick Fixes in both 09 and 11 Rotate Crop Straighten Enhance Red-Eye Retouch Plus the Effects and Adjust Buttons
17

18 Effects Windows - 09 and 11 differences


19 Adjust Windows- 09 and 11 Understanding the Adjust sliders and Histogram are basic to editing in iphoto
20 Histogram and Levels slider: Adjust the photo s light and dark level Exposure: The photo s overall lightness and darkness Contrast: The amount of difference between light and dark Saturation: Color richness Avoid saturating skin tones: Keep skin tones the same while you adjust color intensity Definition: Improves clarity, reduces haze; affects contrast in parts of the photo Highlights: Reduces the brightness of highlights Shadows: Brightens shadows to improve detail in shadowy areas Sharpness: Crispness or softness De-noise: Graininess Temperature: Color tone coolness and warmth Tint: The photo s overall color cast Eyedropper: Use to automatically adjust temperature and tint based on gray or white area
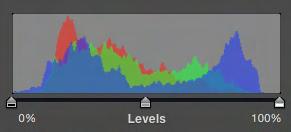
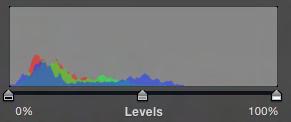
21 Understanding the Histogram
iphoto Objective Course Outline
 iphoto Objective In this class participants will learn how iphoto creates a photo center for photo organization by using rolls and albums. Participants will also learn the built-in editing tools. Participants
Apple Photos Quick Start Guide
 Apple Photos Quick Start Guide Photos is Apple s replacement for iphoto. It is a photograph organizational tool that allows users to view and make basic changes to photos, create slideshows, albums, photo
iphoto Getting Started Get to know iphoto and learn how to import and organize your photos, and create a photo slideshow and book.
 iphoto Getting Started Get to know iphoto and learn how to import and organize your photos, and create a photo slideshow and book. 1 Contents Chapter 1 3 Welcome to iphoto 3 What You ll Learn 4 Before
Worksheet II Technology Exploration III Grade 9 Subject ICT0130
 Worksheet II Technology Exploration III Grade 9 Subject ICT0130 Section Date Name ID Score/20 True or False: If you are installing ilife on Mac without an internal Super drive, idvd will install by default.
Created by Eugene Stephens iphoto 11. To start iphoto: - Double-click Macintosh HD. Go to Applications > iphoto. Layout
 iphoto 11 To start iphoto: - Double-click Macintosh HD. Go to Applications > iphoto. Layout Library Viewing Area Search Zoom Toolbar - Library Library of imported photos & video clips, folders, albums,
Adobe PhotoShop Elements
 Adobe PhotoShop Elements North Lake College DCCCD 2006 1 When you open Adobe PhotoShop Elements, you will see this welcome screen. You can open any of the specialized areas. We will talk about 4 of them:
Apple iphoto 4 ITS Technology & Learning Services Dr. Luanne Fose Revised April 29, 2004
 Apple iphoto 4 ITS Technology & Learning Services Dr. Luanne Fose Revised April 29, 2004 Table of Contents Introduction...1 Importing Photos From Your Digital Camera...1 Importing Photos From Other Sources...2
Photo Editing in Mac and ipad and iphone
 Page 1 Photo Editing in Mac and ipad and iphone Switching to Edit mode in Photos for Mac To edit a photo you ll first need to double-click its thumbnail to open it for viewing, and then click the Edit
iphoto Getting Started Learn how to import and organize your photos, and create a photo slideshow and book
 iphoto Getting Started Learn how to import and organize your photos, and create a photo slideshow and book 1 ontents hapter 1 4 Welcome to iphoto 4 Using This ocument 5 What s New in iphoto 6 Finding Out
32 Float v3 Quick Start Guide. AUTHORED BY ANTHONY HERNANDEZ (415)
") 32 Float v3 Quick Start Guide 32 Float v3 Trademark/Copyright Information Copyright 2013 by United Color Technologies, LLC. All rights reserved. Unified Color Technologies, BeyondRGB, and HDR Expose are
32 Float v3 Quick Start Guide 32 Float v3 Trademark/Copyright Information Copyright 2013 by United Color Technologies, LLC. All rights reserved. Unified Color Technologies, BeyondRGB, and HDR Expose are
Extreme Makeovers: Photoshop Retouching Techniques
 Extreme Makeovers: Table of Contents About the Workshop... 1 Workshop Objectives... 1 Getting Started... 1 Photoshop Workspace... 1 Retouching Tools... 2 General Steps... 2 Resolution and image size...
Apple iphoto 2. Cal Poly State University, San Luis Obispo Instructor: Luanne Fose, Ph.D
 Apple iphoto 2 Cal Poly State University, San Luis Obispo Instructor: Luanne Fose, Ph.D Introduction This workshop for Mac OS X users focuses upon using iphoto 2, the easy-to-use, all-inone application
Challenge Image: Blur the Background
 Challenge Image: Blur the Background Challenge Image: Blur the Background In this lesson, we re going to work on a challenge image that was submitted by a Masters Academy member. The image features a little
Introduction to Photoshop: Basic Editing & Prepare Images for the Web
 Introduction to Photoshop: Basic Editing & Prepare Images for the Web 1 LEARNING OBJECTIVES Basic tools in Photoshop & Use of Bridge Prepare images for print and web use TOPICS COVERED Photoshop Interface
32 Float v2 Quick Start Guide. AUTHORED BY ANTHONY HERNANDEZ - (415)
") 32 Float v2 Quick Start Guide 32 Float V2 Trademark/Copyright Information Copyright 2011 by United Color Technologies, LLC. All rights reserved. Unified Color Technologies, BeyondRGB, and HDR Float are
32 Float v2 Quick Start Guide 32 Float V2 Trademark/Copyright Information Copyright 2011 by United Color Technologies, LLC. All rights reserved. Unified Color Technologies, BeyondRGB, and HDR Float are
Photoshop CC Editing Images
 Photoshop CC Editing Images Rotate a Canvas A canvas can be rotated 90 degrees Clockwise, 90 degrees Counter Clockwise, or rotated 180 degrees. Navigate to the Image Menu, select Image Rotation and then
Photoshop Elements Hints by Steve Miller
 2015 Elements 13 A brief tutorial for basic photo file processing To begin, click on the Elements 13 icon, click on Photo Editor in the first box that appears. We will not be discussing the Organizer portion
Digital Design and Communication Teaching (DiDACT) University of Sheffield Department of Landscape. Adobe Photoshop CS5 INTRODUCTION WORKSHOPS
 University of Sheffield Department of Landscape. Adobe Photoshop CS5 INTRODUCTION WORKSHOPS") Adobe INTRODUCTION WORKSHOPS WORKSHOP 1 - what is Photoshop + what does it do? Outcomes: What is Photoshop? Opening, importing and creating images. Basic knowledge of Photoshop tools. Examples of work.
Adobe INTRODUCTION WORKSHOPS WORKSHOP 1 - what is Photoshop + what does it do? Outcomes: What is Photoshop? Opening, importing and creating images. Basic knowledge of Photoshop tools. Examples of work.
Camera & Photos Apps ios10
 2017 Class Camera & Photos Apps ios10 iphone and ipad 1 Camera iphone also has filter options Live Photos, iphone 6s, 7 and ipad Pro Grid HDR - High Dynamic Range Timer Flash Switch Cameras Exposure Adjust
Gloucester County Library System
 1 Gloucester County Library System Gloucester County Library System 2 DIGITAL PHOTO ORGANIZING AND EDITING USING PICASA 3.9 FROM GOOGLE To Download the FREE Picasa 3.9 Program from Google G O T O T H E
Adobe Lightroom CC Tutorial
 Adobe Lightroom CC Tutorial GETTING STARTED Adobe Lightroom CC is a photo editing program which can be used to manipulate and edit large quantities of photos at once. It has great exporting and metadata
Instructions: Editing a Photo Using Picasa 2. Allison Way and Charlie Windham ENG 313 February 27, 2008
 Instructions: Editing a Photo Using Picasa 2 Allison Way and Charlie Windham ENG 313 February 27, 2008 ABOUT THIS PICASA 2 MANUAL This manual tells you how to edit any photo using a free and downloadable
Adobe Photoshop. Levels
 How to correct color Once you ve opened an image in Photoshop, you may want to adjust color quality or light levels, convert it to black and white, or correct color or lens distortions. This can improve
How to Image Editor. Enhance. Effects. Frames. Overlays. Stickers
 How to Image Editor Included in your NewZapp account is a powerful Image Editor capable of extraordinary things! To access the editor simple navigate to the Images panel, choose or upload an image to edit
Using Photoshop Elements
 Using Photoshop Elements Created By: Rick Williams August 2004 Table of Contents Photoshop Element Tools...Page 1 Tool Descriptions... Page 3 Starting Photoshop Elements... Page 7 Resizing an Image...
Teach Yourself Adobe Photoshop Topic 9: Photo Retouching Part 2
 http://www.gerrykruyer.com Teach Yourself Adobe Photoshop Topic 9: Photo Retouching Part 2 In the last week s lesson, you repaired damaged areas of an image, removed unwanted parts of an image, cloned
Creating a Slide Show with Background Music in Adobe Lightroom January 2017 Maryann Flick
 Creating a Slide Show with Background Music in Adobe Lightroom January 2017 Maryann Flick Adobe Lightroom is widely used by many photographers for image organization and editing. If you are already using
Adobe Photoshop CC 2018 Tutorial
 Adobe Photoshop CC 2018 Tutorial GETTING STARTED Adobe Photoshop CC 2018 is a popular image editing software that provides a work environment consistent with Adobe Illustrator, Adobe InDesign, Adobe Photoshop,
Mullingar Camera Club Basic introduction to Digital Printing using Photoshop CC.
 Mullingar Camera Club Basic introduction to Digital Printing using Photoshop CC. Table of Contents Course aims: 1 Course presentation notes: 1 Introducing Photoshop: 1 Adjusting the Brightness or Contrast
Teton Photography Group
 Overview general post-processing (editing) workflow for serious photographers Focus on processes more than software Examples using Adobe Lightroom and Photoshop Teton Photography Group January 2016 Emphasis
For customers in USA This device complies with Part 15 of the FCC rules. Operation is subject to the following two conditions:
 User manual For customers in North and South America For customers in USA This device complies with Part 15 of the FCC rules. Operation is subject to the following two conditions: (1) This device may not
Capture NX-D Reference Manual for Version 1.5.0
 Capture NX-D Reference Manual for Version 1.5.0 Introduction What Capture NX-D Can Do for You... 2 Image Adjustments... 4 The Capture NX-D Window... 5 Palettes... 6 The Toolbar... 8 The Status Bar...10
Contents Foreword 1 Feedback 2 Legal information 3 Getting started 4 Installing the correct Capture One version 4 Changing the version type 5 Getting
 Contents Foreword 1 Feedback 2 Legal information 3 Getting started 4 Installing the correct Capture One version 4 Changing the version type 5 Getting to know Capture One Pro 6 The Grand Overview 6 The
ACDSee Pro 3 tutorials: Process mode overview
 ACDSee Pro 3 tutorials: Process overview After you have organized and viewed your images in Manage and View s, you are ready to take your images into Process for developing and editing. Start in to do
University Libraries ScanPro 3000 Microfilm Scanner
 University Libraries ScanPro 3000 Microfilm Scanner Help Guide Table of Contents Getting Started 3 Loading the Film 4-5 Viewing Your Film 6-7 Motorized Roll Film Control 6 Crop Box 7 Using the Toolbar
Adobe Photoshop. How To Get Started With Adobe InDesign CC: 10 Things Beginners Want To Know How To Do TO START: 1) ZOOM, MOVE, RETOUCH (05:11)
 ZOOM, MOVE, RETOUCH (05:11)") Adobe Photoshop How To Get Started With Adobe InDesign CC: 10 Things Beginners Want To Know How To Do Video By Terry White Tutorial Sheet by Juliet Davis TO START: Open the tutorial in YouTube, download
Adobe Photoshop How To Get Started With Adobe InDesign CC: 10 Things Beginners Want To Know How To Do Video By Terry White Tutorial Sheet by Juliet Davis TO START: Open the tutorial in YouTube, download
Photo One Digital Photo Shoots and Edits
 Photo One Digital Photo Shoots and Edits You will submit photo shoots, unedited and you will submit selected edited images. The shoots will be explained first and the edits will be explained later on this
Learning Photo Retouching techniques the simple way
 Learning Photo Retouching techniques the simple way Table of Contents About the Workshop... i Workshop Objectives... i Getting Started... 1 Photoshop Workspace... 1 Setting up the Preferences... 2 Retouching
PHOTOSHOP: 3.3 CAMERA RAW
 1 PHOTOSHOP: 3.3 CAMERA RAW Raw image files are uncompressed images that contain all the information of the photo. Raw images give you flexibility in editing and allow you to achieve a better look because
Photo Story Tutorial
 Photo Story Tutorial To create a new Photo Story Project: 1. Start 2. Programs 3. Photo Story 4. Begin a New Story 5. Next 6. Import Pictures 7. Click on your Flash Drive s name from the window on the
Essential Post Processing
 Essential Post Processing By Ian Cran Preamble Getting to grips with Photoshop and Lightroom could be described in three stages. One is always learning and going through stages but there are three main
Camera Raw software is included as a plug-in with Adobe Photoshop and also adds some functions to Adobe Bridge.
 Editing Images in Camera RAW Camera Raw software is included as a plug-in with Adobe Photoshop and also adds some functions to Adobe Bridge. Camera Raw gives each of these applications the ability to import
Copyright Notice. Trademarks
 Copyright Notice All rights reserved. No part of this publication may be reproduced, stored in a retrieval system, or transmitted in any form or by any means, electronic, mechanical, photocopying, recording,
Photoshop CS part 2. Workshop Objective. Getting Started Quit all open applications Single click Adobe Photoshop from the Dock
 pg. 1 Photoshop CS part 2 Photoshop is the premier digital photo editor application used for photo retouching, creating web images, film/video compositing, and other pixel/vector-based imagery. Workshop
Color and More. Color basics
 Color and More In this lesson, you'll evaluate an image in terms of its overall tonal range (lightness, darkness, and contrast), its overall balance of color, and its overall appearance for areas that
Capture NX-D Reference Manual for Version 1.4.6
 Capture NX-D Reference Manual for Version 1.4.6 Introduction What Capture NX-D Can Do for You... 2 Hiding Changes Made in Capture NX/Capture NX 2... 4 The Capture NX-D Window... 5 Palettes... 6 The Toolbar...
Capture NX-D Reference Manual for Version 1.4.0
 Capture NX-D Reference Manual for Version 1.4.0 Introduction What Capture NX-D Can Do for You... 2 Hiding Changes Made in Capture NX/Capture NX 2... 4 The Capture NX-D Window... 5 Palettes... 6 The Toolbar...
Unit 7 : Image Painting, Editing and Layers
 Unit 7 : Image Painting, Editing and Layers Introduction This Unit describes about various painting tools; such as selection, cropping and measuring tools, retouching, drawing and type tools, Navigation
Version 4.2 For WINDOWS
 SIGMA Photo Pro User Guide Companion Processing Software for SIGMA Digital Cameras Version 4.2 For WINDOWS I M P O R T A N T : Please Read Before You Start Thank you very much for purchasing this SIGMA
MEASUREMENT CAMERA USER GUIDE
 How to use your Aven camera s imaging and measurement tools Part 1 of this guide identifies software icons for on-screen functions, camera settings and measurement tools. Part 2 provides step-by-step operating
Professional RAW Editor for ios and icloud Photo Library (v2.0)
") Professional RAW Editor for ios and icloud Photo Library (v2.0) INTRODUCTION Thank you for downloading RAW Power. RAW Power is the first RAW editor for ios 11 that can read and modify the ios Photo Library
Professional RAW Editor for ios and icloud Photo Library (v2.0) INTRODUCTION Thank you for downloading RAW Power. RAW Power is the first RAW editor for ios 11 that can read and modify the ios Photo Library
Managing images with NewZapp
 Managing images with NewZapp This guide is for anyone using the NewZapp Fixed editor as opposed to the Drag and Drop editor. The Image Manager is where images are uploaded and stored in your NewZapp account
Photoshop: Manipulating Photos
 Photoshop: Manipulating Photos All Labs must be uploaded to the University s web server and permissions set properly. In this lab we will be manipulating photos using a very small subset of all of Photoshop
1/31/2010 Google's Picture Perfect Picasa
 The Picasa software lets you organize, edit, and upload your photos in quick, easy steps. Download Picasa at http://picasa.google.com You'll be prompted to accept the terms of agreement. Click I Agree.
ScanGear CS-U 5.3 for CanoScan FB630U/FB636U Color Image Scanner User s Guide
 ScanGear CS-U 5.3 for CanoScan FB630U/FB636U Color Image Scanner User s Guide Copyright Notice 1999 Canon Inc. This manual is copyrighted with all rights reserved. Under the copyright laws, this manual
Digital Portable Overhead Document Camera LV-1010
 Digital Portable Overhead Document Camera LV-1010 Instruction Manual 1 Content I Product Introduction 1.1 Product appearance..3 1.2 Main functions and features of the product.3 1.3 Production specifications.4
How to prepare your files for competition using
 How to prepare your files for competition using Many thanks to Margaret Carter Baumgartner for the use of her portrait painting in this demonstration. 2015 Christine Ivers Before you do anything! MAKE
digitization station DIGITAL SCRAPBOOKING 120 West 14th Street
 digitization station DIGITAL SCRAPBOOKING 120 West 14th Street www.nvcl.ca techconnect@cnv.org DIGITAL SCRAPBOOKING With MyMemories Suite 6 The MyMemories Digital Scrapbooking software allows you to create
Select your Image in Bridge. Make sure you are opening the RAW version of your image file!
 CO 3403: Photographic Communication Steps for Non-Destructive Image Adjustments in Photoshop Use the application Bridge to preview your images and open your files with Camera Raw Review the information
OzE Field Modules. OzE School. Quick reference pages OzE Main Opening Screen OzE Process Data OzE Order Entry OzE Preview School Promotion Checklist
 1 OzE Field Modules OzE School Quick reference pages OzE Main Opening Screen OzE Process Data OzE Order Entry OzE Preview School Promotion Checklist OzESchool System Features Field unit for preparing all
ArcSoft PhotoImpression Table of Contents:
 ArcSoft PhotoImpression Table of Contents: 1. Welcome to PhotoImpression 2. Highlights of PhotoImpression 3. System Requirements 4. Installing PhotoImpression 5. Working with PhotoImpression Getting Started
Adobe Photoshop CS5 Tutorial
 Adobe Photoshop CS5 Tutorial GETTING STARTED Adobe Photoshop CS5 is a popular image editing software that provides a work environment consistent with Adobe Illustrator, Adobe InDesign, Adobe Photoshop
How to use advanced color techniques
 How to use advanced color techniques In Adobe Photoshop, you can adjust an image s colors in a variety of ways. Using the techniques described in this guide, you can take the raw material of your image
How to use advanced color techniques
 Adobe Photoshop CS5 Extended Project 6 guide How to use advanced color techniques In Adobe Photoshop CS5, you can adjust an image s colors in a variety of ways. Using the techniques described in this guide,
Session 3: Getting to Know Photoshop Elements. Keep in mind that there are many others ways of solving the problems.
 Tutorial Session 3: Getting to Know Photoshop Elements Now that you have taken some pictures you might have noticed that some of the images have little problems like red-eye, colorcast, and too dark or
OzE Field Modules. OzE Studio Series. OzE Studio OzE Studio Lite. Quick reference pages OzE Studio Data Entry (2pgs) OzE Preview.
 OzE Preview.") 1 OzE Field Modules OzE Studio Series OzE Studio OzE Studio Lite Quick reference pages OzE Studio Data Entry (2pgs) OzE Preview OzE has been designed to accommodate many different fields of photography,
1 OzE Field Modules OzE Studio Series OzE Studio OzE Studio Lite Quick reference pages OzE Studio Data Entry (2pgs) OzE Preview OzE has been designed to accommodate many different fields of photography,
SIMPLY TIFFANY STUDIOS SCRAPANEERS.COM
 Get Prepped Organize & Prepare The tips I want to share with you today will help you prepare tomorrow for Scanning Day and increase your scanning speed. Tip 1: Divide & Conquer Arrange your photos into
Paint Shop Pro Photo Xi: advanced features
 Paint ShoP Pro Photo Xi for PhotograPherS 11 Paint Shop Pro Photo Xi: advanced features tonal controls Most of the processes mentioned in the previous section deal with single-button operations that perform
ADDING RAIN TO A PHOTO
 ADDING RAIN TO A PHOTO Most of us would prefer to avoid being caught in the rain if possible, especially if we have our cameras with us. But what if you re one of a large number of people who enjoy taking
Editing Using Photoshop CS5
 The Photoshop CS4 Editing Workspace - shown is the document (image) window, ToolBox, Info, Navigator, History, Adjustments and Layers Palettes, Windows Menus and Options Bar (on top). USING THE LAYERS
Guidance on Using Scanning Software: Part 5. Epson Scan
 Guidance on Using Scanning Software: Part 5. Epson Scan Version of 4/29/2012 Epson Scan comes with Epson scanners and has simple manual adjustments, but requires vigilance to control the default settings
2007 Adobe Systems Incorporated. All rights reserved. Adobe Photoshop Lightroom Getting Started Guide
 2007 Adobe Systems Incorporated. All rights reserved. Adobe Photoshop Lightroom Getting Started Guide If this guide is distributed with software that includes an end user agreement, this guide, as well
User Manual. Copyright 2010 Lumos. All rights reserved
 User Manual The contents of this document may not be copied nor duplicated in any form, in whole or in part, without prior written consent from Lumos. Lumos makes no warranties as to the accuracy of the
The Basics. Introducing PaintShop Pro X4 CHAPTER 1. What s Covered in this Chapter
 CHAPTER 1 The Basics Introducing PaintShop Pro X4 What s Covered in this Chapter This chapter explains what PaintShop Pro X4 can do and how it works. If you re new to the program, I d strongly recommend
M a c i n t o s h. Canon Plug-in Module CS-U 3.9 for CanoScan D660U Color Image Scanner. User's Guide
 f o r M a c i n t o s h Canon Plug-in Module CS-U 3.9 for CanoScan D660U Color Image Scanner User's Guide How to Make Best Use of the Manuals When you open the box Printed Manual CanoScan D660U Getting
Local Adjustment Tools
 PHOTOGRAPHY: TRICKS OF THE TRADE Lightroom CC Local Adjustment Tools Loren Nelson www.naturalphotographyjackson.com Goals for Tricks of the Trade NOT show you the way you should work Demonstrate and discuss
Companion Processing Software for SIGMA Digital Cameras. Version 4.1 For Macintosh
 SIGMA Photo Pro User Guide Companion Processing Software for SIGMA Digital Cameras Version 4.1 For Macintosh I M P O R T A N T : Please Read Before You Start Thank you very much for purchasing this SIGMA
Introduction to Photoshop Elements
 John W. Jacobs Technology Center 450 Exton Square Parkway Exton, PA 19341 610.280.2666 ccljtc@ccls.org www.ccls.org Facebook.com/ChesterCountyLibrary Introduction to Photoshop Elements Chester County Library
By Washan Najat Nawi
 By Washan Najat Nawi how to get started how to use the interface how to modify images with basic editing skills Adobe Photoshop: is a popular image-editing software. Two general usage of Photoshop Creating
Photoshop: Manipulating Photos
 Photoshop: Manipulating Photos All Labs must be uploaded to the University s web server and permissions set properly. In this lab we will be manipulating photos using a very small subset of all of Photoshop
ISCapture User Guide. advanced CCD imaging. Opticstar
 advanced CCD imaging Opticstar I We always check the accuracy of the information in our promotional material. However, due to the continuous process of product development and improvement it is possible
Imaging Features Available in HTML5. it just makes sense
 Imaging Features Available in HTML5 it just makes sense August, 2018 Imaging Features Available in HTML5 As part of the 5.2 SP1 release, the Images functionality is now available in HTML5 and provides
ADOBE PHOTOSHOP CS TUTORIAL
 ADOBE PHOTOSHOP CS TUTORIAL A D O B E P H O T O S H O P C S Adobe Photoshop CS is a popular image editing software that provides a work environment consistent with Adobe Illustrator, Adobe InDesign, Adobe
INSTRUCTION MANUAL MM-A209
 E INSTRUCTION MANUAL 9222-7300-11 MM-A209 2 BEFORE YOU BEGIN Before installing the DiMAGE Viewer software, read the data-transfer section in the camera manual. This section details how to connect the camera
Color Correction and Enhancement
 10 Approach to Color Correction 151 Color Correction and Enhancement The primary purpose of Photoshop is to act as a digital darkroom where images can be corrected, enhanced, and refined. How do you know
Go Daddy Online Photo Filer
 Getting Started and User Guide Discover an easier way to share, print and manage your photos online! Online Photo Filer gives you an online photo album site for sharing photos, as well as easy-to-use editing
Adobe Photoshop CS 6 Level II. Topics: Selection Tools Layers Photo Correction
 Adobe Photoshop CS 6 Level II Topics: Selection Tools Layers Photo Correction Chapter 3 Quick Selection Tool The Quick Selection tool provides one of the easiest ways to make a selection. You simply paint
Contents: Bibliography:
 ( 2 ) Contents: Sizing an Image...4 RAW File Conversion...4 Selection Tools...5 Colour Range...5 Quick Mask...6 Extract Tool...7 Adding a Layer Style...7 Adjustment Layer...8 Adding a gradient to an Adjustment
Photoshop: a Beginner s course. by: Charina Ong Centre for Development of Teaching and Learning National University of Singapore
 Photoshop: a Beginner s course by: Charina Ong Centre for Development of Teaching and Learning National University of Singapore Table of Contents About the Workshop... 1 Prerequisites... 1 Workshop Objectives...
Rubbing your Nikon RAW file the Right Way
 Rubbing your Nikon RAW file the Right Way You can ignore reality, but you can t ignore the consequences of ignoring reality. Ayn Rand If you are a Nikon shooter, you will get the best result from processing
A Basic Guide to Photoshop Adjustment Layers
 A Basic Guide to Photoshop Adjustment Layers Photoshop has a Panel named Adjustments, based on the Adjustment Layers of previous versions. These adjustments can be used for non-destructive editing, can
Revitalize Portraits with FaceFilter Studio
 Revitalize Portraits with FaceFilter Studio FaceFilter Studio is part of the Roxio Creator suite. With FaceFilter Studio, you can transform, rejuvenate, and revitalize your portraits. Turn frowns into
Contents STARTUP MICROSCOPE CONTROLS CAMERA CONTROLS SOFTWARE CONTROLS EXPOSURE AND CONTRAST MONOCHROME IMAGE HANDLING
 Operations Guide Contents STARTUP MICROSCOPE CONTROLS CAMERA CONTROLS SOFTWARE CONTROLS EXPOSURE AND CONTRAST MONOCHROME IMAGE HANDLING Nikon Eclipse 90i Operations Guide STARTUP Startup Powering Up Fluorescence
For customers in Canada This Class B digital apparatus meets all requirements of the Canadian Interference-Causing Equipment Regulations.
 User manual For customers in North and South America For customers in USA This device complies with Part 15 of the FCC rules. Operation is subject to the following two conditions: (1) This device may not
Photoshop CC: Essentials
 Photoshop CC: Essentials Summary Workspace Overview... 2 Exercise Files... 2 Selection Tools... 3 Select All, Deselect, And Reselect... 3 Adding, Subtracting, and Intersecting... 3 Working with Layers...
Davis Art Images: Create and Share Slideshows
 Davis Art Images: Create and Share Slideshows Davis Art Images, you can create and curate custom sets of images to use in your art room with Tags. Your Tagged Image Sets can then be viewed and presented
Improve your photos and rescue old pictures
 PSPRO REVISTED Nov 5 2007 Page 1 of 7 Improve your photos and rescue old pictures This guide gives tips on how you can use Paint Shop5 and similar free graphic programmes to improve your photos. It doesn
Introduction Welcome to PhotoSweeper
 Introduction Welcome to Do you really need all 12 shots of that coffee table? helps you organize your photo collections by finding and grouping duplicate or similar photos using powerful comparison settings.
PosterArtist Quick Guide
 PosterArtist Quick Guide Create posters in four easy steps STEP STEP STEP STEP Use Auto Design to Create Posters Simply select a poster type and a design image to automatically create high-quality posters.
Step 5) Split the red data using the Multi Scale Decomposition tool into a detail and residual background image.
 Split the red data using the Multi Scale Decomposition tool into a detail and residual background image.") Step 1) Press the Copy Portion toolbar button then left-click and drag a rectangle to crop the image. Press the Copy Portion button again to turn off cropping. Step 2) Scale the cropped image by 0.50 to
Step 1) Press the Copy Portion toolbar button then left-click and drag a rectangle to crop the image. Press the Copy Portion button again to turn off cropping. Step 2) Scale the cropped image by 0.50 to