Photo Editing in Mac and ipad and iphone
|
|
|
- Dennis Horn
- 6 years ago
- Views:
Transcription

1 Page 1 Photo Editing in Mac and ipad and iphone Switching to Edit mode in Photos for Mac To edit a photo you ll first need to double-click its thumbnail to open it for viewing, and then click the Edit button at the top right. Note that if you open for editing a photo in a Shared Album you ll be told it needs to be imported into your photo library first, and that imported photo will be the one you ll edit rather than the shared version. Because every inch of screen space matters when you re editing photos, switching to full screen mode makes sense (click View > Full Screen, or the green blob). Pro tip: You might notice the toolbar slides off the top of the screen along with the menu. To fix this, click View > Always Show Toolbar in Full Screen. The screen goes black to indicate Edit mode is activated and the toolkit appears at the right of the program window, while a zoom control appears at the top left. When zoomed you can navigate around the image by clicking and dragging, or via a two-fingered scroll if using a trackpad. Pro tip: Holding down Cmd while tapping plus and minus on the keyboard lets you zoom in and out without using the mouse/trackpad.

2 Page 2 The zoom control at the top left lets you look closely at an image, and clicking and dragging will scroll around Non-destructive editing of photos on the Mac Photos uses non-destructive editing, which means the original is always stored alongside your edits, no matter how extensive these are or even if you quit the app after making them. Just open the photo for editing at any time and click Revert to Original. Warning: Undoing individual actions in Photos via Ctrl+Z, or Edit > Undo, isn t quite the same as other apps. Undos when editing an image are limited to the current tool you re working in. For example, if you alter the brightness and then switch to the Retouch tool, you won t be able to undo the brightness alterations you just made other than reverting to the original image as described above.
3 Page 3 If you find you re unhappy with any edits you can click Revert to Original at any time even after you ve finished editing, or even restarted your Mac Using the editing tools: enhance, rotate, crop, filter, adjust, & retouch There are six icons in the toolkit at the right of the screen and you can see what they are by hovering the mouse cursor over each. Some work via a single click, while others open an additional set of tools. All are pretty simple to use, though. Enhance: Auto-adjusts the color balance, brightness and contrast of your image. You re not given control over this. To control brightness, contrast, color etc you ll need the Adjust tool, discussed below. Rotate: Turns the image counter-clockwise 90 degrees. Holding down the Alt key (Option on some keyboards) switches it so it rotates clockwise 90 degrees. It s not possible to flip the image vertically or horizontally here, although these options are available on the Image main menu and in the Crop tool, described below. Crop: The least-accurately named of all the tools because, as well as dragging the frame to crop the image, this tool also lets you rotate the image to various small degrees just click and drag the dial at the right of the image. You can also flip it and adjust it to fit particular aspect ratios such as 3:2 or simply square by clicking the Flip or Aspect buttons at the bottom right. Adjusting the aspect ratio can help crop a photo slightly for printing via commercial photo printing outfits the popular 6x4in print size is 3:2 ratio, for example, while a standard iphone image is slightly larger at 16:9. The Auto button will attempt to automatically rotate and crop the image so lines within it (horizons, poles, walls etc) look straight. On other types of images, such as portraits, it has no effect.

4 Page 4 The Crop tool also lets you rotate an image by small degrees, as well as flip it and adjust its aspect ratio. Filters: Various readymade one-click filters that apply visual styles to your image, such as Mono, Instant, Chrome, and so on. Again, you have no control over any of them. Adjust: The meat of the editing tools, and discussed in more depth below. Retouch: Known as the heal tool in image editors like Photoshop, this lets you click (or click and drag over a wider area) to remove elements from an image such as skin blemishes. How it works is magical, as are the results, which are usually extremely impressive. However if you find it doesn t work quite as it should then holding down Alt (Option on some keyboards) and selecting a nearby point in the image for a sample will improve accuracy. Clicking the Reset button at the bottom of the screen undoes any edits you ve made using the Retouch tool. Making adjustments to your image using Light, Color & Black & White Clicking the Adjust tool opens a new set of controls alongside the image. By default three are shown: Light (combined brightness and contrast control), Color, and Black &
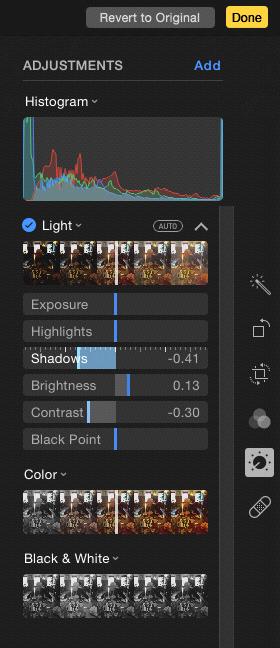
5 Page 5 White. Clicking and dragging the white bar within each control lets you make adjustments, although if you hover the mouse cursor over each you ll see an Auto button appear. This attempts to auto-adjust to the best settings based on the image data, as well as the Histogram graph shown above. Hovering the mouse cursor over the control also shows a down arrow that, when clicked, reveals more fine-grained options under the Light slider you ll see additional sliders for Exposure, Highlights, Shadows and so on. Clicking the Add button at the top right lets you reveal even more tools including some to sharpen the image, remove noise, and add a vignette effect. Perhaps the most useful for those used to Aperture or other pro-level tools is the Levels tool. Drag the handles beneath the levels histogram to adjust the darkest, lightest and mid-points of the image.
6 Page 6

7 Page 7 Clicking the down arrow alongside each control s heading shows finer-grained controls Advanced editing tricks in Photos Right-clicking on the image lets you copy to the clipboard the current set of edits you ve made, and you can then paste them onto a different image in the same way by rightclicking. This is useful if you find yourself correcting many images with a similar low-light fault, for example. Perhaps one of the best advanced tricks for using Photos is to hold down Alt (Option on some keyboards) while using any of the tools. Doing so while adjusting the cropping box will cause it to resize in a different way, for example, and doing so whilst adjusting the rotation dial will decrease the severity of your drag. Just give it a try! Edits made on one image and be copied and then pasted onto a different image just right-click and select the option

8 Page 8 How to Edit Your Pictures with Apple s Photos Application Photos was released as part of a larger OS X system update ( ). The app is meant to supplant iphoto as most Mac user s go-to photo application. As such, it s got quite a few basic but necessary photo-editing tools in it. We ve previously introduced Photos when we discussed how to move its library to a different location, as well as what every user should know about its icloud sharing settings. But up to this point, we ve not really talked about the application itself. When you first start using Photos on OS X for the first time, it doesn t become immediately apparent that you can edit with it. You still need to select a photo or photos and open them in editing mode. On the Photos view, everything will be arranged by date. This view only allows you to edit photos one at a time.


9 Page 9 The backwards arrows will let you take a much wider view of things, which is useful for quickly sorting through your library if you have a lot of content.
.")

10 Page 10 If you click on the Albums view, then you can select All Photos (or any other album in which you ve sorted them). This is the easiest way to edit a group of photos, rather than having to select each one separately. In your All Photos album view for example, double-click on any photo to make it bigger. From here, you can use the arrow keys to move through your photos.


11 Page 11 Here, you see you can show or hide the split view, which displays all the photos in your album. Use the slider to zoom in or out. With a photo selected, there are options in the upper-right corner to mark it as a favorite, see its info, and most importantly, Edit it.

12 Page 12 Editing mode differs greatly from View mode however, you can still use the arrow keys to quickly move through your collection. Note, there are generally a lot of similarities between OS X s Photo s editor and ios s Photo s editor. Both share a single-click Enhance button, a Crop button, filters, adjustment options, and a Red-eye remover.

13 Page 13 Photos on ipad is a tad bit different than on a Mac, but not by much. Just about everything is the same except OS X s Photos separates crop and rotate functions, and adds a Retouch button, which gives you the ability to smudge out little blemishes and imperfections.

14 Page 14 When you edit your pictures, you can click the button Revert to Original to undo your changes, or click Done to exit and/or commit to them. Note, when you click Done you re not necessarily finished. You can still go back into the photo you just edited and revert to the original. Perhaps you want to edit your photos and save it as a new one. Click the File menu while you re viewing your photo (doesn t matter if it s in View or Edit mode) and select Export. You can then export that photo (or as many as you have selected) or the unmodified original(s).

15 Page 15 As you can see, using Photos to edit your pictures is really easy and it gives you enough tools to do all but the most advanced functions. Yes, they are very basic and won t approach the kind of power you have with applications like PhotoShop, Gimp, or even something like Picasa. But that s okay, just being able to do simple crops, or apply filters, or adjust brightness and contrast, is often more than enough for most of us. Best of all, and this is where the application really shines, whenever you make any changes, they are replicated across all your devices connected to your icloud account. This means that if you want to use your Mac to edit your photos quickly, your new changes will appear on your ipad, iphone, or ipod Touch. If you have any comments or questions you would like to offer, please leave your feedback in our discussion forum. How to use the new editing tools in Photos In ios 8 many more editing features have arrived inside the Photo app where previously ios 7 only offered a selection of preset filters and a cropping tool. You needed to use iphoto to do anything more advanced. The new editing tools make it easier to be more creative with your photos. Apple is also allowing users to make use of third party filters and effects without having to open and close apps.

16 Page 16 Now you can crop, straighten, remove red eye, adjust lighting and contrast and more. Just open Photos and select the image you wish to edit. Now tap Edit > and pick the crop, filter, or saturation tool. Read: Best ways to back up photographs
17 Page 17 How to crop an image on the iphone or ipad Choose your image. Tap Edit. Now tap the square Crop icon. The interface here is a little different to ios 7, you need to tap the icon on the right that looks like different shaped boxes. Now you can pick the constraints of your crop. Tap Done when you are happy.

18 Page 18 Editing mode is much different from view mode. When you click Edit,, the application turns dark and tools appear along the right edge of the window.

19 Page 19 How to straighten an image on the iphone or ipad Do you have a photo that needs straightening up? This is often the case when you photograph water and then find it looks like the water is going to run out of the image because it s on a slant. ios 8 makes this edit easy. Tap the Crop icon and you will see a new dial appears below the image, turn this dial until the lines that it draws over your image look in line with the horizon.
20 Page 20 How to add more color to an image on the ipad or iphone To change the color saturation of an image tap the dial icon and pick Color. You can drag the slide up (or to the right depending on the orientation of your device) to add more color to the image. You can do even more here. Tap the three lines and you can see what the Saturation, Contrast and Cast levels are. To increase contrast, tap Contrast, then move that slide until you are happy. We were able to get a nice blue sky this way.

21 Page 21 Finally we looked at Cast and moved the slider until we were happy with the white of the clouds in our image. Adjust the brightness of an image taken on your ipad or iphone You can also adjust the Light levels. Options include Exposure, Highlights, Shadows, Brightness, Contrast and Black Point.

22 Page 22 Find the image you wish to edit. Tap Edit. Select the dial icon and pick Light. You could drag the slide up for a more ethereal feel to your image. Tap the three line icon to access the additional settings. Turn down Exposure to see more of the sky. Drag down Highlights to see more sky. Pull up Shadows to see more of what s in the shade. Pull up Black Point to get deeper blacks.

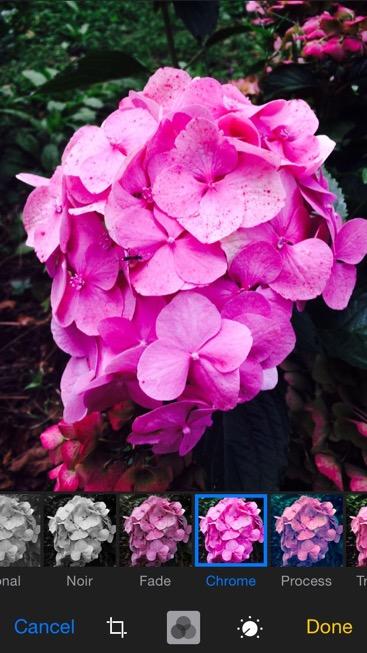
23 Page 23 Choosing a filter for an image on your iphone You don t have to use all these sliders to get the perfect image. Apple has a number of preset filters available. These were also available in ios 7. Find your image and select Edit. Tap the three circles at the bottom of the screen. Select the filter you like from: Mono, Tonal, Noir, Fade, Chrome, Process, Transfer, Instant.
24 Page 24

25 Page 25 You can also add filters to the photo when taking it. Tap on the three circles in the bottom right corner when you open the Camera app.

26 Page 26 Undo photo edits on the iphone or ipad Find the image. Tap Edit, then tap Revert to revert the image back to the original. You can do this at anytime as they are nondestructive edits. If you wanted to keep the before and after image you could screen grab the edited image before reverting to original.

27 Page 27 Edit a photo not stored on your iphone or ipad If you are sharing images via icloud you will see the image, but the phone will warn that you need to Duplicate the image before you can Edit it. This is presumably because the edits will not apply to the original image at least not until Apple launches Photos on the Mac.
28 Page 28
Apple Photos Quick Start Guide
 Apple Photos Quick Start Guide Photos is Apple s replacement for iphoto. It is a photograph organizational tool that allows users to view and make basic changes to photos, create slideshows, albums, photo
The Main Screen. Viewing Area - show the photos that were selected in the Source List.
 iphoto 11 The Main Screen Source List - This is where the Library, Events and Albums are identified. It is the place where photos can be organized and accessed. The Source List can also contain the slideshows,
Photoshop CC 2018 Essential Skills
 Photoshop CC 2018 Essential Skills Adobe Photoshop Creative Cloud 2018 University Information Technology Services Learning Technology, Training, Audiovisual and Outreach Copyright 2018 KSU Division of
Camera & Photos Apps ios10
 2017 Class Camera & Photos Apps ios10 iphone and ipad 1 Camera iphone also has filter options Live Photos, iphone 6s, 7 and ipad Pro Grid HDR - High Dynamic Range Timer Flash Switch Cameras Exposure Adjust
Adobe Photoshop CS 6 Level I. Topics: Toolbars Workspace Panels Camera Raw Image Adjustment
 Adobe Photoshop CS 6 Level I Topics: Toolbars Workspace Panels Camera Raw Image Adjustment Chapter 1 Toolbars Selections By default, Photoshop gives you a set of tools on the left called the Toolbar or
Photoshop CC Editing Images
 Photoshop CC Editing Images Rotate a Canvas A canvas can be rotated 90 degrees Clockwise, 90 degrees Counter Clockwise, or rotated 180 degrees. Navigate to the Image Menu, select Image Rotation and then
Photoshop CC: Essentials
 Photoshop CC: Essentials Summary Workspace Overview... 2 Exercise Files... 2 Selection Tools... 3 Select All, Deselect, And Reselect... 3 Adding, Subtracting, and Intersecting... 3 Working with Layers...
Professional RAW Editor for ios and icloud Photo Library (v2.0)
") Professional RAW Editor for ios and icloud Photo Library (v2.0) INTRODUCTION Thank you for downloading RAW Power. RAW Power is the first RAW editor for ios 11 that can read and modify the ios Photo Library
Professional RAW Editor for ios and icloud Photo Library (v2.0) INTRODUCTION Thank you for downloading RAW Power. RAW Power is the first RAW editor for ios 11 that can read and modify the ios Photo Library
Photoshop CS6 automatically places a crop box and handles around the image. Click and drag the handles to resize the crop box.
 CROPPING IMAGES In Photoshop CS6 One of the great new features in Photoshop CS6 is the improved and enhanced Crop Tool. If you ve been using earlier versions of Photoshop to crop your photos, you ll find
PHOTOSHOP: 3.3 CAMERA RAW
 1 PHOTOSHOP: 3.3 CAMERA RAW Raw image files are uncompressed images that contain all the information of the photo. Raw images give you flexibility in editing and allow you to achieve a better look because
Introduction to Photoshop Elements
 John W. Jacobs Technology Center 450 Exton Square Parkway Exton, PA 19341 610.280.2666 ccljtc@ccls.org www.ccls.org Facebook.com/ChesterCountyLibrary Introduction to Photoshop Elements Chester County Library
The original image. Let s get started! The final rainbow effect. The photo sits on the Background layer in the Layers panel.
 Add A Realistic Rainbow To A Photo In this Photoshop photo effects tutorial, we ll learn how to easily add a rainbow, and even a double rainbow, to a photo! As we ll see, Photoshop ships with a ready-made
Adobe Photoshop. Levels
 How to correct color Once you ve opened an image in Photoshop, you may want to adjust color quality or light levels, convert it to black and white, or correct color or lens distortions. This can improve
Photoshop Elements Hints by Steve Miller
 2015 Elements 13 A brief tutorial for basic photo file processing To begin, click on the Elements 13 icon, click on Photo Editor in the first box that appears. We will not be discussing the Organizer portion
Essential Post Processing
 Essential Post Processing By Ian Cran Preamble Getting to grips with Photoshop and Lightroom could be described in three stages. One is always learning and going through stages but there are three main
How to Image Editor. Enhance. Effects. Frames. Overlays. Stickers
 How to Image Editor Included in your NewZapp account is a powerful Image Editor capable of extraordinary things! To access the editor simple navigate to the Images panel, choose or upload an image to edit
How to prepare your files for competition using
 How to prepare your files for competition using Many thanks to Margaret Carter Baumgartner for the use of her portrait painting in this demonstration. 2015 Christine Ivers Before you do anything! MAKE
Created by Eugene Stephens iphoto 11. To start iphoto: - Double-click Macintosh HD. Go to Applications > iphoto. Layout
 iphoto 11 To start iphoto: - Double-click Macintosh HD. Go to Applications > iphoto. Layout Library Viewing Area Search Zoom Toolbar - Library Library of imported photos & video clips, folders, albums,
Photoshop Elements for Genealogists Part 1
 Photoshop Elements for Genealogists Part 1 By Barry J. Ewell Topics Covered Photoshop Elements Workspace Exploring the Tools Quick Fix Preview Photoshop Elements Workspace Workspace File Edit Image Enhance
Retouching Portraits in Photoshop
 Retouching Portraits in Photoshop I Removing Blemishes When removing blemishes, acne or other imperfections on the skin, our goal is to maintain as much of the original skin texture as possible. That way,
iphoto Objective Course Outline
 iphoto Objective In this class participants will learn how iphoto creates a photo center for photo organization by using rolls and albums. Participants will also learn the built-in editing tools. Participants
Mullingar Camera Club Basic introduction to Digital Printing using Photoshop CC.
 Mullingar Camera Club Basic introduction to Digital Printing using Photoshop CC. Table of Contents Course aims: 1 Course presentation notes: 1 Introducing Photoshop: 1 Adjusting the Brightness or Contrast
For customers in USA This device complies with Part 15 of the FCC rules. Operation is subject to the following two conditions:
 User manual For customers in North and South America For customers in USA This device complies with Part 15 of the FCC rules. Operation is subject to the following two conditions: (1) This device may not
Extreme Makeovers: Photoshop Retouching Techniques
 Extreme Makeovers: Table of Contents About the Workshop... 1 Workshop Objectives... 1 Getting Started... 1 Photoshop Workspace... 1 Retouching Tools... 2 General Steps... 2 Resolution and image size...
Adobe Lightroom CC Tutorial
 Adobe Lightroom CC Tutorial GETTING STARTED Adobe Lightroom CC is a photo editing program which can be used to manipulate and edit large quantities of photos at once. It has great exporting and metadata
Lightroom Classic CC and Lightroom CC Updates
 Lightroom Classic CC and Lightroom CC Updates Information about the latest December 2017 Lightroom system updates This December Adobe have released updates for the entire Lightroom CC ecosystem, including
Color Correction and Enhancement
 10 Approach to Color Correction 151 Color Correction and Enhancement The primary purpose of Photoshop is to act as a digital darkroom where images can be corrected, enhanced, and refined. How do you know
Challenge Image: Blur the Background
 Challenge Image: Blur the Background Challenge Image: Blur the Background In this lesson, we re going to work on a challenge image that was submitted by a Masters Academy member. The image features a little
Contents Foreword 1 Feedback 2 Legal information 3 Getting started 4 Installing the correct Capture One version 4 Changing the version type 5 Getting
 Contents Foreword 1 Feedback 2 Legal information 3 Getting started 4 Installing the correct Capture One version 4 Changing the version type 5 Getting to know Capture One Pro 6 The Grand Overview 6 The
Photoshop 1. click Create.
 Photoshop 1 Step 1: Create a new file Open Adobe Photoshop. Create a new file: File->New On the right side, create a new file of size 600x600 pixels at a resolution of 300 pixels per inch. Name the file
Photo/Image Controls
 Table of Contents Introduction... 2 Using Image Controls... 2 Using the Image Editor... 3 19 July 2017 TIP-2017-092 1 Introduction The Edge s photo controls now include image editing options. This document
12. Creating a Product Mockup in Perspective
 12. Creating a Product Mockup in Perspective Lesson overview In this lesson, you ll learn how to do the following: Understand perspective drawing. Use grid presets. Adjust the perspective grid. Draw and
Miniature Effect With Tilt-Shift In Photoshop CS6
 Miniature Effect With Tilt-Shift In Photoshop CS6 This effect works best with a photo taken from high overhead and looking down on your subject at an angle. You ll also want a photo where everything is
Make the Most of Your ipad s Camera Class Handouts
 Make the Most of Your ipad s Camera Class Handouts Presented by: Ashlee Tominey Adult Services Librarian atominey@clpl.org (815) 526-5152 Not sure of your ipad model? You can identify your ipad model at
The original image. Let s get started! The final result.
 Miniature Effect With Tilt-Shift In Photoshop CS6 In this tutorial, we ll learn how to create a miniature effect in Photoshop CS6 using its brand new Tilt-Shift blur filter. Tilt-shift camera lenses are
15 Photoshop Tips. Changing Photoshop rulers from inches to picas
 5 Photoshop Tips Changing Photoshop rulers from inches to picas What s the difference between inches and picas? a 6x inch RGB JPEG file is.9 MB a 6x pica RGB JPEG file is. MB a 6x inch RGB TIFF file is.
RETRO User guide RETRO. Photoshop actions. For PS CC, CS6, CS5, CS4. User Guide
 RETRO Photoshop actions For PS CC, CS6, CS5, CS4 User Guide CONTENTS 1. THE BASICS... 1 1.1. About the effects... 1 1.2. How the actions are organized... 1 1.3. Installing the actions in Photoshop... 2
The Basics. Introducing PaintShop Pro X4 CHAPTER 1. What s Covered in this Chapter
 CHAPTER 1 The Basics Introducing PaintShop Pro X4 What s Covered in this Chapter This chapter explains what PaintShop Pro X4 can do and how it works. If you re new to the program, I d strongly recommend
Photoshop: Manipulating Photos
 Photoshop: Manipulating Photos All Labs must be uploaded to the University s web server and permissions set properly. In this lab we will be manipulating photos using a very small subset of all of Photoshop
Adobe PhotoShop Elements
 Adobe PhotoShop Elements North Lake College DCCCD 2006 1 When you open Adobe PhotoShop Elements, you will see this welcome screen. You can open any of the specialized areas. We will talk about 4 of them:
Photo One Digital Photo Shoots and Edits
 Photo One Digital Photo Shoots and Edits You will submit photo shoots, unedited and you will submit selected edited images. The shoots will be explained first and the edits will be explained later on this
ArcSoft PhotoImpression Table of Contents:
 ArcSoft PhotoImpression Table of Contents: 1. Welcome to PhotoImpression 2. Highlights of PhotoImpression 3. System Requirements 4. Installing PhotoImpression 5. Working with PhotoImpression Getting Started
Photos. for Mac. Michael Grothaus. 800 East 96th Street, Indianapolis, Indiana USA
 My Photos for Mac Michael Grothaus 800 East 96th Street, Indianapolis, Indiana 46240 USA ii My Photos for Mac Copyright 2015 by Pearson Education, Inc. All rights reserved. No part of this book shall be
For customers in Canada This Class B digital apparatus meets all requirements of the Canadian Interference-Causing Equipment Regulations.
 User manual For customers in North and South America For customers in USA This device complies with Part 15 of the FCC rules. Operation is subject to the following two conditions: (1) This device may not
Lightroom System April 2018 Updates
 Lightroom System April 2018 Updates This April Adobe updated Lightroom Classic CC. This included a major update to profiles, making profile looks more prominent. Some essential interface tweaks and also
INTERMEDIATE PHOTOSHOP: FAMILY PHOTOS
 INTERMEDIATE PHOTOSHOP: FAMILY PHOTOS What is Photoshop Elements? Photoshop Elements is a streamlined version of Adobe Photoshop CC. Despite missing some more advanced features, it is a robust piece of
WORN, TORN PHOTO EDGES EFFECT
 Photo Effects: CC - Worn, Torn Photo Edges Effect WORN, TORN PHOTO EDGES EFFECT In this Photoshop tutorial, we ll learn how to take the normally sharp, straight edges of an image and make them look all
CREATE A BURNT EDGE EFFECT
 CREATE A BURNT EDGE EFFECT One of the all-time classic effects in Photoshop is the burnt edge, and there s lots of different ways to create it, but in this Adobe Photoshop tutorial, we re going to look
Introduction to Photoshop
 Introduction to Photoshop Instructional Services at KU Libraries A Division of Information Services www.lib.ku.edu/instruction Abstract: This course covers the basics of Photoshop, including common tools
Iphoto Manual Sort Not Working >>>CLICK HERE<<<
 Iphoto Manual Sort Not Working This app is a working replacement for iphoto, and does much better job of with Photos, though you can still use Photos by manually syncing with your phone. You can sort by
The Future. of History
 The Future Non-Linear History option allows you to undo a state and try a new version of the image while the previous states remain available for reference (Figure 2). of History The Photoshop 5.0 History
Imaging Features Available in HTML5. it just makes sense
 Imaging Features Available in HTML5 it just makes sense August, 2018 Imaging Features Available in HTML5 As part of the 5.2 SP1 release, the Images functionality is now available in HTML5 and provides
Module 1 Lighting. Lesson 1 Light, Your First Decision. What s the first thing you should think about when choosing a location?
 Module 1 Lighting Lesson 1 Light, Your First Decision What s the first thing you should think about when choosing a location? We want to be: -Centered Photographers Three priorities for choosing light
Unit 7 : Image Painting, Editing and Layers
 Unit 7 : Image Painting, Editing and Layers Introduction This Unit describes about various painting tools; such as selection, cropping and measuring tools, retouching, drawing and type tools, Navigation
Color and More. Color basics
 Color and More In this lesson, you'll evaluate an image in terms of its overall tonal range (lightness, darkness, and contrast), its overall balance of color, and its overall appearance for areas that
The original image. As I said, we ll be looking at a few different variations on the effect. Here s the first one we ll be working towards:
 DIGITAL PIXEL EFFECT In this Photoshop tutorial, we re going to look at how to create a digital pixel effect, which is often used in ads that sell anything to do with digital. We re going to first pixelate
The original photo. The final result.
 giving a photo painted edges In this Adobe Photoshop tutorial, we re going to combine a couple of different effects. First, we ll give the photo easy-tocreate painted edges, and then we ll make it look
TOPAZ LENS EFFECTS QUICK START GUIDE
 TOPAZ LENS EFFECTS QUICK START GUIDE Introduction Topaz Lens Effects is designed to give you the power to direct and focus your viewer s eyes where you want them. With Lens Effects, you get advanced technology
Copyrights and Trademarks
 Mobile Copyrights and Trademarks Autodesk SketchBook Mobile (2.0) 2012 Autodesk, Inc. All Rights Reserved. Except as otherwise permitted by Autodesk, Inc., this publication, or parts thereof, may not be
Buxton & District U3A Digital Photography Beginners Group Lesson 5: Simple Editing. 5 November 2013
 U3A Group Lesson 5: Simple Editing 5 November 2013 Programme Buxton & District 19 September Exploring your camera 1 October You ve taken some pictures now what? (Viewing pictures; filing on your computer)
Infinity Software Manual
 Infinity Software Manual Version 1.5 - October 2017 1 Contents Introduction 4 Getting Started 5 Main Screen 6 Mode Selection 7 Replay Mode 7 Taking an Image 8 Play 8 Exposure Progress 8 Exposure Settings
THE ORGANIZER 12 THE EDITOR 17 ORGANIZING YOUR WORKFLOW 19 CREATING A NEW DOCUMENT 22 RESIZING AN IMAGE 25 MAKING A SELECTION 27
 Contents 1 PHOTOSHOP ELEMENTS ESSENTIALS 10 2 PHOTO OPTIMIZING 46 INTRODUCTION 8 THE ORGANIZER 12 SEPARATING SCANNED IMAGES 48 THE EDITOR 17 CROPPING WITH CUSTOM SHAPES 50 ORGANIZING YOUR WORKFLOW 19 CROPPING
The horse image used for this tutorial comes from Capgros at the Stock Exchange. The rest are mine.
 First off, sorry to those of you that are on the mailing list or RSS that get this twice. I m finally moved over to a dedicated server, and in doing so, this post was lost. So, I m republishing it. This
Cricut Design Space App for ipad User Manual
 Cricut Design Space App for ipad User Manual Cricut Explore design-and-cut system From inspiration to creation in just a few taps! Cricut Design Space App for ipad 1. ipad Setup A. Setting up the app B.
Blab Gallery Uploads: How to Reduce and/or Rotate Your Photo Last edited 11/20/2016
 Blab Gallery Uploads: How to Reduce and/or Rotate Your Photo Contents & Links QUICK LINK-JUMPS to information in this PDF document Photo Editors General Information Includes finding pre-installed editors
PHOTOSHOP1 15 / WORKSPACE
 MassArt Studio Foundation: Visual Language Digital Media Cookbook, Fall 2013 PHOTOSHOP1 15 / WORKSPACE Imaging software, just like our computers, relies on metaphors from the physical world for their design.
A.J. Wood on Instagram
 A.J. Wood http://ajwood.com ajwood@adobe.com @adobewan on Instagram The Photoshop Environment Photoshop's Start Workspace provides info at a glance including recent files, CC files, and presets for starting
Learning Photo Retouching techniques the simple way
 Learning Photo Retouching techniques the simple way Table of Contents About the Workshop... i Workshop Objectives... i Getting Started... 1 Photoshop Workspace... 1 Setting up the Preferences... 2 Retouching
Introduction to Photoshop: Basic Editing & Prepare Images for the Web
 Introduction to Photoshop: Basic Editing & Prepare Images for the Web 1 LEARNING OBJECTIVES Basic tools in Photoshop & Use of Bridge Prepare images for print and web use TOPICS COVERED Photoshop Interface
How to Join Instagram
 How to Join Instagram Instagram is a growing social network based on still images and short videos. It is used on phones but you can watch Instagram videos and leave comments at http://instagram.com. Here
Processing RAW files in ACR Roy Killen, APSEM, EFIAP, GMPSA
 Processing RAW files in ACR Roy Killen, APSEM, EFIAP, GMPSA (c) 2017 Roy Killen RAW Page 1 Processing RAW files What are RAW files? Most digital cameras save files to memory cards in one of two basic formats
Clipping Masks And Type Placing An Image In Text With Photoshop
 Clipping Masks And Type Placing An Image In Text With Photoshop Written by Steve Patterson. In a previous tutorial, we learned the basics and essentials of using clipping masks in Photoshop to hide unwanted
Photoshop: Manipulating Photos
 Photoshop: Manipulating Photos All Labs must be uploaded to the University s web server and permissions set properly. In this lab we will be manipulating photos using a very small subset of all of Photoshop
Session 3: Getting to Know Photoshop Elements. Keep in mind that there are many others ways of solving the problems.
 Tutorial Session 3: Getting to Know Photoshop Elements Now that you have taken some pictures you might have noticed that some of the images have little problems like red-eye, colorcast, and too dark or
Autodesk. SketchBook Mobile
 Autodesk SketchBook Mobile Copyrights and Trademarks Autodesk SketchBook Mobile (2.0.2) 2013 Autodesk, Inc. All Rights Reserved. Except as otherwise permitted by Autodesk, Inc., this publication, or parts
ADDING RAIN TO A PHOTO
 ADDING RAIN TO A PHOTO Most of us would prefer to avoid being caught in the rain if possible, especially if we have our cameras with us. But what if you re one of a large number of people who enjoy taking
Digital Photography 1
 Digital Photography 1 Photoshop Lesson 3 Resizing and transforming images Name Date Create a new image 1. Choose File > New. 2. In the New dialog box, type a name for the image. 3. Choose document size
Create A Starry Night Sky In Photoshop
 Create A Starry Night Sky In Photoshop Written by Steve Patterson. In this Photoshop effects tutorial, we ll learn how to easily add a star-filled sky to a night time photo. I ll be using Photoshop CS5
Lightroom CC. Welcome to Joshua Tree Workshops. Astro & Landscape Lightroom Workflow w/presets
 Welcome to My approach to teaching is to offer small workshops which allow you to explore and discover our amazing planet, while learning photography and timelapse techniques. Astro & Landscape Lightroom
Contents: Bibliography:
 ( 2 ) Contents: Sizing an Image...4 RAW File Conversion...4 Selection Tools...5 Colour Range...5 Quick Mask...6 Extract Tool...7 Adding a Layer Style...7 Adjustment Layer...8 Adding a gradient to an Adjustment
straightening an image using your crop tool correct altered perspective with your crop tool
 THE CROP TOOL This is one tool available in all image editing programs. It is useful for: quickly removing unwanted information at the edges of an image(aka distracting stuff!), recomposing a shot for
University Libraries ScanPro 3000 Microfilm Scanner
 University Libraries ScanPro 3000 Microfilm Scanner Help Guide Table of Contents Getting Started 3 Loading the Film 4-5 Viewing Your Film 6-7 Motorized Roll Film Control 6 Crop Box 7 Using the Toolbar
Photoshop Exercise 2 Developing X
 Photoshop Exercise 2 Developing X X-ray Vision: In this exercise, you will learn to take original photographs and combine them, using special effects. The objective is to create a portrait of someone holding
photokaboom Learn Photography Home About Privacy, Etc. Ask Jim SarasotaPhotoLessons.com Lightroom > All Tutorials Combined > 5 - Develop Module
 1 of 59 12/19/2017, 1:04 PM photokaboom Learn Photography Home About Privacy, Etc. Ask Jim SarasotaPhotoLessons.com Lightroom > All Tutorials Combined > 5 - Develop Module 1 - Editing Principles 2 - Editing
Sunglass Selfi Illustration
 Sunglass Selfi Illustration www.orchardviewcolor.com theresa@orchardviewcolor.com @tjsorchard Mobile App Illustration with Adobe Capture & Adobe Draw In this hands on creative lab you will illustrate a
Impact With Smartphone Photography. Smartphone Camera Handling. A Smartphone for Serious Photography?
 A Smartphone for Serious Photography? DSLR technically superior but photo quality depends on technical skill, creative vision Smartphone cameras can produce remarkable pictures always at ready After all
Creating Stitched Panoramas
 Creating Stitched Panoramas Here are the topics that we ll cover 1. What is a stitched panorama? 2. What equipment will I need? 3. What settings & techniques do I use? 4. How do I stitch my images together
The original image. Let s get started! The final effect.
 Non-Destructive Infrared Glow Effect In this Photoshop tutorial, we ll learn how to quickly and easily add a dream-like infrared glow effect to an image, and we ll do it non-destructively using Smart Filters
Digital Imaging and Photoshop Fun/ Marianne Wallace
 EZ GREETING CARD This tutorial uses Photoshop Elements 2 but it will also work in all versions of Photoshop. It will show how to create and print 2 cards per 8 ½ X 11 sized papers. The finished folded
PIXELMATOR FOR IPAD HELP
 PIXELMATOR FOR IPAD HELP Yves Cornil Pixelmator. Pixelmator.... 2 Get started.... 4 Pixelmator at a glance... 4 Create or open an image.... 6 Basic gestures... 7 Tap... 7 Scroll and swipe... 7 Drag...
Lightroom- Creative Cloud Tips with NIK
 Lightroom- Creative Cloud Tips with NIK Motion Sequence Make several images in your camera on burst mode without following the subject. Let them move past your field. It is best to use a tripod, but not
SAVING, LOADING AND REUSING LAYER STYLES
 SAVING, LOADING AND REUSING LAYER STYLES In this Photoshop tutorial, we re going to learn how to save, load and reuse layer styles! Layer styles are a great way to create fun and interesting photo effects
PHOTOSHOP & ILLUSTRATOR BOOTCAMP
 FALL 2014 - ELIZABETH LIN PHOTOSHOP & ILLUSTRATOR BOOTCAMP ILLUSTRATOR ALIGNMENT To access the alignment panel, go to Window -> Align. You should see a panel like the one below. This panel allows you to
Teach Yourself Adobe Photoshop Topic 9: Photo Retouching Part 2
 http://www.gerrykruyer.com Teach Yourself Adobe Photoshop Topic 9: Photo Retouching Part 2 In the last week s lesson, you repaired damaged areas of an image, removed unwanted parts of an image, cloned
Digital Negative. What is Digital Negative? What is linear DNG? Version 1.0. Created by Cypress Innovations 2012
 Digital Negative Version 1.0 Created by Cypress Innovations 2012 All rights reserved. Contact us at digitalnegativeapp@gmail.com What is Digital Negative? Digital Negative is specifically designed to help
ADD A REALISTIC WATER REFLECTION
 ADD A REALISTIC WATER REFLECTION In this Photoshop photo effects tutorial, we re going to learn how to easily add a realistic water reflection to any photo. It s a very easy effect to create and you can
Using Adobe Photoshop
 Using Adobe Photoshop 8 In the last section we looked at adjusting colours to improve your image. In this section we ll look at various ways of touching up your images to fix problems with the images or
Bramhall Photographic Society
 Bramhall Photographic Society PHOTOSHOP ELEMENTS ADJUSTMENT LAYERS EXPLAINED (WHAT THEY DO) (This technique will work in any version of Elements although the screenshots may vary slightly) There are a
Check out our website!
 Check out our website! www.nvcc.edu/woodbr idge/computer-lab Contact Us Location: Open Computer Lab Seefeldt Building #336 NOVA Woodbridge Campus Hussna Azamy (OCL Supervisor) Phone: 703-878-5714 E-mail:
Copyright Notice. Trademarks
 Copyright Notice All rights reserved. No part of this publication may be reproduced, stored in a retrieval system, or transmitted in any form or by any means, electronic, mechanical, photocopying, recording,