PHOTOSHOP LIGHTROOM 5
|
|
|
- Rhoda Evans
- 6 years ago
- Views:
Transcription
1 PHOTOSHOP LIGHTROOM 5 INTRODUCTION This material is primarily targetted at the new and intermediate photographers in our club. You have captured an image and used the various factors when taking this image: - appropriate depth of field; - good composition; - appropriate lighting; - captured in the RAW format; and - image is in focus. The two key factors RAW format and image is in focus.s sharpness. RAW file contains appropriate details while a JPG image has been striped of most data making your editing quite limited. Once your image has been captured, you have completed 80% of the work in preparing your image for a photo competition or framing. The remaining 20% will be achieved through a photo editing application. The Adobe Photo Editing software packages are now the standard for most photographers around the world: - Photoshop Elements 13 (functionalities in versions 10/11/12 are very similar with a slightly different layout and interface features); - Photoshop Lightroom 5 (Version 4 is very similar to Version 5. Whereas version 3.5 has fewer features but is still usable); and - Photoshop CS 6 is the cadillac of photo editing. So you are now wondering which of these three packages should I use? 1 of 18
2 The answer depends on your skills in photography and computer abilities. My suggestions are as follows: BEGINNERS to INTERMEDIATE - Photoshop Elements is the scaled down version of Photoshop CS 6 with many levels of interface. However, the user interfaces are different but they achieve many of the same results as Photoshop CS 6. Don t discount Elements because of its low price - it is a quite powerful program and can address the majority of your photo editing with a range of skill level interfaces such as: Quick Features, Guided Features, Expert (with layers), etc INTERMEDIATE - Photoshop Lightroom - was designed as a photographer s managment and workflow application: where images on your camera memory card are uploaded, viewed, evaluated, rated by yourself, categorized, selected images are saved and edited in the DEVELOP module. Using the SYNC feature in the DEVELOP module, you can apply editing settings to other photographs taken at the same time or under similar atmosphere conditions. INTERMEDIATE TO HIGHLY SKILLED - Photoshop CS 6 - is the cadillac of applications and as such it has a steep learning curve. This product was introduced in 1990 and has grown into a mammoth software application. Individuals usually migrates to Photoshop CS 6 after mastering the skills of Elements and/or Lightroom. Both the Elements and Photoshop CS6 have a wide range of editing features such as: complex editing and masking; blending & compositions, image manipulation; etc These features are not available within Lightroom. With Lightroom, you can edit your image in either Elements or Photoshop CS6 or any third party Plug-in application. For all of these Adobe applications, you can add third party plugins such as: Nik Software, Topaz Labs, 1One Perfect Suite or Photomatric Pro 5 (HDR). In addition, Lightroom Presets are available and costs range from free to $ Each of these plugs streamline certain editing features. If you want more information on these products, you can check them out on internet. WORKFLOW For most beginners and intermediate photographers, you purchase Lightroom 5 and randomly go through the editing features hoping to bring out the best in your image. In so doing, you really don t fully benefit from the full power of the application. In an effort to become more proficient with these products, you turn to available books and courses on Lightroom. However, the majority of books and courses only 2 of 18
3 provide an introduction to the functionality of the applications. They do not contain suggests to settings or provide a workflow. Therefore, you spend countless hours on a trial-and-error basis to figure out what to do. Many experienced photographers have developed a workflow in editing their photographs and takes advantage of the full power and potential of the software edition applications. By having a workflow, your editing is completed faster and the result are significantly better. Using a workflow is similar to building a house - start with the foundation, framing, roof, drywall, floors, windows, cupboards, paint colour and flooring. I decided to research the topic of Adobe workflow and found very little documentation on the topic. With the information available, I then analyzed the photo editing practises of many experience photographers. My review discovered: 1) there is no standard workflow and everyone s editing practices are slightly different; and 2) there are some commonailities. Based on these commonalities and my review, I find that the following sequence through the different DEVELOP Modules is a good Lightroom 5 workflow: A comprehensive Lightroom 5 Workflow would sequence of panels within the Lightroom Development Module: Camera Calibration Panel Lens Corrections Panel Basic Panel ** Optional - use Plugins here ** Edit in Photoshop Elements or Photoshop CS 6 Tone Curve Panel Effects Panel HSL/Color/B&W Panel Split Toning Panel 3 of 18
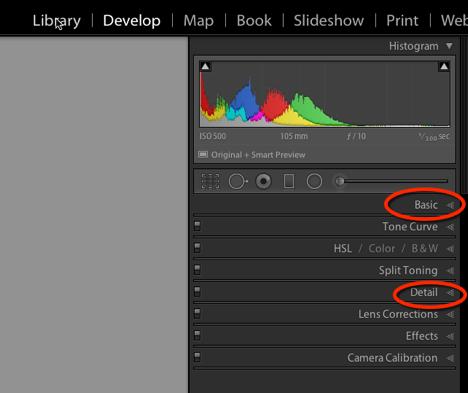
4 External Plugins Detail Panel Local Adjustments EXPORT TO PRINT OR SAVE TO COMPUTER. However for this presentation, we are only demonstrating and explaining the Basic Panel and the Detail Panel. As beginners and intermediate photographers, I would suggest: - familiarizing yourself with the basic functionalities of Lightroom 5. You can either purchase a book on Lightroom 5 (i.e. Scott Kelby s book entitled Lightroom 5: Book For Digital Photographers - cost $52.99) or an ebook (i.e. Andrew Gibson - Mastering Lightroom 5. There are five ebooks - however you may only need to read Book One and Book Two to give you the basic information - $7.00 for each ebook) or video some free internet videos (i.e. Anthony Morganti s Adobe Lightroom 5 Training Videos); and - following the workflow outlined below. As you become familiar with the workflow and Lightroom, you can adapt or modify the workflow. The scope of this Lightroom 5 Workflow is limited to only the Basic Panel and the Detail Panel. The remaining Panels can be incorporated in a future expanded Lightroom 5 Workflow. The Workflow STEPS are outlined below and are in a specific sequence. Step #1 - Capture your image in the RAW format and insert your memory card into your computer; Step #2 - Open Lightrooom 5. While in the LIBRARY Module select the image you wish to edit. Next select the DEVELOP option on the top right menu or press the letter D on your keyboard. In so doing, the following drop down menu will appear on the right side of your selected image. 4 of 18
5 5 of 18

6 STEP #3 - Double click your mouse on BASIC and the following drop-down menu will be shown. This image to the left contains three major components: - histogram at the top; - customization bar (includes: cropping, spot removal, red eye correction, graduated filter, radial filter and adjustment brush) which will not be discussed in this workflow; and - Basic Panel sliders. The histogram reflects the distribution of colours in your image. Throughout this workflow, you will see how your adjustments are reflected in this histogram. Ideally, you don t want the histogram to have any colours showing in the extreme left or extreme right. White Balance - examine your image and see if there are any bright blue or red areas in your image. The histogram reflects the distribution of colours in your image. Throughout this workflow, you will see how your adjustments are reflected in this histogram. 6 of 18

7 Ideally, you don t want the histogram to have any colours showing in the extreme left or extreme right. The bright blue indicates areas where are under exposed and the bright red for the over exposed areas. Your actions undertaken in Steps #8 & #9 will address these two issues. Let us not get ahead of ourselves. Continue with the details of this step and subsequently steps. White Balance - (as shown above) has a drop down menu with the following options: - As Shot; - Auto; - Daylight; - Cloudy; - Shade; - Tungsten; - Fluorescent; - Flash; - Custom. Select each one of the first eight options and determine which option best represents the image you wish. If none of these selects meet your desire, select the eye dropper and its position is indicated below on the Basic Panel. 7 of 18

8 With the eye dropper activated, a rectangle box will appear over your image as shown below. The eye dropper will appear just above and to the left of this box. Move the eye dropper around touch areas that are white or medium gray. As you do so, notice the setting at the bottom of the box. R is for Red, G is for Green and B is for Blue. What you want is to select a white point area where the values are relative close to each other. When you click your mouse, Adobe will select this as the white balance point of reference and the image will change its colours slightly. Use this eye-dropper to try different white and gray areas in your image and select the one that best compliments your image. You can fine-tune the white balance by adjusting the Temperature and Tint sliders. Temperature is used to add warmth of colour to your image. Move the slider to the right or left to a position which best compliments your image. Sometimes setting the warmth with the Temperature slider may not be enough. Adjust the Tint slider to the left if your image seems to have a purple tint and to the right if it seems to have too much green. 8 of 18

9 STEP #4 - Next, we move to the Tone portion of the Basic Panel. To begin with, press the AUTO - its position is circled in red below. This features is Adobe s assessment of your image. If you like the settings created by the Auto feature then advance to the Detail Panel & Step #15. If no then press the Default option to the right of the Auto option. Default resets the settings to the default setting with zero values. 9 of 18

10 In the tone portion of the Basic Panel, there are nine sliders. Specific slider relate to specific components of the histogram. The illustration to the left provides an indication of which sliders impact the corresponding area in the histogram. The next following steps (#5 to #13) leads you through each of these sliders and provides suggestions on appropriate settings. STEP #5 - EXPOSURE slider - is extremely useful in correcting any kind of over or under exposed image. Use your eye to adjust to best exposure which best compliments your image. STEP #6 - HIGHTLIGHTS slider - move to the left (-60 to -100) to recover the details in the highlighted area. As you move the slider to the left, notice highlight peaks diminish and are spreads out in the histogram. Notice how your image changes. Refine the adjustment slightly as needed. STEP #7 - SHADOWS slider - affects the tones on the left of the mid-point on the histogram. This slider is used to recover details in the darker portions of your image. Move the slider to the right (+60 to +100). Examine your image and move the slider to the left while examining your image until you achieve the appropriate effect you want in your image. 10 of 18
11 STEP #8 - WHITES slider - is used to reduce the amount of over-exposure in your image. Press and hold down the OPTION key (on a Apple Computer) or ALT key (on a Windows Computer) and use your mouse cursor to touch the WHITE slider. Your screen will go black. While still holding down your OPTION or ALT key and cursor on the WHITE slider - move the slider slowly to the right or left slowly until all the you see slight indications of red. Then slide back until there is no red showing. When this is achieved release the OPTION or ALT key. If you still see red highlights then move the White slider to the left until the red highlights disappear. STEP #9 - BLACKS slider - is used to reduce the amount of under-exposure in your image. Press and hold down the OPTION key (on a Apple Computer) or ALT key (on a Windows Computer) and use your mouse cursor to touch the BLACK slider. Your screen will go white. Slide the Black slider to the left until black areas start to appear. When this occurs, you can release the OPTION/ALT key. In the event there is still bright blue highlights, move the Black slider to the right until the bright blue disappear. STEP #10 - CLARITY slider - mostly effects the transitions between light and dark portions of the image. It boosts the mid-tones by moving the slider to the right. CLARITY setting can transpose a dull image to one with more contrast. CLARITY slider also reduces haze in your image. However, if your image is that of a women, you want to move the slider to the left to de-emphasize wrinkles and blemishes. Increase CLARITY slider for architecture or landdscape to add punch. CAUTION: Many new photogaphs to Lightroom have a tendancy to crank up the CLARITY setting to the high settings suchj as: 50 and above. In so doing, you will introduce significant amounts of digital noise. SUBTLE TOUCH IS OFTEN THE BEST - It is suggested that the slider should not exceed +45. HOWEVER: if you only want to add CLARITY to a certain area of your image only then leave the CLARITY slider in the middle and make the adjustments later in Lightroom as a Local Adjustment (i.e. Graduated Filter, Radial Filter or Adjustment Brush). STEP #11 - VIBRANCE slider - moving it to the right increases the intensity of weak colour (i.e. blue and greens) before stronger colours. This slider has more subtle effect than using the SATURATION slider. NOTE: One added benefit of slightly using VIBRANCE is that he smooths out noise in your image. A setting of 69 dramatically reduces noise. 11 of 18
12 NOTE: If your colours are dull, you may wish to increase the VIBRANCE slider. NOTE: CLARITY and VIBRANCE sliders are usually worked in conjunction with each other to emphasize texture, lift contrast and reducing colour saturation. NOTE: For buildings, you can try CLARITY +77 and -66 VIBRANCE then move the SATURATION to bring back the colour. STEP #12 - SATURATION slider - should only be used to make very minor adjustments to slightly enhane or dull colours in your image. Suggest not having a setting higher than +5. In many cases, experienced photographers rarely use this slider and instead use the CLARITY and VIBRANCE sliders. STEP #13 - CONTRAST slider - use your eye to adjust to best highlight your images. It is suggested not to exceed a +35. STEP #14 - Go back through STEPS #5 to #13 above at least once or twice before advancing to the DETAIL panel. By doing so, you ensure that your image has been optimized. Practise with different images to become comfortable with these steps. DETAIL PANEL You advance to the Detail Panel by selecting the double triangle in the icon just below the histogram. See the top red circle as shown in the image below. 12 of 18
13 As we have seen is some recent competitions, the judges have commented on the details of images as being tack sharp. There are many things that contribute to tack sharp images such as low ISO (to minimize noise); using a tripod; etc. The DETAIL PANEL permits you to minimize noise and adjust sharpness. One of the difficulties for new photographs is a tendency to over sharpen and is quite noticeable by judges. Characteristics of over sharpening are: creates harsh images; visible lines on edges and around object; and makes the image appears textured. With over sharpening, you also create more digital noise. The workflow steps below provide a systematic approach to reducing image noise while at the same time not over sharpening your image. STEP #15 - Locate the magnification button on the left side of the word Sharpening and clip on it. In so doing, your image will be magnified to a 1:1 ratio. A hand cursor will appear on your image. Use this hand to move around your image to select the are you want to examin the noise in your image. The image below illustrates the position of this magnification button. 13 of 18

14 STEP #16 - LUMINANCE slider - we start with the noise reduction first prior to the sharpening. This slider affects the brightness of pixels but not the colour. The default setting is zero. With your image to the left zoomed into a point you best reflects the digital noise in your image, move the slider slowly to the right while noting the gradual diminishing of the digital noise. Continue to move it but try to keep the setting at 25 or less. Setting beyond 25 introduces artifacts which should be avoided or minimized. NOTE: The Luminance and the Sharpening Amount settings are inter-related. Several photographers use the Staying Within 100 rules when addressing noise 14 of 18
15 reduction and sharpening. With this rule, the Luminance is not set higher than +25. Any setting above 25 will introduce artifacts into your image. With the staying within 100 rule, if you set Luminance at 25 then the (Sharpening) Amount should not exceed 75. While other photographers use this same rule but avoid having a Sharpening Amount above 60. By using this rule, you avoid over sharpening your image. STEP #17 - LUMINANCE DETAIL & LUMINANCE CONTRAST sliders - brings back some details lost when using the Luminance adjustments. Be careful not to adjust too far as it will introduce artifacts. In the majority of cases, these sliders should only be moved very slightly. Examine your image as you make adjustments with these sliders. STEP #18 - Noise Reduction - COLOR & COLOR DETAIL sliders - move to the right to remove colour noise if it is detected. Only use minor adjustments. Many experience photographers don t touch these settings. STEP #19 - Sharpening AMOUNT slider - has a default value of 25. Now use the magnification hand on your image and move to the area of your image that you want the image to be its sharpest. Move the Amount slider slowly to the right and see the sharpness increasing in your image. NOTE - As mentioned in STEP #16 - there is a co-relationship between Luminace and the Sharpening Amount slider. By using the staying with 100 rule minimizes digital noise and over sharpening. Therefore, you use the number 100 subtract your Luminance slider setting and you achieve the MAXIMUM value for your Sharpening Amount setting. This setting can be less but not more. STEP #20 - Sharpening RADIUS slider - increases the size of teh sharpened details in your image. Move it too far to the right and you wil lose detail. Move it too far to the left and sharpening isn t as effective. Radius makes edges and lines sharper. The default setting of 1 seems to work well for most photographers. Others suggest to never have a value over 1.5. NOTE: If your images contains small detail then you should lower the number slightly. When your image has larger details - you can increase the setting slightly. SUGGESTION: Photos with small detail should be set to a lower number while photos with larger details can tolerate a little higher Radius setting such as 1.5. STEP #21 - Sharpening DETAIL sliders - will increase sharpeness and intesify the edges of your image. Moving the slider to the right increases texture detail and creates halos and unwanted grain in the sky. 15 of 18
16 NOTE: move the slider to the left softens the scene and removes the noise or move to the right to reveal more details. SUGGEST: Stay below 50 as a higher setting increases noise. FOR BIRD PHOTOGRAPHY: With a slider setting of 0, only the edges of thick feathers will be sharpened while a larger number about 50 woud bring out and sharpen even the thinner feathers. STEP #22 - Sharpening MASKING slider - provides you the opportunity to sharpen specific areas within your image. Press the OPTION key (on a Apple computer (or) ALT key (on a Windows computer) and use your mouse cursor to touch the Masking slider. In so doing, your screen will go white. While still holding down the OPTION or ALT key, move the Masking slider to the right and you will start to see black areas appearing in your image. The white areas will be the only portions of your image that will be sharpened based on your settings in the Sharpening and Noise Reduction sliders. You can move the slider all the way to the right and only the areas that remain in white will be sharpened. To see the results just release your finger on the OPTION or ALT key. 16 of 18


17 Sharpening Masking slider set at 16. Sharpening Masking slider set at of 18
18 STEP #23 - You may wish to go through STEPS #16 to #22 to fine-tune your settings and/or go back to the Basic Panel settings (STEPS #5 to #13) to re-adjust these settings. STEP #24 - Now you are ready to advance to the Elements main editing areas where you will proceed with: local adjustments; sizing; cropping; leveling your image; spot removal; dodging & burning; printing the image; sending the image; saving the image. Double click with your mouse cursor the button labelled OPEN IMAGE (located in the lower right hand corner of the Camera Raw screen. CONCLUSION With the workflow proivded above, you will have the necessary knowledge to realize the full benefit of taking your photographs in a RAW format and truly take your image to the next level. As noted, this workflow is only a starting point and you can refine it as you so wish. Good luck in your photo editing. Sheldon Boles 18 of 18
Local Adjustment Tools
 PHOTOGRAPHY: TRICKS OF THE TRADE Lightroom CC Local Adjustment Tools Loren Nelson www.naturalphotographyjackson.com Goals for Tricks of the Trade NOT show you the way you should work Demonstrate and discuss
32 Float v3 Quick Start Guide. AUTHORED BY ANTHONY HERNANDEZ (415)
") 32 Float v3 Quick Start Guide 32 Float v3 Trademark/Copyright Information Copyright 2013 by United Color Technologies, LLC. All rights reserved. Unified Color Technologies, BeyondRGB, and HDR Expose are
32 Float v3 Quick Start Guide 32 Float v3 Trademark/Copyright Information Copyright 2013 by United Color Technologies, LLC. All rights reserved. Unified Color Technologies, BeyondRGB, and HDR Expose are
32 Float v2 Quick Start Guide. AUTHORED BY ANTHONY HERNANDEZ - (415)
") 32 Float v2 Quick Start Guide 32 Float V2 Trademark/Copyright Information Copyright 2011 by United Color Technologies, LLC. All rights reserved. Unified Color Technologies, BeyondRGB, and HDR Float are
32 Float v2 Quick Start Guide 32 Float V2 Trademark/Copyright Information Copyright 2011 by United Color Technologies, LLC. All rights reserved. Unified Color Technologies, BeyondRGB, and HDR Float are
Contents: Bibliography:
 ( 2 ) Contents: Sizing an Image...4 RAW File Conversion...4 Selection Tools...5 Colour Range...5 Quick Mask...6 Extract Tool...7 Adding a Layer Style...7 Adjustment Layer...8 Adding a gradient to an Adjustment
Converting and editing raw images
 Converting and editing raw images Raw v jpeg As we have found out, jpeg files are processed in the camera and much of the data is lost. Raw files are not. Raw file formats: General term for a variety of
CONVERTING AND EDITING RAW IMAGES
 CONVERTING AND EDITING RAW IMAGES RAW V JPEG As we have found out, jpeg files are processed in the camera and much of the data is lost. Raw files are not and so all of the data is preserved. RAW FILE FORMATS:
Capturing Realistic HDR Images. Dave Curtin Nassau County Camera Club February 24 th, 2016
 Capturing Realistic HDR Images Dave Curtin Nassau County Camera Club February 24 th, 2016 Capturing Realistic HDR Images Topics: What is HDR? In Camera. Post-Processing. Sample Workflow. Q & A. Capturing
SHAW ACADEMY NOTES. Ultimate Photography Program
 SHAW ACADEMY NOTES Ultimate Photography Program What is a Raw file? RAW is simply a file type, like a JPEG. But, where a JPEG photo is considered a photograph, a RAW is a digital negative, an image that
Topaz Labs DeNoise 3 Review By Dennis Goulet. The Problem
 Topaz Labs DeNoise 3 Review By Dennis Goulet The Problem As grain was the nemesis of clean images in film photography, electronic noise in digitally captured images can be a problem in making photographs
HDR Show & Tell Image / Workflow Review Session. Dave Curtin Nassau County Camera Club October 3 rd, 2016
 HDR Show & Tell Image / Workflow Review Session Dave Curtin Nassau County Camera Club October 3 rd, 2016 Capturing Realistic HDR Images Topics: HDR Review (Brief Summary from HDR Presentation Parts: 1
PHOTOSHOP: 3.3 CAMERA RAW
 1 PHOTOSHOP: 3.3 CAMERA RAW Raw image files are uncompressed images that contain all the information of the photo. Raw images give you flexibility in editing and allow you to achieve a better look because
loss of detail in highlights and shadows (noise reduction)
") Introduction Have you printed your images and felt they lacked a little extra punch? Have you worked on your images only to find that you have created strange little halos and lines, but you re not sure
Introduction Have you printed your images and felt they lacked a little extra punch? Have you worked on your images only to find that you have created strange little halos and lines, but you re not sure
Adobe Photoshop. Levels
 How to correct color Once you ve opened an image in Photoshop, you may want to adjust color quality or light levels, convert it to black and white, or correct color or lens distortions. This can improve
PHOTOGRAPHY: MINI-SYMPOSIUM
 PHOTOGRAPHY: MINI-SYMPOSIUM In Adobe Lightroom Loren Nelson www.naturalphotographyjackson.com Welcome and introductions Overview of general problems in photography Avoiding image blahs Focus / sharpness
This exercise shows how the Unsharp Mask in Adobe Photoshop Elements can sometimes repair blurred photographs in Post Production.
 Unsharp Mask This exercise shows how the Unsharp Mask in Adobe Photoshop Elements can sometimes repair blurred photographs in Post Production. Task Take a photograph of something close up but don t have
Lightroom CC. Welcome to Joshua Tree Workshops. Astro & Landscape Lightroom Workflow w/presets
 Welcome to My approach to teaching is to offer small workshops which allow you to explore and discover our amazing planet, while learning photography and timelapse techniques. Astro & Landscape Lightroom
Editing your digital images:
 Editing your digital images: 1 By Garry Sankowsky zodpub@rainforestmagic.com.au All images taken with a digital camera need to be edited. You will usually get software with your camera that can do at least
Photo Editing Workflow
 Photo Editing Workflow WHY EDITING Modern digital photography is a complex process, which starts with the Photographer s Eye, that is, their observational ability, it continues with photo session preparations,
Pacific New Media David Ulrich
 Pacific New Media David Ulrich pacimage@maui.net www.creativeguide.com 808.721.2862 Digital Imaging Workflow in Adobe Photoshop All color and tonal correction editing should be done in a non-destructive
Color Correction and Enhancement
 10 Approach to Color Correction 151 Color Correction and Enhancement The primary purpose of Photoshop is to act as a digital darkroom where images can be corrected, enhanced, and refined. How do you know
Essential Post Processing
 Essential Post Processing By Ian Cran Preamble Getting to grips with Photoshop and Lightroom could be described in three stages. One is always learning and going through stages but there are three main
Extreme Makeovers: Photoshop Retouching Techniques
 Extreme Makeovers: Table of Contents About the Workshop... 1 Workshop Objectives... 1 Getting Started... 1 Photoshop Workspace... 1 Retouching Tools... 2 General Steps... 2 Resolution and image size...
Select your Image in Bridge. Make sure you are opening the RAW version of your image file!
 CO 3403: Photographic Communication Steps for Non-Destructive Image Adjustments in Photoshop Use the application Bridge to preview your images and open your files with Camera Raw Review the information
Photoshop CC Editing Images
 Photoshop CC Editing Images Rotate a Canvas A canvas can be rotated 90 degrees Clockwise, 90 degrees Counter Clockwise, or rotated 180 degrees. Navigate to the Image Menu, select Image Rotation and then
VSCO FILM 01 MANUAL FOR: LIGHTROOM 4 & ADOBE CAMERA RAW 7
 VSCO FILM 01 MANUAL FOR: LIGHTROOM 4 & ADOBE CAMERA RAW 7 VSCO FILM MANUAL INTRODUCTION VSCO Film Pro is a brand new way to emulate film and speed up your workflow in Adobe Lightroom 4 and Camera Raw 7.
Challenge Image: Blur the Background
 Challenge Image: Blur the Background Challenge Image: Blur the Background In this lesson, we re going to work on a challenge image that was submitted by a Masters Academy member. The image features a little
BASIC PHOTO EDITS USING LIGHTROOM with TIFFANY TILLMAN-EMANUEL HANDOUTS. Companion Book. March 2018: Lesson 03 Basic Photo Edits Using Lightroom
 Companion Book March 2018: Lesson 03 BASIC PHOTO EDITS USING LIGHTROOM with TIFFANY TILLMAN-EMANUEL HANDOUTS Page 1 of 7 Table of Contents Table of Contents 2 Introduction 3 The Lightroom Process 4 a.
What is a Raw file? How a RAW file differs from a JPEG
 What is a Raw file? RAW is simply a file type, like a JPEG. But, where a JPEG photo is considered a photograph, a RAW is a digital negative, an image that hasn t been processed or adjusted by software
HDR ~ The Possibilities
 HDR ~ The Possibilities Dooleys Camera Club 14th March 2014!1 HDR - The Possibilities Steve Mullarkey email: stevemul@ozemail.com.au website: http://www.stevemul.com.au/! A PDF copy of this presentation
Black and White using Photoshop
 Topics to be covered: Methods for B&W conversion Improving the image Toning Printer color management Black and White using Photoshop Various ways to get to B&W Adobe Raw Converter (ACR) in from Bridge
Selective Editing in Camera Raw 5
 Selective Editing in Camera Raw 5 The editing tools that you saw in the last chapter are global editing tools. That is, they affect all parts of the image. So, when you choose to, for example, brighten
HISTOGRAMS. These notes are a basic introduction to using histograms to guide image capture and image processing.
 HISTOGRAMS Roy Killen, APSEM, EFIAP, GMPSA These notes are a basic introduction to using histograms to guide image capture and image processing. What are histograms? Histograms are graphs that show what
Teton Photography Group
 Overview general post-processing (editing) workflow for serious photographers Focus on processes more than software Examples using Adobe Lightroom and Photoshop Teton Photography Group January 2016 Emphasis
Software & Computers DxO Optics Pro 5.3; Raw Converter & Image Enhancer With Auto Or Manual Transmission By Howard Millard March, 2009
 Software & Computers DxO Optics Pro 5.3; Raw Converter & Image Enhancer With Auto Or Manual Transmission By Howard Millard March, 2009 Whether you shoot raw or JPEG, whether you re on the Windows or Mac
Using The Nik Collection Plug-ins In Lightroom And Photoshop. Dan Lenardon
 Using The Nik Collection Plug-ins In Lightroom And Photoshop Dan Lenardon What Are We Going To Cover Today? A Brief Overview Of The Nik Collection By Google How To Use Nik From Within Lightroom How To
Process 2003 and 2010 image editing A definitive guide to working with the image processing controls in the Develop module
 Process 2003 and 2010 image editing A definitive guide to working with the image processing controls in the Develop module The introduction of Process Version 2012 in Lightroom 4 means that when Process
Processing RAW files in ACR Roy Killen, APSEM, EFIAP, GMPSA
 Processing RAW files in ACR Roy Killen, APSEM, EFIAP, GMPSA (c) 2017 Roy Killen RAW Page 1 Processing RAW files What are RAW files? Most digital cameras save files to memory cards in one of two basic formats
Adobe Lightroom CC Tutorial
 Adobe Lightroom CC Tutorial GETTING STARTED Adobe Lightroom CC is a photo editing program which can be used to manipulate and edit large quantities of photos at once. It has great exporting and metadata
HIGH DYNAMIC RANGE IMAGING Nancy Clements Beasley, March 22, 2011
 HIGH DYNAMIC RANGE IMAGING Nancy Clements Beasley, March 22, 2011 First - What Is Dynamic Range? Dynamic range is essentially about Luminance the range of brightness levels in a scene o From the darkest
Opening a File in Camera Raw
 Camera Raw is a simplified version of Adobe Lightroom and comes free as part of Adobe Photoshop. In this Lesson we show you how to Open Images in Adobe Camera Raw, directly inside Photoshop, rather than
An Introduction to Histograms in Photography
 An Introduction to Histograms in Photography Histograms are a graphical representation of all the pixels that make up an image, and are plotted by 'Luminance' or brightness. Every pixel, regardless of
Appendix A ACE exam objectives map
 A 1 Appendix A ACE exam objectives map This appendix covers these additional topics: A ACE exam objectives for Photoshop CS6, with references to corresponding coverage in ILT Series courseware. A 2 Photoshop
How to combine images in Photoshop
 How to combine images in Photoshop In Photoshop, you can use multiple layers to combine images, but there are two other ways to create a single image from mulitple images. Create a panoramic image with
Luminosity Masks Program Notes Gateway Camera Club January 2017
 Luminosity Masks Program Notes Gateway Camera Club January 2017 What are Luminosity Masks : Luminosity Masks are a way of making advanced selections in Photoshop Selections are based on Luminosity - how
Contents Foreword 1 Feedback 2 Legal information 3 Getting started 4 Installing the correct Capture One version 4 Changing the version type 5 Getting
 Contents Foreword 1 Feedback 2 Legal information 3 Getting started 4 Installing the correct Capture One version 4 Changing the version type 5 Getting to know Capture One Pro 6 The Grand Overview 6 The
Mullingar Camera Club Basic introduction to Digital Printing using Photoshop CC.
 Mullingar Camera Club Basic introduction to Digital Printing using Photoshop CC. Table of Contents Course aims: 1 Course presentation notes: 1 Introducing Photoshop: 1 Adjusting the Brightness or Contrast
Wooly s personal workflow in RAW & Photoshop
 1. Open a RAW file from Bridge into the Camera Raw workspace. This photograph was taken in September 2014 at the Imperial War Museum Duxford Airshow in the United Kingdom. For history buffs this was one
Kent Messamore 3/6/2010
 Post Processing Kent Messamore 3/6/2010 What we will cover Post Processing Photoshop, Lightroom, Elements, and others JPEG or RAW Photoshop Elements Workflow Organization, Create, share Photoshop Elements
How to capture the best HDR shots.
 What is HDR? How to capture the best HDR shots. Processing HDR. Noise reduction. Conversion to monochrome. Enhancing room textures through local area sharpening. Standard shot What is HDR? HDR shot What
Learning Photo Retouching techniques the simple way
 Learning Photo Retouching techniques the simple way Table of Contents About the Workshop... i Workshop Objectives... i Getting Started... 1 Photoshop Workspace... 1 Setting up the Preferences... 2 Retouching
IMAGE CORRECTION. You can find this and more information with video tutorials at
 IMAGE CORRECTION You can find this and more information with video tutorials at http://www.adobe.com/support/photoshop/ P H O T O S H O P T O O L S CLONE STAMP TOOL The Clone Stamp tool paints one part
Camera Raw software is included as a plug-in with Adobe Photoshop and also adds some functions to Adobe Bridge.
 Editing Images in Camera RAW Camera Raw software is included as a plug-in with Adobe Photoshop and also adds some functions to Adobe Bridge. Camera Raw gives each of these applications the ability to import
Bristol Photographic Society Introduction to Digital Imaging
 Bristol Photographic Society Introduction to Digital Imaging Part 16 HDR an Introduction HDR stands for High Dynamic Range and is a method for capturing a scene that has a light range (light to dark) that
Maine Day in May. 54 Chapter 2: Painterly Techniques for Non-Painters
 Maine Day in May 54 Chapter 2: Painterly Techniques for Non-Painters Simplifying a Photograph to Achieve a Hand-Rendered Result Excerpted from Beyond Digital Photography: Transforming Photos into Fine
photokaboom Learn Photography Home About Privacy, Etc. Ask Jim SarasotaPhotoLessons.com Lightroom > All Tutorials Combined > 5 - Develop Module
 1 of 59 12/19/2017, 1:04 PM photokaboom Learn Photography Home About Privacy, Etc. Ask Jim SarasotaPhotoLessons.com Lightroom > All Tutorials Combined > 5 - Develop Module 1 - Editing Principles 2 - Editing
When you first open the dialog box you only see two sliders.
 Shadow/Highlight Of course there will still be the times when you do not either remember to make two exposures or you have older images that are already exposed you can give Shadow/Highlight a try. I find
Transforming Your Photographs with Photoshop
 Transforming Your Photographs with Photoshop Jesús Ramirez PhotoshopTrainingChannel.com Contents Introduction 2 About the Instructor 2 Lab Project Files 2 Lab Objectives 2 Lab Description 2 Removing Distracting
CHAPTER 12 - HIGH DYNAMIC RANGE IMAGES
 CHAPTER 12 - HIGH DYNAMIC RANGE IMAGES The most common exposure problem a nature photographer faces is a scene dynamic range that exceeds the capability of the sensor. We will see this in the histogram
Tablet overrides: overrides current settings for opacity and size based on pen pressure.
 Photoshop 1 Painting Eye Dropper Tool Samples a color from an image source and makes it the foreground color. Brush Tool Paints brush strokes with anti-aliased (smooth) edges. Brush Presets Quickly access
Adobe Photoshop CC 2018 Tutorial
 Adobe Photoshop CC 2018 Tutorial GETTING STARTED Adobe Photoshop CC 2018 is a popular image editing software that provides a work environment consistent with Adobe Illustrator, Adobe InDesign, Adobe Photoshop,
PHOTOTUTOR.com.au Share the Knowledge
 THE DIGITAL WORKFLOW BY MICHAEL SMYTH This tutorial is designed to outline the necessary steps from digital capture, image editing and creating a final print. FIRSTLY, BE AWARE OF WHAT CAN AND CAN T BE
Lightroom- Creative Cloud Tips with NIK
 Lightroom- Creative Cloud Tips with NIK Motion Sequence Make several images in your camera on burst mode without following the subject. Let them move past your field. It is best to use a tripod, but not
A quick overview of the basics of my workflow in. Those gaps in Photoshop s Histogram indicate missing information.
 Another Photoshop tutorial by Bruce Philpott Copyright 2007 Bruce Philpott A quick overview of the basics of my workflow in Adobe Camera Raw This short tutorial certainly won t cover everything about Adobe
Impact With Smartphone Photography. Smartphone Camera Handling. A Smartphone for Serious Photography?
 A Smartphone for Serious Photography? DSLR technically superior but photo quality depends on technical skill, creative vision Smartphone cameras can produce remarkable pictures always at ready After all
ADOBE PHOTOSHOP CS TUTORIAL
 ADOBE PHOTOSHOP CS TUTORIAL A D O B E P H O T O S H O P C S Adobe Photoshop CS is a popular image editing software that provides a work environment consistent with Adobe Illustrator, Adobe InDesign, Adobe
Using Adobe Photoshop
 Using Adobe Photoshop 8 In the last section we looked at adjusting colours to improve your image. In this section we ll look at various ways of touching up your images to fix problems with the images or
Adobe PhotoShop Elements
 Adobe PhotoShop Elements North Lake College DCCCD 2006 1 When you open Adobe PhotoShop Elements, you will see this welcome screen. You can open any of the specialized areas. We will talk about 4 of them:
Digital Design and Communication Teaching (DiDACT) University of Sheffield Department of Landscape. Adobe Photoshop CS5 INTRODUCTION WORKSHOPS
 University of Sheffield Department of Landscape. Adobe Photoshop CS5 INTRODUCTION WORKSHOPS") Adobe INTRODUCTION WORKSHOPS WORKSHOP 1 - what is Photoshop + what does it do? Outcomes: What is Photoshop? Opening, importing and creating images. Basic knowledge of Photoshop tools. Examples of work.
Adobe INTRODUCTION WORKSHOPS WORKSHOP 1 - what is Photoshop + what does it do? Outcomes: What is Photoshop? Opening, importing and creating images. Basic knowledge of Photoshop tools. Examples of work.
Use of the built-in Camera Raw plug-in to take your RAW/JPEG/TIFF file and apply basic changes
 There are a lot of different software packages available to process an image for this tutorial we are working with Adobe Photoshop CS5 on a Windows based PC. A lot of what is covered is also available
Each camera manufacturer has their own RAW file extension, but all are handled the same way through Photoshop and Lightroom.
 RAW files are the pure data collected by the camera sensors and there is NO in camera processing. Adobe Camera Raw is an editor for these file types** and allows total editing control by the user. Each
HDR with Smart Objects
 HDR with Smart Objects March 2006 HDR with Smart Objects The article could be easily called Shoot once, Use it twice, because this article explains how to use a single RAW file to get most data out of
Adobe Photoshop CS5 Tutorial
 Adobe Photoshop CS5 Tutorial GETTING STARTED Adobe Photoshop CS5 is a popular image editing software that provides a work environment consistent with Adobe Illustrator, Adobe InDesign, Adobe Photoshop
Using the Advanced Sharpen Transformation
 Using the Advanced Sharpen Transformation Written by Jonathan Sachs Revised 10 Aug 2014 Copyright 2002-2014 Digital Light & Color Introduction Picture Window Pro s Advanced Sharpen transformation is a
lightroom vs. capture one pro
 THE ADOBE PHOTOSHOP HOW-T0 MAGAZINE SEPTEMBER 2016 DYNAMIC RANGE A close-up look at the many tools in Photoshop for removing distracting objects PHOTOGRAPHY SECRETS Learn how to re-create the mood and
PASS4TEST. IT Certification Guaranteed, The Easy Way! We offer free update service for one year
 PASS4TEST IT Certification Guaranteed, The Easy Way! \ We offer free update service for one year Exam : 9A0-125 Title : Adobe Photoshop Lightroom 2 ACE Exam Vendors : Adobe Version : DEMO Get Latest &
Step-by-step processing in Photoshop
 Step-by-step processing in Photoshop (Barry Pearson, 02 April 2010; version 4). For probably about 90% of photographs I intend to display to other people, I use the following method in Photoshop. The Photoshop
Photoshop Blending Modes
 Photoshop Blending Modes https://photoshoptrainingchannel.com/blending-modes-explained/#when-blend-modes-added For those mathematically inclined. https://photoblogstop.com/photoshop/photoshop-blend-modes-
Portraiture Creating and Editing. Aaron Taylor Aaron Taylor Photography LLC
 Portraiture Creating and Editing Aaron Taylor Aaron Taylor Photography LLC Who Am I? Owner of Aaron Taylor Photography LLC Family portraits Seniors Weddings and events Business and social media Headshots
Rubbing your Nikon RAW file the Right Way
 Rubbing your Nikon RAW file the Right Way You can ignore reality, but you can t ignore the consequences of ignoring reality. Ayn Rand If you are a Nikon shooter, you will get the best result from processing
One method for removing and replacing the sky in an image
 One method for removing and replacing the sky in an image Reality versus Artistic License I am pretty sure that when Monet painted these they did not reflect reality. What I Look For I look for an image
How to do Basic Processing on a Portrait in 5 Minutes Using Lightroom plus 1 more: Digital Photography School
 How to do Basic Processing on a Portrait in 5 Minutes Using Lightroom plus 1 more: Digital Photography School How to do Basic Processing on a Portrait in 5 Minutes Using Lightroom Posted: 10 Nov 2015 10:00
Adobe Photoshop CC 2018
 Adobe Photoshop CC 2018 By Martin Evening Welcome to the latest Adobe Photoshop CC bulletin update. This is provided free to ensure everyone can be kept up-to-date with the latest changes that have taken
V S C O F I L M M A N UA L
 VSCO FILM MANUAL GETTING STARTED WITH VSCO FILM LIGHTROOM 4, 5 & 6 ACR FOR PS CS6 & CC Thank you for buying VSCO Film, the best way to emulate film in Adobe Lightroom and Camera Raw. Combining the speed
Photoshop Elements Hints by Steve Miller
 2015 Elements 13 A brief tutorial for basic photo file processing To begin, click on the Elements 13 icon, click on Photo Editor in the first box that appears. We will not be discussing the Organizer portion
in association with Getting to Grips with Printing
 in association with Getting to Grips with Printing Managing Colour Custom profiles - why you should use them Raw files are not colour managed Should I set my camera to srgb or Adobe RGB? What happens
White Balance and Colour Calibration Workflow in Lightroom with the X -Rite ColorChecker Passport
 White Balance and Colour Calibration Workflow in Lightroom with the X -Rite ColorChecker Passport White Balance an the Temperature of Light One of the basic ways of controlling colour when we are taking
Acknowledgements About this book Other Goodies Included with this Book Resources for Nikon Photographers. Part I: Capture NX2 2. Why Capture NX2?
 The Photographer s Guide to Capture NX2 Contents Acknowledgements About this book Other Goodies Included with this Book Resources for Nikon Photographers x xi xii xiii Part I: Capture NX2 2 Why Capture
Welcome to the Hands-On Working with Digital RAW workshop.
 Welcome to the Hands-On Working with Digital RAW workshop. This workshop starts at 9:30am and finishes in time to leave at 4:30pm Your instructor for today is Roger Buchanan. If at any time you have any
Adobe Photoshop. How To Get Started With Adobe InDesign CC: 10 Things Beginners Want To Know How To Do TO START: 1) ZOOM, MOVE, RETOUCH (05:11)
 ZOOM, MOVE, RETOUCH (05:11)") Adobe Photoshop How To Get Started With Adobe InDesign CC: 10 Things Beginners Want To Know How To Do Video By Terry White Tutorial Sheet by Juliet Davis TO START: Open the tutorial in YouTube, download
Adobe Photoshop How To Get Started With Adobe InDesign CC: 10 Things Beginners Want To Know How To Do Video By Terry White Tutorial Sheet by Juliet Davis TO START: Open the tutorial in YouTube, download
Lightroom Classic CC and Lightroom CC Updates
 Lightroom Classic CC and Lightroom CC Updates Information about the latest December 2017 Lightroom system updates This December Adobe have released updates for the entire Lightroom CC ecosystem, including
GETTING STARTED. 0 P a g e B a s i c s o f A d o b e P h o t o s h o p A g a P r i v a t e I n s t i t u t e f o r c o m p u t e r s c i e n c e
 GETTING STARTED 0 P a g e B a s i c s o f A d o b e P h o t o s h o p Adobe Photoshop: is a popular image editing software that provides a work environment consistent with Adobe Illustrator, Adobe InDesign,
DIGITAL INFRARED PHOTOGRAPHY By Steve Zimic
 DIGITAL INFRARED PHOTOGRAPHY By Steve Zimic If you're looking to break outside the box so to speak, infrared imaging may be just the ticket. It does take a bit of practice to learn what types of scenes
What is real? What is art?
 HDCC208N Fall 2018 We ll fix it in post The Digital Darkroom What is real? What is art? We have been discussing this pair of questions at various points this semester, with drawings, paintings, the camera
PUBLIC BETA: LUMINAR FOR WINDOWS Facts, Features & Tools
 PUBLIC BETA: LUMINAR FOR WINDOWS Facts, Features & Tools Key Facts Release date: Public Beta for Windows: July 13, 2017 Full featured version for Windows: late 2017 Product name: Public Beta of Luminar
Diploma in Photoshop
 Diploma in Photoshop Adjustment Layers An adjustment layer applies colour and tonal adjustments to your image without permanently changing pixel values. The colour and tonal adjustments are stored in the
Advanced Diploma in. Photoshop. Summary Notes
 Advanced Diploma in Photoshop Summary Notes Suggested Set Up Workspace: Essentials or Custom Recommended: Ctrl Shift U Ctrl + T Menu Ctrl + I Ctrl + J Desaturate Free Transform Filter options Invert Duplicate
CS 547 Digital Imaging Lecture 2
 CS 547 Digital Imaging Lecture 2 Basic Photo Corrections & Retouching and Repairing Selection Tools Rectangular marquee tool Use to select rectangular images Elliptical Marque Tool Use to select elliptical
Movie 7. Merge to HDR Pro
 Movie 7 Merge to HDR Pro 1 Merge to HDR Pro When shooting photographs with the intention of using Merge to HDR Pro to merge them I suggest you choose an easy subject to shoot first and follow the advice
Using Adobe Photoshop
 Using Adobe Photoshop 8 In the last section we looked at adjusting colours to improve your image. In this section we ll look at various ways of touching up your images to fix problems with the images or
Presenting... PhotoShop Elements 7 (PSE7) Photoshop LightRoom 2.3 (LR2) and High Dynamic Range Photography
 Photoshop LightRoom 2.3 (LR2) and High Dynamic Range Photography") Presenting... PhotoShop Elements 7 (PSE7) Photoshop LightRoom 2.3 (LR2) and High Dynamic Range Photography 1 Before getting into Photoshop products, I need to be sure you can process the information I
Presenting... PhotoShop Elements 7 (PSE7) Photoshop LightRoom 2.3 (LR2) and High Dynamic Range Photography 1 Before getting into Photoshop products, I need to be sure you can process the information I