Lightroom CC. Welcome to Joshua Tree Workshops. Astro & Landscape Lightroom Workflow w/presets
|
|
|
- Stuart Walsh
- 6 years ago
- Views:
Transcription

1 Welcome to My approach to teaching is to offer small workshops which allow you to explore and discover our amazing planet, while learning photography and timelapse techniques. Astro & Landscape Lightroom Workflow w/presets This document covers the standard workflow I follow when editing astro and landscape images. Use this as a guide - but remember - image editing is based on your personal preferences! Topics Covered Using Lightroom for Landscape and Astro-Photography Lightroom Presets (download) Library and Develop Modes White Balance, Histogram and Tone Curves Hue, Saturation and Luminance Lens Correction, Sharpening and Noise Reduction Cropping, Local Adjustments and Spot Removal Dehaze Filter and Post-Crop Vignetting Exporting 1
2 Lightroom Workflow A few Initial Hints/Tips Editting Multiple Images at once - Lightroom was originally created for wedding photographers who had to process thousands of images and have previews available for their customers within hours of the event. Lightroom is designed for this workflow as opposed to Photoshop which was designed to work on one-image-a-time. One of the most powerful features of Lightroom is the ability to make adjustments to collections images - with one click - i.e. color correct all of your astro images as once. Lightroom does not change your original images - The Lightroom Catalog only stores your list of adjustments and image previews. The Catalog does not store the original image files, which remain on your hard drive - unchanged. You do not need to save your changes in Lightroom - every change is saved automatically. Experiment - Every image adjustment you make in Lightroom is performed with a slider. If you want to see the effect of any specific slider - TRY IT! Slide it all the way to the LEFT and then all the way to the RIGHT. You can always UNDO changes. Reset - To RESET a slider value to neutral - double click on the word associated with the slider- i.e. Exposure. In Develop Mode, you can press the [RESET] button to remove all image adjustments. Lightroom is best used with RAW images RAW - Color Temperature (Warm or Cold) can be adjusted during editing. For JPEG, all camera settings (including Color Temperature) are hard-coded into JPEG images, making adjustments difficult. RAW - Lightroom adjustments (Meta-Data) are stored outside of the image (as.xmp sidecar files). For JPEG, changes are stamped directly onto the image file. RAW - Files are uncompressed and contain every pixel. JPEG files are compressed which discards valuable information, making image editing difficult. 2
 are used for publishing your images. I will not cover these modes.")
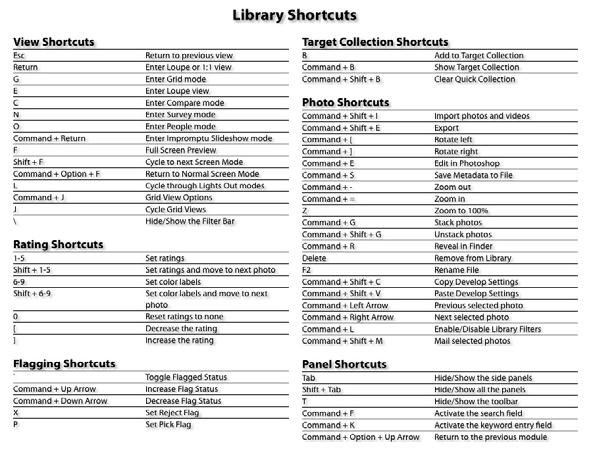
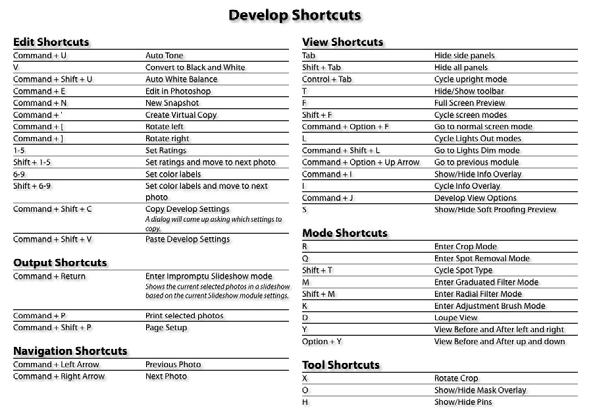
3 Lightroom Modes Getting Started The majority of your time editing images in Lightroom will be in the LIBRARY mode (G) and the DEVELOP mode (D). The other modes (Map, Book, Slide show, Print and Web) are used for publishing your images. I will not cover these modes. At the end of the document I will show you how to export an image (for or print). LIBRARY Mode (G) LIBRARY mode is used for organizing and previewing your images. Use [IMPORT] to import images into Lightroom directly from your camera s memory card - Lightwoom will copy the images to your HardDrive. Once imported, to edit an image, click on it and press D (for Develop). This will switch Lightroom to DEVELOP mode. Useful Shortcuts* (See end of document for a complete list) G LIBRARY mode D DEVELOP mode - for selected image F Full Screen Preview - press again to close I Camera Info (for image) - press again for more info Y Show BEFORE and AFTER images - press again to close Z Zoom - press again to un-zoom TAB HIDE/SHOW Side Panels *To show the full list of Shortcuts - (PC) Ctrl / or (Mac) Cmd / 3

4 Develop Mode (D) Develop Panels DEVELOP mode is used for editing individual images. DEVELOP functions are organized as panels (HISTOGRAM, BASIC, TONE CURVE, HSL,...). Typically you start editing an image with the BASIC panel - to set the color temp and normalize the histogram. Then you use the other panels as needed for additional editing - i.e. sharpening, lens correction, saturation,... 4
, the distribution is spread across the histogram, rising in the middle (mid-tones), and tapering off in the")


5 Histogram Panel The histogram shows the distribution of light (right) and dark (left) regions of your image. Typically (for daylight images), the distribution is spread across the histogram, rising in the middle (mid-tones), and tapering off in the shadows (left side) and highlights (right side). Clipping indicates that portions of the image are either totally black or totally white - this is referred to as clipping since there is no usable detail in these portions of the image. Turn on Clipping Indicators - In the histogram display, click on the upper left and right corners so that you see two white squares (see image). This will highlight clipping areas in the image as RED (highlights) and BLUE (shadows). Normal Histogram shape Clipping - under exposed image Red Clipping in over exposed areas of the image Clipping - over exposed image 5
6 Basic Panel Set White Balance (optional) Eye Dropper Tool (White Balance Selector) W HINT: Set camera to Auto White Balance (AWB) when shooting. If your camera is set to use Auto White Balance, then your white balance is probably correct. If you want to adjust the White Balance, click on the eye dropper, then click on a neutral color in the Image - such as white clouds, sand or rocks. Review the image and make sure it looks normal. Adjust TEMP/TINT only as needed. To reset, set WB to As Shot. Normalize the Histogram (light and dark areas) Highlights Slide all the way to the LEFT - This reveals all of the highlights in the image. Shadows Slide all the way to the RIGHT. This reveals all of the shadow detail in the image. Whites Slide until all RED clipping indicators are all removed. If RED indicators re-appear in the image, adjust WHITES to remove them. Darks Slide until there are only a few tiny BLUE clipping indicators. If BLUE indicators re-appear in the image, adjust DARKS to reduce them. Contrast Once the above are set, increase contrast in order to help define the image. Exposure (only if absolutely needed) If your image is still too dark (a typical problem) or too light, then you can optionally adjust Exposure. Use Exposure only as a last resort to correct images. See Hint at right. Watch how the Histogram changes as you adjust the settings above. Note: Every image is exposed differently. As you make these changes, check the image (and the histogram). Make the adjustments so that the image looks good to you! Hint: If your images tend to be too dark or too light, then you need to check your camera settings. You might have Exposure Compensation set to something other than zero. It is generally a good idea set Exposure Compensation to Zero and use Aperture Priority (A or AP) shooting mode - This lets the camera decide the correct exposure. 6
 Use sparingly - 10-30 Use sparingly - 0-20 Use sparingly - 0-20 Tone Curve Panel The Tone")
7 Basic Panel - cont d Presence This section is used to enhance the image. Clarity Sharpening / Contrast Saturation Applies to all colors Vibrance Enhances only muted colors (shadows) Use sparingly Use sparingly Use sparingly Tone Curve Panel The Tone Curve is the classic tool for adjusting the exposure of different luminance areas of the image - from the brightest regions (Highlights / Lights) to the darkest regions (Darks / Shadows). I used this only when trying to fix problem areas of the image - i.e. shadow areas that are too dark. Curves Button Sliders Set this to the state shown. Use only if needed to fix problem areas of the image. 7
, then click on a portion of the image that has some detail.")
8 Detail Panel This panel has two uses - sharpening and noise reduction. All images need some sharpening. Noise reduction is only used for images taken at a high ISO. Sharpening To start sharpening, click on the small icon (upper left of the preview image), then click on a portion of the image that has some detail. Amount I generally set near the mid point (70-80) Masking This slider creates a sharpening Mask for the image (similar to an un-sharp mask ). Generally, you only want to sharpen edges within the image. To set the mask, press the OPTION Key (mac) and then click on the slider. Now slide it to about You want to see a black/white image preview showing outlines. Radius 1.0 Detail 25 Noise Reduction (NR) Generally, for Canon and Nikon, Lightroom can reduce noise for images shot up to 3200 ISO. Use NR sparingly. NR is a trade-off between showing details (i.e. stars) and removing noise (small stars will be removed because they appear to be noise). Luminance Color Others Set to about 30. Review the image in the detail window to see if it has removed the noise. (make sure to wait a few seconds for Lightroom to complete processing) Noise sometimes appears as small patches of color (similar to jpeg artifacts). Look at the image detail preview area (top of the DETAIL panel) to see if this slider is useful. Use these sliders sparingly. Try each one individually. If they reduce noise, then keep the setting, otherwise set it back to neutral. 8

 Angle (horizon) Constrain to Image Click on this icon, then click/ drag on the image to define the desired crop.")
9 Lens Correction Panel Lens correction corrects for distortions and vignetting in the lens. Remove Chromatic Aberration Enable Profile Correction ON - Always Check this box. Your lens should be found automatically. If not, click on the fields to find your lens. If your lens is not found, search the Internet for Lightroom Lens Profile for your lens. NOTE: This is optional. Look at the image before and after the profile is applied to see if the image looks better or not. Crop Tool (R) The crop tool is used to crop the image and correct the horizon. Aspect (image dimension / aspect ratio) Angle (horizon) Constrain to Image Click on this icon, then click/ drag on the image to define the desired crop. Use this tool to draw a line showing the correct horizon in the image. When this is set to on, Lightroom will automatically crop the image to the largest possible rectangle. 9
.")

10 HSL Panel This panel allows you to work with specific potions of the color band. This tool is much more powerful than the standard Saturation slider (which Saturates the entire image at once). Hue Saturation Luminance Hue is used to alter a specific color (within limits). To define the color to alter, click on the icon (left of the word Hue) and then click in the image on the color you want to modify. You can then change the sliders to change that color. Double-click on the word hue to reset all color adjustments. This lets you adjust the saturation of specific colors. i.e. make the sky more blue. Luminance determines how light or dark a color is. To darken the sky - slide the blue slider to the left. Effects Panel These are some nice features that I use often. Dehaze Dehaze is a combination of sharpening / contrast and clarity. It is amazing for night photography. Amount Post Crop Vignetting Amount For astro images, I come here first and set it to about 90%. It is also effective for landscape (30-40). If you like vignettes, then slide this to about -5 or so. It helps to focus the eye on the center of the image. 10
 and then apply localized adjustments (exposure, contrast, saturation,...) to specific parts of the image.")

11 Graduated Filter (M) Radial Filter (Shift M) Adjustment Brush (K) Filter coverage - in green Filters are the functional equivalent of layers in Photoshop. You can define a filter (or brush) and then apply localized adjustments (exposure, contrast, saturation,...) to specific parts of the image. Choose the filter type (see list above) and then click/drag on the image to create the filter. You can tilt and resize the filters as well. You can have multiple overlapping filters on a single image. Adjustment Brushes are functionally the same as filters, but you use a Brush to paint the adjustments onto the image. This is very nice for painting highlights on an image. Graduated and Radial Filters now provide an Erase Brush which allows you to remove (erase) portions of the (rectangular or circular) filter coverage area. Graduated filter settings and Erase Brush - almost all of the Lightroom adjustments can be applied to a specific filter. 11

 from one image to another - or to a group of images.")
12 Spot Removal (Q) This works pretty well. Tip: To remove airplanes streaks from astro images. - CLICK on one end of the airplane streak - then SHIFT-CLICK on the other end - and LR will draw a straight line. Clone vs Heal Size I generally use Clone Set as needed Feather Usually around 90 Opacity Usually at 100 Copy SETTINGS to another image One of the most powerful features of LR is that you can COPY the settings (image adjustments) from one image to another - or to a group of images. So, once you get one astro image just how you like it, use this feature to copy the settings to the rest of the images from that night. [PREVIOUS] or [SYNC...] [RESET] [PREVIOUS] This will copy ALL settings to the current image - from the previous image that you had clicked on. SYNC: If multiple images are selected, then a dialog will appear to let you define which settings to copy from the first selected image - to the rest of the selected images. (see dialog at right) Resets all adjustments back to neutral for the selected image(s). Sync Dialog: Generally you will want to copy all options except spot correction and crop. 12
 Set the path For web - I use jpeg (srgb color space) and limit the file size to 500k.")
13 Export Images This dialog is used for exporting images with all of their Lightroom adjustments applied - prior to printing or ing. Export To Export Location File Settings Image Sizing Output Sharpening [Add] Preset Export Hard Drive (generally) Set the path For web - I use jpeg (srgb color space) and limit the file size to 500k. For web - resize the image to 1440 pixels long (it s a good size for most monitors - but not too big). I sharpen the image for screen viewing. Once you have all of the setting set, press the [add] button create your own preset to use next time. Exports the file(s) to disk. 13

14 Downloading & Installing Presets I have developed presets for landscape and astro images which applies some the adjustments described in the document. Download and install the preset as follows: 1. Click on the link below (or enter the path In your browser and click the Download Lightroom Presets link to save the file to your desktop In Lightroom, select Menu: Lightroom > Preferences and click on the [PRESET] button (image at right) 3. Click on [Show Lightroom Presets Folder] Button 4. This will launch the Mac Finder (or PC Explorer) 5. Click on the Lightroom folder. 6. Click on the Develop Presets folder. 7. Create a directory named in the Develop Presets Folder. 8. Copy the downloaded file into the folder. 9. Then you will need to Restart Lightroom. 10. in Lightroom, choose an image (Library mode) and press D (Develop mode). Then expand the Presets Panel (left hand side - Develop Mode) and choose one of the presets within the folder. The image will change based upon the preset. You can see the effect of the preset by the changes it makes to the sliders (in the DEVELOP Panels). You can further alter the image by making your own changes to the image as defined in this document. To undo the changes made by the preset, use Menu EDIT -> UNDO. Or, in Develop Mode, press the [RESET] button (lower right) to remove all adjustments from the image. This will reset all slider values back to neutral. 14
15 15
16 Catalog Settings Automatically record changes to disk - This setting tells Lightroom to automatically record all RAW image changes to.xmp files directly on disk (in addition torecording changes into the Lightroom Catalog). Click on the Lightroom menu. Choose Catalog Settings... The Catalog Settings dialog will appear (right) Click on the [Metadata] button Check [X} Automatically write changes into XMP Close dialog 16
17 offerings from Available Workshops 1 Night Milky Way Astro-Photography / B&B or Camping Scheduled near the New Moon in Joshua Tree National Park. We offer the comfort of our B&B, or camping in the park under a million stars 2 Night Weekend Landscape/Astro-photography / B&B Learn Landscape and Astro Photography techniques 2 Night Weekend Wildflower Workshop / B&B (Spring) Explore the Joshua Tree National Park photographing Wildflowers 2 Night Weekend Introduction to Timelapse Workshop / B&B Get an intense introduction to Timelapse techniques (w/lrtimelapse) 3 Night Timelapse Workshop / B&B In-depth training on the complete Timelapse workflow (w/lrtimelapse) 5 Night Timelapse Motion Control Workshop / B&B Our most popular workshop. Learn the complete RAW Timelapse workflow and receive training on Motion Control Sliders (provided). 7 Night Iceland Workshop / Spring and Fall Tours An amazing experience trekking across southern Iceland - from the west coast to the east coast - while learning Landscape, Astro, Aurora and Timelapse photography techniques. See the aurora, waterfalls, Diamond Beach and the southern coastline of Iceland. It s on your bucket list! /iceland Gear Guides Equipment Recommendations Full-Frame Cameras Wide Angle Lenses Protective clothing Timelapse Gear Tripods and Accessories Drones Apps /gear-overview 17
Adobe Lightroom CC Tutorial
 Adobe Lightroom CC Tutorial GETTING STARTED Adobe Lightroom CC is a photo editing program which can be used to manipulate and edit large quantities of photos at once. It has great exporting and metadata
Local Adjustment Tools
 PHOTOGRAPHY: TRICKS OF THE TRADE Lightroom CC Local Adjustment Tools Loren Nelson www.naturalphotographyjackson.com Goals for Tricks of the Trade NOT show you the way you should work Demonstrate and discuss
PHOTOSHOP: 3.3 CAMERA RAW
 1 PHOTOSHOP: 3.3 CAMERA RAW Raw image files are uncompressed images that contain all the information of the photo. Raw images give you flexibility in editing and allow you to achieve a better look because
Teton Photography Group
 Overview general post-processing (editing) workflow for serious photographers Focus on processes more than software Examples using Adobe Lightroom and Photoshop Teton Photography Group January 2016 Emphasis
SHAW ACADEMY NOTES. Ultimate Photography Program
 SHAW ACADEMY NOTES Ultimate Photography Program What is a Raw file? RAW is simply a file type, like a JPEG. But, where a JPEG photo is considered a photograph, a RAW is a digital negative, an image that
Camera Raw software is included as a plug-in with Adobe Photoshop and also adds some functions to Adobe Bridge.
 Editing Images in Camera RAW Camera Raw software is included as a plug-in with Adobe Photoshop and also adds some functions to Adobe Bridge. Camera Raw gives each of these applications the ability to import
Craft Incredible Images this Summer 3-Minute makeovers that will make your images pop! Presented by Mark Galer
 Craft Incredible Images this Summer 3-Minute makeovers that will make your images pop! Presented by Mark Galer Projects Overview One of the best ways to become comfortable with editing images in Lightroom
Contents Foreword 1 Feedback 2 Legal information 3 Getting started 4 Installing the correct Capture One version 4 Changing the version type 5 Getting
 Contents Foreword 1 Feedback 2 Legal information 3 Getting started 4 Installing the correct Capture One version 4 Changing the version type 5 Getting to know Capture One Pro 6 The Grand Overview 6 The
Opening a File in Camera Raw
 Camera Raw is a simplified version of Adobe Lightroom and comes free as part of Adobe Photoshop. In this Lesson we show you how to Open Images in Adobe Camera Raw, directly inside Photoshop, rather than
Lightroom Classic CC and Lightroom CC Updates
 Lightroom Classic CC and Lightroom CC Updates Information about the latest December 2017 Lightroom system updates This December Adobe have released updates for the entire Lightroom CC ecosystem, including
Creating Stitched Panoramas
 Creating Stitched Panoramas Here are the topics that we ll cover 1. What is a stitched panorama? 2. What equipment will I need? 3. What settings & techniques do I use? 4. How do I stitch my images together
Software & Computers DxO Optics Pro 5.3; Raw Converter & Image Enhancer With Auto Or Manual Transmission By Howard Millard March, 2009
 Software & Computers DxO Optics Pro 5.3; Raw Converter & Image Enhancer With Auto Or Manual Transmission By Howard Millard March, 2009 Whether you shoot raw or JPEG, whether you re on the Windows or Mac
Photoshop CC: Essentials
 Photoshop CC: Essentials Summary Workspace Overview... 2 Exercise Files... 2 Selection Tools... 3 Select All, Deselect, And Reselect... 3 Adding, Subtracting, and Intersecting... 3 Working with Layers...
Processing RAW files in ACR Roy Killen, APSEM, EFIAP, GMPSA
 Processing RAW files in ACR Roy Killen, APSEM, EFIAP, GMPSA (c) 2017 Roy Killen RAW Page 1 Processing RAW files What are RAW files? Most digital cameras save files to memory cards in one of two basic formats
Converting and editing raw images
 Converting and editing raw images Raw v jpeg As we have found out, jpeg files are processed in the camera and much of the data is lost. Raw files are not. Raw file formats: General term for a variety of
CONVERTING AND EDITING RAW IMAGES
 CONVERTING AND EDITING RAW IMAGES RAW V JPEG As we have found out, jpeg files are processed in the camera and much of the data is lost. Raw files are not and so all of the data is preserved. RAW FILE FORMATS:
photokaboom Learn Photography Home About Privacy, Etc. Ask Jim SarasotaPhotoLessons.com Lightroom > All Tutorials Combined > 5 - Develop Module
 1 of 59 12/19/2017, 1:04 PM photokaboom Learn Photography Home About Privacy, Etc. Ask Jim SarasotaPhotoLessons.com Lightroom > All Tutorials Combined > 5 - Develop Module 1 - Editing Principles 2 - Editing
Contents: Bibliography:
 ( 2 ) Contents: Sizing an Image...4 RAW File Conversion...4 Selection Tools...5 Colour Range...5 Quick Mask...6 Extract Tool...7 Adding a Layer Style...7 Adjustment Layer...8 Adding a gradient to an Adjustment
Photoshop Elements Hints by Steve Miller
 2015 Elements 13 A brief tutorial for basic photo file processing To begin, click on the Elements 13 icon, click on Photo Editor in the first box that appears. We will not be discussing the Organizer portion
PHOTOGRAPHY: MINI-SYMPOSIUM
 PHOTOGRAPHY: MINI-SYMPOSIUM In Adobe Lightroom Loren Nelson www.naturalphotographyjackson.com Welcome and introductions Overview of general problems in photography Avoiding image blahs Focus / sharpness
PASS4TEST. IT Certification Guaranteed, The Easy Way! We offer free update service for one year
 PASS4TEST IT Certification Guaranteed, The Easy Way! \ We offer free update service for one year Exam : 9A0-125 Title : Adobe Photoshop Lightroom 2 ACE Exam Vendors : Adobe Version : DEMO Get Latest &
Photo Editing Workflow
 Photo Editing Workflow WHY EDITING Modern digital photography is a complex process, which starts with the Photographer s Eye, that is, their observational ability, it continues with photo session preparations,
Acknowledgements About this book Other Goodies Included with this Book Resources for Nikon Photographers. Part I: Capture NX2 2. Why Capture NX2?
 The Photographer s Guide to Capture NX2 Contents Acknowledgements About this book Other Goodies Included with this Book Resources for Nikon Photographers x xi xii xiii Part I: Capture NX2 2 Why Capture
Lightroom System April 2018 Updates
 Lightroom System April 2018 Updates This April Adobe updated Lightroom Classic CC. This included a major update to profiles, making profile looks more prominent. Some essential interface tweaks and also
NEW ITEMS IN LIGHTROOM 6. Notes in red are notes to me for the presentation and to help you recall what I was doing if you refer to these notes later.
 NEW ITEMS IN LIGHTROOM 6 INTRO Notes in red are notes to me for the presentation and to help you recall what I was doing if you refer to these notes later. Good evening folks. It is a pleasure to see everyone.
Challenge Image: Blur the Background
 Challenge Image: Blur the Background Challenge Image: Blur the Background In this lesson, we re going to work on a challenge image that was submitted by a Masters Academy member. The image features a little
Machinery HDR Effects 3
 1 Machinery HDR Effects 3 MACHINERY HDR is a photo editor that utilizes HDR technology. You do not need to be an expert to achieve dazzling effects even from a single image saved in JPG format! MACHINERY
Kent Messamore 3/6/2010
 Post Processing Kent Messamore 3/6/2010 What we will cover Post Processing Photoshop, Lightroom, Elements, and others JPEG or RAW Photoshop Elements Workflow Organization, Create, share Photoshop Elements
Select your Image in Bridge. Make sure you are opening the RAW version of your image file!
 CO 3403: Photographic Communication Steps for Non-Destructive Image Adjustments in Photoshop Use the application Bridge to preview your images and open your files with Camera Raw Review the information
Adobe Photoshop CC 2018 Tutorial
 Adobe Photoshop CC 2018 Tutorial GETTING STARTED Adobe Photoshop CC 2018 is a popular image editing software that provides a work environment consistent with Adobe Illustrator, Adobe InDesign, Adobe Photoshop,
Using Photoshop Elements
 Using Photoshop Elements Created By: Rick Williams August 2004 Table of Contents Photoshop Element Tools...Page 1 Tool Descriptions... Page 3 Starting Photoshop Elements... Page 7 Resizing an Image...
Photomatix Pro 3.1 User Manual
 Introduction Photomatix Pro 3.1 User Manual Photomatix Pro User Manual Introduction Table of Contents Section 1: Taking photos for HDR... 1 1.1 Camera set up... 1 1.2 Selecting the exposures... 3 1.3 Taking
Adobe Photoshop. Levels
 How to correct color Once you ve opened an image in Photoshop, you may want to adjust color quality or light levels, convert it to black and white, or correct color or lens distortions. This can improve
The A6000 is one of Sony's best selling mirrorless cameras, even with its successor
 Introduction The A6000 is one of Sony's best selling mirrorless cameras, even with its successor the A6300 now in the market. The compact E-mount camera is a diminutive powerhouse, with its 24mp sensor
Capture NX-D Reference Manual for Version 1.5.0
 Capture NX-D Reference Manual for Version 1.5.0 Introduction What Capture NX-D Can Do for You... 2 Image Adjustments... 4 The Capture NX-D Window... 5 Palettes... 6 The Toolbar... 8 The Status Bar...10
Module 1 Lighting. Lesson 1 Light, Your First Decision. What s the first thing you should think about when choosing a location?
 Module 1 Lighting Lesson 1 Light, Your First Decision What s the first thing you should think about when choosing a location? We want to be: -Centered Photographers Three priorities for choosing light
PHOTOSHOP LIGHTROOM 5
 PHOTOSHOP LIGHTROOM 5 INTRODUCTION This material is primarily targetted at the new and intermediate photographers in our club. You have captured an image and used the various factors when taking this image:
High Dynamic Range photography software. Photomatix Pro 6.0
 High Dynamic Range photography software Photomatix Pro 6.0 Photomatix Pro User Manual Version 6.0 2017 HDRsoft. All rights reserved. Table of Contents Introduction... 1 1 Taking Photos for HDR... 2 1.1
IMAGE CORRECTION. You can find this and more information with video tutorials at
 IMAGE CORRECTION You can find this and more information with video tutorials at http://www.adobe.com/support/photoshop/ P H O T O S H O P T O O L S CLONE STAMP TOOL The Clone Stamp tool paints one part
Portraiture Creating and Editing. Aaron Taylor Aaron Taylor Photography LLC
 Portraiture Creating and Editing Aaron Taylor Aaron Taylor Photography LLC Who Am I? Owner of Aaron Taylor Photography LLC Family portraits Seniors Weddings and events Business and social media Headshots
How I did it by Chris Axe. Special thanks to Kim Walker
 How I did it by Chris Axe Special thanks to Kim Walker Story of this image This photo was taken in Garrapata State Park at the very first gate as you head south. It took about 15 minutes to figure out
CTE BASIC DIGITAL PHOTOGRAPHY STUDY GUIDE
 CTE BASIC DIGITAL PHOTOGRAPHY STUDY GUIDE VOCABULARY Histogram a graph of all tones in an image Image/adjust (hue/saturation, brightness/contrast) hue: color name (like green), saturation: how opaque (rich
Extreme Makeovers: Photoshop Retouching Techniques
 Extreme Makeovers: Table of Contents About the Workshop... 1 Workshop Objectives... 1 Getting Started... 1 Photoshop Workspace... 1 Retouching Tools... 2 General Steps... 2 Resolution and image size...
Photomatix Light 1.0 User Manual
 Photomatix Light 1.0 User Manual Table of Contents Introduction... iii Section 1: HDR...1 1.1 Taking Photos for HDR...2 1.1.1 Setting Up Your Camera...2 1.1.2 Taking the Photos...3 Section 2: Using Photomatix
PHOTOTUTOR.com.au Share the Knowledge
 THE DIGITAL WORKFLOW BY MICHAEL SMYTH This tutorial is designed to outline the necessary steps from digital capture, image editing and creating a final print. FIRSTLY, BE AWARE OF WHAT CAN AND CAN T BE
Topaz Labs DeNoise 3 Review By Dennis Goulet. The Problem
 Topaz Labs DeNoise 3 Review By Dennis Goulet The Problem As grain was the nemesis of clean images in film photography, electronic noise in digitally captured images can be a problem in making photographs
What is a Raw file? How a RAW file differs from a JPEG
 What is a Raw file? RAW is simply a file type, like a JPEG. But, where a JPEG photo is considered a photograph, a RAW is a digital negative, an image that hasn t been processed or adjusted by software
Essential Post Processing
 Essential Post Processing By Ian Cran Preamble Getting to grips with Photoshop and Lightroom could be described in three stages. One is always learning and going through stages but there are three main
TOPAZ LENS EFFECTS QUICK START GUIDE
 TOPAZ LENS EFFECTS QUICK START GUIDE Introduction Topaz Lens Effects is designed to give you the power to direct and focus your viewer s eyes where you want them. With Lens Effects, you get advanced technology
Photoshop CC Editing Images
 Photoshop CC Editing Images Rotate a Canvas A canvas can be rotated 90 degrees Clockwise, 90 degrees Counter Clockwise, or rotated 180 degrees. Navigate to the Image Menu, select Image Rotation and then
Capturing Realistic HDR Images. Dave Curtin Nassau County Camera Club February 24 th, 2016
 Capturing Realistic HDR Images Dave Curtin Nassau County Camera Club February 24 th, 2016 Capturing Realistic HDR Images Topics: What is HDR? In Camera. Post-Processing. Sample Workflow. Q & A. Capturing
The Photographer s Guide to Capture NX. Supplement One. by Jason P. Odell, Ph.D.
 The Photographer s Guide to Capture NX Supplement One by Jason P. Odell, Ph.D. The Photographer s Guide to Capture NX Supplement One First Edition 2007 Published in the United States by Luminescence of
What s New in Capture NX
 What s New in Capture NX Thank you for downloading the latest version of Capture NX, with support for Picture Controls and other new features. Please note the following changes to the manual. En Camera
Photomatix Pro 6 User Manual Table of Contents
 Photomatix Pro 6 User Manual Table of Contents 2018 HDRsoft. All rights reserved. TOC link Table of Contents Introduction... 1 1 Taking Photos for HDR... 2 1.1 Setting up the Camera...3 1.2 Exposure...3
Using Adobe Photoshop to enhance the image quality. Assistant course web site:
 Using Adobe Photoshop to enhance the image quality Assistant course web site: http://www.arches.uga.edu/~skwang/edit6170/course.htm Content Introduction 2 Unit1: Scan images 3 Lesson 1-1: Preparations
By Washan Najat Nawi
 By Washan Najat Nawi how to get started how to use the interface how to modify images with basic editing skills Adobe Photoshop: is a popular image-editing software. Two general usage of Photoshop Creating
Black and White using Photoshop
 Topics to be covered: Methods for B&W conversion Improving the image Toning Printer color management Black and White using Photoshop Various ways to get to B&W Adobe Raw Converter (ACR) in from Bridge
Tablet overrides: overrides current settings for opacity and size based on pen pressure.
 Photoshop 1 Painting Eye Dropper Tool Samples a color from an image source and makes it the foreground color. Brush Tool Paints brush strokes with anti-aliased (smooth) edges. Brush Presets Quickly access
A RAW Development Workflow
 A RAW Development Workflow Presented by David Rouchet 2017 Who I am? An enthusiastic photographer I m French and installed in Montreal for a bit more than a year I work on the software engineering for
Basics of Photographing Star Trails
 Basics of Photographing Star Trails By Rick Graves November 15, 2016 1 What are Star Trails? Night sky images with foreground elements that show the passage of time and the motion of the stars 2 Which
MY ASTROPHOTOGRAPHY WORKFLOW Scott J. Davis June 21, 2012
 Table of Contents Image Acquisition Types 2 Image Acquisition Exposure 3 Image Acquisition Some Extra Notes 4 Stacking Setup 5 Stacking 7 Preparing for Post Processing 8 Preparing your Photoshop File 9
Editing Using Photoshop CS5
 The Photoshop CS4 Editing Workspace - shown is the document (image) window, ToolBox, Info, Navigator, History, Adjustments and Layers Palettes, Windows Menus and Options Bar (on top). USING THE LAYERS
What is real? What is art?
 HDCC208N Fall 2018 We ll fix it in post The Digital Darkroom What is real? What is art? We have been discussing this pair of questions at various points this semester, with drawings, paintings, the camera
Advanced Diploma in. Photoshop. Summary Notes
 Advanced Diploma in Photoshop Summary Notes Suggested Set Up Workspace: Essentials or Custom Recommended: Ctrl Shift U Ctrl + T Menu Ctrl + I Ctrl + J Desaturate Free Transform Filter options Invert Duplicate
2. Picture Window Tutorial
 2. Picture Window Tutorial Copyright (c) Ken Deitcher, 1999 Original image Final image To get you started using Picture Window we present two short tutorials. Basic Image Editing This tutorial covers basic
HDR Show & Tell Image / Workflow Review Session. Dave Curtin Nassau County Camera Club October 3 rd, 2016
 HDR Show & Tell Image / Workflow Review Session Dave Curtin Nassau County Camera Club October 3 rd, 2016 Capturing Realistic HDR Images Topics: HDR Review (Brief Summary from HDR Presentation Parts: 1
POLAROID EMULATION INCREASED CONTRAST, SATURATION & CLARITY
 POLAROID EMULATION The Polaroid SX-70 Camera was a sensational tool. It took photographs in real time. But just the color balance of the film and they way it developed had a unique look. Here are some
Capture NX-D Reference Manual for Version 1.4.0
 Capture NX-D Reference Manual for Version 1.4.0 Introduction What Capture NX-D Can Do for You... 2 Hiding Changes Made in Capture NX/Capture NX 2... 4 The Capture NX-D Window... 5 Palettes... 6 The Toolbar...
Adobe Photoshop CC 2018
 Adobe Photoshop CC 2018 By Martin Evening Welcome to the latest Adobe Photoshop CC bulletin update. This is provided free to ensure everyone can be kept up-to-date with the latest changes that have taken
Recitation 2 Introduction to Photoshop
 Recitation 2 Introduction to Photoshop What is Adobe Photoshop? Adobe Photoshop is a tool for creating digital graphics either by starting with a scanned photograph or artwork or by creating the graphics
Capture NX-D Reference Manual for Version 1.4.6
 Capture NX-D Reference Manual for Version 1.4.6 Introduction What Capture NX-D Can Do for You... 2 Hiding Changes Made in Capture NX/Capture NX 2... 4 The Capture NX-D Window... 5 Palettes... 6 The Toolbar...
32 Float v3 Quick Start Guide. AUTHORED BY ANTHONY HERNANDEZ (415)
") 32 Float v3 Quick Start Guide 32 Float v3 Trademark/Copyright Information Copyright 2013 by United Color Technologies, LLC. All rights reserved. Unified Color Technologies, BeyondRGB, and HDR Expose are
32 Float v3 Quick Start Guide 32 Float v3 Trademark/Copyright Information Copyright 2013 by United Color Technologies, LLC. All rights reserved. Unified Color Technologies, BeyondRGB, and HDR Expose are
Using The Nik Collection Plug-ins In Lightroom And Photoshop. Dan Lenardon
 Using The Nik Collection Plug-ins In Lightroom And Photoshop Dan Lenardon What Are We Going To Cover Today? A Brief Overview Of The Nik Collection By Google How To Use Nik From Within Lightroom How To
Lightroom- Creative Cloud Tips with NIK
 Lightroom- Creative Cloud Tips with NIK Motion Sequence Make several images in your camera on burst mode without following the subject. Let them move past your field. It is best to use a tripod, but not
Editing your digital images:
 Editing your digital images: 1 By Garry Sankowsky zodpub@rainforestmagic.com.au All images taken with a digital camera need to be edited. You will usually get software with your camera that can do at least
Learning Photo Retouching techniques the simple way
 Learning Photo Retouching techniques the simple way Table of Contents About the Workshop... i Workshop Objectives... i Getting Started... 1 Photoshop Workspace... 1 Setting up the Preferences... 2 Retouching
2007 Adobe Systems Incorporated. All rights reserved. Adobe Photoshop Lightroom Getting Started Guide
 2007 Adobe Systems Incorporated. All rights reserved. Adobe Photoshop Lightroom Getting Started Guide If this guide is distributed with software that includes an end user agreement, this guide, as well
Process 2003 and 2010 image editing A definitive guide to working with the image processing controls in the Develop module
 Process 2003 and 2010 image editing A definitive guide to working with the image processing controls in the Develop module The introduction of Process Version 2012 in Lightroom 4 means that when Process
Preparing images for the ZAPP digital jury system with Photoshop Elements 3.0 Larry Berman - 09/02/05
 1 Preparing images for the ZAPP digital jury system with Photoshop Elements 3.0 Larry Berman - 09/02/05 www.bermangraphics.com 800-350-9289 1 - Set color settings To convert any image to the srgb color
ON1 Photo RAW User Guide
 ON1 Photo RAW 2018 User Guide E D I T. C R E AT E. I M P R E S S. Contents Part 1: ON1 Photo RAW 2018 Overview... 1 Flexible Workflow... 1 Using the Help System... 2 System Requirements... 2 Installation...
15 Photoshop Tips. Changing Photoshop rulers from inches to picas
 5 Photoshop Tips Changing Photoshop rulers from inches to picas What s the difference between inches and picas? a 6x inch RGB JPEG file is.9 MB a 6x pica RGB JPEG file is. MB a 6x inch RGB TIFF file is.
Photo Editing in Mac and ipad and iphone
 Page 1 Photo Editing in Mac and ipad and iphone Switching to Edit mode in Photos for Mac To edit a photo you ll first need to double-click its thumbnail to open it for viewing, and then click the Edit
Professional RAW Editor for ios and icloud Photo Library (v2.0)
") Professional RAW Editor for ios and icloud Photo Library (v2.0) INTRODUCTION Thank you for downloading RAW Power. RAW Power is the first RAW editor for ios 11 that can read and modify the ios Photo Library
Professional RAW Editor for ios and icloud Photo Library (v2.0) INTRODUCTION Thank you for downloading RAW Power. RAW Power is the first RAW editor for ios 11 that can read and modify the ios Photo Library
USING GOOGLE'S NIK COLLECTION
 USING GOOGLE'S NIK COLLECTION Workshop Outline Resources Download Source: https://www.google.com/nikcollection/ Video: https://www.youtube.com/user/niksoftwarelessons There will also be a set of eight
Rubbing your Nikon RAW file the Right Way
 Rubbing your Nikon RAW file the Right Way You can ignore reality, but you can t ignore the consequences of ignoring reality. Ayn Rand If you are a Nikon shooter, you will get the best result from processing
Mullingar Camera Club Basic introduction to Digital Printing using Photoshop CC.
 Mullingar Camera Club Basic introduction to Digital Printing using Photoshop CC. Table of Contents Course aims: 1 Course presentation notes: 1 Introducing Photoshop: 1 Adjusting the Brightness or Contrast
32 Float v2 Quick Start Guide. AUTHORED BY ANTHONY HERNANDEZ - (415)
") 32 Float v2 Quick Start Guide 32 Float V2 Trademark/Copyright Information Copyright 2011 by United Color Technologies, LLC. All rights reserved. Unified Color Technologies, BeyondRGB, and HDR Float are
32 Float v2 Quick Start Guide 32 Float V2 Trademark/Copyright Information Copyright 2011 by United Color Technologies, LLC. All rights reserved. Unified Color Technologies, BeyondRGB, and HDR Float are
It makes sense to read this section first if new to Silkypix... How to Handle SILKYPIX Perfectly Silkypix Pro PDF Contents Page Index
 It makes sense to read this section first if new to Silkypix... How to Handle SILKYPIX Perfectly...145 Silkypix Pro PDF Contents Page Index 0. 0.Overview and Introduction...9 0.1. Section Names...9 0.1.1.
Adobe Photoshop CC update: May 2013
 Adobe Photoshop CC update: May 2013 Welcome to the latest Adobe Photoshop CC bulletin update. This is provided free to ensure everyone can be kept upto-date with the latest changes that have taken place
How to capture the best HDR shots.
 What is HDR? How to capture the best HDR shots. Processing HDR. Noise reduction. Conversion to monochrome. Enhancing room textures through local area sharpening. Standard shot What is HDR? HDR shot What
Luminar 2018 for Windows User Guide
 TABLE of CONTENTS Luminar 2018 for Windows User Guide By Richard Harrington Version 1.0 Welcome... 2 Key Features and Benefits of Luminar... 3 Installing and Activating Luminar... 4 System Requirements
Diploma in Adobe Lightroom - Final Assignment
 Diploma in Adobe Lightroom - Final Assignment Claudia Mumford's Certificate Report Summary Name : Claudia Mumford (69.156.53.147) Your Score : 100 out of 100 (100%) Answers : 80 Question Incorrect Answers
Wooly s personal workflow in RAW & Photoshop
 1. Open a RAW file from Bridge into the Camera Raw workspace. This photograph was taken in September 2014 at the Imperial War Museum Duxford Airshow in the United Kingdom. For history buffs this was one
Photomatix Pro User Manual. Photomatix Pro 3.0 User Manual
 Photomatix Pro User Manual Photomatix Pro 3.0 User Manual Introduction Photomatix Pro processes multiple photographs of a high contrast scene into a single image with details in both highlights and shadows.
HIGH DYNAMIC RANGE IMAGING Nancy Clements Beasley, March 22, 2011
 HIGH DYNAMIC RANGE IMAGING Nancy Clements Beasley, March 22, 2011 First - What Is Dynamic Range? Dynamic range is essentially about Luminance the range of brightness levels in a scene o From the darkest
Lightroom 5.2 Information about the latest Lightroom update
 Lightroom 5.2 Information about the latest Lightroom update The Lightroom 5.2 update has been timed to coincide with the release of Camera Raw 8.2. The latter offers a number of brand new features. Some
A.J. Wood on Instagram
 A.J. Wood http://ajwood.com ajwood@adobe.com @adobewan on Instagram The Photoshop Environment Photoshop's Start Workspace provides info at a glance including recent files, CC files, and presets for starting
V S C O F I L M M A N UA L
 VSCO FILM MANUAL GETTING STARTED WITH VSCO FILM LIGHTROOM 4, 5 & 6 ACR FOR PS CS6 & CC Thank you for buying VSCO Film, the best way to emulate film in Adobe Lightroom and Camera Raw. Combining the speed
HDR Darkroom 2 Pro User Manual
 HDR Darkroom 2 Pro User Manual Everimaging Ltd 1 / 28 www.everimaging.com Content: 1. Introduction... 3 1.1 A Brief Introduction to HDR Photography... 3 1.2 Introduction to HDR Darkroom 2 Pro... 5 2. HDR
INTERMEDIATE PHOTOSHOP: FAMILY PHOTOS
 INTERMEDIATE PHOTOSHOP: FAMILY PHOTOS What is Photoshop Elements? Photoshop Elements is a streamlined version of Adobe Photoshop CC. Despite missing some more advanced features, it is a robust piece of