in association with Getting to Grips with Printing
|
|
|
- Alexandrina Ellis
- 5 years ago
- Views:
Transcription


1 in association with Getting to Grips with Printing
2

3 Managing Colour
4
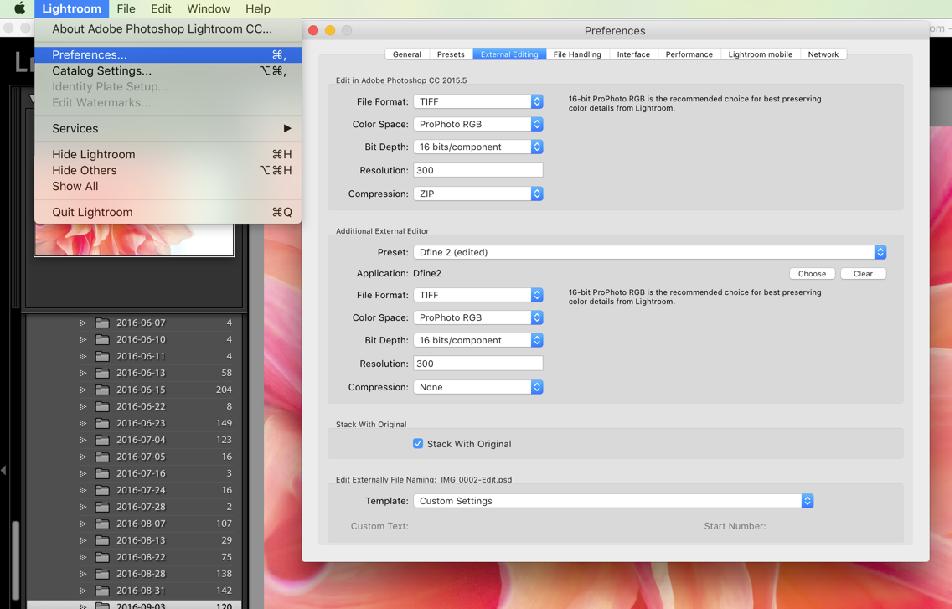
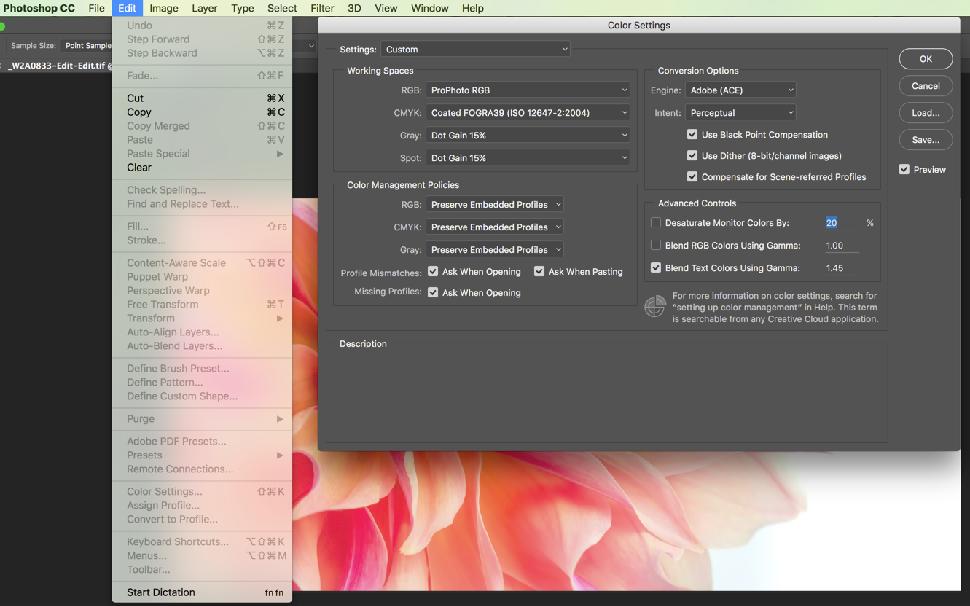
5 Custom profiles - why you should use them
6 Raw files are not colour managed
7 Should I set my camera to srgb or Adobe RGB?
8 What happens to a file if you change from one colour space to another? Assign a profile Convert to profile
9 Studio setup & Calibration
10 Monitor Calibration Settings 1. Only a guide - you need to experiment. 2. Luminance 100 to 120 cd/m2 (I more often use 80 or 90 cd/m2 - I find it matches paper better) 3. Gamma White point 5000 to 6500k (Lower number reflects warmer papers, higher number for bluer/ whiter papers) The white point can be used to reflect the whiteness of the paper you are printing to and some calibration software allows multiple profiles with different sets of settings for different papers (white points) and other preferences in the settings above.
11
12
13
14 Rendering Intents Remember - There are no rules - personal choice Perceptual - For most, the intent of choice. Looks good in isolation but may differ compared to the screen more than Relative. Colours maintain their relationships to each other. Better for smooth gradations of colour, but colour shifts are bigger. Good at shadow detail. Squeezes colours into gamut. In gamut colours shift as well as out of gamut colours. Is reversible as no colour information is lost (but not easily reversible) Relative - Clips colours to nearest possible in gamut colour. Only out of gamut colours shifted - in gamut colours remain unchanged. Always use for mono images as based on tonal information. Better if you sell prints from your website (works well with srgb viewed images). Tonal relationships can change and colours can become blocky, losing pure gradations somewhat. Often delivers punchier results. Slight loss of shadow detail. Discards colours - not reversible.

15 Perceptual Rendering Intent Relative Rendering Intent
16 Soft and Hard Proofing
17 Sharpening
18 Three stage process 1. Raw pre-sharpening 2. Creative sharpening 3. Output sharpening

19 Try holding down the alt key as you move each slider below. Amount = Intensity of sharpening Radius = Looks for edges & how much to compress them Detail = Looks for details & brings them back after above. Masking = Removes sharpening from solid areas to reduce artefacts Remember - only white areas sharpened.
20 Creative Sharpening
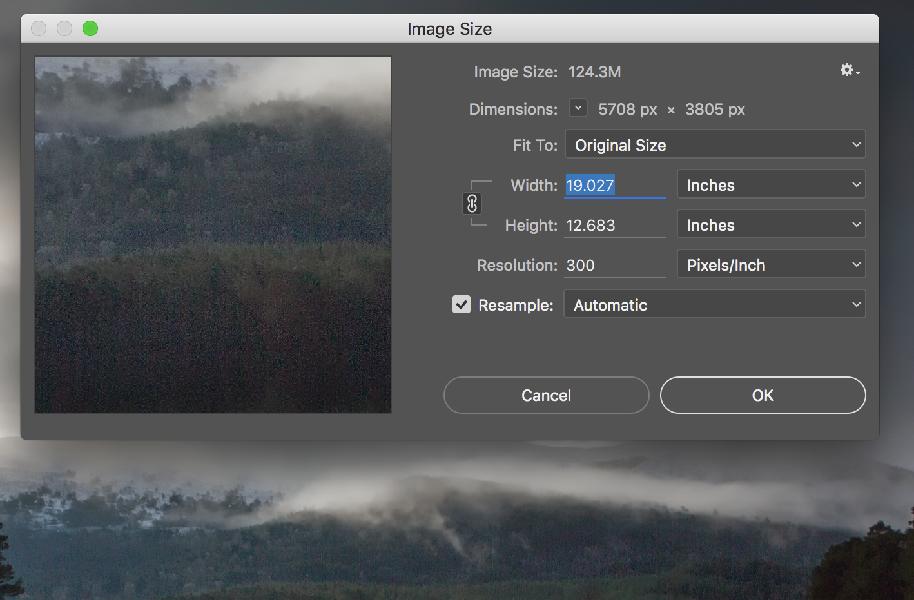
21 Sharpening in Lightroom for Fuji X-Trans Sensor Users
22 Why is Smart Sharpen so smart? 1. It lets you sharpen and then fade the sharpening separately in the shadow and highlight areas of an image 2. It detects edges and tends to produce fewer halos than Unsharp Mask 3. It has a reduce noise option, so it sharpens edges without tending to sharpen the noise in an image 4. It corrects three types of unsharp issues - Gaussian blur, lens blur and motion blur. Unsharp mask only works on Gaussian blur 5. It lets you save your settings which can speed up your workflow
23 Suggested settings for Smart Sharpen (only a starting point) 1. Ctrl-J (Windows) or cmd-j (Mac) on background layer. 2. Click Filter menu >> Sharpen >> Smart Sharpen 3. View image at 100% 4. In Preset menu select Default 5. Lower the Reduce Noise slider to about 5% to see the sharpening effect 6. Choose an Amount, for example at 300ppi use around 250 to 350% 7. Increase Radius until you see halos appear on edges and then move slider back to where they just disappear. 8. In the remove menu select the type of blur to correct - Gaussian is a good choice. Lens blur is good for sharpening fine detail with fewer halo issues. Motion blur is used if you have moved the camera slightly but you do need to enter the angle of movement. 9. Increase the Reduce noise value - 10 to 20% is about right generally - much further and the image softens 10. Expand the Shadows/highlights section - move the preview first to a shadow & midtone area and make adjustments. Aim for a Radius between about 10 & 25 (controls how many pixels beside each other will be compared to each adjusted pixel - the higher the figure, the larger the area compared. 11. Move the Fade Amount slider until you are happy with the reduction in over sharpening in the shadows 12. Chose a Tonal Width to control the range of midtones affected by the Fade Amount. The higher the figure the wider the range of midtones are affected and the more gradually the sharpening is faded into the shadows. So at 5 to 20% only very dark shadows will be sharpened, for example. 13. Now move the preview to an area of highlights and midtones. Repeat as you did with the shadows.
24 Unsharp Mask Settings - (based on image of 2000 x 3000 pixels or larger) 1. Landscapes - Amount to 150% Radius - 1 to 1.5 Threshold - 6 to Portraits - Amount 100 to 120% Radius - 1 to 2 Threshold - 4 to 6 3. Architecture etc - Amount 150 to 200% (or higher) Radius to 3 Threshold 0 to 3 4. Duplicate background layer as before 5. Filter >> Sharpen >> Unsharp Mask 6. Amount controls the increase in contrast on the edges 7. Radius controls how many pixels out from edges the filter will affect (The higher the number of pixels in an image the higher this should be set. Another tip is that for low contrast images with large simple objects and simple transitions try a radius of around 2. For images which are intricate, full of detail and high contrast go for a lower setting of Remember, if you raise the radius then lower the amount and vice versa as the effects they create are linked. 9. Threshold defines how different each area must be from an adjacent area. So 0 sharpens the entire image, at 5 to 10 high contrast areas are sharpened but lower contrast areas less so. Remember the masking tool in Lightroom - this is doing the same thing. If you increase the Threshold you can also increase the amount and Radius to sharpen edges. 10.If you are getting colour halos on edges, change the blend mode of the sharpened layer to Luminosity in the Layers panel - this means only brightness values of pixels will be sharpened, not hue and saturation values (which is causing the problem.
25 High Pass Sharpening 1. This is an edge detection filter. 2. Duplicate the background layer 3. Filter>>Other>>High Pass 4. Set the radius by eye to between 1 and 5 generally (the more pixels in an image the higher you go) 5. Change the blend mode of the layer to Overlay in the Layers panel drop down box. 6. Overlay is good because it ignores neutral grey and works on contrast - which is what we want - edge contrast. 7. If it is too strong try Soft Light. If it is too weak, try Hard Light 8. You can also change the opacity of the layer if required.
26 Print Sharpening
27 Resizing Images

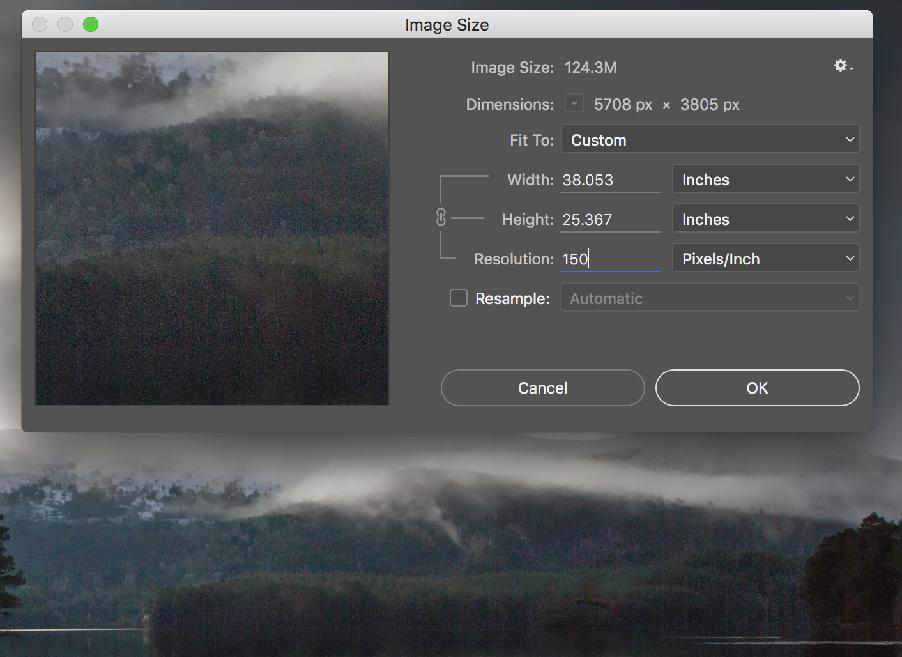
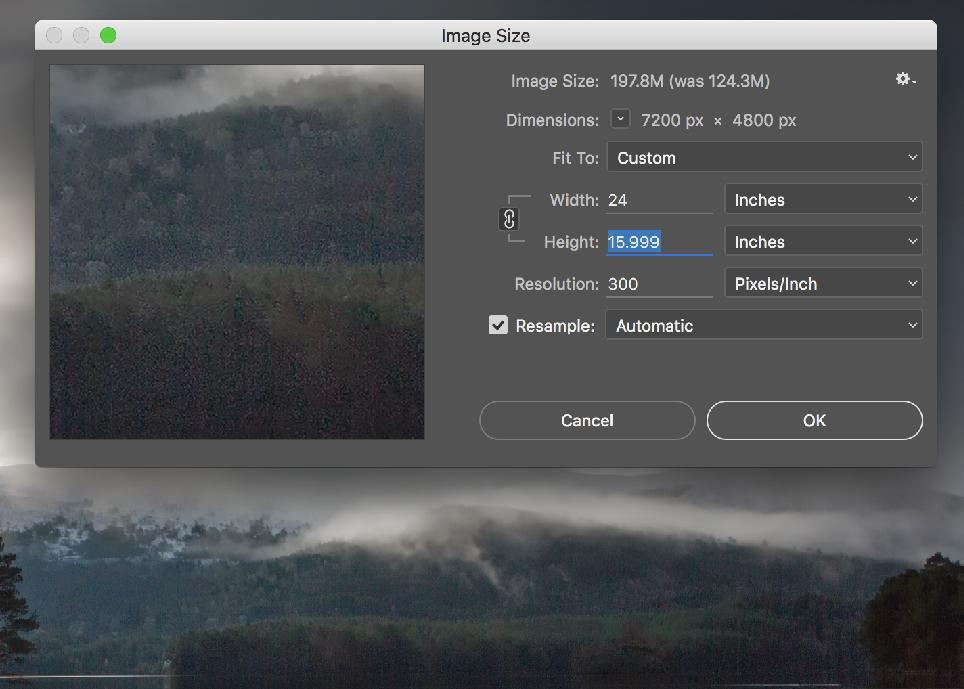
28 Understanding Pixels 5708 x 3805 px = 21,718,940 = 21.8mp 130.3mb tiff

29
30
31
32
33
34
35 Automatic (for the lazy amongst us) Photoshop chooses the resampling method based on the document type and whether the document is scaling up or down. Preserve Details (enlargement) (only use if noise is a real issue - maybe deal with noise first?) When this method is chosen, a Noise reduction slider becomes available for smoothing out noise as you upscale the image. Bicubic Smoother (enlargement) - (My enlargement method of choice usually) A good method for enlarging images based on Bicubic interpolation but designed to produce smoother results. Bicubic Sharper (reduction) - (I always use this if reducing the size of an image in PS) A good method for reducing the size of an image based on Bicubic interpolation with enhanced sharpening. This method maintains the detail in a resampled image. If Bicubic Sharper oversharpens some areas of an image, try using Bicubic. Bicubic (smoother gradients) - (I sometimes use this, but prefer Bicubic Smoother unless the gradients cause issues) A slower but more precise method based on an examination of the values of surrounding pixels. Using more complex calculations, Bicubic produces smoother tonal gradations than Nearest Neighbor or Bilinear. Nearest Neighbor (hard edges) - (don t even think about using this) A fast but less precise method that replicates the pixels in an image. This method preserves hard edges and produces a smaller file in illustrations containing edges that are not anti-aliased. However, this method can produce jagged effects, which become apparent when you distort or scale an image or perform multiple manipulations on a selection. Bilinear (use this if you are a medium quality kind of photographer) A method that adds pixels by averaging the color values of surrounding pixels. It produces medium-quality results.
36 Smaller images - A4/A3 etc - 300ppi is ideal if you have the resolution from your camera Larger images - above A3 - Experiment with/consider reducing ppi to 240 or 180. (or even lower) Compare with resampling and maintaining 300ppi. Remember - only photographers pixel peep View from the correct viewing distance. For the web - 72ppi (and embed srgb colour space)
37 Choosing the Right Paper for Your Print 1. One paper does not fit all 2. Paper choice is a crucial creative decision 3. Paper choice can hugely affect the colours your print can display. 4. Don t fixate on matt papers 5. Mono images often look MUCH better on Baryta papers (dmax) 6. Remember white paper is rarely white. The warmth of the paper will affect the colours of the print - get to know your papers whiteness. (Custom profiles will help a great deal with this). 7. Matt papers introduce a softness & subtlety to prints - they are nonreflective and good for fine detail as well as softer images. If not carefully soft and hard proofed they can suck the life out of images - reducing contrast. 8. Baryta papers have a sheen but behind glass this is not an issue. They allow more sharpening for fine detail and often give more intense, punchier results. Hold contrast well and breath life into images. 9. Matt papers much harder to print difficult colours to - they have a narrower gamut. Often a Baryta paper solves the issue.
38 Discount code for use on the Fotospeed website Quote DOUG15 for a 15% discount on your order Valid for the next seven days.
39
Printing on the Epson You should save a second.psd or tiff version of your image for printing
 Printing on the Epson 9600 Preparing your image to print You should save a second.psd or tiff version of your image for printing Resizing To observe the image size and resolution of an existing file, you
Pacific New Media David Ulrich
 Pacific New Media David Ulrich pacimage@maui.net www.creativeguide.com 808.721.2862 Sharpening and Noise Reduction in Adobe Photoshop One of the limitations of digital capture devices and digital chips
Contents: Bibliography:
 ( 2 ) Contents: Sizing an Image...4 RAW File Conversion...4 Selection Tools...5 Colour Range...5 Quick Mask...6 Extract Tool...7 Adding a Layer Style...7 Adjustment Layer...8 Adding a gradient to an Adjustment
Mullingar Camera Club Basic introduction to Digital Printing using Photoshop CC.
 Mullingar Camera Club Basic introduction to Digital Printing using Photoshop CC. Table of Contents Course aims: 1 Course presentation notes: 1 Introducing Photoshop: 1 Adjusting the Brightness or Contrast
Photoshop: Save for Web and Devices
 Photoshop: Save for Web and Devices Nigel Buckner 2011 nigelbuckner.com This handout explains how to use the Save for Web and Devices process in Photoshop. This process is useful for preparing images for
PHOTOTUTOR.com.au Share the Knowledge
 THE DIGITAL WORKFLOW BY MICHAEL SMYTH This tutorial is designed to outline the necessary steps from digital capture, image editing and creating a final print. FIRSTLY, BE AWARE OF WHAT CAN AND CAN T BE
How to Resize And Sharpen A Digital Image With PhotoShop CC
 How to Resize And Sharpen A Digital Image With PhotoShop CC I will assume that you have done all your editing. You have saved your file as a master copy. I save it as a PSD with all the layers so that
Ian Barber Photography
 1 Ian Barber Photography Sharpen & Diffuse Photoshop Extension Panel June 2014 By Ian Barber 2 Ian Barber Photography Introduction The Sharpening and Diffuse Photoshop panel gives you easy access to various
Maine Day in May. 54 Chapter 2: Painterly Techniques for Non-Painters
 Maine Day in May 54 Chapter 2: Painterly Techniques for Non-Painters Simplifying a Photograph to Achieve a Hand-Rendered Result Excerpted from Beyond Digital Photography: Transforming Photos into Fine
Optimizing Images for Digital Projection A few of our Camera Club members have been disappointed that their digital images just don t look the same
 Optimizing Images for Digital Projection A few of our Camera Club members have been disappointed that their digital images just don t look the same when projected during a digital critique or a slide show.
Kent Messamore 3/6/2010
 Post Processing Kent Messamore 3/6/2010 What we will cover Post Processing Photoshop, Lightroom, Elements, and others JPEG or RAW Photoshop Elements Workflow Organization, Create, share Photoshop Elements
2Click the Symbol XX
 Adjustment Layers, Channels and Layer Masks 2Click the Symbol XX ( Adjustment Layer ) and choose Channel Mixer. 3Check the box Monochrome and choose the values R=30, G=60, B=10. Thus you ll get a grayscale
By Washan Najat Nawi
 By Washan Najat Nawi how to get started how to use the interface how to modify images with basic editing skills Adobe Photoshop: is a popular image-editing software. Two general usage of Photoshop Creating
Pacific New Media David Ulrich
 Pacific New Media David Ulrich pacimage@maui.net www.creativeguide.com 808.721.2862 Digital Imaging Workflow in Adobe Photoshop All color and tonal correction editing should be done in a non-destructive
SHARPENING: The Arcane & Mystical Knowledge
 SHARPENING: The Arcane & Mystical Knowledge Sharpening: What is it? Why do it? Enhancement of local contrast that produces the appearance of greater definition and clarity (accutance). Where areas of different
Select your Image in Bridge. Make sure you are opening the RAW version of your image file!
 CO 3403: Photographic Communication Steps for Non-Destructive Image Adjustments in Photoshop Use the application Bridge to preview your images and open your files with Camera Raw Review the information
CONVERTING AND EDITING RAW IMAGES
 CONVERTING AND EDITING RAW IMAGES RAW V JPEG As we have found out, jpeg files are processed in the camera and much of the data is lost. Raw files are not and so all of the data is preserved. RAW FILE FORMATS:
Genuine Fractals 4.1 Evaluation Guide
 Genuine Fractals 4.1 Evaluation Guide Table of Contents Contents Introducing Genuine Fractals 4.1... 3 Introduction to Image Resampling... 3 Interpolation Methods Available in Photoshop... 3 Image Scaling
Converting and editing raw images
 Converting and editing raw images Raw v jpeg As we have found out, jpeg files are processed in the camera and much of the data is lost. Raw files are not. Raw file formats: General term for a variety of
The Arcane & Mystical Knowledge
 The Arcane & Mystical Knowledge Sharpening: What is it? Enhancement of local contrast that produces the appearance of greater definition and clarity (accutance). Where areas of different luminance values
loss of detail in highlights and shadows (noise reduction)
") Introduction Have you printed your images and felt they lacked a little extra punch? Have you worked on your images only to find that you have created strange little halos and lines, but you re not sure
Introduction Have you printed your images and felt they lacked a little extra punch? Have you worked on your images only to find that you have created strange little halos and lines, but you re not sure
Color, Resolution, & Other Image Essentials
 www.gilbertconsulting.com blog.gilbertconsulting.com kgilbert@gilbertconsulting.com Twitter: @gilbertconsult lynda.com/keithgilbert Every Photoshop image consists of three specific attributes: image resolution,
Resizing Images in Photoshop
 Resizing Images in Photoshop Dr Roy Killen, EFIAP, GMPSA, GMAPS, APSEM (c) 2017 Roy Killen Resizing images v4.0 1 Resizing Images in Photoshop CC Roy Killen, EFIAP, GMPSA, GMAPS, APSEM These notes assume
Tablet overrides: overrides current settings for opacity and size based on pen pressure.
 Photoshop 1 Painting Eye Dropper Tool Samples a color from an image source and makes it the foreground color. Brush Tool Paints brush strokes with anti-aliased (smooth) edges. Brush Presets Quickly access
The Camera Club. David Champion January 2011
 The Camera Club B&W Negative Proccesing After Scanning. David Champion January 2011 That s how to scan a negative, now I will explain how to process the image using Photoshop CS5. To achieve a good scan
HISTOGRAMS. These notes are a basic introduction to using histograms to guide image capture and image processing.
 HISTOGRAMS Roy Killen, APSEM, EFIAP, GMPSA These notes are a basic introduction to using histograms to guide image capture and image processing. What are histograms? Histograms are graphs that show what
PHOTO 11: INTRODUCTION TO DIGITAL IMAGING
 1 PHOTO 11: INTRODUCTION TO DIGITAL IMAGING Instructor: Sue Leith, sleith@csus.edu EXAM REVIEW Computer Components: Hardware - the term used to describe computer equipment -- hard drives, printers, scanners.
VECTOR PAINTINGS - User Guide VECTOR PAINTINGS. For Adobe Photoshop Elements 2019, 2018, 15, 14, 13, 12, 11. User Guide
 VECTOR PAINTINGS For Adobe Photoshop Elements 2019, 2018, 15, 14, 13, 12, 11 User Guide CONTENTS 1. THE BASICS...1 1.1. About the effects...1 1.2. How the actions are organized...1 1.3. Downloading and
Adobe Studio on Adobe Photoshop CS2 Enhance scientific and medical images. 2 Hide the original layer.
 1 Adobe Studio on Adobe Photoshop CS2 Light, shadow and detail interact in wild and mysterious ways in microscopic photography, posing special challenges for the researcher and educator. With Adobe Photoshop
1. Transfer original JPEG (.jpg ) or RAW camera file to hard drive of your choice via USB or Firewire directly from the camera or with a card reader.
 or RAW camera file to hard drive of your choice via USB or Firewire directly from the camera or with a card reader.") Processing a Digital Image Revision 4.17.13 1. Transfer original JPEG (.jpg ) or RAW camera file to hard drive of your choice via USB or Firewire directly from the camera or with a card reader. 2. Sort,
Processing a Digital Image Revision 4.17.13 1. Transfer original JPEG (.jpg ) or RAW camera file to hard drive of your choice via USB or Firewire directly from the camera or with a card reader. 2. Sort,
Lesson 16 Text, Layer Effects, & Filters
 Lesson 16 Text, Layer Effects, & Filters Digital Media I Susan M. Raymond West High School In this tutorial, you will: Create a Type Layer Add and Format Type within a Type Layer Apply Layer Effects Apply
Resizing Images for Competition Entry
 Resizing Images for Competition Entry Dr Roy Killen, EFIAP, GMPSA, APSEM TABLE OF CONTENTS Some Basic Principles 1 An Simple Way to Resize and Save Files in Photoshop 5 An Alternative way to Resize Images
Preparing Images for Digital Projection
 Preparing Images for Digital Projection Checklist see the notes on the following pages for more details 1 Edit your image at full native resolution but do not sharpen. 2 Save it as a normal Photoshop file
ADOBE PHOTOSHOP CS TUTORIAL
 ADOBE PHOTOSHOP CS TUTORIAL A D O B E P H O T O S H O P C S Adobe Photoshop CS is a popular image editing software that provides a work environment consistent with Adobe Illustrator, Adobe InDesign, Adobe
Adobe Photoshop CS5 Tutorial
 Adobe Photoshop CS5 Tutorial GETTING STARTED Adobe Photoshop CS5 is a popular image editing software that provides a work environment consistent with Adobe Illustrator, Adobe InDesign, Adobe Photoshop
Photoshop Filters. Applying Filters from the Filter Menu
 Photoshop Filters Filters are easy to learn and use, and yet are one of Photoshop s most powerful features. When used properly, they can recreate a number of photographic and artistic effects, can enhance
MY ASTROPHOTOGRAPHY WORKFLOW Scott J. Davis June 21, 2012
 Table of Contents Image Acquisition Types 2 Image Acquisition Exposure 3 Image Acquisition Some Extra Notes 4 Stacking Setup 5 Stacking 7 Preparing for Post Processing 8 Preparing your Photoshop File 9
Title goes Shadows and here Highlights
 Shadows Title goes and Highlights here The new Shadows and Highlights command in Photoshop CS (8) is a great new tool that will allow you to adjust the shadow areas of an image while leaving the highlights
IMAGE SHARPENING. Dr Roy Killen EFIAP APSEM GMPSA (C) ROY KILLEN SHARPENING!1
 ROY KILLEN SHARPENING!1") IMAGE SHARPENING Dr Roy Killen EFIAP APSEM GMPSA 2017 (C) ROY KILLEN SHARPENING!1 IMAGE SHARPENING WHAT IS A SHARP IMAGE? 3 GETTING IMAGES SHARP IN CAMERA 3 GENERAL SHARPENING PRINCIPLES 7 SHARPENING WITH
IMAGE SHARPENING Dr Roy Killen EFIAP APSEM GMPSA 2017 (C) ROY KILLEN SHARPENING!1 IMAGE SHARPENING WHAT IS A SHARP IMAGE? 3 GETTING IMAGES SHARP IN CAMERA 3 GENERAL SHARPENING PRINCIPLES 7 SHARPENING WITH
Adobe Photoshop. Levels
 How to correct color Once you ve opened an image in Photoshop, you may want to adjust color quality or light levels, convert it to black and white, or correct color or lens distortions. This can improve
Black and White using Photoshop
 Topics to be covered: Methods for B&W conversion Improving the image Toning Printer color management Black and White using Photoshop Various ways to get to B&W Adobe Raw Converter (ACR) in from Bridge
PHOTOSHOP TUTORIAL 14 How To Prepare Your Image For Display on a Digital Projector (in Photoshop CC)
") PHOTOSHOP TUTORIAL 14 How To Prepare Your Image For Display on a Digital Projector (in Photoshop CC) Introduction. This tutorial is aimed at photographers that convert their images for Projected Image
PHOTOSHOP TUTORIAL 14 How To Prepare Your Image For Display on a Digital Projector (in Photoshop CC) Introduction. This tutorial is aimed at photographers that convert their images for Projected Image
DIGITAL IMAGING FOUNDATIONS
 CHAPTER DIGITAL IMAGING FOUNDATIONS Photography is, and always has been, a blend of art and science. The technology has continually changed and evolved over the centuries but the goal of photographers
CS 547 Digital Imaging Lecture 2
 CS 547 Digital Imaging Lecture 2 Basic Photo Corrections & Retouching and Repairing Selection Tools Rectangular marquee tool Use to select rectangular images Elliptical Marque Tool Use to select elliptical
SHAW ACADEMY NOTES. Ultimate Photography Program
 SHAW ACADEMY NOTES Ultimate Photography Program What is a Raw file? RAW is simply a file type, like a JPEG. But, where a JPEG photo is considered a photograph, a RAW is a digital negative, an image that
Colour Management & Profiling
 Colour Management & Profiling Why Colour management in photography is very important if we are to produce a final product (digital projected image or print) which matches what we saw when took the photography
Using The Nik Collection Plug-ins In Lightroom And Photoshop. Dan Lenardon
 Using The Nik Collection Plug-ins In Lightroom And Photoshop Dan Lenardon What Are We Going To Cover Today? A Brief Overview Of The Nik Collection By Google How To Use Nik From Within Lightroom How To
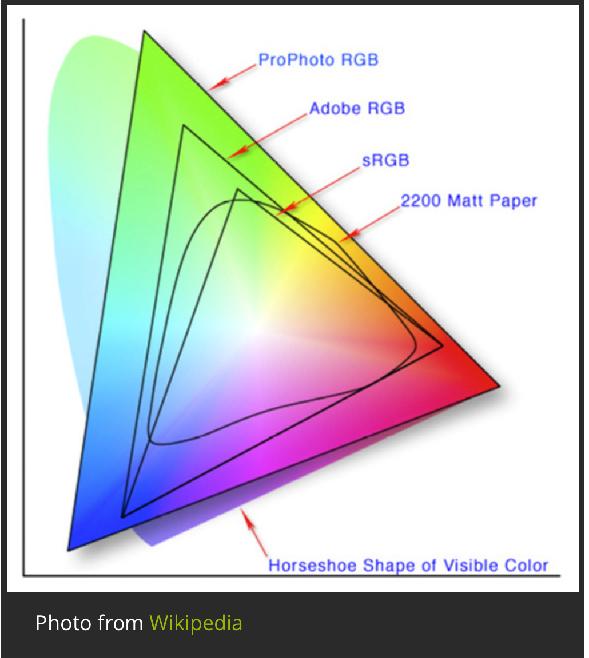
Adobe RGB (1998) vs. ProPhoto RGB
 vs. ProPhoto RGB") Page1 Adobe RGB (1998) vs. ProPhoto RGB Are you getting maximum quality in your images and prints? The answer is probably not! Why? Read on. This is an extract from an Adobe Technical paper: At this point,
Page1 Adobe RGB (1998) vs. ProPhoto RGB Are you getting maximum quality in your images and prints? The answer is probably not! Why? Read on. This is an extract from an Adobe Technical paper: At this point,
An Introduction to Layers, Masks and Channels in Photoshop
 An Introduction to Layers, Masks and Channels in Photoshop Roy Killen, GMAPS, EFIAP, GMPSA (c) 2017 Roy Killen Layers, Masks and Channels Page 1 Two approaches to image editing When images are edited in
Adobe Photoshop CC 2018 Tutorial
 Adobe Photoshop CC 2018 Tutorial GETTING STARTED Adobe Photoshop CC 2018 is a popular image editing software that provides a work environment consistent with Adobe Illustrator, Adobe InDesign, Adobe Photoshop,
HDR Show & Tell Image / Workflow Review Session. Dave Curtin Nassau County Camera Club October 3 rd, 2016
 HDR Show & Tell Image / Workflow Review Session Dave Curtin Nassau County Camera Club October 3 rd, 2016 Capturing Realistic HDR Images Topics: HDR Review (Brief Summary from HDR Presentation Parts: 1
Photo Editing Workflow
 Photo Editing Workflow WHY EDITING Modern digital photography is a complex process, which starts with the Photographer s Eye, that is, their observational ability, it continues with photo session preparations,
POLAROID EMULATION INCREASED CONTRAST, SATURATION & CLARITY
 POLAROID EMULATION The Polaroid SX-70 Camera was a sensational tool. It took photographs in real time. But just the color balance of the film and they way it developed had a unique look. Here are some
Using Adobe Photoshop
 Using Adobe Photoshop 8 In the last section we looked at adjusting colours to improve your image. In this section we ll look at various ways of touching up your images to fix problems with the images or
Course Syllabus. Course Title. Who should attend? Course Description. Photoshop ( Level 2 (
 Course Title Photoshop ( Level 2 ( Course Description Adobe Photoshop CC (Creative Clouds) is the world's most powerful graphic design (bitmap-based) program for editing, manipulating, compositing, enhancing
Using Adobe Photoshop
 Using Adobe Photoshop 8 In the last section we looked at adjusting colours to improve your image. In this section we ll look at various ways of touching up your images to fix problems with the images or
Photoshop Elements 3 Filters
 Photoshop Elements 3 Filters Many photographers with SLR cameras (digital or film) attach filters, such as the one shown at the right, to the front of their lenses to protect them from dust and scratches.
Gernot Hoffmann Edit in Lab and Proof Colors
 Gernot Hoffmann Edit in Lab and Proof Colors Contents 1. Introduction 2 2. Background Neutralization 3 3. Proof Colors, Gamut Warning and Correction in Lab 6 4. Sharpening 9 5. Orange Grass 10 6. Blue
GETTING STARTED. 0 P a g e B a s i c s o f A d o b e P h o t o s h o p A g a P r i v a t e I n s t i t u t e f o r c o m p u t e r s c i e n c e
 GETTING STARTED 0 P a g e B a s i c s o f A d o b e P h o t o s h o p Adobe Photoshop: is a popular image editing software that provides a work environment consistent with Adobe Illustrator, Adobe InDesign,
Wooly s personal workflow in RAW & Photoshop
 1. Open a RAW file from Bridge into the Camera Raw workspace. This photograph was taken in September 2014 at the Imperial War Museum Duxford Airshow in the United Kingdom. For history buffs this was one
Topaz Labs DeNoise 3 Review By Dennis Goulet. The Problem
 Topaz Labs DeNoise 3 Review By Dennis Goulet The Problem As grain was the nemesis of clean images in film photography, electronic noise in digitally captured images can be a problem in making photographs
Printing at a commercial printing service
 Photo 65a Kate Jordahl Printing at a commercial printing service Foothill College Commercial printing services range in price and product. For this type of service, you will likely have to Convert to Profile
PS958 - SHARPENING WORKFLOW 1 N/08/08
 INTRODUCTION TO GRAPHICS Sharpening Workflow Information Sheet No. PS958 Sharpening is a critical step in digital imaging, yet few people are satisfied with the results. Research conducted for a commercial
Wisconsin Heritage Online Digital Imaging Guidelines QUICK GUIDE TO SCANNING
 Wisconsin Heritage Online Digital Imaging Guidelines QUICK GUIDE TO SCANNING January 2010 This Scanning Quick Guide is a summary of the recommended scanning standards for WHO Content Providers. It is intended
Machinery HDR Effects 3
 1 Machinery HDR Effects 3 MACHINERY HDR is a photo editor that utilizes HDR technology. You do not need to be an expert to achieve dazzling effects even from a single image saved in JPG format! MACHINERY
Improve your photos and rescue old pictures
 PSPRO REVISTED Nov 5 2007 Page 1 of 7 Improve your photos and rescue old pictures This guide gives tips on how you can use Paint Shop5 and similar free graphic programmes to improve your photos. It doesn
lightroom vs. capture one pro
 THE ADOBE PHOTOSHOP HOW-T0 MAGAZINE SEPTEMBER 2016 DYNAMIC RANGE A close-up look at the many tools in Photoshop for removing distracting objects PHOTOGRAPHY SECRETS Learn how to re-create the mood and
Monaco ColorWorks User Guide
 Monaco ColorWorks User Guide Monaco ColorWorks User Guide Printed in the U.S.A. 2003 Monaco Systems, Inc. All rights reserved. This document contains proprietary information of Monaco Systems, Inc. No
Using the Advanced Sharpen Transformation
 Using the Advanced Sharpen Transformation Written by Jonathan Sachs Revised 10 Aug 2014 Copyright 2002-2014 Digital Light & Color Introduction Picture Window Pro s Advanced Sharpen transformation is a
Acknowledgements About this book Other Goodies Included with this Book Resources for Nikon Photographers. Part I: Capture NX2 2. Why Capture NX2?
 The Photographer s Guide to Capture NX2 Contents Acknowledgements About this book Other Goodies Included with this Book Resources for Nikon Photographers x xi xii xiii Part I: Capture NX2 2 Why Capture
PHOTOSHOP TUTORIAL: DIGITAL DARKROOM TECHNIQUES
 PHOTOSHOP TUTORIAL: DIGITAL DARKROOM TECHNIQUES STEP BY STEP TRAINING Learn by doing step by step exercises. Includes downloadable class files that work on Mac & PC. EDITION 1 Copyright Info Published
METAL TEXT EFFECT. Step 1: Create A New Document. Step 2: Fill The Background With Black
 METAL TEXT EFFECT In this text effects tutorial, we ll learn how to easily create metal text, a popular effect widely used in video games and movie posters! It may seem like there s a lot of steps involved,
Essential Post Processing
 Essential Post Processing By Ian Cran Preamble Getting to grips with Photoshop and Lightroom could be described in three stages. One is always learning and going through stages but there are three main
How To Set Up & Calibrate Your EIZO Monitor
 How To Set Up & Calibrate Your EIZO Monitor - A PUBLICATION OF EIZO APAC- 1 INTRODUCTION Congratulations! You ve invested in an EIZO monitor. You ve gone through the exciting unboxing process. Now what?
EXTREME CONTRAST PHOTO EFFECT
 EXTREME CONTRAST PHOTO EFFECT In this Photoshop tutorial, we re going to learn how to use layers, layer blend modes, some noise, a little sharpening, and a simple adjustment layer to easily give a photo
Rubbing your Nikon RAW file the Right Way
 Rubbing your Nikon RAW file the Right Way You can ignore reality, but you can t ignore the consequences of ignoring reality. Ayn Rand If you are a Nikon shooter, you will get the best result from processing
Why soft proofing may not always work
 Why soft proofing may not always work Why it is important to learn to manage your expectations when using soft proofing in Lightroom Soft proofing is an important new feature in Lightroom 4. While it is
The Layer Blend Modes drop-down box in the top left corner of the Layers palette.
 Photoshop s Five Essential Blend Modes For Photo Editing When it comes to learning Photoshop, believe it or not, there's really only a handful of things you absolutely, positively need to know. Sure, Photoshop
Using Adobe Photoshop
 Using Adobe Photoshop 6 One of the most useful features of applications like Photoshop is the ability to work with layers. allow you to have several pieces of images in the same file, which can be arranged
PHOTOGRAPHY: MINI-SYMPOSIUM
 PHOTOGRAPHY: MINI-SYMPOSIUM In Adobe Lightroom Loren Nelson www.naturalphotographyjackson.com Welcome and introductions Overview of general problems in photography Avoiding image blahs Focus / sharpness
Software & Computers DxO Optics Pro 5.3; Raw Converter & Image Enhancer With Auto Or Manual Transmission By Howard Millard March, 2009
 Software & Computers DxO Optics Pro 5.3; Raw Converter & Image Enhancer With Auto Or Manual Transmission By Howard Millard March, 2009 Whether you shoot raw or JPEG, whether you re on the Windows or Mac
Camera Club of Hendersonville
 For the best presentation, images submitted for digital projection need to be prepared and resized properly. The club displays images with a high quality projector so the final image needs to be no more
A Basic Guide to Photoshop Adjustment Layers
 A Basic Guide to Photoshop Adjustment Layers Photoshop has a Panel named Adjustments, based on the Adjustment Layers of previous versions. These adjustments can be used for non-destructive editing, can
Teach Yourself Adobe Photoshop Topic 9: Photo Retouching Part 2
 http://www.gerrykruyer.com Teach Yourself Adobe Photoshop Topic 9: Photo Retouching Part 2 In the last week s lesson, you repaired damaged areas of an image, removed unwanted parts of an image, cloned
What is real? What is art?
 HDCC208N Fall 2018 We ll fix it in post The Digital Darkroom What is real? What is art? We have been discussing this pair of questions at various points this semester, with drawings, paintings, the camera
A Division of Sun Chemical Corporation. Unsharp Masking How to Make Your Images Pop!
 Unsharp Masking How to Make Your Images Pop! Copyright US INK Volume XL A re your images dull and lack pop? Do you want your pictures to stand off the page more? Well maybe you are not using Unsharp Masking
Identifying Design Elements When Preparing Images
 DOMAIN 2 Identifying Design Elements When Preparing Images OBJECTIVES Upon completion of this domain, you should be able to: Demonstrate knowledge of image resolution, image size, and image file format
Add Rays Of Sunlight To A Photo With Photoshop
 Add Rays Of Sunlight To A Photo With Photoshop Written by Steve Patterson. In this photo effects tutorial, we'll learn how to easily add rays of sunlight to an image, a great way to make an already beautiful
BCC 3 Way Color Grade. Parameter descriptions:
 BCC 3 Way Color Grade The 3 Way Color Grade filter enables you to color correct an input image using industry standard Lift- Gamma- Gain controls with an intuitive color sphere and luma slider interface.
Bristol Photographic Society Introduction to Digital Imaging
 Bristol Photographic Society Introduction to Digital Imaging Part 16 HDR an Introduction HDR stands for High Dynamic Range and is a method for capturing a scene that has a light range (light to dark) that
Extreme Makeovers: Photoshop Retouching Techniques
 Extreme Makeovers: Table of Contents About the Workshop... 1 Workshop Objectives... 1 Getting Started... 1 Photoshop Workspace... 1 Retouching Tools... 2 General Steps... 2 Resolution and image size...
Photoshop: Manipulating Photos
 Photoshop: Manipulating Photos All Labs must be uploaded to the University s web server and permissions set properly. In this lab we will be manipulating photos using a very small subset of all of Photoshop
Colour Management Workflow
 Colour Management Workflow The Eye as a Sensor The eye has three types of receptor called 'cones' that can pick up blue (S), green (M) and red (L) wavelengths. The sensitivity overlaps slightly enabling
Module All You Ever Need to Know About The Displace Filter
 Module 02-05 All You Ever Need to Know About The Displace Filter 02-05 All You Ever Need to Know About The Displace Filter [00:00:00] In this video, we're going to talk about the Displace Filter in Photoshop.
VECTOR ART - User Guide VECTOR ART. For Adobe Photoshop CC, CS6, CS5, CS4. User Guide
 VECTOR ART For Adobe Photoshop CC, CS6, CS5, CS4 User Guide TABLE OF CONTENTS 1. THE BASICS... 1 1.1. About the effects... 1 1.2. How the actions are organized... 1 2. INSTALLATION & TROUBLESHOOTING...
Resizing for ACCC Competition. Rev 1.0 9/12/2011
 Resizing for ACCC Competition Rev 1.0 9/12/2011 This document contains instructions for resizing your images to comply with the new Digital Image Competition Guidelines. In this document we have attempted
Calibration. Kent Messamore 7/23/2013. JKM 7/23/2013 Enhanced Images 1
 Calibration Kent Messamore 7/23/2013 JKM 7/23/2013 Enhanced Images 1 Predictable Consistent Results? How do you calibrate your camera? Auto White Balance in camera is inconsistent Amateur takes a single
Photoshop for Photography
 An introduction to: Photoshop for Photography Objective: Digital image editing as a means to an end, not an end in itself. Graeme James Presented PHPC 6 June 2011 Revised 7 June 2011 Article Outline pages
step 1 PHOTOSHOP TUTORIAL 9 Hein Waschefort for VSS Creative and PSSA
 PHOTOSHOP TUTORIAL 9 Hein Waschefort for VSS Creative and PSSA Tip 1 - Lifting skin tones In the early and mid 20th century, when monochrome was king, no professional portrait (or movie) photographer would
32 Float v2 Quick Start Guide. AUTHORED BY ANTHONY HERNANDEZ - (415)
") 32 Float v2 Quick Start Guide 32 Float V2 Trademark/Copyright Information Copyright 2011 by United Color Technologies, LLC. All rights reserved. Unified Color Technologies, BeyondRGB, and HDR Float are
32 Float v2 Quick Start Guide 32 Float V2 Trademark/Copyright Information Copyright 2011 by United Color Technologies, LLC. All rights reserved. Unified Color Technologies, BeyondRGB, and HDR Float are