HDR Show & Tell Image / Workflow Review Session. Dave Curtin Nassau County Camera Club October 3 rd, 2016
|
|
|
- Kelly Paul
- 6 years ago
- Views:
Transcription
1 HDR Show & Tell Image / Workflow Review Session Dave Curtin Nassau County Camera Club October 3 rd, 2016

2
3 Capturing Realistic HDR Images Topics: HDR Review (Brief Summary from HDR Presentation Parts: 1 & 2) HDR Post-Processing. Sample HDR Workflow. Member Image Show & Tell / Workflow Discussion Q & A.
4
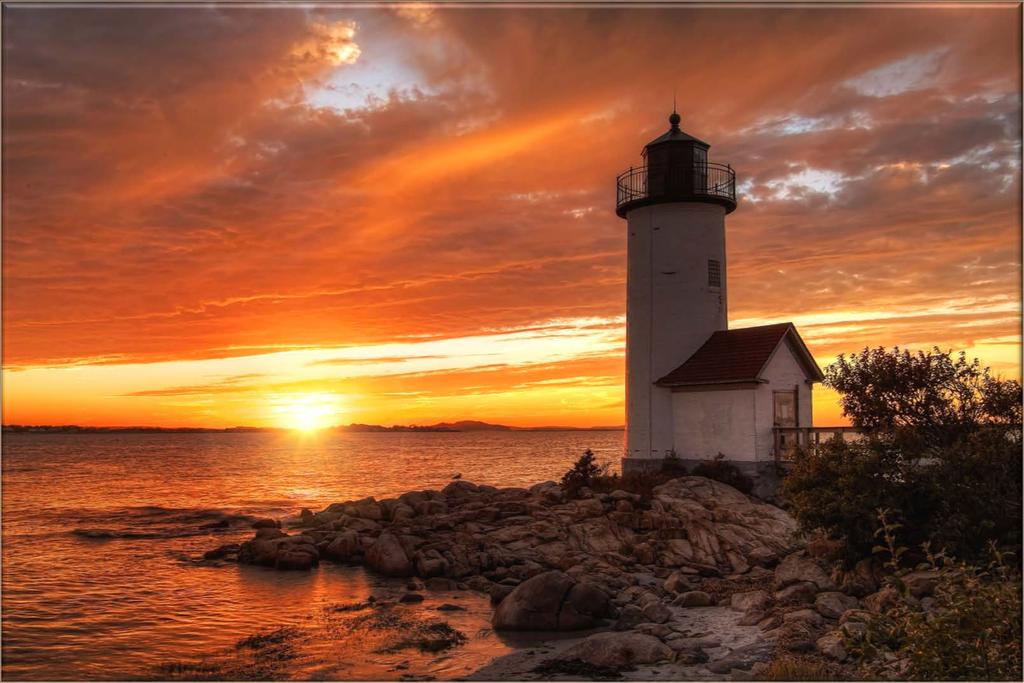
5 HDR Photography: In Camera Quick Review: What is Bracketing?
 EV: -2 EV: 0 EV: +2 EV = Exposure Values.")
6 What are HDR Brackets? (EV -2/ 0 / +2) EV: -2 EV: 0 EV: +2 EV = Exposure Values. EV s are more commonly referred to as: Stops.
7 What are Brackets? EV: 0 Brackets are commonly shot in groups of 3, 5, 7, or 9. Typically in odd numbers. The number of stops between images can be set for 1 stop, 2 stops, or even smaller increments in between. Typically brackets are set to either +/- 1 stop or +/- 2 stops in between. If you re shooting 3 brackets, consider 2 stops in between each to cover a wider dynamic range. If you re shooting 5, 7, or 9, consider 1 stop in between as you ll have more images in between to pull detail from. Use a greater number of brackets when trying to cover a wider dynamic range. Always meter the shot to achieve a perfectly exposed image, and the auto bracketing feature of the camera will handle the +/- images.
8 Now that I have my bracketed images What s next? What software do I need to create an HDR Image?
9 Capturing Realistic HDR Images Post-Processing
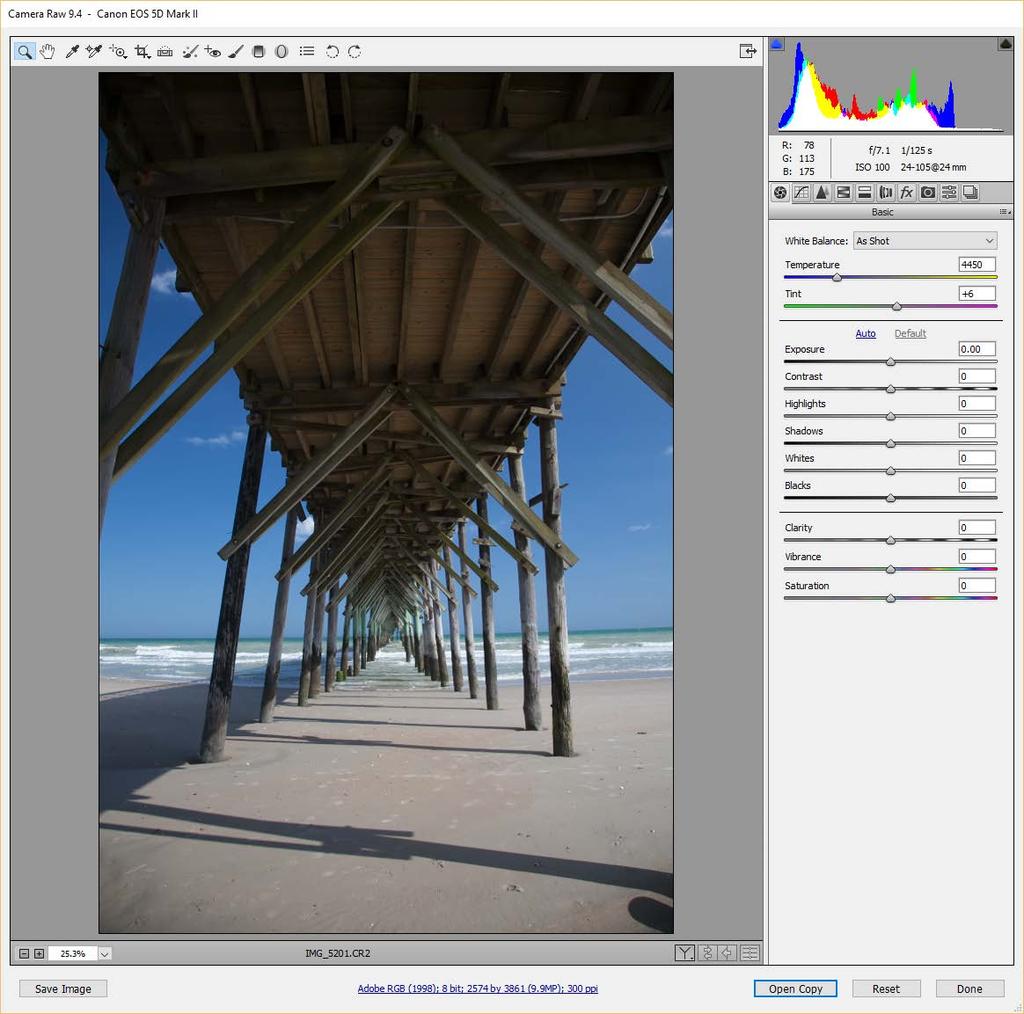
10 Start with your RAW images and process in Adobe Camera Raw (ACR).
11
12 Adobe Camera Raw (ACR) Perform some minor adjustments in ACR: Ensure that all bracketed shots needed for the HDR image are loaded into ACR. Ensure that all images are selected so ACR adjustments are applied to all images. When all images adjustments have been completed, save the resulting files as *.TIF. The TIF files will be used as your input into the HDR processing software. Open the TIF files in Photoshop before processing in the HDR software plan to remove noise from the images prior to processing. HDR software does include feature to remove noise, but some noise reduction plugins can do a better job of cleaning it up.
13 Open the RAW files (YOURIMAGES.CR2) from Bridge Perform minor adjustments in Adobe Camera RAW (ACR): White Balance: Adjusts the Color Temp of the Image. Clarity: Adjusts midtone contrast Helps make your images sharper without actually sharpening them. Vibrance: Makes only dull colors in the image more vibrant and colorful. Saturation: Makes every color more vibrant and colorful (even the ones that are already vibrant and colorful). Tread lightly with this adjustment. Consider Enabling Lens Profile Corrections.
14 Adobe Camera Raw (ACR) Input Sharpening Settings Amount: Adjusts edge definition. Increase the Amount value to increase sharpening. A value of zero (0) turns off sharpening. In general, set Amount to a lower value for cleaner images. Radius: Adjusts the size of the details that sharpening is applied to. Photos with fine details generally need a lower setting. Photos with larger details can use a larger radius. Using too large a radius generally results in unnatural-looking results. Detail: Adjusts how much high-frequency information is sharpened in the image and how much the sharpening process emphasizes edges. Lower settings primarily sharpen edges to remove blurring. Higher values are useful for making the textures in the image more pronounced. Masking: Controls an edge mask. With a setting of zero (0), everything in the image receives the same amount of sharpening. With a setting of 100, sharpening is mostly restricted to those areas near the strongest edges. Press Alt (Windows) or Option (Mac OS) while dragging this slider to see the areas to be sharpened (white) versus the areas masked out (black). ** Note: Sharpening definitions courtesy Adobe.
15 Photomatix Pro Load all bracketed shots into Photomatix to combine into a single HDR image. The combined image will contain great detail from the darkest to the lightest areas. Photomatix can use RAW, TIF and JPG files as input to merge into single HDR image. My preference is to use TIF files that include previous ACR adjustments & noise reduction.
16 Photomatix Pro Typical Photomatix HDR Options to Consider: Align Source Settings / Include Perspective Corrections. Presets available for Tripod or Hand-Held. Show Options to Remove Ghosts. Reduce Noise (If not handled in Photoshop prior to Photomatix use). Reduce Chromatic Aberrations.
17 Photomatix Pro Typical Photomatix HDR Options to Consider: HDR presets are available to select a base look for the combined image. Realistic, Artistic and b/w presets are available. Sliders are used to tune the overall look of the HDR image. Avoid adjusting color temps / saturation in Photomatix Perform those updates in PS later. Once you ve established your preferred HDR settings for an image, you can save them for use again as a preset.
18 Photomatix Pro / Photoshop Considerations After the new Photomatix HDR image is complete: Do not perform contrast adjustments or sharpening in Photomatix. Wait to perform those tasks in Photoshop during final post-processing. Work on new image in Photoshop... Make additional modifications as needed / desired. Save the new working HDR file as a PSD file to include Photoshop layer adjustments. When complete with all Photoshop modifications, flatten the image, save as TIF file. If desired, save the TIF file again as JPG for use on the web, social media, etc.
19 Photoshop
20 Photoshop Continue with final processing of the HDR image: Save the new HDR file as a TIF file. Bring the TIF file into Photoshop to continue post processing. Additional adjustments include fixing problems areas, cropping, straightening, color correction, etc. Do not perform contrast adjustments or sharpening in Photomatix. Wait to perform those tasks in Photoshop during final post-processing. The new file created in Photomatix will be available now in Adobe: Bridge. Double click the file to bring into Photoshop.
21 Some of My Favorite PS Keyboard Shortcuts: Photoshop B Brush Tool C Crop Tool D Default Background / Foreground Colors (Black & White) M Marquee Tool S Clone Stamp Tool V Move Tool X Exchange Background / Foreground Colors Space Bar Hand Tool (Hold Down Space Bar) 0-9 Select Layer, Press # to Set Opacity (Ex: 4 = 40%, 8 = 80%, etc.) Ctrl-J Copy Layer Ctrl + H Hide Guidelines Shift + F5 Open Fill Dialogue - Content Aware Fill to Remove Items from Image
22 Output Sharpening Methods: Photoshop High Pass -- Limits sharpening to the edges in the image which is where the most value can be obtained from sharpening the image. Steps: Copy Background Layer (Ctrl-J). Select: Filter > Other > High Pass Select Radius where main components are only slightly visible. Set Blending Mode to Overlay on Sharpening Layer.
23 Photoshop - Smart Sharpen Filter Allows for image sharpening, and allows for sharpening to be faded separately in the shadow & highlights as needed. With its reduce noise option, the filter sharpens edges without sharpening noise. Smart sharpen lets you choose from three algorithms (to correct Gaussian blur, lens blur, or motion blur). Smart sharpen lets you save and reuse your settings, for greater speed and consistency in your workflow. How-To: Copy Background Layer (Ctrl-J). Select: Filter > Sharpen > Smart Sharpen Select Radius where main components are only slightly visible. Set Blending Mode to Overlay on Sharpening Layer. Adjust Amount / Radius Typical settings: Amount- Around 100% / Radius: Around Select: Remove Blur Type (Gaussian, Motion or Lens Blur).
24 Capturing Realistic HDR Images Sample HDR Workflow.
25 From RAW brackets to Finished Image: Sample Workflow Summary Start with RAW files Open in Adobe Bridge. Make Adobe Camera RAW adjustments as desired. Save RAW files as TIF files Make sure ACR changes are applied to all brackets. Load TIF files into Photomatix and process to construct a processed HDR image. Save completed Photomatix HDR file as a new TIF file.
26 From RAW brackets to Finished Image: Sample Workflow Summary Load New HDR TIF into Photoshop and make additional post processing adjustments. Save as a PSD file in Photoshop until all desired post processing has been completed. Flatten completed image, save as TIF file. If necessary, save another copy as JPG file, ready for publication on the web, social media, or use in other applications.
27 Capturing Realistic HDR Images Member HDR Images & Workflow Discussion How did you create your images? Bracketing, Camera Modes, Tripod, Shutter Release, etc. What were the post-processing steps / software involved? What issues did you encounter? How was the overall process? What would you do differently next time around?
28 Capturing Realistic HDR Images Sample of My HDR Workflow (Time Permitting)
29 Capturing Realistic HDR Images Q & A.
30 Capturing Realistic HDR Images Thank you again!!! As always, I m available if you ever have any questions. Please visit me on Facebook (Dave Curtin Photography) - or -
Capturing Realistic HDR Images. Dave Curtin Nassau County Camera Club February 24 th, 2016
 Capturing Realistic HDR Images Dave Curtin Nassau County Camera Club February 24 th, 2016 Capturing Realistic HDR Images Topics: What is HDR? In Camera. Post-Processing. Sample Workflow. Q & A. Capturing
Movie 7. Merge to HDR Pro
 Movie 7 Merge to HDR Pro 1 Merge to HDR Pro When shooting photographs with the intention of using Merge to HDR Pro to merge them I suggest you choose an easy subject to shoot first and follow the advice
HIGH DYNAMIC RANGE IMAGING Nancy Clements Beasley, March 22, 2011
 HIGH DYNAMIC RANGE IMAGING Nancy Clements Beasley, March 22, 2011 First - What Is Dynamic Range? Dynamic range is essentially about Luminance the range of brightness levels in a scene o From the darkest
Contents: Bibliography:
 ( 2 ) Contents: Sizing an Image...4 RAW File Conversion...4 Selection Tools...5 Colour Range...5 Quick Mask...6 Extract Tool...7 Adding a Layer Style...7 Adjustment Layer...8 Adding a gradient to an Adjustment
HDR is a process for increasing the range of tonal values beyond what a single frame (either film or digital) can produce.
 can produce.") HDR HDR is a process for increasing the range of tonal values beyond what a single frame (either film or digital) can produce. It can be used to create more realistic views, or wild extravagant ones What
HDR HDR is a process for increasing the range of tonal values beyond what a single frame (either film or digital) can produce. It can be used to create more realistic views, or wild extravagant ones What
Appendix A ACE exam objectives map
 A 1 Appendix A ACE exam objectives map This appendix covers these additional topics: A ACE exam objectives for Photoshop CS6, with references to corresponding coverage in ILT Series courseware. A 2 Photoshop
Local Adjustment Tools
 PHOTOGRAPHY: TRICKS OF THE TRADE Lightroom CC Local Adjustment Tools Loren Nelson www.naturalphotographyjackson.com Goals for Tricks of the Trade NOT show you the way you should work Demonstrate and discuss
Learning Photo Retouching techniques the simple way
 Learning Photo Retouching techniques the simple way Table of Contents About the Workshop... i Workshop Objectives... i Getting Started... 1 Photoshop Workspace... 1 Setting up the Preferences... 2 Retouching
Editing Using Photoshop CS5
 The Photoshop CS4 Editing Workspace - shown is the document (image) window, ToolBox, Info, Navigator, History, Adjustments and Layers Palettes, Windows Menus and Options Bar (on top). USING THE LAYERS
HDR ~ The Possibilities
 HDR ~ The Possibilities Dooleys Camera Club 14th March 2014!1 HDR - The Possibilities Steve Mullarkey email: stevemul@ozemail.com.au website: http://www.stevemul.com.au/! A PDF copy of this presentation
Adobe Photoshop. Levels
 How to correct color Once you ve opened an image in Photoshop, you may want to adjust color quality or light levels, convert it to black and white, or correct color or lens distortions. This can improve
Using Adobe Photoshop
 Using Adobe Photoshop 8 In the last section we looked at adjusting colours to improve your image. In this section we ll look at various ways of touching up your images to fix problems with the images or
Photomatix Light 1.0 User Manual
 Photomatix Light 1.0 User Manual Table of Contents Introduction... iii Section 1: HDR...1 1.1 Taking Photos for HDR...2 1.1.1 Setting Up Your Camera...2 1.1.2 Taking the Photos...3 Section 2: Using Photomatix
Sincerely, Blake Rudis
 1 Thanks a lot for your purchase! If you are reading this it shows that you truly care about your photos and are ready to take them to levels you could only dream of! I have been doing HDR for 5 years.
How to combine images in Photoshop
 How to combine images in Photoshop In Photoshop, you can use multiple layers to combine images, but there are two other ways to create a single image from mulitple images. Create a panoramic image with
Maine Day in May. 54 Chapter 2: Painterly Techniques for Non-Painters
 Maine Day in May 54 Chapter 2: Painterly Techniques for Non-Painters Simplifying a Photograph to Achieve a Hand-Rendered Result Excerpted from Beyond Digital Photography: Transforming Photos into Fine
CHAPTER 12 - HIGH DYNAMIC RANGE IMAGES
 CHAPTER 12 - HIGH DYNAMIC RANGE IMAGES The most common exposure problem a nature photographer faces is a scene dynamic range that exceeds the capability of the sensor. We will see this in the histogram
Challenge Image: Blur the Background
 Challenge Image: Blur the Background Challenge Image: Blur the Background In this lesson, we re going to work on a challenge image that was submitted by a Masters Academy member. The image features a little
Photoshop CC Editing Images
 Photoshop CC Editing Images Rotate a Canvas A canvas can be rotated 90 degrees Clockwise, 90 degrees Counter Clockwise, or rotated 180 degrees. Navigate to the Image Menu, select Image Rotation and then
Resolution, DPI NOTICE WE HAVE NOT YET EVEN DOUBLED LINEAR RESOLUTION, DESPITE ALMOST QUADRUPLING THE MEGAPIXELS. Don t get caught up with resolution
 Printing Basics Printing Basics Resolution, DPI Don t get caught up with resolution 6 MP about 3,000 x 2,000 pixels 12 MP about 4,256 2,832 pixels 21 MP about 5,616 x 3,744 pixels NOTICE WE HAVE NOT YET
PHOTOGRAPHY: MINI-SYMPOSIUM
 PHOTOGRAPHY: MINI-SYMPOSIUM In Adobe Lightroom Loren Nelson www.naturalphotographyjackson.com Welcome and introductions Overview of general problems in photography Avoiding image blahs Focus / sharpness
Photomatix Pro 6 User Manual Table of Contents
 Photomatix Pro 6 User Manual Table of Contents 2018 HDRsoft. All rights reserved. TOC link Table of Contents Introduction... 1 1 Taking Photos for HDR... 2 1.1 Setting up the Camera...3 1.2 Exposure...3
Extreme Makeovers: Photoshop Retouching Techniques
 Extreme Makeovers: Table of Contents About the Workshop... 1 Workshop Objectives... 1 Getting Started... 1 Photoshop Workspace... 1 Retouching Tools... 2 General Steps... 2 Resolution and image size...
Using Adobe Photoshop
 Using Adobe Photoshop 8 In the last section we looked at adjusting colours to improve your image. In this section we ll look at various ways of touching up your images to fix problems with the images or
Advanced Diploma in. Photoshop. Summary Notes
 Advanced Diploma in Photoshop Summary Notes Suggested Set Up Workspace: Essentials or Custom Recommended: Ctrl Shift U Ctrl + T Menu Ctrl + I Ctrl + J Desaturate Free Transform Filter options Invert Duplicate
PHOTOSHOP TUTORIAL 16 (Revised Version) Merge to 32 bit HDR Pro in Photoshop CC
 Merge to 32 bit HDR Pro in Photoshop CC") PHOTOSHOP TUTORIAL 16 (Revised Version) Merge to 32 bit HDR Pro in Photoshop CC Complete the Toning MANUALLY in Adobe Camera Raw (ACR) and output to Photoshop as a 32bit smart object, then reduce the image
PHOTOSHOP TUTORIAL 16 (Revised Version) Merge to 32 bit HDR Pro in Photoshop CC Complete the Toning MANUALLY in Adobe Camera Raw (ACR) and output to Photoshop as a 32bit smart object, then reduce the image
How to capture the best HDR shots.
 What is HDR? How to capture the best HDR shots. Processing HDR. Noise reduction. Conversion to monochrome. Enhancing room textures through local area sharpening. Standard shot What is HDR? HDR shot What
Pacific New Media David Ulrich
 Pacific New Media David Ulrich pacimage@maui.net www.creativeguide.com 808.721.2862 Sharpening and Noise Reduction in Adobe Photoshop One of the limitations of digital capture devices and digital chips
Luminosity Masks Program Notes Gateway Camera Club January 2017
 Luminosity Masks Program Notes Gateway Camera Club January 2017 What are Luminosity Masks : Luminosity Masks are a way of making advanced selections in Photoshop Selections are based on Luminosity - how
High Dynamic Range photography software. Photomatix Pro 6.0
 High Dynamic Range photography software Photomatix Pro 6.0 Photomatix Pro User Manual Version 6.0 2017 HDRsoft. All rights reserved. Table of Contents Introduction... 1 1 Taking Photos for HDR... 2 1.1
Camera Raw software is included as a plug-in with Adobe Photoshop and also adds some functions to Adobe Bridge.
 Editing Images in Camera RAW Camera Raw software is included as a plug-in with Adobe Photoshop and also adds some functions to Adobe Bridge. Camera Raw gives each of these applications the ability to import
Teton Photography Group
 Overview general post-processing (editing) workflow for serious photographers Focus on processes more than software Examples using Adobe Lightroom and Photoshop Teton Photography Group January 2016 Emphasis
2017 HDRsoft. All rights reserved. Photomatix Essentials 4.2 User Manual
 Photomatix Essentials 4.2 User Manual 2017 HDRsoft. All rights reserved. Photomatix Essentials 4.2 User Manual i Table of Contents Introduction... 1 Section 1: HDR (High Dynamic Range) Photography... 2
From Advanced pixel blending
 1 From www.studio.adobe.com Blending pixel layers in Adobe Photoshop CS2 lets you do things that you simply can t do by adjusting a single image. One situation where we blend pixel layers is when we want
EXTREME CONTRAST PHOTO EFFECT
 EXTREME CONTRAST PHOTO EFFECT In this Photoshop tutorial, we re going to learn how to use layers, layer blend modes, some noise, a little sharpening, and a simple adjustment layer to easily give a photo
HDR. High Dynamic Range Photograph
 HDR High Dynamic Range Photograph HDR This is a properly exposed image. HDR This is a properly exposed image - if I meter off the mountain side. HDR If it s properly exposed, why can t I see details in
CS 547 Digital Imaging Lecture 2
 CS 547 Digital Imaging Lecture 2 Basic Photo Corrections & Retouching and Repairing Selection Tools Rectangular marquee tool Use to select rectangular images Elliptical Marque Tool Use to select elliptical
Photomatix Pro 3.1 User Manual
 Introduction Photomatix Pro 3.1 User Manual Photomatix Pro User Manual Introduction Table of Contents Section 1: Taking photos for HDR... 1 1.1 Camera set up... 1 1.2 Selecting the exposures... 3 1.3 Taking
Kent Messamore 3/6/2010
 Post Processing Kent Messamore 3/6/2010 What we will cover Post Processing Photoshop, Lightroom, Elements, and others JPEG or RAW Photoshop Elements Workflow Organization, Create, share Photoshop Elements
Black and White using Photoshop
 Topics to be covered: Methods for B&W conversion Improving the image Toning Printer color management Black and White using Photoshop Various ways to get to B&W Adobe Raw Converter (ACR) in from Bridge
My Inspiration. Trey Ratcliffe Stuck in Customs Klaus Herrman Farbspiel Photography
 HDR By Ken Fisher My Inspiration Trey Ratcliffe Stuck in Customs Klaus Herrman Farbspiel Photography Trey Ratcliffe Klaus Herrmann My Inspiration Klaus Herrmann My Inspiration Klaus Herrmann Klaus Herrmann
Using The Nik Collection Plug-ins In Lightroom And Photoshop. Dan Lenardon
 Using The Nik Collection Plug-ins In Lightroom And Photoshop Dan Lenardon What Are We Going To Cover Today? A Brief Overview Of The Nik Collection By Google How To Use Nik From Within Lightroom How To
Contents Foreword 1 Feedback 2 Legal information 3 Getting started 4 Installing the correct Capture One version 4 Changing the version type 5 Getting
 Contents Foreword 1 Feedback 2 Legal information 3 Getting started 4 Installing the correct Capture One version 4 Changing the version type 5 Getting to know Capture One Pro 6 The Grand Overview 6 The
PHOTOSHOP: 3.3 CAMERA RAW
 1 PHOTOSHOP: 3.3 CAMERA RAW Raw image files are uncompressed images that contain all the information of the photo. Raw images give you flexibility in editing and allow you to achieve a better look because
ADDING RAIN TO A PHOTO
 ADDING RAIN TO A PHOTO Most of us would prefer to avoid being caught in the rain if possible, especially if we have our cameras with us. But what if you re one of a large number of people who enjoy taking
Select your Image in Bridge. Make sure you are opening the RAW version of your image file!
 CO 3403: Photographic Communication Steps for Non-Destructive Image Adjustments in Photoshop Use the application Bridge to preview your images and open your files with Camera Raw Review the information
Movie Merchandising. Movie Poster. Open the Poster Background.psd file. Open the Cloud.jpg file.
 Movie Poster Open the Poster Background.psd file. Open the Cloud.jpg file. Movie Merchandising Choose Image>Adjustments>Desaturate to make it a grayscale image. Select the Move tool in the Toolbar and
Photo One Digital Photo Shoots and Edits
 Photo One Digital Photo Shoots and Edits You will submit photo shoots, unedited and you will submit selected edited images. The shoots will be explained first and the edits will be explained later on this
PASS4TEST. IT Certification Guaranteed, The Easy Way! We offer free update service for one year
 PASS4TEST IT Certification Guaranteed, The Easy Way! \ We offer free update service for one year Exam : 9A0-125 Title : Adobe Photoshop Lightroom 2 ACE Exam Vendors : Adobe Version : DEMO Get Latest &
Professional Photograph Restoration 50 Points
 Professional Photograph Restoration 50 Points In this tutorial, we'll take an in-depth look at restoring an old torn photograph. Restoring old family photos is something that you can do for your relatives
HDR with Smart Objects
 HDR with Smart Objects March 2006 HDR with Smart Objects The article could be easily called Shoot once, Use it twice, because this article explains how to use a single RAW file to get most data out of
Rubbing your Nikon RAW file the Right Way
 Rubbing your Nikon RAW file the Right Way You can ignore reality, but you can t ignore the consequences of ignoring reality. Ayn Rand If you are a Nikon shooter, you will get the best result from processing
PHOTOSHOP LIGHTROOM 5
 PHOTOSHOP LIGHTROOM 5 INTRODUCTION This material is primarily targetted at the new and intermediate photographers in our club. You have captured an image and used the various factors when taking this image:
Photoshop CC: Essentials
 Photoshop CC: Essentials Summary Workspace Overview... 2 Exercise Files... 2 Selection Tools... 3 Select All, Deselect, And Reselect... 3 Adding, Subtracting, and Intersecting... 3 Working with Layers...
HDR Darkroom 2 User Manual
 HDR Darkroom 2 User Manual Everimaging Ltd. 1 / 22 www.everimaging.com Cotent: 1. Introduction... 3 1.1 A Brief Introduction to HDR Photography... 3 1.2 Introduction to HDR Darkroom 2... 5 2. HDR Darkroom
Presenting... PhotoShop Elements 7 (PSE7) Photoshop LightRoom 2.3 (LR2) and High Dynamic Range Photography
 Photoshop LightRoom 2.3 (LR2) and High Dynamic Range Photography") Presenting... PhotoShop Elements 7 (PSE7) Photoshop LightRoom 2.3 (LR2) and High Dynamic Range Photography 1 Before getting into Photoshop products, I need to be sure you can process the information I
Presenting... PhotoShop Elements 7 (PSE7) Photoshop LightRoom 2.3 (LR2) and High Dynamic Range Photography 1 Before getting into Photoshop products, I need to be sure you can process the information I
Converting and editing raw images
 Converting and editing raw images Raw v jpeg As we have found out, jpeg files are processed in the camera and much of the data is lost. Raw files are not. Raw file formats: General term for a variety of
CONVERTING AND EDITING RAW IMAGES
 CONVERTING AND EDITING RAW IMAGES RAW V JPEG As we have found out, jpeg files are processed in the camera and much of the data is lost. Raw files are not and so all of the data is preserved. RAW FILE FORMATS:
LANDSCAPE PHOTOGRAPHY TECHNIQUES, COMPOSITION, AND PROCESSING
 LANDSCAPE PHOTOGRAPHY TECHNIQUES, COMPOSITION, AND PROCESSING Tom Price LANDSCAPE PHOTOGRAPHY TIPS AND TRICKS Wide angle lens desirable 16-18 mm good focal length for APC-C sensor Telephoto also produce
Lightroom- Creative Cloud Tips with NIK
 Lightroom- Creative Cloud Tips with NIK Motion Sequence Make several images in your camera on burst mode without following the subject. Let them move past your field. It is best to use a tripod, but not
What is real? What is art?
 HDCC208N Fall 2018 We ll fix it in post The Digital Darkroom What is real? What is art? We have been discussing this pair of questions at various points this semester, with drawings, paintings, the camera
CREATE A BURNT EDGE EFFECT
 CREATE A BURNT EDGE EFFECT One of the all-time classic effects in Photoshop is the burnt edge, and there s lots of different ways to create it, but in this Adobe Photoshop tutorial, we re going to look
DIGITAL INFRARED PHOTOGRAPHY By Steve Zimic
 DIGITAL INFRARED PHOTOGRAPHY By Steve Zimic If you're looking to break outside the box so to speak, infrared imaging may be just the ticket. It does take a bit of practice to learn what types of scenes
Photoshop Tutorial. Millbrae Camera Club 2008 August 21
 Photoshop Tutorial Millbrae Camera Club 2008 August 21 Introduction Tutorial For this session Speak up if: you have a question I m going too fast or too slow I m not speaking loudly enough you know a better
Digital Design and Communication Teaching (DiDACT) University of Sheffield Department of Landscape. Adobe Photoshop CS5 INTRODUCTION WORKSHOPS
 University of Sheffield Department of Landscape. Adobe Photoshop CS5 INTRODUCTION WORKSHOPS") Adobe INTRODUCTION WORKSHOPS WORKSHOP 1 - what is Photoshop + what does it do? Outcomes: What is Photoshop? Opening, importing and creating images. Basic knowledge of Photoshop tools. Examples of work.
Adobe INTRODUCTION WORKSHOPS WORKSHOP 1 - what is Photoshop + what does it do? Outcomes: What is Photoshop? Opening, importing and creating images. Basic knowledge of Photoshop tools. Examples of work.
Produce stunning. Pro photographer Chris Humphreys guides you through HDR and how to create captivating natural-looking images
 Masterclass: In association with Produce stunning HDR images Pro photographer Chris Humphreys guides you through HDR and how to create captivating natural-looking images 8 digital photographer 45 masterclass4produce
PROFESSIONAL PHOTOGRAPH RESTORATION WORKFLOW
 PROFESSIONAL PHOTOGRAPH RESTORATION WORKFLOW Tutorial from http://psd.tutsplus.com/ Compiled by INTRODUCTION In this tutorial, we'll take an in-depth look at restoring an old torn photograph.
INTRO TO HIGH DYNAMIC RANGE PHOTOGRAPHY
 INTRO TO HIGH DYNAMIC RANGE PHOTOGRAPHY INSTRUCTOR: ROGER BUCHANAN NOTES AVAILABLE VIA THENERDWORKS.COM WHY DO I NEED TO KNOW ABOUT HDR? DYNAMIC RANGE: THE RATIO BETWEEN THE BRIGHTEST AND DARKEST PARTS
HDR Darkroom 2 Pro User Manual
 HDR Darkroom 2 Pro User Manual Everimaging Ltd 1 / 28 www.everimaging.com Content: 1. Introduction... 3 1.1 A Brief Introduction to HDR Photography... 3 1.2 Introduction to HDR Darkroom 2 Pro... 5 2. HDR
Recitation 2 Introduction to Photoshop
 Recitation 2 Introduction to Photoshop What is Adobe Photoshop? Adobe Photoshop is a tool for creating digital graphics either by starting with a scanned photograph or artwork or by creating the graphics
Dynamic Range. H. David Stein
 Dynamic Range H. David Stein Dynamic Range What is dynamic range? What is low or limited dynamic range (LDR)? What is high dynamic range (HDR)? What s the difference? Since we normally work in LDR Why
Processing RAW files in ACR Roy Killen, APSEM, EFIAP, GMPSA
 Processing RAW files in ACR Roy Killen, APSEM, EFIAP, GMPSA (c) 2017 Roy Killen RAW Page 1 Processing RAW files What are RAW files? Most digital cameras save files to memory cards in one of two basic formats
Introduction to Photoshop Elements
 John W. Jacobs Technology Center 450 Exton Square Parkway Exton, PA 19341 610.280.2666 ccljtc@ccls.org www.ccls.org Facebook.com/ChesterCountyLibrary Introduction to Photoshop Elements Chester County Library
Adobe Photoshop CS 6 Level I. Topics: Toolbars Workspace Panels Camera Raw Image Adjustment
 Adobe Photoshop CS 6 Level I Topics: Toolbars Workspace Panels Camera Raw Image Adjustment Chapter 1 Toolbars Selections By default, Photoshop gives you a set of tools on the left called the Toolbar or
Mullingar Camera Club Basic introduction to Digital Printing using Photoshop CC.
 Mullingar Camera Club Basic introduction to Digital Printing using Photoshop CC. Table of Contents Course aims: 1 Course presentation notes: 1 Introducing Photoshop: 1 Adjusting the Brightness or Contrast
Lightroom CC. Welcome to Joshua Tree Workshops. Astro & Landscape Lightroom Workflow w/presets
 Welcome to My approach to teaching is to offer small workshops which allow you to explore and discover our amazing planet, while learning photography and timelapse techniques. Astro & Landscape Lightroom
METAL TEXT EFFECT. Step 1: Create A New Document. Step 2: Fill The Background With Black
 METAL TEXT EFFECT In this text effects tutorial, we ll learn how to easily create metal text, a popular effect widely used in video games and movie posters! It may seem like there s a lot of steps involved,
ITEC185 INTRODUCTION TO DIGITAL MEDIA
 1 ITEC185 INTRODUCTION TO DIGITAL MEDIA ADOBE PHOTOSHOP ITEC185 - Introduction to Digital Media ITEC185 - Introduction to Digital Media 2 What is Adobe Photoshop? Photoshop is the leading professional
PHOTOSHOP INVERTED COLORS PHOTO EFFECT
 Photo Effects: Photoshop Inverted Colors Photo Effect PHOTOSHOP INVERTED COLORS PHOTO EFFECT Most people would agree that taking a stroll through the forest can be very calming and peaceful, with all of
Photoshop Elements Hints by Steve Miller
 2015 Elements 13 A brief tutorial for basic photo file processing To begin, click on the Elements 13 icon, click on Photo Editor in the first box that appears. We will not be discussing the Organizer portion
POLAROID EMULATION INCREASED CONTRAST, SATURATION & CLARITY
 POLAROID EMULATION The Polaroid SX-70 Camera was a sensational tool. It took photographs in real time. But just the color balance of the film and they way it developed had a unique look. Here are some
A type of wheel or dial on a camera that makes it possible to scroll through setting options by
 Unit 3.2 Page 1 Vocabulary Wednesday, September 30, 2015 4:31 PM aperture back lighting candid photograph color temperature cropping depth of field digital single lens reflex (DSLR) digital zoom focal
Tablet overrides: overrides current settings for opacity and size based on pen pressure.
 Photoshop 1 Painting Eye Dropper Tool Samples a color from an image source and makes it the foreground color. Brush Tool Paints brush strokes with anti-aliased (smooth) edges. Brush Presets Quickly access
Course Syllabus. Course Title. Who should attend? Course Description. Photoshop ( Level 2 (
 Course Title Photoshop ( Level 2 ( Course Description Adobe Photoshop CC (Creative Clouds) is the world's most powerful graphic design (bitmap-based) program for editing, manipulating, compositing, enhancing
AGENDA :: MULTI- MEDIA TOOLS :: CLASS NOTES. :: Homework Critiques Best and Worst Websites. :: Photoshop Lesson 2 Things aren t what they seem
 CLASS :: 02 02.02 2018 AGENDA :: Homework Critiques Best and Worst Websites :: Photoshop Lesson 2 Things aren t what they seem I. PHOTO RETOUCHING: Before There Were Computers (Web Post) http://jmcolberg.com/weblog/2010/01/photoshop_before_there_were_computers_the_art_of_retouching_and_improving_negatives_and_prints/
Preparing images for the ZAPP digital jury system with Photoshop Elements 3.0 Larry Berman - 09/02/05
 1 Preparing images for the ZAPP digital jury system with Photoshop Elements 3.0 Larry Berman - 09/02/05 www.bermangraphics.com 800-350-9289 1 - Set color settings To convert any image to the srgb color
Extending Exposure with HDR 307. When to Shoot HDR
 Extending Exposure with HDR 307 When to Shoot HDR In many scenes, the dynamic range of contrast from the deep shadows to the bright highlights exceeds the capabilities of image sensors to capture all the
Photoshop Elements 14 Training part 1
 Photoshop Elements 14 Training part 1 Introduction and Tour 01 Using the Training 3:03 02 Welcome Screen 2:45 03 Organizer Tour 5:37 04 elive 2:14 05 Online Tutorials 1:52 Using the Organizer 06 File Menu
Pacific New Media David Ulrich
 Pacific New Media David Ulrich pacimage@maui.net www.creativeguide.com 808.721.2862 Digital Imaging Workflow in Adobe Photoshop All color and tonal correction editing should be done in a non-destructive
in association with Getting to Grips with Printing
 in association with Getting to Grips with Printing Managing Colour Custom profiles - why you should use them Raw files are not colour managed Should I set my camera to srgb or Adobe RGB? What happens
HISTOGRAMS. These notes are a basic introduction to using histograms to guide image capture and image processing.
 HISTOGRAMS Roy Killen, APSEM, EFIAP, GMPSA These notes are a basic introduction to using histograms to guide image capture and image processing. What are histograms? Histograms are graphs that show what
ADOBE PHOTOSHOP CS TUTORIAL
 ADOBE PHOTOSHOP CS TUTORIAL A D O B E P H O T O S H O P C S Adobe Photoshop CS is a popular image editing software that provides a work environment consistent with Adobe Illustrator, Adobe InDesign, Adobe
Photomatix Pro User Manual. Photomatix Pro 3.0 User Manual
 Photomatix Pro User Manual Photomatix Pro 3.0 User Manual Introduction Photomatix Pro processes multiple photographs of a high contrast scene into a single image with details in both highlights and shadows.
DIGITAL ECLIPSE. Eclipse photos courtesy of Fred Espanak 1998
 If you ve ever experienced a total solar eclipse, then you know that film truly cannot capture the entire visual experience. Many have tried, using complex darkroom printing techniques, but now Adobe Photoshop
Photoshop Elements for Genealogists Part 1
 Photoshop Elements for Genealogists Part 1 By Barry J. Ewell Topics Covered Photoshop Elements Workspace Exploring the Tools Quick Fix Preview Photoshop Elements Workspace Workspace File Edit Image Enhance
2Click the Symbol XX
 Adjustment Layers, Channels and Layer Masks 2Click the Symbol XX ( Adjustment Layer ) and choose Channel Mixer. 3Check the box Monochrome and choose the values R=30, G=60, B=10. Thus you ll get a grayscale
Easily Smooth And Soften Skin In A Photo With Photoshop
 Easily Smooth And Soften Skin In A Photo With Photoshop Written by Steve Patterson OPEN THE START FILE BY RIGHT CLICKING THE.JPG FILE AND CHOOSING OPEN WITH ADOBE PHOTOSHOP. SAVE AS: X_lastname_firstname_Smooth_Soft
Step 1: Select The Main Subject In The Photo
 Create A custom Motion Trail from your subject In this Photoshop photo effects tutorial, we ll learn how to add a sense of action and movement to an image by giving the main subject an easy to create motion
Realistic Skin Smoothing
 TIP SHEET #7 Realistic Skin Smoothing I think it s fair to say when it comes to retouching techniques, the number of different ways to smooth skin is seemingly endless. From blurring techniques through
PHIL MORGAN PHOTOGRAPHY
 Including: Creative shooting Manual mode Editing PHIL MORGAN PHOTOGRAPHY A free e-book to help you get the most from your camera. Many photographers begin with the naïve idea of instantly making money