Extending Exposure with HDR 307. When to Shoot HDR
|
|
|
- Shanon Johnson
- 6 years ago
- Views:
Transcription
1

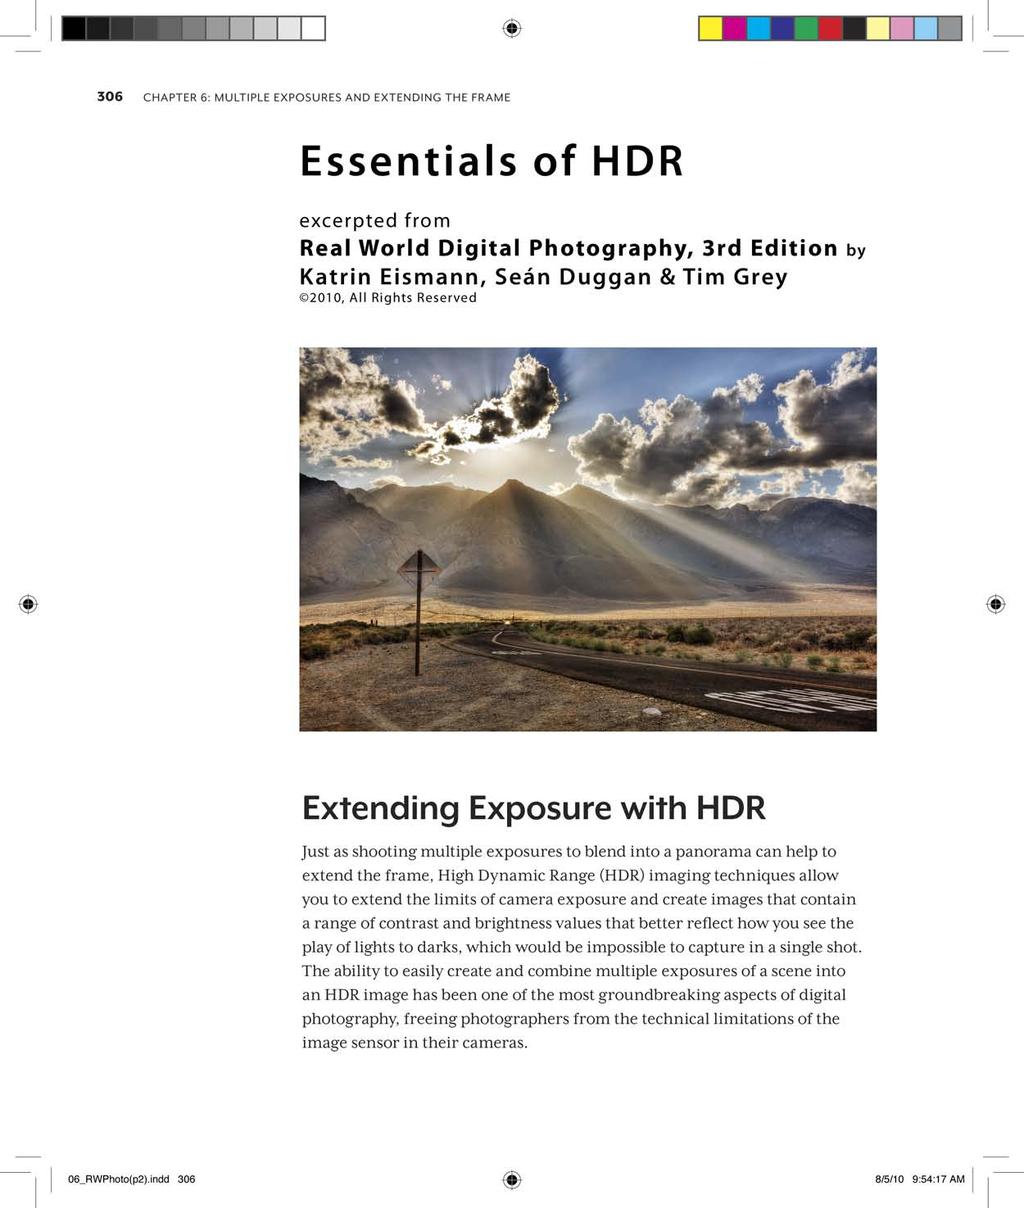
2 Extending Exposure with HDR 307 When to Shoot HDR In many scenes, the dynamic range of contrast from the deep shadows to the bright highlights exceeds the capabilities of image sensors to capture all the tonal detail present in the scene in a single exposure. High-contrast outdoor scenes on bright, sunny days; sunsets (Figure 6.21); twilight photography; and interior locations that combine darker areas with artificial illumination or views through windows to brightly lit exteriors are all situations in which you can use HDR techniques to capture a full range of tonal values. Figure 6.21 This HDR image of Bass Harbor Head lighthouse in Maine was created from six exposures. Because HDR involves taking multiple shots of the same scene, each at a different exposure optimized to record a different level of brightness in the scene, it is not suited for all types of photography, especially where fast motion in the main subject is an integral part of the story, such as with sports photos. It is an excellent match, however, for landscapes, cityscapes, architecture, nature, travel, and still lifes, and can even be used to create an intriguing look for highly stylized portraits. For longer exposure times, a tripod is necessary, but for scenes where the shutter speeds are fast enough for handheld photography or where you can artfully brace the camera to reduce camera shake, your camera s Auto Exposure Bracketing feature will let you create HDR images of many different subjects.
3 308 Chapter 6: Multiple Exposures and Extending the Frame Photographing for HDR To make a great HDR image, the first step is recognizing situations in which this technique will work well for the scene. As noted previously, any highcontrast scene with a wide range of brightness values is perfect for HDR. But even scenes with tamer contrast ratios can be enhanced in interesting ways when rendered in HDR. Exposure considerations Recording a scene in HDR involves taking a series of shots so that all levels of the brightness range are recorded with a good exposure. The number of shots you create will vary depending on the range of contrast present in the scene. Three to seven are a typical number that work for many situations, but more may be necessary in extreme situations, especially when the light source, usually the sun, is in the frame. The number of shots you use will be determined by the lighting conditions and also by how much detail in the deepest shadows you want to reveal. To get the most benefit from HDR, shoot in RAW to capture as much tonal information as possible. Here are some additional exposure considerations to keep in mind: Aperture. In terms of camera exposure, the main thing to remember is that, as with panoramas, the aperture needs to be the same for all the shots in the sequence so that the depth of field is consistent. Differences in depth of field will cause alignment issues when the images are blended together. Shutter speed. Because the aperture will not change, adjusting the shutter speed will create the range of different exposures. If you will be using an Auto Exposure Bracketing feature and holding the camera, keep an eye on what the shutter speeds are for the different shots. If the shutter speed gets too low, it may not be feasible to hold the camera for the shot without some trace of camera shake being recorded. Vibration reduction lenses can help you get by when holding the camera, even at lower shutter speeds like 1/15th and 1/8th of a second. But you should test the camera s ability to record a sharp handheld shot at those slower speeds before relying on it for a photograph that really matters. When in doubt, try to steady the camera as best you can, and for best results, use a tripod.
, although some photographers use a 2-stop difference between images.")
4 Extending Exposure with HDR 309 Exposure range. The classic approach to HDR exposure is to bracket the shots so that they are one stop apart in exposure (Figure 6.22), although some photographers use a 2-stop difference between images. In a shot where the normal exposure would be f/8 at 1/125, a 1-stop range would result in shutter speeds of 1/30 and 1/60 on the overexposed end, which will record more detail in the darkest shadows, and 1/250 and 1/500 on the underexposed side, which will record detail in the brightest highlights. This would produce a sequence of five images with an exposure difference of one stop each. Figure 6.22 The six source exposures for the lighthouse HDR image in Figure These are exposed at 1 stop apart at f/20 and range from 1/15th of a second to 2 seconds. ISO. If the camera is not on a tripod, the ISO should be set to a number that produces exposures with shutter speeds than can be adequately handheld. Onsite testing will determine the best ISO for handheld shooting. If you do have the luxury of using a tripod, choose a lower ISO, such as 100 or 200, to minimize noise. Tip For tripodmounted HDR work, consider using an electronic remote release or the camera s self timer. When longer exposures are necessary, this will reduce the chance that motion or vibration from pressing the shutter button is transmitted to the camera body.

5 310 Chapter 6: Multiple Exposures and Extending the Frame Auto Exposure Bracketing for HDR Some DSLR cameras feature some form of Auto Exposure Bracketing (AEB). When you set your camera to high-speed, continuous shooting mode, it allows you to take a range of shots bracketed to different exposure settings. The amount by which the exposures are bracketed will vary depending on the camera, but typically you can change the exposure in 1/3 to 1/2-stop increments (Figure 6.23). Likewise, the camera determines the number of frames that can be exposed. Three auto bracketed shots are the norm for most cameras that offer this feature, but some high-end pro cameras let you take seven to nine shots. Figure 6.23 The Auto Exposure Bracketing screen on a Canon 5D. The camera has been set to take three shots at one stop apart. To use Auto Exposure Bracketing for HDR, set the shooting mode to Aperture Priority and choose an aperture that will yield the right amount of depth of field for the shot (remember that you can use the depth of field preview button to see the actual depth of field through the viewfinder). The use of Aperture Priority mode ensures that the aperture remains consistent across all the shots. Brace the camera so that it is steady, and take the bracketed shots. When you re done shooting HDR sequences, be sure to remember to go back into the menu system and turn off AEB; otherwise, your next non-hdr shot will be bracketed.

6 Extending Exposure with HDR 311 HDR styles Once you have made the actual exposures and have downloaded them to your computer, you can begin the process of using HDR software to blend the different source files together into a single, high dynamic range image. It is in the processing of the files that creative and aesthetic concerns arise in how the image will look when the HDR merge is complete. There is a range of different stylistic approaches to HDR imaging, and having an idea of where you want to go with the image will help you once you begin working with the software. Some HDR results are very exaggerated with intense color saturation, implausible shadow details, and over the top glowing edges. This style of HDR often looks more like an illustration than an actual photograph (Figure 6.24). Many photographers like this punchy, cartoon style of HDR, whereas just as many view it with disdain and feel that it is too much of a departure from what a photograph should be. Figure 6.24 This style of HDR looks more like an illustration than a photograph, with overly saturated colors, hyperdefined details, and obvious glowing edges.
 detail in both the highlights and the shadows, and a full, rich range of tones (Figure 6.25).")
7 312 Chapter 6: Multiple Exposures and Extending the Frame At the opposite end of the style spectrum are images that use HDR technology only to create an extended tonal range. This method results in images that have excellent (though not implausible) detail in both the highlights and the shadows, and a full, rich range of tones (Figure 6.25). They look like photographs, not candy-colored illustrations, and many times you wouldn t even know they were HDR images. Figure 6.25 An HDR process was used to create this image of New York City, but the result looks much more like a well-exposed photograph instead of an exaggerated HDR shot. Image by Robert Anthony DeRosa Of course, like any creative medium, photography is very personal, and only you can say what the best approach is for your images. Knowing the styles that you like will help you chart a course through the myriad controls for fine-tuning and seasoning your image in HDR software. Processing the HDR Image The source files are the first step in the HDR process. The second step takes place in the digital darkroom. The most widely used HDR program and the one that has set the standard for HDR processing is arguably Photomatix Pro by HDRSoft ( This is a stand-alone program that is also available as a plug-in for Photoshop, Lightroom, and Aperture. HDR capabilities have been available in Photoshop for a number of years, but they have been pretty lackluster and not really usable. Many photographers
8 Extending Exposure with HDR 313 would simply use the Merge to HDR feature in Photoshop CS3 and CS4 to create an initial 32-bit file that they would then import into Photomatix for most of the HDR processing. With the release of Photoshop CS5, however, Adobe greatly enhanced the HDR features with the introduction of Merge to HDR Pro, a much needed improvement over what was available in previous versions. Adobe also created an HDR Toning feature that lets you apply HDR styling to single images. We ll take a look at both programs in the following section. Our coverage of HDR processing techniques is not meant to be the definitive exploration of this topic. The goal here is to introduce you to the basic workflow and processing concepts, and provide an overview on techniques that can help you get started with your own explorations of HDR. Merge to HDR Pro We ll begin our look at HDR processing with Merge to HDR Pro in Photoshop CS5. Just as with images that you will merge into a panorama, apply any overall adjustments and image cleanup, such as dust spotting and fixing chromatic aberration, before you launch the HDR process. Adjustments can be applied to one image and then synchronized with the other files in the sequence (see Pre-panorama adjustments earlier in this chapter). When you re ready to start the HDR process, select all the thumbnails for the source images in Lightroom or Bridge. Merge to HDR Pro can be accessed from within Lightroom by choosing Photo > Edit In, from Adobe Bridge CS5 by choosing Tools > Photoshop, or from the Tools icon in the Mini-Bridge panel in Photoshop CS5. When the Merge to HDR Pro dialog appears, you will see the source image thumbnails arranged below an initial preview of the merged image (Figure 6.26). If you feel you do not need to use all the source files for the HDR, you can click in the check boxes to remove them from the merged result. Tip Lightroom will always import images into Photoshop at the full camera resolution. If you just want to do a quick proof to see how an image will work in HDR, you can process smaller size files by starting in Bridge, opening one of the files in Camera Raw, and setting the image size to something smaller than the native camera resolution. Then click the Done button and return to Bridge. When you launch Merge to HDR Pro from Bridge, it will use the previous image size setting specified in Camera Raw. This will make the entire process go much faster because there is less pixel data to process. Just remember to set the Camera Raw image size back to native camera resolution when you are done.

9 314 Chapter 6: Multiple Exposures and Extending the Frame Figure 6.26 The Merge to HDR Pro dialog in Photoshop CS5. Presets A preset menu is located at the top of the dialog. Test-driving a few of these presets will give you an idea of some of the different ways you can style the HDR effect. To be honest, we find that most of these are pretty useless without additional intervention and should only be considered as a starting point for further explorations. But they are good for seeing how the sliders are configured to achieve a certain type of look. This is information you can use to help you find the look you want. For photographic-looking results, the Default or Photorealistic presets are a good place to start. Bit Depth and Mode Under the Mode section, use 16 Bit to ensure that you have a file with high-bit tonal information to work with once the HDR process is complete. When 32 Bit is selected, the dialog reverts to the functionality of earlier versions of Merge to HDR; you don t have all the cool new creative controls, but it is useful if you want to create a 32-bit merged file to import into other HDR applications like

: Figure 6.27 The Radius and Strength sliders control the characteristics of the edge glow.")
10 Extending Exposure with HDR 315 Photomatix. Local Adaptation should be selected, because this will give you the full set of tone mapping controls as well as access to a tone curve. Edge Glow One of the hallmarks of a certain type of HDR style is a noticeable glow around contrast edges in an image, and this is where you can control this effect. A good way to see what different sliders do in a software program is to move them drastically back and forth and pay attention to the results. Radius and Strength work in tandem, and adjusting one will affect the results of the other (Figure 6.27): Figure 6.27 The Radius and Strength sliders control the characteristics of the edge glow. Radius. Controls the size of the glow effect. Smaller amounts create a thinner edge halo that hugs a contrast edge, whereas higher amounts not only increase the size of the glow but also soften it by spreading it into other areas of the image. Strength. Controls the intensity of contrast in the glow effect. Just as these sliders influence each other, the sliders in the Tone and Detail section can also affect them, so you may need to revisit them after configuring those controls.

11 316 Chapter 6: Multiple Exposures and Extending the Frame Tone and Detail The Tone and Detail section contains five sliders that affect the overall tonal balance of the image (Figure 6.28): Figure 6.28 The sliders in the Tone and Detail section create the overall balance between brightness and contrast in the image. Gamma and Exposure. The Gamma slider adjusts the brightness difference between highlights and shadows, but it can initially be a bit confusing because it is reversed in terms of how sliders normally work; moving it to the left results in higher values and moving it to the right results in lower values. With a low setting there will be a pronounced difference between the highlights and shadows, with the former being very bright and the latter quite dark. Moving the slider to the right gradually removes the differences between the two tonal regions until the image takes on a flatter appearance, with highlights and shadows having a similar level of brightness. Exposure affects the overall tone and brightness of the image. It is fairly sensitive, and small movements can create very noticeable shifts in brightness. Just as with the Radius and Strength sliders, think of Gamma and Exposure as a tandem adjustment.
12 Extending Exposure with HDR 317 Detail, Shadow, and Highlight. Detail sets the amount of contrast in the details of the image. Low values create a dreamy, diffuse look, whereas high values render a stark, high-contrast effect. Shadow and Highlight adjust the luminance (brightness) of those regions. Lower values darken and higher values lighten. Working with all the sliders in the Edge Glow and Tone and Detail sections involves a lot of back and forth because they are interdependent; changes to one may prompt you to make further refinements to sliders you have already set. That s why developing a sense of exactly what each slider does is so important. Color and Curve The Color sliders can be thought of as a way to fine-tune the color saturation, and the Curve offers you a great deal of control over contrast and brightness that can have a big impact on how the image looks. Color settings. These settings are similar to how Vibrance and Saturation are implemented in Camera Raw or Lightroom. Saturation affects all colors equally, whereas Vibrance has a more refined approach, affecting lower-saturation colors more and higher-saturation colors less. Curve. If you know how Curves works in Photoshop, this feature will be familiar to you. The lower-left corner controls the black point, whereas the upper-right corner controls the white point. You can click on the curve line to manually place a point and drag to adjust it. Think of the Curve as way to fine-tune the overall contrast in the image after you ve set all the sliders in the section above it. Keep in mind that you may need to revisit some of the previous settings to compensate for changes created by the Curve adjustments (Figure 6.29). Tip If you have created an HDR look you like and you feel it might work well on other images that are similar in overall tone and contrast (such as landscape images), it s a good idea to save your settings as a preset so you don t have to start from scratch every time. Click the menu icon just to the right of the Presets menu and choose Save Preset.


. You can also make your own choice by clicking on a thumbnail (Figure 6.")
13 318 Chapter 6: Multiple Exposures and Extending the Frame Figure 6.29 The Curve allows you to fine-tune the contrast of the merged HDR image. Remove ghosts If your image contains elements that might have traces of motion in them, such as moving water or tree branches, select the Remove Ghosts check box near the top of the dialog. Merge to HDR Pro will select the source file that is best for the motion-affected areas in the image (the thumbnail will be highlighted in green). You can also make your own choice by clicking on a thumbnail (Figure 6.30). Figure 6.30 Ghosting is obvious in the surf in image A. Image B is a result of using the Remove Ghosts option in Merge to HDR Pro. A B

14 Extending Exposure with HDR 319 Although the entire interface is a great improvement over the previous HDR functionality in Photoshop, this simple feature is a great addition that addresses one of the classic problem areas in HDR photography: moving elements within the image. Keep in mind that for some images, ghosted motion in the scene, such as movement caused by cars or people, may look interesting and might create an effect that works well with a particular photo (Figure 6.31). Figure 6.31 This HDR image was made from three exposures with long shutter speeds ranging from a half second to two seconds. The movement of the people entering the revolving doors resulted in motion blur that works well to illustrate the hustle and bustle of a busy Las Vegas casino. Edge inspection at 100% Before clicking OK to complete the HDR process, be sure to zoom in to 100% or more and scroll around the image to check the edges. A zoom menu is located in the lower-left corner of the dialog. You can move through the image by pressing the spacebar and dragging in the image. Some combinations of settings can create hard and jagged pixilation along contrast edges (Figure 6.32). Low Strength settings are often to blame for hard crackly edges, so if you see any, try increasing the value of this setting. And keep in mind that changes to Strength may require slight modifications to Radius, Detail, and other settings. After clicking OK, inspect the


15 320 Chapter 6: Multiple Exposures and Extending the Frame edges again because Photoshop provides a much better view than the lowres preview in Merge to HDR Pro. Figure 6.32 Inspecting the preview at 100% is a good way to check for problems with the edges. Photomatix Pro As mentioned earlier, Photomatix Pro is the application that set the standard for HDR software and is still the program that many HDR photographers prefer. The Tone Mapping settings offer many more controls for fine-tuning the image than Photoshop s Merge to HDR Pro, and the initial results without changing any of the sliders are likely to be more pleasing and have a more finished look. Photomatix Pro s HDR features are divided into two sections. In the first you select the images from which an HDR image will be made. In the second you apply HDR Tone mapping. The tone mapping features are also available as a Photoshop plug-in that can be used with 32-bit HDR or 16-bit stand-alone images (Figure 6.33). Figure 6.33 The Photomatix Tone Mapping plug-in for Photoshop. Generate HDR If you re using Photomatix to create the initial HDR, you ll use the Generate HDR feature to specify the files you want to use. In the Generate HDR Options dialog you can choose to have the software automatically align the source images and reduce noise and chromatic aberrations. There is also an option for reducing ghosting artifacts that lets you specify whether the ghosting is due to background movement such as water or foliage, or moving subjects like people or cars.
.")


16 Extending Exposure with HDR 321 HDR Tone Mapping on a Single Image Photoshop CS5 has an HDR Toning feature that lets you create an HDR look for a single exposure. This is very useful for those shots where you either don t have multiple exposures, or making them does not work for the subject (such as people or action scenes). To access this feature, choose Image > Adjustments > HDR Toning. The controls are exactly the same as those in Merge to HDR Pro, and you can even use saved HDR Pro presets. It s not the same as creating a real HDR because the tonal range will be limited to what was captured in the single exposure you re using. But it is a handy way to apply HDR styling to a stand-alone image (Figure 6.34). Additionally, you can combine the bracketed exposures in HDR Pro, save the result as a 32-bit file, and open it in HDR Toning to take advantage of the ability to zoom to a true 1:1 or 100% pixel view of the file, which is not possible in HDR Pro. Before After Figure 6.34 The HDR Toning dialog in Photoshop CS5 lets you apply an HDR look to a single image. After clicking the Generate HDR button, the image is created from the source files and displayed onscreen. Initially, it looks pretty bad with


17 322 Chapter 6: Multiple Exposures and Extending the Frame excessive contrast, blown-out highlights, and totally black shadows. This is due to the fact that the HDR file is still unprocessed and also because standard monitors cannot display the wide range of tonal values available in an unprocessed HDR image. An HDR Viewer panel is supplied, which shows you the actual detail present in different areas of the image when you mouse over them (Figure 6.35). Once the HDR image is processed with Tone Mapping, the details in the highlights and shadows will be revealed. Figure 6.35 The Photomatix HDR Viewer shows the detail that is really present in the image. Tone mapping Tone mapping is the real heart of the Photomatix Pro software. The controls appear in a long panel and are divided between Details Enhancer and Tone Compressor. The Details Enhancer section is where all the HDR magic takes place and where crafting a classic HDR look is accomplished (Figure 6.36). There are no fewer than 15 sliders available for fine-tuning the many different qualities that create the look of the image, which is far too many to go into here. Check out the video tutorials for the latest version of Photomatix Pro at
.")
, the initial results are much closer to the mark of what")
18 Extending Exposure with HDR 323 Figure 6.36 The Photomatix Tone Mapping interface is where most of the HDR styling action takes place. This increased level of control is the reason many photographers who specialize in HDR use this software (Figure 6.37). Until the revamped Merge to HDR Pro in Photoshop, Photomatix was the primary HDR program, and for many it is likely to retain that status. Although its interface is more complex (and likely more intimidating to those new to HDR), the initial results are much closer to the mark of what most people think an HDR photo should look like.

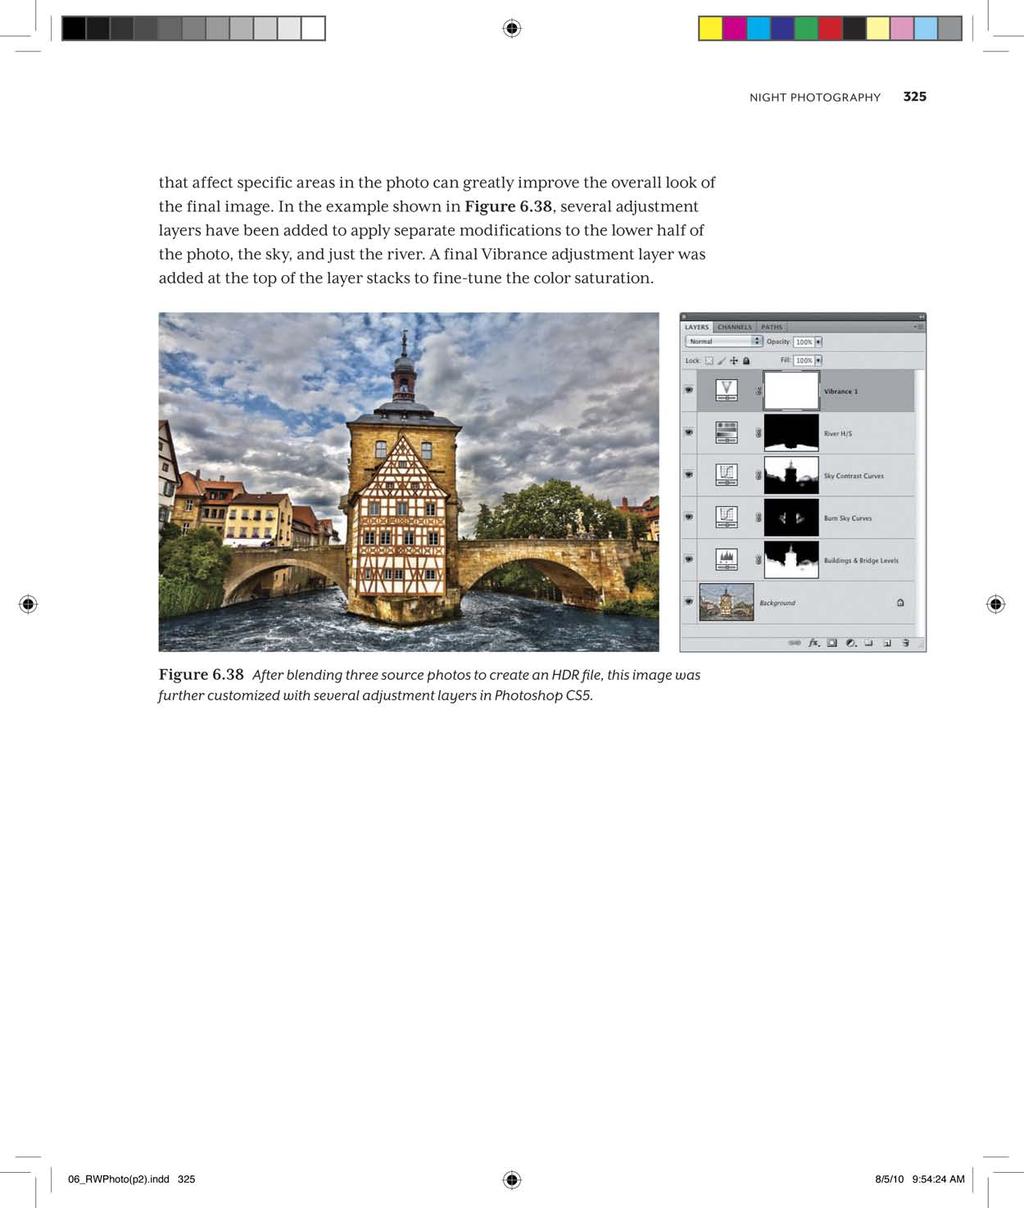
19 324 Chapter 6: Multiple Exposures and Extending the Frame Figure 6.37 This photograph of New York s Manhattan Bridge was created from three source files that were combined into an HDR image using Photomatix Pro. Image by Robert Anthony DeRosa Customize with Adjustment Layers No matter what program you use for creating an HDR image and applying a tone mapping effect, one very important detail to remember is that simply running a series of files through HDR software does not necessarily make a finished image. At best you will have a really good combination of all the source exposures with a full range of tones as well as good color and detail that gives you a solid platform on which to continue enhancing the image. Nearly all HDR images can be improved with further enhancements and seasoning in Photoshop. The use of adjustment layers with layer masks
20
HIGH DYNAMIC RANGE IMAGING Nancy Clements Beasley, March 22, 2011
 HIGH DYNAMIC RANGE IMAGING Nancy Clements Beasley, March 22, 2011 First - What Is Dynamic Range? Dynamic range is essentially about Luminance the range of brightness levels in a scene o From the darkest
Capturing Realistic HDR Images. Dave Curtin Nassau County Camera Club February 24 th, 2016
 Capturing Realistic HDR Images Dave Curtin Nassau County Camera Club February 24 th, 2016 Capturing Realistic HDR Images Topics: What is HDR? In Camera. Post-Processing. Sample Workflow. Q & A. Capturing
Photomatix Pro 3.1 User Manual
 Introduction Photomatix Pro 3.1 User Manual Photomatix Pro User Manual Introduction Table of Contents Section 1: Taking photos for HDR... 1 1.1 Camera set up... 1 1.2 Selecting the exposures... 3 1.3 Taking
Photomatix Light 1.0 User Manual
 Photomatix Light 1.0 User Manual Table of Contents Introduction... iii Section 1: HDR...1 1.1 Taking Photos for HDR...2 1.1.1 Setting Up Your Camera...2 1.1.2 Taking the Photos...3 Section 2: Using Photomatix
How to combine images in Photoshop
 How to combine images in Photoshop In Photoshop, you can use multiple layers to combine images, but there are two other ways to create a single image from mulitple images. Create a panoramic image with
Produce stunning. Pro photographer Chris Humphreys guides you through HDR and how to create captivating natural-looking images
 Masterclass: In association with Produce stunning HDR images Pro photographer Chris Humphreys guides you through HDR and how to create captivating natural-looking images 8 digital photographer 45 masterclass4produce
2017 HDRsoft. All rights reserved. Photomatix Essentials 4.2 User Manual
 Photomatix Essentials 4.2 User Manual 2017 HDRsoft. All rights reserved. Photomatix Essentials 4.2 User Manual i Table of Contents Introduction... 1 Section 1: HDR (High Dynamic Range) Photography... 2
CHAPTER 12 - HIGH DYNAMIC RANGE IMAGES
 CHAPTER 12 - HIGH DYNAMIC RANGE IMAGES The most common exposure problem a nature photographer faces is a scene dynamic range that exceeds the capability of the sensor. We will see this in the histogram
Photomatix Pro User Manual. Photomatix Pro 3.0 User Manual
 Photomatix Pro User Manual Photomatix Pro 3.0 User Manual Introduction Photomatix Pro processes multiple photographs of a high contrast scene into a single image with details in both highlights and shadows.
High Dynamic Range photography software. Photomatix Pro 6.0
 High Dynamic Range photography software Photomatix Pro 6.0 Photomatix Pro User Manual Version 6.0 2017 HDRsoft. All rights reserved. Table of Contents Introduction... 1 1 Taking Photos for HDR... 2 1.1
High Dynamic Range (HDR) photography is a combination of a specialized image capture technique and image processing.
 photography is a combination of a specialized image capture technique and image processing.") Introduction High Dynamic Range (HDR) photography is a combination of a specialized image capture technique and image processing. Photomatix Pro's HDR imaging processes combine several Low Dynamic Range
Introduction High Dynamic Range (HDR) photography is a combination of a specialized image capture technique and image processing. Photomatix Pro's HDR imaging processes combine several Low Dynamic Range
Movie 7. Merge to HDR Pro
 Movie 7 Merge to HDR Pro 1 Merge to HDR Pro When shooting photographs with the intention of using Merge to HDR Pro to merge them I suggest you choose an easy subject to shoot first and follow the advice
Photomatix Pro 6 User Manual Table of Contents
 Photomatix Pro 6 User Manual Table of Contents 2018 HDRsoft. All rights reserved. TOC link Table of Contents Introduction... 1 1 Taking Photos for HDR... 2 1.1 Setting up the Camera...3 1.2 Exposure...3
HDR. High Dynamic Range Photograph
 HDR High Dynamic Range Photograph HDR This is a properly exposed image. HDR This is a properly exposed image - if I meter off the mountain side. HDR If it s properly exposed, why can t I see details in
Maine Day in May. 54 Chapter 2: Painterly Techniques for Non-Painters
 Maine Day in May 54 Chapter 2: Painterly Techniques for Non-Painters Simplifying a Photograph to Achieve a Hand-Rendered Result Excerpted from Beyond Digital Photography: Transforming Photos into Fine
High Dynamic Range (HDR) Photography in Photoshop CS2
 Photography in Photoshop CS2") Page 1 of 7 High dynamic range (HDR) images enable photographers to record a greater range of tonal detail than a given camera could capture in a single photo. This opens up a whole new set of lighting
Page 1 of 7 High dynamic range (HDR) images enable photographers to record a greater range of tonal detail than a given camera could capture in a single photo. This opens up a whole new set of lighting
Bristol Photographic Society Introduction to Digital Imaging
 Bristol Photographic Society Introduction to Digital Imaging Part 16 HDR an Introduction HDR stands for High Dynamic Range and is a method for capturing a scene that has a light range (light to dark) that
Dynamic Range. H. David Stein
 Dynamic Range H. David Stein Dynamic Range What is dynamic range? What is low or limited dynamic range (LDR)? What is high dynamic range (HDR)? What s the difference? Since we normally work in LDR Why
AF Area Mode. Face Priority
 Chapter 4: The Shooting Menu 71 AF Area Mode This next option on the second screen of the Shooting menu gives you several options for controlling how the autofocus frame is set up when the camera is in
HDR Show & Tell Image / Workflow Review Session. Dave Curtin Nassau County Camera Club October 3 rd, 2016
 HDR Show & Tell Image / Workflow Review Session Dave Curtin Nassau County Camera Club October 3 rd, 2016 Capturing Realistic HDR Images Topics: HDR Review (Brief Summary from HDR Presentation Parts: 1
32 Float v3 Quick Start Guide. AUTHORED BY ANTHONY HERNANDEZ (415)
") 32 Float v3 Quick Start Guide 32 Float v3 Trademark/Copyright Information Copyright 2013 by United Color Technologies, LLC. All rights reserved. Unified Color Technologies, BeyondRGB, and HDR Expose are
32 Float v3 Quick Start Guide 32 Float v3 Trademark/Copyright Information Copyright 2013 by United Color Technologies, LLC. All rights reserved. Unified Color Technologies, BeyondRGB, and HDR Expose are
HDR and Beyond Seeing is believing! by Gavin Phillips
 HDR and Beyond Seeing is believing! by Gavin Phillips What is High Dynamic Range Imaging? (HDR) HDR is when you take 3-5 or 7 photos at different exposure settings, and then merge them into a single image
High Dynamic Range Photography
 JUNE 13, 2018 ADVANCED High Dynamic Range Photography Featuring TONY SWEET Tony Sweet D3, AF-S NIKKOR 14-24mm f/2.8g ED. f/22, ISO 200, aperture priority, Matrix metering. Basically there are two reasons
PHIL MORGAN PHOTOGRAPHY
 Including: Creative shooting Manual mode Editing PHIL MORGAN PHOTOGRAPHY A free e-book to help you get the most from your camera. Many photographers begin with the naïve idea of instantly making money
Lightroom Classic CC and Lightroom CC Updates
 Lightroom Classic CC and Lightroom CC Updates Information about the latest December 2017 Lightroom system updates This December Adobe have released updates for the entire Lightroom CC ecosystem, including
HDR ~ The Possibilities
 HDR ~ The Possibilities Dooleys Camera Club 14th March 2014!1 HDR - The Possibilities Steve Mullarkey email: stevemul@ozemail.com.au website: http://www.stevemul.com.au/! A PDF copy of this presentation
Camera Exposure Modes
 What is Exposure? Exposure refers to how bright or dark your photo is. This is affected by the amount of light that is recorded by your camera s sensor. A properly exposed photo should typically resemble
LANDSCAPE PHOTOGRAPHY TECHNIQUES, COMPOSITION, AND PROCESSING
 LANDSCAPE PHOTOGRAPHY TECHNIQUES, COMPOSITION, AND PROCESSING Tom Price LANDSCAPE PHOTOGRAPHY TIPS AND TRICKS Wide angle lens desirable 16-18 mm good focal length for APC-C sensor Telephoto also produce
ONE OF THE MOST IMPORTANT SETTINGS ON YOUR CAMERA!
 Chapter 4-Exposure ONE OF THE MOST IMPORTANT SETTINGS ON YOUR CAMERA! Exposure Basics The amount of light reaching the film or digital sensor. Each digital image requires a specific amount of light to
Color Correction and Enhancement
 10 Approach to Color Correction 151 Color Correction and Enhancement The primary purpose of Photoshop is to act as a digital darkroom where images can be corrected, enhanced, and refined. How do you know
32 Float v2 Quick Start Guide. AUTHORED BY ANTHONY HERNANDEZ - (415)
") 32 Float v2 Quick Start Guide 32 Float V2 Trademark/Copyright Information Copyright 2011 by United Color Technologies, LLC. All rights reserved. Unified Color Technologies, BeyondRGB, and HDR Float are
32 Float v2 Quick Start Guide 32 Float V2 Trademark/Copyright Information Copyright 2011 by United Color Technologies, LLC. All rights reserved. Unified Color Technologies, BeyondRGB, and HDR Float are
Histograms and Tone Curves
 Histograms and Tone Curves We present an overview to explain Digital photography essentials behind Histograms, Tone Curves, and a powerful new slider feature called the TAT tool (Targeted Assessment Tool)
How to capture the best HDR shots.
 What is HDR? How to capture the best HDR shots. Processing HDR. Noise reduction. Conversion to monochrome. Enhancing room textures through local area sharpening. Standard shot What is HDR? HDR shot What
CHAPTER 7 - HISTOGRAMS
 CHAPTER 7 - HISTOGRAMS In the field, the histogram is the single most important tool you use to evaluate image exposure. With the histogram, you can be certain that your image has no important areas that
Raymond Klass Photography Newsletter
 Raymond Klass Photography Newsletter The Next Step: Realistic HDR Techniques by Photographer Raymond Klass High Dynamic Range or HDR images, as they are often called, compensate for the limitations of
Introduction to camera usage. The universal manual controls of most cameras
 Introduction to camera usage A camera in its barest form is simply a light tight container that utilizes a lens with iris, a shutter that has variable speeds, and contains a sensitive piece of media, either
Creating Stitched Panoramas
 Creating Stitched Panoramas Here are the topics that we ll cover 1. What is a stitched panorama? 2. What equipment will I need? 3. What settings & techniques do I use? 4. How do I stitch my images together
Photography Help Sheets
 Photography Help Sheets Phone: 01233 771915 Web: www.bigcatsanctuary.org Using your Digital SLR What is Exposure? Exposure is basically the process of recording light onto your digital sensor (or film).
My Inspiration. Trey Ratcliffe Stuck in Customs Klaus Herrman Farbspiel Photography
 HDR By Ken Fisher My Inspiration Trey Ratcliffe Stuck in Customs Klaus Herrman Farbspiel Photography Trey Ratcliffe Klaus Herrmann My Inspiration Klaus Herrmann My Inspiration Klaus Herrmann Klaus Herrmann
A Beginner s Guide To Exposure
 A Beginner s Guide To Exposure What is exposure? A Beginner s Guide to Exposure What is exposure? According to Wikipedia: In photography, exposure is the amount of light per unit area (the image plane
Movie 3. Basic Camera Raw workflow
 Movie 3 Basic Camera Raw workflow 1 The tone adjustment controls The tone adjustment controls allow you to make adjustments to the highlight and shadow clipping points as well as the overall tone balance
Sincerely, Blake Rudis
 1 Thanks a lot for your purchase! If you are reading this it shows that you truly care about your photos and are ready to take them to levels you could only dream of! I have been doing HDR for 5 years.
Challenge Image: Blur the Background
 Challenge Image: Blur the Background Challenge Image: Blur the Background In this lesson, we re going to work on a challenge image that was submitted by a Masters Academy member. The image features a little
INTRO TO HIGH DYNAMIC RANGE PHOTOGRAPHY
 INTRO TO HIGH DYNAMIC RANGE PHOTOGRAPHY INSTRUCTOR: ROGER BUCHANAN NOTES AVAILABLE VIA THENERDWORKS.COM WHY DO I NEED TO KNOW ABOUT HDR? DYNAMIC RANGE: THE RATIO BETWEEN THE BRIGHTEST AND DARKEST PARTS
Extending the Dynamic Range of Film
 Written by Jonathan Sachs Copyright 1999-2003 Digital Light & Color Introduction Limited dynamic range is a common problem, especially with today s fine-grained slide films. When photographing contrasty
HDR Darkroom 2 User Manual
 HDR Darkroom 2 User Manual Everimaging Ltd. 1 / 22 www.everimaging.com Cotent: 1. Introduction... 3 1.1 A Brief Introduction to HDR Photography... 3 1.2 Introduction to HDR Darkroom 2... 5 2. HDR Darkroom
A quick overview of the basics of my workflow in. Those gaps in Photoshop s Histogram indicate missing information.
 Another Photoshop tutorial by Bruce Philpott Copyright 2007 Bruce Philpott A quick overview of the basics of my workflow in Adobe Camera Raw This short tutorial certainly won t cover everything about Adobe
Select your Image in Bridge. Make sure you are opening the RAW version of your image file!
 CO 3403: Photographic Communication Steps for Non-Destructive Image Adjustments in Photoshop Use the application Bridge to preview your images and open your files with Camera Raw Review the information
Introduction to HDR Photography with Brian McPhee
 Introduction to HDR Photography with Brian McPhee What is HDR Photography? What is HDR Photography? HDR stands for High Dynamic Range What is HDR Photography? HDR stands for High Dynamic Range It is a
FOCUS, EXPOSURE (& METERING) BVCC May 2018
 BVCC May 2018") FOCUS, EXPOSURE (& METERING) BVCC May 2018 SUMMARY Metering in digital cameras. Metering modes. Exposure, quick recap. Exposure settings and modes. Focus system(s) and camera controls. Challenges & Experiments.
FOCUS, EXPOSURE (& METERING) BVCC May 2018 SUMMARY Metering in digital cameras. Metering modes. Exposure, quick recap. Exposure settings and modes. Focus system(s) and camera controls. Challenges & Experiments.
Step 1: taking the perfect shot
 HDR MY WAY On demand of many people who like my way of making high dynamic range images from one single RAW file, I hereby present what I think is the best way to do it. For others that may very well not
CAMERA BASICS. Stops of light
 CAMERA BASICS Stops of light A stop of light isn t a quantifiable measurement it s a relative measurement. A stop of light is defined as a doubling or halving of any quantity of light. The word stop is
Topaz Labs DeNoise 3 Review By Dennis Goulet. The Problem
 Topaz Labs DeNoise 3 Review By Dennis Goulet The Problem As grain was the nemesis of clean images in film photography, electronic noise in digitally captured images can be a problem in making photographs
Drive Mode. Details for each of these Drive Mode settings are discussed below.
 Chapter 4: Shooting Menu 67 When you highlight this option and press the Center button, a menu appears at the left of the screen as shown in Figure 4-20, with 9 choices represented by icons: Single Shooting,
Aperture & Shutter Speed Review
 Aperture & Shutter Speed Review Light Meters Your camera s light meter measures the available light in a scene. It does so by averaging all of the reflected light in the image to find 18% gray. By metering
For many years now, everyone has become preoccupied. Extending the dynamic range. Chapter 7
 Chapter 7 Extending the dynamic range For many years now, everyone has become preoccupied with counting the numbers of pixels in a digital capture as if this were the one benchmark of image quality that
Blue Hour and HDR Tutorial by John Strung
 Blue Hour and HDR Tutorial by John Strung the Blue Hour is a wonderful time of night when photography can yield images of intense blue colours. Blue Hour is a bit of a misnomer for two reasons. There are
Using The Nik Collection Plug-ins In Lightroom And Photoshop. Dan Lenardon
 Using The Nik Collection Plug-ins In Lightroom And Photoshop Dan Lenardon What Are We Going To Cover Today? A Brief Overview Of The Nik Collection By Google How To Use Nik From Within Lightroom How To
Advanced Diploma in. Photoshop. Summary Notes
 Advanced Diploma in Photoshop Summary Notes Suggested Set Up Workspace: Essentials or Custom Recommended: Ctrl Shift U Ctrl + T Menu Ctrl + I Ctrl + J Desaturate Free Transform Filter options Invert Duplicate
Landscape Photography
 Landscape Photography Francis J Pullen Photography 2015 Landscape photography requires a considered approach, and like fine wine or food, should not be rushed. You may even want scout out the desired location
by Don Dement DPCA 3 Dec 2012
 by Don Dement DPCA 3 Dec 2012 Basic tips for setup and handling Exposure modes and light metering Shooting to the right to minimize noise 11/17/2012 Don Dement 2012 2 Many DSLRs have caught up to compacts
Impact With Smartphone Photography. Smartphone Camera Handling. A Smartphone for Serious Photography?
 A Smartphone for Serious Photography? DSLR technically superior but photo quality depends on technical skill, creative vision Smartphone cameras can produce remarkable pictures always at ready After all
PHOTOGRAPHY: MINI-SYMPOSIUM
 PHOTOGRAPHY: MINI-SYMPOSIUM In Adobe Lightroom Loren Nelson www.naturalphotographyjackson.com Welcome and introductions Overview of general problems in photography Avoiding image blahs Focus / sharpness
The Essential Guide To Advanced EOS Features. Written by Nina Bailey. Especially for Canon EOS cameras
 The Essential Guide To Advanced EOS Features Written by Nina Bailey Especially for Canon EOS cameras Introduction 2 Written, designed and images by Nina Bailey www.eos-magazine.com/ebooks/es/ Produced
Color and More. Color basics
 Color and More In this lesson, you'll evaluate an image in terms of its overall tonal range (lightness, darkness, and contrast), its overall balance of color, and its overall appearance for areas that
Lightroom CC. Welcome to Joshua Tree Workshops. Astro & Landscape Lightroom Workflow w/presets
 Welcome to My approach to teaching is to offer small workshops which allow you to explore and discover our amazing planet, while learning photography and timelapse techniques. Astro & Landscape Lightroom
PASS4TEST. IT Certification Guaranteed, The Easy Way! We offer free update service for one year
 PASS4TEST IT Certification Guaranteed, The Easy Way! \ We offer free update service for one year Exam : 9A0-125 Title : Adobe Photoshop Lightroom 2 ACE Exam Vendors : Adobe Version : DEMO Get Latest &
1 / 9
 WWW.RICHIEHUG.COM 1 / 9 A Beginner's Guide to Digital Photography Version 1.2 By Richie Hug November 24, 2016. Most people owning a digital camera have never used other settings than just the AUTO mode.
Contents: Bibliography:
 ( 2 ) Contents: Sizing an Image...4 RAW File Conversion...4 Selection Tools...5 Colour Range...5 Quick Mask...6 Extract Tool...7 Adding a Layer Style...7 Adjustment Layer...8 Adding a gradient to an Adjustment
Until now, I have discussed the basics of setting
 Chapter 3: Shooting Modes for Still Images Until now, I have discussed the basics of setting up the camera for quick shots, using Intelligent Auto mode to take pictures with settings controlled mostly
Understanding and Using Dynamic Range. Eagle River Camera Club October 2, 2014
 Understanding and Using Dynamic Range Eagle River Camera Club October 2, 2014 Dynamic Range Simplified Definition The number of exposure stops between the lightest usable white and the darkest useable
Camera Modes Worksheet
 Tools and Program Needed: Digital C. Computer USB Drive Bridge PhotoShop Camera Modes Worksheet Targets 1. Students will create images demonstrating an understanding of Auto Scene Modes and Creative Zone
T I P S F O R I M P R O V I N G I M A G E Q U A L I T Y O N O Z O F O O T A G E
 T I P S F O R I M P R O V I N G I M A G E Q U A L I T Y O N O Z O F O O T A G E Updated 20 th Jan. 2017 References Creator V1.4.0 2 Overview This document will concentrate on OZO Creator s Image Parameter
lightroom vs. capture one pro
 THE ADOBE PHOTOSHOP HOW-T0 MAGAZINE SEPTEMBER 2016 DYNAMIC RANGE A close-up look at the many tools in Photoshop for removing distracting objects PHOTOGRAPHY SECRETS Learn how to re-create the mood and
Part One Beginners Guide
 Part One Beginners Guide Note The explanations, workflow and everything else in this beginners guide is how I have developed my HDR images. The guide is just that, I am not trying to tell you this is the
PHOTOSHOP: 3.3 CAMERA RAW
 1 PHOTOSHOP: 3.3 CAMERA RAW Raw image files are uncompressed images that contain all the information of the photo. Raw images give you flexibility in editing and allow you to achieve a better look because
Combine Black-and-White and Color
 Combine Black-and-White and Color Contributor: Seán Duggan n Specialty: Fine Art Primary Tool Used: Smart Objects Combining color and black-and-white in the same image is a technique that has been around
Aperture & Shutter Speed Review
 Aperture & Shutter Speed Review Light Meters Your camera s light meter measures the available light in a scene. It does so by averaging all of the reflected light in the image to find 18% gray. By metering
Chapter 6-Existing Light Photography
 Chapter 6-Existing Light Photography All of these images were taken with available light. Painting with light-using available light Photography that includes artificial light which naturally exists in
40 Digital Photo Retouching Techniques COPYRIGHTED MATERIAL
 40 Digital Photo Retouching Techniques COPYRIGHTED MATERIAL C h a p t e r Correcting Contrast If you are a photography enthusiast, you know that light is the defining factor in photography. You probably
Luminosity Masks Program Notes Gateway Camera Club January 2017
 Luminosity Masks Program Notes Gateway Camera Club January 2017 What are Luminosity Masks : Luminosity Masks are a way of making advanced selections in Photoshop Selections are based on Luminosity - how
From Advanced pixel blending
 1 From www.studio.adobe.com Blending pixel layers in Adobe Photoshop CS2 lets you do things that you simply can t do by adjusting a single image. One situation where we blend pixel layers is when we want
DIGITAL PHOTOGRAPHY CAMERA MANUAL
 DIGITAL PHOTOGRAPHY CAMERA MANUAL TABLE OF CONTENTS KNOW YOUR CAMERA...1 SETTINGS SHUTTER SPEED...2 WHITE BALANCE...3 ISO SPEED...4 APERTURE...5 DEPTH OF FIELD...6 WORKING WITH LIGHT CAMERA SETUP...7 LIGHTING
Mastering Y our Your Digital Camera
 Mastering Your Digital Camera The Exposure Triangle The ISO setting on your camera defines how sensitive it is to light. Normally ISO 100 is the least sensitive setting on your camera and as the ISO numbers
The Fundamental Problem
 The What, Why & How WHAT IS IT? Technique of blending multiple different exposures of the same scene to create a single image with a greater dynamic range than can be achieved with a single exposure. Can
Machinery HDR Effects 3
 1 Machinery HDR Effects 3 MACHINERY HDR is a photo editor that utilizes HDR technology. You do not need to be an expert to achieve dazzling effects even from a single image saved in JPG format! MACHINERY
Photoshop Cs5 Hdr Manually Set Ev
 Photoshop Cs5 Hdr Manually Set Ev And while HDR techniques can accommodate a wide range of brightnesses, the end shows nine images made with the Canon 5D set on MANUAL exposure. Then it's time to let Photoshop
Realistic HDR Histograms Camera Raw
 Realistic HDR Histograms Camera Raw Wednesday September 2 nd 2015 6:30pm 8:30pm Simsbury Camera Club Presented by Frank Zaremba Gcephoto@comcast.net 1 There are no bad pictures; that's just how your face
HDR is a process for increasing the range of tonal values beyond what a single frame (either film or digital) can produce.
 can produce.") HDR HDR is a process for increasing the range of tonal values beyond what a single frame (either film or digital) can produce. It can be used to create more realistic views, or wild extravagant ones What
HDR HDR is a process for increasing the range of tonal values beyond what a single frame (either film or digital) can produce. It can be used to create more realistic views, or wild extravagant ones What
Very High Dynamic Range Photography
 Very High Dynamic Range Photography Night photography with Moons & Lights November 24, 2917 Guy Huntley The Complete Photographer Meetup The Preprocessing & The Postprocessing Manual Bracketing Camera
Aperture Priority Mode
 Chapter 3: Shooting Modes for Still Images 23 The Program Shift function is available only in Program mode; it works as follows. Once you have aimed the camera at your subject, the camera displays its
Basic Camera Craft. Roy Killen, GMAPS, EFIAP, MPSA. (c) 2016 Roy Killen Basic Camera Craft, Page 1
 2016 Roy Killen Basic Camera Craft, Page 1") Basic Camera Craft Roy Killen, GMAPS, EFIAP, MPSA (c) 2016 Roy Killen Basic Camera Craft, Page 1 Basic Camera Craft Whether you use a camera that cost $100 or one that cost $10,000, you need to be able
Basic Camera Craft Roy Killen, GMAPS, EFIAP, MPSA (c) 2016 Roy Killen Basic Camera Craft, Page 1 Basic Camera Craft Whether you use a camera that cost $100 or one that cost $10,000, you need to be able
Black and White using Photoshop
 Topics to be covered: Methods for B&W conversion Improving the image Toning Printer color management Black and White using Photoshop Various ways to get to B&W Adobe Raw Converter (ACR) in from Bridge
An Introduction to Histograms in Photography
 An Introduction to Histograms in Photography Histograms are a graphical representation of all the pixels that make up an image, and are plotted by 'Luminance' or brightness. Every pixel, regardless of
PHOTOTUTOR.com.au Share the Knowledge
 THE DIGITAL WORKFLOW BY MICHAEL SMYTH This tutorial is designed to outline the necessary steps from digital capture, image editing and creating a final print. FIRSTLY, BE AWARE OF WHAT CAN AND CAN T BE
Extract from NCTech Application Notes & Case Studies Download the complete booklet from nctechimaging.com/technotes
 Extract from NCTech Application Notes & Case Studies Download the complete booklet from nctechimaging.com/technotes [Application note - istar & HDR, multiple locations] Low Light Conditions Date: 17 December
loss of detail in highlights and shadows (noise reduction)
") Introduction Have you printed your images and felt they lacked a little extra punch? Have you worked on your images only to find that you have created strange little halos and lines, but you re not sure
Introduction Have you printed your images and felt they lacked a little extra punch? Have you worked on your images only to find that you have created strange little halos and lines, but you re not sure
Aperture & Shutter Speed. Review
 Aperture & Shutter Speed Review Light Meters Your camera s light meter measures the available light in a scene. It does so by averaging all of the reflected light in the image to find 18% gray. By metering
Chapter 11-Shooting Action
 Chapter 11-Shooting Action Interpreting Action There are three basic ways of interpreting action in a still photograph: Stopping action (42) Blurring movement Combining both in the same image Any
Converting and editing raw images
 Converting and editing raw images Raw v jpeg As we have found out, jpeg files are processed in the camera and much of the data is lost. Raw files are not. Raw file formats: General term for a variety of