Creating a Single Page Flyer in PowerPoint
|
|
|
- Harvey Freeman
- 6 years ago
- Views:
Transcription
1 Creating a Single Page Flyer in PowerPoint Digital Media Commons Fondren Basement B42 (713) dmc-info@rice.edu 1

2 Creating a Single Page Flyer in PowerPoint Jane Zhao janezhao@rice.edu Director, Digital Media Commons This guide was developed with Microsoft PowerPoint Last updated by Jane Zhao on Thursday, February 16, Open Microsoft PowerPoint 2010, you will typically see a blank presentation with a new slide based on the default office theme. When you type text within the placeholders of this slide, the text shows up in black over a white slide background. 2. Choose the flyer size a. Design -> Page Setup b. Input 8.5 for Width and 11 for Height in inches for a letter size flyer. c. Choose portrait orientation 3. Insert an image a. Refer to page on Creating an Academic Poster with PowerPoint for information on image resolution b. Insert->Picture, choose the picture file you want to use for the flyer c. Double click on the picture, Picture Tools -> Crop, Click and drag on the crop corners to cover the page 2

, and recolor (e.g. grayscale, sepia, washout, etc.")
3 d. To pick the crop options Fit or Fill: Click on the the small downwardpointing arrow and then select Fill, then click Crop button. 4. Picture manipulations After inserting a picture, the Picture Tools ribbon appears allowing you to manipulate the following: Adjust Remove Background This option helps figure out the boundaries of an object in the picture, and allows to keep some portion of the picture, and remove the rest. Corrections This option is used to adjust brightness and contrast. Color This option is used to adjust color saturation, color tone (i.e. cool or warm color), and recolor (e.g. grayscale, sepia, washout, etc.) Artistic Effects This option offers you various artistic filters (e.g. charcoal drawing, canvas, watercolor, etc) Compress Picture By defauly, PowerPoint simply copies your inserted pictures into the presentation file leaving the size and format unchanged. This option allows you to reduce the size of the inserted picture. Change Picture This option allows you to swap out the picture for another picture on your computer. (Any formatting performed on the old picture will not transfer to the new picture) Reset Picture This option cancels the picture formatting done to the picture. 3
 Picture Border Changes the color of the frame selected.")


4 Picture Style Frames Adds a pre-made artistic border to the picture (e.g. bevels, rounded edges, fade-outs, etc) Picture Border Changes the color of the frame selected. If no frame is selected, then a thin rectangle of the color selected is placed around the picture. Picture Effects This option add effects such as shadows, 3D tilts, or glows around the picture edges. Note that some frames are a pre-made composite of several picture effects. Picture Layout This option offers layouts to preset charts or flow diagrams to more easily show a flow of information. Arrange Bring Forward Allows you to place the selected picture on top of others when multiple pictures are present on the poster 4

5 Size Send Backward Allows you place the selected picture underneath other when multiple pictures are present on the poster Selection Pane Toggle the a pane that lists all objects on poster and their options Align Shifts pictures to various alignments with respect to the poster or other pictures Group When multiple objects are selected, allows you to choose for pictures to be treated as one entity instead of individual images Rotate This option is used to rotate or flip your image Crop As described on pages 3-4, this option allows you to resize your photo inside the crop area. Shape Height This option changes the height of the image to the user-specified value, and scales the width at the same time Shape Width This option changes the width of the image to the user-specified value, and scales the height at the same time 5. How to Insert a shape a. Click Insert -> Shapes, and select the shape type desired (e.g. Rectangle or Block Arrows). b. Drag and draw the shape where you would like it to go (e.g. at the top of the picture) c. Double click on the shape, and the Drawing Tools ribbon will be activated. 6. Change shape style You can click a shape style to apply to your shape quickly. 5


6 7. Create your own shape look by adjusting Fill and Line of the shape. a. Click on Fill, choose Orange b. Right-Click on the shape -> Format Shape c. Fill-> Gradient Fill, adjust the settings as below. d. Click on Line -> no line. You will get a rectangle box looking like below 8. Insert a triangle shape and edit a shape a. Insert a shape -> Basic shapes -> Right triangle 6

7 b. Drag and draw a right triangle at the lower left corner of the flyer. i. Fill -> white, darker 5%; Line -> no line ii. Select the right triangle; hold down contol key, drag away from the right triangle to duplicate it. c. Rotate the duplicate right triangle 180 degree i. Fill -> white, darker 15% ii. Move the duplicate triangle to make the two triangles symmetric d. Create a custom shadow effect i. Right click over the shape -> Format Shape ii. Shadow -> Outer -> Offset Diagonal Bottom Left iii. Adjust the shadow settings as below and click OK button. 7


8 e. Right click over the shape -> Edit points f. Drag the upper right black square towards the inner triangle a bit, then drag the white squares towards the inner triangle a bit. See above for the illustrations. 9. Convert a shape to a text box As soon as you start typing in a shape, the shape will be converted to a text box. Almost any shape in PowerPoint is essentially also a text box. a. You can apply text style from Format -> WordArt Styles 8

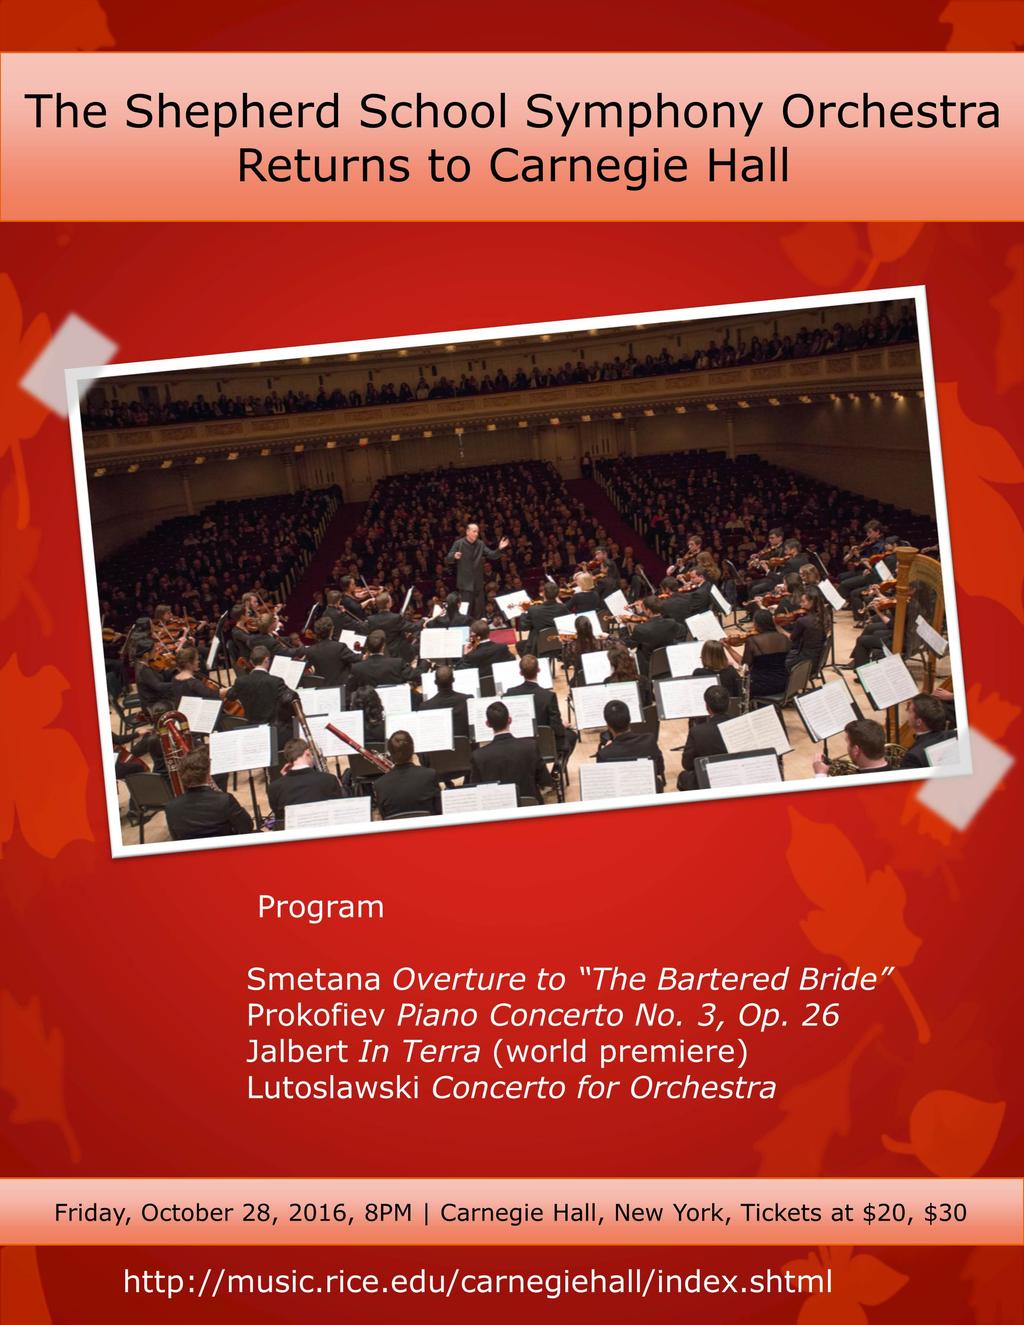
9 b. c. Or Home -> Font and Paragraph 10. Insert a text box It is convenient to have a text box so that you can manipulate text separately than the shape. a. Insert -> Text Box b. Drag and draw a text box at the top of the flyer c. Type in the text of The Shepherd School Symphony Orchestra Returns to Carnegie Hall d. Double click on the text box, you will notice the Drawing Tools ribbon is activated, which is the same Drawing Tools ribbon as you double click a shape. In other words, a shape and a text box share the same Format settings. e. Change the text color to white and adjust the size to 32 f. Add a few text boxes at the lower left corner of the flyer to include date, time, location, ticket and website. 9

10 11. Your final flyer should look something like this Additional Activity Try to play with the picture and text provided and see if you can create a poster like this. 10
11 11


12 Below are the settings used in the above flyer: 1. Background: Autumn -> Style Picture : a. Arrange: Rotate b. Picture Styles: Simple Frame, White 3. Shape a. The title and bottom text boxes Shape styles Subtle Effect Orange, Accent 5 12

13 b. The tape like shapes Format shape -> Fill White, transparency 17%; Soft Edges: 7 pt 13
Adding Graphics to a Presentation
 8 Adding Graphics to a Presentation LESSON SKILL MATRIX Skill Exam Objective Objective Number Adding a Picture to a Slide Formatting Graphical Elements Resize graphical elements. 3.1.3 Apply styles to
GO! with Microsoft PowerPoint 2016 Comprehensive
 GO! with Microsoft PowerPoint 2016 Comprehensive First Edition Chapter 2 Formatting PowerPoint Presentations Learning Objectives Format Numbered and Bulleted Lists Insert Online Pictures Insert Text Boxes
TECHNOTravel. For Microsoft Word & PowerPoint 2010 Student Workbook. TECHNOeBooks Project-based Computer Curriculum ebooks.
 TECHNOTravel For Microsoft Word & PowerPoint 2010 Student Workbook TECHNOeBooks Project-based Computer Curriculum ebooks www.bepublishing.com Copyright 1993 2010. TechnoKids Inc. in partnership with B.E.
PowerPoint 2016: Formatting Pictures. Introduction
 PowerPoint 2016: Formatting Pictures Introduction There are a variety of ways to format the pictures in your slide show. The picture tools in PowerPoint make it easy to personalize and modify the images
Adding Graphics to a Presentation
 8 Adding Graphics to a Presentation LESSON SKILL MATRIX Skill Exam Objective Objective Number Inserting and Formatting Images Adding Shapes to Slides Display gridlines. Crop images. Resize images. Apply
Adding Graphics to a Presentation
 Lesson 8 Page 1 Adding Graphics to a Presentation Lesson Skill Matrix Skill Exam Objective Objective Number Inserting and Formatting Images Insert images. Display alignment tools. Resize and crop images.
Adding Graphics to a Presentation
 8 Adding Graphics to a Presentation LESSON SKILL MATRIX Skill Exam Objective Objective Number Inserting and Formatting Images Adding Shapes to Slides Ordering and Grouping Shapes Insert images. Display
CHAPTER 5: MICROSOFT OFFICE: POWERPOINT 2010
 CHAPTER 5: MICROSOFT OFFICE: POWERPOINT 2010 Quick Summary Microsoft PowerPoint 2010 is software that can be used to effectively present information to an audience. The following objects are parts of the
Introduction. Basic Image Formatting. PowerPoint 2010 Formatting Pictures. To Crop an Image: Page 1
 PowerPoint 2010 Formatting Pictures Introduction Page 1 Once you've added pictures to your presentations, you can format them in various ways. The picture tools in PowerPoint 2010 make it easy to incorporate
MID-LEVEL EXERCISES. Project Management Life Cycle. Project Management
 MID-LEVEL EXERCISES Project Management Life Cycle You have been asked to train the employees of a family-owned company about the life cycle of a m* " project. You begin a slide show by creating an infographic,
Introduction. Basic Image Formatting. Word 2010 Formatting Pictures. To Crop an Image: Page 1
 Word 2010 Formatting Pictures Introduction Page 1 Once you've added pictures to your documents, you can format them in various ways. The picture tools in Word 2010 make it easy to incorporate images into
MS Word Training Formatting Pictures
 Introduction MS Word Training Formatting Pictures There are many ways to format pictures in Word. For instance, you can change the size or shape of an image to better suit your document. You can also enhance
Microsoft Powerpoint 2013
 Microsoft Powerpoint 2013 Lesson 7 Creating SmartArt Graphics 2014, John Wiley & Sons, Inc. Microsoft Official Academic Course, Powerpoint 2013 1 Objectives 2014, John Wiley & Sons, Inc. Microsoft Official
Explain SAM Capstone Project FOR MORE CLASSES VISIT
 Explain SAM Capstone Project FOR MORE CLASSES VISIT www.tutorialoutlet.com SAM Capstone Project 1a HI FROM HOME ORGANIZING AND ENHANCING MEDIA, AND ANIMATING A PRESENTATION GETTING STARTED Open the file
Inserting Images Into Documents
 Inserting Images Into Documents Chapter 11 Microsoft Word has its own library of graphics, called Clip Art, which can be inserted into documents when required. You can also insert graphics created in other
How to Create Website Banners
 How to Create Website Banners In the following instructions you will be creating banners in Adobe Photoshop Elements 6.0, using different images and fonts. The instructions will consist of finding images,
HANDS-ON EXER. 3 Object Manipulation. rrr/gls HOE3 Training SIZE AND POSITION CLIP ART
 HANDS-ON EXER rrr/gls HOE3 Training 3 Object Manipulation While you could teach your mini-camp participants how to size, position, align, ungroup, and use other object manipulation techniques using shapes,
Photo Story Tutorial
 Photo Story Tutorial To create a new Photo Story Project: 1. Start 2. Programs 3. Photo Story 4. Begin a New Story 5. Next 6. Import Pictures 7. Click on your Flash Drive s name from the window on the
New Perspectives on PowerPoint Module 1: Creating a Presentation
 New Perspectives on PowerPoint 2016 Module 1: Creating a Presentation Objectives, Part 1 Plan and create a new presentation Create a title slide and slides with lists Edit and format text Move and copy
Key Terms. Where is it Located Start > All Programs > Adobe Design Premium CS5> Adobe Photoshop CS5. Description
 Adobe Adobe Creative Suite (CS) is collection of video editing, graphic design, and web developing applications made by Adobe Systems. It includes Photoshop, InDesign, and Acrobat among other programs.
Photoshop: Manipulating Photos
 Photoshop: Manipulating Photos All Labs must be uploaded to the University s web server and permissions set properly. In this lab we will be manipulating photos using a very small subset of all of Photoshop
Learn More about TechnoPhotoshop SAMPLE
 Learn More about TechnoPhotoshop Session 2 Filtering Fun In this session, students are introduced to Photoshop photo editing software. To start, they learn about the program environment. Afterwards, they
ADD A FILL (SHADING) OR EFFECT TO A SHAPE OR TEXT BOX
 OR EFFECT TO A SHAPE OR TEXT BOX") ADD A FILL (SHADING) OR EFFECT TO A SHAPE OR TEXT BOX Definitions of Fills, Gradients, and Effects You can change the look of a shape or text box by changing its fill or by adding effects to it, such as
ADD A FILL (SHADING) OR EFFECT TO A SHAPE OR TEXT BOX Definitions of Fills, Gradients, and Effects You can change the look of a shape or text box by changing its fill or by adding effects to it, such as
Learning Adobe FireWorks CS5
 Module 1 Contents Chapter 1: Introduction to FireWorks Starting the Document...1-1 Screen Modes...1-3 Bitmap and Vector Tools...1-4 Bitmap Tools... 1-4 Vector Tools... 1-6 Filling Shapes...1-8 Importing
Photoshop: Manipulating Photos
 Photoshop: Manipulating Photos All Labs must be uploaded to the University s web server and permissions set properly. In this lab we will be manipulating photos using a very small subset of all of Photoshop
Learn PowerPoint 2010
 Table of Contents Chapter 1 Introduction Introduction...4 Chapter 2 PowerPoint 2010 Basics Introduction to PowerPoint 2010 Basics...5 Start and Exit...6 PowerPoint 2010 Window...7 The Ribbon...9 The Backstage:
A quick note: We hope that you will find something from the Tips and Tricks that will add a little pizazz to your yearbook pages!
 A quick note: The following pages are tips and tricks for Basic Photoshop users. You may notice that some instructions indicate that non-awpc fonts were used, and that some colors were created using the
2
 1 2 3 4 5 6 7 of 14 7/11/17, 8:46 AM 7 8 9 10 11 12 13 Apply an animation 1. Select the object or text on the slide that you want to animate. An "object" in this context is any thing on a slide, such as
Photoshop CC Editing Images
 Photoshop CC Editing Images Rotate a Canvas A canvas can be rotated 90 degrees Clockwise, 90 degrees Counter Clockwise, or rotated 180 degrees. Navigate to the Image Menu, select Image Rotation and then
PosterArtist Quick Guide
 PosterArtist Quick Guide Create posters in four easy steps STEP STEP STEP STEP Use Auto Design to Create Posters Simply select a poster type and a design image to automatically create high-quality posters.
In Photoshop you can change the size of an image by going to:
 Change an images size In Photoshop you can change the size of an image by going to: Image Image Size and change the dimensions of the pictures in pixels. Once you adjust the top number the bottom number
GO! with Microsoft PowerPoint 2010 Introductory Gaskin Vargas Madsen Marucco First Edition
 GO! with Microsoft PowerPoint 2010 Introductory Gaskin Vargas Madsen Marucco First Edition Pearson Education Limited Edinburgh Gate Harlow Essex CM20 2JE England and Associated Companies throughout the
ArcSoft PhotoImpression Table of Contents:
 ArcSoft PhotoImpression Table of Contents: 1. Welcome to PhotoImpression 2. Highlights of PhotoImpression 3. System Requirements 4. Installing PhotoImpression 5. Working with PhotoImpression Getting Started
Image resizing with Microsoft Office Picture Manager
 Marketing Services and Web Management Digital Marketing Image resizing with Microsoft Office Picture Manager Document Owner Adam Seeley Last update Monday, 3 February 2014 Status Final Version 2.0 Circulation
How to Image Editor. Enhance. Effects. Frames. Overlays. Stickers
 How to Image Editor Included in your NewZapp account is a powerful Image Editor capable of extraordinary things! To access the editor simple navigate to the Images panel, choose or upload an image to edit
PhotoFiltre DEPARTMENT OF EDUCATION
 DEPARTMENT OF EDUCATION PhotoFiltre Updated on 20 February 2010 This resource is part of the resource collection available through the ecentre for teachers. www.ecentre.education.tas.gov.au PhotoFiltre
Digital Photography 1
 Digital Photography 1 Photoshop Lesson 3 Resizing and transforming images Name Date Create a new image 1. Choose File > New. 2. In the New dialog box, type a name for the image. 3. Choose document size
Central Photography [INSTAGRAM EFFECTS]
![Central Photography [INSTAGRAM EFFECTS]](/thumbs/96/129260346.jpg "Central Photography [INSTAGRAM EFFECTS]") 1 1. Open Photoshop. 2. Go to File/New (Ctrl+N). 3. Name your file. 4. Set the Width to 11 inches. 2 5. Set the Height to 8.5 inches. 6. Set your Resolution to 200 pixels/inch. 7. Set your Background Contents
1 1. Open Photoshop. 2. Go to File/New (Ctrl+N). 3. Name your file. 4. Set the Width to 11 inches. 2 5. Set the Height to 8.5 inches. 6. Set your Resolution to 200 pixels/inch. 7. Set your Background Contents
Using Adobe Photoshop
 Using Adobe Photoshop 6 One of the most useful features of applications like Photoshop is the ability to work with layers. allow you to have several pieces of images in the same file, which can be arranged
Chapter 4 Adding and Formatting Pictures
 Impress Guide Chapter 4 Adding and Formatting Pictures OpenOffice.org Copyright This document is Copyright 2007 by its contributors as listed in the section titled Authors. You can distribute it and/or
Lesson 4: Inserting and Modifying Clip Art and Photos
 CNET tech sites: Price comparisons Product reviews Tech news Downloads Site map Home Your Courses Your Profile Logout FAQ Contact Us About Lesson 4: Inserting and Modifying Clip Art and Photos PowerPoint
Lesson 16 Text, Layer Effects, & Filters
 Lesson 16 Text, Layer Effects, & Filters Digital Media I Susan M. Raymond West High School In this tutorial, you will: Create a Type Layer Add and Format Type within a Type Layer Apply Layer Effects Apply
LESSON 04: ORGANIZE IT FOR PSE USERS COMPANION BOOK. Digital Scrapbook Academy. April 2018: Lesson 04 Organize It for Elements Users
 Digital Scrapbook Academy April 2018: Lesson 04 LESSON 04: ORGANIZE IT FOR PSE USERS COMPANION BOOK Page 1 of 15 Table of Contents Table of Contents 2 Welcome to Lesson 04 for Elements Users 3 1: Add Photos,
Impress Guide. Chapter 4 Adding and Formatting Pictures
 Impress Guide Chapter 4 Adding and Formatting Pictures Copyright This document is Copyright 2005 2012 by its contributors as listed below. You may distribute it and/or modify it under the terms of either
Combine Black-and-White and Color
 Combine Black-and-White and Color Contributor: Seán Duggan n Specialty: Fine Art Primary Tool Used: Smart Objects Combining color and black-and-white in the same image is a technique that has been around
Impress Guide Chapter 4 Adding and Formatting Pictures
 Impress Guide Chapter 4 Adding and Formatting Pictures This PDF is designed to be read onscreen, two pages at a time. If you want to print a copy, your PDF viewer should have an option for printing two
Corel PHOTO-PAINT BERNINA Page 1 DL
 Corel PHOTO-PAINT 2018 BERNINA Page 1 Corel PHOTO-PAINT Corel PHOTO-PAINT is part of BERNINA Embroidery Software and gives users many tools for editing photos or bitmap artwork. Corel PHOTO- PAINT can
How to Apply a Halftone Effect as a Photo Background Using CorelDRAW
 How to Apply a Halftone Effect as a Photo Background Using CorelDRAW by Silvio Gomes CorelDRAW offers great tools for applying interesting effects that can really highlight the look of your art work. One
Adobe Photoshop CS5 Tutorial
 Adobe Photoshop CS5 Tutorial GETTING STARTED Adobe Photoshop CS5 is a popular image editing software that provides a work environment consistent with Adobe Illustrator, Adobe InDesign, Adobe Photoshop
Photoshop CC 2018 Essential Skills
 Photoshop CC 2018 Essential Skills Adobe Photoshop Creative Cloud 2018 University Information Technology Services Learning Technology, Training, Audiovisual and Outreach Copyright 2018 KSU Division of
Introduction.
 Introduction At Photobooks Express, it s our aim to go that extra mile to deliver excellent service, products and quality. Our fresh, dynamic and flexible culture enables us to stand above the rest and
ADD TRANSPARENT TYPE TO AN IMAGE
 ADD TRANSPARENT TYPE TO AN IMAGE In this Photoshop tutorial, we re going to learn how to add transparent type to an image. There s lots of different ways to make type transparent in Photoshop, and in this
FLAMING HOT FIRE TEXT
 FLAMING HOT FIRE TEXT In this Photoshop text effects tutorial, we re going to learn how to create a fire text effect, engulfing our letters in burning hot flames. We ll be using Photoshop s powerful Liquify
Using Photoshop Elements
 Using Photoshop Elements Created By: Rick Williams August 2004 Table of Contents Photoshop Element Tools...Page 1 Tool Descriptions... Page 3 Starting Photoshop Elements... Page 7 Resizing an Image...
Copyrights and Trademarks
 Mobile Copyrights and Trademarks Autodesk SketchBook Mobile (2.0) 2012 Autodesk, Inc. All Rights Reserved. Except as otherwise permitted by Autodesk, Inc., this publication, or parts thereof, may not be
Adobe Photoshop CS5 Layers and Masks
 Adobe Photoshop CS5 Layers and Masks Email: training@health.ufl.edu Web Page: http://training.health.ufl.edu Adobe Photoshop CS5: Layers and Masks 2.0 Hours The workshop will cover creating and manipulating
University Libraries ScanPro 3000 Microfilm Scanner
 University Libraries ScanPro 3000 Microfilm Scanner Help Guide Table of Contents Getting Started 3 Loading the Film 4-5 Viewing Your Film 6-7 Motorized Roll Film Control 6 Crop Box 7 Using the Toolbar
Building a Chart Using Trick or Treat Data a step by step guide By Jeffrey A. Shaffer
 Building a Chart Using Trick or Treat Data a step by step guide By Jeffrey A. Shaffer Each year my home is bombarded on Halloween with an incredible amount of Trick or Treaters. So what else would an analytics
Exploring Photoshop Tutorial
 Exploring Photoshop Tutorial Objective: In this tutorial we will create a poster composed of three distinct elements: a Bokeh, an image and title text. The Bokeh is an effect which is sometimes seen in
digitization station DIGITAL SCRAPBOOKING 120 West 14th Street
 digitization station DIGITAL SCRAPBOOKING 120 West 14th Street www.nvcl.ca techconnect@cnv.org DIGITAL SCRAPBOOKING With MyMemories Suite 6 The MyMemories Digital Scrapbooking software allows you to create
Photoshop Elements 3 Layers
 Photoshop Elements 3 Layers One of the most powerful features of modern imaging software is the ability to work with layers. If an image is made of layers, we can work on the part that is in one layer
HOW TO CREATE A SUPER SHINY PENCIL ICON
 HOW TO CREATE A SUPER SHINY PENCIL ICON Tutorial from http://psd.tutsplus.com/ Compiled by INTRODUCTION The Pencil is one of the visual metaphors most used to express creativity. In this tutorial,
By Washan Najat Nawi
 By Washan Najat Nawi how to get started how to use the interface how to modify images with basic editing skills Adobe Photoshop: is a popular image-editing software. Two general usage of Photoshop Creating
Add Transparent Type To An Image With Photoshop
 Add Transparent Type To An Image With Photoshop Written by Steve Patterson. In this Photoshop Effects tutorial, we re going to learn how to add transparent type to an image. There s lots of different ways
PhotoText. PhotoText is a great introduction to Photoshop.
 1 is a great introduction to Photoshop. To earn an A, you ll need to have the complete the following tasks within your : Downloaded and installed font. All photos are student taken and appropriate. Textures
Basics Pictures Media Bar
 Basics 1 The right pictures can make your publication stand out from the crowd. In this tutorial, we ll show you how to: Add and replace pictures. Use the Media Bar. Pan, zoom, and crop pictures. Apply
Downloaded From : Working with Photoshop 7.0
 Adobe Photoshop 1. Introduction What is Adobe Photoshop? Adobe Photoshop is a web designing software used for giving effects and filters to an image to make it more appealing and attractive. Brought out
Start from Scratch Open Photoshop.
 Mr. Manders Repeating Patterns (Developed by Mr. Kasten) Our goals in this activity: To understand the similarities and differences working with the shape tools vs the marquee tools in Photoshop. It can
Now we ve had a look at the basics of using layers, I thought we d have a look at a few ways that we can use them.
 Stone Creek Textiles stonecreektextiles.co.uk Layers Part 2 Now we ve had a look at the basics of using layers, I thought we d have a look at a few ways that we can use them. In Layers part 1 we had a
Spreadsheets 3: Charts and Graphs
 Spreadsheets 3: Charts and Graphs Name: Main: When you have finished this handout, you should have the following skills: Setting up data correctly Labeling axes, legend, scale, title Editing symbols, colors,
Movie Merchandising. Movie Poster. Open the Poster Background.psd file. Open the Cloud.jpg file.
 Movie Poster Open the Poster Background.psd file. Open the Cloud.jpg file. Movie Merchandising Choose Image>Adjustments>Desaturate to make it a grayscale image. Select the Move tool in the Toolbar and
PASS Sample Size Software. These options specify the characteristics of the lines, labels, and tick marks along the X and Y axes.
 Chapter 940 Introduction This section describes the options that are available for the appearance of a scatter plot. A set of all these options can be stored as a template file which can be retrieved later.
Computer Graphics and Image Editing Software
 ELCHK Lutheran Secondary School Form Two Computer Literacy Computer Graphics and Image Editing Software Name : Class : ( ) 0 Content Chapter 1 Bitmap image and vector graphic 2 Chapter 2 Photoshop basic
How to Vignette. Introduction. Written by Jonathan Sachs Copyright Digital Light & Color
 Written by Jonathan Sachs Copyright 1999-2000 Digital Light & Color Introduction This document explains several methods for creating vignettes with Picture Window. To vignette means to create a soft-edged
Preparing Images For Print
 Preparing Images For Print The aim of this tutorial is to offer various methods in preparing your photographs for printing. Sometimes the processing a printer does is not as good as Adobe Photoshop, so
Autodesk. SketchBook Mobile
 Autodesk SketchBook Mobile Copyrights and Trademarks Autodesk SketchBook Mobile (2.0.2) 2013 Autodesk, Inc. All Rights Reserved. Except as otherwise permitted by Autodesk, Inc., this publication, or parts
What is real? What is art?
 HDCC208N Fall 2018 We ll fix it in post The Digital Darkroom What is real? What is art? We have been discussing this pair of questions at various points this semester, with drawings, paintings, the camera
Adobe Photoshop CS2 Workshop
 COMMUNITY TECHNICAL SUPPORT Adobe Photoshop CS2 Workshop Photoshop CS2 Help For more technical assistance, open Photoshop CS2 and press the F1 key, or go to Help > Photoshop Help. Selection Tools - The
XI. Rotary Attachment Setups
 XI. Rotary Attachment Setups 1) Turn off the laser. 2) Put the rotary attachment onto the engraving table. Ensure the two screw holes on right side of rotary attachment match the two corresponding holes
GETTING STARTED. 0 P a g e B a s i c s o f A d o b e P h o t o s h o p A g a P r i v a t e I n s t i t u t e f o r c o m p u t e r s c i e n c e
 GETTING STARTED 0 P a g e B a s i c s o f A d o b e P h o t o s h o p Adobe Photoshop: is a popular image editing software that provides a work environment consistent with Adobe Illustrator, Adobe InDesign,
DeltaCad and Your Cylinder (Shepherd s) Sundial Carl Sabanski
 Sundial Carl Sabanski") 1 The Sundial Primer created by In the instruction set SONNE and Your Cylinder Shepherd s Sundial we went through the process of designing a cylinder sundial with SONNE and saving it as a dxf file. In
1 The Sundial Primer created by In the instruction set SONNE and Your Cylinder Shepherd s Sundial we went through the process of designing a cylinder sundial with SONNE and saving it as a dxf file. In
Crop, Resize, and Recolor an Image in MS Word by Debra Laraway
 Crop, Resize, and Recolor an Image in MS Word by Debra Laraway This tutorial presumes you have used MS Word and can create a basic document. Do keep in mind that Word is not a graphics program. You can
Digital Image Manipulation 2014
 Week 4 Advanced Type Techniques- create special effect type Step 1 Create a new 1024 x 768 px document. Set the document background color to light pink or follow my colour (#f8cece) Create the text using
Adobe Photoshop CC 2018 Tutorial
 Adobe Photoshop CC 2018 Tutorial GETTING STARTED Adobe Photoshop CC 2018 is a popular image editing software that provides a work environment consistent with Adobe Illustrator, Adobe InDesign, Adobe Photoshop,
Photoshop Elements 7.0
 Photoshop Elements 7.0 Photoshop Elements is a powerful software package that lets you create or edit pictures and images. Photoshop works on the principles of layers. Think about an image as a number
Copyright Notice. Trademarks
 Copyright Notice All rights reserved. No part of this publication may be reproduced, stored in a retrieval system, or transmitted in any form or by any means, electronic, mechanical, photocopying, recording,
How to generate different file formats
 How to generate different file formats Different mediums print, web, and video require different file formats. This guide describes how to generate appropriate file formats for these mediums by using Adobe
A Basic Guide to Photoshop Adjustment Layers
 A Basic Guide to Photoshop Adjustment Layers Photoshop has a Panel named Adjustments, based on the Adjustment Layers of previous versions. These adjustments can be used for non-destructive editing, can
THE OFFICE DRAWING TOOLS
 ESSENTIAL MICROSOFT OFFICE 2013: Tutorials for Teachers Copyright Bernard John Poole, 2013. All rights reserved 3 THE OFFICE DRAWING TOOLS LEARNING OUTCOMES In Lesson 2 you learned how to work with a longer
15 Photoshop Tips. Changing Photoshop rulers from inches to picas
 5 Photoshop Tips Changing Photoshop rulers from inches to picas What s the difference between inches and picas? a 6x inch RGB JPEG file is.9 MB a 6x pica RGB JPEG file is. MB a 6x inch RGB TIFF file is.
Learning Adobe Photoshop CS6
 Module 1 Contents Chapter 1: Introduction to Photoshop Loading Photoshop...1-1 The Tools Panel...1-2 Using the Tools...1-3 The Panel Group...1-5 Layers...1-6 Loading a Sample File...1-6 Looking at the
Perspective Guides. Perspective Contextual Toolbar. 1-Point Perspective
 WHAT S NEW 1. Perspective Guides 2. Flipbook Animation 3. Gradient Flood Fills 4. Layer Workflow Enhancements - Layer Grouping - Extended Blending Modes - Background Color - Multi-Layer Select 5. Distort
Drawing with precision
 Drawing with precision Welcome to Corel DESIGNER, a comprehensive vector-based drawing application for creating technical graphics. Precision is essential in creating technical graphics. This tutorial
Digital Design and Communication Teaching (DiDACT) University of Sheffield Department of Landscape. Adobe Photoshop CS5 INTRODUCTION WORKSHOPS
 University of Sheffield Department of Landscape. Adobe Photoshop CS5 INTRODUCTION WORKSHOPS") Adobe INTRODUCTION WORKSHOPS WORKSHOP 1 - what is Photoshop + what does it do? Outcomes: What is Photoshop? Opening, importing and creating images. Basic knowledge of Photoshop tools. Examples of work.
Adobe INTRODUCTION WORKSHOPS WORKSHOP 1 - what is Photoshop + what does it do? Outcomes: What is Photoshop? Opening, importing and creating images. Basic knowledge of Photoshop tools. Examples of work.
Copyright Ellen Finkelstein, Inc. Do not copy or forward Instead, refer people to where they
 Copyright Ellen Finkelstein, Inc. Do not copy or forward Instead, refer people to www.outstandingpresentationsworkshop.com/slidelayout where they sign up for the training video series themselves 1 Finding
ADOBE PHOTOSHOP CS TUTORIAL
 ADOBE PHOTOSHOP CS TUTORIAL A D O B E P H O T O S H O P C S Adobe Photoshop CS is a popular image editing software that provides a work environment consistent with Adobe Illustrator, Adobe InDesign, Adobe
Instructions: Editing a Photo Using Picasa 2. Allison Way and Charlie Windham ENG 313 February 27, 2008
 Instructions: Editing a Photo Using Picasa 2 Allison Way and Charlie Windham ENG 313 February 27, 2008 ABOUT THIS PICASA 2 MANUAL This manual tells you how to edit any photo using a free and downloadable
Photoshop Elements Hints by Steve Miller
 2015 Elements 13 A brief tutorial for basic photo file processing To begin, click on the Elements 13 icon, click on Photo Editor in the first box that appears. We will not be discussing the Organizer portion
A. Selecting. Example: Start the GIMP by clicking Start, choose Gimp and GIMP 2 from the menu. Open the Keys.jpg image from your course folder.
 A. Selecting Open the Keys.jpg image from your course folder. From the Layer menu, choose New Layer. Ensure Transparency is ticked Click OK. The Layer dialog now shows two layers. Page 1 Click the Background
Photoshop: Manipulating Photos
 Photoshop: Manipulating Photos All Labs must be uploaded to the University s web server and permissions set properly. In this lab we will be manipulating photos using a very small subset of all of Photoshop