PhotoText. PhotoText is a great introduction to Photoshop.
|
|
|
- Geraldine McDowell
- 6 years ago
- Views:
Transcription

1 1 is a great introduction to Photoshop. To earn an A, you ll need to have the complete the following tasks within your : Downloaded and installed font. All photos are student taken and appropriate. Textures can be used from the Internet. All photos and font must support the theme of the. must contain at least 4 letters. must contain at least 15 layers.

2 2 Install a cool font that supports the theme of your. SELECT A BIG THICK HEAVY FONT. THIN OR HOLLOW FONTS WILL NOT WORK. 1. To install a font, complete the following steps: a. Open a web browser and navigate to

3 3 b. Choose a genre for your font that supports the theme of your. I chose Comic. c. Go to Preview and type in your word. I used Beach. This will give you a preview of what your word will look like in that font. d. Go to Fonts and use the drop down box to choose 100. That will give you 100 fonts to choose from on each page.


4 4 e. Remember to select a BIG, HEAVY, THICK font. I m choosing the last one in the phtoo above. f. After you ve selected your font, look to the right of the page to make sure it s free. If it s free, click Download to download it. It will appear in Downloads on your computer. g. REMEMBER or WRITE DOWN the NAME of YOUR FONT. You ll need to know this in Photoshop. h. Go to Downloads and find your file. It will be a Zipped file. Double- click the Zipped file to unpack it. i. Open the folder and double- click on your font file. Your font file will have the file extension of.ttf or.otf. My example has several fonts I can install.i d install them all.

5 5 j. Double- click the font file and the Installer panel will pop up. Click Install Font to install your font. k. Note that not all fonts work. If yours doesn t work, you may need to download a different font.

. 4.")

6 6 2. Open Photoshop. 3. Go to File/New (Command+N). 4. Name your file. 5. Set the Width to 20 inches.


7 7 6. Set the Height to 10 inches. 7. Set your Resolution to 200 pixels/inch.

8 8 8. Set your Background Contents to Transparent.
9 9 9. This is your blank canvas with a transparent background.

10 It s time to add your font. Select the Type Tool from the Tool pallet. You can select either Horizontal or Vertical, based on what you want to do.


11 Select the font you installed from the dropdown box. Fonts are listed alphabetically. If you haven t donloaded a font, save your file and close Photoshop. Then, download and install a font. 12. Set the Font size. This will vary based on the number of letters in your word. Remember, you have to have at least 10 layers. I usually start at 300 point font. You ll need to type in your number.

12 Choose the Left align text setting for your text. 14. Set the font color. For now, make it black so you can see it easily.


13 Position the mouse at the left of the canvas and type your word. Mine is Beach. 16. Using the Move Tool, move your word where you want it to be.

14 If you find that your word is too small or too big, select the Type Tool to highlight your word.


15 Now, change your font size. Remember, you ll need to type in the size. I made mine bigger (350pt). 19. Using the Move Tool, reposition your word. Use the transparent grid to help you line up your word.

16 Now comes the fun part. The reason why we left aligned your word is to keep your first letter from moving as we delete your letters. We need to delete all but the first letter of your word, in my case B. We must delete the other letters because each letter must be in it s own layer so we can put pictures in it. If you look in the Layers tab on the right of your screen, you ll notice, right now that your entire word is a layer: 21. To put each letter in a layer, go to the Type Tool and backspace all but your first letter and select the Move Tool. Notice how your layer is just named your first letter. In my case, it s B.


17 To add each letter as a layer, select the Type Tool and move far away from your first letter, click the canvas and type your second letter. You ll notice that your second letter is now in it s own layer.
18 Select the Move Tool and position your second letter where you want it. Be creative, it doesn t have to be in a straight line. Mine is, but yours doesn t have to be, if you choose. The cool thing is that you can always change it by moving your layers. 24. Continue this process until all letters in your word are in their own layers.
. 27. Now, let s add in a background picture.")
19 If you find that you want to move a letter, simply select it s layer in the Layers tab, then select the Move Tool and position it where you want. Here I moved the A for you to see the layer selected. 26. If you find you want to undo a change, go to Edit/Step Backward (Alt+Command+Z). 27. Now, let s add in a background picture. You can choose to have a single picture or several it s up to you. Be creative and have fun.


20 Go to File.Open and navigate to where your picture is stored and double- click it to open it. Remember, you must use your own images, no pictures from the Internet. Your Lightroom edits are good images to use. 29. When your new picture opens in Photoshop, it ll open in a tab across the top. 30. Use your move tool to drag your picture tab down. This will give you two windows; your window and your image
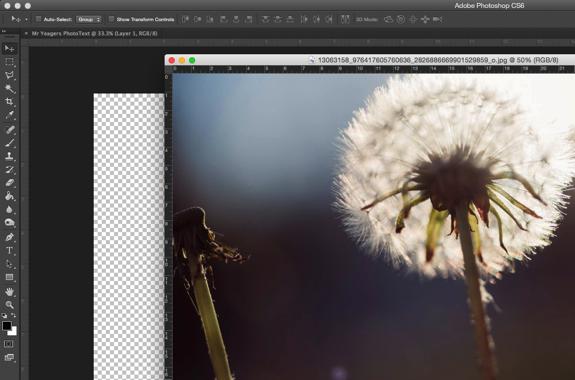
21 21 window.

22 Use your Move Tool to drag and drop your image into your canvas. 32. Select Command+T so you can resize your image. 33. Hold Shift and resize your image from the CORNERS ONLY. If you distort your image, I will take off a lot of points.

23 Resize your image so that it covers the whole background.

24 24 Remember to hold Shift and resize your picture from a corner so it doesn t distort. To move your photo to the background, simply drag and drop the layer to the bottom.

25 If you want, add a texture to your background. Your texture should support the theme of your phototext or support the style you want to create. I m going to add some sunny light leaks and maybe some lens flares to make it feel really warm and sunny. 36. To add a texture you need another picture. You can use your own picture or a picture from the Internet. This is the only time you can use an Internet picture.


26 Open a web browser and search for the texture you want. 38. Select your texture and open it and copy it.

27 Paste it into your canvas. 40. Using the Move Tool, drag your texture to the corner of the canvas and hit Command+T to resize it. Depending on your texture, it may not matter if you distort it as you resize it. Be sure to cover your whole canvas with your

28 28 texture image.


29 Use the Blending Modes to select a look that you like.

30 30 Now, I want to give my bakground a vignette. To add a vignette, choose a color using the Eye Dropper Tool. This will allow you to select a color that will go with your background and look more realistic.

31 Go to the Rectangle Tool and select it.
32 Draw a rectangle over your whole picture and put it under your Texture layer.

33 Now we have to rasterize your rectangel (shape). Select your rectangle layer and navigate to Layer/Rasterize/Shape.


34 Now select the Lasso Tool to set our vignette. Set the Feather to 100 pixels. 46. Draw where you want your vignette to be. Do not make it perfect!


35 Hit delete to reveal your vignette. 48. Deselect your vignette and play with the blending modes until you get one you like. You can also change the opacity of the vignette.
36 Now, let s put your pictures in your text. Select your first letter the go to File>Open to open the image for that letter. Then, drag and drop your image into your canvas. By selecting the letter you are using before placing the picture, the picture comes into Photoshop above the letter, where it needs to be. NOTE: Plan to have 2 or 3 pictures for each letter because you never know how they are going to fit. 50. Using the Move Tool, position the new picture above your letter. Then, holding Shift, size your image. Double- click your image to deselect it.

37 To group your picture with your letter, go to Layer/Create Clipping Mask (Alt+Command+G).

38 38 You can move your picture in your letter or resize it. See how mine is offset?

39 Select your Move Tool and position your picture the way you want it inside your letter. If you want to resize your picture, hit Command+T and resize your picture from the corner while holding the Shift key down.
40 Here s how mine looks, so far. 54. Now, place your pictures in each letter like we did for the first letter. Remember to select the letter you are filling in the Layers Panel.
41 Here s how mine looks: Looks good, but it can look better. Let s play with the text. 56. Using the Move Tool, select your first letter on the Layers Panel. Mine is B. Then, navigate to Layer/Layer Style and select any option. I chose Outer
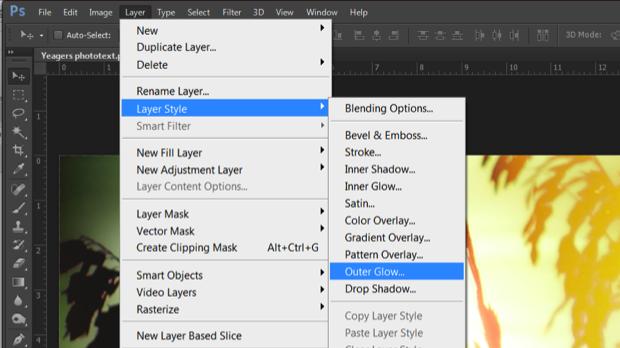
42 42 Glow.

43 Experiment with the settings, Blending Modes, Bevels, anything you want. Experiment until you find a look you like. Here s what I liked:
44 44

45 Now, apply the same Layer Style to all letters. You can change things up for each letter, if you want. I like mine consistent. 59. Just for kicks, I put my texture layer on top and got this effect. I like it. Feel free to experiment. Yours does not have to look like mine, but should reflect considerable thought and effort.
Central Photography [NASHVILLE EFFECT MAKING A GROUP]
![Central Photography [NASHVILLE EFFECT MAKING A GROUP]](/thumbs/86/93804615.jpg "Central Photography [NASHVILLE EFFECT MAKING A GROUP]") 1 1. Open Photoshop. 2. Go to File/New (Ctrl+N). 3. Name your file. 4. Set the Width to 11 inches. 2 5. Set the Height to 8.5 inches. 6. Set your Resolution to 200 pixels/inch. 7. Set your Background Contents
1 1. Open Photoshop. 2. Go to File/New (Ctrl+N). 3. Name your file. 4. Set the Width to 11 inches. 2 5. Set the Height to 8.5 inches. 6. Set your Resolution to 200 pixels/inch. 7. Set your Background Contents
Central Photography [INSTAGRAM EFFECTS]
![Central Photography [INSTAGRAM EFFECTS]](/thumbs/96/129260346.jpg "Central Photography [INSTAGRAM EFFECTS]") 1 1. Open Photoshop. 2. Go to File/New (Ctrl+N). 3. Name your file. 4. Set the Width to 11 inches. 2 5. Set the Height to 8.5 inches. 6. Set your Resolution to 200 pixels/inch. 7. Set your Background Contents
1 1. Open Photoshop. 2. Go to File/New (Ctrl+N). 3. Name your file. 4. Set the Width to 11 inches. 2 5. Set the Height to 8.5 inches. 6. Set your Resolution to 200 pixels/inch. 7. Set your Background Contents
Clipping Masks And Type Placing An Image In Text With Photoshop
 Clipping Masks And Type Placing An Image In Text With Photoshop Written by Steve Patterson. In a previous tutorial, we learned the basics and essentials of using clipping masks in Photoshop to hide unwanted
SHAPE CLUSTER PHOTO DISPLAY
 SHAPE CLUSTER PHOTO DISPLAY In this Photoshop tutorial, we ll learn how to display a single photo as a cluster of shapes, similar to larger wall cluster displays where several photos, usually in different
Glowing Surreal Planet Design. Final Image Preview
 Glowing Surreal Planet Design Final Image Preview. Step 1 First, go to the S:\ drive and locate the folder called Glowing Planet Design. Copy the City Skyline file and paste it in your Glowing Planet Design
Photoshop: Manipulating Photos
 Photoshop: Manipulating Photos All Labs must be uploaded to the University s web server and permissions set properly. In this lab we will be manipulating photos using a very small subset of all of Photoshop
Central Photography [OUT OF BOUNDS]
![Central Photography [OUT OF BOUNDS]](/thumbs/77/75801528.jpg "Central Photography [OUT OF BOUNDS]") The effect is called Out of Bounds or sometimes 3D Border Breakout. 1. First off you need to pick a suitable picture. Photos with a strong subject help, one that has some depth in the frame. Movement is
The effect is called Out of Bounds or sometimes 3D Border Breakout. 1. First off you need to pick a suitable picture. Photos with a strong subject help, one that has some depth in the frame. Movement is
Photoshop 1. click Create.
 Photoshop 1 Step 1: Create a new file Open Adobe Photoshop. Create a new file: File->New On the right side, create a new file of size 600x600 pixels at a resolution of 300 pixels per inch. Name the file
Now we ve had a look at the basics of using layers, I thought we d have a look at a few ways that we can use them.
 Stone Creek Textiles stonecreektextiles.co.uk Layers Part 2 Now we ve had a look at the basics of using layers, I thought we d have a look at a few ways that we can use them. In Layers part 1 we had a
Photoshop: Manipulating Photos
 Photoshop: Manipulating Photos All Labs must be uploaded to the University s web server and permissions set properly. In this lab we will be manipulating photos using a very small subset of all of Photoshop
Key Terms. Where is it Located Start > All Programs > Adobe Design Premium CS5> Adobe Photoshop CS5. Description
 Adobe Adobe Creative Suite (CS) is collection of video editing, graphic design, and web developing applications made by Adobe Systems. It includes Photoshop, InDesign, and Acrobat among other programs.
Photoshop CC 2018 Essential Skills
 Photoshop CC 2018 Essential Skills Adobe Photoshop Creative Cloud 2018 University Information Technology Services Learning Technology, Training, Audiovisual and Outreach Copyright 2018 KSU Division of
METAL TEXT EFFECT. Step 1: Create A New Document. Step 2: Fill The Background With Black
 METAL TEXT EFFECT In this text effects tutorial, we ll learn how to easily create metal text, a popular effect widely used in video games and movie posters! It may seem like there s a lot of steps involved,
Project 25 Page 1 ` JAZZ POSTCARD
 Project 25 Page 1 ` JAZZ POSTCARD Reset all tools! Create the Background 1. Create a new RGB document, 4.25 in. wide by 5.75 in. high at 100 dpi with a white background. 2. Click the foreground color swatch
Part 1- Fundamental Functions
 Part 1- Fundamental Functions Note: Alt+Tab will allow you to move between programs in the docker. Shift+Tab removes right pallets Tab removes all pallets Ctrl+1= centers art board Ctrl + 0= fill window
Step 1: Create A New Photoshop Document
 Film Strip Photo Collage - Part 2 In part one of this two-part Photoshop tutorial, we learned how Photoshop s shape tools made it easy to draw a simple film strip which we can then use as a photo frame,
Photoshop: Manipulating Photos
 Photoshop: Manipulating Photos All Labs must be uploaded to the University s web server and permissions set properly. In this lab we will be manipulating photos using a very small subset of all of Photoshop
FLAMING HOT FIRE TEXT
 FLAMING HOT FIRE TEXT In this Photoshop text effects tutorial, we re going to learn how to create a fire text effect, engulfing our letters in burning hot flames. We ll be using Photoshop s powerful Liquify
Photoshop Activity #05: Creating Composite Pictures /Collages
 Photoshop Activity #05: Creating Composite Pictures /Collages Overview You can create composite pictures for an unlimited number of purposes and subjects! Literature units, science, history, virtually
Introduction to Photoshop
 Introduction to Photoshop Photoshop Creative Cloud (CC) Start -> All Programs -> Classes -> Web Expressions -> Tutorials Google Photoshop CC tutorial Color Replacement Image -> Adjustments -> Replace
prepared by Allison Hwang for T. Purdy 2011
 This tutorial shows you how to create a basic screen display on a product in Adobe Photoshop. Creating details, such as shadows and reflections, can help make your product more realistic and convincing
Reflection Project. Please start by resetting all tools in Photoshop.
 Reflection Project You will be creating a floor and wall for your advertisement. Before you begin on the Reflection Project, create a new composition. File New: Width 720 Pixels / Height 486 Pixels. Resolution
12. Creating a Product Mockup in Perspective
 12. Creating a Product Mockup in Perspective Lesson overview In this lesson, you ll learn how to do the following: Understand perspective drawing. Use grid presets. Adjust the perspective grid. Draw and
A quick note: We hope that you will find something from the Tips and Tricks that will add a little pizazz to your yearbook pages!
 A quick note: The following pages are tips and tricks for Basic Photoshop users. You may notice that some instructions indicate that non-awpc fonts were used, and that some colors were created using the
Launch Photoshop and use File>Open from the Photoshop menu to open an image file.
 PREPARING IMAGES FOR ART 620 DOCUMENTATION This paper details the procedure for preparing images for Art 620 documentation according to the Art 620 Guidelines, pp. 6-7. It assumes you have taken digital
Step 1: Open A Photo To Place Inside Your Text
 Place A Photo Or Image In Text In Photoshop In this Photoshop tutorial, we re going to learn how to place a photo or image inside text, a very popular thing to do in Photoshop, and also a very easy thing
Add Transparent Type To An Image With Photoshop
 Add Transparent Type To An Image With Photoshop Written by Steve Patterson. In this Photoshop Effects tutorial, we re going to learn how to add transparent type to an image. There s lots of different ways
Photoshop Elements 3 Layers
 Photoshop Elements 3 Layers One of the most powerful features of modern imaging software is the ability to work with layers. If an image is made of layers, we can work on the part that is in one layer
ADD TRANSPARENT TYPE TO AN IMAGE
 ADD TRANSPARENT TYPE TO AN IMAGE In this Photoshop tutorial, we re going to learn how to add transparent type to an image. There s lots of different ways to make type transparent in Photoshop, and in this
BRUSHES AND LAYERS We will learn how to use brushes and illustration tools to make a simple composition. Introduction to using layers.
 Brushes BRUSHES AND LAYERS We will learn how to use brushes and illustration tools to make a simple composition. Introduction to using layers. WHAT IS A BRUSH? A brush is a type of tool in Photoshop used
Lesson 16 Text, Layer Effects, & Filters
 Lesson 16 Text, Layer Effects, & Filters Digital Media I Susan M. Raymond West High School In this tutorial, you will: Create a Type Layer Add and Format Type within a Type Layer Apply Layer Effects Apply
Here is a 100% zoom close up. Name in Popsicles
 Here is a 100% zoom close up Name in Popsicles Step 1 Let s start by creating a new Photoshop document. Mine is 2560 1440 pixels. Fill the background with a color of your choice (it s not important at
Adobe Photoshop CC 2018 Tutorial
 Adobe Photoshop CC 2018 Tutorial GETTING STARTED Adobe Photoshop CC 2018 is a popular image editing software that provides a work environment consistent with Adobe Illustrator, Adobe InDesign, Adobe Photoshop,
How to Create Website Banners
 How to Create Website Banners In the following instructions you will be creating banners in Adobe Photoshop Elements 6.0, using different images and fonts. The instructions will consist of finding images,
Photoshop CS2. Step by Step Instructions Using Layers. Adobe. About Layers:
 About Layers: Layers allow you to work on one element of an image without disturbing the others. Think of layers as sheets of acetate stacked one on top of the other. You can see through transparent areas
XXXX - MAKING A FLYER BOOKLET COVER 1 N/08/08
 INTRODUCTION TO GRAPHICS Making a flyer booklet cover Information Sheet No. XXXX Create a new document with these settings. Note that you will be using 300 dpi because this will be made for print. Keepit
An Idiot's Guide to Photoshop. Part II Azamat Bohed E. TrueKolor.net
 An Idiot's Guide to Photoshop Part II Azamat Bohed E. TrueKolor.net Table of Contents 1.Introduction 3 2. Opening a Digital Image/Photo in Photoshop 3 3. Changing/removing the Background 4 3.1 Using the
CREATE A BURNT EDGE EFFECT
 CREATE A BURNT EDGE EFFECT One of the all-time classic effects in Photoshop is the burnt edge, and there s lots of different ways to create it, but in this Adobe Photoshop tutorial, we re going to look
11 Advanced Layer Techniques
 11 Advanced Layer Techniques After you ve learned basic layer techniques, you can create more complex effects in your artwork using layer masks, path groups, filters, adjustment layers, and more style
PhotoFrame Pro 3. Review by Darrel Priebe
 PhotoFrame Pro 3 Review by Darrel Priebe Summary PhotoFrame Pro 3 is a fun and easy-to-use plug-in for Photoshop or Photoshop Elements to give your photographs exciting frame or edge effects. With over
Duplicate Layer 1 by dragging it and dropping it on top of the New Layer icon in the Layer s Palette. You should now have two layers rename the top la
 50 Face Project For this project, you are going to put your face on a coin. The object is to make it look as real as possible. Though you will probably be able to tell your project was computer generated,
Downloaded From : Working with Photoshop 7.0
 Adobe Photoshop 1. Introduction What is Adobe Photoshop? Adobe Photoshop is a web designing software used for giving effects and filters to an image to make it more appealing and attractive. Brought out
Creating Photo Borders With Photoshop Brushes
 Creating Photo Borders With Photoshop Brushes Written by Steve Patterson. In this Photoshop photo effects tutorial, we ll learn how to create interesting photo border effects using Photoshop s brushes.
Diploma in Photoshop
 Diploma in Photoshop Tabbed Window Document Workspace Options Options Bar Main Interface Tool Palette Active Image Stage Layers Palette Menu Bar Palettes Useful Tip Choose between pre-set workspace arrangements
Adobe Photoshop CS5 Tutorial
 Adobe Photoshop CS5 Tutorial GETTING STARTED Adobe Photoshop CS5 is a popular image editing software that provides a work environment consistent with Adobe Illustrator, Adobe InDesign, Adobe Photoshop
Name the layer you rotated in step 3 Stripe and lower the opacity to 43%.
 Step 1 Open Photoshop and create a new file 1085 649 pixels. Fill the layer with a bright blue color (#0095db) by pressing Shift + F5. This will be the background for our pop art scene. Step 2 Let s create
ADD A REALISTIC WATER REFLECTION
 ADD A REALISTIC WATER REFLECTION In this Photoshop photo effects tutorial, we re going to learn how to easily add a realistic water reflection to any photo. It s a very easy effect to create and you can
Organizing artwork on layers
 3 Layer Basics Both Adobe Photoshop and Adobe ImageReady let you isolate different parts of an image on layers. Each layer can then be edited as discrete artwork, allowing unlimited flexibility in composing
Movie Merchandising. Movie Poster. Open the Poster Background.psd file. Open the Cloud.jpg file.
 Movie Poster Open the Poster Background.psd file. Open the Cloud.jpg file. Movie Merchandising Choose Image>Adjustments>Desaturate to make it a grayscale image. Select the Move tool in the Toolbar and
Using Photoshop Elements
 Using Photoshop Elements Created By: Rick Williams August 2004 Table of Contents Photoshop Element Tools...Page 1 Tool Descriptions... Page 3 Starting Photoshop Elements... Page 7 Resizing an Image...
In the following sections, if you are using a Mac, then in the instructions below, replace the words Ctrl Key with the Command (Cmd) Key.
 Key.") Mac Vs PC In the following sections, if you are using a Mac, then in the instructions below, replace the words Ctrl Key with the Command (Cmd) Key. Zoom in, Zoom Out and Pan You can use the magnifying
Mac Vs PC In the following sections, if you are using a Mac, then in the instructions below, replace the words Ctrl Key with the Command (Cmd) Key. Zoom in, Zoom Out and Pan You can use the magnifying
Adding Fireworks To A Photo With Photoshop
 Adding Fireworks To A Photo With Photoshop Written by Steve Patterson. In this Photoshop Effects tutorial, we re going to learn how to add fireworks to a photo. What you ll need is a photo of fireworks
Lab 2 Assignment Part 2: (Due two weeks following the fluorescence lab) (10 points)
 (10 points)") Lab 2 Assignment Part 2: (Due two weeks following the fluorescence lab) (10 points) Each individual should prepare one set of corresponding phase contrast and fluorescent images and an accompanying figure
Lab 2 Assignment Part 2: (Due two weeks following the fluorescence lab) (10 points) Each individual should prepare one set of corresponding phase contrast and fluorescent images and an accompanying figure
S e a m l e s s C o l l a g e I m a g e
 Some familiarity with the Macintosh and Photoshop 4.0 is very helpful. We also assume you have a previously created, scanned or other image to open. In addition to working with multiple image layers, adding
GETTING STARTED MAKING A NEW DOCUMENT
 Accessed with permission from http://web.ics.purdue.edu/~agenad/help/photoshop.html GETTING STARTED MAKING A NEW DOCUMENT To get a new document started, simply choose new from the File menu. You'll get
Quick Mask Setting Up your Work Environment Setting Up the Quickmask Parameters
 Quick Mask Quickmask gets its name from the fact that as you create your selection area, Photoshop masks that area off, tinting it with a colored mask to show what has been selected. When you're finished
The original photo. The final result.
 giving a photo painted edges In this Adobe Photoshop tutorial, we re going to combine a couple of different effects. First, we ll give the photo easy-tocreate painted edges, and then we ll make it look
Managing images with NewZapp
 Managing images with NewZapp This guide is for anyone using the NewZapp Fixed editor as opposed to the Drag and Drop editor. The Image Manager is where images are uploaded and stored in your NewZapp account
ITEC185 INTRODUCTION TO DIGITAL MEDIA
 1 ITEC185 INTRODUCTION TO DIGITAL MEDIA ADOBE PHOTOSHOP ITEC185 - Introduction to Digital Media ITEC185 - Introduction to Digital Media 2 What is Adobe Photoshop? Photoshop is the leading professional
How to Draw a Realistic iphone 4 with
 Home Freebies Submit Your Work Contact Us How to Draw a Realistic iphone 4 with Photoshop Jan 3 2011 By Mohammad Jeprie 34 Comments In this tutorial, we will draw a realistic-looking iphone 4 using Photoshop.
CSCI Lab 6. Part I: Simple Image Editing with Paint. Introduction to Personal Computing University of Georgia. Multimedia/Image Processing
 CSCI-1100 Introduction to Personal Computing University of Georgia Lab 6 Multimedia/Image Processing Purpose: The purpose of this lab is for you to gain experience performing image processing using some
CATEGORY SKILL SET REF. TASK ITEM
 ECDL / ICDL Image Editing This module sets out essential concepts and skills relating to the ability to understand the main concepts underlying digital images and to use an image editing application to
Getting Started. 1. Double click on the eye con. 2. Single click on File, then new, then OK. Click here.
 Getting Started 1. Double click on the eye con. 2. Single click on File, then new, then OK. Click here. What is Photoshop? Photoshop is a program that lets you make pictures. You can put away your markers
GIMP Simple Animation Tutorial
 GIMP Simple Animation Tutorial Banner size: 690 x 200 transparent background layer There are really two parts to making an animated banner. The first is to set up the banner all the components besides
Create A Briefcase Icon
 Create A Briefcase Icon In this tutorial, I will show you how to create a briefcase icon with rectangles, ellipses, and gradients. This briefcase icon is great for web designs and user interfaces. Moreover,
You ve Been Framed! (Adobe Photoshop)
") You ve Been Framed! (Adobe Photoshop) Tip of the Week by Linda Sattgast on September 28, 2009 Do you have a great photo of someone special that you want to bring into sharp focus the special person, that
You ve Been Framed! (Adobe Photoshop) Tip of the Week by Linda Sattgast on September 28, 2009 Do you have a great photo of someone special that you want to bring into sharp focus the special person, that
ITEC 715: WEEK 03 IN-CLASS EXERCISE: CREATING AN INSTRUCTIONAL COMIC WITH PHOTOSHOP STEP 1: GET IMAGES STEP 2: PLAN YOUR LAYOUT
 ITEC 715: WEEK 03 IN-CLASS EXERCISE: CREATING AN Here's the finished comic you will create: INSTRUCTIONAL COMIC WITH PHOTOSHOP STEP 1: GET IMAGES If you can draw (and want to), that's fine, but it's not
Step 1. Facebook Twitter Google+ Find us on Facebook. Vectortuts+ How to Create a Curious Owl in Illustrator CS4 Vectortuts+
 Joomla developers needed - Long term potential in India Copywriter Email Campaigns Wordpress Creative design Social media in UK More Freelance Jobs... Facebook Twitter Google+ Find us on Facebook Step
Adobe Photoshop CC update: May 2013
 Adobe Photoshop CC update: May 2013 Welcome to the latest Adobe Photoshop CC bulletin update. This is provided free to ensure everyone can be kept upto-date with the latest changes that have taken place
Blend Photos Like a Hollywood Movie Poster
 Blend Photos Like a Hollywood Movie Poster Written By Steve Patterson In this Photoshop tutorial, we're going to learn how to blend photos together like a Hollywood movie poster. Blending photos is easy
SAVING, LOADING AND REUSING LAYER STYLES
 SAVING, LOADING AND REUSING LAYER STYLES In this Photoshop tutorial, we re going to learn how to save, load and reuse layer styles! Layer styles are a great way to create fun and interesting photo effects
Rendering a perspective drawing using Adobe Photoshop
 Rendering a perspective drawing using Adobe Photoshop This hand-out will take you through the steps to render a perspective line drawing using Adobe Photoshop. The first important element in this process
Reducing Noise in an image
 Reducing Noise in an image - Open the image in Photoshop. - Go to the Filter menu then click on Noise and then the Reduce Noise button. - Zoom in on the preview image in the Reduce Noise window, so that
Learning Adobe Photoshop CS6
 Module 1 Contents Chapter 1: Introduction to Photoshop Loading Photoshop...1-1 The Tools Panel...1-2 Using the Tools...1-3 The Panel Group...1-5 Layers...1-6 Loading a Sample File...1-6 Looking at the
Module All You Ever Need to Know About The Displace Filter
 Module 02-05 All You Ever Need to Know About The Displace Filter 02-05 All You Ever Need to Know About The Displace Filter [00:00:00] In this video, we're going to talk about the Displace Filter in Photoshop.
Add A Transparent Text Area To An Image With Photoshop
 Add A Transparent Text Area To An Image With Photoshop Written by Steve Patterson. In this Photoshop tutorial, we ll learn how to add an area of transparent text to an image. By that, I mean the text itself
How to Create a Landscape Wallpaper for your Desktop
 How to Create a Landscape Wallpaper for your Desktop Why not create a vector landscape wallpaper? In this simple tutorial, you will learn how to create an eye-appealing wallpaper quickly and effectively.
Contents. Introduction
 Contents Introduction 1. Overview 1-1. Glossary 8 1-2. Menus 11 File Menu 11 Edit Menu 15 Image Menu 19 Layer Menu 20 Select Menu 23 Filter Menu 25 View Menu 26 Window Menu 27 1-3. Tool Bar 28 Selection
Source photo, sketchbook collage and digital collage
 Source photo, sketchbook collage and digital collage Develop a mixed media project using traditional media, digital camera, scanner and image manipulation software. This technique encourages a creative
Composite Master Class Blend two images together to create a seamless collage
 Composite Master Class Blend two images together to create a seamless collage By Liz Ness Whether it s a custom senior photo, an album cover, or a basic digital collage, combining two or more images to
The original image. Let s get started! The final rainbow effect. The photo sits on the Background layer in the Layers panel.
 Add A Realistic Rainbow To A Photo In this Photoshop photo effects tutorial, we ll learn how to easily add a rainbow, and even a double rainbow, to a photo! As we ll see, Photoshop ships with a ready-made
Stitching Panoramas using the GIMP
 Stitching Panoramas using the GIMP Reference: http://mailman.linuxchix.org/pipermail/courses/2005-april/001854.html Put your camera in scene mode and place it on a tripod. Shoot a series of photographs,
House Design Tutorial
 House Design Tutorial This House Design Tutorial shows you how to get started on a design project. The tutorials that follow continue with the same plan. When you are finished, you will have created a
Adobe Photoshop CS5 Layers and Masks
 Adobe Photoshop CS5 Layers and Masks Email: training@health.ufl.edu Web Page: http://training.health.ufl.edu Adobe Photoshop CS5: Layers and Masks 2.0 Hours The workshop will cover creating and manipulating
Photoshop CS6 Basics. Using Layers to Create a Magazine Cover
 Photoshop CS6 Basics Using Layers to Create a Magazine Cover If you re using Photoshop Elements to do this project, the steps I cover in this tutorial will hopefully be useful to you as a guide Photoshop
Elegant Lady Signature Tag
 Elegant Lady Signature Tag by Doris C. Murphy August, 2003 My apologies for the length of this download. I kept it on one page for easier printing. I created this signature tag for an online Friend and
Introduction to: Microsoft Photo Story 3. for Windows. Brevard County, Florida
 Introduction to: Microsoft Photo Story 3 for Windows Brevard County, Florida 1 Table of Contents Introduction... 3 Downloading Photo Story 3... 4 Adding Pictures to Your PC... 7 Launching Photo Story 3...
 No Tech Genius Required: Your Guide to Photo Editing with Photoshop Unless you re a graphic designer, it s likely that when you hear the word Photoshop your heart starts pumping fast and your brain shuts
The original image. The final rainbow effect.
 ADD A realistic rainbow to a photo In this Photoshop photo effects tutorial, we re going to learn how to easily add a rainbow, even a double rainbow, to a photo. Of course, as with most photo effects,
Creating a Single Page Flyer in PowerPoint
 Creating a Single Page Flyer in PowerPoint Digital Media Commons Fondren Basement B42 (713) 348-3635 dmc-info@rice.edu 1 Creating a Single Page Flyer in PowerPoint Jane Zhao janezhao@rice.edu Director,
4 LAYER BASICS. Lesson overview
 4 LAYER BASICS Lesson overview In this lesson, you ll learn how to do the following: Organize artwork on layers. Create, view, hide, and select layers. Rearrange layers to change the stacking order of
Design a Halloween Pumpkin Wallpaper in Photoshop
 Design a Halloween Pumpkin Wallpaper in Photoshop By: Alvaro Guzman Halloween is near! So let's take a pumpkin image, carve it up, and light it for this coming holiday. You'll learn how to get this nice
With the paper layer selected, select the lock transparent pixels box. An icon of a lock should now appear in the paper layer
 Eye In Hand Project This project is going to entail placing the eyeball you made in your last project in the middle of your hand. The goal is to make it look like it s popping out of the skin and to make
The original image. As I said, we ll be looking at a few different variations on the effect. Here s the first one we ll be working towards:
 DIGITAL PIXEL EFFECT In this Photoshop tutorial, we re going to look at how to create a digital pixel effect, which is often used in ads that sell anything to do with digital. We re going to first pixelate
Silhouette Connect Layout... 4 The Preview Window... 5 Undo/Redo... 5 Navigational Zoom Tools... 5 Cut Options... 6
 user s manual Table of Contents Introduction... 3 Sending Designs to Silhouette Connect... 3 Sending a Design to Silhouette Connect from Adobe Illustrator... 3 Sending a Design to Silhouette Connect from
How to Create a Curious Owl in Illustrator
 How to Create a Curious Owl in Illustrator Tutorial Details Program: Adobe Illustrator Difficulty: Intermediate Estimated Completion Time: 1.5 hours Take a look at what we're aiming for, an inquisitive
Create a Flowchart in Word
 Create a Flowchart in Word A flowchart is a diagram of steps, movements or actions involved in a system or activity. Flowcharts use conventional geometric symbols and arrows to define relationships and
Perspective Guides. Perspective Contextual Toolbar. 1-Point Perspective
 WHAT S NEW 1. Perspective Guides 2. Flipbook Animation 3. Gradient Flood Fills 4. Layer Workflow Enhancements - Layer Grouping - Extended Blending Modes - Background Color - Multi-Layer Select 5. Distort
Adobe Photoshop CS2 Workshop
 COMMUNITY TECHNICAL SUPPORT Adobe Photoshop CS2 Workshop Photoshop CS2 Help For more technical assistance, open Photoshop CS2 and press the F1 key, or go to Help > Photoshop Help. Selection Tools - The
Recitation 2 Introduction to Photoshop
 Recitation 2 Introduction to Photoshop What is Adobe Photoshop? Adobe Photoshop is a tool for creating digital graphics either by starting with a scanned photograph or artwork or by creating the graphics