How to Sculpt a Pterosaur with Polymer Clay
|
|
|
- Arnold Gordon
- 5 years ago
- Views:
Transcription

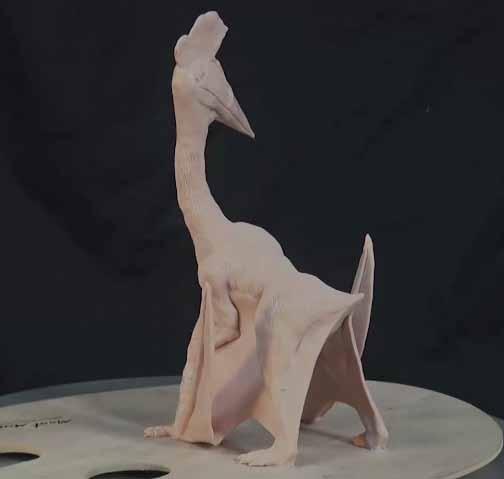
1 How to Sculpt a Pterosaur with Polymer Clay The pterosaur modelled in this lesson is the Quetzalcoatlus. Pronounced Kwet zal co art-lus. Quetzalcoatlus soared in the skies 68 million years ago. It had a 15 metre wingspan, a head the size of a car and stood as tall as a modern day giraffe.


2 Materials List... The materials for this lesson can be found at a Gold or above Art Centre. Go to to find the one nearest to you. MMSP6401 Mont Marte Polymer Clay Beige 400g CMMD9012 Mont Marte Double Thick Canvas 91x121cm MMSP0002 Mont Marte Clay Tool Set 11p MMSP0003 Mont Marte Mini Modelling Tools 10pce MACR0004 Mont Marte Hobby Knife Set 13pce MCG0009 Mont Marte Oval Wood Palette MAPL0002 Mont Marte Easy Clean Wood Palette Also required: Drill with 3/16 Bit Tie Wire 2 Booker Rods 3/16 2 Wire Coat Hangers Nuts 3/16, Washers, Spring Washers all in 3/16 Sizing x8 Scissors Flat Nosed Pliers x2

 Place a 3/16 Booker rod through a hole and fix it with a washer,spring washer and nut on both sides of the palette.")
3 1 Note: It is essential to view the accompanying video to familiarize yourself with the steps and techniques. All plans to be printed out to A3 sizing. 1. Building the armature. The first step involves building an armature. Refer to the image on page 9 in the PDF and follow these steps. 1) Cut out the fixing template and tape it onto the middle of a traditional wooden palette. Drill the marked holes with a 3/16 drill bit. 2) Place a 3/16 Booker rod through a hole and fix it with a washer,spring washer and nut on both sides of the palette. Measure the cut off point from the armature guide, transfer this measurement onto the rod and use a pair of pliers to snap it off at the correct point. Repeat these steps for the existing 3 rods. 3) Cut and straighten a coat hanger. Refer to the armature guide and use some pliers to cut and bend the shape of the rear legs. Use sellotape to attach the wire shapes onto rods 3 and 4. Bind the wire onto the booker rods with tie wire. Tie it of at the bottom and snip off the excess tie wire. Repeat the process to create the front legs but take into account that they are bigger and the shoulders sit at an angle and don t cut off the wire after it is tied off at the bottom. Instead trim it to a length of 14 cms. 4) Cut another wire coat hanger and create the spine and connect it onto the legs with tie wire. 5) Cut a length for the head and twist it onto the spine. 6) Reinforce the armature by twisting wire around the armature then cut the neck at the appropriate length. 7) Use alfoil to bulk out the body. Keep the clay about 6mms from where the limit of the clay will lie. Wrap sellotape around the alfoil so its tight and immovable. It is important to ensure that the nuts are nipped up tight. If the armature comes loose whilst sculpting it can cause cracking in the baking stage. When adding the alfiol ensure the alfoil does not extend out past the final position of where the clay is intended to lie. If at some point the sculpture needs to be adjusted/clay removed you need to be able to have the underlying area free of any obstacle. of Mont Marte International Ltd ACN Copyright ofcopyright Mont Marte International Pty Ltd ACNPty


4 12 2. First layer Refer to the outline image on page 8 for this step. Use a Mont Marte Clay Press and extrude 2 layers of clay on setting 1. Lay the flattened sheet over the armature. Bring the edges together and cut off the excess. Blend the edges together so the join is not apparent. Follow the same step for the legs. Use a hobby knife with a straight blade to whittle the clay so the legs are a uniform thickness. Add some fashioned clay to suggest the thigh muscles and blend them into the body. Pack the clay in behind the thigh area and smooth it into the belly. Add a piece of clay to suggest the pelvic area on the rear of the body and smooth it in. Whittle the tail so the shape matches that on the outline image. Next add the knee caps and muscles in the legs. Pack clay around the head and smooth it off. Wrap the sheet of clay around the top of the head between the 2 highest parts of the armature and squeeze it so it is about 4 mm thick. Blend this into the head. This will be the Pterosaur s crest. Trim the crest to shape. Use the needle tool to create a series of lines emitting from the head in a fan shape. While you have the needle tool create a series of lines on the body to suggest a fine coat of fur. Take the fur from the neck to the top of the shoulders. Pre heat a household oven to 125 degrees C (250 degrees F). Place the sculpture on the bottom shelf. And bake the sculpture for 1 hour. Once the baking is finished turn the oven off and open the door. Don't remove the sculpture until it is totally cooled. There have been enquiries made as to the validity of placing a wood pallet, metal and tape under the clay in the oven. All these materials are stable at the temperature and duration that they are required to be baked. This project calls for the use of a hobby knife for the sculpting stage. Please exercise caution when using this tool. Hobby knives are not recommended for use by non adults.


. Take another sheet extruded to setting 2 and attach it up the phalange.")
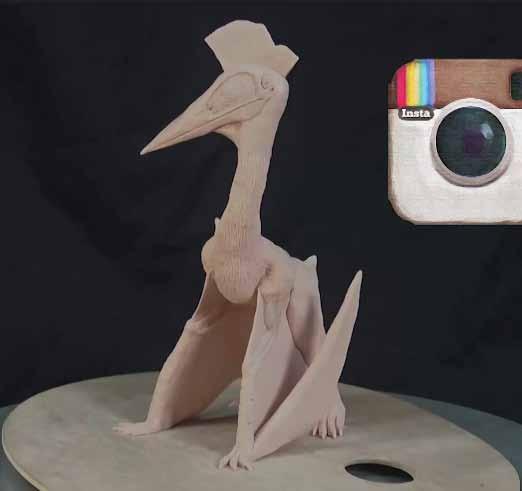
5 3 3. The wing and patagium membranes Main Wings: Extrude two layers of clay on setting 2. Lay the clay sheet out and cut it into a rectangle. Cut it in half and join the clay. Roll it smooth so the join is not visible. Place the sheet between the legs and lightly profile the area to cut with a hobby knife. Remove the sheet and place it on the cutting board and cut it to the shape. Place the sheet back in between the legs and press the wet clay onto the legs. Roll the edge where the wing meets the leg so the join is not apparent. Repeat the same process for the other wing. The end of the wing that folds up is called the phalange. To create this, roll a tapered tube the length of the excess length emitting from the base of the front legs. Use a scrap piece of tie wire and thread it up the centre of the tube. Pull it out and thread it onto the wire connected to the base and smooth it onto the leg (at the base). Take another sheet extruded to setting 2 and attach it up the phalange. Smooth it on with a stiff bristled brush and then cut it to size with a hobby knife. Join the two wing parts and smooth them so the join is not apparent. Repeat the process for the other wing. Patagiums: Many pterosaurs had membranes from the shoulder to the wrist and the coxis to the ankle. Handle these in the same way as the wing membranes. When joining flat extruded sheets it is recommended to cut the edges to be joined at an angle, this is called a chamfer cut, and it enables the join to have more surface area. You then lay the chamfered edges on top of one other and roll them so the join is non apparent.. Copyright of Mont Marte International Pty Ltd ACN 10158


6 4 4. Feet Quetzalcoatlus had 4 digits on each rear leg and 3 digits on each one of the front legs. Begin with the rear foot and create a wedge shape. Press this onto the base of the rear leg and cut the shape into 4 equal sized ribbons. Fashion each ribbon into a tube and taper it toward the end. Lightly mark a line where the joint would connect under the skin. To create the talons, cut the tip off each tube and vertically flatten the tip and reconnect it. Repeat this process for the other digits. The digits on the front foot sit at a slightly splayed out angle. The best way to create these is to fashion three tapered tubes and press them together and connect them to the base of the front leg. Follow the same steps as were taken with the rear digits but ensure that they splay outwards. The feet are a challenge on any sculpture. The thing to remember is perseverance. Remember it doesn't matter how long it takes as long as it looks right. Copyright of Mont Marte International Pty Ltd ACN

 Create a line along the head where the upper and lower mandibles join.")
7 5 5. Head Quetzalcoatlus had a head that was long but quite slender and a beak very similar to that of a modern day stork. Begin by packing up the head with clay so that it resembles a rectangle. Reference the outline image and ensure you have enough clay to cover the area. To shape the head, first use a hobby knife to cut away the bottom of the head then cut away the top of the head. Refer to the top view and cut the sides away. Use the round tool to smooth off any rough areas. Now the head is shaped and smoothed you can follow the steps below to detail the head: 1) Create a line along the head where the upper and lower mandibles join. Use a ruler and the needle tool for this. 2) Locate the eye placement by creating a small indentation. Refer to the plans as this position is quite far back and is important for the other elements to be situated correctly. 3) Mark in the oblong shaped nasal patch. Create an indentation for the nostril under the eye and create a hollow for the orbital cavity. 4) Excavate the nasal patch to a depth of about 2 mm with the flat blade in the hobby knife and smooth it out. Use the fork tool to create a texture in the nasal patch and then create a small indentation to suggest a nostril. 5) Create a small oval ball and place it into the orbital cavity, use the needle tool to create 4 eye lids, press the end of a small paint brush between the eyelids, create a smaller ball and place it into the cavity. 6) Create a triangular shape. Connect this under the beak and to the neck. Smooth this on and cut the shape so it is slightly concaved from the side. When sculpting the head it pays to get as much reference material as you can to draw from. Also pay particular attention to this important stage.
8
9


10
How to create a Fairy Tea Light with Polymer Clay
 How to create a Fairy Tea Light with Polymer Clay 400g Beige Make N Bake Polymer Clay Copyright of Mont Marte International Pty Ltd ACN 101589897 Materials List... The materials for this lesson can be
How to cast an owl in plaster
 How to cast an owl in plaster The materials for this lesson can be found at a Gold or above Art Centre. Go to www.montmarte.net to find the one nearest to you. MMSP0008 Mont Marte Air Hardening Clay 2kg
How to make a Necklace with Polymer Clay
 How to make a Necklace with Polymer Clay Materials List... The materials for this lesson can be found at a Gold or above Art Centre. Go to to find the one nearest to you. MMSP5011 Mont Marte Acrylic Polymer
How to paint a Realistic GIANT Bee in Satin Series Acrylic Paint
 How to paint a Realistic GIANT Bee in Satin Series Acrylic Paint www.montmarte.net Copyright of Mont Marte International Pty Ltd ACN 101589897 Materials List... The materials for this lesson can be found
How to Paint an Abstract Butterfly
 How to Paint an Abstract Butterfly Materials List... The materials for this lesson can be found at a Gold or above Art Centre. Go to to find the one nearest to you. CMMD9090 Mont Marte Double Thick Canvas
How to Paint a Field of Poppies with Studio Acrylic Paint
 How to Paint a Field of Poppies with Studio Acrylic Paint Copyright of Mont Marte International Pty Ltd ACN 101589897 Materials List... The materials for this lesson can be found at a Gold or above Art
How to paint a Rainbow Eucalyptus Tree with Acrylic paint
 How to paint a Rainbow Eucalyptus Tree with Acrylic paint www.montmarte.net Copyright of Mont Marte International Pty Ltd ACN 101589897 Materials List... The materials for this lesson can be found at a
How to make a Christmas Snowglobe
 How to make a Christmas Snowglobe. What You Need: You can get all of these materials at a gold or above art centre Mapl0002 mmsp0004 polymer clay: mmsp6001 mmsp6023 mmsp6050 mmsp6053 mmsp6025 mmsp6005
How to paint a Pterosaur Sculpture
 How to paint a Pterosaur Sculpture Materials List... The materials for this lesson can be found at a Gold or above Art Centre. Go to to find the one nearest to you. BMHS0014 Mont Marte Acrylic Brushes
How to paint a Painterly landscape using the 8pce Oil Colour Intro set
 How to paint a Painterly landscape using the 8pce Oil Colour Intro set www.montmarte.net Copyright of Mont Marte International Pty Ltd ACN 101589897 Materials List... The materials for this lesson can
How to paint a Lion fish in H20 Water Mixable Oil Paint
 How to paint a Lion fish in H20 Water Mixable Oil Paint Materials List... The materials for this lesson can be found at a Gold or above Art Centre. Go to to find the one nearest to you. BMHS0030 Mont Marte
How to paint a Tiger on a rock
 How to paint a Tiger on a rock Materials List... The materials for this lesson can be found at a Gold or above Art Centre. Go to to find the one nearest to you. MCG0120 Mont Marte Taklon Filbert # 16 BMHS0033
How to paint a Horse in Traditional Oil Paint
 How to paint a Horse in Traditional Oil Paint www.montmarte.net Copyright of Mont Marte International Pty Ltd ACN 101589897 Materials List... The materials for this lesson can be found at a Gold or above
How to make Christmas Cards and Gift Tags
 How to make Christmas Cards and Gift Tags Scented Glitter Glue Materials List... The materials for this lesson can be found at a Gold or above art centre. Go to to find the one nearest to you. MSB0037
How to Paint Koi with Premium Watercolour
 How to Paint Koi with Premium Watercolour Materials List... The materials for this lesson can be found at a Gold or above Art Centre. Go to to find the one nearest to you. PMHS0053 Mont Marte Watercolour
UNIT 6 HAND CONSTRUCTION WITH STONEWARE
 Refer to requirements Unit 6 on page 2 Requirements: Basic Information: Hand Construction with Stoneware: (1) Stoneware is more or less vitreous depending on the temperature to which it is fired. (2) Hobbyist
How to draw a Girl in the Manga Anime style
 How to draw a Girl in the Manga Anime style Materials List... The materials for this lesson can be found at a Gold or above Art Centre. Go to to find the one nearest to you. MPN0026 Mont Marte Drawing
Sculpting Hands. With Deb Wood. Deb Wood /Enchanted Hearts All Rights Reserved
 Sculpting Hands With Deb Wood Deb Wood /Enchanted Hearts 2016. All Rights Reserved Copyright Notice and Disclaimer: The instructions herein are copyright protected and are intended for the personal use
How to paint a Francoise Nielly inspired Portrait in H20 Oil Paints and Fluro Acrylics
 How to paint a Francoise Nielly inspired Portrait in H20 Oil Paints and Fluro Acrylics Materials List... The materials for this lesson can be found at a Gold or above Art Centre. Go to to find the one
How to Paint a Succulent with Premium Watercolour
 How to Paint a Succulent with Premium Watercolour Materials List... The materials for this lesson can be found at a Gold or above Art Centre. Go to to find the one nearest to you. PMHS0054 Mont Marte Watercolour
Tools and Tips: ( 1 )
") Tools and Tips: As you build instructions will show in my many picture manual how to assemble. You can use your own methods as you desire, my results are very good. A smooth, flat work surface is very
Tools and Tips: As you build instructions will show in my many picture manual how to assemble. You can use your own methods as you desire, my results are very good. A smooth, flat work surface is very
Sculpting a Ball-Jointed Doll Sculpting Guide
 Sculpting a Ball-Jointed Doll Sculpting Guide Create the Torso by Apryl Jensen Materials: Ultralight, ProSculpt Light clay, Xacto knife, hollow tube, wooden tool, beads for hips, drill bit, ball stylus,
Cautionary and Warning Statement. How a Trebuchet Works. Materials Included. Items Required (not included) Building the Base.
 Building the Base.") Cautionary and Warning Statement This kit is designed and intended for educational purposes only. Use only under the direct supervision of an adult who has read and understood the instructions provided
Cautionary and Warning Statement This kit is designed and intended for educational purposes only. Use only under the direct supervision of an adult who has read and understood the instructions provided
Little Reef Fish Paintings
 Little Reef Fish Paintings. Pick up these materials from any mont marte silver art centre csst0101 mont marte studio single thick canvas BMHS0009 mont Marte Gallery Series Brush Set 4 pce MACR0002 Mont
Tools and Tips: ( 1 )
") Tools and Tips: As you build instructions will show in my many picture manual how to assemble. You can use your own methods as you desire, my results are very good. A smooth, flat work surface is very
Tools and Tips: As you build instructions will show in my many picture manual how to assemble. You can use your own methods as you desire, my results are very good. A smooth, flat work surface is very
How to paint a fairy sculpture with Acrylic Paint and Water Mixable Oil Paint
 How to paint a fairy sculpture with Acrylic Paint and Water Mixable Oil Paint www.montmarte.net Materials List... The materials for this lesson can be found at a Gold or above art centre. Go to www.montmarte.net
Page 1. Jumblenut. The Head. Design by Barbara Allen
 Page 1 Needle felting Needle felting is quite different from creating felt by shrinking wet wool. There s no water involved, it requires very little space and creates no mess at all. It s a craft that
How to do Spin Painting
 How to do Spin Painting ADULT SUPERVISION REQUIRED FOR THIS PROJECT Materials List... The materials for this lesson can be found at a Gold or above Art Centre. Go to to find the one nearest to you. PMSA000
What is Included in the Kits. HPA-M2 BASIC Step-by-Step Instructions What is HPA-M2 Basic Kit
 HPA-M2 BASIC Step-by-Step Instructions What is HPA-M2 Basic Kit HPA-M2 Basic Kit is the next generation of Humanly Posable Armature kits Description and instructions for previous versions can be found
Basic Bearmaking Instructions
 Laying out the Pattern Basic Bearmaking Instructions We recommend that you read the instructions right through before commencing. This will help you to understand the steps you need to take. Copying your
Wheelchair Quilts. A guide to make fitted quilts for those in a wheelchair
 Wheelchair Quilts A guide to make fitted quilts for those in a wheelchair Table of Contents Introduction Creating a Template Fitting the Template p. 2 p. 3 p. 5 Sew Blocks or Pattern p. 8 Quilt Top Assembly
MUDGUN Drywall Finishing System
 Watch the demonstration video online at hydetools.com MUDGUN Drywall Finishing System Quick Start Guide Hyde Tools, Inc. / A Hyde Group Company / 800-872-4933 / custrelations@hydetools.com / hydetools.com
3Insert the second rod no. 4
 Yamato: Step-by-step 37 The stern block and searchlight control towers a b c d e f Recommended tools and materials Wood glue Sandpaper (no. 800 grain) Metal file Putty Craft knife For metal: Super Glue
Jewelry Making Techniques
 Jewelry Making Techniques ITSY BITSY LEAVES: The itsy bitsy leaves are created by taking a piece of clay about one half the size of a pea and making a small leaf shape. The leaves do not have to be exact.
Pretty Poppet. Print out the pdf files. Do NOT select fit to page! They will come out wonky! No Margins! Margins are BAD!
 Pretty Poppet Please read through the entire instruction sheet before making this doll. These instructions are written for a beginning level doll maker. Tips for Beginners: 1. Set your sewing machine stitch
How to Sketch a Lion using Graphite Pencils
 How to Sketch a Lion using Graphite Pencils Materials List... The materials for this lesson can be found at a Gold or above art centre. Go to to find the one nearest to you. MSB0053 Mont Marte Sketch Pad
Designed by Melissa DiRenzo thesweetescape.ca
 instructions Designed by Melissa DiRenzo thesweetescape.ca YOU WILL NEED 3 -diameter foam ball Christmas sweater Hot glue gun and glue sticks 3/8 -wide satin ribbon Elastic thread: metallic Note: A child
What You Need. Pick up all these materials at a Gold or above art centre near you
 Budgicorn Sci Fi Painting. What You Need Pick up all these materials at a Gold or above art centre near you cmmd7510 mont marte double thick canvas 76x101 cm macr0002 mont marte foam roller 50 mm mcg0063
Golden angels in an elegant design
 Golden angels in an elegant design The magic of advent these modern-looking, golden-gowned angels are simply perfect for giving your home a festive Christmas feel. Made using the clay-like FIMOair basic
Copyright of Mont Marte International Pty Ltd ACN
 Traditional bouquet in Oils pick up these materials from any gold mont marte art centre Cmmd6076 Mont Marte double thick canvas 60 x 72cm bmhs0019 mont marte gallery series brush pack 6pce bmhs0024 mont
FM-a. Learn Origami - The Art Of Folding Paper Learn a new skill and increase the fine motor coordination in your hands.
 FM-a. Learn Origami - The Art Of Folding Paper Learn a new skill and increase the fine motor coordination in your hands. 1 Preparation Begin with the Hand Exercises found on page V. Position Sit at a table.
Citabria Pro. Aerobatic Parkflyer. by Joel Dirnberger
 Citabria Pro Aerobatic Parkflyer by Joel Dirnberger Revision C: December 21, 2004 Citabria Pro Building Instructions Length: Wingspan: Wing Area: Flying Weight: Wing Loading: Functions: Specifications:
How to Upcycle a Painting.
 How to Upcycle a Painting.. Materials list: You can get all of these materials at a Bronze or above art centre go to www.montmarte.net/stockist mcg0036 mont marte Oil paints 12 pce bmhs0009 mont marte
Weathered Leather pendant
 Weathered Leather pendant Want to try your hand at faking it? Make this fake leather & fabric pendant from polymer clay... seriously, polymer clay! by Christi Friesen Sometimes you just have to fake it.
Santa Mold Project. Supplies:
 Santa Mold Project Supplies: Santa Face and Hand molds Glue Gun 6 oz. flesh colored polymer clay Toothpick 1 oz. red and green polymer clays Xacto knife Minuscule amount of acrylic Ceramic tile paint in
Art of Ancient Times, Studio 1 5
 Art of Ancient Times, Studio 1 5 Creating a Clay Relief Sculpture and an In-the-Round Sculpture In this studio you will make a relief sculpture and an in-the-round sculpture inspired by those created by
Work Space Set-up. Slats will level the pipe during bending and help minimize twisting of the bow.
 Work Space Set-up Affix pipe bender to end of working surface Slats will level the pipe during bending and help minimize twisting of the bow. Make the slat height equal the distance from your work surface
Triangles. Pendulum. Dangling from handmade curvilinear ear wires, Construct earrings from carefully fitted panels. METAL CLAY EARRINGS
 The front of each earring is impressed with a slightly different pattern than those used on the sides and backs. 1¾ in. (44mm). beginner/intermediate metal clay METAL CLAY EARRINGS Pendulum Triangles Construct
Curious Brown Bunny Polymer Clay Sculpture
 Curious Brown Bunny Polymer Clay Sculpture Brought to you by: MagicByLeah.com 1 P a g e Inspired by the wild bunnies in my backyard, I ve decided to sculpt a series of bunny rabbits in honor of spring.
Binding a Limp-bound Book which make great site tokens or personal largess
 Binding a Limp-bound Book which make great site tokens or personal largess As presented by THLady Jorhildr Hrafnkelsdottir version 1.2 2 Miniature Bookbinding - THLady Jorhildr Hrafnkelsdottir Larger books
CENTER WING SECTION (CWS) WORK REPORT
 WORK REPORT") CENTER WING SECTION (CWS) WORK REPORT No. Check Parts / Description Qty PHASE 1: Preparations 1 [ ] 6V1-3 Rear ribs 2R & 2L 1 [ ] L Angle 6 2 [ ] 6V2-1 Rear Ribs.032 2R & 2L 2 [ ] 6V5-1 Gear Rib Doubler
CENTER WING SECTION (CWS) WORK REPORT No. Check Parts / Description Qty PHASE 1: Preparations 1 [ ] 6V1-3 Rear ribs 2R & 2L 1 [ ] L Angle 6 2 [ ] 6V2-1 Rear Ribs.032 2R & 2L 2 [ ] 6V5-1 Gear Rib Doubler
LANTERNS. Good & Evil. Give your room the warm enchanted glow of delicate paper lanterns. Tabletop Lanterns. Hanging Lanterns. Have an adult help you.
 Good & Evil LANTERNS Give your room the warm enchanted glow of delicate paper lanterns. USE LED LIGHTS ONLY. DO NOT USE REAL CANDLES. Tabletop Lanterns Have an adult help you. Step 1: Print out (2) of
The Hearse Carriage Assembly Instructions Page 1.
 The Hearse Carriage Assembly Instructions Page 1. The Hearse Carriage Assembly Instructions Page 2. WHAT YOU'LL NEED: Scissors, Elmer's glue (or a glue stick), a needle, two toothpicks, a sharpened pencil,
SUPPLIES. OTHER SUPPLIES Marking pen Masking tape Aleene s Stop Fraying Toothpick Basic sewing supplies (See Tools link at
 SUPPLIES 30 x 9 piece of 5/8 curly matted mohair 7 x 6 piece of wool felt or ultrasuede 8 mm black glass eyes (1 pair) 6-1 fiberboard discs (neck & front legs) 4-1 ¼ fiberboard discs (rear legs) 5 Cotterpins
Sculpting. This page shows you how to sculpt basic pieces so you can make molds and casts of them for your projects.
 Sculpting This page shows you how to sculpt basic pieces so you can make molds and casts of them for your projects. A basic rule Don't sculpt it if you can borrow it. I'm talking about basic stuff that
How to paint a space ship Sci Fi scene.
 How to paint a space ship Sci Fi scene.. What You Need: You can get all of these materials at a gold or above art centre go to /stockist cmmd6012 mont marte double thick canvas 60 x 120 cm mamd0001 mont
Treviso POCKET BILLIARD TABLE INSTALLATION MANUAL. SERVICE DEPARTMENT P.O. BOX 68 BRISTOL, WI 53104
 Treviso TM POCKET BILLIARD TABLE INSTALLATION MANUAL www.brunswickbilliards.com SERVICE DEPARTMENT P.O. BOX 68 BRISTOL, WI 53104 51-905881-000 NOVEMBER 2008 NOTE: Please use the instructions in this manual
Monster Marionette ART GRADE LEVEL FOURTH FIFTH MATERIALS
 MATERIALS FOR STUDENT: (one per student unless otherwise noted) FloraCraft Make It: Fun Foam: Rectangular pieces (arms & legs) cut from large Foam Block: Four 1" x 3" x 1" thick, Four 1" x 2 1/2" x 1"
Page 1. LION BRAND TRELLIS Dreidl Napkin Rings
 Page 1 LION BRAND TRELLIS Dreidl Napkin Rings Pattern from Lion Brand Yarn Page 2 Skill Level: Beginner LION BRAND TRELLIS Holiday Twist Napkin Rings SIZE: One Size 1¾ inches [4.5 cm] tall, 4½ inches [10
Table of Contents. Pom-Pom Bookmark Yarn covered Pencil Holder Yarn Hangers... Yarn Hair Bows
 1 Table of Contents Pom-Pom Bookmark... 3-5 Yarn covered Pencil Holder... 6-8 Yarn Hangers... 9-11 Yarn Hair Bows... 12-14 Tassel Necklace or Gift Wrapping... 15-17 No Knit Infinity Scarf... 18-20 Braided
Drawing Goats. Proceedings of the 28th Annual Goat Field Day, Langston University, April 27, 2013
 Drawing Goats Mr. Kenneth Williams Science Illustrator Science Graphics and Design Drawing goats or any other subject depends on accurate observation and correct proportional placement of shapes and lines.
 Supplies WARM AND NATURAL COTTON BATTING FIBER FILL STUFFING COTTON PRINT FABRIC FOR DRESS OLD LIGHT WEIGHT SWEATER TO CUT UP SMALL PIECE OF MUSLIN FOR CANDY RABBIT PLAID-APPLE BARREL NUTMEG BROWN CRAFT
Supplies. Crystal Mushroom Tutorial. * Molly Stanton
 Crystal Mushroom Tutorial * Molly Stanton Mushrooms and the Fair Folk have enjoyed a symbiotic relationship throughout mythology. Anyone who stepped into a fairy ring of mushrooms might just be transported
"Delores Bear" 16 (41cm) To make "Delores Bear" you will need:
 To make Delores Bear you will need:") "Delores Bear" 16 (41cm) To make "Delores Bear" you will need: Viscose plush fabric 22 x 16 Suedette 6 x 6 1/2 5 x 26mm Nut & bolt joints 2 x 12mm Black safety eyes Perli thread (nose) Floral fabric (drawers)
"Delores Bear" 16 (41cm) To make "Delores Bear" you will need: Viscose plush fabric 22 x 16 Suedette 6 x 6 1/2 5 x 26mm Nut & bolt joints 2 x 12mm Black safety eyes Perli thread (nose) Floral fabric (drawers)
Tips & Tricks using Part 2
 Tips & Tricks using Part 2 Using the cobblestone mold #210...1 Making a dungeon diorama...2 Making torches...3 Making a textured door...4 Making a portcullis...5 Adding moss...6 Tips & Tricks using Bruce
Cardboard Model Buildings
 Cardboard Model Buildings Get more model kits from http://www.modelbuildings.org PRINTING & ASSEMBLY TIPS: These OO designs can easily be resized by reducing the print percentage as follows: OO scale is
Fryer's Trebuchet Paper Kits
 Fryer's Trebuchet Paper Kits Things you will need 7 sheets of card approx. 0.3 mm or 0.01 inches thick 1 sheet of paper to print out to download. 2 x 6-7 mm dowel or pencils 1 paper clip String 6 cms (2.5
SASKATOON, Saskatchewan
 CONSTRUCTION GUIDE AVRO ARROW (CONTEST VERSION) Copyright, Bill Jones, 2004 SASKATOON, Saskatchewan This is a work in progress, so there are a couple of rough areas ( I ll point out those that I m aware
Explorer Wiring Kit (assembled)
") Explorer Wiring Kit (assembled) For Vintage, Firestorm & Standard Series Please Read All Instructions Before Beginning. Tools you will need: Soldering Iron (35 watt preferably) Solder Wet Sponge Wire Clippers
Explorer Wiring Kit (assembled) For Vintage, Firestorm & Standard Series Please Read All Instructions Before Beginning. Tools you will need: Soldering Iron (35 watt preferably) Solder Wet Sponge Wire Clippers
THE APOGEE A 100-INCH AMA DURATION SAILPLANE FROM DYNAFLITE
 THE APOGEE A 100-INCH AMA DURATION SAILPLANE FROM DYNAFLITE Apogee is the intermediate sailplane designed to be competitive in AMA duration contests. Effective spoilers, rudder and full flying stabilizer
Sewing Roll. Base Fabric. Base Fabric. Third Fabric. Second Fabric (Bottom Pockets) Pockets)
 Pockets)") You will need Brother Creative Sewing Pack (Free Motion Foot, Braiding Foot, Narrow Hem Foot, Piping Foot and Concealed Zipper Foot) Base fabric 1 x fat ¼ (50cm square) cut in half Second fabric 50cm x
You will need Brother Creative Sewing Pack (Free Motion Foot, Braiding Foot, Narrow Hem Foot, Piping Foot and Concealed Zipper Foot) Base fabric 1 x fat ¼ (50cm square) cut in half Second fabric 50cm x
Vintage Style Teddy Bear Pattern
 9 by 12 wool or wool blend felt contrasting color wool felt (or blend) for paw pads and nose 6 mm safety eyes needle and thread doll making needle embroidery thread 100% mohair wool cotton fleece teddy
Bulle Clock Serial Number 57561
 Page 1 Restored Bulle Clock Bulle Clock Serial Number 57561 Page 2 Restored Bulle Clock Clock Restoration pictures by kind permission of the owner. The clock as delivered. It came without a case and the
TOOL LIST FOR TAILGATE HIDDEN LATCH & LINK ASSY FOR FORD FLARESIDE TRUCKS
 TOOL LIST FOR TAILGATE HIDDEN LATCH & LINK ASSY FOR 53-87 FORD FLARESIDE TRUCKS Vise Grip Clamps C-clamps Sharpie Marker Ball Peen Hammer Center Punch 3/8 or 1/2 Drill 5/32, 7/32, 9/32, and 3/8 Drill Bits
F-F-Fiddle Assembly Instructions
 F-F-Fiddle Assembly Instructions Bout Bridge Neck Machine Heads/Tuners Truss Rod Strings An open-source FFF 3d-printable electric violin. 1. Assemble materials 5 3 8 1 9,10, 11 7 4 2 6 PARTS 1. Bout part
Max Launch Abort System Prod. No *Kevlar is a registered trademark of Dupont
 Flying Model Parts List Max Launch Abort System Prod. No. 3014 A 11820 - Body Tube 3.5 Diam x 5.5" Long B 11824 - Orange Capsule Base Shoulder Ring C 16032 - Laser-cut Ring motor mount rear D 16033 - Laser-cut
Technicians of Terror. This is the air valve we make to use with our air
 These are pictures of our scissor prop. Technicians of Terror http://www.halloweenfear.com/scissorprop.html props. This is the air valve we make to use with our air This pictures the duel door closer cylinders
kiva design kiva design GARDEN TOWNS Bill's Water Tower
 GREN TOWNS Scaled and easy to read patterns and instructions for a Water Tower made from wood, a 3 pound coffee can and a few sundry items. ompatible with Garden Scale Railroads and Kiva's GardenTowns
Scratchbuild A Backwoods Water Tank Part V - Making the Frost Box and Hanging the Water Spout
 Scratchbuild A Backwoods Water Tank Part V - Making the Frost Box and Hanging the Water Spout By Dwight Ennis In this section, we're going to make the Frost Box, and we'll build the Spout Hanger Assembly
of 44 1/11/2008 8:22 AM another artist, so collect only the tools you think you will use as opposed to gigantic sets of generic tools. The above are t
 of 44 1/11/2008 8:22 AM Materials Tools (shown below) Polymer clay Steel wire for armature Floral tape Aluminium foil Glass tiger-eye beads for eyes Mineral oil Atelier mediums: matte varnish, acrylic
Paint Neat Edges. on Zebra Stripes. Draw a Symmetrical Zebra Face
 Level: Intermediate Flesch-Kincaid Grade Level: 7.5 Flesch-Kincaid Reading Ease: 62.1 Drawspace Curriculum 8.2.A6-10 Pages and 33 Illustrations Paint Neat Edges on Zebra Stripes Outline the contours of
Safety First! Use eye protection, always! Use ear protection with loud power tools. Stay with children while they work!
 TM TM ART TABLE Safety First! Use eye protection, always! Use ear protection with loud power tools Stay with children while they work! Follow tool manufacturers safety guidelines Page 1 ART TABLE Page
shine to by Jana Roberts Benzon
 intermediate/ advanced polymer clay Taking a shine to polymer clay Give polymer clay a glossy surface with sandpaper and a quick buffing. FCT-CRON0216_ART30 The featured pendant s intricate cane pattern
SAMSON IN THE SNOW. by Philip C. Stead Ages 4 8
 SAMSON IN THE SNOW by Philip C. Stead Ages 4 8 MAZE ACTIVITY Help Samson and Mouse find their way to the little red bird! SAMSON IN THE SNOW by Philip C. Stead Ages 4 8 ACT LIKE THE ANIMALS (READ ALONG)
Nothin But A Hound Dog
 ART FROM THE BARK Nothin But A Hound Dog (1st d Edition) Kathy Overcash 3/18/2014 Instructional guide on carving a hound dog from basswood. Copyright 2012 by Art From The Bark, LLC, Kathryn Overcash All
Big Oz. Rocket. User Guide V0313
 Big Oz Rocket User Guide 59824 V0313 Materials Included The Big Oz Rocket Kit should include the following materials. If something is missing, contact Customer Service at 800-358-4983. 20-ounce plastic
7. Ailerons. Overview.
 7. Ailerons Overview. The ailerons are made in much the same way as the rudder. The only difference being that the ends are not rounded but have close-out ribs instead and the aileron cores are supplied
Make Your Own Dept 56 Accessories Tombstones. Tombstones
 Make Your Own Dept 56 Accessories This is one of the many Make Your Own Dept 56 Accessories reports that describe, in detail, the necessary steps to make you own D56 accessories. All accessories are made
Build a Water Bottle Rocket Assembly!
 Build a Water Bottle Rocket Assembly! In February of 2008 Leland flew aboard the Space Shuttle Atlantis for his first space mission, launching with two attached solid rocket boosters. Check out the experiment
a lot of fuchsia and a little yellow make red red and yellow make orange yellow and turquoise make green turquoise plus fuchsia makes purple
 Additional Dyes at the end of each lab Bench Black, Orange, and Azure Blue Safari Gray (Camo), Moss Green (Camo), Bronze (Camo) Lab Bench #1 Station A Turquoise Fuchsia Red Bright Green Station D Fire
How to Use the Wooden Plank Mold
 How to Use the Wooden Plank Mold Even though I'm giving instructions for only two projects, there are tons of uses for this mold. Some of these include: Floors Steps Doors Tables Benches Crates Drawbridge
Aerospace Speciality Products
 Specifications:! Length: 18.75"/47.6 cm! Diameter: 0.98"/24.9 mm! Weight: 1.5 oz/44 gm! Streamer Recovery! Recommended Engines:!! A8-3; B4-4; B6-4; C6-5! Skill Level: Beginner This is a model rocket kit
raw edge selvage length of tunic
 If you know your way around a sewing machine, and have a passing familiarity with scissors, you can do this. The style fits, and looks good on just about everyone, saves fabric and prevents fighter's tear.
Do # 11 Tile Message Board
 Do # 11 Tile Message Board Supplies Needed: 6x6 tiles (or larger!), felt scraps, embellishments (feather, copies of the Be you, Bravely logo, ribbon, stickers, scrapbook paper), Mod Podge, 1 dry erase
Name: Class: Monster Doll. Grading Rubric
 Name: Class: Monster Doll Grading Rubric Grade yourself on the skills listed below. (0 being the lowest, and 5 being the highest.) Once you have graded yourself in each area, pin your grading sheet to
How to paint a Humpback Whale
 How to paint a Humpback Whale Oil Paint Advanced Open...Hello and welcome to another awesome lesson. Today we ll be creating a real talking piece by painting this Giant Whale in Oil So... What we used:
!!!!!!!! "#$%&'!(#&)*!(#+,! A polymer and mixed media bangle project with Christi Friesen
*!(#+,! A polymer and mixed media bangle project with Christi Friesen") !!!!!!!! "#$%&'!(#&)*!(#+,! A polymer and mixed media bangle project with Christi Friesen For this project you will need:. polymer clay I recommend Premo for this project! A great clay for sculpting: (I
!!!!!!!! "#$%&'!(#&)*!(#+,! A polymer and mixed media bangle project with Christi Friesen For this project you will need:. polymer clay I recommend Premo for this project! A great clay for sculpting: (I
Hollow metal clay forms are typically built over organic cores like. Coreless Construction: Rethinking the Metal Clay
 PROJECT INTERMEDIATE METAL CLAY Coreless Construction: Rethinking the Metal Clay Build this four-sided pendant using forethought and a 3-D template. by Cindy Ambrose FCT-MWON0216_ART17 Hollow metal clay
j e n n y l o v e s b e n n y B o u t i q u e B e a r s Sunday by Jenny Lee
 j e n n y l o v e s b e n n y B o u t i q u e B e a r s Sunday by Jenny Lee Please meet an old friend of mine...the original Sunday!! Sunday loves nothing better than to laz around and do absolutely NOTHING!!...hmmm
Tool Wagon Assembly Instructions
 Tool Wagon Assembly Instructions Adhesives Wood to wood joints are best done with a PVA wood glue but a good quality, slow acting (beware of instant grab ) cyanoacrylate super glue can be used if preferred.